In the coming examples, you'll create a more complex display with a DataGrid, and you'll display data from multiple tables — but to get started, you'll keep it as simple as possible. In this first example, you'll create a simple Windows Form with a single ListBox called lbBugs. You'll populate this ListBox with bits of information from the Bugs table in the WindForms_Bugs database.
To get started, you need to create the WindForm_Bugs database based on the description provided previously, or you may download it from our web site. In addition, you may find it convenient to create an ODBC connection known as a Data Source Name (DSN).
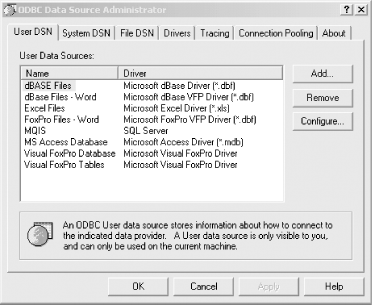
To create the DSN, click Start → Settings → Control Panel. Within the Control Panel, click on Administrative Tools and then on Data Sources (ODBC). The ODBC Data Source Administrator dialog box will open, as shown in Figure 19-7.
Click on the System DSN tab, and then click on the Add button. The dialog to select a data source will open as shown in Figure 19-8. Scroll to the bottom and choose SQL Server.
Enter the name WindForm_bugs and choose your server from the drop-down menu in the next dialog. You will be prompted to identify how SQL Server should verify the authenticity of the login ID. Choose "With SQL Server authentication using a login ID and password entered by the user." In the Login ID, choose sa (the system administrator) and enter the sa password, as shown in Figure 19-9.
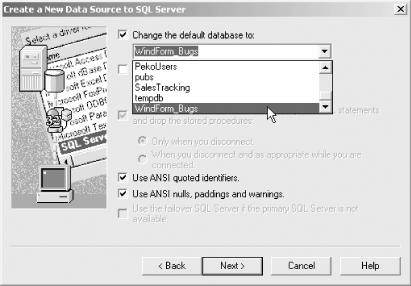
On the next dialog box, change the default database to WindForm_Bugs, as shown in Figure 19-10.
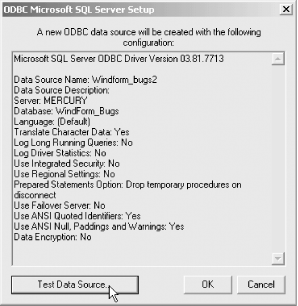
Accept the defaults on the following dialog and then test the data source you've created on the final dialog, as shown in Figure 19-11. You can now use this DSN in your application.
To test your DSN and see how you place data in a Windows application, you'll create a new Windows Application project named SimpleBugListBox. You can create it in either C# or in VB.NET.
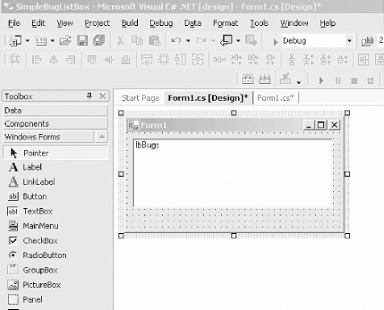
Drag a ListBox onto the form and name it lbBugs (that is, change the value of its (Name) property to lbBugs). Stretch the ListBox to fill the form, as shown in Figure 19-12.
Example 19-2 is the complete source code from the code window.
Example 19-2. A Simple ADO.NET in C#
using System;
using System.Drawing;
using System.Collections;
using System.ComponentModel;
using System.Windows.Forms;
using System.Data;
using System.Data.SqlClient;

namespace SimpleBugListBox
{
   /// <summary>
   /// Summary description for Form1.
   /// </summary>
   public class Form1 : System.Windows.Forms.Form
   {
        private System.Windows.Forms.ListBox lbBugs;
      /// <summary>
      /// Required designer variable.
      /// </summary>
      private System.ComponentModel.Container components = null;

      public Form1(  )
      {
         //
         // Required for Windows Form Designer support
         //
         InitializeComponent(  );

            // connect to the Bugs database
            string connectionString =
            "server=YourServer; uid=sa; pwd=YourPassword;            database=WindForm_Bugs";


            // get records from the Bugs table
            string commandString =  "Select BugID, Description from Bugs";

            // create the data set command object
            // and the DataSet
            SqlDataAdapter dataAdapter =
                new SqlDataAdapter(commandString, connectionString);

            DataSet dataSet = new DataSet(  );

            // fill the data set object
            dataAdapter.Fill(dataSet,"Bugs");

            // Get the one table from the DataSet
            DataTable dataTable = dataSet.Tables[0];

            // for each row in the table, display the info
            foreach (DataRow dataRow in dataTable.Rows)
            {
                lbBugs.Items.Add(
                    dataRow["BugID"] +
                    ": " + dataRow["Description"]  );
            }
        }

      /// <summary>
      /// Clean up any resources being used.
      /// </summary>
      protected override void Dispose( bool disposing )
      {
         if( disposing )
         {
            if (components != null)
            {
               components.Dispose(  );
            }
         }
         base.Dispose( disposing );
      }

      #region Windows Form Designer generated code
      /// <summary>
      /// Required method for Designer support - do not modify
      /// the contents of this method with the code editor.
      /// </summary>
      private void InitializeComponent(  )
      {
            this.lbBugs = new System.Windows.Forms.ListBox(  );
            this.SuspendLayout(  );
            //
            // lbBugs
            //
            this.lbBugs.Location = new System.Drawing.Point(24, 16);
            this.lbBugs.Name = "lbBugs";
            this.lbBugs.Size = new System.Drawing.Size(240, 95);
            this.lbBugs.TabIndex = 0;
            //
            // Form1
            //
            this.AutoScaleBaseSize = new System.Drawing.Size(5, 13);
            this.ClientSize = new System.Drawing.Size(292, 273);
            this.Controls.AddRange(new System.Windows.Forms.Control[  ] {
                                                                          this.lbBugs});
            this.Name = "Form1";
            this.Text = "Form1";
            this.ResumeLayout(false);

        }
      #endregion

      /// <summary>
      /// The main entry point for the application.
      /// </summary>
      [STAThread]
      static void Main(  )
      {
         Application.Run(new Form1(  ));
      }
   }
}
The VB.NET example is nearly identical, except for the constructor, which is shown in Example 19-3.
Example 19-3. Constructor in VB.NET
Public Sub New(  )
        MyBase.New(  )

        'This call is required by the Windows Form Designer.
        InitializeComponent(  )

        Dim connectionString As String
        connectionString = _
        "Server=YourServer; uid=sa; pwd=YourPassword; " & _
          database=WindForm_Bugs"

        Dim commandString As String
        commandString = "Select BugID, Description from Bugs"

        Dim myDataAdapter As New System.Data.SqlClient.SqlDataAdapter(_
            commandString, connectionString)

        Dim myDataSet As New DataSet(  )

        myDataAdapter.Fill(myDataSet, "Bugs")

        Dim myDataTable As DataTable
        myDataTable = myDataSet.Tables(0)

        Dim theRow As DataRow
        For Each theRow In myDataTable.Rows
            lbBugs.Items.Add(theRow("BugID") & ": " & _
              theRow("Description"))
        Next
    End Sub
With just about eight lines of code in the form's constructor, you have extracted a set of data from the database and displayed it in the ListBox, as shown in Figure 19-13
The eight lines accomplished the following tasks:
Created the string for the connection. The connection string is whatever string is needed to connect to the database. In the case of our example:
string connectionString =
   "server=YourServer; uid=sa;
    pwd=YourPassword; database=WindForms_Bugs";
Dim connectionString As String connectionString = _ "Server=YourServer; uid=sa; pwd=YourPassword; " & _ database=WindForm_Bugs"
Created the string for the select statement, which generates a table containing bug IDs and their descriptions:
string commandString =
   "Select BugID, Description from Bugs";
Dim commandString As String
commandString = "Select BugID, Description from Bugs"
Created the DataAdapter to extract the data from the SQL Server database and pass in the selection and connection strings:
SqlDataAdapter dataAdapter =
new SqlDataAdapter(
commandString, connectionString);
Dim myDataAdapter As New System.Data.SqlClient.SqlDataAdapter(_
    commandString, connectionString)
Created a new DataSet object:
DataSet dataSet = new DataSet( );
Dim myDataSet As New DataSet( )
Filled the DataSet with the data obtained from the SQL select statement using the DataAdapter:
dataAdapter.Fill(dataSet,"Bugs");
myDataAdapter.Fill(myDataSet, "Bugs")
Extracted the DataTable from the DataTableCollection object:
DataTable dataTable = dataSet.Tables[0];
Dim myDataTable As DataTable
myDataTable = myDataSet.Tables(0)
Iterated the rows in the data table to fill the ListBox:
foreach (DataRow dataRow in dataTable.Rows)
{
   lbBugs.Items.Add(
      dataRow["BugID"] +
      ": " + dataRow["Description"]  );
}
Dim theRow As DataRow For Each theRow In myDataTable.Rows lbBugs.Items.Add(theRow("BugID") & ": " & _ theRow("Description")) Next
Visual Studio .NET provides extensive wizard support for automating the interaction with the DataBase. The advantage of using wizards is that it can simplify the development process and shield you from the details of database interaction. The disadvantage is that it shields you from the details of database interaction, and thus can leave you vulnerable when things don't work as expected.
This book does not focus on using the wizards; frankly we prefer to write code by hand. However, a quick review will give you a sense of the power of this level of automation. Create a new Windows application and drag a ListBox in place as you have in previous examples. Next, drag a SqlConnection control onto the form. (The SqlConnection control can be found under the Data tab of the Toolbox.) The SqlConnection control will appear in the "tray" below the form, as shown circled in Figure 19-14.
Tip
SQL is pronounced "see-quill" or "ess-que-ell." In this book, we pronounce it as "see-quill" and so write "a SQLConnection" (a see-quillConnection) rather than "an SQLConnection" (an ess-que-ellConnection).
Select the SQLConnection control on the form and click on the connectionString property in the properties window (highlighted in the lower-righthand corner of Figure 19-14) and drop down the list. Click on New Connection and a new connection dialog box appears, as shown in Figure 19-15. You can use the same values used in your ODBC connection.
Drag an SqlCommand control (again from the Data tab of the Toolbox) onto the tray. Drop its Connection property and set it to the existing connection you just created, as shown in Figure 19-16.
Click on the CommandText property. Click on the button with three dots. This brings up the Query Builder, as shown in Figure 19-17. Click on Bugs to choose the Bugs table, click Add, and then close. You will select only from the Bugs table for now.
Within the Query Builder, you can select the columns you want to display and control sorting and filtering. Check BugID and Description to include these columns in the query results (as you did manually in the previous example), as shown in Figure 19-18.
You are ready now to return to your code to use the command and connection objects. Enter the code-editing window, and you'll find that Visual Studio .NET has added two member variables to your class:
private System.Data.SqlClient.SqlConnection sqlConnection1;
private System.Data.SqlClient.SqlCommand sqlCommand1;
These components are initialized in the InitializeComponent section of the code (normally collapsed). Click the + sign next to this block of code to expand it. You'll find that the Connection and Command objects are instantiated and initialized, as shown in this excerpt:
this.sqlConnection1 = new System.Data.SqlClient.SqlConnection(  );
this.sqlCommand1 = new System.Data.SqlClient.SqlCommand(  );
this.sqlConnection1.ConnectionString = "data source=YourServer;initial
 catalog=WindForm_Bugs; password=YourPassword;persist security info=True;
 user id=sa;workstation id=YOURSERVER;packet size=4096";
this.sqlCommand1.CommandText = "SELECT BugID, Description FROM Bugs";
this.sqlCommand1.Connection = this.sqlConnection1;
Associate the command object with the data adapter explicitly:
SqlDataAdapter dataAdapter = new SqlDataAdapter(  );
dataAdapter.SelectCommand = sqlCommand1;
dataAdapter.TableMappings.Add("Table", "Bugs");
Don't forget to add:
using System.Data.SqlClient;
to the top of the file.
The complete constructor is shown in:
public Form1(  )
{
      InitializeComponent(  );

      DataSet DataSet = new DataSet(  );

      SqlDataAdapter dataAdapter = new SqlDataAdapter(  );
      dataAdapter.SelectCommand = sqlCommand1;
      dataAdapter.TableMappings.Add("Table", "Bugs");

      // fill the data set object
      dataAdapter.Fill(DataSet,"Customers");

      // Get the one table from the DataSet
      DataTable dataTable = DataSet.Tables[0];

      // for each row in the table, display the info
      foreach (DataRow dataRow in dataTable.Rows)
      {
            lbBugs.Items.Add(
                  dataRow["BugID"] +
                  ": " + dataRow["Description"]  );
      }
}
You can see that the wizards have simplified the process considerably.
Rather than using the wizards, you can create the command and control objects programmatically as shown in Example 19-4 in C# and in Example 19-5 in VB.NET.
Example 19-4. Explicit command and connection objects (C#)
using System;
using System.Drawing;
using System.Collections;
using System.ComponentModel;
using System.Windows.Forms;
using System.Data;
using System.Data.SqlClient;

namespace CommandObjectCS
{
   public class Form1 : System.Windows.Forms.Form
   {
        private System.Data.SqlClient.SqlConnection myConnection;
        private System.Data.DataSet myDataSet;
        private System.Data.SqlClient.SqlCommand myCommand;
        private System.Data.SqlClient.SqlDataAdapter myDataAdapter;
        private System.Windows.Forms.ListBox lbBugs;
      /// <summary>
      /// Required designer variable.
      /// </summary>
      private System.ComponentModel.Container components = null;

      public Form1(  )
      {
         //
         // Required for Windows Form Designer support
         //
         InitializeComponent(  );
            string connectionString =
                "server=YourServer; uid=sa; pwd=YourPW; database=WindForm_Bugs";

            // create and open the myConnection object
            myConnection =
              new System.Data.SqlClient.SqlConnection(connectionString);
            myConnection.Open(  );

            // create the dataset, set property
            myDataSet = new System.Data.DataSet(  );
            myDataSet.CaseSensitive=true;

            // get records from the Bugs table
            string commandString = "Select BugID, Description from Bugs";

            myCommand = new System.Data.SqlClient.SqlCommand(  );
            myCommand.Connection=myConnection;
            myCommand.CommandText= commandString;

            myDataAdapter = new SqlDataAdapter(  );
            myDataAdapter.SelectCommand = myCommand;
            myDataAdapter.TableMappings.Add("Table", "Bugs");
            myDataAdapter.Fill(myDataSet);


            // Get the one table from the DataSet
            DataTable myDataTable = myDataSet.Tables[0];

            // for each row in the table, display the info
            foreach (DataRow dataRow in myDataTable.Rows)
            {
                lbBugs.Items.Add(
                    dataRow["BugID"] +
                    ": " + dataRow["Description"]  );
            }
        }

   }
}
Example 19-5. Explicit command and connection objects (VB.NET)
Imports System.Data
Imports System.Data.SqlClient

Public Class Form1
    Inherits System.Windows.Forms.Form

    Private myConnection As System.Data.SqlClient.SqlConnection
    Private myDataSet As System.Data.DataSet
    Private myCommand As System.Data.SqlClient.SqlCommand
    Private myDataAdapter As System.Data.SqlClient.SqlDataAdapter

#Region " Windows Form Designer generated code "
#End Region

    Public Sub New(  )
        MyBase.New(  )

        'This call is required by the Windows Form Designer.
        InitializeComponent(  )

        Dim connectionString As String
        connectionString = _
        "Server=YourServer; uid=sa; pwd=YourPW; database=WindForm_Bugs"

        myConnection = _
         New System.Data.SqlClient.SqlConnection(connectionString)
        myConnection.Open(  )

        myDataSet = New System.Data.DataSet(  )
        myDataSet.CaseSensitive = True


        Dim commandString As String
        commandString = "Select BugID, Description from Bugs "

        myCommand = New System.Data.SqlClient.SqlCommand(  )
        myCommand.Connection = myConnection
        myCommand.CommandText = commandString

        myDataAdapter = New SqlDataAdapter(  )
        myDataAdapter.SelectCommand = myCommand
        myDataAdapter.TableMappings.Add("Table", "Bugs")
        myDataAdapter.Fill(myDataSet)

        Dim myDataTable As DataTable
        myDataTable = myDataSet.Tables(0)

        Dim dataRow As DataRow
        For Each dataRow In myDataTable.Rows
            lbBugs.Items.Add(dataRow("BugID") & ": " & _
            dataRow("Description"))
        Next
    End Sub
End Class
In Example 19-4 and Example 19-5, start by creating four new instance members for the Form class:
private System.Data.SqlClient.SqlConnection myConnection;
private System.Data.DataSet myDataSet;
private System.Data.SqlClient.SqlCommand myCommand;
private System.Data.SqlClient.SqlDataAdapter myDataAdapter;
Private myConnection As System.Data.SqlClient.SqlConnection
Private myDataSet As System.Data.DataSet
Private myCommand As System.Data.SqlClient.SqlCommand
Private myDataAdapter As System.Data.SqlClient.SqlDataAdapter
The connection is created by instantiating a SQLConnection object with the connection string:
myConnection = new System.Data.SqlClient.SqlConnection(connectionString);
The VB.NET is identical, except that you leave off the semicolon.
The connection is explicitly opened:
myConnection.Open( )
You can hang on to this connection object and reuse it, as you'll see in later examples. This connection can also be used for transactions, as described in Chapter 20.
Next, create the DataSet object and set its CaseSensitive property to
true to indicate that string comparisons within
DataTable objects are case sensitive:
myDataSet = New System.Data.DataSet(  )
myDataSet.CaseSensitive = True
Create the SqlCommand object and give that new command object the connection object and the text for the command:
myCommand = New System.Data.SqlClient.SqlCommand(  )
myCommand.Connection = myConnection
myCommand.CommandText = commandString
Finally, create the SqlDataAdapter object and assign to it the SqlCommand object you just created. Then tell the DataSet how to map the table columns and instruct the SqlDataAdapter to fill the DataSet:
myDataAdapter = New SqlDataAdapter(  )
myDataAdapter.SelectCommand = myCommand
myDataAdapter.TableMappings.Add("Table", "Bugs")
myDataAdapter.Fill(myDataSet)


