Chapter 16
Clustering SQL Server 2012
WHAT’S IN THIS CHAPTER
- Identifying Clustering and Mastering its Intricacies
- Researching Hardware and Software Configurations to Identify What Works Best for your Organization
- Configuring Hardware
- Configuring and then Clustering the Operating System
- Configuring SQL Server 2012 on the Cluster
- Testing
- Documenting
- Administering and Troubleshooting the Production SQL Server 2012 Cluster
Unlike most aspects of the DBA’s job, the task of installing, configuring, and administering a clustered SQL Server can be an adventure, complete with excitement, danger, and an uncertain outcome. But with this chapter’s tried-and-true information, you can successfully install, configure, and administer a clustered instance of SQL Server 2012. In this chapter, you learn how a Windows Failover Cluster works and whether it’s the right solution for your organization. You learn how to choose between upgrading a previous version of a Windows Failover cluster and building a new cluster; how to plan for clustering, including hardware and the operating system; and how to install a SQL Server 2012 on a Windows Failover Cluster. Finally, you learn how to maintain and troubleshoot an operational instance of SQL Server on a cluster. Although you can deploy a geographically dispersed cluster in Windows 2008, this chapter primarily focuses on co-located clustering as well as the most commonly deployed Windows Failover Cluster configuration.
If you don’t have Storage Area Network (SAN) or the hardware to create these examples on physical hardware, consider using a Hyper-V VM solution. You can download Internet Small Computer Systems Interface (ISCSI) target software such as StarWind by Rocket Division (www.rocketdivision.com) to simulate shared disk arrays for the cluster. Regardless of the Windows Failover Cluster, disk configuration is one of the most challenging pieces of the puzzle, and ISCSI makes this slightly less challenging, but you may pay a performance penalty if your network is not correctly optimized.
CLUSTERING AND YOUR ORGANIZATION
Many DBAs seem to have difficulty understanding exactly what clustering is. Following is a good working definition:
Microsoft Windows Failover Clustering is a high-availability option designed to increase the uptime of SQL Server instances. A cluster includes two or more physical servers, called nodes; identical configuration is recommended. One is identified as the active node, on which a SQL Server instance is running the production workload, and the other is a passive node, on which SQL Server is installed but not running. If the SQL Server instance on the active node fails, the passive node becomes the active node and begins to run the SQL Server production workload with some minimal failover downtime. Additionally, you can deploy a Windows Failover Cluster to have both nodes active, which means running different SQL Server instances where any SQL Server instances can failover to the other node.
This definition is straightforward, but it has a lot of unclear implications, which is where many clustering misunderstandings arise. One of the best ways to more fully understand what clustering can and cannot do is to drill down into the details.
What Clustering Can Do
Clustering is designed to improve the availability of the physical server hardware, operating system, and SQL Server instances but excluding the shared storage. Should any of these aspects fail, the SQL Server instance fails over. The other node in a cluster automatically takes over the failed SQL Server instance to reduce downtime to a minimum.
Additionally, the use of a Windows Failover Cluster can help reduce downtime when you perform maintenance on cluster nodes. For example, if you need to update hardware on a physical server or install a new service pack on the operating system, you can do so one node at a time. To do so, follow these steps:
1. First, you upgrade the passive node that is not running a SQL Server instance.
2. Next, manually failover from the active node to the now upgraded node, which becomes the active node.
3. Then upgrade the currently passive node.
4. After it is upgraded, if you choose, you can fail back to the original node. This cluster feature helps to reduce the overall downtime caused by upgrades.
When running an upgrade, you need to ensure that you do not manually failover to a node that has not been upgraded because that would cause instability since the binary would not have been updated.
A Windows 2003 Failover Cluster cannot be upgraded to a Windows 2008 Failover Cluster because architecturally the two versions are different. Instead, create a Windows 2008 Failover Cluster and migrate the databases.
What Clustering Cannot Do
The list of what clustering cannot do is much longer than the list of what it can do, and this is where the misunderstandings start for many people. Clustering is just one part of many important and required pieces in a puzzle to ensure high availability. Other aspects of high availability, such as ensuring redundancy in all hardware components, are just as important. Without hardware redundancy, the most sophisticated cluster solution in the world can fail. If all the pieces of that puzzle are not in place, spending a lot of money on clustering may not be a good investment. The section “Getting Prepared for Clustering” discusses this in further detail.
Some DBAs believe that clustering can reduce downtime to zero. This is not the case; clustering can mitigate downtime, but it can’t eliminate it. For example, the failover itself causes an outage lasting from seconds to a few minutes while the SQL Server services are stopped on one node then started on the other node and database recovery is performed.
Nor is clustering designed to intrinsically protect data as the shared storage is a single point of failover in clustering. This is a great surprise to many DBAs. Data must be protected using other options, such as backups, log shipping, or disk mirroring. In actuality, the same database drives are shared, albeit without being seen at the same time, by all servers in the cluster, so corruption in one would carry over to the others.
Clustering is not a solution for load balancing either. Load balancing is when many servers act as one, spreading your load across several servers simultaneously. Many DBAs, especially those who work for large commercial websites, may think that clustering provides load balancing between the cluster nodes. This is not the case; clustering helps improve only uptime of SQL Server instances. If you need load balancing, then you must look for a different solution. A possibility might be Peer-to-Peer Transactional Replication, discussed in Chapter 15, “Replication.”
Clustering purchases require Enterprise or Datacenter versions of the Windows operating system and SQL Server Standard, Enterprise, or BI editions. These can get expensive and many organizations may not cost-justify this expense. Clustering is usually deployed within the confines of a data center, but can be used over geographic distances (geoclusters). To implement a geocluster, work with your storage vendor to enable the storage across the geographic distances to synchronize the disk arrays. SQL Server 2012 also supports another option: multi-site clustering across subnet. The same subnet restriction was eliminated with the release of SQL Server 2012.
Clustering requires experienced DBAs to be highly trained in hardware and software, and DBAs with clustering experience command higher salaries.
Although SQL Server is cluster-aware, not all client applications that use SQL Server are cluster-aware. For example, even if the failover of a SQL Server instance is relatively seamless, a client application may not have the reconnect logic. Applications without reconnect logic require that users exit and then restart the client application after the SQL Server instance has failed over, then users may lose any data displayed on their current screen.
Choosing SQL Server 2012 Clustering for the Right Reasons
When it comes right down to it, the reason for a clustered SQL Server is to improve the high availability of the whole SQL Server instances which includes all user/system databases, logins, SQL Jobs but this justification makes sense only if the following are true:
- You have experienced DBA staff to install, configure, and administer a clustered SQL Server.
- The cost (and pain) resulting from downtime is more than the cost of purchasing the cluster hardware and software and maintaining it over time.
- You have in place the capability to protect your storage redundancy. Remember that clusters don’t protect data.
- For a geographically dispersed cluster across remote data centers, you have a Microsoft certified third-party hardware and software solution.
- You have in place all the necessary peripherals required to support a highly available server environment (for example, backup power and so on).
If all these things are true, your organization is a good candidate for installing a clustered SQL Server, and you should proceed; but if your organization doesn’t meet these criteria, and you are not willing to implement them, you would probably be better with an alternative, high-availability option, such as one of those discussed next.
Alternatives to Clustering
SQL Server clustering is just one of many options available to help provide high availability within your SQL Server 2012 instances, and high-availability solutions consist of multiple layers of solutions to ensure uptime. This section takes a brief look at alternatives to clustering, starting with the least expensive and easy-to-implement options and working along to the more expensive and more difficult-to-implement options.
Cold Backup Server
A cold backup refers to having a spare physical server available that you can use as your SQL Server 2012 server should your production server fail. Generally speaking, this server does not have SQL Server 2012 or any database backups installed on it. This means that it can take time to install SQL Server 2012, restoring the databases and redirecting applications to the new server, before you are up and running again. It also means that you may lose some of your data if you cannot recover the last transaction logs from the failed production server and you have only your most recent database backups to restore from.
If being down a while or possibly losing data is not a major concern, having a cold backup server is the least expensive way to ensure that your organization stays in business should your production SQL Server 2012 server go down.
Warm Backup Server
The major difference between a cold backup server and a warm backup server is that your spare server (the “warm” one) has SQL Server 2012 preinstalled, may be used as a development server where it has some less recent production databases installed. This means that you save a lot of installation and configuration time, getting back into production sooner than you would with the use of a cold backup server. You still need to redirect your database applications, refresh the data to the most current, and you may lose some of your data should you not recover the last transaction logs from the failed server.
Log Shipping
In a log-shipping scenario, you have two SQL Servers, includes the primary (production) server and a secondary. The secondary server also has SQL Server 2012 installed and configured. The major difference between a warm backup server and log shipping is that log shipping adds the capability not only to restore database backups from the production server to the spare server automatically, but also to ship database transaction logs and automatically restore them. This means there is less manual work than with a warm backup server, and less chance for data loss, as the most data you might lose would be the equivalent of one transaction log. For example, if you create transaction logs every 15 minutes, in the worst case you would lose only 15 minutes of data.
Log shipping is covered in detail in Chapter 18, “SQL Server 2012 Log Shipping.”
Replication
Many experts include SQL Server replication as a means to increase high availability, but the authors are not among them. Although replication is great for moving data from one SQL Server to others, it’s not a good high-availability option. It is much too complex and limited in its capability to easily replicate entire databases to be worth the effort of spending any time trying to make it work in failover scenarios unless you already have the replication expertise.
Replication is covered in detail in Chapter 15, “Replication.”
Database Mirroring
Database mirroring in many ways is a good alternative to clustering SQL Server. Like clustering, you can use database mirroring to automatically failover a failed SQL Server instance to the mirror server, on a database-by-database basis. The biggest difference between clustering and database mirroring is that data is actually protected when there are two different copies of the data stored in mirroring. In clustering, the shared disk can be a single point of failure. In addition, database mirroring can operate over long distances, is less expensive than clustering, requires less knowledge to set up and manage, and the failover can be fully automated in some circumstances, like clustering is. In some cases, database mirroring may be a better choice instead of clustering for high availability.
AlwaysOn Availability Groups
AlwaysOn is a high-availability and disaster recovery solution new to SQL Server 2012 that enables you to maximize availability for one to many user databases as a group. Deploying AlwaysOn involves configuring one or more availability groups. Each availability group defines a set of user databases that can failover as a single unit by leveraging a Windows Failover Cluster and its clustered SQL Server name and IP address. The availability group involves a set of five failover partners, known as availability replicas. Each availability replica possesses a non-shared copy of each of the databases in the availability group where the data can be maintained either synchronously or asynchronously. One of these replicas, known as primary replica, maintains the primary copy of each database. The primary replica makes these databases, known as primary databases, available to users for read-write access. For each primary database, other availability replicas, known as secondary replicas, maintain failover copy for each database that can also be configured for read-only access.
See Chapter 25, “AlwaysOn Availability Groups,” for more information on this subject.
Third-Party Clustering Solutions
In addition to Microsoft, there are third-party partners that also offer high availability solutions for SQL Server. In general, these options may be more expensive than and as complex as Microsoft’s clustering option, but some offer additional features and benefits beyond what Microsoft offers.
What to Do?
Although this brief introduction clarifies your options, it may not be enough information for you to make a good decision. If the best solution is not self-evident, then you need to spend time researching the preceding options before you can determine what is best for your organization.
If you’re going to deploy and manage clustering, you need to know how it works, including clustering configuration options.
How Clustering Works
In this section, you consider active and passive nodes, the shared disk array, the quorum, public and private networks, and the cluster server. Then, you learn how a failover works.
Active Nodes Versus Passive Nodes
A Windows Failover Cluster can support up to sixteen nodes; however, most clustering deployment is only two nodes. A single SQL Server 2012 instance can run on only a single node at a time; and should a failover occur, the failed instance can failover to another node. Clusters of three or more physical nodes should be considered when you need to cluster many SQL Server instances. Larger clusters are discussed later in this chapter.
In a two-node Windows Failover Cluster with SQL Server, one of the physical nodes is considered the active node, and the second one is the passive node for that single SQL Server instance. It doesn’t matter which of the physical servers in the cluster is designated as active or passive, but you should specifically assign one node as the active and the other as the passive. This way, there is no confusion about which physical server is performing which role at the current time.
When referring to an active node, this particular node is currently running a SQL Server instance accessing that instance’s databases, which are located on a shared disk array.
When referring to a passive node, this particular node is not currently running the SQL Server. When a node is passive, it is not running the production databases, but it is in a state of readiness. If the active node fails and a failover occurs, the passive node automatically runs production databases and begins serving user requests. In this case, the passive node has become active, and the formerly active node becomes the passive node (or the failed node, if a failure occurs that prevents it from operating).
Shared Disk Array
Standalone SQL Server instances usually store their databases on local disk storage or nonshared disk storage; clustered SQL Server instances store data on a shared disk array. Shared means that all nodes of the Windows Failover Cluster are physically connected to the shared disk array, but only the active node can access that instance’s databases. To ensure the integrity of the databases, both nodes of a cluster never access the shared disk at the same time.
Generally speaking, a shared disk array can be an iSCSI, a fiber-channel, SAS connected, a RAID 1, a RAID 5, or a RAID 10 disk array housed in a standalone unit, or a SAN. This shared disk array must have at least two logical disk partitions. One partition is used for storing the clustered instance’s SQL Server databases, and the other is used for the quorum drive, if a quorum drive is used. Additionally, you need a third logical partition if you choose to cluster MSDTC.
The Quorum
When both cluster nodes are up and running and participating in their respective active and passive roles, they communicate with each other over the network. For example, if you change a configuration setting on the active node, this configuration is propagated automatically, and quickly, to the passive node, thereby ensuring synchronization.
As you might imagine, though, you can make a change on the active node and have it fail before the change is sent over the network and made on the passive node. In this scenario, the change is never applied to the passive node. Depending on the nature of the change, this could cause problems, even causing both nodes of the cluster to fail.
To prevent this change from happening, a Windows Failover Cluster employs a quorum. A quorum is essentially a log file, similar in concept to database logs. Its purpose is to record any change made on the active node. This way, should any recorded change not get to the passive node because the active node has failed and cannot send the change to the passive node over the network, the passive node, when it becomes the active node, can read the quorum log file to find out what the change was. The passive node can then make the change before it becomes the new active node. If the state of this drive is compromised, your cluster may become inoperable.
In effect, each cluster quorum can cast one “vote,” where the majority of total votes (based on the number of these cluster quorums that are online) determine whether the cluster continues running on the cluster node. This prevents more than one cluster node attempting to take ownership of the same SQL Server instance. The voting quorums are cluster nodes or, in some cases, a disk witness or file share witness. Each voting cluster quorum (with the exception of a file share witness) contains a copy of the cluster configuration. The cluster service works to keep all copies synchronized at all times.
Following are the four supported Windows Failover Cluster quorum modes:
- Node Majority: Each node that is available and in communication can vote. The cluster functions only with a majority of the votes.
- Node and Disk Majority: Each node plus a designated disk in the cluster storage (the “disk witness”) can vote, whenever they are available and in communication. The cluster functions only with a majority of the votes.
- Node and File Share Majority: Each node plus a designated file share created by the administrator (the “file share witness”) can vote, whenever they are available and in communication. The cluster functions only with a majority of the votes.
- No Majority: Disk Only: The cluster has a quorum if one node is available and in communication with a specific disk in the cluster storage. Only the nodes that are also in communication with that disk can join the cluster. The disk is the single point of failure, so use highly reliable storage. A quorum drive is a logical drive on the shared disk array dedicated to storing the quorum and as a best practice should be around 1GB of fault tolerant disk storage.
With two-node clusters Disk only is the most often used quorum configuration, commonly known as the quorum disk. The quorum configuration can be switched after the cluster has been deployed based on the number of clustered nodes and user requirements. While in clusters with greater than two nodes, the other three quorum modes are more commonly used.
Public and Private Networks
Each node of a cluster must have at least two network cards to be a fully supported installation. One network card is connected to the public network, and the other network card will be connected to a private cluster network.
- The public network is the network to which the client applications connect. This is how they communicate to a clustered SQL Server instance using the clustered IP address and clustered SQL Server name. It is recommended to have two teamed network cards for the public network for redundancy and to improve availability.
- The private network is used solely for communications between the clustered nodes. It is used mainly for the heartbeat communication. Two forms of communications are executed:
- LooksAlive: Verifies that the SQL Server service runs on the online node every 5 seconds by default
- IsAlive: Verifies that SQL Server accepts connections by executing sp_server_diagnostics.
This health detection logic determines if a node is down and the passive node then takes over the production workload.
The SQL Server Instance
Surprisingly, SQL Server client applications don’t need to know how to switch communicating from a failed cluster node to the new active node or anything else about specific cluster nodes (such as the NETBIOS name or IP address of individual cluster nodes). This is because each clustered SQL Server instance is assigned a Network name and IP address, which client applications use to connect to the clustered SQL Server. In other words, client applications don’t connect to a node’s specific name or IP address but instead to the cluster SQL network name or cluster SQL IP address that stays consistent and fails over. Each clustered SQL Server will belong to a Failover Cluster Resource Group that contains the following resources that will fail together:
- SQL Server Network Name
- IP Address
- One or more shared disks
- SQL Server Database Engine service
- SQL Server Agent
- SQL Server Analysis Services, if installed in the same group
- One file share resource, if the FILESTREAM feature is installed
How a Failover Works
Assume that a single SQL Server 2012 instance runs on the active node of a cluster and that a passive node is available to take over when needed. At this time, the active node communicates with both the database and the quorum on the shared disk array. Because only a single node at a time can access the shared disk array, the passive node does not access the database or the quorum. In addition, the active node sends out heartbeat signals over the private network, and the passive node monitors them, so it can take over if a failover occurs. Clients are also interacting with the active node via the clustered SQL Server name and IP address while running production workloads.
Now assume that the active node stops working because of a power failure. The passive node, which is monitoring the heartbeats from the active node, notices that the heartbeats stopped. After a predetermined delay, the passive node assumes that the active node has failed and initiates a failover. As part of the failover process, the passive node (now the active node) takes over control of the shared disk array and reads the quorum, looking for any unsynchronized configuration changes. It also takes over control of the clustered SQL Server name and IP address. In addition, as the node takes over the databases, it has to perform a SQL Server startup and recover the databases.
The time this takes depends on many factors, including the performance of the hardware and the number of transactions that might have to be rolled forward or back during the database recovery process. When the recovery process is complete, the new active node announces itself on the network with the clustered SQL Server name and IP address, which enables the client applications to reconnect and begin using the SQL Server 2012 instance after this minimal interruption.
Clustering Options
Up to this point, simple two-node, active/passive clusters running a single SQL Server instance have been discussed. However, this is only one of many options you have when clustering SQL Server. Two other popular options include active/active clustering and multi-node clustering. Additionally, it is available to cluster multiple instances of SQL Server on the same server. The following sections discuss these alternatives in detail.
Active/Active Cluster
The examples so far have described what is called an active/passive cluster. This is a two-node cluster in which there is only one active instance of SQL Server 2011. Should the active node fail, the passive node takes over the single instance of SQL Server 2011, becoming the active node.
To save hardware costs, some organizations like to configure an active/active cluster. Like active/passive, this is also a two-node cluster, but instead of only a single SQL Server instance running, there are two instances, one on each physical node of the cluster.
The advantage of an active/active cluster is that you make better use of the available hardware. Both nodes of the cluster are in use instead of just one, as in an active/passive cluster. The disadvantage is that when a failover occurs, both SQL Server instances are running on a single physical server, which can reduce performance of both instances where memory may need to be readjusted to ensure that each has adequate memory. To help overcome this problem, both of the physical servers can be oversized to better meet the needs of both instances should a failover occur. Chances are good, however, that the perfect balance will not be met and there will be some performance slowdown when failing over to the other node. In addition, if you have an active/active cluster running two SQL Server instances, each instance needs its own logical disk on the shared disk array. Logical disks cannot be shared among SQL Server instances.
In the end, if you want to save hardware costs and don’t mind potential application slowdowns, use an active/active two-node cluster.
Multi-node Clusters
If you think you will be adding even more clustered SQL Server 2012 instances in the future you may want to consider a third option: multi-node clusters. For the more conservative, a three-node cluster, or active/active/passive, is a good option that provides more redundancy and it won’t cause any application slowdown should a failover occur with the passive node. For those that don’t mind the complexity of large clusters, you can add even more nodes.
The number of physical nodes supported for SQL Server clustering depends on which version of the software you purchase, along with which version of the operating system you intend to use.
Purchasing the Right Software
One of the reasons it is important to research your clustering needs is that they directly affect what software you need, along with licensing costs. Following are your options:
- SQL Server 2012 Standard Edition (32-bit or 64-bit): Supports up to two-node clustering.
- SQL Server 2012 BI Edition (32-bit or 64-bit): Supports up to two-node clustering.
- SQL Server 2012 Enterprise Edition (32-bit or 64-bit): Supports up to sixteen-node clustering.
If you need only a two-node cluster, you can save by licensing Windows Server 2008 Enterprise Edition and SQL Server 2012 Standard Edition. If you want more than a two- node cluster, your licensing costs will escalate quickly because you will need SQL Server 2012 Enterprise Edition.
SQL Server 2012 is not supported on Windows 2003.
Number of Nodes to Use
As covered earlier, in a two-node cluster, a SQL Server instance runs on the active node, while the passive node is currently not running SQL Server but is ready to do so when a failover occurs. This same principle applies to multi-node clusters.
As an example, say that you have a three-node cluster. In this case, there are two active nodes running their own individual SQL Server instances, and the third physical node acts as a passive node for the other two active nodes. If either of the two active nodes fails, the passive node can take over. You can set up a failover preferred node to predetermine the failover sequence from node to node.
Now look at an eight-node cluster. In this case, you have seven active nodes and one passive. Should any of the seven active nodes fail, then the passive node takes over after a failover. In this case, with a large number of nodes, it is more preferable to have a passive node to avoid multiple node failures that cause the surviving nodes to carry all that additional workload.
In an active/passive configuration, the advantage of many nodes is that less hardware is used for failover needs. For example, in a two-node cluster, 50 percent of your hardware is used for redundancy; but in an eight-node cluster, only 12.5 percent of your cluster hardware is used for redundancy.
Ultimately, deciding how many nodes your cluster has should depend on your business restrictions like your budget, your in-house expertise, and your level of aversion, if any, to complexity. Some organizations have many different SQL Server instances that they need to cluster, but choose to use multiple two-node active/passive clusters instead of a single multi-node cluster, working under the impression that it is best to keep things as simple as possible.
Clustering Multiple Instances of SQL Server on the Same Server
As indicated in the types of clustering discussed previously, a single SQL Server instance can run on a single physical server, however, this is not a requirement. SQL Server Enterprise Edition can actually support up to 25 SQL instances on a single clustered configuration. This is a restriction of drive letter limitations though so you need mount points to achieve this. The effectiveness of this depends on the business requirements, the capacity of the hardware, SLAs, and the expertise of the IT organization managing it.
The purpose of clustering is to boost high availability. Adding many SQL Server instances to a cluster adds complexity, and complexity can increases risk and failover points in the solution. But complexity can also be managed depending on the IT expertise to support it; speak to your IT support when considering this option.
UPGRADING SQL SERVER CLUSTERING
If your organization is like many, it probably already has some older versions of SQL Server clusters in production. If so, it is time to decide how to upgrade them to SQL Server 2012. Your available options include the following:
- Don’t upgrade.
- Perform an in-place SQL Server 2012 upgrade.
- Rebuild your cluster from scratch, and then install SQL Server 2012 clustering. Or leave the Windows Failover Cluster intact, if it is a Windows 2008 R2, but install a new SQL Server 2012 on it and migrate the databases.
This section considers each of these three options.
Don’t Upgrade
This is an easy decision. Not upgrading is simple and doesn’t cost anything. Just because a new version of SQL Server comes out doesn’t mean you have to upgrade. If your current SQL Server cluster is running satisfactory, it may not be worth the costs and upgrade work. A properly configured Windows 2008 cluster is stable running SQL Server 2005, 2008, and 2008 R2.
On the other hand, SQL Server 2012 offers scalability, ease of use, capabilities and reliability, and new functionality of which you may want to take advantage. Before you upgrade, do the research to determine whether the new features of SQL Server 2012 are what you need. Otherwise, you can choose to stay on the current SQL Server version, provided that it is still supported by Microsoft.
Upgrading Your SQL Server 2012 Cluster In Place
Before talking about how to upgrade a Windows Failover Cluster to SQL Server 2012, first consider what operating system you currently run. If you are on Windows Server 2008 with the latest service pack or R2, you are in good shape and an in-place upgrade to SQL Server 2012 should not be a problem.
If, however, you still run Windows Server 2003, you should deploy Windows 2008 (or R2). Upgrading from Windows 2003 to Windows 2008 Failover Cluster is not supported; a total rebuild is required.
If you run a Windows 2008 Failover Cluster where SQL Server needs to be upgraded to SQL Server 2012, you can perform a rolling upgrade with minimum downtime by performing the following steps:
1. Identify the cluster node that you want to upgrade first.
2. Failover all the SQL instances from that node. As a result, no SQL instances will run on that node, therefore, that node becomes passive.
3. Install prerequisites on each passive node, and upgrade the shared SQL Server components.
4. Restart passive nodes as prompted.
5. Run the SQL Server 2012 setup to perform an in-place upgrade. Prior to doing any upgrades, SQL upgrade validation procedures should be completely followed. Set up a test environment, run the SQL Server 2012 Upgrade Advisor, upgrade the test environment to SQL 2012, replay a production SQL Profiler trace, and test the application connectivity and performance test. Not following upgrade procedures can result in a failed upgrade that results in a need to back out, which is more challenging in a Windows Cluster than in standalone SQL Server environment.
6. After more than half of the passive nodes have been upgraded, the upgrade process automatically initiates a failover to the upgraded nodes and maintains a list of possible owners to which the resources can fail while the remaining nodes are upgraded.
Not all SQL instances need to be upgraded; Windows Failover Cluster supports a mix of SQL Server 2005, 2008 (and R2), and 2011 on a single Windows 2008 Failover Cluster.
Rebuilding Your Cluster
Rebuilding your cluster from scratch is a good idea if any one of the following conditions exists:
- You need to upgrade your current hardware. (It is either old or underpowered.)
- The server is using the Windows 2003 operating system.
- The current cluster installation is unstable.
- You have disdain for upgrading software in place and prefer a fresh install.
If you do decide to upgrade from scratch, you also have to decide whether to install on new hardware or use your old hardware. If you install on new hardware, you have the convenience of building the cluster, and testing it, at your own pace, while the current cluster is still in production. This helps to ensure that you have done an outstanding job and at the same time relieves some of the stress that you might experience if you have to reuse your old hardware and then rebuild the cluster during a brief and intense time period.
If you don’t have the luxury of acquiring new hardware, you have to identify a down time when your system can be shut down while the rebuild occurs. This could range from a 4-hour period to a 12-hour period, depending on the size of the cluster and complexity. Besides the time your cluster will be down, there is also the added risk of unexpected problems. For example, you might make an installation mistake halfway through the upgrade and have to start over. Because of the uncertainty involved, you should first estimate how much time you think the upgrade will take under good circumstances, and then double that estimate as the size of your requested downtime window. This way, your users are prepared.
Whether you upgrade using new hardware or old hardware, you have to consider two additional issues:
- Will you reuse your current clustered SQL Server name and IP address or select new ones?
- How will you move your data from the previous cluster to the new cluster?
The clients that access your current SQL Server cluster do so using the cluster’s SQL Server name and IP address. If you want the clients to continue using the same clustered SQL Server name and IP address, you need to reuse the old clustered SQL Server name and IP address in the new cluster. This is the most common approach because it is generally easier to change a single clustered SQL Server name and IP address than to reconfigure dozens, if not hundreds, of clients that access the SQL Servers on the Windows Failover cluster.
If you upgrade using old hardware, reusing the former clustered SQL Server name and IP address is not an issue because the old cluster is brought down and then the new one is brought up, so there is never a time when the clustered SQL Server name and IP address are on two clusters at the same time (which won’t work).
If you upgrade by using new hardware, you need to assign a clustered SQL Server name and IP address for testing, but you won’t use the old ones because they are currently in use. In this case, you need to use a temporary clustered SQL Server name and IP address for testing; when you are ready for the actual changeover from the old cluster to the new cluster, you need to follow these general steps:
1. Back up the data.
2. Remove SQL Server clustering from the old cluster or turn off the old cluster.
3. On the new cluster, change the clustered SQL Server name and IP address from the old cluster.
4. Restore the data.
How you move the data from the old cluster to the new cluster depends on both the size of the databases and somewhat on whether you use old hardware or new hardware.
Regardless of the option you choose, before you proceed, back up all the databases. Remember, identify any objects in the System databases such as SQL jobs, SSIS packages and logins, and re-create them in the new Windows Failover cluster. If you use old hardware, all you have to do is backup or detach the user databases. When the cluster rebuild is complete, restore or reattach the user databases.
If you move to new hardware or change the database file locations, you should first backup or detach user databases. Next, move these to the new cluster or new database location. Then when the cluster rebuild completes, restore or reattach the user databases.
There isn’t space here to include detailed steps for every possible scenario, such as what happens if the drive letter changes, and so on. The key to success is to plan all these steps and, if possible, perform a trial run before you do an actual cutover.
Back-Out Plan
No matter how you decide to upgrade to SQL Server 2012 clustering, you need to have a back-out plan. Essentially, a back-out plan is what you do if your upgrade fails. Typically, a back-out plan consists of reinstalling SQL Server, restoring the system and user databases, and incurring at least a few hours of outage, but because each particular circumstance can vary, it is impossible to create one set of steps to follow for all back-out plans. Therefore, as you plan your upgrade, consider how the plan could fail, and come up with options to get you back in business should things not go well. Your job could depend on how good your back-out plan is.
Which Upgrade Option Is Best?
Speaking from experience, the authors always prefer to upgrade by rebuilding clusters from scratch on new hardware. This is the easiest, fastest, least risky, and least stressful way. Unfortunately, you may not have this option for whatever reasons based on your circumstances. In this case, you have to work with what you have been given. The key to a successful upgrade is a lot of detailed planning, as much testing as possible, and, of course, having a complete back-out plan.
GETTING PREPARED FOR CLUSTERING
For SQL Server 2012 clustering, the devil is in the details. If you take the time to ensure that every step is done correctly and in the right order, your cluster installation will be smooth and relatively quick and painless; but if you don’t like to read instructions, and instead prefer the trial-and-error approach to computer administration, then expect to face a lot of frustration and a lot of time installing and reinstalling your SQL Server 2012 cluster.
The best way to ensure a smooth cluster installation is to create a detailed, step-by-step plan for the installation, down to the screen level. Yes, this is boring and tedious, but it forces you to think through every option and how it can affect your installation and your organization (after it is in production). In addition, such a plan can come in handy the next time you build a cluster and can be great documentation for your disaster recovery plan.
Preparing the Infrastructure
Before you begin building a SQL Server 2012 cluster, you must ensure that your network infrastructure is in place. Following is a checklist of everything required before you begin installing a SQL Server 2012 cluster. In many cases, these items are the responsibility of others on your IT staff, but it is your responsibility to ensure that all these are in place before you begin building your SQL Server 2012 cluster:
- Your network must have at least one Active Directory server and ideally two for redundancy.
- Your network must have at least one DNS server and ideally two for redundancy.
- Your network must have available switch ports for the public network cards used by the nodes of the cluster. Be sure to set them to match the manually set network card settings used in the nodes of the cluster. SQL Server 2012 supports nodes in different subnets, but for SQL Server versions prior to SQL Server 2012 all the nodes of a cluster must be on the same subnet.
- You must secure IP addresses for all the public network cards. Windows 2008 does support DHCP but you should use static IPs.
- You must decide how you will configure the private heartbeat network. Choose between using a direct network card-to-network card connection using a cross over cable (only possible with a two-node cluster), or use a hub or switch. The hub or switch should be different than the one supporting the public network for redundancy.
- You need to secure IP addresses for the private network cards. Generally you should use a private network subnet such as 10.0.0.0–10.255.255.255, 172.16.0.0–172.31.255.255, or 192.168.0.0–192.168.255.255. Remember, this is a private network seen only by the nodes of the cluster. Again, Windows 2008 enables DHCP to claim these IP addresses.
- Ensure that you have proper electrical power for the new cluster nodes and shared disk array.
- Ensure that battery backup power is available to all the nodes in your cluster and your shared disk array.
- If you don’t already have one, create a SQL Server service account to be used by the SQL Server services running on the cluster. This must be a domain account with the password set to never expire.
- If you don’t already have one, create a cluster service account to be used by the Windows Clustering service. This must be a domain account with the password set to never expire.
- Determine a name for your Windows Failover Cluster and secure an IP address for it. This name will be used for management of the cluster after it is created.
- Determine a name for your SQL Server 2012 cluster and secure an IP address for it. This will be the name that clients will connect to.
These preparations will come back into play during the installation process.
Preparing the Hardware
Hardware typically presents certain issues, often taking the most time to research and configure. Part of the reason for this is that there are many hardware options, some of which work, some of which don’t. Unfortunately, there is no complete resource you can use to help you sort through this. Each vendor offers different hardware, and the available hardware is always changing, along with new and updated hardware drivers, making this entire subject a moving target with no easy answers. In spite of all this, here is what you need to know to start selecting the proper hardware for your SQL Server 2012 cluster.
Finding Your Way Through the Hardware Jungle
This section describes the basic hardware you need for a SQL Server cluster. To keep things simple, only a two-node active/passive cluster is referred to; although, these same recommendations apply to multinode clusters. Additionally, most Windows Failover clusters are configured with a quorum drive so assume a quorum drive configuration. The following are the author’s minimum hardware recommendations. If you check out Microsoft’s minimum hardware requirements for a SQL Server 2012 cluster, they will be somewhat less.
Each node in your cluster should be identical. This will avoid installation and administrative headaches.
The minimum specifications for the server nodes should be the following:
- Dual CPUs, 2GHz or higher, 2MB L2 Cache (32-bit or 64-bit)
- 2GB or more RAM
- Local mirrored SCSI drive for the application drive (RAID 10, 5 or 1) (C:), 9GB or larger
- SCSI DVD drive
- SCSI connection for local SCSI drive and DVD drive
- SCSI or fiber connection to shared disk array or SAN or shared ISCSI drives
- Redundant power supplies
- Private network card
- Public network card
- Mouse, keyboard, and monitor (can be shared)
The shared disk array should have a SCSI-attached RAID 10, 5, or 1 array with an appropriate high-speed SCSI connection. With Microsoft Windows Failover clustering, SCSI is supported only if you have a two-node cluster. If you want to cluster more than two nodes, you must use a fiber-attached disk array or SAN; or you may have a fiber-attached RAID 10, 5, or 1 array with an appropriate high-speed connection. You could also use a fiber-attached SAN storage array with an appropriate high-speed connection (generally a fiber switch).
There is much more to learn about hardware specifics that is beyond the scope of this chapter. If you are new to clustering, contact your hardware vendor for specific hardware recommendations. Keep in mind that you will be running SQL Server 2012 on this cluster, so ensure that whatever hardware you select meets the needs of your predicted production workload.
Preparing the Hardware
As a DBA, you may not be the one who installs the hardware. In any case, here are the general steps most people follow when building cluster hardware:
1. Install and configure the hardware for each node in the cluster as if it will be running as a standalone server. This includes installing the latest approved drivers and firmware.
2. After the hardware is installed, install the operating system and the latest service pack, along with any additional required drivers. Then run Windows Update.
3. Configure the nodes to the public network. To make things easy to identify, name the network used for public connections public network.
4. Configure the private heartbeat network. To make things easy to identify, name the private heartbeat network private network.
5. Set up and configure the shared disk array, iSCSI targets, or SAN.
6. Install and configure the iSCSI or fiber cards in each of the nodes, and install the latest drivers. In Windows 2008, you can also use iSCSI. In this case, you need to set up the iSCSI initiators to connect to the drives.
7. One at a time, connect each node to the shared disk array, iSCSI drive, or SAN, following the instructions for your specific hardware. It is critical that you do this one node at a time. In other words, only one node at a time should be physically on and connected to the shared disk array or SAN and configured. After that node is configured, turn it off and turn the next node on and configure it, and so on, one node at a time. If you do not follow this procedure, you risk corrupting the disk configuration on your nodes, requiring you to start the process over.
8. Use Disk Administrator to configure and format the drives on the shared disk array. You need at minimum two logical drives on the shared disk array: one for storing your SQL Server databases, and the other for the quorum drive. The data drive must be big enough to store all the required data and the quorum drive must be at least 500MB (which is the smallest size that an NTFS volume can efficiently operate). When configuring the shared drives using Disk Administrator, each node of the cluster is required to use the same drive letter when referring to the drives on the shared disk array or SAN. For example, you might want to assign your data drive as drive “F:” on all the nodes, and assign the quorum drive letter “Q:” on all the nodes.
9. When all the hardware is put together, ensure that there are no problems before you begin installing clustering services by checking the Windows Event Viewer. Although you may do some diagnostic hardware testing before you install the operating system, you need to wait until after installing the operating system before you can fully test the hardware.
10. Ensure that you can ping the cluster nodes over the public and then the private networks. Likewise, ensure that you can ping the domain controller and DNS server to verify that they are available.
11. Write a file in the shared disks by one node, which should be visible by the other node.
12. Additionally, verify that the drive letters correspond between nodes and that there is not a mismatch in drive letters from the shared disks between nodes.
After all the hardware has been configured and tested, you are ready to install Windows Failover clustering.
CLUSTERING WINDOWS SERVER 2008
Before you can install SQL Server 2012 on the cluster, you must first install Windows Server 2008 Failover Cluster services. After it is successfully installed and tested, you can cluster SQL Server. This section takes a high-level, step-by-step approach to installing and configuring a Windows Failover Cluster.
Before Installing Windows 2011 Clustering
To install Windows Failover clustering, you need to perform a series of important steps. This is especially important if you didn’t build the cluster nodes because you want to ensure everything is working correctly before you begin the actual cluster installation. When they are completed, you can install Windows 2008 Failover clustering. Following are the steps you must perform:
1. Ensure that all the physical nodes are working properly and are configured identically (hardware, software, and drivers).
2. Verify that none of the physical nodes have been configured as a domain controller or for any other critical services such as Exchange. Also, ensure that you have multiple domain controllers in your environment.
3. Verify that all drives are NTFS and are not compressed.
4. Ensure that the public and private networks are properly installed and configured.
5. SQL Server failover cluster installation supports Local Disk only for installing the tempdb files. Ensure that the path specified for the tempdb data and log files is valid on all the cluster nodes. During failover, if the tempdb directories are not available on the failover target node, the SQL Server resource will fail to come online.
6. Verify that you have disabled NetBIOS for all private network cards.
7. Verify that there are no network shares on any of the shared drives.
8. If you intend to use SQL Server encryption, install the server certificate with the fully qualified DNS name of the clustered SQL Server on all cluster nodes.
9. Check all the error logs to ensure that there are no problems. If there are, resolve them before proceeding with the cluster installation.
10. Add the SQL Server and clustering service accounts to the Local Administrators group of all the cluster nodes.
11. Verify that no antivirus software has been installed on the cluster nodes. Antivirus software can reduce the availability of a cluster. If you want to check for possible viruses on a Windows Failover Cluster, run scans on the cluster nodes remotely from another computer.
These are many things to check, but each is important. If skipped, any one of these steps could prevent your cluster from installing or working properly.
Installing Windows Server 2008 Failover Clustering
Now that all your physical nodes and shared disk array, iSCSI device, or SAN is ready, you are ready to install a Windows 2008 Failover Cluster. This section describes the process from beginning to end.
To begin, you must enable the clustering feature for each of the Windows 2008 node candidates. In Windows 2008 the decision was made to reduce the Windows surface area by disabling the feature by default. To enable the failover clustering feature, from the Server Manager, open the Add Features Wizard. Check Failover Clustering, and the wizard completes the installation for you (shown in Figure 16-1). This doesn’t actually cluster your machines but installs the necessary components on your server to manage the cluster and perform the failover. This step needs to be repeated on each physical node participating on the Windows Failover Cluster.

Validating the Windows Failover Cluster
Before you create the cluster, you want to validate that the cluster physical nodes run on supported hardware. You can tell if this is true if the nodes by pass the cluster validation. To do this, open the Failover Cluster Management tool, and click Validate a Configuration. This opens the Validate a Cluster Configuration Wizard, which runs a full diagnosis of your cluster prior to the installation. Additionally, this wizard can also be used after installation of the cluster to ensure that you still meet the cluster hardware requirements and that all the hardware is in proper working condition.
Microsoft supports a Windows Failover Cluster if it passes the cluster validation. Gone are the days of looking over a long compatibility matrix list to determine whether your Windows Failover Cluster was supported on a given hardware platform!
When you’re in the Validate a Configuration Wizard, you will be asked which physical nodes or potential nodes you want to validate. Enter each of them into the list, and click Next. You are then asked what types of tests you want to run. The tests begin to run, and you get a visual confirmation as the validation tests move from step to step, as shown in Figure 16-2. If you fail a test, do not install the cluster, even though you can override the test and still cluster the nodes. Review the report; you see a component-by-component evaluation of your configuration to determine whether your hardware is suitable.

Viewing the report is as easy as clicking the View Report button. Doing so takes you to an HTML report, a granular report about each of your hardware components, and whether they’re cluster approved.
Installing the Clustered Nodes
Windows 2008 Failover Cluster has simplified substantially from Windows 2003. This is mainly because you can now cluster all nodes at once in a wizard that asks you two questions. If you’ve deployed a Windows 2003 Failover Cluster, you will be amazed when you see how easy these steps are to cluster Windows 2008:
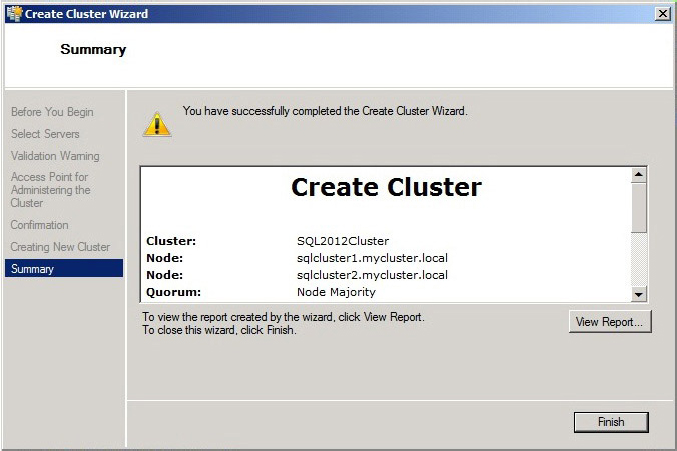
1. From within the Failover Cluster Management, click Create a Cluster. This opens the Create Cluster Wizard. The first screen after the welcome screen asks you which physical nodes will participate in the cluster. Type in each physical node and click Add, as shown in Figure 16-3. More physical nodes can be added later if need be.

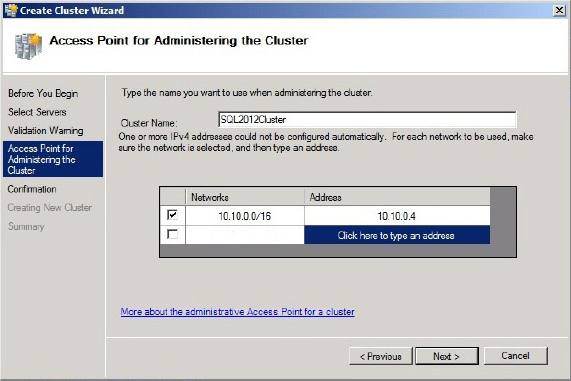
2. Assign the Windows cluster an IP address, and specify which network you want the cluster to use, as shown in Figure 16-4. In the figure, you can see that “SQL2012Cluster” was the Windows cluster name used for management. That name is too long for NetBIOS though so it is shortened for customers using the NetBIOS network protocol.
The cluster then begins to be created and configured (see Figure 16-5) and you will be notified when the build process is done. This is a much shorter process than it was in Windows 2003; it takes no more than 2 minutes in a test environment.
Preparing Windows Server 2008 for Clustering
Before you can install SQL Server, there is one small step you need to perform, and that is to prepare the cluster for SQL Server. In the previous section, you clustered Windows but didn’t tell Windows which are the shared disks. This is because Microsoft now deploys a minimalist approach to clustering during the installation, doing the absolute minimum it needs to get it clustered and then enabling you to add the necessary components later.
To prepare the cluster for SQL Server, perform the following steps from the Failover Cluster Management tool:
1. Under Navigate, click the Storage shortcut.
2. From the Actions pane, click Add Disk.
3. Add any disks that you want to be visible to the Windows Failover Cluster.
4. Click OK (see Figure 16-6).

If you cannot see the shared disks, they are either already added as a disk resource or the disks are not visible to all nodes in the cluster. This might indicate that the masking is incorrect or there’s a communication problem of some sort.
CLUSTERING MICROSOFT DISTRIBUTED TRANSACTION COORDINATOR
To coordinate transactions across SQL Servers in a clustered environment, you will need to leverage Microsoft Distributed Transaction Coordinator (MSDTC) to make it highly available.
Windows 2003 supported only one cluster MSDTC resource; as a result, all applications across the cluster needed to use the single MSDTC instance. However, when a MSTDC is highly utilized, it can become a bottleneck. On Windows 2008 and later, for better performance, you can install multiple MSDTC instances on a single Windows Failover Cluster as shown in the following steps. The first MSDTC instance installed becomes the default instance but can be changed from the Component Services Management Console (dcomcnfg).
1. Launch the Component Services Management Console from the Administration folder or by executing dcomcnfg from a command prompt.
2. Expand Computers and then right-click My Computer.
3. Click Properties, click the MSDTC tab, and select the default coordinator.
If multiple MSDTC instances exist, SQL Server uses the following rules to identify the MSDTC instance to be chosen in priority order:
1. Use the MSDTC instance installed to the local SQL Server group.
2. Use the mapped MSDTC instance. To create a mapping, execute the following at the command prompt:
 msdtc -tmMappingSet -name <MappingName>
-service <SQLServerServiceName> -clusterResource <MSDTCResourceName>
- <MappingName> is any chosen name to identify the mapping.
- <SQLServerServiceName> is the service name from the SQL Server instance such as MSSQLServer or MSSQL$<InstanceName>.
- <MSDTCResourceName> is the MSDTC resource name to map.
3. Use the cluster’s default MSDTC instance.
4. Use the local node MSDTC instance.
SQL Server automatically uses its local group MSDTC instance if it exists; otherwise, it uses the default instance. If the local group MSDTC instance fails, you need to tell SQL Server to use another MSDTC instance; it does not automatically use the default instance. To create a cluster MSDTC instance, use the Failover Cluster Management tool.
1. Identify a small shared disk to store the MSDTC log file. It is best to put the log file on its own shared disk or mount point to protect it from any other service that may corrupt the disk.
2. If the MSDTC resource is installed within a SQL Server Resource Group, it can share the IP and clustered SQL Server name of that group.
3. The default MSDTC should be installed on its own Cluster Resource Group to avoid a failover of MSDTC, which in turn fails other services contained in that own resource group. When installed on its own resource group, it needs its own IP and network name in addition to a shared disk.
After creating the MSDTC resource(s), you need to enable MSDTC network access to allow MSDTC to access network resources and for applications to access it. To do so perform these steps:
1. Launch the Component Services Management Console from the Administration folder or by executing dcomcnfg from a command prompt.
2. Expand Computers, and then right-click My Computer. Expand Distributed Transaction Coordinator and then expand <Your instance of MSDTC>.
3. Right-click the Properties of your MSDTC instance.
4. Under Security Settings, select the Network DTC Access tab and Allow Inbound and Allow Outbound check boxes, and click OK.
The procedure to install a SQL Server instance onto a Windows Failover Cluster is one of the easiest parts of getting your SQL Server cluster up and running. The SQL Server 2012 setup program is used for the install and does the heavy lifting for you. All you have to do is make a few (but critically important) decisions, and then sit back and watch the installation complete. The setup program even goes to the trouble to verify that your nodes are all properly configured; and if not, it suggests how to fix any problems before the installation begins.
When the installation process does begin, the setup program identifies the physical node, and after you give it the go-ahead to install on each one, it does so, all automatically. SQL Server 2012 binaries are installed on the local drive of each node, and the system databases are stored on the shared disk array you designate.
The next section shows the step-by-step instructions for installing a SQL Server 2012 instance in a Windows Failover Cluster. The assumption for this example is that you will install this instance in a two-node active/passive cluster. Even if you install in a two-node active/active or a multi-node cluster, the steps in this section are applicable. The only difference is that you have to run SQL Server 2012 setup on every node you want to install SQL Server, and you have to specify a different logical drive on the shared disk array for each SQL Server instance.
Step by Step to Cluster SQL Server
To begin installing your SQL Server on the cluster, you need the installation media (DVD or ISO). You can either install it directly from the media or copy the install files from the media to the current active node of the cluster, and run the setup program from there. The general process for SQL Server installation is the same as a normal, non-clustered installation; this is covered in Chapter 2. Therefore, the following steps outline the differences from a normal non-clustered installation.
1. To begin installation, run Setup.exe. The prerequisite components (which you learned about in Chapter 2, “SQL Server 2012 Installation Best Practices”) install first. It is a good idea to run these prerequisites on each of the nodes prior to clustering because doing so can save time and enable you to debug visually if something goes wrong during the installation.
2. When you get to the SQL Server Installation Center, click New SQL Server Failover Cluster Installation. In this screen you can also add new nodes to the cluster after the installation, as shown in Figure 16-7.

For the most part, the cluster installation is exactly the same as the standalone SQL Server installation with the exception of just a few screens. When you get to the Setup Support Rules page, you notice a number of new rules that are checked (see Figure 16-8). For example, a check is made to determine whether MSDTC is clustered. Although SQL Server can work without MSDTC clustered, some features such as distributed transactions for linked servers or SSIS will not work without it.

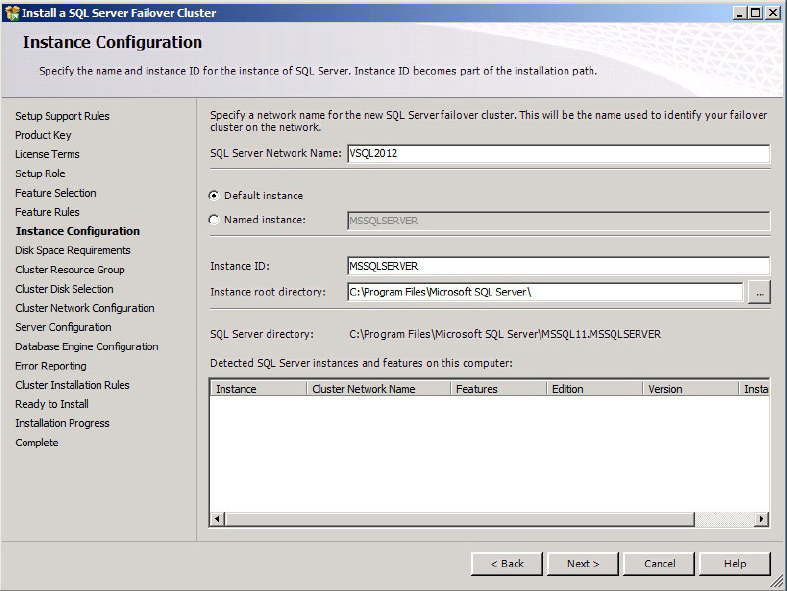
3. In the Instance Configuration dialog, specify the clustered SQL Server Network Name for your SQL Server instance, as shown in Figure 16-9. This is the name that all the client applications use to connect in their connection strings. The name of the directory where your program files will be copied is also based on this name by default.
4. Specify the cluster resource group that will group all your SQL Server resources, such as your network name, IP, and SQL Server services, as shown in Figure 16-10.

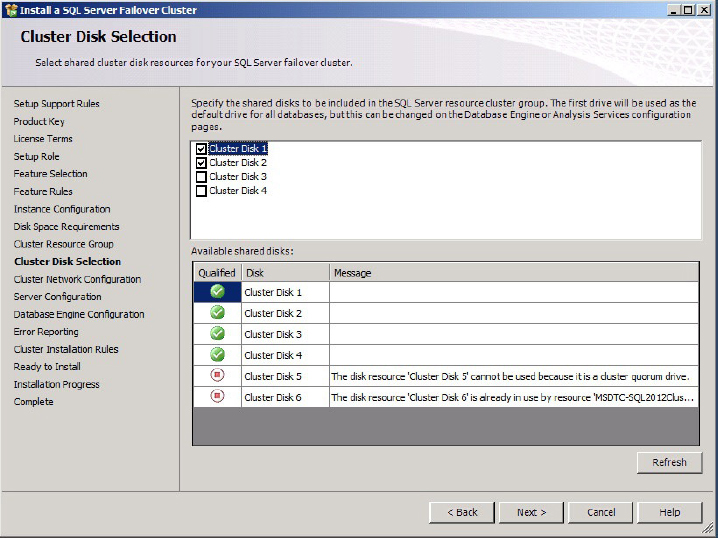
A nice improvement since SQL Server 2008 is that you can have SQL Server use multiple drives in a cluster during the installation. In SQL Server 2005, you had to configure this behavior afterward, and you weren’t able to back up to another disk other than the main SQL Server disk until you fixed the dependencies. In SQL Server 2012, simply check which clustered drive resources you want SQL Server to access, as shown in Figure 16-11.
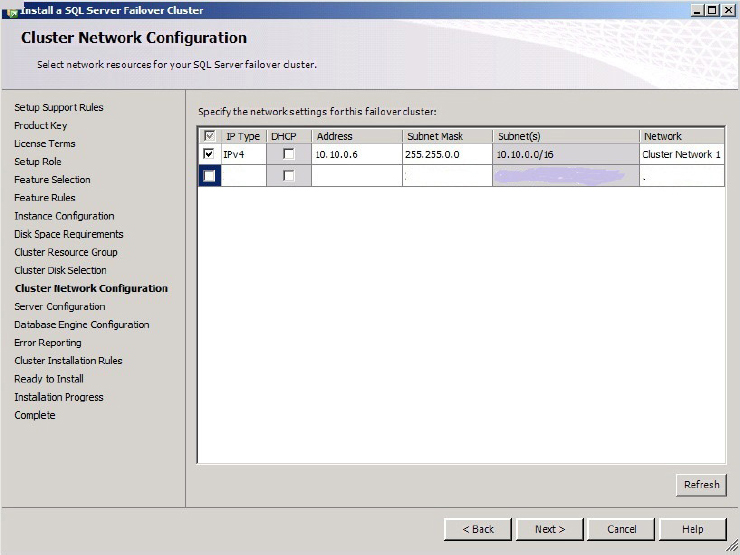
5. With the drive configuration complete, specify the network that SQL Server will use to communicate with client applications, and choose an IP address for each of the networks. This IP address should have been obtained earlier from a network administrator. Notice in Figure 16-12 that Windows 2008 can also use DHCP.
6. Then for Server Configuration, specify the service accounts and collation configuration as shown in Figure 16-13.

Then continue with the installation to proceed to copy the files to the cluster node and run the setup. Additionally, all the SQL cluster resources will be created and configured. When finished with that cluster node, you can go to the other cluster node to Add Node to join each other node a part of the SQL Server cluster instance. Unlike clustering SQL Server 2005 where the SQL setup program copied the SQL binary to all clustered nodes, starting in SQL Server 2008 the SQL setup program clusters the current node onto where the setup is executing. To add another node for SQL Server 2008 or later perform the following steps:
1. Log in to the node that you want to join to the cluster.
2. Run the SQL Setup on the node.
3. Choose Add Node to a SQL Server Failover Cluster.
4. As the setup proceeds, you will be asked for the name of the SQL Cluster to join to. Provide the appropriate name.
5. Then the setup will proceed to join that node. If you want to add more nodes to the cluster, follow above steps for each node.
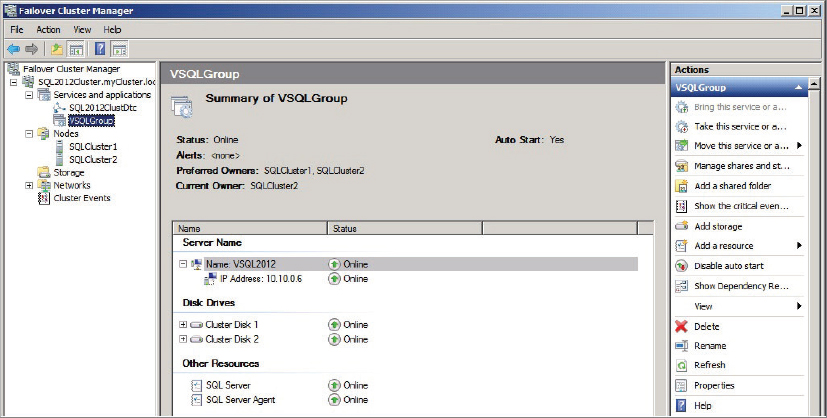
When the cluster installation is complete, from within the Windows Failover Cluster Manager, your two-node Cluster installation should look similar to Figure 16-14.
Like clustering the SQL Server relational engine that is fully integrated with the Windows Failover Cluster, Analysis Services is fully clustered. Moreover, Integration Services can only be clustered as a generic resource, whereas Reporting Services cannot be clustered.
After each SQL Server instance that has been clustered, the resource group should contain the following resources:
- Network name
- IP address
- One or more shared disks
- SQL Server Database Engine service
- SQL Server Agent service
- SQL Server Analysis Services service, if installed. As a best practice, install it on its own resource group to avoid a failure in one resource to affect the other.
- One file share resource, if the FILESTREAM feature is installed.
After the clustered SQL Server installation completes, evaluate the resources’ dependencies to identify what other resources in the group must be online before a particular resource can be brought online for. For example, SQL Server Agent depends on SQL Server being online, and SQL Server depends on the shared disks and clustered SQL Server name and IP address. The complete Windows Failover Cluster installation should look like Figure 16-14.
Installing the Service Pack and Cumulative Updates
After you install and cluster SQL Server, your next step is to install any available SQL Server service pack and cumulative updates, which you can download from Windows Update .You can perform a rolling upgrade as described in the “Upgrading Your SQL Server 2012 Cluster In-Place” section. Installing a service pack and/or a cumulative update is fairly straightforward because they are cluster-aware.
Test, Test, and Test Again
After you cluster SQL Server on the nodes, you need to thoroughly test the installation, just as you did after first installing Windows 2008 Failover Cluster. For example, check the Windows Event Viewer for any error messages, and validate that you can failover the SQL Server across nodes and fails back. However, not only do you want to test the SQL Server cluster, but you also want to test how your client applications “react” to failovers. Because of this, the following testing section is similar to the one you previously read but has been modified to meet the more complex needs of the additional client applications testing you need to perform.
The following is a series of tests you can perform to verify that your SQL Server 2012 cluster and its client applications work properly during failover situations. After you perform each test, verify whether you get the expected results (a successful failover), and be sure you check the Windows log files for any possible problems. If you find a problem during one test, resolve it before proceeding to the next test.
Preparing for the Testing
As with your previous cluster testing, identify a workstation with the Failover Cluster Management tool to interact with your cluster during testing.
To be prepared, you need to test each client application that will be accessing your clustered SQL Server to see what happens should a failover occur. Some client applications deal with clustering failovers by reconnecting, whereas others that are not designed with reconnect logic just fail to reconnect. You must determine beforehand how each client application responds.
To do this, first identify all the client applications; there may be dozens. Each of these has to be reconfigured to use the clustered SQL Server name (and IP address) for the new clustered SQL Server instance. In addition, for the client applications to work, you need to have the appropriate databases restored or installed on the new cluster. This is necessary if you want a highly available cluster solution.
After you have each of your client applications connected to the SQL Server instance, you are ready for testing. Keep in mind that you are testing multiple things, including the Windows 2008 Cluster, the clustered SQL Server, and the client applications.
Moving Resource Groups Between Nodes
The easiest test to perform is to use the Failover Cluster Management tool to manually move the SQL Server resource group from the active node to a passive node, and then back again. To do this, follow these steps:
1. Go to the resource group that contains SQL Server, right click to select Move This Service, and specify where you’d like to move the resource group. This initiates the resource group move from your active node to the designated passive node.
2. After this happens, check the Failover Cluster Management tool and each of the client applications. Each should continue to operate as if no failover had occurred. The Failover Cluster Management tool should pass this test easily. The clients are another story; you must check each client application to see if it reconnected. If not, you need to determine why not, which is not always easy. Most client applications that stop working after a failover do so because of no reconnect logic for. For example, they reconnect if you exit and restart the client application.
3. When the resource group has been successfully moved from the active node to a passive node, use the same procedure to move the group back to the original node; and as before, check the Failover Cluster Management tool, the client applications, and the event logs to see if there were any problems. If you noticed any Windows Failover Cluster or SQL Server problems because of the failover test, you need to resolve them before proceeding. If you have a client applications problem, you can continue with your testing and try to resolve it later. In most cases, if a client application fails this first test, it will fail all the other tests.
Manually Failing Over Nodes by Turning Them Off
To validate that the failover from node to node is taking place and that each node can take over the SQL Server, you can perform a failover test by manually turning nodes off.
1. Turn off the active node. When this happens, watch the failover in the Failover Cluster Management tool and the client applications. As before, check for any problems.
2. Next, turn on the node and wait until it boots back up successfully. Then turn off the now current active node. Again, watch the failover in the Failover Cluster Management tool and the client applications, and check for problems.
3. Turn the node back on when done.
Manually Failing Over Nodes by Disconnecting the Public Network Connections
You can also manually failover nodes by turning off public network connections.
1. Unplug the public network connection from the active node. This causes a failover to a passive node, which you can watch in the Failover Cluster Management tool and the client applications. Check for any problems.
2. Now plug the public network connection back into the server and unplug the public network connection from the now active node. This causes a failover to the current passive node, which you can watch in the Failover Cluster Management tool. Watch the failover in the Failover Cluster Management tool and the client applications, and check for problems.
3. When the testing is complete, plug the network connection back into the node.
Manually Failing Over Nodes by Breaking the Shared Array Connection
You can perform a third manual failover test by breaking a shared array connection.
1. From the active node, remove the shared disk array connection. This can cause a failover that you can watch in the Failover Cluster Management tool and client applications. Check for any problems.
2. Next, reconnect the connection from the now active node, and remove the shared disk array connection. Watch the failover in the Failover Cluster Management tool and the client applications, and check for problems.
3. When done, reconnect the connection. If you run into problems in any of these tests, resolve them before continuing.
MANAGING AND MONITORING THE CLUSTER
After you have your clustered SQL Server up, running, and tested, you are ready to deploy it into production. This may involve creating new databases, moving databases from older servers to this one, setting up SQL jobs, and so on. In most cases, managing SQL Server on a cluster is the same as managing it as a standalone SQL Server instance. The key thing to keep in mind is that whenever you access your cluster with any of your SQL Server 2012 administrative tools, such as Management Studio, you access it using its SQL cluster network name and IP address; but if you use any of the operating system tools, such as System Monitor, you need to use the SQL cluster network or IP address of the node to monitor (which is usually the active node).
In most cases, as a DBA, you probably will administer SQL Server 2012 using Management Studio, but sometimes you need to access the individual nodes of the cluster. If you have easy access to the cluster, you can always log on locally; if you prefer remote administration, you can use Remote Desktop (Terminal Services) to access the individual nodes.
When DBAs begin to administer their first Windows Failover cluster, they get a little confused as to where SQL Server actually runs. Keep in mind that a clustered SQL Server instance consists of an active node which is running a SQL Server and the passive node which is not running a SQL Server. At any one time, a SQL Server instance runs on the active node only, so when you need to look at the nodes directly, generally you want to look at the active node. If you don’t know which node is currently active, you can find out by using the Failover Cluster Management tool.
When you log into the active node (or connect to it remotely using Remote Desktop) and then bring up Windows Explorer (a routine task), you can access the SQL Server shared data disks; but if you log on to the passive node, you cannot access the SQL Server shared data disks. This is because drives can be accessed from only a single SQL Server node at a time.
If you access your cluster through Remote Desktop (Terminal Services), be aware of a couple of odd behaviors. For example, if you use Remote Desktop to connect to the cluster using the SQL cluster network name or IP address, you will connect to the active node, just as if you used Remote Desktop to connect to the active node directly (using its network name and IP address); but if a failover should occur and you use Remote Desktop to access the cluster using the SQL cluster network name and IP address, Remote Desktop gets a little confused, especially if you use Windows Explorer. For example, you may discover that your data drives no longer appear to be accessible, even though they actually are. To resolve this problem, you may need to log out of Remote Desktop and reconnect after the failover.
TROUBLESHOOTING CLUSTER PROBLEMS
Troubleshooting cluster-related issues require a lot of fortitude, persistence, and experience, and a support contract with Microsoft Technical Support. The problem is that clustering is somewhat complex and requires that you know hardware, shared disk array, hardware drivers, operating systems, clustering services, and SQL Server. Any problem you have could be caused by any one of them, and identifying the exact cause of a problem is often difficult.
Another reason cluster troubleshooting is difficult is that the feedback you get, in the form of messages or logs, is not easy to understand, assuming you get any feedback at all. And when you do get feedback, the resources for identifying and remedying problems are minimal.
Because of all this, if you have a Windows Failover Cluster, you should plan to purchase Microsoft Technical Support. This is a good investment, and one that will pay for itself. The authors have used Microsoft Technical Support many times, and in most cases it assisted adequately. You don’t need to automatically call support as soon as you have a problem; always try to identify and resolve problems on your own if you can. But at some point, especially if your cluster is down and you need assistance getting it back up, you need to recognize when you can’t resolve the problem by yourself and when you need outside help.
The next section includes some general advice to get you started when you need to identify and resolve cluster-related problems.
How to Approach Windows Failover Clustering Troubleshooting
The discussion about how to install clustering in this chapter emphasized the importance of testing each task after it is performed and only proceeding to the next step if everything works. This methodical approach helps you more easily identify causes the problem as soon as possible after it happens. For example, if things work correctly but you perform a task and the test fails, you can fairly assume that what you just did is directly or indirectly responsible for the problem, making problem identification easier. If you don’t perform regular testing and don’t notice a problem until after many tasks have been performed, identifying the cause of a problem or problems is much more difficult. Therefore, the best way to troubleshoot problems is to perform incremental testing. This also makes it much easier if you have a detailed installation plan that you can follow, helping to ensure that you perform all the necessary steps (including testing at appropriate places).
Doing It Right the First Time
You can save a lot of troubleshooting problems by preventing them. Here’s how:
- Be sure that all the hardware for the physical nodes and shared disk array passes the Cluster Validation.
- Ensure that you use the latest hardware and software drivers and service packs.
- Create a detailed installation plan that you can use as your guide for the installation and for disaster recovery should the need arise.
- Learn as much as you can about Windows Failover Cluster before you begin your installation. Many cluster problems are user-created because the people responsible guessed instead of knowing for sure what they needed to do.
- Develop a Windows Failover Cluster runbook identifying the state, configuration, and instructions on running each cluster to establish a consistent and stable system.
Gathering Information
To help identify the cause of a problem, you often need a lot of information. Unfortunately, the information you need may not exist, or it may be scattered about in many different locations, or it may be downright misleading. In any event, to troubleshoot problems, you need to find as much information as you can. To try to combat these issues, use the following guidelines and resources when gathering information to troubleshoot a cluster problem:
- Know what is supposed to happen. If you expect a specific result, and you are not getting it, be sure that you fully understand what is supposed to happen, and exactly what is happening. In other words, know the difference between the two.
- Know what happened directly before the problem occurred. This is much easier if you test incrementally, as described earlier.
- Know whether the problem is repeatable. Not all problems can be easily repeated, but if they can, the repetition can provide useful information.
- Take note of any onscreen error messages. Be sure that you take screen captures of any messages for reference. Some DBAs have the habit of clicking OK after an error message without recording its exact content. Often, the exact content of a message is helpful if you need to search the Internet to learn more about it.
- View logs. There are a variety of logs you can view, depending on how far along you are in the cluster setup process. These include the three operating system logs: the cluster log (located at c:windowsclustercluster.log); the SQL Server 2012 Setup log files (located at %ProgramFiles%Microsoft SQL Server110Setup BootstrapLOGSummary.txt); and the SQL Server 2012 log files. There can be a variety of error messages in the log; once you identify the error, you can perform a web search to see if anyone else has had this error and if there are any suggestions around on how to resolve.
- Perform an Internet search for the error message. If the error messages you identify aren’t obvious (are they ever?), search on the Internet, including newsgroups.
The more information you can gather about a problem, the better position you are to resolve the problem.
Resolving Problems
Many cluster problems are due to the complexity of the software involved, and it is sometimes faster to just rebuild the cluster from scratch, including the operating system. This is especially true if you have tried to install Windows Failover Cluster or clustered SQL Server and the setup process aborted during setup and did not setup itself cleanly.
When you build a new Windows Failover cluster, rebuilding it to resolve problems is usually an option because time is not an issue. However, suppose you have a clustered SQL Server in production and it fails where neither node works. Since time now becomes an issue, you should bring in Microsoft.
Working with Microsoft
Operating a clustered SQL Server without having a Microsoft Technical Support contract is like operating a car without insurance. You can do it, but if you have any unexpected problems, you will be sorry you went without.
Generally, there are two main reasons to call Microsoft Technical Support for clustering issues. The first situation would be when it’s a noncritical issue that you just can’t figure out for yourself. In this case, you will be assigned an engineer, and over a period of several days, you work with that engineer to resolve that problem. This may involve running diagnostics to gather information about your cluster so the Microsoft support engineer can diagnose it.
The second reason to call is because your production cluster is down, and there are no obvious solutions that you know of to get it quickly back up. Generally, in this case, call Microsoft Technical Support as soon as you can to get the problem ticket started. In addition, you should emphasize to the technical call screener (the first person who answers the phone) and the support engineer you is assigned to that you are facing a production down situation and that you want to declare a critical situation (critsit). This tells Microsoft that your problem is top priority, and you will get special attention. When you declare a critsit, the person on the phone will validate that it is a critsit because it causes a chain of events to happen within Microsoft Technical Support; but if your production cluster is down, you need to emphasize the serious nature of your problem. If it is, you can get immediate help with your problem until your Windows Failover Cluster is resolved.
This chapter represents only the tip of the iceberg when it comes to covering everything the DBA should know about clustering SQL Server 2012. It is important to understand the basics around installing, configuring, testing monitoring, troubleshooting and maintaining a Windows 2008 Failover Cluster running SQL Server 2012. To successfully install a Windows Failover Cluster, start with identifying the hardware and verify that it meets the cluster prerequisites. Follow step-by-step to configure the hardware to be clustered. All of these steps must be configured as described; any variation will likely prevent the cluster to install successfully. You should run the Cluster Validation to verify that the cluster configuration can be clustered; if any errors are identified, address them before proceeding. Then, you may go ahead and create the cluster. Determine the need for MSDTC(s) and install them. Using the SQL Server 2012 setup, install the SQL Server instance on the cluster. You can have more than one SQL Server instance on a node, or have many nodes each running SQL Server instances supported by a passive node or even without a passive node. Run the SQL Server 2012 setup to install additional SQL Server cluster instances. Clustering can be combined to offer high availability and disaster recovery by deploying a geographically dispersed cluster where a cluster is established with nodes that live across two data centers which may even be on different subnets. There are different Windows Failover Cluster deployed configurations possible that you can learn more about by reading clustering articles, the SQL Server 2012 Books Online, and any additional information from the Microsoft’s website and elsewhere on the Internet.