Chapter 15
Replication
WHAT’S IN THIS CHAPTER
- The Different Types of Replication
- Replication Models
- Setting up Snapshot Replication
- Setting up the Distributor
- How Snapshot Differs from Transactional, and Merge Replication
- Peer to Peer Replication
- How to Monitor Replication
Today’s enterprise needs to distribute its data across many departments and geographically dispersed offices. SQL Server replication provides ways to distribute data and database objects among its SQL Server databases, databases from other vendors such as Oracle, mobile devices such as Windows Phone 7, and point-of-sale terminals. Along with log shipping, database mirroring, and clustering, replication provides functionalities that satisfy customers’ needs for load balancing, high availability, and scaling.
This chapter introduces you to the concept of replication, explaining how to implement basic snapshot replication, and noting things to pay attention to when setting up transactional and merge replication.
SQL Server replication closely resembles the magazine publishing process, so we use that analogy to explain its overall architecture. Consider a popular magazine. The starting point is the large pool of journalists writing articles. From all the available articles, the editor picks which ones to include in the current month’s magazine. The selected set of articles is then published in a publication. After a monthly publication is printed, it is shipped out via various distribution channels to subscribers all over the world.
SQL Server replication uses similar terminology. The pool from which a publication is formed can be considered a database. Each piece selected for publication is an article; it can be a table, a stored procedure, or another database object. Like a magazine publisher, replication also needs a distributor to deliver publications, keep track of delivery status, and track a history of synchronization to maintain data consistency. Depending on the kind of replication model you choose, articles from a publication can either be stored as files in a folder to which both publisher and subscriber(s) have access, or as records in tables in a distribution database synchronously or asynchronously. Regardless of how publications are delivered, replication always needs a distributor database to keep track of delivery status. Depending on the capacity of the publication server, the distributor database can be located on the Publisher, the Subscriber, or on another server that might be dedicated purely to serving as the distribution database.
Conceptually, however, there are differences between SQL Server replication and a magazine publishing company, the biggest being the contributor-like role the subscriber can sometimes take on. For example, in some replication models, a subscriber or subscribers can update articles and have them propagated back to the publisher or other subscribers. In the peer-to-peer replication model, each participant of replication acts both as publisher and subscriber so that changes made in different databases replicate back and forth between multiple servers.
Replication Components
Now that you have an idea of how replication works in comparison to magazine publishing, it is time to examine what these terms and functions mean in direct relation to the SQL Server. SQL Server replication is comprised of several key components which are grouped into the following areas: replication roles, replication data, replication agents, and replication internal components.
Replication Roles
Following are three key roles in replication:
- Publisher: The publisher is the server, or database instance, that is the source, or master, for the articles being published.
- Distributor: The distributor is the intermediary in the act of publishing and subscribing, and in some types of replication is the medium whereby the data gets from the publisher to the subscriber. The distributor stores the data to be replicated from the Publisher, and also stores the location of snapshots. The distributor is a database that can live on the publishing server, its own dedicated server, or the subscriber.
- Subscriber: The subscriber is the server, or database instance, that is the destination, for the articles being published. In some replication models the subscriber can also be a publisher. The subscriber can republish articles when they need to be sent onto another subscriber in the Updating Subscriber model. The subscriber can also republish articles in a peer-to-peer model (explained in the “Replication Types” section).
Subscriptions can be setup as either Push or Pull subscriptions. The difference is where the agent executes. For a Push subscription, the agent executes on the Publisher, and so when it executes, it pushes changes down to the Subscriber. For a Pull subscription, the agent runs on the publisher, and pulls changes down from the Publisher.
Replication Data
There are three key components to replication data: articles, publications, and subscriptions:
- Article: An article is the smallest set of data that can be configured for replication. It can consist of a table, a view, or a stored procedure and can have additional restrictions on the rows and columns included in each article.
- Publication: A publication is a grouping of articles published together. Using a publication enables the replication of logically grouped articles to be managed together, rather than having to manage each article individually.
- Subscription: A subscription is a request to receive data from one or more publications. It can add additional constraints to the publication regarding how and when the data is distributed.
Replication Agents
Replication Agents are executable programs that perform much of the work of replication. They are commonly executed through SQL Server Agent jobs, but can also be run manually. A number of SQL Agent jobs are created by replication:
- Snapshot Agent: The Snapshot agent is a SQL Agent job that takes and applies a snapshot for the three types of replication: transactional, merge or snapshot replication. These types are explained in greater detail in the “Replication Types” section. For transactional and merge replication, the snapshot is only needed when replication is being setup, or when an article is added, or changed significantly. For snapshot replication, the snapshot agent is run on every synchronization.
- Log Reader Agent: The Log Reader agent is a SQL Agent job that reads the transaction log on the publisher and records the transactions for each article being published into the distribution database.
- Distribution Agent: The Distribution agent is a SQL Agent job that reads the transactions written to the distribution database and applies them to the subscribing databases.
- Merge Agent: The Merge agent is a SQL Agent job that moves changes at the publisher to the subscriber, moves changes from the subscriber to the publisher, and initiates the conflict resolution process if necessary.
- Queue Reader Agent: The Queue Reader Agent is used to read messages stored in a SQL Server queue, or a Microsoft Message Queue. It then applies those messages to the Publisher. The Queue Reader Agent is used in either snapshot or transactional replication publications, which allow queued updating (see the section on “Replication Types” for details on snapshot and transactional replication).
Replication Maintenance Jobs
Replication uses a number of additional SQL Agent Jobs to perform maintenance.
- Agent History Cleanup: This job removes replication agent history that is stored in the distribution database. This job is scheduled to run every ten minutes.
- Distribution Cleanup: This job removes transactions from the distribution database after they are no longer needed. This job is scheduled to run every ten minutes.
- Expired Subscription Cleanup: This job determines when a snapshot has expired, and will remove it. This job is scheduled to run once a day at 1 A.M.
- Reinitialize Failed Subscriptions: This job looks for subscriptions that have failed, and marks them for re-initialization. This job is not enabled by default, so it can either be run manually when required, or you can create a custom schedule to suite your needs.
- Replication Agent Monitor: This job monitors the execution of the SQL Agents and writes to the Windows event log when a job step fails. This job is scheduled to run every 10 minutes.
Replication Types
SQL Server 2012 provides three types of replication. The three types are as follows:
- Snapshot replication
- Transactional replication
- Merge replication
Peer-to-Peer replication and Oracle Publishing replication are variations of the three types of replication previously listed and are also discussed in this section.
Snapshot Replication
As its name implies, snapshot replication takes a snapshot of a publication and makes it available to subscribers. When the snapshot is applied on the subscribing database, the articles at the subscriber, such as tables, views, and stored procedures, are dropped and re-created. Snapshot replication is a one-shot deal; there is no continuous stream of data from the publisher to the subscriber. The data at the publisher at the time the snapshot is taken is applied to the subscriber.
Snapshot replication is best suited for fairly static data, at times when it is acceptable to have copies of data that are out of date between replication intervals, or when article size is small. For example, suppose you have to look up tables that maintain ZIP codes. Those tables can be good snapshot replication candidates in most cases because they are typically static.
During the period when a snapshot refresh is being applied, the article is unavailable for use.
Transactional Replication
Transactional replication replicates changes to an article as they occur. To set up transactional replication, a snapshot of the publication is taken and applied to the subscriber once to create the same set of data. After the snapshot is taken, the Log Reader agent reads all the transactions that occur against the articles being published and records them in the distribution database. The transactions are then applied to each subscriber according to the subscription’s configuration.
Transactional replication enables faster data synchronization with less latency. Depending on how it is set up, this data synchronization can occur in nearly real time, so it is useful for cases in which you want incremental changes to quickly happen on the subscriber.
Merge Replication
Merge replication is usually used whenever there is a slow, or intermittent network connection between the publisher and subscriber. It enables sites to work fairly autonomously and synchronize the changes to the data when they are next online. It needs a snapshot to initialize the replication, after which subsequent changes are tracked with triggers.
One side effect of merge replication is the possibility of conflicts when offline changes are synchronized in. Merge replication automatically resolves these issues though in the Merge agent using the conflict resolver model chosen when the publication was created. If you don’t want to use automatic conflict resolution, you can configure the publication for interactive conflict resolution. When the publication is configured for interactive conflict resolution, each conflict must be manually resolved. You can do this using the Interactive Resolver user interface.
Other “Types” of Replication
The following two options are often considered additional types of replication, but they are not actually separate replication types. Instead, these are just variations of the ones listed previously:
- Peer-to-peer replication: Peer-to-peer replication is a subtype of transactional replication. In peer-to-peer replication, each publisher owns a subset of the total set of rows in an article. Each Peer publishes its own rows, to which each of its peers subscribes, and it subscribes to the other rows from each of its peers. More details about peer-to-peer transactional replication appear later in this chapter.
- Oracle Publishing: SQL Server 2000 enabled the capability to subscribe to data published from an Oracle database. Using Oracle Publishing, you can subscribe using either snapshot or transactional replication, but not merge replication.
This chapter does not cover programming replication using Replication Management Objects (RMO). RMO is a managed code-programming model for SQL Server replication. All of the steps and processes discussed in the chapter can be programmed using RMO. For more information on RMO see the sample applications and code samples from Books Online.
Replication Enhancements in SQL Server 2012
There are only two new additions to SQL Server 2012 from SQL Server 2008 R2 pertaining to Replication, and they are the following:
- Peer-to-peer transactional replication is now shown as a new replication type in the wizard page to create a new publication. This is a change from SQL 2008, in which peer-to-peer replication was created first as a transactional replication type and then switched to a property of the publication.
- Replication Monitor has a new view to monitor a distributor. This new view can be helpful when monitoring a distributor that serves multiple publishers.
Replication can be set up in quite a few different ways. This section covers some of the most common replication topologies. These are the basic building blocks, and from these, considerably more complex topologies can be constructed.
Single Publisher, One or More Subscribers
A Single Publisher Model is perhaps the simplest topology to use with a single publishing database that has one or more subscription databases. This topology might be used where you need to keep a hot standby system or distribute data from a central office to multiple field offices. Figure 15-1 shows the basic structure of this topology with the distributor on the publishing server.
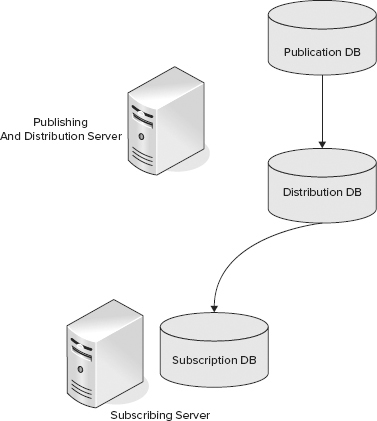
Figure 15-2 shows a more advanced option with a separate server for the distribution database. Use this option when you need more performance at the distributor than you can get from a single server acting as the publisher and distributor.
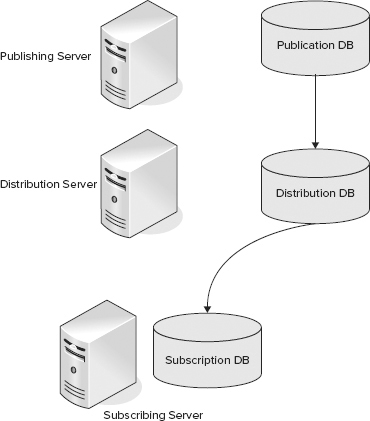
Figure 15-3 shows the next variant of the single Publisher model, with multiple subscription databases.

Multiple Publishers, Single Subscriber
A Point of Service (POS) application is a good example of a Multiple Publisher model. A POS application has multiple publishers but only one subscriber. In a POS, it is often necessary to send data from the many POS terminals in a store to a central system either in the store or at the head office where the individual transactions can be consolidated. The replication topology to use for this is a multiple publisher, single subscriber model. Figure 15-4 shows this topology.

Multiple Publishers Also Subscribing
A Customer Resource Management (CRM) application is a good example of the Multiple Publishers also Subscribing model. In the CRM application it might be necessary to have an address book that contains all contacts that is updated locally, yet is synchronized across all sites. One way to do this is to have each branch office publish the updates made at that office, and also subscribe to the updates made by all other branch offices. Figure 15-5 shows how to achieve this.

Updating Subscriber
The CRM application can also be implemented when using an Updating Subscriber model. In this topology, the master copy of the contacts is held at a central location. This would be published to all branch offices. Any changes at the branch offices are then updated back to the publisher using the Updating Subscriber feature built into replication. Figure 15-6 shows the updating subscriber topology.

Peer-to-peer
Finally, a Peer-to-peer topology is also exemplified by implementing the CRM application. The Peer-to-peer model doesn’t have the concept of a master copy of the data; instead, each instance owns its own set of rows and receives any updates made at the other instances. Figure 15-7 shows a peer-to-peer topology.

Now that you’ve learned the terminology, types, and models, it is time to implement replication. To start with, this section provides an exercise to set up snapshot replication. Transactional and merge replication are similar, but they each have a few differences that are reviewed after the snapshot replication setup discussion.
It’s always worth reminding yourself that after a fresh install of SQL Server, all the external protocols are disabled. To talk to a remote SQL Server, you have to run the SQL Server Configuration Manager, enable one of the external protocols, either Named Pipes, or TCP-IP, and then remember to restart the SQL Service.
Setting Up Snapshot Replication
To keep things simple, you only create two new databases in this replication example: a new database called Publisher that is the publisher, and a new database called Subscriber that is the subscriber. For the purposes of this example, you create a sales schema, and in that schema create a single table, Cars. You then insert a small set of rows into that table. The scenario is based on a car company that sells fuel-efficient hybrid cars in the United States, China, and Sweden. You set up snapshot replication between database servers in the United States and China to refresh data. Furthermore, you can set up transactional replication between database servers in the United States and Sweden. The data can also be used to set up merge replication.
Replication can be implemented through both GUI wizard pages and scripting. If you are new to replication, we recommend that you first go through the GUI and property pages through SQL Server Management Studio. As you work through the GUI, you are able to generate SQL scripts at the end of processes, which you can save to a file and edit for other deployments.
You must implement a distributor before you can create publications and subscribe to publications, so first create the distributor which you need for all types of replications.
Setting Up Distribution
As mentioned earlier, a distributor consists of a distribution database (where replication history, status, and other important information are stored) and a shared folder (where data and articles can be stored, retrieved, and refreshed).
To begin setting up distribution, you need to find out the domain name and account that will be used during the process to run various replication agents, such as the Snapshot agent, Log Reader agent, and Queue Reader agent. For the purpose of this example right now, you can just choose to impersonate the SQL Server Agent account, but when you put things into production, a dedicated domain account is recommended for security reasons.
Following is a step-by-step process of how to set up distribution:
1. Using SQL Server Management Studio, connect to the distributor server. Expand the server in Object Explorer.
2. Right-click Replication and select Configure Distribution.
If you use a fresh default install of SQL Server 2012, by default the Agent XPs are disabled. This prevents you from starting the SQL Agent Service. If SQL Agent is not running, you see an error when you try to complete Step 2. To prevent this error, enable the Agent XPs using the following script, and then start the SQL Agent service, either from SSMS, or SQL Server Configuration Manager.
sp_configure 'show advanced options', 1;
GO
RECONFIGURE;
GO
sp_configure 'Agent XPs', 1;
GO
RECONFIGURE
GO
After executing this script the SQL Server Agent node in SSMS will no longer have the “Agent XPs disabled” tag appended.
3. At the Welcome screen, click Next. You see the Distributor screen, where you pick which server to use as the distributor. This example uses the current machine. For a more complex topology, you can choose a separate server.
4. Click Next. The SQL Server Agent Start page appears. This enables you to configure the SQL Server Agent to start automatically or manually. Select the option to start the agent automatically.
5. Click Next. The Snapshot Folder screen appears. Here you can enter the snapshot folder. If you want to use a pull subscription, the path entered here should be a network path. This example sets up a local replication topology, so a network path is not necessary.
6. After you pick the snapshot folder, move to the Distribution Database screen shown in Figure 15-8, where you configure the name of the distribution database (distribution, in this example), and the folder locations for the database and log files. Click Next to continue.

7. Next you see the Publishers screen, shown in Figure 15-9, where you set the list of servers that can use this distribution database.

8. Next, define what the wizard should do from the Wizard Actions screen, shown in Figure 15-10. Choose to either configure the distribution database or create scripts. If you want to create scripts, select both options.

9. The next page of the wizard displays a list of actions the SQL Server can perform. Confirm that the list of actions is what you expect and select Finish. If it’s not correct, go back and fix the incorrect settings. You then see a screen indicating the progress the wizard has made at executing the actions you selected.
10. Figure 15-11 shows the wizard actions completed successfully. If any errors are reported, investigate and resolve each one before attempting to rerun the wizard.

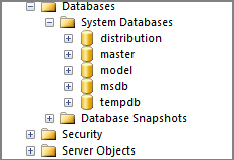
After executing the wizard you can browse to the new distribution database using the Server Explorer in Management Studio. The new distribution database appears under System Databases, as shown in Figure 15-12. Additionally, you can expand the SQL Server Agent in Object Explorer, and open the Jobs folder; you see that a number of new jobs were created for the replication, as shown in Figure 15-13.

Implementing Snapshot Replication
Now that you’ve set up the distributor, you can use that for the replication exercise later in this chapter. Before you set up snapshot replication though, you need to create the databases to use as the Publisher and Subscriber.
![]() In this example, you create these databases on a single server. You can find a script to create these databases in the code samples, 01 Create Databases.sql, or you can create them manually using Management Studio. To create them manually, follow these steps:
In this example, you create these databases on a single server. You can find a script to create these databases in the code samples, 01 Create Databases.sql, or you can create them manually using Management Studio. To create them manually, follow these steps:
1. Right-click on the Databases Node and select the New Database option.
2. Make sure the publication database is called Publisher, and the subscription database is called Subscriber. All other settings can be left at default for now.
3. After creating the Publisher, you also need to create some tables, and load some data. To do this, download and run the script in the samples called 02 Create and load sales.sql.
After you complete these initial steps, you can move onto the steps involved in setting up Snapshot Publication which is covered in the next section.
Setting Up Snapshot Publication
The best way to set up Snapshot Publication is to use Management Studio and elect to have everything scripted at the end of the process:
1. Within Management Studio, while connected to the server where the publication database resides, expand the Replication folder. Right-click Local Publications and select New Publication.
2. You see the Publication Wizard welcome screen; click Next. On the Publication Database screen, pick a database for publication. Select Publisher as your database to create a publication, and click Next.
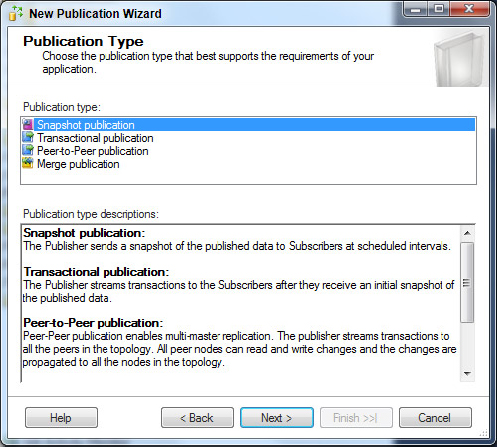
3. Figure 15-14 shows the Publication Type screen where you select the type of replication. In this case, select Snapshot Publication and click Next to continue.
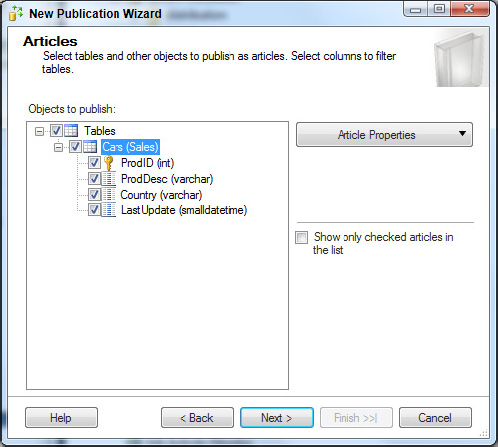
4. Next is the Articles screen where you select the tables in this article. By default, nothing is selected, so you have to expand the Tables node and pick the tables you want to publish. Once you expand, select the Cars table you created earlier for publication and its children, as shown in Figure 15-15. You can see that the Cars table under the sales schema is selected. In other scenarios if necessary, you can pick and choose columns of the table for publication by unchecking the box next to the column name.
You can also set properties of articles that you choose to publish. These properties affect how the article is published and some behaviors when it is synchronized with the subscriber. Don’t change the default properties here; however, they can be useful in other situations. Click Next to continue.
5. On the Filter Table Rows page, the wizard gives you an option to filter out rows. Click the Add button to display the Add Filter page.
6. As mentioned earlier, because you want to replicate data to the Chinese market, you need to filter the cars by country. To do this add a WHERE clause to the filter statement to match the following SQL text as shown in Figure 15-16.

SELECT <published_columns>
FROM [Sales].[Cars]
WHERE [Country] = 'China'
After you click OK, the filter is applied. This returns you to the previous screen, which now has a filter defined, as shown in Figure 15-17.

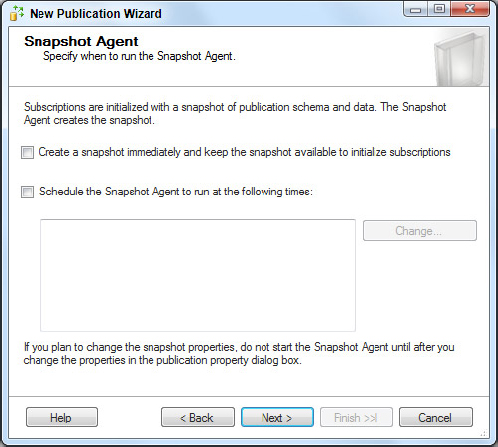
7. Figure 15-18 shows the Snapshot Agent screen, where you define how the snapshot should be created, and when it should be scheduled to run. In this case, don’t schedule it or create one immediately; instead, in the example, you will invoke it manually by running a SQL Server Agent job yourself. Click Next to continue.
8. The next screen is the Snapshot Agent Security screen, where you can specify the accounts used to run the snapshot agent job and to connect to the Publisher. As mentioned earlier, different replication models call for different agents to be run. Click the Security Settings button to configure the accounts needed for your replication model.
It is convenient to have a dedicated domain account with a secure password that doesn’t need to be changed often for this purpose. However, if you don’t have that access, you can choose to impersonate the SQL Server Agent account, as mentioned previously. Even though you will do so for this exercise, it is a best practice to always use a dedicated account. Enter the account details on the Snapshot Agent Security screen, shown in Figure 15-19. After the account is set, click OK.

9. Figure 15-20 shows the Wizard Actions screen, where you can specify whether you want the wizard to create the publication or script the creation. For now leave these settings on the default, and just create the publication.

10. The next screen is the wizard action confirmation screen. Here you can assign a name to this publication. Enter the name Pub_Cars_China in the Publication Name text box. Review the actions specified here, and if anything is incorrect go back and fix it. When everything is correct, click Finish.
11. The next screen (see Figure 15-21) confirms your actions, which in this case are to Create the Publication and then add the articles, (of which we have just one). The status should indicate success showing that you have now successfully created a new publication. If any errors are reported, investigate and resolve them before attempting to execute the actions again.

The rest of the process is quite similar to the distributor creation documented earlier. After you click Finish, the snapshot publication is created. Again, you can use Object Explorer to see the publication and SQL Server jobs created during this process.
At this point no files or folders have been created, and the snapshot has not been created because no one is subscribed to the snapshot. To get SQL Server to do anything further, you have to subscribe to the new publication. When there is a subscriber, SQL Server creates all the necessary files. You can find these in the shared folder defined when the distributor was set up earlier. The default location is C:Program FilesMicrosoft SQL ServerMSSQL11.MSSQLSERVERMSSQLReplData. If you specified a different location during setup, you can always retrieve the current location by expanding the Replication node in SQL Server management Studio Object Explorer, expanding Local Publications, and selecting the relevant publication. Right-click and select properties. On the Snapshot page (see Figure 15-22) you see a section titled Location of Snapshot Files that shows you the current location.

Setting Up a Subscription to the Snapshot Publication
Now that a snapshot publication is created, you can subscribe to it from a different server:
1. If you are not already connected to it, connect to the subscription server using SQL Server Management Studio, and expand the Replication node in Object Explorer. Right-click Local Subscription and select New Subscriptions (see Figure 15-23).

2. You see the welcome screen of the New Subscription Wizard. Click Next to choose the publication you want to subscribe to.
This example has the Publisher and Subscriber on the same server, so the page should already be populated with the available publications. In a real scenario in which the Publisher and Subscribers are on different servers, you need to find the Publishing server. Do this by selecting <Find SQL Server Publisher. . .> from the drop-down list (see Figure 15-24). You see the typical Connect to Server window that is common in SQL Server Management Studio. To connect to the server where you set up the snapshot publication earlier, select the Publishing server, and click Connect. You then see the Publication screen, as shown in Figure 15-25. Expand the database (Publisher) and select the publication you just created by the name you gave it: Pub_Cars_China. Click Next to continue.


3. The next screen is the Distribution Agent Location screen, shown in Figure 15-26. Here, select the location for the distribution agents to execute. This can be either at the distributor for a push subscription or at the subscriber for a pull subscription. Make your subscription a push subscription by selecting the first option, Run All Agents at the Distributor, and click Next.

4. The next screen is the Subscribers screen, (see Figure 15-27) where you can set the subscriber properties. Select the Server where the subscriber will be; in this case it is the current server. Then select the subscription database. If you want to add additional subscribers, you can do so on this page as well, by using the Add Subscriber button. Select Next to move to the next screen.

5. Figure 15-28 shows the Distribution Agent Security screen, where you see the familiar screen used for setting agent security settings. Click the ellipsis (. . .) to set up the security options. If you want to specify a different domain account for Distribution Agent Security, fill out account information here. For this example, select the options shown in Figure 15-29.


6. Specify the synchronization schedule. Because this is just your first test example, make it simple and set it to run on demand. Click the drop-down and select Run on Demand Only. As shown in Figure 15-30. Click Next to continue.

7. Figure 15-31 shows the Initialize Subscriptions screen where you specify when the snapshot is initialized. Check the box to select initialization; and in the drop-down, choose to initialize immediately.

8. Next is the Wizard Actions screen shown earlier (refer to Figure 15-21), where you can choose to create the subscription and script the creation. Make your selection and click Next to continue.
9. From the confirmation screen that appears, confirm that the actions are as you expect. If not, then go back and fix anything before executing the wizard actions you selected. When you are satisfied, click Finish.
10. The next screen shows the actions and their status. You should see three actions, with the last of these indicating a warning. Clicking the message for this action should reveal a message indicating the snapshot is not available. Although you marked the subscription to initialize immediately, it has to wait until you manually run the snapshot agent to create a snapshot that is available to be applied. You can see this in Figure 15-32. If this step shows any errors, investigate and resolve before attempting to rerun the wizard.

Verifying Snapshot Replication
So far, the setup is simple, but how do you know it actually works? Following are some tests you can conduct to make sure it does indeed work properly:
1. Connect to the publication server and verify the records there using the following SQL code:
use publisher;
 select * from Sales.Cars;

ProdID      ProdDesc                            Country LastUpdate
----------- ----------------------------------- ------- -----------------------
1           ProEfficient Sedan                  US      2011-05-07 12:43:00
2           ProEfficient Van                    US      2011-05-07 12:43:00
3           JieNeng Crossover                   China   2011-05-07 12:43:00
4           Jieneng Utility                     China   2011-05-07 12:43:00
5           EuroEfficient Wagon                 Sweden  2011-05-07 12:43:00
6           EuroEfficient Pickup                Sweden  2011-05-07 12:43:00

(6 row(s) affected)
Code snippet 03 verify publisher.sql
2. Now connect to the subscription server using the following SQL code. You’ve already initialized the subscription, so you see only cars for the Chinese market.
use subscriber;
 select * from Sales.Cars;


 ProdID      ProdDesc                            Country LastUpdate
----------- ----------------------------------- ------- -----------------------
3           JieNeng Crossover                   China   2011-05-07 12:43:00
4           Jieneng Utility                     China   2011-05-07 12:43:00

(2 row(s) affected)
Code snippet 04 verify subscriber.sql
3. Now suppose you made some changes to cars for the Chinese market and upgraded JieNeng Crossover to JieNeng Crossover LE at the publication server. To make these changes, use the following code.
  use publisher;

update Sales.Cars set proddesc = 'JieNeng Crossover LE' where prodid = 3;
Code snippet 05 Update Publication.sql
4. You’ve updated records at the publisher, so you need to take a new snapshot by running the SQL Server Agent jobs. You can do this using either of the following methods:
- In Object Explorer, expand the SQL Server Agent Jobs folder, right-click the OFFICE-PC-Publisher-Pub_Cars_Chine-1 job, and select Start Job from the context menu.
- In Object Explorer right-click the replication node, and select Launch Replication Monitor. Using Replication Monitor is covered in the “Monitoring Replication” section later in this chapter. In the example, this should open up, and because you’re connected to the current server, it already knows about the local Publications, so under the My Publications Node, you see the local server, in this case called OFFICE-PC. Open that node and you see the publication you set up on the Publisher database called [Publisher]: Pub_Cars_China. Right-click and select Generate Snapshot. This creates the new snapshot but has not yet applied it to the subscriber.
5. Because you implemented a pull subscription, go to the subscriber and run the job to refresh this snapshot. Again, this can be done by either running the specified job or through the replication monitor.
- To run the specified job, open Object Explorer on the subscriber and expand the SQL Server Agent Jobs folder. Locate the job with a name of OFFICE-PC-Publisher-Pub_Cars_Chine-OFFICE-PC-1, right-click the job, and select Start Job from the context menu.
- In the Replication Monitor, select the node for your publication. In the right pane, select the Agent Tab. Right-click the line for the Snapshot Agent job, and select Start Agent.
6. Now ensure that the data is indeed refreshed by running the same SQL code from step 2:
use subscriber;

select * from Sales.Cars;


 ProdID      ProdDesc                            Country LastUpdate
----------- ----------------------------------- ------- -----------------------
3           JieNeng Crossover LE                China   2011-05-07 12:43:00
4           Jieneng Utility                     China   2011-05-07 12:43:00

 (2 rows affected)
Code snippet file 04 verify subscriber.sql
Implementing Transactional and Merge Replication
Procedurally, setting up transactional and merge replication is similar to the snapshot replication discussed earlier; refer back to that section for step-by-step instructions. This section notes the additions, exceptions, and a few other noteworthy highlights.
Transactional Replication
The typical transactional replication is not too different from snapshot replication, but with one major component added: the Log Reader agent. This agent tracks all changes made to the article so that it can be propagated to the subscriber. As a result, the load on the distribution database is higher than with snapshot replication, which means you need to keep a closer eye on it, especially the log file of the distribution database.
One variation of transactional replication you may encounter is having updateable subscriptions. If you implement a transactional publication with an updateable subscription, changes at the subscriber are applied back to the publisher. To enable this, SQL Server adds one additional column in tables included in the publication to track changes. This column is called MSrepl_tran_version and is a unique identifier column. Therefore, code such as the following fails because it does not have a column list.
insert into Sales.Cars values (9,'English Car','UK', getdate());
As a result, the application of that code needs to be updated. To fix that, the column list that corresponds to the values in parentheses must be provided right after the table name, as shown next.
insert into Sales.Cars (prodid, proddesc, country, lastupdate)
values (9,'English Car','UK', getdate());
For transactional replication with updatable subscription, a linked server is used among SQL Server publishing and subscribing databases. The linked server uses the MS Distributed Transaction Coordinator (MS DTC) to coordinate transactions; therefore, MS DTC on the publisher must be enabled to accept remote connections.
Merge Replication
For merge replication, all articles must have a unique identifier column with a unique index and the ROWGUIDCOL property. If they don’t have it, SQL Server adds one for you. Just like the transactional replication with an updateable subscription, an INSERT statement without the column list will fail.
Additional agents are used for transactional and merge replication, such as the Log Reader agent and Queue Reader agent. The agents require a domain account to run under. The domain account can be their own or shared with other agents. How you choose to implement that depends on your company’s security policy.
In peer-to-peer replication, every participant is both a publisher and a subscriber. It is suitable for cases in which user applications need to read or modify data at any of the databases participating in the setup. It provides an interesting alternative for load-balancing and high-availability scenarios. This feature is available only in the Enterprise Edition of SQL Server. Oracle calls this kind of replication multimaster, whereas DB2 calls it update anywhere.
Consider the following when evaluating and setting up peer-to-peer replication:
- It is designed for a small number of participating databases. A good rule-of-thumb number is less than 10. If you use more than that, you are likely to encounter performance issues.
- Peer-to-peer replication handles conflict resolution but in a different way from Merge replication. Starting with SQL Server 2008, peer-to-peer replication causes a critical error to occur when it detects a conflict. This critical error causes the Distribution Agent to fail. Because of this, you should design your application so that you do not have conflicts.
- Peer-to-peer does not support data filtering. That would defeat its purpose because everybody is an equal partner here for high availability and load balancing.
- Applications can scale out read operations across multiple databases, and databases are always online. Participating nodes can be added or removed for maintenance.
- As mentioned previously, peer-to-peer replication is available only in the Enterprise Edition; however, for your testing purposes, it is available in Developer Edition of SQL Server 2012.
Setting Up Peer-to-Peer Replication
From an implementation standpoint, the process to setup peer to-peer replication is similar to setting up snapshot, transactional, or merge replication. However, there are some differences, as you will see in the following sections as you walk through an example to set up peer-to-peer replication.
1. To start out, begin with one database, back it up, and restore it on all other participating databases. This way, you start from a clean and consistent slate.
2. All nodes in the topology need a distributor, so set one here. Although you can use a single distribution database for all publications, this is not recommended for a production system, but for the purpose of these examples it is fine. The examples here use a local distribution database, one on each Publishing server.
3. After the distributor is set, create a publication just like a regular transactional replication publication, except that there is now a new replication type to choose from: peer-to-peer publication. Choose this new option, as the Publication Type on the Publication Type page which was previously shown in Figure 15-14.
4. After selecting the replication type of Peer-to-Peer Publication, complete the new Publication wizard, which is similar to the steps used to create the snapshot publication previously.
5. After the new peer-to-peer Publication is created, you must create additional peer-to-peer publications to act as peers in the topology. This example has two separate servers, one with a peer-to-peer publication called NorthAmerica publication, the other with a peer-to-peer publication called Europe. You can use the same sample code from the previous snapshot replication example to create a single table to be replicated in each of these systems.
6. Proceed with the rest of the setup by right-clicking the publication and selecting Configure Peer-to-Peer Topology. The resulting dialog box is shown in Figure 15-33. This option is only available for a peer-to-peer publication. This feature is only available in SQL Server 2012 Enterprise Edition. Click Next to continue.

Configuring Peer-to-Peer Replication
After setting up peer to peer replication a welcome screen appears. From here you can begin configuring the peer-to-peer topology:
1. Select which peer-to-peer publication will configure the topology. For this example, choose to configure the topology from the local publication, which is NorthAmerica.
2. After choosing NorthAmerica, click Next, and you see the Configure Topology page, which presents you with a designer surface that looks like the screen shown in Figure 15-34. To add nodes to the topology, right-click the designer surface, and select Add a New Peer Node.

3. You now see the standard SQL Server Management Studio server connection dialog, where you can specify which server the peer is on. In this example everything is on the same server, so specify “.” as a reference to the local server.
4. Next you see the Add a New Peer Node dialog, as shown in Figure 15-35. Select the Europe database, as shown in the figure.

5. Select OK, and the node is added to the topology designer, as shown in Figure 15-36. It is hard to know which node is which from just looking at the display surface. Fortunately, extensive tips are available when you hover your mouse over each node.

6. The next step is to connect the nodes in the topology. To connect the two nodes, right click on either node on the designer and select either Connect to ALL displayed nodes, or Add a new peer connection. For this example, select Connect to ALL displayed nodes because you have only two nodes displayed. This adds a two-way arrow between the two nodes.
Since there are only two nodes in this particular example, you could have done this previously by selecting Connect to ALL displayed nodes (refer to Figure 15-35), but you can perform this step earlier (and should) only when you have only two nodes.
7. Select Next and the wizard moves onto the Log reader Agent Security page. Set the security information by clicking the ellipsis ( “. . .”) button, and choose Run under the SQL Server Agent service account option. Click Next and the Distribution Agent Security page appears.
8. On the Distribution Agent Security page, you need to provide security information for the distribution agents on all nodes in the topology. For this example, select the same options for both servers: Run Under the SQL Server Agent Service Account, and choose By Impersonating the Process Account for how you connect to the distributor and subscriber, as shown in Figure 15-37. Select Next to move onto the next page.

9. The next page in the wizard is the New Peer Initialization page, where you can specify how the new peer should be initialized. In this case, the DBs were created manually, and the same data was loaded into each database, so you can select the first option. Select Next to move onto the next page.
10. The Complete the Wizard page displays; here you see all the choices made in the wizard. If these all appear to be correct, then select Finish to start applying the actions selected in the wizard.
11. The final page in the wizard shows the actions as they are executed and reports any warnings or errors with the process. If there are any actions that report other than success, you need to investigate each and resolve the reported issue before attempting to rerun the topology wizard.
You have just completed the build out of a peer-to-peer topology. You can alter the topology at any time by re-running the Configure topology wizard and adding additional nodes, removing existing nodes, and changing connections.
For many the preferred interface for managing replication is the graphical interface provided in SQL Server Management Studio in the various replication wizards. However, DBAs want to create a script that can be checked into a source code control system such as Visual Source Safe or Visual Studio Team Foundation Server.
To script replication, you have two options. You can use either the various replication wizards, which provide a scripting option, or use SQL Server Management Studio and script individual objects.
You can save the scripts into your source code control system, where you can version-control them and use them to deploy a replication configuration to development, test, QA, preproduction, and production systems. See Chapter 9, “Change Management” for more information on using Visual Studio Team Server Database Edition (VSTS DB Pro) and Team Server Source Control (TSSC).
You can use three tools for monitoring replication: Replication Monitor, Performance Monitor, and the replication-related DMVs. This section discusses these three tools in detail.
Replication Monitor
Replication Monitor is built into SQL Server Management Studio. It shows the status of replication and can be used to make configuration changes. It can also show the current latency and the number of outstanding commands. It does not show the transaction or command rates; nor does it show any history of what happened at any time before the current snapshot of data was read.
You can invoke the Replication Monitor from Management Studio.
1. First, navigate to either the context menu of the top level replication node, or the context menu of any server listed under Publications or Subscriptions.
2. From here choose the Launch Replication Monitor option. Figure 15-38 shows the Replication Monitor after it has been started when running on a server with a local replication configuration. If you start Replication Monitor from a computer without a local replication configuration, you need to specify the servers with the replication topology to see any information.

Following are a few of the key options in the Replication Monitor that you can choose from once invoked:
- You can see the new SQL Server 2012 Distributor view by selecting the root node Replication Monitor. Doing this displays in the right pane the options to add a publisher or to Switch to Distributor View. Selecting this second option changes the display to present nodes based on their distributor. This example uses a local distributor, so this doesn’t change the display. In a more complex configuration with multiple replication streams using multiple distributors, this would change the ownership of publications and subscriptions to live under their parent distributor. To switch back, select the root node again, and select Switch to Publisher Group View.
- To look at subscription status (see Figure 15-39), double-click any entry of the All Subscriptions tab to bring up a window where you can easily view reports and the status of publication to distribution, distribution to subscription, and undistributed commands. It is a user-friendly tool that provides a good overview of all your replication status information.
- Tracer tokens are a way to measure the current performance of replication. The Tracer Tokens tab is shown in Figure 15-40. Think of a tracer token as a dummy record that the Replication Monitor uses to gauge the performance of your replication model. It can give you a good idea of latency between your publisher, distributor, and subscriber.


Performance Monitor
You can monitor several replication-related Performance Monitor objects and counters in SQL Server:
- SQLServer: Replication Agent: Has a single counter called Running that shows the number of replication agents running on the server
- SQL Server: Replication Log Reader: Shows the statistics for the Log Reader, with counters for Commands per second, Transactions per second, and Latency
- SQL Server: Replication Dist: Shows the statistics for the distributor with the same counters as for the Log Reader
- SQL Server: Replication Merge: Shows the statistics for the Merge agent, with counters for Conflicts per second, Downloaded changes per second, and Updates per second
- SQL Server: Replication Snapshot: Shows the statistics for the Snapshot agent, with counters for Delivered commands per second and Delivered transactions per second
When considering which performance counters to use, your replication type is the key factor to consider. For snapshot replication, look at the Replication Snapshot counters. For merge replication, look at the Replication Merge counters. For transactional replication, look at the Replication Log Reader and Replication Dist counters.
Here is some more information on the counters you should monitor for transactional replication:
- Object: SQL Server:Replication Log Reader - Counter: LogReader: Delivered Cmds/Sec and Tx/Sec: These two counters are repeated for each publication; they display the commands or transactions read per second and indicate how many commands or transactions are read by the Log Reader per second. If this counter increases, it indicates that the Tx rate at the publisher has increased.
- Object: SQL Server: Replication Dist. - Counter: Dist:Delivered Cmds/Sec and Tx/Sec: These two counters are repeated for each subscription and display the commands or transactions per second delivered to the subscriber. If this number is lower than the Log Reader delivered number, it is an indication that commands may be backing up on the distribution database. If it is higher than the Log Reader rate and there is already a backlog of commands, it might indicate that replication is catching up.
Replication DMVs
Following are four replication-related DMVs in every SQL Server database:
- sys.dm_repl_articles: Contains information about each article being published. It returns data from the database being published and returns one row for each object being published in each article. The syntax is as follows:
 select
* from sys.dm_repl_articles
- sys.dm_repl_schemas: Contains information about each table and column being published. It returns data from the database being published and returns one row for each column in each object being published. The syntax is as follows:
 select
* from sys.dm_repl_schemas
- sys.dm_repl_tranhash: Contains information about the hashing of transactions. The syntax is as follows:
 select
* from sys.dm_repl_tranhash
- sys.dm_repl_traninfo: Contains information about each transaction in a transactional replication. The syntax is as follows:
 select
* from sys.dm_repl_traninfo
These DMVs show information about what is being published from a specific database. They cannot help you monitor what’s going on with replication. For that, you have to either run the sp_replcounters system stored procedure (discussed in the next section) or go digging into the distribution database. It’s much easier to just execute the sp_replcounters stored procedure than dig into the inner workings of replication in the MSDB or distribution databases; although, it may not have all the information you want to monitor. If you do need more information, you will need to search the distribution database. This is currently undocumented territory, but a good place to start is the source code for the replication stored procedures. Use these to begin determining where the data you want is located, and take it from there.
sp_replcounters
The sp_replcounters replication system stored procedure returns information about the transaction rate, latency, and first and last log sequence number (LSN) for each publication on a server. Run it on the publishing server. Calling this stored procedure on a server that is acting as the distributor or subscribing to publications from another server does not return any data.
Table 15-1 is an example of the output of this stored procedure. The results have been split over two lines for clarity.
TABLE 15-1: Example Output From sp_replcounters

Replication is an important technology within SQL Server for moving data between servers. The various types of replication include snapshot, transactional, and merge — and the different topologies that can be used with replication include Single Publishers, Multiple Publishers, Updating Subscribers, and Peer to Peer. You can monitor replication using Replication Monitor, Performance Monitor, and relevant performance counters. Additionally, some of the replication DMVs and system stored procedures help to identify the root cause of issues when they occur.
Along with log shipping, database mirroring, and clustering, SQL Server 2012 provides many features to satisfy customers needs for load balancing, high availability, disaster recovery, and scaling.