
Chapter 15: Network Intrusion (Detection and Prevention) Systems
In this chapter, we will explore the Intrusion Detection System (IDS) and Intrusion Prevention System (IPS) concepts to understand their functionality. This will help us implement a good network perimeter defense using them. We will explore how OPNsense employs Suricata and combines it with Netmap to implement an outstanding IDS and IPS open source solution. By the end of this chapter, you will know how to use an IDS/IPS solution to monitor and block traffic using OPNsense.
In this chapter, we will cover the following topics:
- IDS and IPS definition
- Suricata and Netmap
- Rulesets
- Configuration
- SSL fingerprint
- Troubleshooting
Technical requirements
Good TCP/IP networking knowledge will be enough for you to understand the concepts in this chapter. To follow the configuration steps, you will need a working version of OPNsense with a host connected to it, along with an active internet connection.
IDS and IPS definition
The rise of different types of attacks on the internet has pushed firewall solutions to increase their defense mechanisms. A layer 4-only approach became inefficient against more sophisticated attacks, such as techniques that are used to exploit a known vulnerability, requiring a new approach to detect and block the latest threats. Let's look at a practical example.
Suppose that a layer 4-only firewall allows LAN to internet-only connections to well-known internet protocols such as DNS and HTTP, and connections that are used for email communication, such as POP3, SMTP (submission), and IMAP. So, to bypass the firewall, the attacker could install malware that uses the same ports as the HTTP protocol, such as 80 and 443, so that the malware can transmit data using an allowed port without any problem. Now, suppose that this kind of technique became a trend, and all attackers started bypassing firewalls in this way! Cybersecurity professionals would get in trouble, right? Not so fast – thanks to skilled security researchers, the IDS concept was created, and some excellent tools have risen since then. An IDS can detect attacks using allowed ports, alerting the security teams about possible harmful traffic.
The IDSs that are used in network borders such as firewalls are known as Network IDSs (NIDSs). There are host-based IDS (HIDS) tools that are installed on each host of the network, also known as endpoints.
Important Note
An outstanding HIDS open source project is Open Source HIDS SECurity (OSSEC): https://www.ossec.net/. This project was founded by Daniel B. Cid, who is a Brazilian tech entrepreneur – which I am proud to mention, by the way.
Now, let's look at the next level of protection! What if a NIDS could automatically block attacks based on signatures? It would be heaven for any security team! So, let's introduce the concept of IPSs. Most NIDSs have blocking capabilities, turning them into NIPSs or Network Intrusion Detection and Prevention Systems (NIDPSs). Let's dig a little deeper and explore how all this magic happens.
Suricata and Netmap
The OPNsense IDPS implementation is based on the Suricata project, a truly open source I(DP)S that's supported by the Open Information Security Foundation (OISF). Suricata is an excellent open source NIDS solution with superb support for signatures from companies such as Proofpoint, for example. On OPNsense, Suricata has Netmap support, which means fewer CPU resource requirements to detect threats, which results in good performance. The Netmap framework is driver-dependent, and it is essential to check whether the network device that's being used supports it before activating a feature that uses Netmap. In this chapter, we will do that while enabling IPS mode.
Note
We discussed how to implement Netmap in OPNsense in Chapter 2, Installing OPNsense. There, you can find the Netmap devices that are supported on FreeBSD.
The OPNsense project steps closer to the OISF, so you can always expect a better Suricata implementation on it. The Suricata and Netmap combination means good performance for I(DP)S inspection. One of the most challenging things to implement on a busy network is a NIPS because, with high traffic, packet inspection in real time is a CPU-consuming task. Without an exemplary implementation, like what OPNsense has, using a kernel-based version of Netmap and Suricata, sometimes even with powerful hardware, isn't enough to enable the IPS on larger networks.
Another significant advantage OPNsense has, compared to other NIPS open source projects, is that it only blocks the traffic that matches the NIPS signature. Some solutions block the source/destination IP for a while, which can cause a lot of issues in a false positive case.
Its support for Proofpoint signatures is another vast improvement that the OPNsense project achieved. Having better signature rulesets means fewer false positives and better accuracy while blocking threats.
Some of the key features of the Suricata project are as follows (extracted from the project's official website – https://suricata.io/features/all-features/):
- NIDS engine
- NIPS engine
- Network Security Monitoring (NSM) engine
- Offline analysis of PCAP files
- Traffic recording using a PCAP logger
- Unix socket mode for automated PCAP file processing
As you may have noticed, the OPNsense project is always pursuing state-of-the-art open source security. This is also true for I(DP)S features.
Next, let's check out the available signatures and rulesets.
Rulesets
The I(DP)S rulesets are a group of rules that you can enable to detect certain types of traffic – for example, a signature that's been designed to prevent attacks on web servers. In OPNsense, it is possible to enable different rulesets simultaneously. By default, the available rulesets are as follows:
- Abuse.ch: These are rulesets that are provided by the Abuse.ch project. They focus on blacklists based on an IP address's reputation.
- Proofpoint's Emerging Threat Open (ET Open): This is the community version of the Proofpoint ruleset. It's more limited than the ET Pro version.
- OPNsense Application Detection: This is OPNsense's project ruleset. It contains rules for controlling web applications such as YouTube, Netflix, Dropbox, and others.
Whatever ruleset you decide to use, you must download and install these rulesets before enabling them.
Some additional rulesets that are available as plugins are as follows:
- Proofpoint ET Pro: To use this plugin, you need a valid subscription. Compared to ET Open, it has more than double the amount of signatures, and it is updated more frequently.
- Proofpoint ET Pro Telemetry edition: This plugin is free and provides the same features as the Pro edition but requires you to register. It is free because, when installed, it shares events that have been logged by the I(DP)S with Proofpoint.
- IDS PT Research: The attack detection team ruleset is only available for non-commercial usage.
- IDS Snort VRT: This requires you to register/subscribe. It is a Talos ruleset that's been developed to the Snort IDS, but on OPNsense, we can use it by combining it with Suricata.
Before we configure an I(DP)S in OPNsense, we need to enable some rulesets. To do that, go to Services | Intrusion Detection | Administration and click the Download tab via the webGUI:
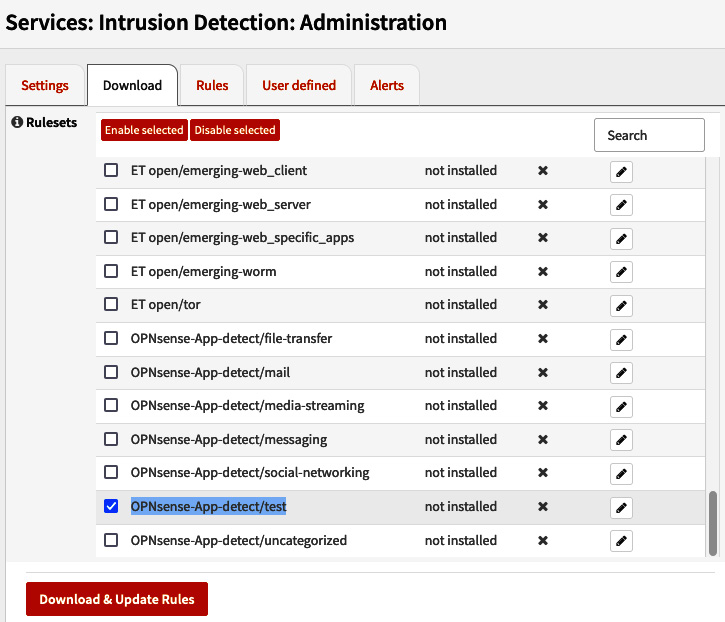
Figure 15.1 – The Services: Intrusion Detection: Administration page
Check the OPNsense-App-detect/test rule, click the Enable selected button, and click the Download & Update Rules button:
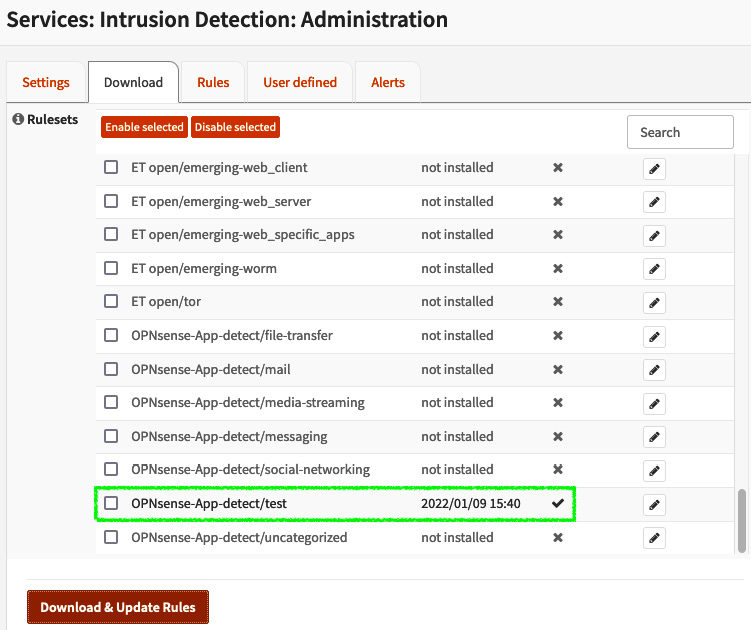
Figure 15.2 – Installing and enabling the OPNsense-App-detect/test ruleset
Once it has been installed, you may see the rule as it's shown in the preceding screenshot. Pay attention to the Last updated column. It must show a recent date. If you see not installed, this means that the ruleset hasn't been installed yet.
Now that we have at least one ruleset installed and enabled, let's learn how to configure an I(DP)S in OPNsense.
Configuration
To configure an I(DP)S, we need to go to Services | Intrusion Detection | Administration and go to the Settings tab. This can be seen in the following screenshot:
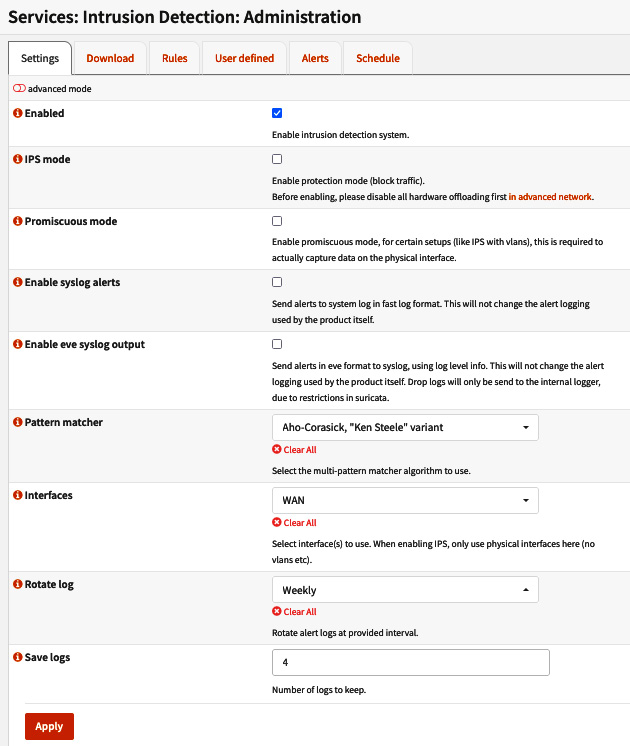
Figure 15.3 – IDS configuration page
Here, you will see the following options:
- Enabled: Check this option to enable the IDS service.
- IPS mode: Enabling this option will turn the IDS into an IPS service, blocking traffic instead of only alerting you about it. Disable the hardware offloading options for network interfaces by going to the Interfaces | Settings page to avoid network issues while using IPS mode. Check the Hardware CRC, Hardware TSO, and Hardware LRO options, and then ensure that Disable VLAN Hardware Filtering is also disabled.
Important Note
The Suricata daemon in IPS mode uses Netmap in OPNsense. It doesn't work well with hardware offloading, so keep it disabled while using IPS mode.
- Promiscuous mode: This mode allows all the traffic to be sent to the CPU to be inspected instead of all the traffic only being processed by the network controller. It is necessary to enable this option while using VLANs, for example.
- Enable syslog alerts: Check this option to send alerts to the system log, instead of only using Suricata's log.
- Enable eve syslog output: Check this option to send alerts using the EVE JSON format to the system log.
- Pattern matcher: Here, you can choose which pattern matcher algorithm will be used for traffic inspection:
- Aho-Corasick: This is the default algorithm. This string-searching algorithm isn't the best option in terms of performance.
- Hyperscan: This high-performance algorithm is supported by CPUs with SSE3 extensions.
- Aho-Corasick, reduced memory implementation: You should use this algorithm variation for systems with limited RAM.
- Aho-Corasick, "Ken Steele" variant: You should use this algorithm variation if your hardware doesn't support Hyperscan. It will perform better than the default version of Aho-Corasick.
- Interfaces: Here, you can choose which interfaces will have IDS enabled. While using IPS, OPNsense only supports physical interfaces.
Important Note
If you are using Zenarmor Sensei, you can't use the same interface that has been configured on it with IDS/IPS (Suricata).
- Rotate log: Here, you can select in which rotation period the logs will be rotated: Weekly, Daily, or every 4 days (default).
- Save logs: Before deleting old log files, you can specify how many logs will be kept on the disk. The default is four logs.
The available advanced options are as follows (you must ensure that advanced mode is checked):
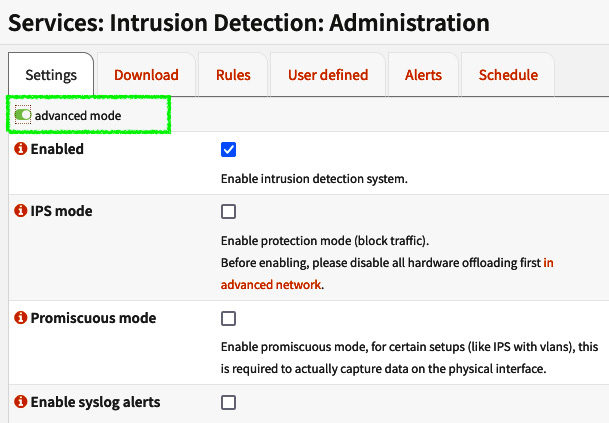
Figure 15.4 – Checking advanced mode to display the advanced options
Some of these additional options are as follows:
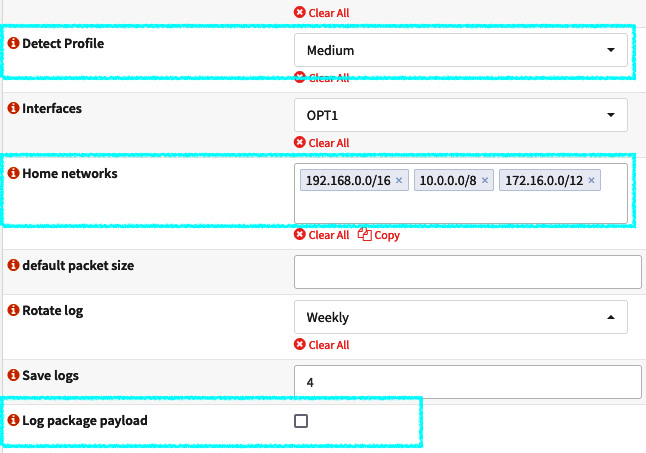
Figure 15.5 – Additional options
Let's look at these options in more detail:
- Detect Profile: You can use this option to optimize the signature-matching process. The IDS engine can group the signatures to improve performance and memory usage, inspecting only packets that match the grouped signatures. The default option will set it to High, which is the recommended option. For the Custom option, you can set your own values. This will allow you to choose from the ToClient and ToServer options. As a parameter, the High profile uses a value of 75 for both ToClient and ToServer.
- Home networks: By default, the RFC1918 networks are configured; these are the local networks. You must set it to your existing local networks once the signatures use this to define which traffic is local and which isn't.
- default packet size: This specifies the default size of the packets that will be processed by the IDS, which is 1514. You can set it to a bigger size but this will decrease performance.
- Log package payload: Check this option to save the package payload in a log. Be aware that this will increase disk usage.
To finish configuring and setting up the service, click on the Apply button. Now, let's test this configuration.
Testing
To test an I(DP)S in OPNsense, you'll need a host connected to OPNsense's LAN. To follow these steps with ease, we'll use the lab that's already been configured using an Ubuntu host, but you can use your own if you wish.
In this exercise, you will detect and block Facebook usage using the OPNsense-App-detect/social-networking ruleset. Follow the steps described in the Rulesets section to enable this ruleset.
Go to Services | Intrusion Detection | Administration via the webGUI and follow these steps:
- Enable the LAN interface option by going to the Settings tab and selecting LAN under Interfaces.
- On the Download tab, enable the OPNsense-App-detect/social-networking ruleset by following the steps highlighted in the following screenshot:
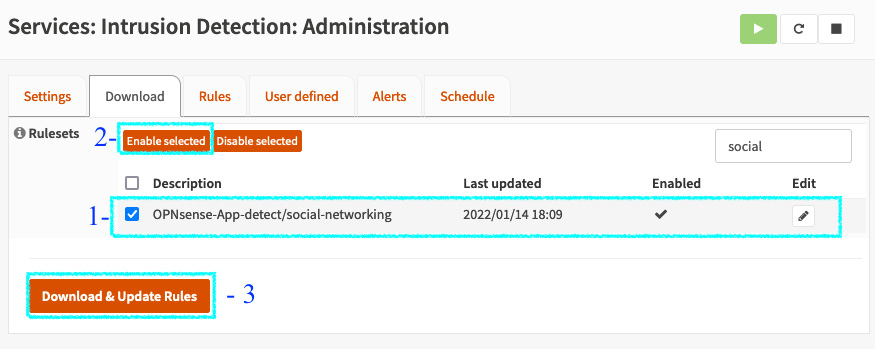
Figure 15.6 – Enabling the OPNsense-App-detect/social-networking ruleset
- Check the box next to OPNsense-App-detect/social-networking.
- Click the Enable selected button.
- Click Download & Update Rules to download and make these rules active.
- Go to the Rules tab to enable Facebook rules:
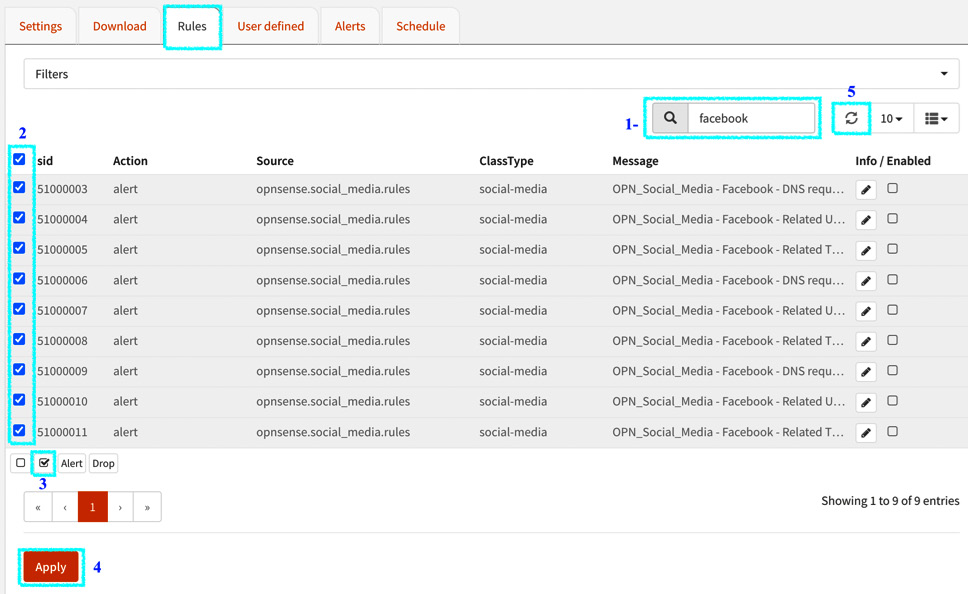
Figure 15.7 – Enabling the OPNsense-App-detect/social-networking ruleset
Let's look at the steps that are highlighted in the preceding screenshot:
- First, type facebook to find the rules you want to enable.
- Next, check all the Facebook rules (social-media ClassType).
- Next, enable these rules by checking the box shown in the preceding screenshot.
- Now, click the Apply button.
- Finally, click the refresh button to ensure the rules are enabled. They will still be disabled until the list is refreshed.
- Go to the host's browser (Ubuntu, in our example) and open Facebook.
- Go back to the webGUI and go to the Alerts tab:
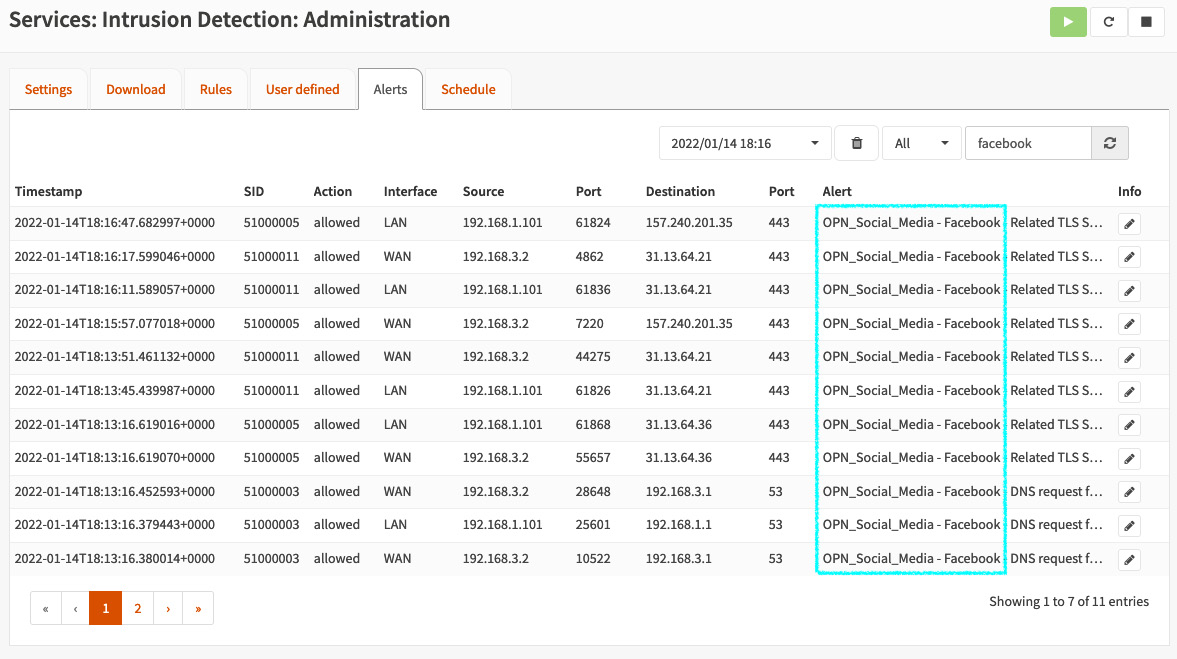
Figure 15.8 – Facebook traffic detected by IDS on the Alerts page
You should see all the alerts related to OPN_Social_Media - Facebook.
Great – the IDS is working! Congratulations!
Now, let's make things more interesting: Let's block Facebook access using the IPS. Follow these steps:
- Go back to the Settings tab and enable IPS mode by checking the box next to it. Remember to disable all the hardware offloading options before doing this, as we explored in the Configuration section of this chapter:
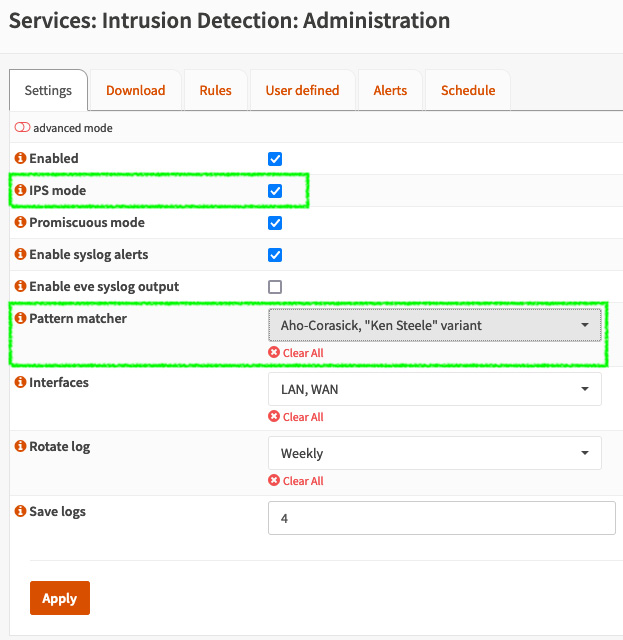
Figure 15.9 – Enabling IPS mode
- If you use OPNsense as a virtual machine, I suggest setting the Pattern matcher option to Aho-Corasick, "Ken Steele" variant.
- Apply these changes by clicking the Apply button.
- Now, let's change the Facebook rules from Alert to Drop:
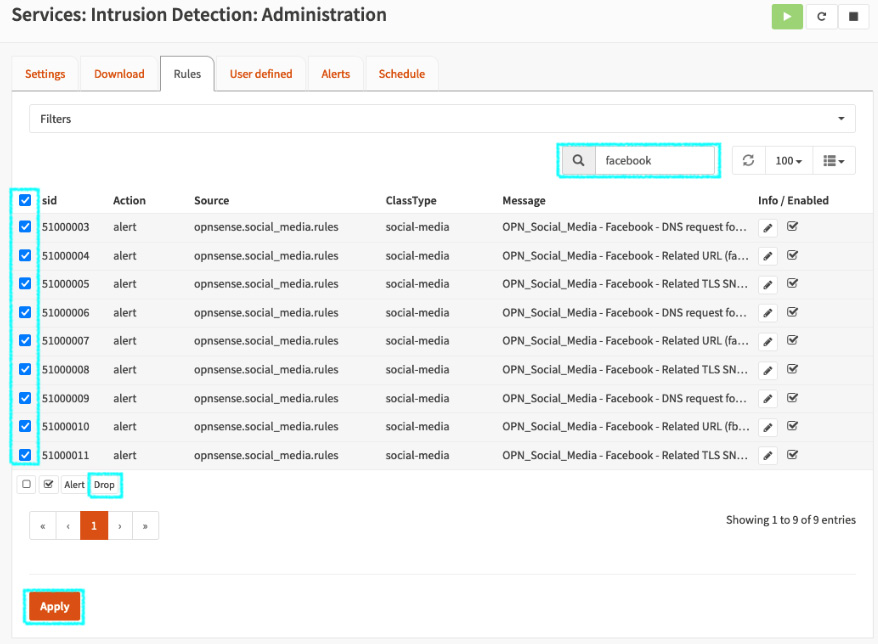
Figure 15.10 – Changing the rules from Alert to Drop
- In the search box, type Facebook to filter only the Facebook rules.
- Select all the displayed rules.
- Click the Drop button to change the default action for these rules.
- Click the Apply button to apply these changes.
You should see that the rules have their default action set to drop:
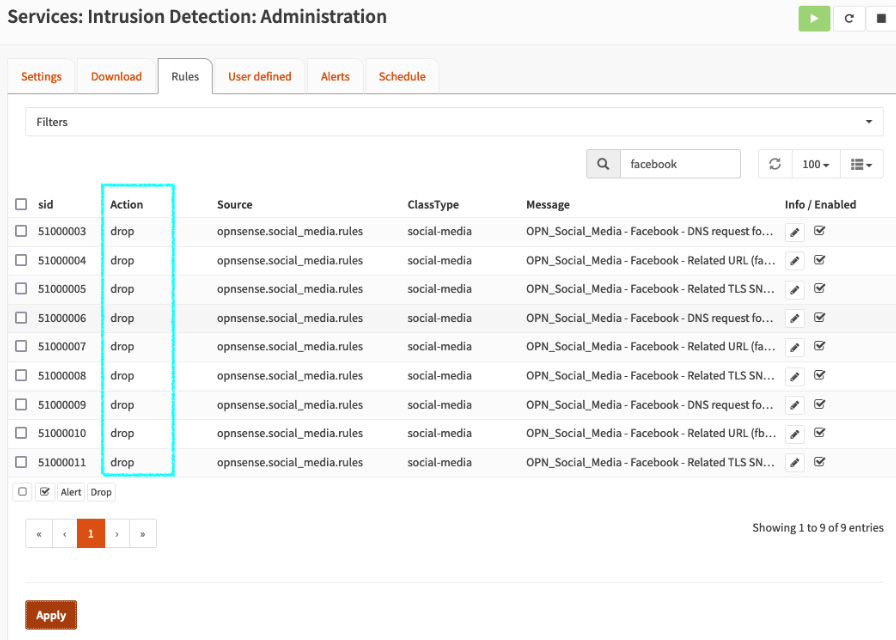
Figure 15.11 – Rules changed to drop
- Go back to the host's browser and open Facebook again. I suggest that you open a new private window to avoid using cached content.
You should see the following error:
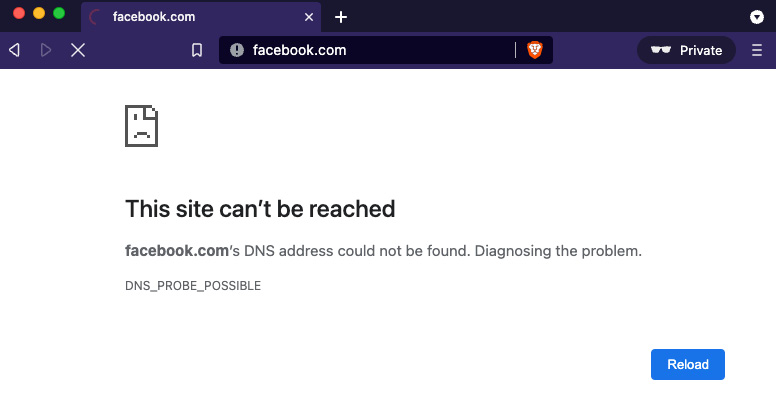
Figure 15.12 – This site can't be reached
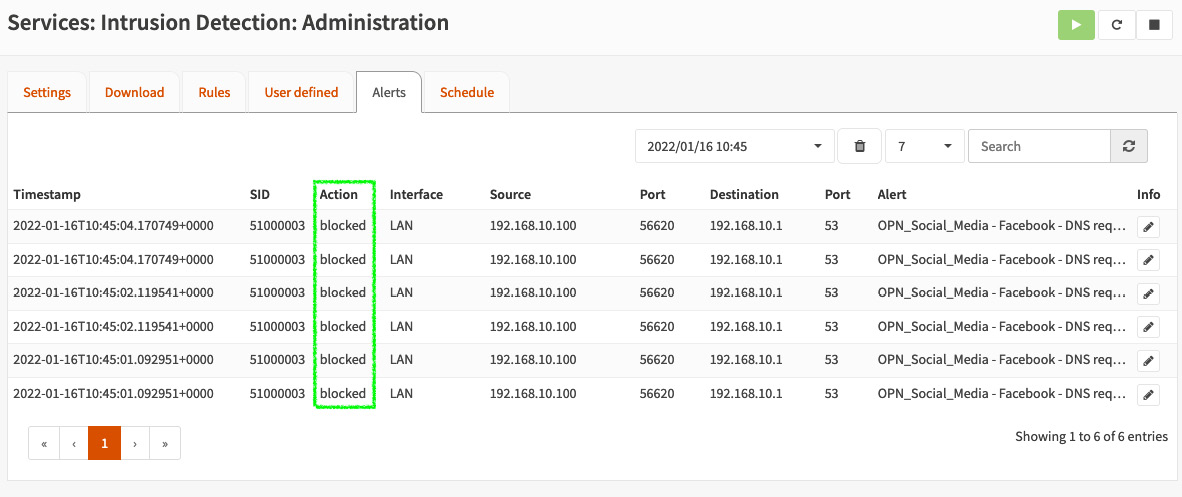
Figure 15.13 – Facebook blocked on the Alerts page
As you can see, an I(DP)S is very efficient and can detect and block content based on traffic. To block Facebook, as we did, using only firewall rules would be difficult, but not impossible, depending on the results you want to achieve.
In this example, we blocked outgoing traffic, but IPS is often used as an effective barrier for dangerous incoming traffic. A good example is attacks based on recent vulnerabilities that can be detected and blocked using an effective ruleset. A recent example is the Log4j vulnerability (also known as Log4Shell), which had rules released by Proofpoint quickly.
SSL fingerprint
The Suricata project that's used by OPNsense, known as a192.168.0.1s, has an I(DP)S engine that isn't capable of decrypting SSL/TLS traffic without external tools. Still, you can create your own rules based on the SSL/TLS certificates' SHA fingerprints. SHA is an algorithm that checks data integrity, and in OPNsense, we can extract it from a website certificate to match traffic and create custom rules for alerting or even blocking traffic.
Note
This isn't a stable feature. Test it before implementing it in a production environment. For more accurate SSL/TLS filtering in a production environment, it is advisable to use the Zenarmor plugin instead.
To start, go to Services | Intrusion Detection | Administration. Then, go to the User defined tab and click + to create a new custom rule. The following screenshot shows the Rule details page:
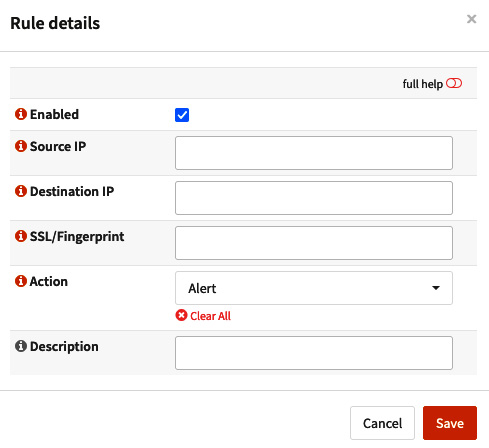
Figure 15.14 – The Rule details page
On the Rule details page, you can define the following options:
- Enabled: Check this box to enable or disable the rule.
- Source IP: The source IP address that matches this rule. For any, leave it empty.
- Destination IP: The destination IP address that matches this rule. For any, leave it empty.
- SSL/Fingerprint: The SHA fingerprint of the SSL/TLS certificate. To extract it using Firefox, follow these steps:
- Open the desired website – for example, https://instagram.com.
- Click on the padlock icon located on the address bar and choose the Connection secure option:
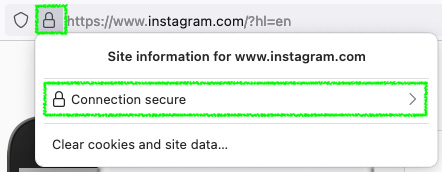
Figure 15.15 – Extracting a website's certificate SSL fingerprint on Firefox
- Click on the More information option:
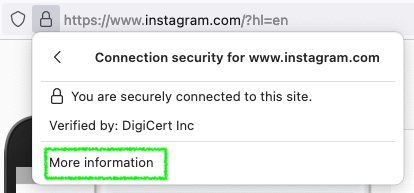
Figure 15.16 – Extracting a website's certificate SSL fingerprint on Firefox
- Click on the View Certificate option in the displayed dialog.
- On the certificate details page, in the Fingerprints section, copy the SHA-1 fingerprint:
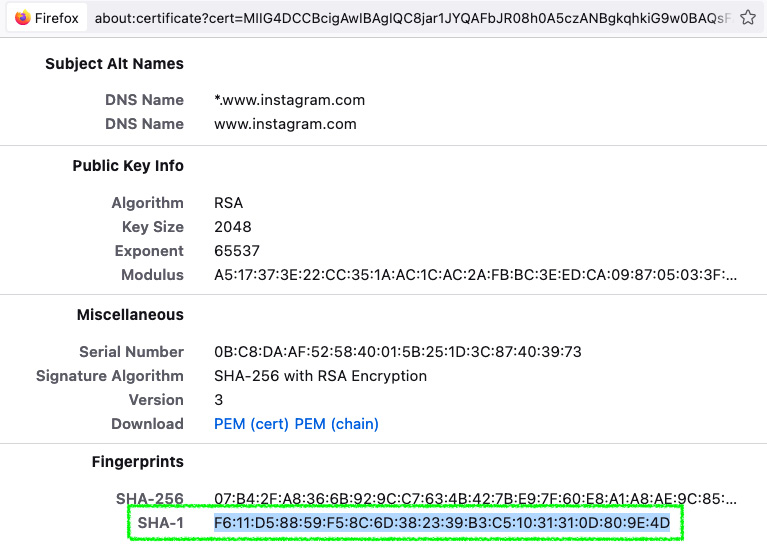
Figure 15.17 – Firefox's certificate details page
- Paste it into the SSL/Fingerprint box, back on the Rule details page.
- Action: Select Alert, Drop, or Pass, depending on which action you want for this rule.
- Description: Describe what this rule is supposed to do.
- Apply the changes by clicking on the Apply button.
Before the Zenarmor Sensei plugin, it was considered useful to block websites and web applications using OPNsense. Nowadays, the Zenarmor Sensei plugin is more effective in blocking localhost traffic rather than collecting every website/app certificate you want to block. A high number of certificates have a short time when they're valid, such as those generated using the Let's Encrypt project, which means that the fingerprint could change every 60 days. In the next chapter, we'll explore the Zenarmor Sensei plugin, which has next-generation firewall capabilities.
Now, it's time to explore the common issues surrounding IDS and IPS and how to solve them.
Troubleshooting
In this section, we will explore some of the common issues you may face while using an I(DP)S in OPNsense and also how to solve each:
- Poor performance while using IPS: First things first – plan your IPS deployment with care! IPS mode is a resource-consuming feature, and you will need suitable hardware with a high-clock CPU, multicores, and good network cards to get the IPS working well in a high-traffic network. The recommended pattern matcher is Hyperscan, which works well with supported CPUs (SSE3-capable). A long list of enabled rulesets will demand a lot of RAM if you wish to inspect traffic without issues. A common symptom of this issue is high CPU usage and low bandwidth, especially from WAN, while using IPS mode. If your hardware isn't working reasonably with IPS mode on, it might be good to keep it only in IDS mode, which will consume fewer resources.
- A lot of false positives: A good deployment plan will avoid this kind of situation. Only choose those rulesets that will match the traffic of the monitored network. Adjust the rules that are causing the false positives. You can adjust each rule individually by going to the Services | Intrusion Detection | Policy page, then the Rule adjustments tab. It is possible to edit the enabled rules and change their actions or even disable them.
- Service isn't up and running: If the IDS service isn't running, even after you've started/restarted, this could indicate a corrupted ruleset or rule. This is rare but not impossible. To check whether there is something wrong with the ruleset or even with the Suricata daemon, go to the Services | Intrusion Detection | Log File page and read the logs carefully.
- The enabled rulesets are not updating automatically: We need to enable the Schedule job to update the rulesets automatically. Go to the Services | Intrusion Detection | Administration – Schedule tab to enable it. A dialog will appear. Enable it to ensure that the job will be created. The default job's configuration is to update daily at 00:00 hours.
- Loss of connectivity (while IPS is enabled): If some connections have been dropped (TCP stream/UDP transmission), it might be a good idea to check IPS alerts. Some connections might be detected as false positives.
Of course, these are not the only issues that you may face while using an I(DP)S in OPNsense, but its community is engaging with it as a fantastic open source project. You may find many topics on this in the official forum talking about the issues other users have faced while using it.
Summary
In this chapter, you learned about IDSs and IPSs and how to configure OPNsense as an IDS to gather traffic alerts for traffic based on rulesets. You also learned about IPS mode, as well as how to enable it and block traffic on the local network. In the Troubleshooting section, we explored common issues that you may face while using an I(DP)S in OPNsense and learned how to solve each.
In the next chapter, we'll take traffic inspection to the next level by using the next-generation capabilities that are available via Sunny Valley's Zenarmor plugin.