
Chapter 2
Choosing Basic Picture Settings
IN THIS CHAPTER
![]() Selecting a Shooting mode (Auto, P, S, A, or M)
Selecting a Shooting mode (Auto, P, S, A, or M)
![]() Changing the Release mode
Changing the Release mode
![]() Enabling Silent Photography mode
Enabling Silent Photography mode
![]() Choosing the right Image Size and Image Quality settings
Choosing the right Image Size and Image Quality settings
![]() Understanding the Image Area option
Understanding the Image Area option
![]() Taking advantage of Vibration Reduction
Taking advantage of Vibration Reduction
To make it as easy as possible for you to take a picture the first time you pick up your camera, the default settings on the Z fc provide fully automatic operation. However, the default settings don't produce optimal results in every situation. For example, if you’re shooting action, you have a better chance of success if you change the Release mode from the default setting, which takes a single photo with each press of the shutter button, to a setting that records multiple frames at a time.
This chapter helps you start fine-tuning camera settings to best suit the subject, by explaining the Release mode and other basic picture options, including those that affect picture quality. They're not the most exciting features (don't think I didn't notice you stifling a yawn), but they make a big difference in how easily you can capture the photo you have in mind.
 Note: You access many settings covered in this chapter by using the i menu, which isn’t the most intuitive feature on the Z fc. So, if you haven’t yet read my brief, 10,000-word explanation of the i menu in Chapter 1, you may want to check it out now.
Picking a Shooting Mode
Any time you pick up the camera, the first setting to consider is the Shooting mode, which determines how much control you have over two critical exposure settings: aperture and shutter speed. Some photographers refer to this setting generically as the exposure mode, but Nikon uses the term Shooting mode for the Z fc. I prefer that term, too, because the setting also determines whether you can access other camera options, such as those that affect color and autofocusing.
Select the Shooting mode by rotating the switch labeled in Figure 2-1 until the small notch aligns with the mode you want to use. In the figure, Auto mode is selected.
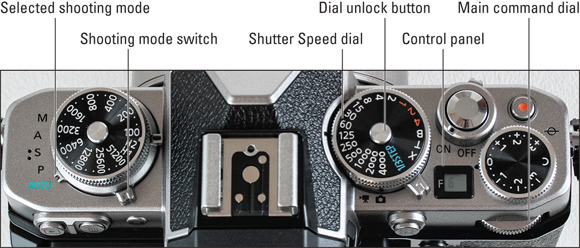
FIGURE 2-1: The Shooting mode determines how much input you have over exposure, color, and other picture options.
You can choose from these modes:
- Auto: Auto puts the camera in charge of exposure settings as well as many other picture-taking options. Settings that are off-limits appear dimmed on menus. (You can adjust options discussed in this chapter, unless otherwise noted.) I presume that you bought this book for help using more advanced Shooting modes, so I don’t mention Auto mode much from this point forward. For a guide to shooting in Auto mode and its companion, Self-Portrait mode, see the end of Chapter 1.
P (programmed autoexposure): In P mode, the camera selects the aperture and shutter speed necessary to ensure a good exposure. But you can choose from different combinations of the two to vary the creative results. For example, shutter speed affects whether moving objects appear blurry or sharp. So you can use a fast shutter speed to freeze action, or you might go in the other direction, choosing a shutter speed slow enough to blur the action, which creates a heightened sense of motion.
 Because P mode gives you the option to choose different aperture and shutter-speed combos, it's sometimes referred to as flexible programmed autoexposure.
- S (shutter-priority autoexposure): You select the shutter speed, and the camera selects the aperture. This mode is ideal for capturing moving subjects because it gives you direct control over shutter speed.
- A (aperture-priority autoexposure): In this mode, you choose the aperture, and the camera sets the shutter speed. Because aperture affects depth of field, or the distance over which objects in a scene appear sharply focused, this Shooting mode is my go-to for portraits. You can select an aperture that results in a soft, blurry background, putting the emphasis on the subject. For landscape shots, on the other hand, you might choose an aperture that produces a large depth of field so that both near and distant objects appear sharp.
M (manual exposure): In M mode, you take the exposure reins completely, selecting both aperture and shutter speed. Even in M this Shooting mode, the camera offers an assist by displaying an exposure meter to help you dial in the right settings. (See Chapter 3 for details.) You have complete control over all other picture settings, too, as well as a few shutter-speed options not available in other Shooting modes.
One important and often misunderstood aspect of M Shooting mode: Selecting the setting has no bearing on focusing. You can still choose manual focusing or autofocusing, assuming that your lens offers autofocusing with the Z fc.
Chapter 3 provides a thorough guide to understanding shutter speed and aperture. In case you’re already familiar with those concepts, here’s a rundown of how you adjust both settings:
To cycle through shutter/aperture combinations in P mode, rotate the Main command dial, labeled in Figure 2-1. Figure 2-2 shows where to see these settings in the default monitor and viewfinder displays; Figure 2-3 shows their location in the monitor’s Information display. (Press the DISP button to cycle through available displays.) Notice that both displays show the Shooting mode, also labeled in the figures. The shutter speed and aperture appear no matter which display style you use.
If the values don’t appear or the entire display is dark, the camera may have gone to sleep to save battery power. To kick-start the action, press the shutter button halfway and then release it.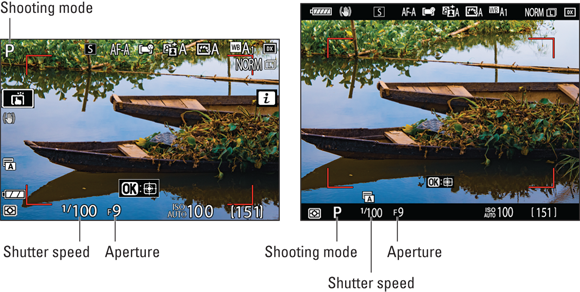
FIGURE 2-2: The default monitor and viewfinder displays show the Shooting mode, shutter speed, and aperture settings.
- In S mode, rotate the Shutter Speed dial, labeled in Figure 2-1, to set the shutter speed. Two important notes here: First, the B (Bulb) and T (Time) settings are off limits in S mode. You can set the dial to either mode, but the camera won’t let you take a picture. You have to switch to M mode to use those settings. Second, to access the 1/3 Step and X settings, you have to press the unlock button in the center of the dial. See Chapter 3 for full details on using the Shutter Speed dial, which is more complex than it appears on the surface. As you change the shutter speed, the camera adjusts the f-stop if needed to produce a good exposure.
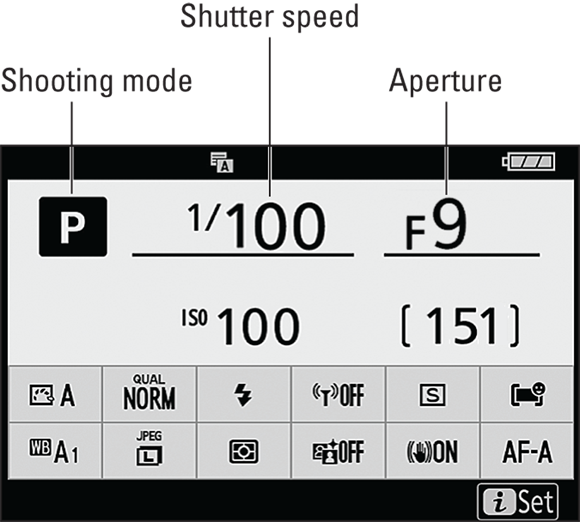
FIGURE 2-3: You also can see all three settings in the Information display.
- In A mode, rotate the Sub-command dial on the front of the camera to adjust the aperture setting. This setting is stated in terms of f numbers or, more commonly, f-stops. You can view the current setting in the displays as well as in the Control panel, labeled in Figure 2-1. (Note the letter F to remind you that you’re looking at the f-stop setting.) The range of available aperture settings depends on the lens. As you change the aperture setting, the camera adjusts the shutter speed if needed.
- In M mode, use the Shutter Speed dial to set the shutter speed; rotate the Sub-command dial to set the aperture. Again, check out Chapter 3 for full details on using the Shutter Speed dial.
 You can also use the touchscreen to adjust the aperture in the A and M Shooting modes. Just tap the setting and then use the arrows that appear to increase or decrease the selected value. If the Shutter Speed dial is set to 1/3 Step, you can also use the touchscreen to adjust shutter speed. Chapter 3 also goes into more detail about adjusting these settings and about how shutter speed and f-stop affect a picture.
Setting the Release Mode
Release mode is short for shutter-release mode. Pressing the shutter button tells the camera to release the shutter — an internal light-control mechanism — so that light can strike the image sensor and expose the image. The Release mode determines what happens when you trigger the shutter release. You can set the camera to capture a single frame; to capture a continuous series of frames with one press of the shutter button; or to delay releasing the shutter for a few seconds after you press the shutter button. The next two sections detail your Release mode options.
Reviewing Release modes
You can check the Release mode by looking at the symbol labeled in Figure 2-4. In the figure, the S stands for Single Frame, which is the default setting and captures one photo at a time.
Remember that in order to see all the data shown in the figures, including the Release mode, you have to stick with the default data display. The exception is the monitor’s Information display, which shows the Release mode in the area shown in Figure 2-5. To cycle through the available display modes, press the DISP button.

FIGURE 2-4: This symbol represents the current Release mode.
The Z fc offers the following Release modes, represented in the displays by icons shown in the margin:
 Single Frame (S): The camera captures one picture at a time.
 Continuous Low: Setting the Release mode to Continuous Low or either of the Continuous High options, discussed next, enables burst mode shooting. In burst mode, the camera records a continuous burst of images for as long as you hold down the shutter button, making it easier to capture fast-paced action.
When the camera is in Continuous Low mode, you can tell it to capture from 1 to 4 frames per second (fps). The default is 3 fps. You can adjust the frame rate either when using the i menu to select the Release mode, as outlined a few paragraphs from here, or via the CL Mode Shooting Speed option, found in the Shooting/Display section of the Custom Settings menu and shown in Figure 2-6.

FIGURE 2-5: When using the monitor’s Information display, look here for the symbol.
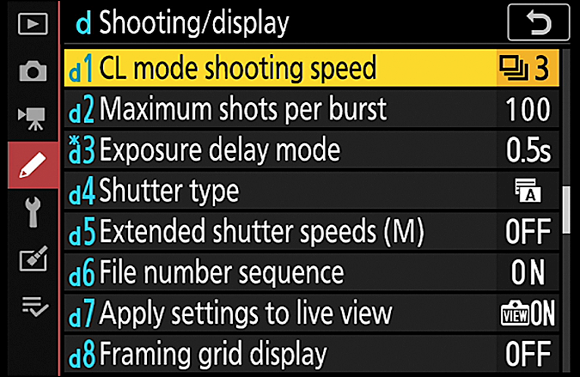
FIGURE 2-6: You can set the Continuous Low frame rate here or by using i menu options.
 Continuous High: This mode works just like Continuous Low except that it records up to 5 frames per second. You can't adjust the frames-per-second rate as you can for Continuous Low.
 Continuous High Extended: The fastest continuous shooting mode, this one results in as many as 11 fps, and, like Continuous High, has no option to adjust the frame rate.
Why would you ever use the other two continuous settings when you get the highest number of frames per second with this one? Well, frankly, unless you're shooting something that's moving at a lightning-fast pace, such as a cheetah chasing its prey, not much changes between photos when you shoot at 11 frames per second. So when you set the burst rate that high, you typically wind up with lots of shots that show the exact same thing, wasting space on your memory card.
 Self-Timer: You're no doubt familiar with Self-Timer mode, which delays the shutter release for a few seconds after you press the shutter button, giving you time to dash in front of the camera so that you can be included in the picture. Here's how it works on the Z fc: After you press the shutter button, the AF-assist illuminator on the front of the camera starts to blink. If you enabled the camera's voice via the Beep Options setting on the Setup menu, you also hear a series of beeps. A few seconds later, the camera captures the image.
By default, the camera waits 10 seconds after you press the shutter button and then records a single image. But you can tweak the delay time, set the camera to capture as many as nine shots each time you press the shutter button, and specify how long you want the camera to wait between recording those successive shots.
To establish these settings, open the Custom Settings menu, choose Timers/AE Lock, and select Self-Timer, as shown on the left in Figure 2-7. Specify your preferences on the next screen, shown on the right.
This menu option is the only way to set the interval between shots; you can adjust the other two options via the i menu, as explained in the next section.
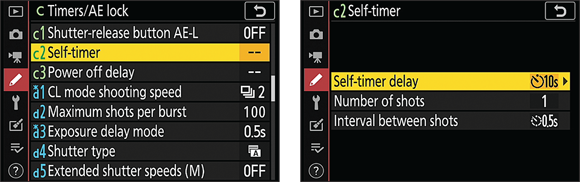
FIGURE 2-7: The only way to adjust all three Self-Timer settings is via this Custom Settings menu option.
I want to share a few other points that may help you select the right Release mode for your next shot:
 The Touch Shutter doesn’t work with the continuous settings. In Chapter 1, I explain how to set up the Touch Shutter so that tapping your subject on the monitor sets focus and releases the shutter. But your tap records only a single frame even when you set the Release mode to one of the continuous options.
- Using a wireless remote control also disables burst mode shooting. You have two ways to release the shutter via a wireless remote control: Use your smartphone or tablet in conjunction with the Nikon SnapBridge app, as detailed in the appendix. Or, if you find that option cumbersome, you can spend about $50 to purchase the Nikon ML-L7 wireless remote. In either case, the camera takes just one photo each time you press the shutter trigger on the remote, regardless of the Release mode.
- You can limit the maximum number of shots recorded in a single burst for any of the continuous settings. By default, you can capture 100 frames at a time. If you want to restrain yourself to recording shorter bursts, head for the Custom Settings menu, choose Shooting/Display, and then select Maximum Shots Per Burst.
- You can’t use flash when using a Release mode that captures more than a single frame at a time. The time that the flash needs to recycle between shots slows down the continuous capture rate too much. So you get one shot for each press of the shutter button regardless of the Release mode. The same rule applies if you use Self-Timer mode and set it to capture multiple images at a time.
- When you shoot a burst of frames, images are stored temporarily in the memory buffer. The camera has some internal memory — a buffer — where it stores picture data until it has time to record it to the memory card. The number of pictures the buffer can hold depends on certain camera settings, such as resolution and file type, explained later in this chapter. In the displays, the buffer capacity appears in place of the shots-remaining value when you press the shutter button halfway. For example, if you see the value [r26], the buffer can hold 26 frames.
- After shooting a burst of images, wait for the card-access light on the back of the camera to go out before turning off the camera. That's your signal that the camera has moved all data from the buffer to the memory card. Turning off the camera before that happens may corrupt the image files.
Depending on other camera settings, you may not achieve the fastest possible frame rate. The actual number of frames you can capture in a single burst depends on a number of factors. Two of the most critical are the shutter type (detailed in Chapter 3) and the Image Quality setting (Raw or JPEG, explained later in this chapter). These settings typically affect the frame rate by only a second or fraction of a second, but if you demand the fastest capture rate, use the mechanical shutter and set the Image Quality option to JPEG or 12-bit Raw.
If you use a slow shutter speed, the camera may not be able to reach the maximum frame rate no matter what shutter type or Image Quality setting you use. Weak batteries and a slow-speed memory card can also affect frame rate. Suffice it to say, your mileage may vary.
Changing the Release mode
You can select the Release mode in the following ways:
 Press the i button to select the setting from the i menu, as shown in Figures 2-8 and 2-9. Again, Chapter 1 details two techniques for using the menu, but here’s the best strategy for this particular setting: Tap the Release mode icon or use the Multi Selector to highlight it and then press the OK button. You then see a new screen showing the available settings, as shown on the left in Figure 2-9. If you select Continuous Low or Self-Timer, a Details box appears at the bottom of the screen. Tap that box or press the Multi Selector down to display a third screen, where you can set options related to those modes. The right screen in Figure 2-9 shows Self-Timer options available through the i menu.
When the initial i menu screen is displayed (refer to Figure 2-8), you can also rotate the Main command dial to display the Release mode settings above the menu and then use the Sub-command dial to specify settings related to the Continuous Low and Self-Timer modes. But you can’t adjust the number of Self-Timer shots if you go this route.
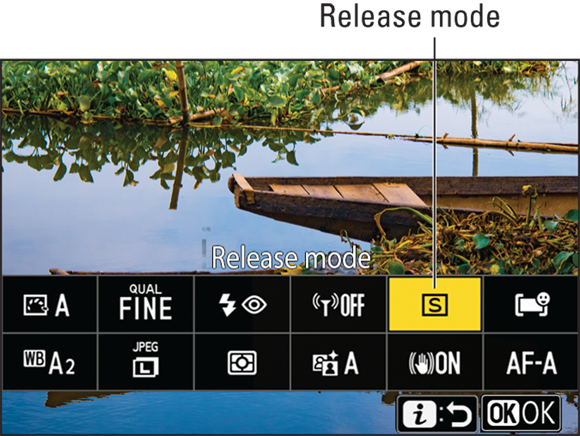
FIGURE 2-8: The i menu offers the easiest way to change the Release mode.
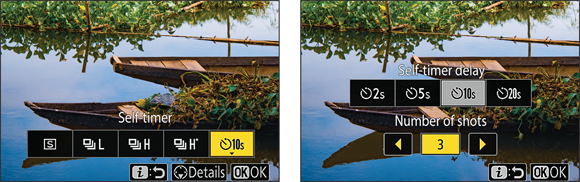
FIGURE 2-9: Tap Details (left) or press the Multi Selector down to display options related to Self-Timer mode (right).
Neither i menu technique enables you to specify how long you want the camera to wait between shots if you set the camera to capture more than one frame. You must do that via the Custom Settings menu option shown earlier, in Figure 2-7.- Open the Photo Shooting menu and select Release Mode, as shown in Figure 2-10. The problem with this method is that you’re limited to choosing one of the five Release modes. You can’t specify Self-Timer or Continuous Low options; the camera uses whatever settings were previously selected.
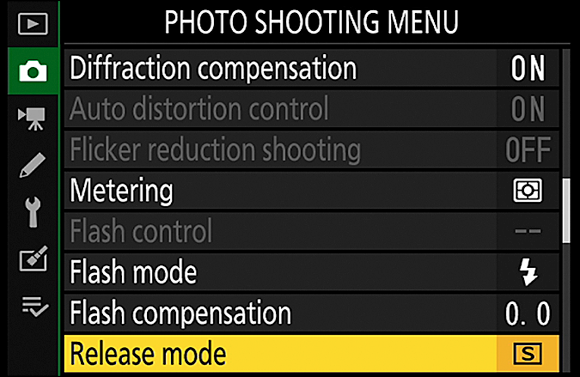
FIGURE 2-10: You also can use this menu option to set the Release mode, but it doesn’t let you adjust the Continuous Low and Self-Timer settings.
Enabling Silent Photography
At the camera’s default settings, you usually hear a clicking sound when you take a picture. That click is produced by the camera’s shutter, a light-control mechanism that helps determine image exposure. (Chapter 3 has details.) If the shutter sound might be disruptive, such as when you’re photographing a sleeping baby, open the Photo Shooting menu and turn on Silent Photography, as shown in Figure 2-11. The camera then relies on a fully electronic shutter that produces no sound. If you previously enabled any of the beep sounds available via the Beep Options setting on the Setup menu, those sounds are temporarily disabled as well.
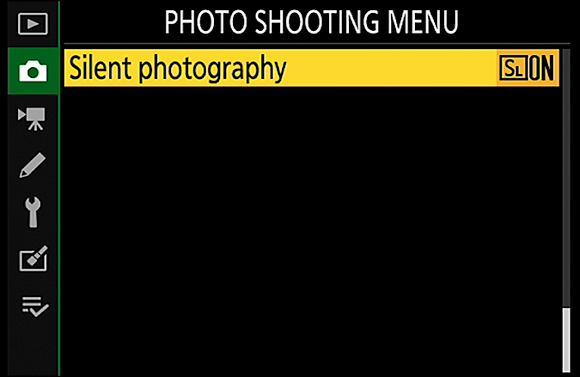
FIGURE 2-11: To silence the shutter and other camera sounds, turn on Silent Photography.
After you take a picture in Silent Photography mode, the displays turn off briefly as a signal that the photo was taken. The exception is when you set the Release mode to Continuous High Extended. Then you just have to trust that the camera recorded your photos.
Silent Photography imposes a few restrictions:
- You can’t use flash. This limitation makes sense because the whole idea of Silent Photography mode is to shoot without calling attention to your camera, and having a flash go off ruins that plan.
- Some advanced exposure options are disabled. You can’t use the highest ISO settings (Hi 1 and Hi 2) or enable Long Exposure Noise Reduction. These features, which I detail in Chapter 3, can produce a brighter image and better picture quality when you’re shooting in dim lighting. I wouldn’t worry much about either feature unless the ambient lighting is very dark. Then experiment to see whether turning off Silent Photography delivers a substantially better photo. If so, you have to decide which is more important: picture quality or silence.
- Shooting fast-moving subjects may be more difficult. The type of electronic shutter used in Silent Photography mode reduces the number of frames you can shoot per second when you use the continuous release modes. Additionally, you can’t access the full range of shutter speeds the camera offers; the top shutter speed you can use is 1/2000 second. A fast shutter speed is critical to catching moving subjects without blur. Unless you’re shooting extremely fast subjects, though, neither the frames per second nor shutter-speed limitation should hamper you much.
- Enabling Silent Photography can produce certain picture defects. Again, the defects are related to the type of shutter that’s employed during silent shooting. It’s not important to understand the science behind the defects; just be on the alert for banding (what should appear as a smooth transition of color looks instead like a blob of solid color); color fringing (weird halos of color around the edges of objects); and moire (a defect that looks like a crosshatch pattern). Additionally, if you’re shooting action, you may notice distortion of moving objects. Long story short: Take test shots in Silent Photography mode to make sure that these defects won’t spoil your images. Note that problems tend to be worse in artificial lighting (such as fluorescent lights in office buildings), and some defects may appear in the live preview but not in the actual photo.
Even in Silent Photography mode, not all camera sounds are completely eliminated; you may hear subtle noises from the autofocusing system, for example. Still, it’s the easiest way to silence the camera as much as possible.
In the displays, the Shutter Type symbol, labeled in Figure 2-12, bears the label SL (for silent) when the fully electronic shutter employed by Silent Photography mode is being used. The symbol otherwise bears a letter representing Shutter Type settings available when Silent Photography is disabled: M, for mechanical shutter; E, for electronic front-curtain shutter, or A, for an auto mode that switches between those two shutter types as necessary. You can read more about the Shutter Type setting in Chapter 3.
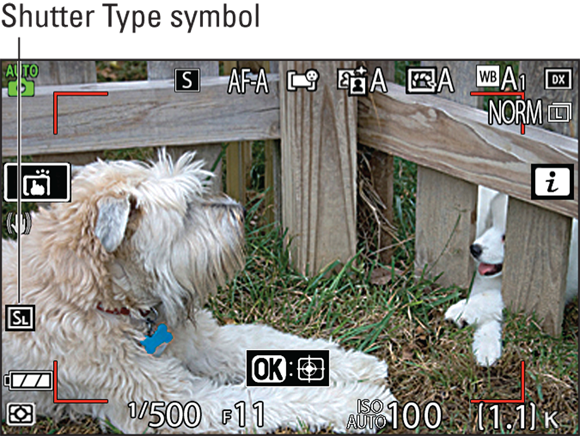
FIGURE 2-12: The Shutter Type symbol bears the label SL when Silent Photography is turned on.
Selecting Image Size and Image Quality
Your preflight camera check should also include a look at the Image Size and Image Quality settings. The first option sets resolution (pixel count); the second, file type (JPEG or Raw/NEF).
The names of these settings are a little misleading, though, because the Image Size setting also contributes to picture quality, and the Image Quality setting affects the file size of the picture. Because the two work in tandem to determine quality and size, it's important to consider them together. The next few sections explain each option; following that, I offer a few final tips and show how to select the settings you want to use.
Considering Image Size (resolution)
The Image Size setting determines how many pixels are used to create a photo. Pixels — short for picture elements — are the square tiles from which digital images are made. You can see individual pixels in the right image in Figure 2-13, which shows a magnified view of the eye area in the left image.
The number of pixels in an image is referred to as resolution. You can define resolution in terms of either the pixel dimensions — the number of horizontal pixels and vertical pixels — or total resolution, which you get by multiplying those two values. This number is usually stated in megapixels, with 1 megapixel equal to 1 million pixels.
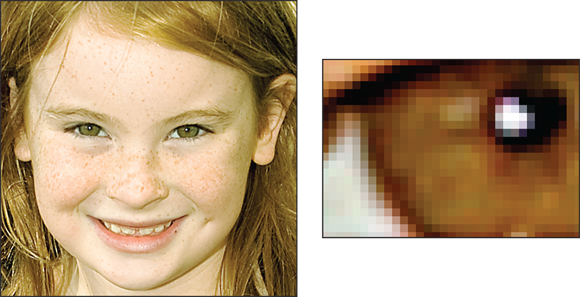
FIGURE 2-13: Pixels are the building blocks of digital photos.
Your camera offers three Image Size options: Large, Medium, and Small. But the resolution you get at any setting depends on the Image Area option, which I explain later in this chapter. At the default setting, the camera captures the image using the entire image sensor (the part of the camera on which the image is formed). If you instead use the 1:1 setting or the 16:9 Image Area setting, you get fewer pixels at each Image Size setting because the camera crops the image to fit the aspect ratio defined by those settings. Table 2-1 shows the pixel count for each Image Area setting, followed by the megapixel count. (Note that this book uses the abbreviation M for megapixel, as does Nikon, but the abbreviation MP is more commonly used.)
TABLE 2-1 Image Size Results in Pixels and Megapixels (M)
Image Size | DX Image Area | 1:1 Image Area | 16:9 Image Area |
|---|---|---|---|
Large | 5568 x 3712 (20.7M) | 3712 x 3712 (13.8M) | 5568 x 3128 (17.4M) |
Medium | 4176 x 2784 (11.6M) | 2784 x 2784 (7.8M) | 4176 x 2344 (9.8M) |
Small | 2784 x 1856 (5.2M) | 1856 x 1856 (3.4M) | 2784 x 1560 (4.3M) |
If you select Raw (NEF) as the Image Quality setting, images are always captured at the Large setting. You can vary the resolution only for pictures taken in the JPEG format. The later section “Understanding Image Quality options” explains file formats.
To choose the right Image Size setting, you need to understand the three ways that resolution affects your pictures:
Print size: Pixel count determines the size at which you can produce a high-quality print. When an image contains too few pixels, details appear muddy, and curved and diagonal lines appear jagged. Such pictures are said to exhibit pixelation. To ensure good print quality, aim for approximately 300 pixels per linear inch, or ppi. To produce an 8 x 10-inch print at 300 ppi, for example, you need a pixel count of 2400 x 3000, or about 7.2 megapixels. Depending on the printer and the photo, you may be happy with a lower resolution, however, so don’t consider 300 ppi a hard-and-fast rule.
Even though many photo-editing programs enable you to add pixels to an existing image — known as upsampling — doing so doesn't enable you to successfully enlarge photo. In fact, upsampling typically makes matters worse. To illustrate the point, Figures 2-14, 2-15, and 2-16 show you the same image at 300 ppi, at 50 ppi, and then resampled from 50 ppi to 300 ppi.
FIGURE 2-14: A high-quality print depends on a high-resolution original.
- Screen display size: Resolution doesn't affect the quality of images viewed on a screen the way it does printed photos. Instead, resolution determines the size at which the image appears. I explain this issue in more detail in Chapter 9; for now, just know that you need way fewer pixels for onscreen photos than you do for prints.
- File size: Every pixel increases the amount of data required to create the picture file. So a higher-resolution image has a larger file size than a lower-resolution image.
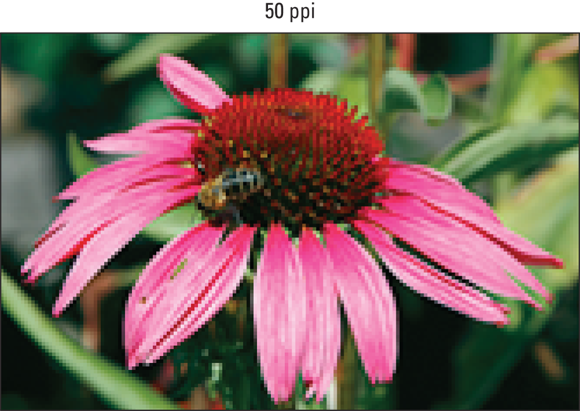
FIGURE 2-15: At 50 ppi, the image has a jagged, pixelated look.
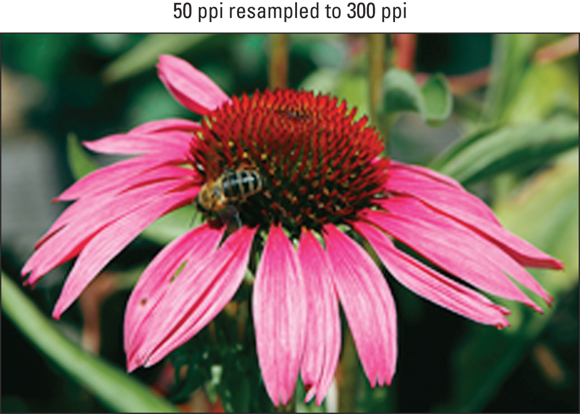
FIGURE 2-16: Adding pixels in a photo editor doesn't rescue a low-resolution original.
Large files present several problems:
- You can store fewer images on the memory card, your computer's hard drive, an online storage site, or other storage media, such as a DVD.
- The camera needs more time to process and store the image data on the memory card after you press the shutter button. This extra time can hamper fast-action shooting.
- When you share photos online, larger files take longer to upload and download.
- When you edit photos in your photo software, your computer needs more resources and time to process large files.
As you can see, resolution is a bit of a sticky wicket. What if you aren't sure how large you want to print your images? What if you want to print your photos and share them online? I take the better-safe-than-sorry route, which leads to the following recommendations:
- Always shoot at a resolution suitable for print. You then can create a low-resolution copy of the image for use online. In fact, your camera offers a built-in resizing option that I cover in Chapter 9.
- For everyday images, Medium is a good choice. I find Large to be overkill for casual shooting, creating huge files for no good reason.
- Choose Large for an image that you plan to crop, print very large, or both. The benefit of maxing out the resolution is that you have the flexibility to crop the photo and still generate a decently sized print of the remaining image. Figure 2-17 offers an example. When I was shooting this photograph, I couldn't get close enough to fill the frame with my main interest — the two juvenile herons at the center of the scene. But because I had the resolution cranked up to Large, I could later crop the shot to the composition you see on the right and still produce a great-looking print. In fact, I could have printed the cropped image at a much larger size than fits on the page here.
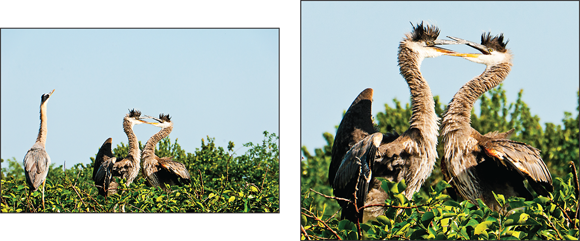
FIGURE 2-17: A high-resolution original (left) enabled me to crop the photo and still have enough pixels to produce a quality print (right).
Understanding Image Quality Options
If I had my druthers, the Image Quality option would instead be called File Type because that's what the setting affects. Here's the deal: The file type, sometimes also known as a file format, determines how picture data is recorded and stored. Your choice does affect picture quality, but so does the Image Size setting, described in the preceding section, and the ISO setting and exposure time, both covered in Chapter 3. (A high ISO setting and long exposure time can produce a defect called noise, which makes an image appear grainy.) In addition, file type has ramifications beyond picture quality.
At any rate, your camera offers two file types: JPEG and Camera Raw — or Raw, for short, which goes by the specific moniker NEF (Nikon Electronic Format) on Nikon cameras. The next couple of sections explain the pros and cons of each format. If your mind is already made up, skip ahead to the section “Adjusting the Image Size and Quality settings,” to find out how to make your selection.
JPEG: The imaging (and web) standard
Pronounced “jay-peg,” this format is the default setting. JPEG is popular for two main reasons:
- Immediate usability: All web browsers and email programs can display JPEG files, so you can share pictures online immediately after you shoot them. You also can have a JPEG file printed at any retail photo outlet. The same can't be said for Raw (NEF) files, which must be converted to JPEG for online sharing and to JPEG or another standard format, such as TIFF, for retail printing.
- Small files: JPEG files are smaller than Raw files, so you need less storage space to hold the files.
The downside (you knew there had to be one) is that JPEG creates smaller files by applying lossy compression. This process actually throws away some image data. Too much compression produces a defect called JPEG artifacting. Figure 2-18 compares a high-quality original (left photo) with a heavily compressed version that exhibits artifacting (right photo).
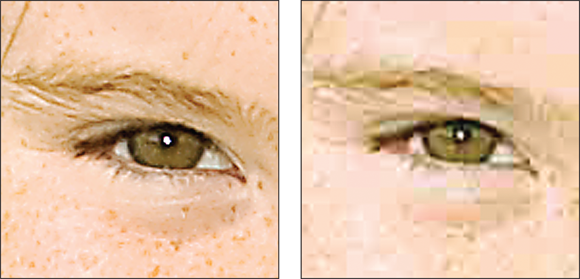
FIGURE 2-18: The reduced quality of the right image is caused by excessive JPEG compression.
Fortunately, your camera enables you to specify how much compression you're willing to accept. You can choose from three JPEG settings, which produce the following results:
- JPEG Fine: The compression ratio is 1:4 — that is, the file is four times smaller than it would otherwise be. Because very little compression is applied, you shouldn't see many compression artifacts, if any.
- JPEG Normal: The compression ratio rises to 1:8. The chance of seeing some artifacting increases as well. This setting is the default.
- JPEG Basic: The compression ratio jumps to 1:16. That's a substantial amount of compression that brings with it a lot more risk of artifacting.
Note, though, that even the Basic setting doesn't result in anywhere near the level of artifacting you see in the right image in Figure 2-18. I exaggerated the defect to help you recognize artifacting and understand how it differs from the quality loss that occurs when you have too few pixels. In fact, if you keep the image print or display size small, you’re unlikely to notice a great deal of difference between the Fine, Normal, and Basic compression levels. It's only when you enlarge a photo that the differences may become apparent.
Given that the differences between the compression settings aren't that easy to spot until you enlarge the photo, is it okay to choose a setting other than Fine in order to reduce file size? Only you can decide what level of quality your pictures demand, but I stick with Fine. You never know when a casual snapshot will be so great that you want to print or display it large enough that minor quality loss becomes a concern. And of all the defects you can correct in a photo editor, artifacting is one of the hardest to remove.
If you don't want any risk of artifacting, change the file type to Raw (NEF). Or consider your other option, which is to record two versions of each file — one Raw and one JPEG. The next section offers details.
Raw (NEF): The purist's choice
The other picture file type you can create is Camera Raw, or just Raw (as in uncooked), for short.
Each manufacturer has its own flavor of Raw. Nikon's is NEF, for Nikon Electronic Format, so you see the three-letter extension NEF at the end of Raw filenames.
Raw is popular with most expert photographers for three reasons:
- Greater creative control: With JPEG, internal camera software tweaks your images, adjusting color, exposure, and sharpness as needed to produce the results that Nikon believes its customers prefer. With Raw, the camera simply records the original, unprocessed image data. The photographer then copies the file to the computer and uses software known as a Raw converter to produce the actual image, making decisions about color, exposure, and so on at that point. Your camera has a built-in Raw converter, and you can also use the free Nikon software, Nikon NX Studio, to do the job. See Chapter 9 for a look at both tools.
Higher bit depth: Bit depth is a measure of how many distinct color values an image file can contain. JPEG files restrict you to 8 bits each for the red, blue, and green color components, or channels, that make up a digital image, for a total of 24 bits. That translates to roughly 16.7 million possible colors.
On the Z fc, you can set the camera to capture either 12 or 14 bits per channel when you shoot in the Raw format. (How-to’s upcoming.) Although jumping from 8 to 12 or 14 bits sounds like a huge difference, you may never notice any difference in your photos. The 8-bit palette of 16.7 million values is more than enough for superb images. Where the extra bits can come in handy is if you adjust exposure, contrast, or color in your photo-editing program. When you apply extreme adjustments, the extra bits sometimes help avoid color banding — the defect that creates abrupt color breaks where you should see smooth, seamless transitions. A higher bit depth doesn't always prevent this problem, however.
You also may find the higher bit depth beneficial when shooting high-contrast scenes (subjects that contain both very dark and very bright areas). More bits may enable the camera to hold on to more detail in the shadows and highlights, although again, it’s not a sure thing.
- Best picture quality: Because Raw doesn't apply the destructive compression associated with JPEG, you don't run the risk of the artifacting that can occur with JPEG.
But Raw isn't without its disadvantages:
- You can't do much with your pictures until you process them in a Raw converter. You can't share them online or put them into a text document or multimedia presentation. You can view and print them immediately if you use the free Nikon NX Studio software, but many other photo programs require you to convert the Raw files to a standard format first, such as JPEG or TIFF. Ditto for retail photo printing.
- Raw files are larger than JPEGs. Unlike JPEG, Raw doesn't apply lossy compression to shrink files. In addition, Raw files are always captured at the maximum resolution. For both reasons, Raw files are significantly larger than JPEGs, so they require more storage space.
Does the upside of Raw outweigh the downside? That’s a decision you need to ponder based on your photographic needs and whether you want to spend time converting Raw files.
If you opt for Raw, you can adjust how many bits you want the camera to use to record the file by choosing RAW Recording, as shown in Figure 2-19. Your choice makes a difference in file size: 14 bits creates a 24.4MB (megabytes) file; 12 bits, about 19.4MB. Most photographers are perfectly happy with 12-bit images, and frankly, I doubt that too many people could perceive much difference between a photo captured at that setting and a 14-bit version. That said, I prefer to take the storage hit required by the larger bit depth in exchange for the benefits it can provide. However, the 14-bit setting also impacts the maximum frames-per-second (fps) rate you can achieve when you use the Continuous High Extended Release mode (the burst mode shooting option explained near the start of this chapter). Nikon reports that the maximum frame rate for 14-bit Raw files is 9 fps, compared to the maximum frame rate of 11 fps for 12-bit files. I don’t often find myself shooting subjects that require 11 frames per second, but if you are an avid rapid-action shooter, experiment with both settings.

FIGURE 2-19: Choose this menu option to specify the bit-depth of Raw files.
Raw+JPEG: Covering both bases
You have the option to capture a picture in the Raw and JPEG formats at the same time. I often take this route when I'm shooting pictures I want to share right away with people who have no software for viewing Raw files. I upload the JPEGs to a photo-sharing site where everyone can view them, and then I process the Raw versions when I have time.
If you choose to create both a Raw and JPEG file, note a few things:
- The list of Raw+JPEG options includes all Image Quality options for the JPEG version (JPEG Fine, JPEG Normal, and JPEG Basic). The JPEG file size is based on the current Image Size setting. The Raw file is always captured at the Large setting.
- During playback, you see only one photo. The camera can’t display Raw files — remember, a Raw file is simply unprocessed image data — so it always displays the JPEG version. (For the same reason, if you shoot only in the Raw format, the camera displays a JPEG preview during playback, using the color, exposure, and other settings that were in force when you took the Raw photo.)
- Deleting the JPEG image also deletes the Raw file if you use the in-camera delete function. After you transfer the two files to your computer, deleting one doesn’t affect the other.
Chapter 9 explains more about deleting photos.
My take: Choose JPEG Fine or Raw (NEF)
At this point, you may be finding all this technical goop a bit overwhelming, so allow me to simplify things for you. Until you have the time or energy to completely digest all the ramifications of JPEG versus Raw, here's a quick summary of my thoughts on the matter:
- If you require the absolute best image quality and have the time and interest in doing the Raw conversion, shoot Raw.
- If great photo quality is good enough and you have no time to spend processing images, stick with JPEG Fine. The trade-off for the smaller files produced by the Normal and Basic settings isn't worth the risk of compression artifacts.
- If you don't mind the added file-storage space requirement and want the flexibility of both formats, choose a Raw+JPEG option, which stores one copy of the image in each format. Set the JPEG size and quality depending on how you plan to use the JPEG image.
Adjusting the Image Size and Quality settings
You can view the current Image Quality and Image Size settings in the monitor and viewfinder displays, in the areas labeled in Figure 2-20. The figures show how things look when you use the default Image Quality and Image Size settings: Normal for Image Quality and Large for Image Size. You can also view the settings in the monitor’s Information display, shown in Figure 2-21. (Press the DISP button to cycle through the available monitor display modes.)
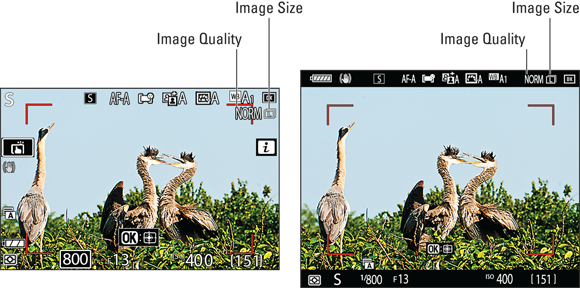
FIGURE 2-20: The current Image Size and Image Quality settings appear in the monitor (left) and viewfinder (right).
To adjust the settings, use these controls:
- i menu: The Image Quality and Image Size options are labeled on the left in Figure 2-22. If you need help selecting items from the i menu, Chapter 1 offers a primer, but here’s a quick recap: You can rotate the Main command dial to display the available options atop the menu, or you can tap the Image Quality or Image Size symbol to display options on a separate screen. If you use the dial technique, you can view only a few options at a time; keep rotating the dial to scroll through all options.
- Photo Shooting menu: You also can choose both options from the Photo Shooting menu, as shown on the right in the figure. Image Quality is highlighted in the figure; Image Size lives just below that setting.
You can’t adjust the Raw setting’s bit-depth option from the i menu; you must use the Raw Recording option on the Photo Shooting menu. (Refer to Figure 2-19.) Because that setting, along with the Image Size and Image Quality settings, affects file size, the shots-remaining value changes when you adjust any of the three. The larger the file size, the fewer shots you can fit on your memory card. Your choice of Image Area setting, described next, also affects file size because it controls how many pixels are used to create your photo. See Table 2-1 for a rundown of pixel counts at each Image Area and Image Size setting.
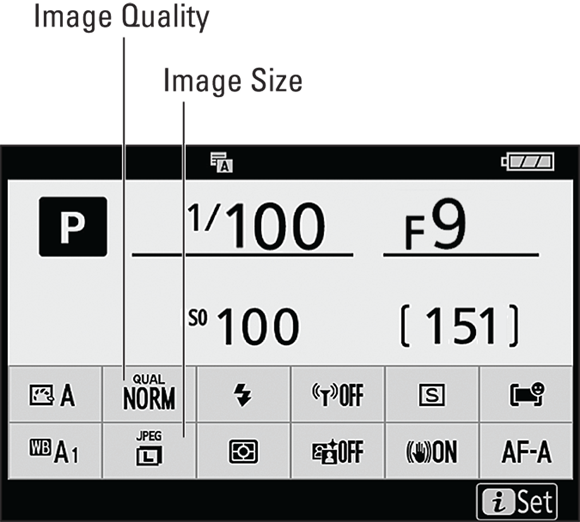
FIGURE 2-21: In the Information display, the settings appear in the same spot as they do on the i menu.
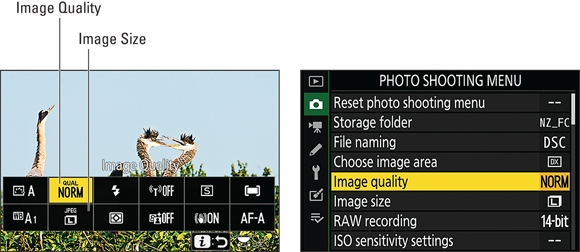
FIGURE 2-22: Adjust Image Size and Image Quality via the i menu or Photo Shooting menu.
Setting the Image Area
Normally, your camera captures photos using the entire image sensor, which is the part on which the picture is formed — similar to the negative in a film camera. When the whole sensor is used, your photo has an aspect ratio (proportions) of 3:2 (or 2:3, if you shoot with the camera in vertical orientation). However, you have the option to record a photo that has an aspect ratio of 1:1 or 16:9. (The latter may be useful if you need a still frame to insert into a video that you shoot with your camera; videos also have a 16:9 aspect ratio.) In both cases, the camera records the scene using a smaller area of the sensor, giving you the same outcome as if you shot using the whole sensor and then cropped the photo.
Of course, because you're using a smaller portion of the image sensor, the resulting photo contains fewer pixels — has a lower resolution — than one captured using the entire sensor. And as discussed earlier in this chapter, the higher the pixel count, the larger you can print the photo and maintain good print quality. On the flip side, because the camera is working with fewer pixels, the resulting file size is smaller.
I prefer to shoot using the entire sensor and then crop the image myself if I deem it necessary. That way, I have more flexibility in making the crop decision — I don’t have to get the framing exact for the initial capture, which can be difficult when photographing moving subjects. You can even crop the image in the camera, by using the Trim feature that I cover in Chapter 11.
When you use the whole-sensor recording option, you see the letters DX in the default monitor and viewfinder displays, as shown in Figure 2-23. (DX is the moniker that Nikon uses to refer to the size of the sensor used in the Z fc.) If you opt for a smaller Image Area setting, the label 1:1 or 16:9 appears instead. Additionally, areas of the frame that won’t be captured are covered with black borders.
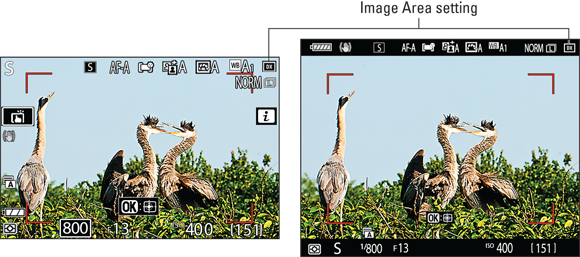
FIGURE 2-23: The DX symbol indicates that the maximum Image Area option is selected.
To change the setting, open the Photo Shooting menu and select Choose Image Area, as shown in Figure 2-24. The numbers that appear for each setting indicate the captured sensor area in millimeters: 24 x 16mm for the DX setting; 16 x 16 for the 1:1 option; and 24 x 14 for the 16:9 setting. Don’t confuse these values with the pixel count of the image; for that detail, refer to Table 2-1.

FIGURE 2-24: Change the Image Area setting via the Photo Shooting menu.
Turning On Vibration Reduction
One common cause of blurry photos is camera shake — movement of the camera during the exposure. Many modern lenses incorporate a feature that’s designed to compensate for small amounts of camera shake, increasing the odds of a sharp shot.
The 16–50mm lens sold as a bundle with the Z fc offers this feature; for other lenses, check the lens instruction manual. On Nikon lenses, the anti-shake feature goes by the name Vibration Reduction; other lens manufacturers use different names, such as Vibration Compensation or Optical Stabilizer.
If your lens offers this feature, here’s what you need to know to take advantage of it on the Z fc:
- Some lenses have a switch that turns the feature on and off. On Nikon lenses, the switch is often labeled VR. Depending on the lens, you may just get an on/off switch. Or you may be able to choose from one setting designed for normal shooting and one for times when a lot of camera shake is expected, such as when you’re shooting while riding in a speedboat that’s bouncing over the water.
- For lenses that have no on/off switch, such as the 16–50mm kit lens, enable or disable Vibration Reduction via the i menu or Photo Shooting menu. Figure 2-25 shows the setting on both menus.

FIGURE 2-25: Vibration Reduction helps compensate for camera shake that can blur an image.
With the 16–50mm kit lens, you can choose from three settings: Off, On (Normal), and SPT, which stands for Sport. The latter implements a form of vibration reduction that’s specially designed for shooting athletes or any object that’s moving rapidly. The default setting, On (Normal), works fine for most other shooting scenarios. When Vibration Reduction is set to On, the symbol labeled in Figure 2-26 appears. For Sport mode, the letters SPT appear with the hand. Turn off Vibration Reduction, and the hand disappears.
Whether you have access to all three settings depends on your lens. If you turn the feature on and off via a lens switch, the camera menus show the selected setting but you can’t adjust the setting from the menus.
- Don’t be alarmed if you notice some jiggling of the scene in the viewfinder or monitor after you release the shutter button. It’s not a display malfunction, just a side effect of the Vibration Reduction system. The display should stabilize after a second or two.
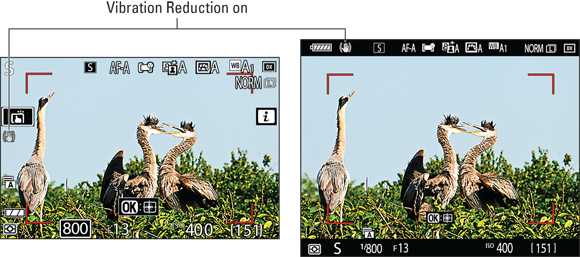
FIGURE 2-26: This symbol indicates that Vibration Reduction is set to On.
- Check the lens manual to find out whether you should turn the feature off when the camera is mounted on a tripod. With some lenses, keeping the feature on can actually cause blurring because the camera tries to compensate for camera movement that isn’t occurring.