
The suggested first step in any new NHibernate application is mapping the model. In this first example, I'll show you how to map a simple product class.
Before we begin mapping, let's get our Visual Studio solution set up. Follow these steps to set up your solution with NHibernate binaries and schemas.
- Download the NHibernate 3.0 binaries from SourceForge at http://sourceforge.net/projects/nhibernate/files/. The filename should be
NHibernate-3.0.0.GA-bin.zip, perhaps with a slightly different version number. - In Visual Studio, create a new C# class library project named
Eg.Corewith a directory for the solution named Cookbook. - Delete the
Class1.csfile. - In the Solution Explorer, right-click on the Cookbook solution and select Open Folder in Windows Explorer. This will open an Explorer window to the
Cookbookdirectory. - Inside the
Cookbookfolder, create a new folder namedLib. - Extract the following files from the NHibernate 3 binaries ZIP to the
Libfolder:- All files in the
Required_Binfolder - All files in the
Required_For_LazyLoadingCastlefolder
- All files in the
- Back in Visual Studio, right-click on the Solution, and select Add | New Solution Folder.
- Name the folder
Schema. - Right-click on the Schema folder, and select Add | Existing Item.
- Browse to the
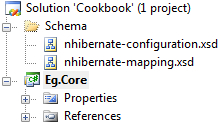
Libfolder, and add two files:nhibernate-configuration.xsdandnhibernate-mapping.xsd. When the files open in the editor, just close them. - Your solution appears as shown in the next screenshot:
Now, let's start by creating our Product class with the following steps:
- In
Eg.Core, create a new C# class namedEntitywith the following code:using System; namespace Eg.Core { public abstract class Entity { public virtual Guid Id { get; protected set; } } } - Create a new class named
Productwith the following code:using System; namespace Eg.Core { public class Product : Entity { public virtual string Name { get; set; } public virtual string Description { get; set; } public virtual decimal UnitPrice { get; set; } } } - Build your application and correct any compilation errors.
Next, let's create an NHibernate mapping for our product class. Follow these steps:
- In the Solution Explorer window, right-click on your project, and choose Add | New Item.
- Choose the Data category on the left pane.
- Choose XML file on the right pane.
- Name the file Product.hbm.xml.
- In the Solution Explorer, right-click on Product.hbm.xml, and choose Properties.
- Change Build Action from Content to Embedded Resource.
- In the editor, enter the following XML in
Product.hbm.xml. Let the IntelliSense guide you.<?xml version="1.0" encoding="utf-8" ?> <hibernate-mapping xmlns="urn:nhibernate-mapping-2.2" assembly="Eg.Core" namespace="Eg.Core"> <class name="Product"> <id name="Id"> <generator class="guid.comb" /> </id> <property name="Name" not-null="true" /> <property name="Description" /> <property name="UnitPrice" not-null="true" type="Currency" /> </class> </hibernate-mapping>
In this recipe, we begin by creating our model. The model is the collection of classes that will be persisted or stored in the database. A persistent class is any class that will be persisted. An entity class is a persistent class with an ID. An instance of an entity class is called an entity. So far, our model only contains the Product entity class. We will expand on this model over the next few recipes.
Notice that our Product class looks just like any other Plain Old CLR Object (POCO) class. One of the strongly held design decisions in NHibernate is that all entity classes should be
persistence ignorant, that is, they should not know about, or be dependent on NHibernate.
Let's examine the Id property a little closer. The Id property of each Product instance will contain the primary key value from the database. In NHibernate, this is named the
persistent object identifier (POID). Just as the primary key value uniquely identifies a row in a database table, the POID will uniquely identify an entity in memory.
If you are new to NHibernate, this protected setter may look strange to you.
public virtual Guid Id { get; protected set; }This is a shorthand way to limit access to the Id property. Code outside of the Product class is unable to change the value of the Id property. However, NHibernate sets properties using highly optimized reflection, ignoring the protected restriction. This keeps your application from inadvertently altering this value.
Next, we create our mapping for the Product entity class. Visual Studio uses the
nhibernate-mapping.xsd schema to provide IntelliSense while completing this mapping. As a general rule, all NHibernate mapping files end with a
.hbm.xml extension, and have a build action of Embedded Resource. NHibernate searches through the embedded resources in your assembly, loading each one with this extension.
Let's break down this XML mapping. Every XML mapping document contains a single hibernate-mapping element. The
xmlns attribute sets the XML namespace. Along with the schema in our Schema folder, Visual Studio uses this to enable IntelliSense inside NHibernate mappings.
The assembly attribute tells NHibernate which assembly, by default, contains our types. Similarly, the namespace attribute sets the default .NET namespace types in this mapping file. Together, they allow us to use the simple name Product instead of the full assembly qualified name of Eg.Core.Product, Eg.Core. Inside the hibernate-mapping element, we have a class element. The name attribute tells NHibernate that this class element defines the mapping for our entity class Product.
The Id element defines the POID. The name attribute refers to the Id property of our Product class. It is case-sensitive, just as in the C# language.
The generator element defines how NHibernate will generate POIDs. In this case, we've told NHibernate to use the guid.comb algorithm. Several other options exist.
The property elements define properties on our Product class. Each name attribute matches the name of a property on our Product class. By default, NHibernate allows null values. Adding not-null="true" tells NHibernate to disallow null values.
Tip
Avoid redundant mappings
In general, it's best to keep your mappings as short and concise as possible. NHibernate intelligently scans your model and combines this knowledge with the information provided in the mapping. In most cases, specifying the types of properties in your mappings only creates redundancies that must be maintained. The default table name matches the class name, and each column name matches the corresponding property by default. It's not necessary to specify this information again. Similarly, you should avoid setting an attribute in your mapping when it matches an NHibernate default. For example, adding not-null="false" to each of your properties is redundant, and makes your mapping difficult to read.
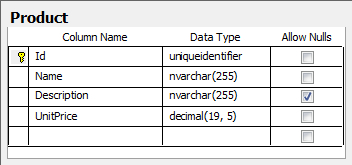
With this mapping, the Microsoft SQL Server database table used to store our Product entities appears as shown in the next screenshot. It may differ slightly for other databases.
There are three main approaches to begin developing an NHibernate application.
- With the model-first approach, the path taken in this book, we create our model, map the model, configure NHibernate, and finally generate our database tables from the model and mappings.
- The configuration-first approach differs slightly. We build our configuration first, then add each entity class and mapping one at a time. This is a more iterative approach to the model-first approach. Again, the database is generated from the model and mappings.
- The database-first approach is only suggested when sharing an existing database with another application. Depending on the database design, this usually requires some advanced mapping techniques. Many NHibernate beginners travel down this path for fresh database applications and end up with mapping and modelling problems well beyond their experience level.
When it loads, NHibernate will deserialize each of our XML mappings into a graph of hibernate mapping objects. NHibernate combines this data with metadata from the entity classes to create mapping metadata. This mapping metadata contains everything NHibernate must know about our model.
A natural key is an ID that has semantic meaning or business value. It "means something" to people in the real world. A surrogate key is a system generated ID that has no semantic meaning. It is just a value that uniquely identifies data in a database table. NHibernate strongly encourages the use of surrogate keys. There are two reasons for this.
First, the use of natural keys inevitably leads to the use of composite keys
. Composite keys are multi-field keys composed of the natural keys of other objects. Let's examine the model of a university's course schedule. The natural key for your term or semester entity may be Fall 2010. The natural key for the Biology department may be BIOL. The natural key for an introductory Biology course would be BIOL 101, a composite of the department's natural key and a course number, each stored in a separate field, with proper foreign keys. The natural key for a section or course offering would be the combination of the natural ids from the term, the course, and a section number. You would have a key composed of four distinct pieces of information. The size of the key grows exponentially with each layer. This quickly leads to an incredible amount of complexity.
Second, because natural keys have real-world meaning, they must be allowed to change with the real world. Let's assume you have an Account class with a UserName property. While this may be unique, it's not a good candidate for use as a key. Suppose usernames are composed of the first initial followed by the last name. When someone changes their name, you'll have to update several foreign keys in your database. If, instead, you use an integer with no meaning for the POID, you only have to update a single UserName field.
However, UserName would be a great candidate for a natural id. A natural id is a property or set of properties that is unique and not null. Essentially, it is the natural key of an entity, though it is not used as the primary key. The mapping for a natural id appears as shown in the following code:
<natural-id mutable="true">
  <property name="UserName" not-null="true" />
</natural-id>
The natural-id element has one attribute: mutable. The default value is false, meaning that the property or properties contained in this natural id are immutable, or constant. In our case, we want to allow our application to change the UserName of an account from time-to-time, so we set mutable to true. In addition to some subtle improvements in caching, this natural id will create a unique database index on UserName.
NHibernate offers many options for generating POIDs. Some are better than others, and generally fall under these four categories:
The assigned generator requires an application to assign an identifier before an object is persisted. This is typical when natural keys are used.
Non-insert POID generators are the best option for new applications. These generators allow NHibernate to assign an identity to a persistent object without writing the object's data to the database, allowing NHibernate to delay writing until the business transaction is complete, reducing round trips to the database. The following POID generators fit in this category:
hilogenerates an integer using the Hi/Lo algorithm, where an entire range of integers is reserved and used as needed. Once they've all been used, another range is reserved. Because the identity reservation is managed using a database table, this POID generator is safe for use in a database cluster, web farm, client, or server application, or other scenarios where a single database is shared by multiple applications or multiple instances of an application.guidgenerates a GUID by callingSystem.Guid.NewGuid(). All of the GUID-based generators are safe for use in a shared-database environment.guid.combcombines 10 bytes of a seemingly-random GUID, with six bytes representing the current date and time to form a new GUID. This algorithm reduces index fragmentation while maintaining high performance.guid.nativegets a GUID from the database. Each generation requires a round-trip to the database.uuid.hexgenerates a GUID and stores it as a human-readable string of 32 hex digits with or without dashes.uuid.stringgenerates a GUID, converts each of the GUID's 16 bytes to the binary equivalent character, and stores the resulting 16 characters as a string. This is not human readable.counter(also known asvm) is a simple incrementing integer. It's initialized from the system clock and counts up. It's not appropriate for shared-database scenarios.incrementis also a simple incrementing integer. It's initialized by fetching the maximum primary key value from the database at start-up. It's not appropriate for shared-database scenarios.sequencefetches a single new ID from a database that supports named sequences, such as Oracle, DB2, and PostgreSQL. Each generation requires a round trip to the database.seqhiloprovides better performance.seqhilocombines the Hi/Lo algorithm and sequences to provide better performance over the sequence generator.foreignsimply copies keys across a one-to-one relationship. For example, if you have contact and customer associated by a one-to-one relationship, a foreign generator on customer would copy the ID from the matching contact.
Post-insert POID generators require data to be persisted to the database for an ID to be generated. This alters the behavior of NHibernate in very subtle ways and disables some performance features. As such, use of these POID generators is strongly discouraged! They should only be used with existing databases where other applications rely on this behavior.
identityreturns a database-generated ID.selectperforms a SELECT to fetch the ID from the row after the insert. It uses the natural id to find the correct row.sequence-identityreturns a database-generated ID for databases that support named sequences.trigger-identityreturns an ID generated by a database trigger.
Finally, the native generator maps to a different POID generator, depending on the database product. For Microsoft SQL Server, DB2, Informix, MySQL, PostgreSQL, SQLite, and Sybase, it is equivalent to identity. For Oracle and Firebird, it's the same as sequence. On Ingres, it's hilo.