
9. Creating and Customizing Trailers

In this chapter, you find out how to create a movie-theater-style trailer for your video. Topics include the following:
→ Creating a trailer
→ Adjusting the trailer
→ Sharing the trailer
A trailer is a short, fun, and well-put-together teaser for your video. You can send it to your friends or share it publically as a way to show your viewers what you are working on.
Creating a Trailer
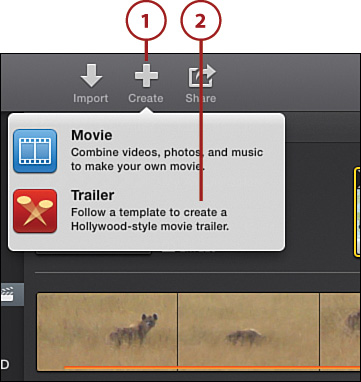
When you create a new trailer, you can choose a style of trailer to use. The list of trailers you can choose from covers the typical trailer types you might see in the movie theater, such as adventure, documentary, action, and so on.
2. Click Trailer.
3. Scroll up and down to see all the templates. Each trailer template indicates how long the final trailer will be and how many cast members it will include.
4. Click a template to select it.
5. Click Create.

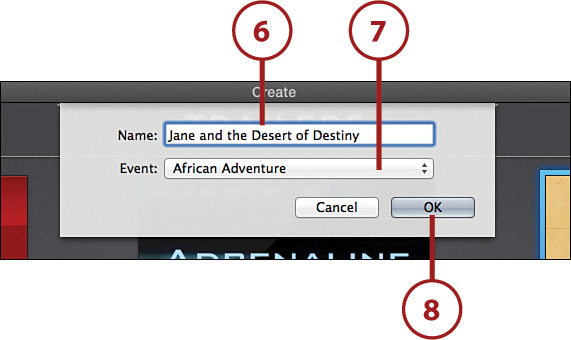
6. In the Name field, type the name of your movie as it will appear in the trailer.
7. In the Event field, select the event that your trailer must use for source video. This is typically the same event you use when creating your movie.
8. Click OK to create your new trailer using the trailer template you chose.
What Does the Trailer Template Do?
When you choose a trailer template, iMovie creates a trailer for your movie complete with music, titles, and graphics. It places dummy clips into the trailer that you will replace with clips from your own source video. The trailer has very high production values. The music is synchronized with the different clips in the trailer; the combination of the music, types of clips, graphics, and titles produces the correct mood for the trailer. As you see later in this chapter, all you need to do is insert the correct type of clips into the predetermined slots, and you end up with a very professional trailer for your movie.
Customize Your Trailer
After you choose the trailer template, you need to add your own clips to the trailer and enter the correct information for the credits screen.
1. Click the Outline tab.
2. Edit the name of your movie and its release date.
3. Edit the names of the cast member(s) and choose whether they are male or female.
4. Edit the name of your movie studio and choose the type of imagery you want shown when your studio name appears.
5. Scroll down for more outline choices.

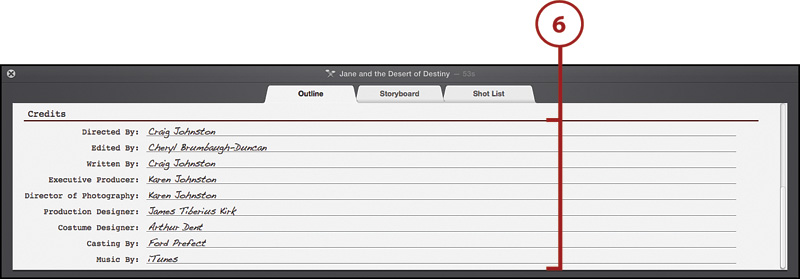
6. Edit the names to use in the credits.
A storyboard is a shot-by-shot layout of a movie. In the case of your trailer, it is a shot-by-shot layout of your trailer. As you scroll from top to bottom of the storyboard, you see how the trailer will be laid out from beginning to end. As you look at the storyboard, it is shown with the text that will be used and the types of video clips it wants to use. For example, the storyboard shows a dummy (or placeholder) clip, and the type of clip that should be used is written below it, such as Landscape, Wide, or Medium, and the name of your cast member(s). The dummy or placeholder clips visually indicate when you need to place a clip of one of the cast members, what they should be doing in the clip, or if you need scenery clips. All you need to do is find the right kinds of clips to use in each placeholder, and your trailer will take shape. If you don’t like the predetermined text that is used in the cutaway scenes, you can change it.
7. Click the Storyboard tab.
8. Click the video clip placeholder you want to replace, unless iMovie has automatically selected it for you.
9. Click a portion of an existing clip you want to insert. The clip selection box is already the correct size for the length of the clip needed.

10. Repeat steps 8 and 9 until you have replaced all placeholder clips with clips from your video.
11. Click the text that iMovie has chosen for each cutaway scene, and replace it with your own text if you want to.

Tweak the Clips
After you have added your own clips to the placeholders, you might want to fine-tune exactly what part of the clip you want to use.
1. Click to change what portion of your clip to use.

2. Move the crop box left and right along the clip by moving your mouse left and right.
3. Click a portion of your clip to select it.
4. Click the X to save your changes.

Work with the Shot List
The Shot List tab shows all of your shots sorted by shot type, for example, all shots of your cast member(s), action shots, and so on. This view helps you eliminate any duplicate shots.
1. Click the Shot List tab.
2. Scroll through the categorized list of shots and make sure that all shots meet with your approval.
3. Click a shot to replace it with a different clip from your video.
4. Click a new clip in your video.

Adjusting Your Trailer’s Look
When your trailer is almost ready, you can still adjust how it looks using the Adjust menu. As described in Chapter 7, “Editing Video Color, Brightness, and More,” you can make adjustments to the clips used in your trailer. Note that you can only adjust your clips, not the predefined trailer objects like the cut scene text and colors or the music.
Have Even More Control Over Your Trailer
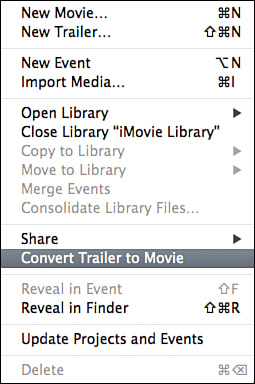
You might want to add to or edit how the trailer looks without the constraints of the trailer template. You can do this by converting your trailer to a movie. Beware that once your trailer has been converted to a movie, you cannot convert it back to a trailer. It is advisable to first make a copy of your trailer, and then convert the copy to a movie just in case you change your mind later. After your trailer has been converted to a movie, you will be able to edit every aspect of it as you would any movie, including the look and feel of transitions. You can even make the trailer longer or shorter by adding or removing clips. To convert your trailer into a movie, select File, Convert Trailer to Movie.
Sharing Your Trailer
When your trailer is ready, you can share it with friends, family, or publically using different online services like YouTube, Facebook, or Vimeo, or you can save it locally to your Mac.
2. Click one of the methods for sharing.
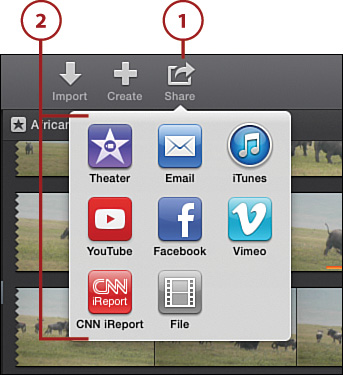
The various methods for sharing a trailer from iMovie work the same as for sharing a movie. (The actual steps are covered in Chapter 10.) Each method starts back at this menu by clicking the relevant sharing option, such as Email.