
5. Adding Special Effects, Maps, Backgrounds, and Titles Clips

In this chapter, you find out how to add special effects, maps, backgrounds, and titles to your movie clips and movie, such as how to speed up or slow down clips and add other special effects. Topics include the following:
→ Speeding up or slowing down a movie clip
→ Creating an instant replay
→ Creating the Green/Blue Screen special effect
→ Creating picture-in-picture movie clips
→ Creating side-by-side movie clips
→ Adding a map and/or background to the movie
→ Adding titles and credits to the movie and to movie clips
iMovie has many techniques to add special effects, maps, backgrounds, and titles to your movie clips. You can speed up or slow down a clip, as well as add the Rewind or Instant Replay special effect to a clip to add more focus or interest to the clip. You can add maps and backgrounds to your movie. Also, you can add titles to your movie and even superimpose titles over existing movie clips to add a better description of the clip and its contents. This chapter covers all of this and more!
Speeding Up or Slowing Down a Clip
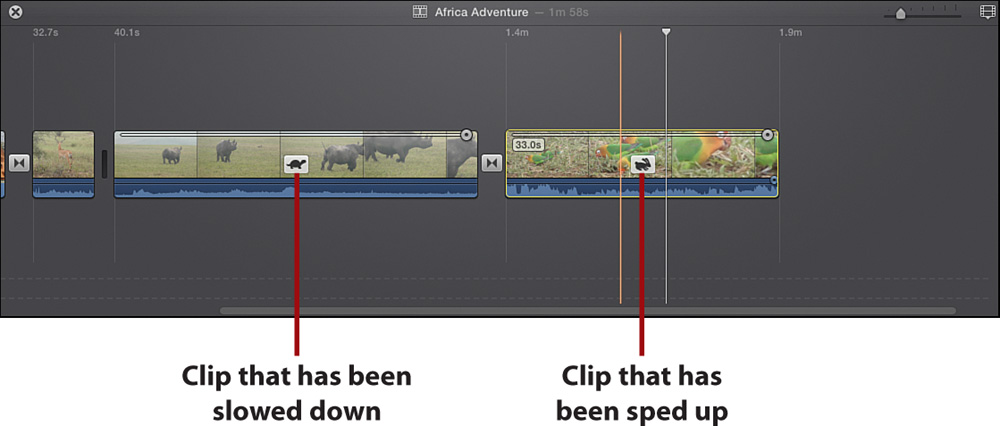
iMovie can speed up or slow down a clip’s playback rate. When you speed up a clip, it becomes shorter in its playback duration; when you slow down a clip, it becomes longer in its playback duration. For instance, if you double the speed of a clip, its duration is reduced by half and the clip in the timeline is displayed at one half its size.
Adjust Clip Speed
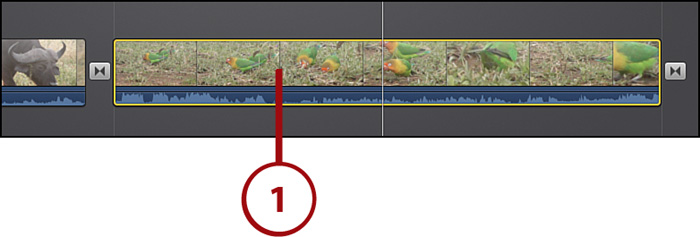
1. Select a clip in the movie timeline.
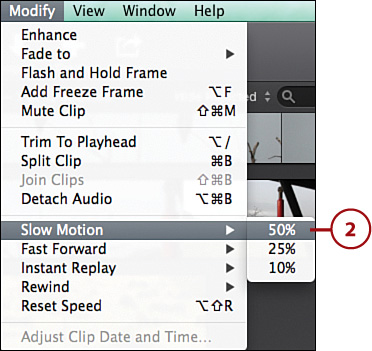
2. To slow down a clip in the movie timeline, choose Modify, Slow Motion, and then choose a speed percentage from the submenu. The Speed Editor is initiated.
3. A turtle icon displays in the center of the clip, and the clip is lengthened in the timeline. For example, if you slow down a clip by 50%, the clip displays at double its size. The Speed slider displays at the top of the clip.

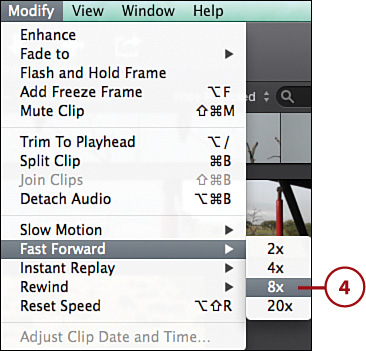
4. To speed up a clip in the movie timeline, choose Modify, Fast Forward, and then choose a speed option from the submenu. The Speed Editor is initiated.
5. The clip shrinks in length in the timeline, and a rabbit icon displays in the center of the clip. A Speed slider displays at the top of the clip.

6. To undo a playback speed setting, select the retimed clip in the timeline and then choose Modify, Reset Speed.

Undo Command
You can also use the Undo command to undo a speed setting applied to a clip. Immediately after you apply Slow Motion or Fast Forward, choose Edit, Undo. The Undo command will undo any action you just initiated.
Adjust Clip Playback Speed
After you apply a playback speed like Fast Forward or Slow Motion to a clip in the movie timeline, you can adjust the speed through a few different techniques. You can manually set a new playback speed or you can set a custom speed setting.
1. Select a retimed clip in the movie timeline.

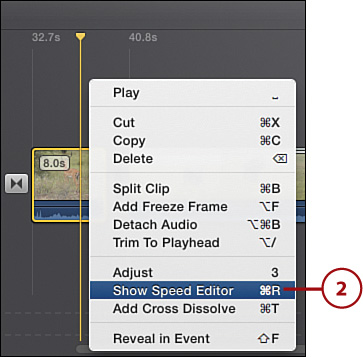
2. If the Speed Editor is not initiated, right-click the clip and choose Show Speed Editor from the context menu. This is a toggle menu—if the Speed Editor is initiated, you will see Hide Speed Editor in the context menu.
3. Click and drag the Speed slider left or right. Dragging left increases the speed of the clip, and dragging right slows down the clip. The new adjusted playback timing is displayed above the end of the clip, indicating the retimed clip duration.

Using the Speed Editor
You can initiate the Speed Editor at any time. It allows you to set any speed you want—not just the preset values you get with the Modify, Slow Motion or Modify, Fast Forward commands. Select a clip in the movie timeline, right-click, and then choose Show Speed Editor from the context menu. Adjust the Speed slider to the speed you want.
Adding a Movie Clip with a Different Frame per Second Rate to a Movie
Recording devices record video at a default frame per second rate, or FPS, that might be different from the iMovie default setting of 30FPS. When you import these clips to iMovie, it automatically adjusts them to 30FPS. If you need to retime these clips, initiate the Speed Editor and adjust the speed of these clips by dragging the Speed slider so that the video in the clip plays faster or slower as you need for the movie.
1. Click the rabbit or turtle icon displayed in the middle of a retimed clip. This opens the Speed settings for the retimed clip.

You can also double-click the Speed slider to open the Speed settings.
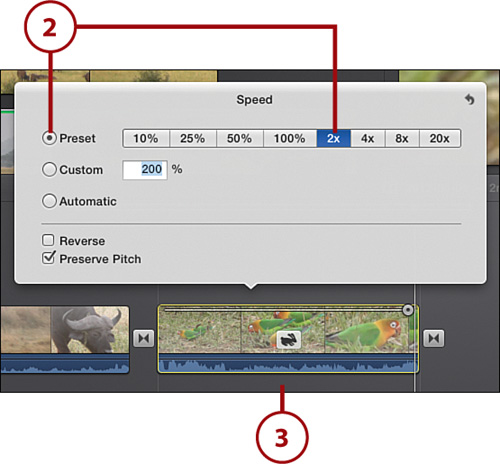
2. Click the Preset option and then choose a preset percentage.
3. Click anywhere in the movie timeline area to close the Speed settings.
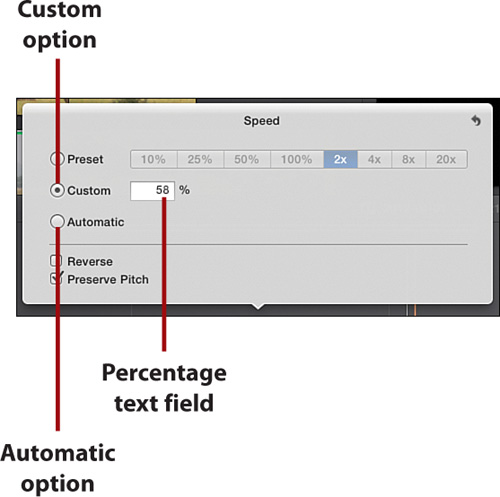
Applying a Custom Speed Setting
To apply a custom speed setting, select the Custom option and then type the percentage you want in the Percentage text field. If you need to adjust the Frame Per Second rate to iMovie’s default setting of 30FPS, click the Automatic option and iMovie automatically adjusts the clip to 30FPS.
Adjust Audio Pitch
When you slow down or speed up a clip, you can have problems with the audio. When you slow down a clip, the audio track is also slowed down, which results in the audio having a lower pitch and sounding funny. If you speed up a clip, the audio has a higher pitch and again sounds funny. iMovie can retain the original pitch of the audio soundtrack.
1. Click a retimed clip in the movie timeline to select it.
2. Click the turtle or rabbit indicator in the middle of the retimed clip to open the Speed settings.

3. Select the Preserve Pitch check box.
4. Click anywhere in the movie timeline area to close the Speed settings.

Reverse a Movie
iMovie can also reverse the direction of the video footage in a movie clip so that it plays backward. Use the Speed settings to apply this adjustment to your movie clip.
1. Click a retimed clip in the movie timeline to select it.
2. Click the turtle or rabbit indicator in the middle of the retimed clip to open the Speed settings.

3. Select the Reverse check box.
4. Click anywhere in the movie timeline area to close the Speed settings.

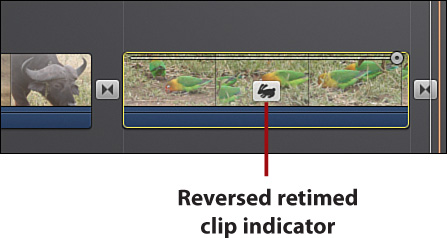
Applying Multiple Speed Settings to a Clip
You can apply multiple Speed settings to a clip. For instance, you can reverse the video for a clip that has Fast Forward or Slow Motion applied to it. In the timeline, the clip displays either the rabbit or turtle indicator but flips it to the left to indicate that the clip has been reversed and retimed.
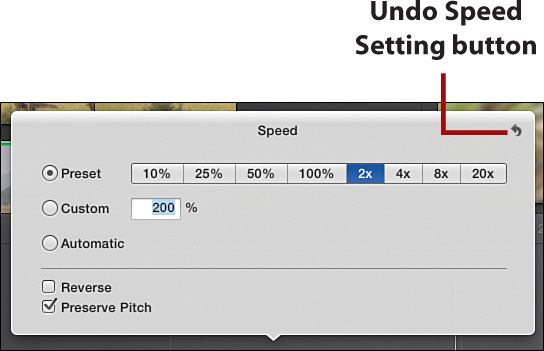
Undoing the Speed Settings
To undo any of the Speed settings you have set for a clip, open the Speed Editor by clicking the rabbit or turtle icon in a retimed clip, and then click the Undo Speed Settings button in the upper-right corner.
Resetting a Retimed Clip Directly in Movie Timeline
You can also reset any clip directly in the movie timeline by selecting a retimed clip and choosing Modify, Reset Speed.
Apply the Rewind Special Effect
iMovie has a special effect that you can apply to a clip that makes it appear to rewind. The Rewind effect modifies the clip so it has three parts. The first part is where the movie plays forward; the second part is where the rewind section plays backward; and the third part is where the clip plays forward again. You can adjust each of the three parts playback speed.
1. Click a clip in the movie timeline to select it.
2. Select Modify, Rewind and then choose the rewind speed from the submenu. The submenu sets the speed of only the rewind video in part 2.

3. The Rewind special effect is applied to the clip and it displays with three parts. Each part has its own Speed slider, allowing individual adjustments for each part.

4. Adjust the speed of each part by clicking the Speed slider and dragging it to the left to increase that part’s playback speed. Drag to the right to slow down that part’s playback speed.

5. The clip displays either the rabbit or the turtle indicator for each part of the Rewind special effect.
Creating an Instant Replay of a Clip
Another effect that can provide interest to a movie clip is the Instant Replay effect. Just like in a sporting event when they cut away from the game to replay a great moment, you can create a replay of a clip.
1. Click a clip in the movie timeline to select it.
2. Choose Modify, Instant Replay and then choose the speed for the replay.

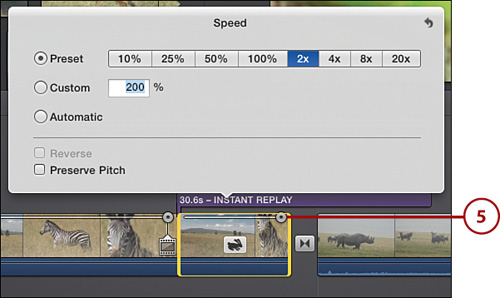
3. In the movie timeline, the selected clip displays in two segments, the clip at normal speed and the Instant Replay segment set at the speed you choose. Each segment has a Speed slider above it. Click and drag the Speed slider to adjust the speed for each segment.
4. Click and drag the speed boundary indicator to adjust what frame to start the Instant Replay segment of the clip.

5. Double-click the Speed slider to access more Speed settings for each segment of the instant replay. If you choose a slow speed, the turtle indicator displays in the clip segment. If you choose a fast speed, the rabbit indicator displays.
Adding Backgrounds Using the Green/Blue Screen
The Green/Blue Screen effect is a cool feature of iMovie, and it is a way to superimpose a clip on top of another clip. For instance, you might have a clip of the ocean and you want to superimpose your children walking on the beach. You need to have two clips for this effect: one that has been recorded in front of a green or blue backdrop—your children walking, in this example—and the other that is a clip you want to use as the background—in this case, the ocean. iMovie drops out the green or blue backdrop so that the first image is superimposed on the new background.
When to Use a Green Screen or a Blue Screen
iMovie’s Green/Blue Screen effect drops out all blues or all greens in a clip based on the color of the backdrop you used when recording. It is wise to think about the colors used in your clip and how they contrast with the backdrop color. For example, if you are recording a green parrot, you would want to use a blue screen as it will contrast well with the green of the parrot. If your parrot is blue, you would want to use a green screen.

2. Click and drag the Green Screen clip above the Background clip.

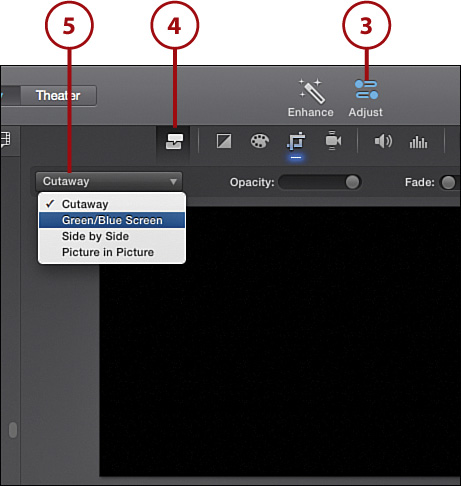
3. With the Green Screen clip selected, click the Adjust button.
Access Adjust Button with a Right-Click
You can right-click on any clip in the movie timeline and choose Adjust from the Context menu to initiate the clip adjustment tools.
4. Click the Video Overlay Settings button.
5. Click the Video Overlay button and select Green/Blue Screen from the drop-down menu.
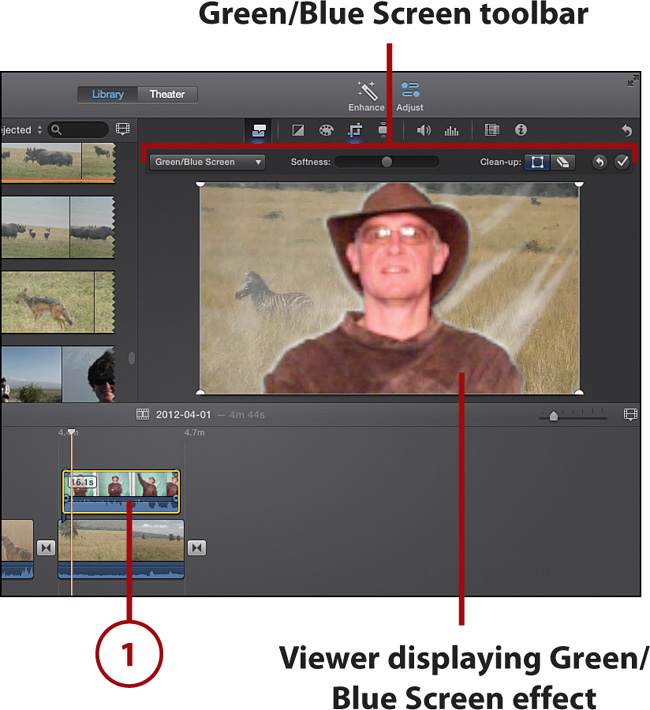
6. The Viewer displays the Green Screen clip superimposed over the Background clip.

>>>Go Further: Using a Background Image with the Green/Blue Screen Effect

Make Green Screen Adjustments
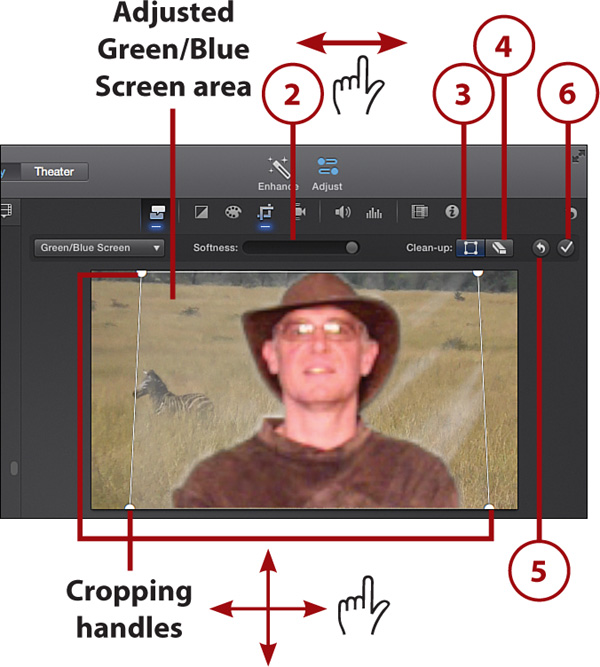
It is common to need to apply a few adjustments to your Green/Blue Screen clip to help clear up issues that display when iMovie drops the backdrop out of the clip. Sample issues include the tightness of the cropping edges to the subject matter or folds and creases in the backdrop that still are visible even though the backdrop was dropped out of the clip.

1. Click to select the clip with a Green/Blue Screen effect. This displays the Green/Blue Screen toolbar.
2. Click and drag the Edge Softness slider to adjust the softness of the edges around your subject of the Green/Blue Screen clip.
3. Click the Crop button and in the Viewer, click and drag the cropping handles to adjust the size of the Green/Blue Screen effect.
4. To fix problem areas, click the Clean-up button and drag across areas that need more Green/Blue Screen effect applied.
5. To revert the clip to its original state, click the Reset Video Overlay Settings button.
6. When you have adjusted the Green/Blue Screen effect the way you want, click the Apply Green/Blue Screen Settings button to finalize your adjustments.
Beware of Cropping the Green/Blue Screen Area Too Small
Always preview the cropping that you set for your Green/Blue Screen effect as you might find that you set the cropping area too small. Based on the movement of your subject in the clip, it might require a larger area to show your subject throughout each frame of the clip’s video.
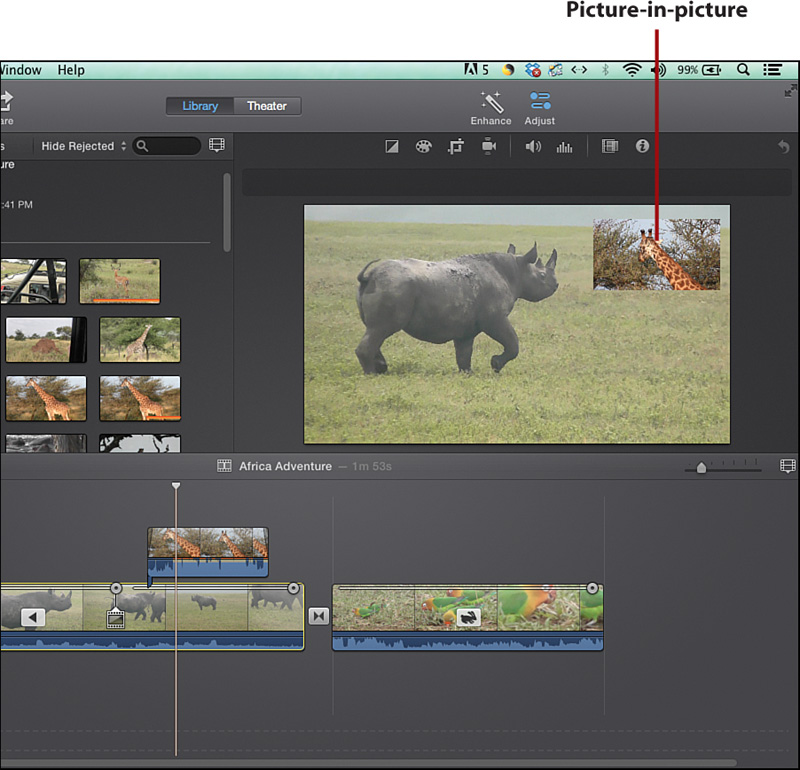
Using Picture-in-Picture
iMovie lets you create a video effect that displays a second window of a clip inside another clip. This is called the picture-in-picture effect.
Apply the Picture-in-Picture Effect
1. Click and drag the clip that you want to be in the smaller window above a clip in the movie timeline.

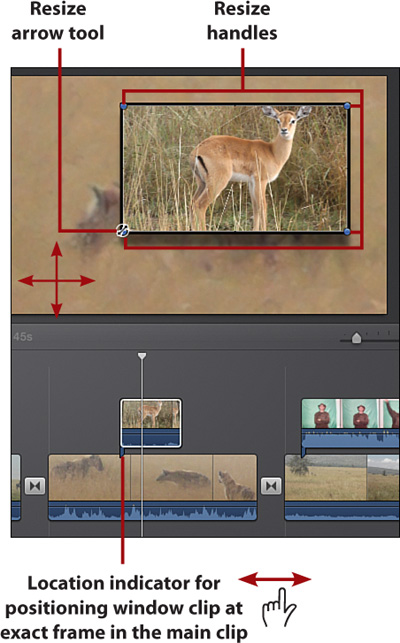
Moving the Picture-in-Picture Window
You can adjust the location of the picture-in-picture window in the main clip video by dragging it left or right above the main clip in the movie timeline.
You can also adjust the size of the picture-in-picture window by clicking and dragging the corner handles of the window that display on the window in the Viewer.
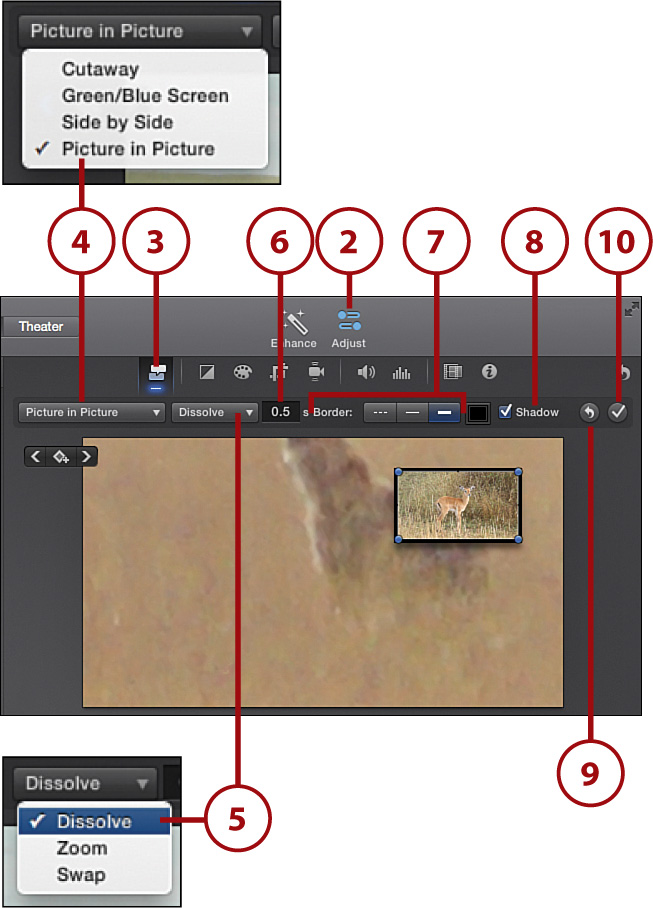
2. Click the Adjust button in the iMovie toolbar.
3. Click the Video Overlay Settings button.
4. Choose Picture in Picture from the Choose a Video Overlay Style menu.
5. Set the transition of how the second clip window enters and exits the movie by clicking the Choose Transition Style menu and selecting the transition that you want for the window. To display the Window clip with a transition of dissolve or zoom, choose Dissolve or Zoom. Choose Swap to switch locations of the main clip and the window clip, with the main clip becoming the picture window and the picture window clip becoming the background
6. Double-click the transition duration and then delete the default transition time of 0.5 seconds; type in the transition duration that you want.
7. Click one of the three border settings to apply a border to your window.
8. Click the Shadow option. This applies a shadow to your window.
9. Click the Reset Video Overlay Settings button to revert the clip to its original settings.
10. When you have the picture-in-picture settings the way you want, click the Apply Picture in Picture Settings button to finalize your settings.
11. The Viewer displays the movie with the picture-in-picture effect applied.

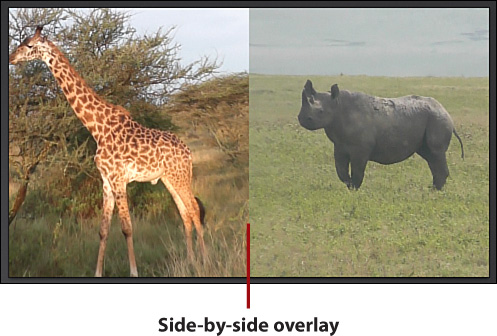
Creating Side by Side Clips
Similar to the picture-in-picture clip, you can create two clips that play side-by-side at the same time. This splits the screen to display both clips at the same time.
Display Side-by-Side Clips
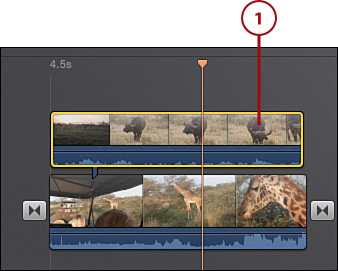
1. Drag a clip or a portion of a clip above a clip in the movie timeline.
2. Click the Adjust button in the iMovie toolbar.
3. Click the Video Overlay Settings button.
4. Choose Side by Side from the Choose a Video Overlay Style menu.
5. Click either the Left or Right button to rearrange which side the side-by-side clips display.
6. Click and drag the Slide In/Slide Out transition to set a transition duration for the side-by-side clips.
7. Manually set a transition duration by double-clicking the Transition Duration Setting text box. Delete the duration setting in the text box and type in the duration you want.
8. Click the Reset Video Overlay Settings button to revert the clip to its original settings.
9. Click the Apply Side-by-Side Settings button to finalize your settings.

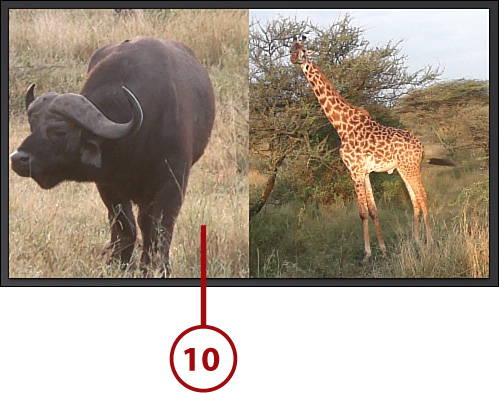
10. The Viewer displays the movie with the side-by-side effect applied.
Adding Maps & Backgrounds to a Movie
You can add maps and background images to your movie. iMovie has a Content Library loaded with extras for making your movie more detailed or descriptive. The Content Library is in the iMovie sidebar, and the Maps & Backgrounds Library is in the Content Library. Each map style has a short animation of the route taken from your starting location to your ending location. You can configure any city, state, or country as the starting and ending location and customize the map style. And you have a choice of backgrounds, both patterned or solid styles, and some have animation for the display.
Add an Interactive Map
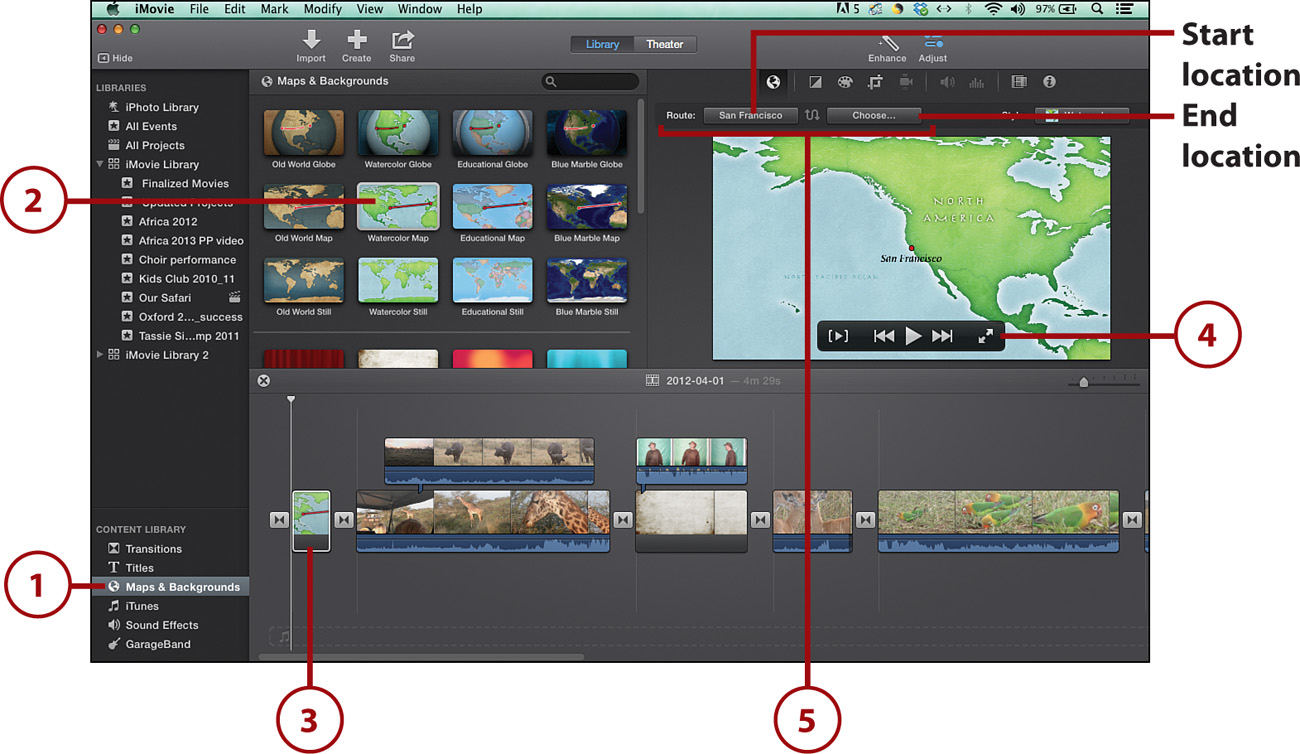
1. Click the Maps & Backgrounds Library in the Content Library.
2. Select a map style in the Event Browser. Skim through the map style by moving your mouse pointer left or right to see the animation.
3. Drag the map style from the Event Browser into the movie timeline. The Viewer displays the map style.
4. Move your mouse into the Viewer to display the playback controls, and click the Play button to see the map animation.
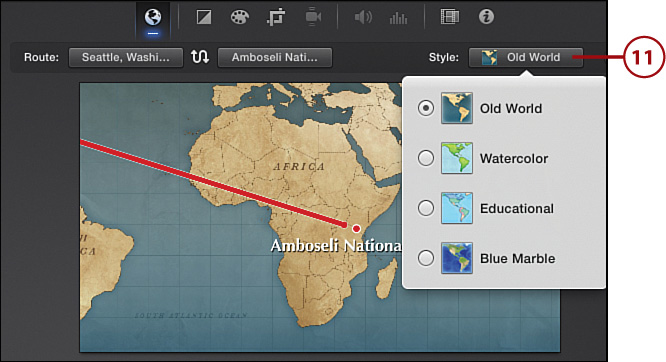
5. You can set the route by clicking the Set Start Location menu. You can also click the Set End Location button to set end destination.
6. The Location Search window displays for setting the Start Location. Type a city, state, airport code, or just a country into the Search field. The search results display any matches.
7. Click to select the city, state, airport, or country in the search results.
8. Click the Name to Display on Map field and type a name.
9. Click the Done button when you are finished with the Start Location search.
10. To create the end location, click the End Location button and repeat steps 6–9 for the End Location.

11. To set a style for the display of the location information on the map, click the Style button and select a new style from the list.
2. Select a background style in the Event Browser. Use the vertical scrollbar to scroll down to see all backgrounds.
3. Drag the background style from the Event Browser into the movie timeline. The Viewer displays the background image.
4. Move your mouse into the Viewer to display the playback controls and click the Play button to see the background animation.

5. If needed, adjust the background screen clip duration by clicking and dragging the starting and/or ending frame of the clip to the left or right.
Adding Titles to a Movie
iMovie lets you add titles to your movie or anywhere in a clip. iMovie has 16 new title styles available. Many of these title styles have animation that displays the title in an entertaining fashion. You can add a title to any movie clip in your movie timeline. You can also use them as their own clip and add them as a title screen to the start or the end of your movie, as well as between any clips in the timeline. Movie titles are in the Content Library.
1. Click the Titles Library listed in the Content Library.
2. Click to select a title style from the Event Browser.
3. Drag the selected title style from the Event Browser and drop it in the movie timeline before or after a movie clip.


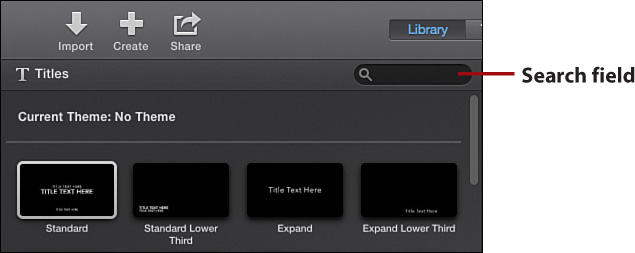
Searching for a Title Style
You can also search for a title style by name in the Search field above the Event Browser.
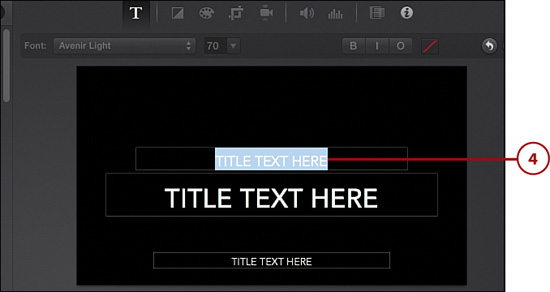
4. The Viewer displays the title screen. Double-click the title field shown in the Viewer to set your cursor in a title line and then click and drag over the default title text to select it.
Quick Access to Title Screen in Viewer
Another technique for selecting the default title text in a title screen is to double-click the purple title screen clip in the movie timeline. This automatically displays the title screen clip in the Viewer with the first default text field already selected.
5. Delete the default text by pressing Delete on the keyboard, and type in the title you want for your title screen.

Adjusting Title Screen Clip Duration
When a title screen is created in the timeline, it displays as a purple clip with a default duration setting. You can extend or shorten the title screen clip by dragging the right or left borders of the clip just like you can for extending or shortening the duration of any clip in the movie timeline.
Add Title Text to Movie Clips
You can also add title text to any clip in your movie timeline. This enables you to add comments or titles directly in your movie clips. The process is similar to adding a title screen to your movie but instead of placing the title style in the movie timeline as its own clip, you add it above a clip in the timeline as an overlay clip. The title and its animation are superimposed on the existing clip in the movie timeline.
1. Click the Titles Library in the Content Library.
2. Click to select a title style from the Event Browser.
3. Drag the title style and place it over an existing clip in the movie timeline.
Positioning the Title Style
Position the title style over the center of a clip in the Movie timeline to display the title throughout all the video of the clip. If you position the title style in the opening third or ending third of the clip, iMovie displays the title for the video of just that third of the clip.
4. The Viewer displays the clip with the title style superimposed over it. Double-click the default title text to select it and press Delete on your keyboard to delete the default text.

5. Type the text you want to be displayed on the existing movie clip.

Some Titles Styles Cannot Be a Title Screen
There are also some titles styles that can only be added to an existing clip in the movie—Lens Flare and Pull Focus. They cannot be added as a title screen; they can only be added as a title style superimposed over an existing clip in the movie timeline.
Adding a Titles Style to a Background Screen Clip
You can also create a title screen using a background style as the background image. First add a background style from the Maps & Backgrounds Library in the Content Library to the movie timeline. Then overlay a title style above the background screen clip in the movie timeline.
Customize Title Font Properties
After you have the titles added to your movie, you can customize the font properties, like the font used or the font size, alignment, and color. Based on the title style used in your movie, some or all font properties might not be accessible. Each title style has its own customizable font properties.
1. Click to select a title screen clip or overlay title clip in your movie timeline.
2. Double-click the title text in the Viewer and select all the text by dragging over it.
3. The Titles toolbar displays above the Viewer. The tools displayed vary based on the selected title style and the available font properties that can be modified for that title style.
4. Format the font by clicking the Font button and selecting a new font from the list.
5. Set a larger or smaller font size by either clicking the Font Size arrow button and selecting a preset size from the list, or by double-clicking the Font Size field and typing a custom font size.
6. Click one of the font alignment buttons to select an alignment style of either left, center, right, or fully justified.
7. Click one of the font style buttons to select a font style of Bold, Italic, or Outline.
8. Click the Font Color button and then click to select a color from the color palette.
9. If you need to reset your title style to its default settings, click the Reset Title Style button.
10. When you have all your font properties set as you want, click the Apply Title Adjustments button to finalize your font properties.

Title Styles and Customizable Font Properties
Some title styles are not customizable in their font, font size, alignment, or font color. The Titles library has 48 different title styles. The first 16 are noncustomizable in font properties, but the remaining 32 are customizable to some extent, if not fully customizable.
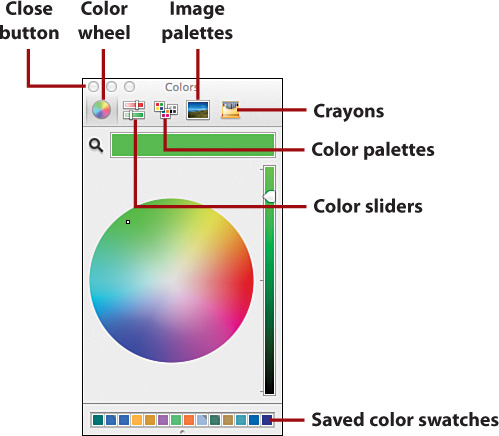
Using the Color Palette
The color palette is a common feature of many Apple products. It lets you choose from millions of colors. You can use the Color Wheel, which is the default color palette that displays, or if you click one of the color selection buttons, like Color Sliders, the color palette changes to a different palette for choosing a color. Click the Close button to close the color palette.
Adding Credits at the End of Your Movie
A common practice in any movie is to add credits to your movie. The credits can be placed anywhere in the movie timeline, but typically they are located at the very end of the movie. iMovie makes this easy with a title style just for credits, the Scrolling Credits style.
1. Click the Titles library in the Content Library located in the iMovie sidebar.
2. Select the Scrolling Credits title style in the Event Browser.
3. To place the Scrolling Credits title style at the end of the movie, click and drag the horizontal scrollbar to the right so that you can see the end of your movie timeline.
4. Click and drag the Scrolling Credits title style to the end of your movie to place it after the last movie clip.
5. To customize the credits displayed, move the playhead into the Scrolling Credits title screen in the timeline to display the credits in the Viewer. Then double-click the default text in the Title field to select all the text.

6. Press Delete on your keyboard to delete the default text and type in the new title text.
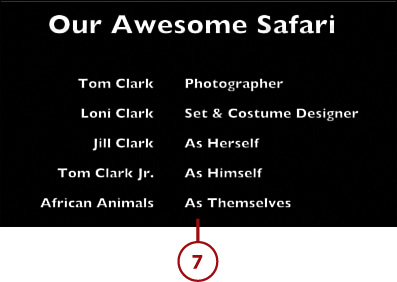
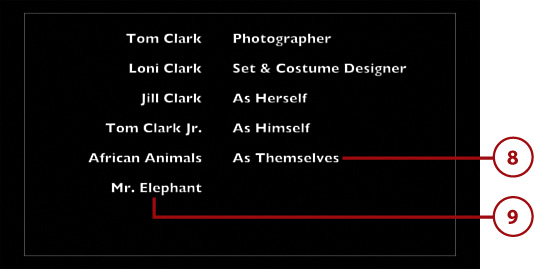
7. Repeat steps 5 and 6 to replace the other credits’ default text fields. If there are more default title fields than what you need, click and drag through them to select the extras and press Delete on your keyboard to delete them.
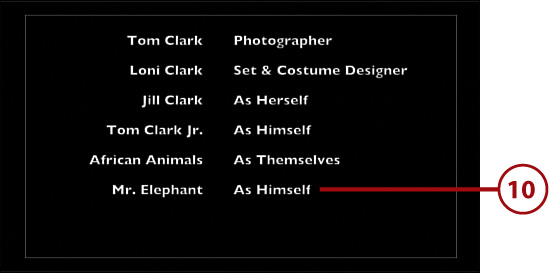
8. Add more text fields by putting your cursor at the end of a credit text field and pressing Return on your keyboard to create a new line.
9. Press Tab on your keyboard to move to the left-center text field and type the text you want.
10. Press Tab again to move to the right-center text field and type the text you want.
Adjusting the Clip Duration
You can adjust the duration of the Scrolling Credits title screen by shortening or lengthening the title screen clip. Click and drag the left or right border of the clip in the movie timeline to adjust the duration of the Scrolling Credits clip.