10. Using SkyDrive to Store and Share Excel Files
In this chapter, you find out how to leverage SkyDrive to store and share Excel files on the Internet. The topics covered in this chapter include the following:
→ Saving a workbook to SkyDrive
→ Downloading a workbook from SkyDrive
→ Sharing a SkyDrive workbook with others
You can think of SkyDrive as a Microsoft Office platform in the cloud (or as Microsoft’s answer to Google Spreadsheets). With it you can save, view, and edit your Office documents on the Web. When you publish your Excel workbooks to SkyDrive, you can
• View and edit your workbooks from any browser, even if the computer you use doesn’t have Excel installed.
• Provide a platform in which two or more people can collaborate on and edit the same Excel file at the same time.
• Share workbooks with others by via web links.
Signing Up For SkyDrive
Before you can use SkyDrive, you need to sign up for a Microsoft passport account. Follow these steps to create an account.
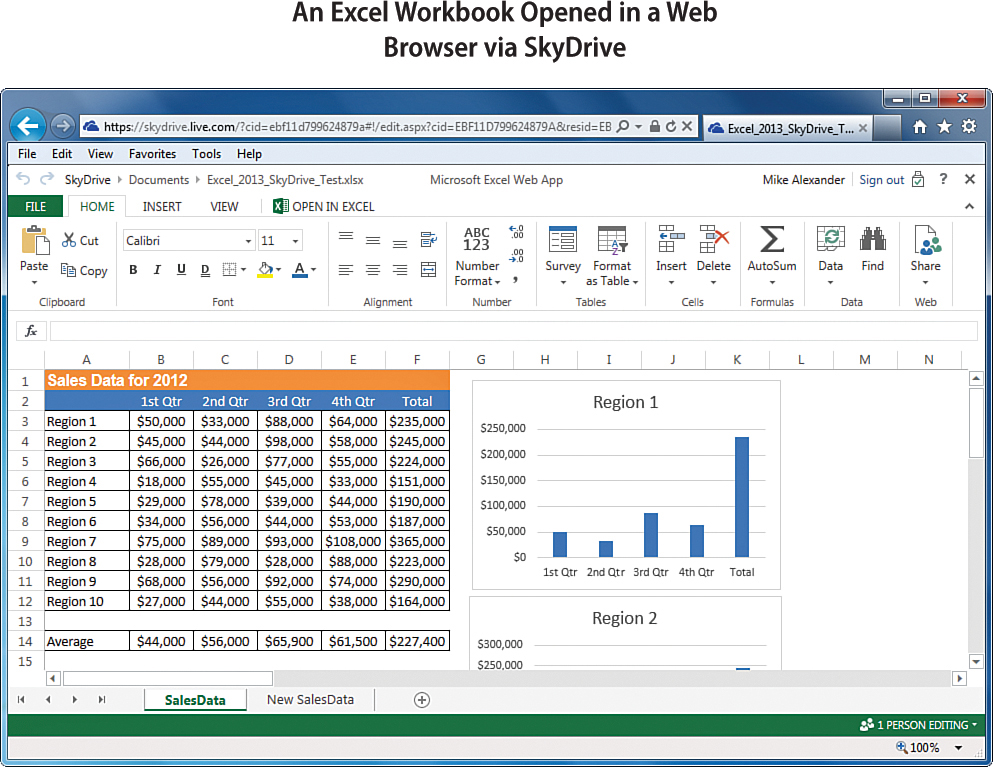
1. Open your web browser and enter skydrive.live.com in the address bar.
2. Click the Sign Up Now link.
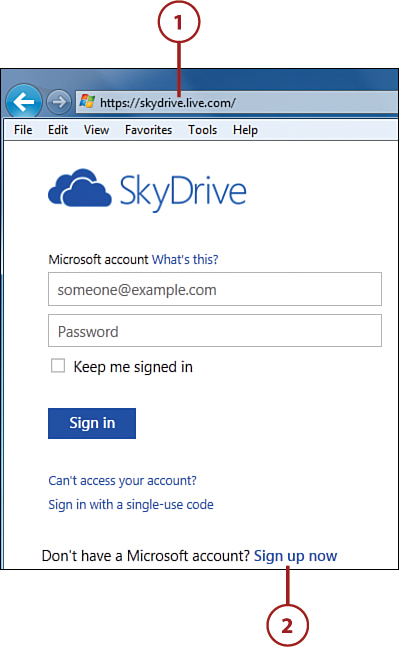
3. Complete the registration form to create your account.
Hotmail Users Can Skip This Step
If you have a Hotmail email account, you already have an account with Microsoft. You can use your Hotmail email address and password to sign into SkyDrive.
Signing into SkyDrive
After you have a SkyDrive account, you need to sign into your SkyDrive account. Signing in through Excel automatically ties your SkyDrive account to any Excel document you open.
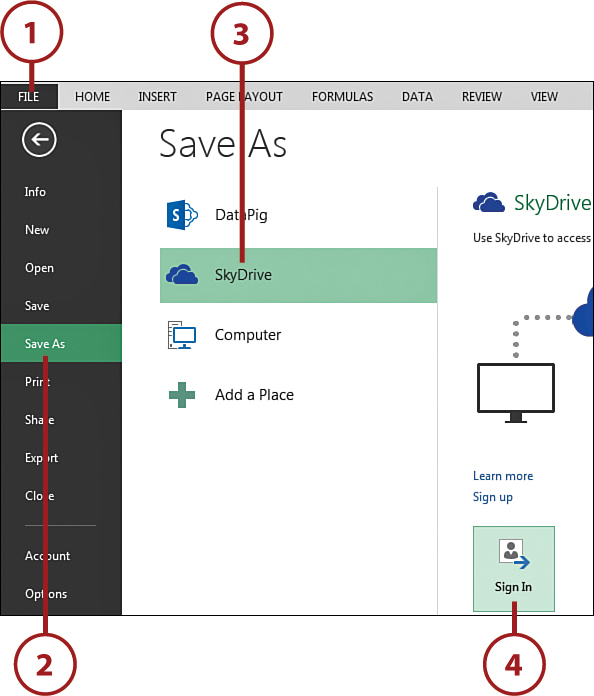
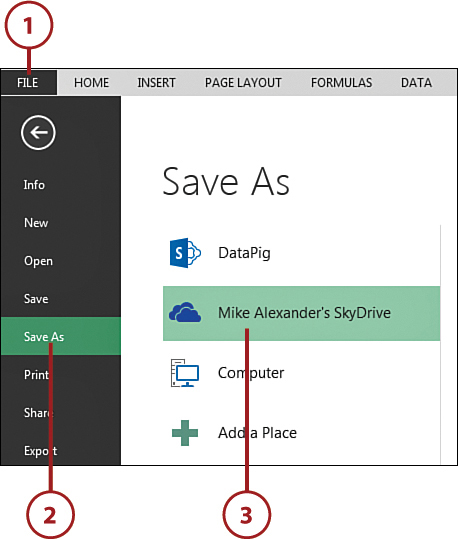
1. Open any Excel document and click the File tab.
2. Click the Save As button.
3. Click SkyDrive.
4. Click the Sign In button.
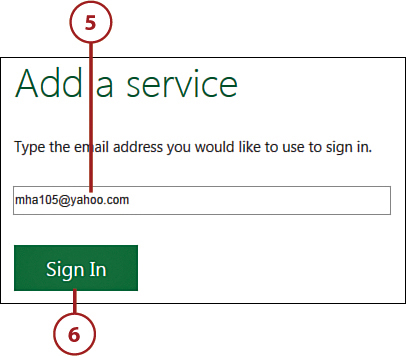
5. Enter the email address you used to register for your Microsoft account.
6. Click the Sign In button.
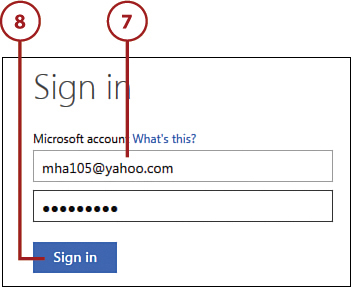
7. Enter the password you created when registering for your Microsoft account.
8. Click the Sign In button.
9. Note your SkyDrive account in the Save As pane.
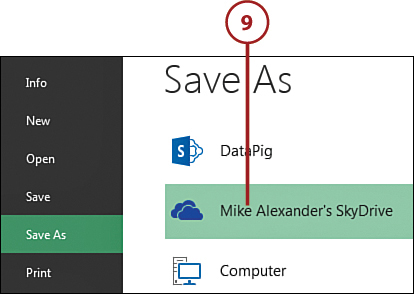
You Only Have to Sign In Once
After signing in one time, Microsoft Office remembers your SkyDrive credentials and automatically signs in for you each time you open an Office document. Your SkyDrive account appears in the Backstage view of any Microsoft Office document you open.
Saving a Workbook to SkyDrive
When you save a workbook to SkyDrive, you are essentially publishing your Excel workbook to the Web. You have a good bit of control over which components of your Excel workbook are viewable on the Web through Excel’s Browser View options described here.
1. Open the workbook you want published to SkyDrive, and click the File tab.
2. Click the Save As button.
3. Double-click your SkyDrive Account.
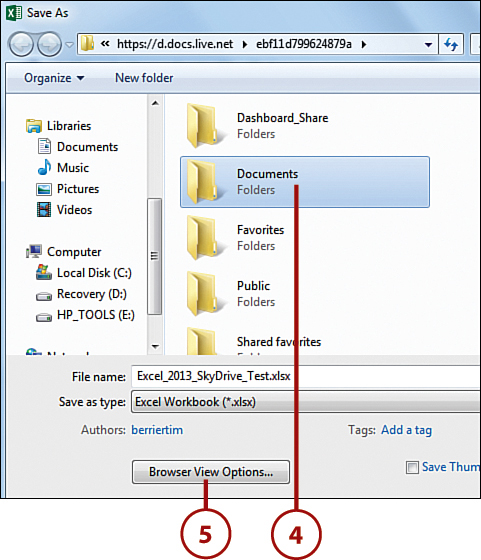
4. Click the Documents folder in the Save As dialog box.
5. Click the Browser View Options button.
Creating a New Folder
By default, SkyDrive starts you with a folder called Documents. This folder is a fine location to save your workbooks. However, if you need to create a separate folder for your workbook, click the New Folder option in the Save As dialog box.
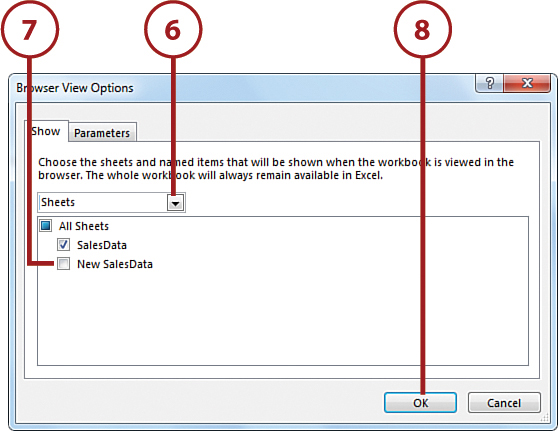
6. Click the drop-down and select Sheets.
7. Place a check next to each sheet you want to make available on the Web. Remove the check next to any sheet you don’t want to share.
8. Click the OK button to return to the Save As dialog box.
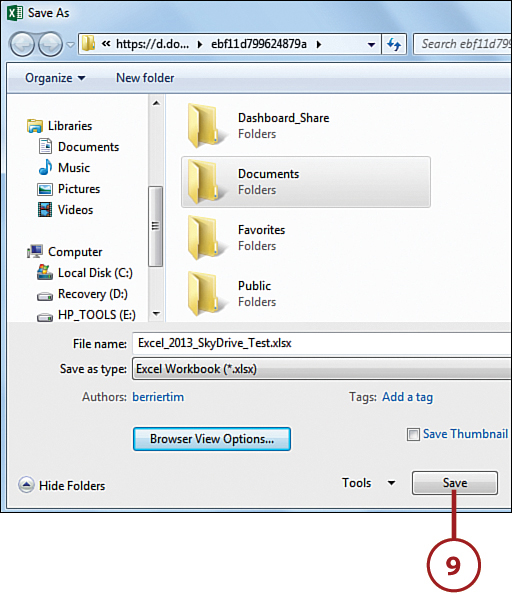
9. Click the Save button to publish your workbook.
Saving Certain Objects in the Workbook
In addition to Sheets, the drop-down shown in step 6 has an option called Items in the Workbook. When this option is selected, you can choose to show or not show certain objects in the workbook. For instance, you might have four charts in the workbook but want to make only two of them visible on the Web. Simply uncheck the charts you don’t want published. You can control the visibility of any object inserted in your workbook—charts, shapes, pictures, pivot tables, and so on.
Opening a SkyDrive Workbook
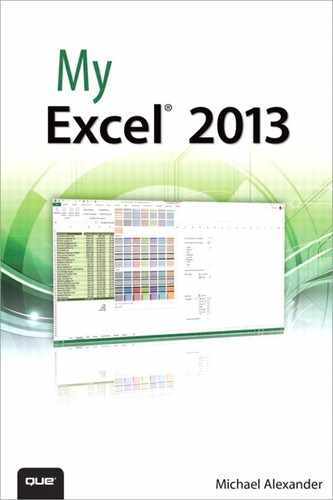
After you publish your workbook to SkyDrive, you can open, view, and edit it through any browser. This enables access to your workbook from any computer, even if that computer doesn’t have Microsoft Excel installed on it. And because your workbook is on the Web, any number of people can open and edit your workbook, allowing for easy collaboration. Follow these steps to open a workbook on SkyDrive.
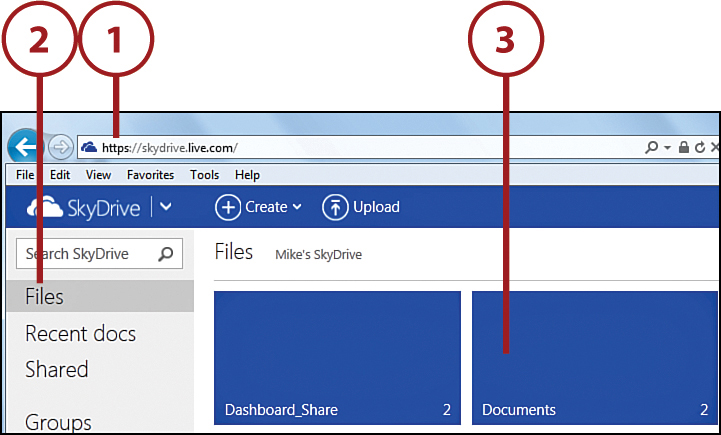
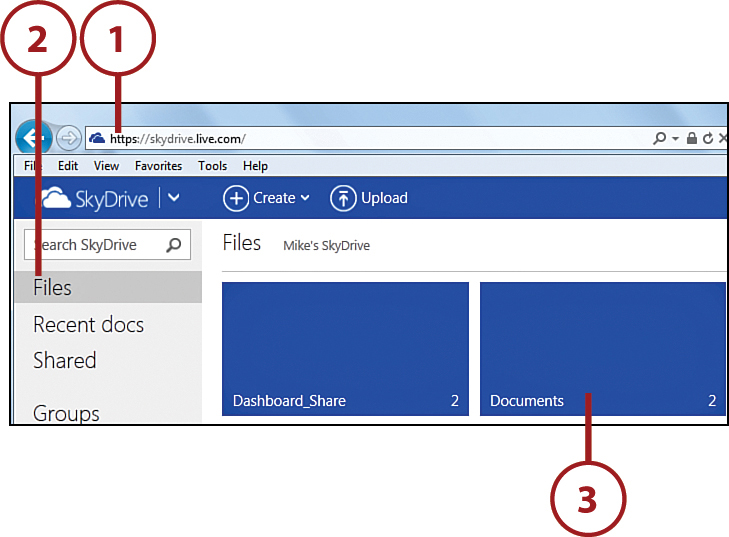
1. Open your browser, enter skydrive.live.com in the address bar, and sign into your SkyDrive account.
2. Click Files.
3. Double-click the folder in which you saved your workbook.
4. Double-click the file you want to view or edit.
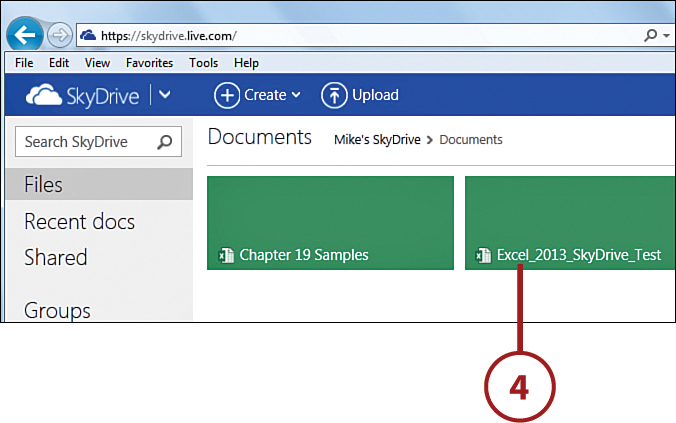
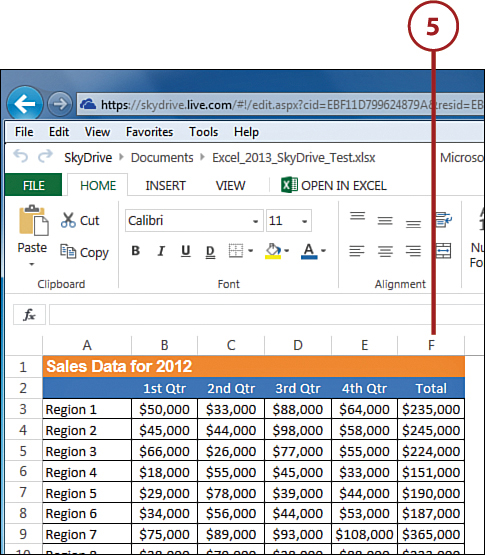
5. Your workbook opens directly in the browser, enabling you to work with it just as you would if it were opened in Excel.
Downloading a Workbook from SkyDrive
You might find that you want to download a copy of a SkyDrive workbook to your local PC. In these cases, you can follow the steps outlined here.
1. With your SkyDrive workbook open, click the File tab.
2. Click the Save As button.
3. Click the Download button.
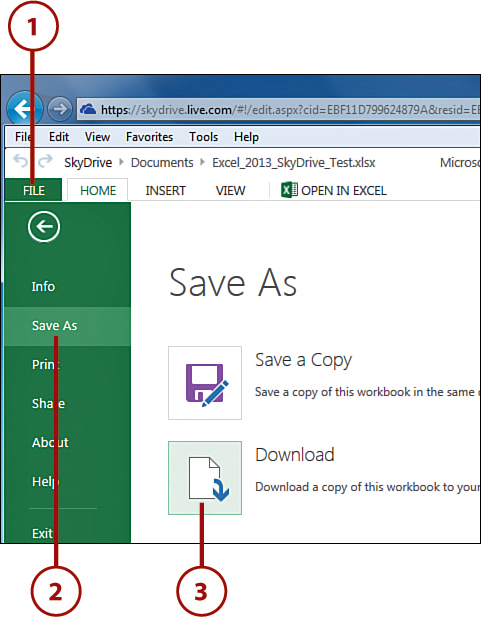
4. Use the Save As dialog box to specify the location and name of the file and then click the Save button.

Sharing Your SkyDrive Workbooks with Others
One of the major benefits of publishing your workbooks to SkyDrive is that multiple people can view and edit your Excel files simply by going to the appropriate web link. Excel makes it easy for you to distribute these web links through the Share feature of SkyDrive.
1. With your SkyDrive workbook open, click the File tab.
2. Click the Share button.
3. Click the Share with People button.

4. Click the Send Email option.
5. Enter the appropriate email address.
6. Enter some text for the body of the email.
7. Choose whether you want the recipients of your link to have rights to edit the workbook and whether you require them to log in to see the workbook.
8. Click the Share button to send the email.

Sending to multiple recipients
To send to multiple email addresses, simply separate the email addresses with a semicolon (;).
Managing SkyDrive Workbooks
After your workbooks are in a SkyDrive folder, you may want to do things such as delete them, rename them, copy them, and move them around. Follow these steps to perform these sorts of actions on your SkyDrive workbooks.
1. Open your browser, enter skydrive.live.com into the address bar and sign in to your SkyDrive account.
2. Click Files.
3. Double-click the folder that contains your target workbook.
4. Place a check in the check box of the target workbook and then right-click the box to open the pop-up menu.
5. Choose the wanted action.

Taking Actions on Multiple Workbooks
You can take actions on multiple workbooks at once by first placing a check in all the targeted workbooks and then right-clicking any one of them. When you select multiple workbooks, your actions are limited to Download, Delete, and Move To.
Recovering Deleted Files in SkyDrive
When you delete a file in SkyDrive, it is sent to a recycle bin folder in SkyDrive. That recycle bin can be used to recover deleted files just as you would in your standard operating system. But be aware that when the recycle bin starts taking up more than 10% of your storage limit, SkyDrive starts deleting your older content and also permanently deletes files that were in the bin for more than 30 days.