
In Chapter 4, Cloud-based Identity with Access Control Service, we have learned how identity and access control implementation can totally be isolated from the actual application code and can be delegated to a cloud-based service, for example, Windows Azure ACS 2.0. A very realistic possibility is a scenario, which is just the opposite of what we encountered in Chapter 4, Cloud-based Identity with Access Control Service. It is quite possible that you have applications hosted in a cloud environment, for example, Windows Azure and want your Active Directory users to have a Single Sign-On experience while accessing the external applications hosted in cloud. The following diagram illustrates this scenario:

In this recipe, we will take a look at the steps of configuring AD FS 2.0 as a trusted identity provider for a Windows Azure hosted application.
Following are the prerequisites:
- Microsoft Visual Studio 2010 with Windows Azure SDK for Visual Studio 2010 installed. You can install it from http://www.microsoft.com/web/gallery/install.aspx?appid=WindowsAzureToolsVS2010 using Microsoft Web Platform Installer.
- Access to an AD FS 2.0 Role configured in your Active Directory Domain Controller. (For our recipe, we will use the federation server that we configured in Chapter 5, Identity Management with Active Directory Federation Services.)
- Microsoft SQL Server 2008 R2 Express. (This should ideally be installed in the same machine where Visual Studio 2010 is installed, as it will be used by Azure Storage Emulator. A different instance can be registered with development storage using the
DSInitcommand line tool.)
To implement the identity with AD FS 2.0 for the applications hosted on Windows Azure, perform the following steps:
- Create a new Visual Studio C# 2010 Windows Azure project and name it as CloudHostedApplication, as shown in the following screenshot:

- Add a Visual C# ASP.NET Web Role in the New Windows Azure Project dialog box and click on OK. The solution is created with a name WebRole1 under Windows Azure solution, as shown in the following screenshot:

- In the
WebRole1properties, add the domain/self-signed certificate that you created for AD FS 2.0 in the previous chapter, under the Certificates section:
- Under the Endpoints section, create a new https endpoint and specify the certificate that you added in the previous step:


- Create a host entry in your machine host file to map the loopback address with your domain name. For our example, it will be:
127.0.0.1 adfsweb.domain.com - Build the solution and run the
CloudHostedApplicationproject. Note the application URL including the generated port. - Right-click on the CloudHostedApplication project and click on Add STS reference…, as shown in the following screenshot:

- In the Federation Utility wizard, select the
Web.configfile of theWebRole1web application project under the Application configuration location section and specify theCloudHostedApplicationweb application secure URL in the Application URI dropdown list, as shown in the following screenshot:
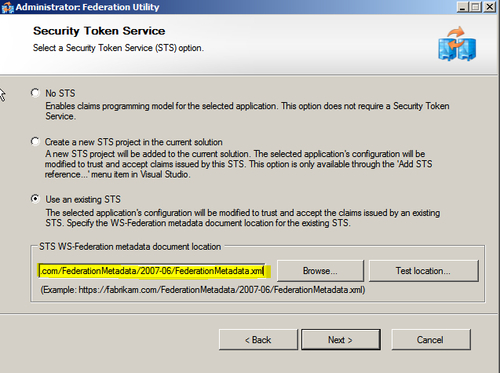
- In the Security Token Service dialog box, select the Use an existing STS option and specify the AD FS 2.0 federation metadata URL. In our example, we will use the federation metadata URL for the federation server instance that we configured in the previous chapter:
- Complete the wizard. Create a new relying party trust in your AD FS 2.0 instance for the
CloudHostedApplicationweb application (refer to Chapter 5, Identity Management with Active Directory Federation Services, for the detailed steps). You have now successfully set up AD FS 2.0 as a trusted identity provider for the Windows Azure Web Role instance.
The federation utility creates a FederationMetadata folder in the WebRole1 project, once the trust is successfully established. Run the CloudHostedApplication project and you will be redirected to the federation server for authentication. After successful authentication, you will be signed-in.
The steps executed in this recipe ensure that the Azure Web Role instance works correctly with AD FS 2.0 in the Development Fabric. However, once the application is ready to be deployed in Azure the following changes are required for it to work correctly with the federation server instance:
- Update the federation settings in the
Web.configfile with the actual address of the application. - Modify the
FederationMetadata.xmlfile to replace the Development Fabric URL with the actual address of the application. - Create a new relying party trust in the federation server to provision the deployed application as a relying party with the correct set of claims.