
CHAPTER 6
Operations
After logical switches have been deployed in the manner described in the Chapter 5, “Deployment,” many of the settings and capabilities defined in those switches cannot be changed without first removing the logical switch and all of the objects that depend on it. The main reason for this is stability, given that changing certain settings and capabilities can significantly influence how the network is presented to virtual machines (VMs) and services that connect through the switch.
With that in mind, no virtual networking solution survives for very long even after being carefully planned based upon what you know at its inception. Factors outside of your immediate control like acquisitions, changing business requirements, and technology developments may force you to review and make one or more changes to your architecture. This chapter walks through some relatively common change scenarios that may occur and provides some detailed recommendations, advice, and guidance around how best to deal with them, noting where logical switch removal and replacement is required to address a particular scenario.
Specifically, this chapter covers what you should do if you need to:
▪ Add support for single root I/O virtualization (SR-IOV)
▪ Change the network adapter assigned to a logical switch
▪ Handle pre-existing network adapter teams
▪ Convert a standard (virtual) switch to a logical switch
▪ Manage logical switch compliance
▪ Make changes to VLAN and PVLAN numbers
▪ Move from VLAN isolation to Network Virtualization
▪ Delete a logical network
▪ Move a VM network to a new logical network
▪ Delete a VM network
Operational scenarios
The sections in this chapter are broken out into a number of distinct and totally separate scenarios that represent some of the most common changes that an IT administrator will need to perform after a virtual network solution has been deployed. Although they may be read end to end for background, each scenario will probably be most useful to read when you experience that condition or need to perform that specific change within your own environment.
Logical switches
The following sections review some of the most common changes a logical switch may require after it has been deployed on a host computer, providing some guidance for successfully implementing those changes and a workaround if the change cannot be made directly.
Adding support for SR-IOV
With SR-IOV, network traffic bypasses the software switch layer of the Hyper-V virtualization stack. As a result, the I/O overhead in the software emulation layer is diminished while the network performance achieved using the interface is nearly the same as in non-virtualized environments.
MORE INFO You can find more details on SR-IOV at http://blogs.technet.com/b/privatecloud/archive/2012/05/14/increased-network-performance-using-sr-iov-in-windows-server-2012.aspx.
As discussed in Chapter 3, "Port profiles," enabling support for SR-IOV requires you to make changes in multiple places within your virtual network architecture, including the physical host and the uplink port profile and the logical switch in Microsoft System Center 2012 Virtual Machine Manager (VMM). Assuming that you have enabled the settings required on the Hyper-V host and in the uplink port profile, but have forgotten to do so on the logical switch, the basic question is can you make those changes after the fact (and enable SR-IOV) on the deployed logical switch.
Unfortunately, although this appears to be a relatively frequent error for those using this form of processor offloading technology, changing the SR-IOV settings after the logical switch has been deployed is not possible. The option to enable SR-IOV will no longer be available within the VMM administrator console after the logical switch is deployed, and any attempt to work around this limitation using Windows PowerShell will simply fail with the following error message:
Error (25212): SR-IOV property (logical switch name) cannot be changed on this logical switch because there are sets of port profiles for virtual network adapters that refer to this property.
The only remediation for this particular scenario is to remove the existing logical switch from any and all network adapters on which it has been deployed and to deploy a new logical switch on which SR-IOV support has been enabled.
Changing the assigned physical network adapter
As discussed in Chapter 3, a single uplink port profile may be applied to multiple physical network adapters in the same host computer (as part of logical switch deployment). The Load Balancing setting with the uplink port profile indicates whether each adapter should function standalone or should instead be configured to act as part of a team.
If one of the teamed physical network adapters fails or needs to be replaced, there is little or no real issue in the short term. You can leave the remaining adapters to provide service, albeit with reduced resiliency to failure and potentially some degradation in overall performance, until the next maintenance window. At that point, you simply replace the failed adapter and apply the same logical switch and uplink port profile to its replacement. The new adapter will automatically become a member of the existing team.
When network adapters are used in standalone mode, this process is clearly not as simple. Assuming that you have already added a replacement physical network adapter to the host computer, you cannot simply edit the logical switch and configure it to use the replacement since attempting to do so results in the following error:
Error (26864): Cannot change the uplink physical network adapter of a non-teamed logical switch instance (logical switch name) since it could lose connectivity-delete the logical switch instance and create a new logical switch instance with the desired uplink physical network adapter.
As the above error message suggests, it will be necessary to delete the logical switch instance from the failed network adapter and deploy a new instance on the replacement. When the existing logical switch and the failed physical network adapter have been successfully removed from the Hyper-V host computer, you can either wait for the next automatic host refresh in VMM, or you can trigger this to occur on demand to force the VMM Agent to discover the new network adapter, at which point you can re-deploy the logical switch.
To avoid this situation in the future, it may be preferable to configure the majority of your uplink port profiles for teaming, and, in cases where a single physical network adapter has been dedicated to a specific function or operation, create a team of one. Then if something should happen, you can simply add a new physical network adapter to the host, join this adapter to the team, and remove the old one. This approach will allow you to recover from the problem without having to remove the logical switch as described above. There are some circumstances, physical network adapters dedicated to SMB 3.0 or that support SR-IOV for example, in which this workaround is not suitable, and you should make a point of reviewing each group of adapters in turn to determine the merits or otherwise of using this strategy to mitigate physical network adapter failure.
NOTE The process for remediating this issue is very different if you are using a Hyper-V virtual switch (referred to as a standard switch in VMM) instead of a logical switch. If this is the case, you first need to change the standard switch mode from External to either Private or Internal. Having done so, change the mode back to External and then configure the standard switch to use the new physical network adapter.
Converting from a standard switch to a logical switch
A Hyper-V virtual switch (known as a standard switch in VMM) is a software-based layer-2 network switch that becomes available once the Hyper-V server role is installed on a host computer. The standard switch includes programmatically managed and extensible capabilities to connect VMs to both virtual networks and the physical network and provides policy enforcement for security, isolation, and service levels.
The main issue with the Hyper-V switch is manageability since each switch is independent and must be configured separately. In VMM, the switch concept is greatly enhanced through the use of logical switches (essentially templates for Hyper-V switches) that allow you to consistently apply the same settings and configuration across multiple hosts and further to ensure that any Hyper-V switches deployed using the template remain compliant with it.
There is no easy migration path from a standard switch to a logical switch since after the physical network adapter has been associated with a standard switch, you cannot subsequently upgrade it to a logical switch. You must first disconnect and remove the standard switch and any associated virtual network interface cards (vNICs) from the network adapter and remove or break any pre-existing network adapter teams (as described below) before you begin to deploy the logical switch.
Handling pre-existing network adapter teams
Windows Server 2012 and subsequent releases allow you to combine multiple network adapters in the form of a NIC team to aggregate bandwidth and to provide for traffic failover, preventing connectivity loss in the event of a network component failure.
MORE INFO You can find an overview of NIC teaming at http://technet.microsoft.com/en-us/library/hh831648.aspx.
You can create a team on a Windows Server computer manually from within Server Manager or by using Windows PowerShell. Having done so, however, you will be unable to deploy a logical switch to any of the network adapters that participate in that team. The fundamental issue is that VMM has no direct insight into how the network team was originally created or its current configuration. As a result, any attempts to assign a logical switch will fail with the following error:
Error (26900): A logical switch instance cannot be created on the physical network adapter (team name) because the adapter is a teamed adapter-delete the team from the host and create a logical switch instance on the physical network adapters.
You can either leave the network team as is, with the understanding that these interfaces can only be used with standard Hyper-V switches, each team needs to be configured and managed separately and finally, that the team and corresponding network adapters fall out of the scope of management of VMM or remove the team and have VMM re-create it during logical switch deployment.
The primary benefits of moving from a team created directly on the Hyper-V host to one that is generated as a result of the deployment of a logical switch, as discussed earlier, are consistent configuration across a large number of hosts coupled with the ability to monitor compliance and to remediate (fix) deviations from expected configuration.
As the error message suggests, to deploy a logical switch to network adapters teamed directly on the host you must first break the existing team. Having done so and having forced a host refresh to allow VMM to discover the new configuration, you can then deploy a logical switch onto each network adapter that you want to team, with an uplink port profile used to define the teaming mode and load balancing port protocol (see Chapter, " Logical switches and network design," 4 and Chapter 5 for more details).
Monitoring logical switch compliance
One of the advantages of logical switches compared to standard Hyper-V switches is that VMM can monitor the expected configuration across all host computers and remediate (fix) any differences. At each host refresh, VMM checks and verifies the configuration of the logical switch on each physical network adapter on which it has been deployed, reporting any deviation from the expected configuration, as shown in Figure 6-1.

FIGURE 6-1 Logical switch compliance report.
For each network adapter on which the logical switch has been deployed, the report indicates one of the following status values:
▪ Fully Compliant or Compliant indicates that the settings on the host are consistent with the expected configuration in VMM.
▪ Partially Compliant indicates that there is only a partial match between the settings on the host and expected configuration.
▪ Not Compliant indicates that the deployed logical switch is significantly different from the expected configuration. This state is most likely caused by a modification directly performed on the Hyper-V host, such as adding or removing an additional virtual network adapter or changing the bandwidth control mode outside of VMM.
For any logical switch that shows as either Partially Compliant or Not Complaint, the reason for the discrepancy will appear in the Compliance Errors section. The Remediate option available through the VMM admin console can be used to address and resolve any of the issues that may have been discovered. Note that you may find that resolving one issue triggers subsequent discovery of another. If this occurs, you should continue with remediation until all network adapters show as Fully Compliant.
Depending on the nature of the property values that are changed as part of the Remediate action, connectivity for guest VMs and even the host itself may be disrupted. As a consequence, it is recommended that you review compliance errors reported and arrange to remediate partially or non-compliant logical switches, place the host into maintenance mode (to evacuate the virtual machines), and then take the steps to necessary to remediate the issue.
Logical networks
The following sections review some of the common changes that may be required for logical networks and network sites, provide some advice and guidance for successfully implementing those changes, and explain how to work around the problem if necessary.
Moving from VLAN isolation to Network Virtualization
When using Network Virtualization as an isolation mechanism, virtual networks are defined entirely in software. As a result, it is unnecessary to reconfigure the physical network (unlike VLAN and PVLAN solutions) to onboard or remove new tenant networks or to make changes to reflect new business requirements. The benefits of such an approach are clear, but having configured a logical network to use either VLAN or PVLAN isolation as described in Chapter 2, there is unfortunately no way to change it. To use Network Virtualization, therefore, you will need to create and deploy a completely new logical network, together with network sites, IP pools, and associated VM networks.
If the original VLAN (or PVLAN) logical network was associated with host network adapters through logical switches, you may be able to simply add the new network sites to the appropriate uplink port profiles defined within each logical switch. VMM will automatically update all of the host computers using the updated uplink port profiles and ensure that the hosts are associated with the new logical network. You can then migrate all of the VMs and services, disconnecting them from the existing VM network and connecting them to one that is associated with the new logical network. Of course, some downtime should be anticipated during this process, but the outage should be relatively minor. Once the migration has been successfully completed, you can remove the VLAN or PVLAN isolated logical network as described in the "Deleting a logical network" section in this chapter.
Changing VLAN and PVLAN ID numbers
In environments that are using VLANs or PVLANs to isolate network traffic, it may become necessary at some point to change the VLAN ID numbers allocated to specific networks. The reasons for doing this can vary considerably, but all such changes will involve some form of disruption to normal service while switches and routing tables are updated to reflect the changes.
As you would expect, making such fundamental changes to the underlying network fabric will require you to make a number of corresponding changes to the solution you designed as part of the process described in Chapters 2 through 4. The open questions therefore are what needs to be changed to reflect the new environment and how can you make those changes with minimal effort, keeping downtime to a minimum.
To support VLAN isolation, a logical network needs to be configured such that sites within the logical network are not connected. In addition, each individual VLAN ID needs to be allocated to a network site as discussed in Chapter 2. To allow VMs and services to connect to the selected logical network using the Network ID, each VLAN needs to be associated with a specific VM network.
If no such association currently exists, you are free to update and make changes to the network ID within the network site without issues until or unless you have created an IP pool linked to that site. In that case, the option to change the VLAN ID for the site will no longer be available within the VMM admin console, and your only recourse is to remove the IP pool and recreate it after the VLAN ID has been changed.
To remove the IP pool, you might first have to revoke the IP addresses that have been allocated to the VMs and services using the logical network. In most cases, IP addresses should be automatically returned to the pool as each VM and vNIC is disconnected, but there can be exceptions. For example, you can use the Inactive Addresses tab of the IP Pool Properties page to view and release any IP addresses that are no longer in use but were never returned to the pool. If there are a lot of allocated but inactive addresses, you can use the following Windows PowerShell script to return any of these addresses to the pool prior to removing the pool itself:
$ip = Cet-SCIPAddress -IPAddress <IP Address>
$ip | Revoke-SCIPAddress
In cases where you have established an association between the network site and a VM network, the option to make changes to the VLAN ID within the network site will also be unavailable. If you attempt to change this via Windows PowerShell, the following error will be returned:
Error (25176): The specified Subnet VLAN cannot be removed because it is being used by VM subnets-remove the referenced VM subnets and try again.
The steps required to mitigate this particular condition can be significantly more impactful than the previous case. As the error message suggests, you cannot simply change the VLAN ID without first deleting the existing VM network. Since the VM network in question may be used by any number of VMs, each of which would remain disconnected from the network until the changes to the network site have being made and a new VM network has been created, the following is the recommended way to mitigate this specific issue.
Instead of changing the existing network site as described above, you should plan to add the new VLAN ID and subnet to the existing network site. You can then create a VM network tied to this VLAN ID and gradually migrate all of the VMs and services from the old VM network to the new one. This approach also provides you with a fallback position in the sense that the existing VM network still exists and can be used until you confirm that the new configuration is working as expected.
NOTE This process will work only when both the VLAN ID and the IP subnet is changed because VMM will not allow you to create a VLAN that has the same subnet as another. In such cases, the remediation steps will be more extensive, requiring you use a temporary (interim) subnet during the transition period.
You can follow a similar process to the above, in essence creating a new site and mapping to a new VM network, whenever you need to change either of the values defined for the Primary VLAN ID or the Secondary VLAN ID in a network site that is part of a logical network configured to support PVLANs.
Deploying new logical networks
You can add network sites for any new logical networks to the uplink port profiles defined within a logical switch at any time. VMM will automatically update all of the host computers that are using the updated uplink port profiles and ensure that network adapters in those hosts are correctly associated with the new logical network. No additional configuration is required.
Deleting a logical network
As described in Chapter 2, logical networks are connected to a significant number of objects within your virtual network architecture. As a result, the process to remove them requires careful coordination; VMM will not allow you to remove a logical network while one or more other objects have a direct dependency on it. To discover which objects are preventing successful deletion, you can use the dependency action within the VMM console. An example of this is shown in Figure 6-2. Note that this list must be empty before you can successfully delete the logical network.

FIGURE 6-2 Checking for dependent resources prior to logical network deletion.
The list of dependencies can include objects such as network sites (note that these are listed under the Type column as logical network definitions), load balancers, IP address pools, hosts, VMs, services, and any templates that exist in the library. As you would expect, before you can successfully delete the logical network, you must first modify or delete all of these dependent items.
The same issue in respect of deletion or removal of a dependency chain is true of most objects within VMM. To ensure that you can actually delete any an object, you must first review and remove or disconnect any objects that have dependencies upon it.
VM networks
This final section reviews the two most common scenarios relating to VM networks: the need to map an existing VM network to a different logical network and how to effectively delete a VM network.
Mapping a VM network to a new logical network
The relationship between a VM network and its host logical network is established when the VM network is initially created and cannot be changed afterward. To use a different logical network, you should first create a new VM network linked to the correct logical network and connect VMs and services to this VM network. You can then safely remove the previous VM network.
Removing a VM network
The proper way to delete a VM network is to start by deleting or disconnecting all of the virtual network adapters associated with the VM network. This includes VMs and service templates that have virtual network adapters associated with the VM network (see Figure 6-3). You then delete any IP pools and finally the VM network itself.
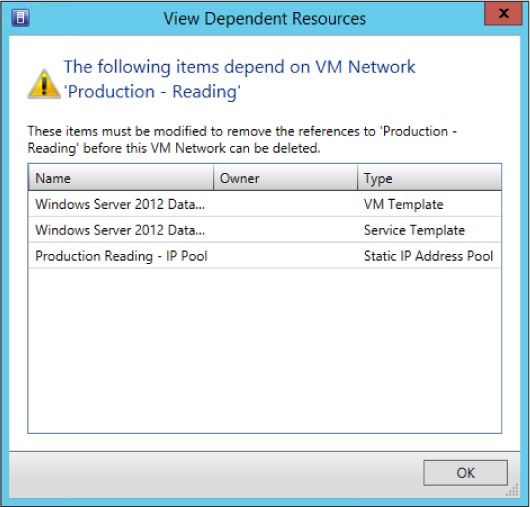
FIGURE 6-3 Checking for dependent resources prior to VM network deletion.
As with logical networks, to remove the IP pool you may have to revoke the IP addresses that have been allocated to VMs and services using the logical network. In most cases, IP addresses should be automatically returned to the pool as each VM or vNIC is disconnected, but there may be exceptions. For these specific cases, you will need to use Windows PowerShell as in the example below to return any of these addresses to the pool prior to removing the pool itself.
$ip = Get-SCIPAddress -IPAddress <IP Address>
$ip | Revoke-SCIPAddress
The Revoke-SCIPAddress command will remove the IP address from the list of assigned IP addresses. When the command completes successfully you can then delete the IP pool for the VM network, then the site, and then the VM network.