Supplement Chapter 3Microsoft 365 Groups
The core objective of Microsoft 365 is to enable collaboration between teams and team members. This common theme can be seen across all Microsoft 365 services. Every Microsoft 365 service offers a unique capability.The beauty of a Microsoft 365 group is that it takes the best elements of every individual service and creates a collaborative space for a group of people or a team to leverage that service. When you create a Microsoft 365 group, you get the following:
- A shared conversation space where team conversations are stored
- A shared calendar where team members can book their meetings
- A file storage service where the team can save and share all team documents, spreadsheets, and so on
- A notebook to capture and share meeting agendas and notes
- A new workspace to share group reports
What this means is that you do not have to create separate instances of these services for your team, nor do you have to go through the pain of granting each member access to these separate service instances. Creating a Microsoft 365 group creates these service instances automatically and once you add members to the group, they are automatically added to each of these services.Microsoft 365 Groups can be created in several ways. You can create a group directly via Outlook, as described in the Creating a Group recipe in this chapter.Microsoft 365 Groups are created indirectly when you do the following:
- Create a planner in Microsoft 365—for more info, go to https://m365book.page.link/groups-planner
- Create a group in Yammer—for more info, go to https://m365book.page.link/groups-yammer
- Create a group in Power BI—for more info, go to https://m365book.page.link/groups-powerbi
- Create a group in Microsoft Dynamics 365—for more info, go to https://m365book.page.link/groups-dynamics
- Create a team in Microsoft Teams—for more info, go to https://m365book.page.link/groups-teams
- Create a modern team site in SharePoint Online—for more info, go to https://m365book.page.link/groups-sharepoint
Technically speaking, we can, therefore, say that Microsoft 365 Groups is a cross-application membership service in Microsoft 365 that has other inbuilt workloads associated with it, such as a SharePoint team site, a Yammer group, a shared Exchange mailbox, Planner, Power BI, and OneNote.
Any Microsoft 365 subscription that has Exchange Online and SharePoint Online will support groups. To find out more about Microsoft 365 plans, go to https://m365book.page.link/m365-plans.
In this chapter, you will learn about the following:
- Creating a group
- Deleting a group
- Joining a group
- Leaving a group
- Adding members to a group
- Removing members from a group
- Having conversations
- Booking meetings
- Sharing files
- Collaborating on a notebook
Let’s start by creating a group.
Creating a group
A group in Microsoft 365 refers to an entity in Azure Active Directory that grants shared resources to a set of people (known as members). Members get access to common resources, such as a group mailbox, a group calendar, shared file storage, permissions, and so on, as soon as they are added to the group. Groups make collaboration easy.Traditionally, you had to request the IT department to create a distribution list (which lets you email several people by using a single recipient address) or a security group (to manage permissions to resources). A Microsoft 365 Group provides you with the benefits of both a distribution list and a security group. In fact, it provides you with more features than distribution lists and security groups combined. On top of that, end users can create and manage Microsoft 365 Groups themselves without needing the IT department's support.In this recipe, you will learn how to create a group.
Getting ready
The ability to create Microsoft 365 Groups depends on the model adopted by the organization, as shown here:
| Model | Advantages |
|---|---|
| Open (default) | Users can create their own groups |
| IT-led | Users request the Microsoft 365 administrator (usually part of the IT department) to create one for them |
| Controlled | Group creation is restricted to specific people, teams, or services |
A Microsoft 365 Group can be created directly via the Outlook client, Outlook Web Access, or the Outlook mobile app. We will demonstrate the steps that you need to follow using Outlook Web Access. There are also indirect ways of provisioning Microsoft 365 Groups, which we will learn about in the coming chapters on Chapter 8, Microsoft Teams, Supplement Chapter 6, Planner, and Supplement Chapter 4, Yammer.
How to do it...
Microsoft 365 Groups appear at the lower left-hand corner of your Outlook profile. Here, it will list all the Microsoft 365 Groups you are a member of. To create a new group, perform the following steps:
In the Groups section on the left, click on New group as shown:

- Provide a Group name and Description.
- Microsoft 365 creates a group email address based on the group name. You can change the email address if you like.
Next, set the Privacy option.
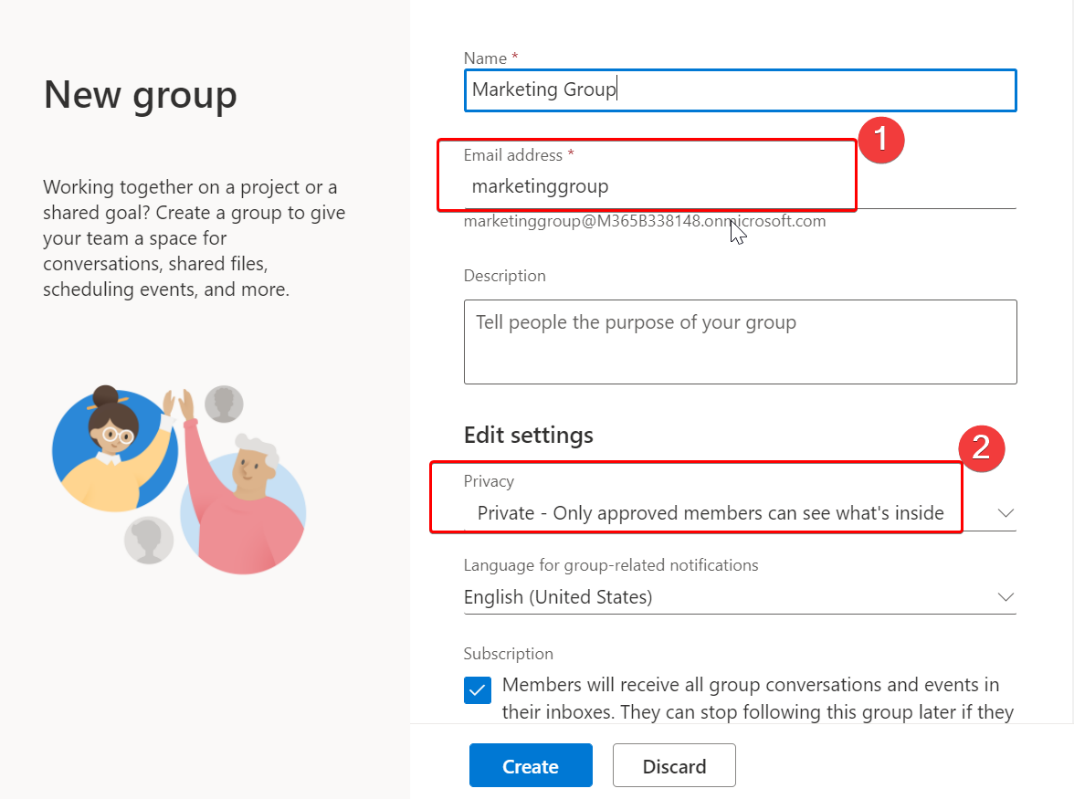
"Public" groups will let anyone in the organization join your group. Users can see the group members and contribute to group files. "Private" groups will require the group owner's approval for someone to join the group. The creator of the group becomes the group owner by default. Additional owners can be added by the group owner.
- Once you have filled in all the sections, click Create.
- Your group is now ready to be shared with members. You can add other colleagues or even other groups. You should be able to invite people from outside your organization (if your organization allows this). You can add up to 1,000 members to one group. The following screenshot shows you how to do this:

Figure S3.3: Add members to the groupNow, your group is ready. The new group should start appearing under the Groups section. At this point, members will receive a welcome email with links to common group tasks.
How it works...
When a new group is created, the group gets an email address assigned to it. You can send a single email to the group email address and all the group members will receive it.As mentioned previously, when a member is added to the group, they receive a welcome email. The welcome email looks as in the following screenshot:

The email contains four links, each taking you to a specific group feature. Let's see what these four features are.
Group emails
The Microsoft 365 Group reserves a conversation area for the group where all group conversations are saved. All emails sent to the group email address will appear in the group mailbox. These conversations remain in the group, even if the participants leave the group at some stage. Having conversations in one place is useful because new group members get access to all past conversations.
Group team site
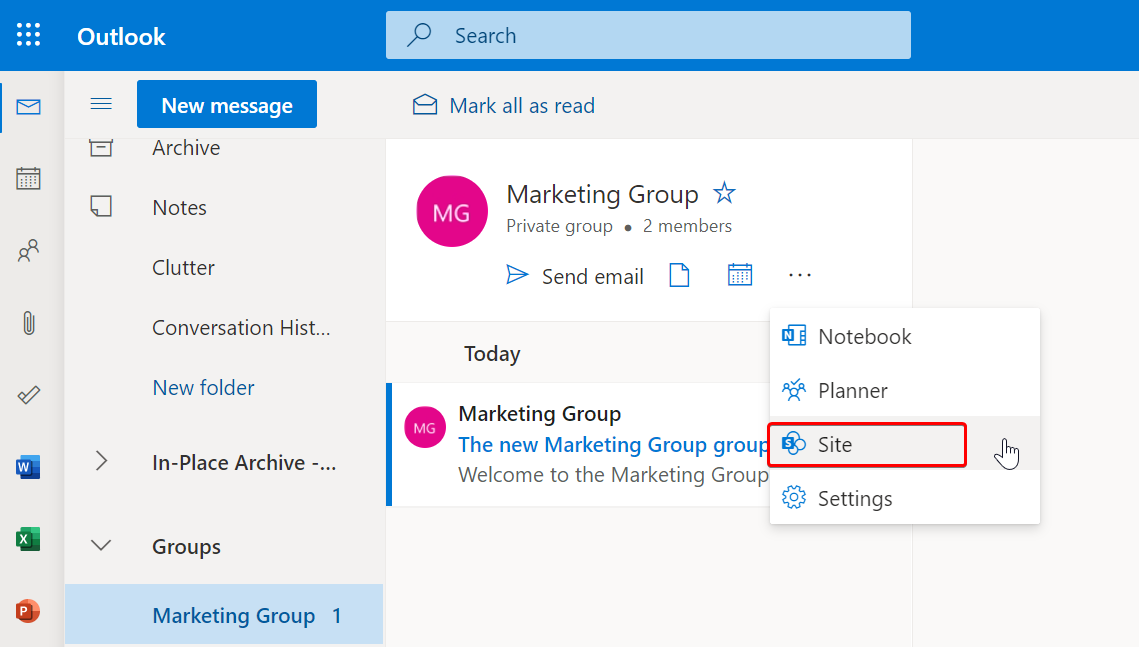
The Microsoft 365 Group provisions a SharePoint site that every group member can access, where all the group files can be saved. SharePoint offers additional capabilities, such as news articles, content pages, and so on. The following screenshots show the landing page of the SharePoint site that is provisioned for the group:

Connecting your apps
The Microsoft 365 Group lets you connect to a host of other apps from the Microsoft 365 store, as shown:


These apps can be used to facilitate tasks within the group. For instance, you could add the Twitter connector to receive tweets from an account or track certain hashtags.
See also
- The Creating a group using Teams recipe in Chapter 11, Microsoft Teams
- The Creating a Yammer group recipe in Chapter 12, Yammer – The Enterprise Social Network
- The Creating a group using Planner recipe in Chapter 17, Planner
To delete a group that is no longer needed, refer to the next recipe.
Deleting a group
Groups are created with a specific objective in mind. Once the objective is achieved, the group can be deleted to free up system resources. It is recommended that you move any documents that you might need in the future to another location before deleting the group.In this recipe, we will learn how to delete a group.
Getting ready
Microsoft 365 users can only delete groups created by them. You can do this via the Outlook client, Outlook Web Access, or the Outlook mobile app.
How to do it...
On Outlook Web Access, you can see all the Microsoft 365 Groups that you are part of in the lower left-hand side navigation section. Follow these steps to delete a Microsoft 365 Group:
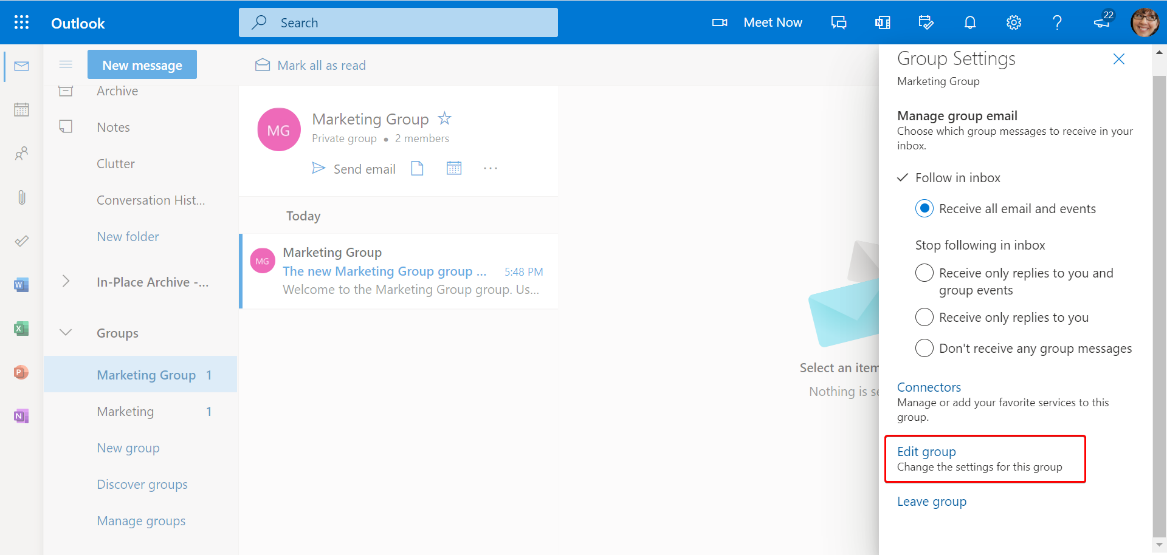
- Select the group you want to delete and click on the Settings symbol next to the group members.
This should bring up the Group Settings pane. Click on Edit group, as shown:
- Click on the Delete group link at the bottom of the pane and click Yes to any confirmation message.

After completing this step, you have now deleted a group.
How it works...
Deleting a group deletes all conversations, files, notebooks, and tasks. There is no concept of a group recycle bin, from where you can restore the group. However, the administrator has the option of restoring the deleted group within 30 days. If the administrator takes no action within 30 days, the contents of the group (files, conversations, etc.) will be deleted forever.
If you want to restore a Microsoft 365 Group that got deleted, you can do it via the Deleted groups page by navigating to the following link and following the guidance provided on screen: https://outlook.office.com/people/group/deleted.
See also
- The Leaving a group recipe in this chapter
- Restoring a deleted group: https://m365book.page.link/m365-restore
In the next recipe, we’ll see how you can join an existing group.
Joining a group
Before creating a new group, it is worth checking whether another group has already been created for the same purpose. If a group already exists and is public, you can join it straight away or ask the owner to add you if the group is private. This recipe will show you how to join a group.
Getting ready
You can join groups that are not created by you. On Outlook Web Access, if you right-click on Groups and click Discover, it lists all the groups in the organization. Some of these groups might be private, while others will be public.
How to do it...
To join a group, do the following:
Right-click on Groups and click Discover. This will bring up the Discover pane with a search box. Start typing the group name you would like to join, as shown here:

Public groups will let you join immediately. Private groups will require the group owner's approval.
- Click on Request to join or Join. If you are joining a private group, you will need to provide the reason for making the request, as shown here:

By clicking Send, your request to join the group will be logged and the group owner will take the appropriate action.
How it works...
If you wish to join a public group, you simply click Join and become a member of the group. You can then participate in group conversations and have access to group files.In the case of a private group, the owner of the group receives an email informing them about your interest. They can then choose to grant you access or ignore your request. The email will look something like this:
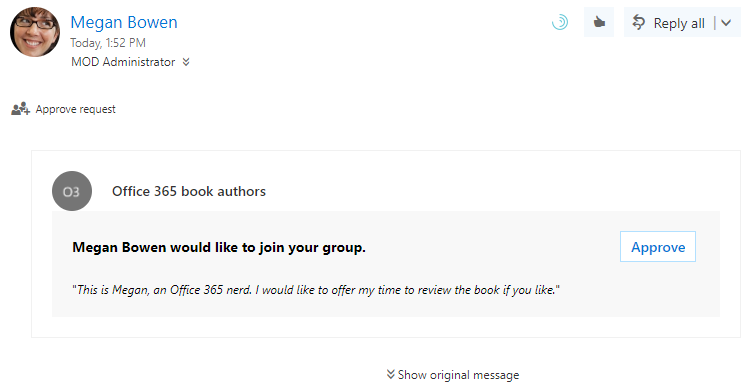
If the owner approves your request, you will receive a group welcome email.
See also
- The Creating a group recipe in this chapter
Next, we’ll see how you can leave a group that you are a part of.
Leaving a group
If you think you no longer need to contribute to the group, or you find that the group is not relevant to your work, you can leave it by following the instructions in this recipe.
Getting ready
You can leave a group at any time. You do not need any special permission to leave the group.
How to do it...
On Outlook Web Access, you can see all the Microsoft 365 groups that you are part of in the lower left-hand side navigation section. To leave a group, do the following:
- Select the group you want to leave and click on the Settings symbol next to the group members.
- Click on Leave group and click Yes to any confirmation message.

How it works...
When you click the Leave group option, all your permissions to the group resources are revoked. If you want to retain access to the group but just do not want to receive notifications about the group activities, you can update your Email preferences in the Group Settings pane, as shown in the following screenshot:

See also
- The Deleting a group recipe in this chapter
A group is of no use if it doesn’t have members, so let’s see how members can be added in the next recipe.
Adding members to a group
You can add members while creating a group or after the group is created. The members will gain access to all the group resources as soon as they are added. At times, you might need to invite members from outside your organization. Say you are organizing the staff Christmas party and you need to get input from a food vendor; you can invite them to the "Christmas Party" group so that they can participate in the conversations in the group. To add new members to the group, follow the instructions in this recipe.
Getting ready
If you are a group owner, you can add additional members to the group. You can also invite people from outside your organization (if your organization permits this). The external users will become part of your team and will have the same privileges as other members of the group.
How to do it...
You can add new members to the group while you are creating a new group. If the group has already been created, take the following steps:
Select the group and click on the number of members, as shown here:

The new screen lets you add new members by searching for them in the company directory, as in the following screenshot:

- Clicking on Add members brings up a text box that lets you type in the email address of the team member.
When you start typing the email address, the text box displays suggestions from the company's active directory. To invite external users, type in their email addresses:

- When you select a member from the list, they get added to the group.
How it works...
Adding members grants them access to all the group resources. Microsoft 365 manages the permissions automatically for you.
If you are adding external users, they receive an email at the email address that you provided. To log in to Microsoft 365, the user needs a Microsoft account. If the email address provided is a Microsoft account, the user can simply log in to Microsoft 365. If not, then the user is prompted to create a Microsoft account using the email.
See also
- The Creating a group recipe in this chapter
- The Removing members from a group recipe in this chapter
Having discussed how to add a user, in the next recipe we will see how you can remove users from a group.
Removing members from a group
If you think you no longer need any input from any of your group members, you can remove them from the group. To remove one or more members from a group, perform the following steps.
Getting ready
If you are a group owner, you can add or remove members from the group. This will revoke their access to the group resources.
How to do it...
On Outlook Web Access, you can see all the Microsoft 365 Groups that you are part of in the lower left-hand side navigation section. You can remove members from the group by following these steps:
Select the group and click on the number of members:

- Remove the user from the group by clicking the X icon, as shown here:

How it works...
Removing a member (which includes external users) revokes their access from all the group resources. Microsoft 365 manages the permissions automatically.
See also
- The Adding members to a group recipe in this chapter
The group can communicate with each other via the shared mailbox. We will learn about this in the next recipe.
Having conversations
The conversation feature is powered by Exchange Online (the email service in Office 365). All your group emails arrive in the group mailbox, which can be accessed by everyone in the group. The conversation area displays all the group emails in one place and lets you respond from within the group interface.
Getting ready
You will have access to the conversation space if you are a group member. Users who are not members of the group can, however, send an email to the group's email address which will reach all members of the group.
How to do it...
On Outlook Web Access, you can see all the Microsoft 365 Groups that you are part of in the lower left-hand side navigation section. To initiate a conversation, do the following:
Select the group and click Send email:
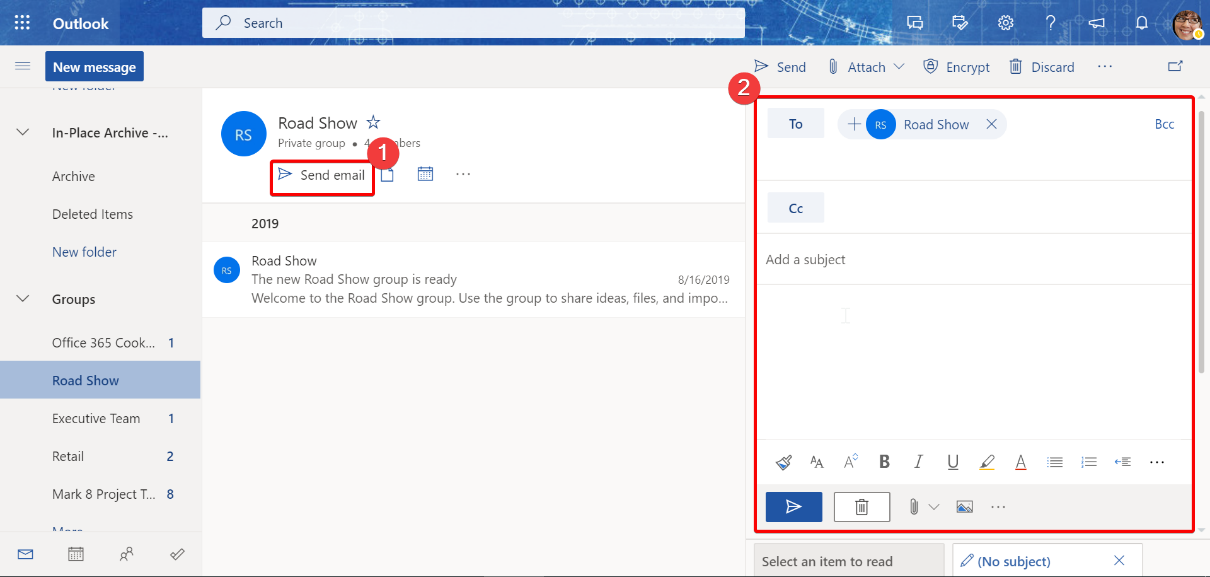
- Type your message and press the Send icon.
How it works...
The conversation space is like a group mailbox, where everybody in the group can view all the conversations. All recent conversations appear at the top.Conversations in a public group can be read and responded to by anyone in the organization. In the case of private groups, only group members can participate in conversations.Conversations can include attachments, emojis, and rich text content. They also support @mentions to notify specific people of a message.By default, conversations appear in the group's conversation area, but you can choose to receive conversations in your personal inbox by following the group by clicking on the Follow icon in the group team site, as you can see in the following screenshot:

See also
- The Booking meetings recipe in this chapter
- The Sharing files recipe in this chapter
- The Collaborating on a notebook recipe in this chapter
In the next recipe, we will see how you can book meetings with team members.
Booking meetings
Sometimes, a situation requires all group members to come together to discuss their ideas. Meetings provide you with that platform. The meetings that you set appear in your calendar as a group meeting, alongside your personal meetings. The following are the instructions for how to book a group meeting.
Getting ready
You will have access to the group calendar if you are a group member. You can book group-specific meetings or group events using the group calendar.
How to do it…
On Outlook Web Access, you can see all the Microsoft 365 Groups that you are part of in the lower left-hand side navigation section. To book a meeting, follow these steps:
Select the group and click on the Calendar icon:

The screen will look as shown in the following screenshot:

- To book a new meeting, click on the New event button on the top left of the screen. Specify the event information, including the following:
- A title for the event
- The event location
- Participants
- The start time
- The end time
- Recurrence
- The meeting agenda
You can see these fields in the following screenshot:

- Once the fields have been filled in, click on the Send button to send the invite.
How it works...
The meeting created in the group's calendar appears when you select the group from the navigation pane:

The meetings from all the selected groups are superimposed on top of each other but coded in different colors:

You can change the view to take a wider or closer look at your schedule:

See also
- The Having conversations recipe in this chapter
- The Sharing files recipe in this chapter
- The Collaborating on a notebook recipe in this chapter
A group needs to collaborate on documents from time to time, the next recipe shows how that is done.
Collaborating on a notebook
Microsoft 365 provides a note-taking application to capture notes during meetings. OneNote lets you capture ideas in any form, including typed text, a link, an image, an embedded video, or even handwritten text. To collaborate on a writeup, follow the instructions in the next section.
Getting ready
Microsoft OneNote is primarily a note-taking application. Its simple user interface allows it to be used as a canvas or a notebook. It supports both handwriting and typed text. In OneNote, users can create notes that include text, tables, pictures, and drawings. You can add links to your notes with a web page, a link to Office documents, and more. Your work is automatically saved as you go along.OneNote offers a very good platform for channeling your creativity. As a member of the Microsoft 365 group, you get access to a team notebook, which lets you create and share team notes and capture team meeting minutes.
How to do it...
The notes in OneNote can be organized in pages and sections. You can think of sections as chapters in a book. Each section can contain several pages. You get a blank notebook, to begin with:

- To create a section, click on + Section and give it a name.
- To create a page, click on + Page and give it a name.
- To draw a picture, go to the Draw tab and select Pen. Use your mouse or a stylus pen (for touch screen devices) to draw.
- Switch to the text mode by selecting Text and type your notes.
- Use formatting options, such as bullet points or to-do controls, accordingly:

How it works...
OneNote lets you share your notebook with others. Anyone who has access to the notebook can see all the sections and pages. The Microsoft 365 Group creates a notebook that the entire team can access. You can use this to capture, compile, and share minutes, thoughts, and ideas with your teammates. You can switch between your notebooks by clicking on the three lines as shown in the following screenshot:

See also
- The Having conversations recipe in this chapter
- The Booking meetings recipe in this chapter
- The Sharing files recipe in this chapter
Feedback
We are constantly looking at improving our content, so what could be better than listening to what you as a reader have to say? Your feedback is important to us and we will do our best to incorporate it. Could you take two mins to fill out the feedback form for this book and let us know what your thoughts are about it? Here's the link: https://forms.office.com/r/SqsgJVkbJ1.Thank you in advance.
