Chapter 10
Azure Private Link
Overview
Azure Private Link supports secure private connectivity for access to Azure PaaS Services such as Azure Storage, Azure App Services, and Azure SQL Database, among others. A private endpoint provides connectivity between the PaaS and the client’s Azure virtual network.
With Azure Private Link, all network traffic traverses the Microsoft Azure global backbone that connects its massive enterprise and consumer services. This eliminates the need for exposure of PaaS services to the public internet for user consumption, keeping access private and easier to control.
You can use Azure Private Link for your internal users or for partners, customers, or clients to provide access to Azure-hosted services.
Azure Private Link features
Azure Private Link provides the following features and benefits:
Enhanced security By enabling private access to Azure PaaS offerings, Private Link enhances the security posture on the access layer for services hosted in Azure.
Improved routing Private Link enables better routing to Azure-hosted services, as the traffic traverses the Microsoft backbone instead of the public internet (which can be unreliable).
Secure access from on-premises or peered networks Access can be from resources on-premises or in peered virtual networks. You can set up ExpressRoute and VPN tunnels with on-premises environments to provide connectivity to Azure.
Restricted access You can connect private endpoints to specific PaaS resources to allow users access to just those resources instead of the entire Azure back end. This reduces the risk of exposure for other services hosted in Azure not exposed via Private Link or the public internet.
Global interconnectivity You can use Private Link to connect to Azure services hosted in any Azure region, regardless of the source region requiring private access.
Secure access for multiple customers Private Link enables customers to access Azure-hosted services privately. Customers can set up a private endpoint in their own virtual network and use that to connect to services.
Consistent experience Whether a service is an Azure PaaS, customer-owned, or partner-owned, using Azure Private Link provides a consistent end-user access experience.
Design concepts and deployment considerations
The following sections cover key considerations when planning the design and deployment of Azure Private Link.
Private endpoints
A private endpoint is a network interface connected to an Azure virtual network and is assigned a private IP address from that virtual network. Private endpoints allow private and secure access to the following services:
Azure PaaS offerings You can associate a private endpoint with an Azure PaaS such as Azure Storage. This effectively enables access over the private IP address assigned to the private endpoint.
Customer-owned services You can associate a private endpoint with a standard Azure load balancer to provide secure internal access to customer-hosted workloads.
Integration with Azure PaaS offerings
An Azure PaaS offering that is the destination target of a private endpoint is called a Private Link resource. Table 10-1 contains examples of Azure PaaS offerings that can currently act as Private Link resources.
TABLE 10-1 Examples of Private Link resources
Azure Application Insights | Azure Database for MySQL | Azure Log Analytics |
Azure App Service | Azure Database for PostgreSQL – Single Server | Azure Machine Learning |
Azure Backup | Azure Managed Disks | Azure Monitor |
Azure Batch | Azure Event Grid | Azure Search |
Azure Container Registry | Azure Event Hub | Azure Service Bus |
Azure Cosmos DB | Azure IoT Hub | Azure SQL Database |
Azure Data Factory | Azure Key Vault | Azure Storage (Blob, File, Queue, and Table) |
Azure Database for MariaDB | Azure Kubernetes Service | Azure Synapse Analytics |
Integration with customer-owned services
Azure Private Link can be connected with a standard Azure load balancer. Using an internal Azure load balancer, access can be provided to a service or application hosted on other services, such as Azure virtual machines.
Private endpoint features
Here are a few key features of private endpoints that you should take into consideration:
Connectivity across different networks Private endpoints allow access to connected virtual networks, peered virtual networks, and on-premises networks connected using ExpressRoute or VPN.
Integration across Azure regions You can host Private Link resources in one Azure region and integrate with a private endpoint hosted in another Azure region.
Read-only private IP Every private endpoint has an associated read-only network interface that is configured and managed by the service. The network interface is assigned an IP address based on the private virtual network and subnet assigned during service creation. This IP stays with the network interface until the private endpoint is deleted.
Integration with Azure private DNS You can integrate private endpoints with Azure private DNS for automatic DNS record registration and management.
Support for multi-endpoint interconnects You can associate a single Private Link resource with multiple private endpoints. This allows for connection to the resource over different IP networks if such segregation is required—for example, in multi-tenant scenarios.
Support for multiple private endpoints on the same virtual network Every virtual network and subnet can support multiple private endpoints. Currently, as many as 1,000 private endpoints are supported per virtual network.
No dedicated subnet required Private endpoints do not require a dedicated subnet in the virtual network. Any subnet can be selected to host some or all private endpoints.
Private endpoint limitations
Here are a few limitations or requirements to keep in mind when designing and deploying private endpoints:
All connections to the private endpoint must be incoming—that is, clients must connect to the private endpoint to access a resource. Outgoing connections from an Azure resource to on-premises or endpoint-connected resources are not supported.
You must deploy a private endpoint using the same region and subscription as the virtual network. Using a different Azure region or subscription is not currently supported.
Employing user-defined routing for a private endpoint can result in asymmetric routing. It is best to set up a SourceNAT (SNAT) for such traffic at the network virtual appliance to ensure symmetric routing takes place.
The subscription hosting the Private Link resource must be registered with the Microsoft.Network resource provider for the integration to work.
Enhanced network security
A private endpoint maps to a single Private Link resource and provides access only to that resource. This ensures that you can securely control and manage network communication. If users require access to multiple resources, you will need to deploy multiple private endpoints. You can restrict or curtail access to public endpoints for Azure resources to ensure access to only the private endpoint.
DNS configuration
To access a resource over Private Link using the resource’s fully qualified domain name (FQDN), you need to keep two points in mind:
You should update the DNS record(s) for the private endpoint to reflect the correct private IP address.
You should set up the DNS services employed to connect to the private endpoint to use the private DNS records. Otherwise, connectivity will continue over the public endpoint. (These can be DNS services referenced in Azure virtual networks or customer-managed DNS services used by on-premises resources.)
There are different ways to set up DNS for accessing resources over private endpoints:
Using HOSTS files You can manually set up HOSTS files to contain a reference for the private endpoint. This approach is suitable during testing. However, using it on a large scale would be impractical, especially when rolling out or changing the configuration—for example, if the IP changes in a disaster-recovery scenario.
Using an Azure private DNS zone You can integrate an Azure private DNS zone to manage the DNS name resolution for private endpoints. All virtual networks that need to connect using the private endpoint can then be set up to use the private DNS zone for custom name resolution.
Using customer-managed DNS forwarders You can set up DNS forwarders to route requests for the private endpoint domain to DNS servers that have the private IP reference for the service.
Disaster recovery
By default, private endpoints come with 99.99% SLA. However, in the event of a regional outage, services would be unavailable. To handle such a scenario, it’s recommended that you do the following:
Set up multiple private endpoints that point to the same Private Link resource in different Azure regions.
Set up redundancy for the Private Link resource if it is in the same region as the private endpoint and account for resource failover in your disaster-recovery plan.
This approach will provide redundancy in the event of a large disaster in any Azure region impacting customer workloads that use private endpoints.
Private endpoint walkthrough
The following sections walk you through the process of setting up a private endpoint using the Azure Portal, Azure PowerShell, and the Azure CLI.
Before you proceed with the walkthrough, you need to complete these prerequisites:
Set up an Azure web app using the App Service Plan – Premium_v2.
Set up or identify the virtual network and subnet where the private endpoint will be hosted.
Using the Azure Portal
To create a private endpoint using the Azure Portal, follow these steps:
Log in to the Azure Portal, type Private Link in the search box to locate the service, and select it from the list that appears. (See Figure 10-1.)

FIGURE 10-1 Search for the Private Link service.
Click the Create Private Endpoint button to start the Create a Private Endpoint wizard. (See Figure 10-2.)

FIGURE 10-2 Create a private endpoint.
In the Basics tab of the Create a Private Endpoint wizard, enter the following information (see Figure 10-3) and click Next:
Subscription Select the subscription that will host the private endpoint.
Resource Group Select the resource group you want to use to host the private endpoint. Alternatively, to create a new resource group, click the Create New link and follow the prompts.
Name Type a unique name for the private endpoint.
Region Choose the Azure region in which you want to host the private endpoint.

FIGURE 10-3 The Basic tab of the Create a Private Endpoint wizard.
In the Resource tab, enter the following information (see Figure 10-4) and click Next:
Connection Method Specify what connection method to use to identify the Azure resource to connect the private endpoint.
Subscription Select the subscription in which the Azure resource is located.
Resource Type Select the type of Azure resource you want to connect the private endpoint to.
Resource Select the specific resource from your subscription to connect the private endpoint to.
Target Sub-Resource Select the resource sub-type to connect. The options here will automatically change based on the resource type and resource you selected earlier.
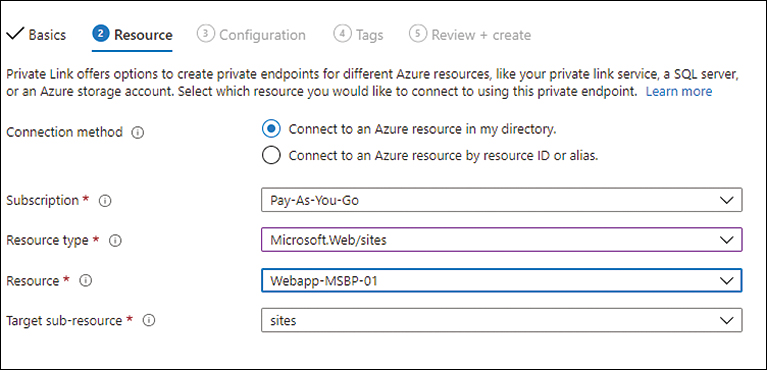
FIGURE 10-4 The Resource tab of the Create a Private Endpoint wizard.
In the Configuration tab, enter the following information (see Figure 10-5) and click Next:
Virtual Network Select the virtual network on which you want to create the private endpoint.
Subnet Select the subnet to associate with the private endpoint. The endpoint NIC will pick up an IP address based on this subnet IP range.
Integrate with Private DNS Zone Specify whether the private endpoint should integrate with a private DNS zone.
Private DNS Zone Configuration If you enable integration, specify what private DNS zone you want to integrate with the private endpoint.

FIGURE 10-5 The Configuration tab of the Create a Private Endpoint wizard.
In the Tags tab, enter any tags required for the private endpoint service or leave the fields blank (see Figure 10-6), and click Next.

FIGURE 10-6 The Tags tab of the Create a Private Endpoint wizard.
In the Review + Create tab (see Figure 10-7), review your settings and click Create.

FIGURE 10-7 Review and create a private endpoint.
Using Azure PowerShell
You can create a private endpoint with Azure PowerShell using the New-AzVirtualNetworkLink command with various switches to set its parameters. For example, to create the same private endpoint as you did in the preceding section, you use the following code:
#Define required variables
$rg = "RG01"
$vnet = "vNET-01"
$subnetName = "Subnet01"
$webapp = "WebApp-MBSP-01"
$endpointname = "PrivateEndpoint"
$location = "East US"
#Configure the private endpoint
$PrivEndPointConn = New-AzPrivateLinkServiceConnection -Name "myPrivateEndpointconnection"
-PrivateLinkServiceID $webApp.Id -GroupId sites
$privateEndpoint = New-AzPrivateEndpoint -Name "myPrivateEndpoint" `
-ResourceGroupName $resourcegroupname `
-Location $location `
-Subnet $subnet `
-PrivateLinkServiceConnection $privEndPointConn
#Create the private DNS zone
$PrivdnsZone = New-AzPrivateDnsZone -Name "privatelink.azurewebsites.net"
-ResourceGroupName $rg
#Create the private DNS link
$dnsLink = New-AzPrivateDnsVirtualNetworkLink -Name "privateendpointlink" `
-ResourceGroupName $rg `
-ZoneName "privatelink.azurewebsites.net" `
-VirtualNetworkId $vnet.Id
#Create the private DNS config
$dnsConfig = New-AzPrivateDnsZoneConfig -Name "privatelink.azurewebsites.net" `
-PrivateDnsZoneId $privdnsZone.ResourceId
$dnsZoneGroup = New-AzPrivateDnsZoneGroup -Name "PrivDNSZoneGroup" `
-ResourceGroupName $rg `
-PrivateEndpointName $privateEndpoint.Name `
-PrivateDnsZoneConfig $dnsConfig
Using the Azure CLI
You can create a private endpoint with the Azure CLI using the az network private-endpoint create command with various switches to set its parameters. For example, to create the same private endpoint as you did in the preceding sections, you use the following code:
#Define required variables
rg="RG01"
vnet="vNET-01"
subnetName="Subnet01"
webapp="WebApp-MBSP-01"
endpointname="PrivateEndpoint"
location="East US"
#Find the web app resource ID
id=$(az webapp list
    --resource-group $rg
    --query '[].[id]'
    --output tsv)
#Create and configure the private endpoint
az network private-endpoint create
    --name PrivateEndpoint
    --resource-group $rg
    --vnet-name $vnet --subnet $subnet
    --private-connection-resource-id $id
    --group-id sites
    --connection-name PrivEndpointConnection
#Create the private DNS zone
az network private-dns zone create
    --resource-group $rg
    --name "privatelink.azurewebsites.net"
#Create the private DNS link
az network private-dns link vnet create
    --resource-group $rg
    --zone-name "privatelink.azurewebsites.net"
    --name privateendpointlink
    --virtual-network $vnet
    --registration-enabled false
#Create the private DNS config
az network private-endpoint dns-zone-group create
   --resource-group $rg
   --endpoint-name PrivateEndpoint
   --name PrivDNSZoneGroup
   --private-dns-zone "privatelink.azurewebsites.net"
   --zone-name webapp
Azure Private Link service
If a service provider needs to provide its customers with secure private connectivity to Azure-hosted services, they can do so using the Azure Private Link service. The Azure Private Link service provides a reference to service provider–hosted services that customers can connect to using Azure Private Link.
For this to work, customers need to create a private endpoint inside their Azure virtual network and map it to the Azure Private Link service alias or a resource URI provided by the service provider. Once this mapping is complete on the customer end, the service provider can either auto-approve or manually approve the connection request before traffic is allowed over the Microsoft backbone. Figure 10-8 shows how such an integration can be performed.

FIGURE 10-8 Private Link service integration with a private endpoint.
Notice the following points in Figure 10-8:
A customer has created a private endpoint in their Azure virtual network and associated it with the Private Link service.
The Private Link service is mapped to a standard Azure load balancer that front-ends all traffic to the back-end service resources hosted on virtual machines and virtual machine scale sets.
The customer has connected their on-premises network to the Azure environment using ExpressRoute. This allows traffic from on-premises and Azure-hosted virtual machines to securely and privately route to the service provider’s Azure tenant over the Microsoft backbone.
Private Link service does not require a dedicated subnet. It can be deployed in any subnet in the same Azure virtual network where the Private Link resource is deployed.
Connect to the Private Link resource
Azure allows you to map to a Private Link service using two methods:
Resource URI The resource URI is a unique reference to the Azure Private Link service hosted in the service provider tenant. The format of this is quite complex and unique. For example:
/subscriptions/<Subscriptionid>/resourceGroups/<resourcegroupname>/providers/
Microsoft.Network/privateLinkServices/{serviceName}
Service alias When a Private Link service is created, a unique alias is generated automatically for the service. This alias can be used by customers instead of the resource URI to connect to the Private Link service. The alias consists of multiple parts:
Prefix This is provided by the service provider when the Private Link service is created.
GUID This is a unique GUID provided by Azure.
Region This is the Azure region in which the Private Link service was created.
Azure.privatelinkservice Suffix This is an automated standardized suffix that is added to the alias.
Once combined, the complete alias would be as follows, making it unique across the entire global Azure network:
-Prefix.{GUID}.region.azure.privatelinkserviceService visibility
There are three visibility options to control the exposure of the Private Link service. Each setting controls how customers can connect to the service:
Role-Based Access Control Only (None) RBAC helps control service visibility across virtual networks sharing the same Azure AD tenant. Although you can set up cross-tenant visibility, it is not the ideal method and can result in excessive permission delegation if performed incorrectly.
Subscription Restriction (Restrictive) You can define trusted subscriptions to provide access to and set up auto-approvals for connection requests received from the private endpoints hosted in trusted subscriptions.
Anyone with Service Alias (All) For services that are designed for public consumption, you choose this visibility option so anyone can request to connect. Manual approvals would still be required to approve the connection request.
Service access approvals
You can control access to the Private Link service in one of two ways:
Automated approval When the service provider predefines a set of trusted subscriptions or is hosting the private endpoint, any connection requests are automatically approved.
Manual approval In cases where the service provider wants to control access to the Private Link service before traffic is allowed through, manual approval can be set up. In this scenario, connection requests are kept in a pending state until the manual approval is performed.
High availability
Private Link service supports up to eight IPs per service. This can be used to provide high availability in case connectivity issues occur over a single IP. In addition, you can add multiple Private Link services standard load balancers to provide redundancy in case of service failure. Currently, each standard load balancer supports up to eight Private Link services.
Limitations
The Private Link service has a few limitations that you should consider when deciding on its use:
Private Link service requires the use of a standard load balancer. The basic load balancer is not supported.
The back-end pool on the standard load balancer should be configured to point to VMs or a VMSS.
Private Link supports IPv4 TCP and UDP traffic only.
Private Link service walkthrough
The following sections walk you through the process of setting up an Azure Private Link service using the Azure Portal, Azure PowerShell, and the Azure CLI.
Before you proceed with the walkthrough, you need to complete these prerequisites:
Set up an Azure standard load balancer and assign at least one VM to the back-end pool.
Set up or identify the virtual network and subnet where the Private Link service will be created.
Using the Azure Portal
To create a Private Link service using the Azure Portal, follow these steps:
Log in to the Azure Portal, type Private Link in the search box to locate the service, and select it from the list that appears. (See Figure 10-9.)

FIGURE 10-9 Search for the Private Link service.
Click the Create Private Link Service button to start the Create Private Link Service wizard. (See Figure 10-10.)

FIGURE 10-10 Create a Private Link service.
In the Basics tab of the Create Private Link Service wizard, enter the following information (see Figure 10-11) and click Next:
Subscription Select the subscription that will host the Private Link service.
Resource Group Select the resource group you want to use to host the Private Link Service. Alternatively, to create a new resource group, click the Create New link and follow the prompts.
Name Type a unique name for the Private Link service.
Region Choose the Azure region in which you want to host the Private Link service.

FIGURE 10-11 The Basics tab of the Create Private Link Service wizard.
In the Outbound settings tab, enter the following information (see Figure 10-12) and click Next:
Load Balancer Select the load balancer to associate with the Private Link service.
Load Balancer Frontend IP Address Select the front-end IP address to use for the load balancer.
Source NAT Virtual Network This is set automatically based on the load balancer’s virtual network.
Source NAT Subnet Select the subnet to associate with the Private Link service.
Enable TCP Proxy V2 Specify whether TCP proxy V2 should be enabled. Leave this at the default value of No unless required.
Private IP Address Settings Specify whether the private IP address should be dynamic or static. Leave this at the default value of Dynamic.

FIGURE 10-12 The Outbound Settings tab of the Create Private Link Service wizard.
In the Access Security tab, next to Who Can Request Access to Your Service, select the Role-Based Access Control Only option button and click Next. (See Figure 10-13.)

FIGURE 10-13 The Access Security tab of the Create Private Link Service wizard.
In the Tags tab, enter any tags required for the Private Link service or leave the fields blank (see Figure 10-14), and click Next.

FIGURE 10-14 The Tags tab of the Create Private Link Service wizard.
In the Review + Create tab (see Figure 10-15), review your settings and click Create.

FIGURE 10-15 Review and create a Private Link service.
Using Azure PowerShell
You can create a Private Link service with Azure PowerShell using the New-AzVirtualNetworkLink command with various switches to set its parameters. For example, to create the same Private Link service as you did in the preceding section, you use the following code:
#Define required variables
$rg = "RG01"
$vnet = "vNET-01"
$subnet = "Subnet01"
$loadbalancer = "LoadBalancer"
$lb-ip = "lb-frontend-ip"
$location = "East US"
#Create Private Link private IP
$IPConf = New-AzPrivateLinkServiceIpConfig -Name 'PrivLink-IPConfig' -Subnet $subnet
-PrivateIpAddress '10.2.0.5'
#Create Private Link service
New-AzPrivateLinkService -Name ‘PrivateLinkService' -ResourceGroupName = $rg -Location =
$location -LoadBalancerFrontendIpConfiguration $lb-ip -IpConfiguration $IPConf
Using the Azure CLI
You can create a Private Link endpoint with the Azure CLI using the az network private-endpoint create command with various switches to set its parameters. For example, to create the same Private Link service as you did in the preceding sections, you use the following code:
#Define required variables
rg="RG01"
vnet="vNET-01"
subnetName="Subnet01"
loadbalancer="LoadBalancer"
lb-ip="lb-frontend-ip"
location="eastus"
#Create Private Link service
az network private-link-service create
    --resource-group $rg
    --name PrivateLinkService
    --vnet-name $vnet
    --subnet $subnetname
    --lb-name $loadbalancer
    --lb-frontend-ip-configs $lb-ip
    --location $location
Best practices
Following are some best practices for private endpoint and Private Link service setup, management, monitoring, and security. Although this list is not exhaustive, it is a great starting point, and covers most of the important areas to consider:
Control access using custom groups If you must delegate permissions for deploying Private Link resources, use custom roles to granularly define the required permissions instead of providing access to built-in role groups such as Owner, Contributor, or Network Contributor. Microsoft provides detailed templates for role permissions to create custom role groups to limit access.
Use one private endpoint for a shared DNS You can create multiple private endpoints for every Private Link resource. However, if the DNS service is common across all the endpoints, it’s best to deploy a single private endpoint to avoid DNS record duplication or conflicts resulting in service outages.
Use activity logs and alerts Use Azure activity logs to monitor changes to Private Link resources. Set up alerts for unwanted activities so you can take effective rollback actions in a timely manner.
Use Azure Monitor To monitor logs generated by Private Link resources in a centralized manner, ingest them into Azure Monitor for easier analysis. You can also use Log Analytics workspaces to analyze the data, derive actionable insights, and set up effective alerts related to activity logs and security logs generated by the service.
Configure long-term log retention If organizational compliance demands the storage of activity and security logs for extended periods of time, set up retention policies on the log analytics storage to ensure data is stored for the required period.
Perform regular service backups Azure Private Link does not integrate with Azure Backup for service backups. However, Azure provides the ability to export the Private Link service configuration as a template, which you can use to restore Private Link endpoints and related resources. In addition, you should perform regular backups using Azure Automation and REST APIs.