Chapter 5
Azure Firewall
Overview
Azure Firewall is a fully managed, highly available, highly scalable, stateful firewall provided as an Azure service. It enables you to centrally define network and application logging and to enforce policies to protect Azure virtual network (vNET) resources across multiple subscriptions. (See Figure 5-1.) The service complies with most international standards, including service organization controls (SOCs), International Organization for Standardization (ISO) standards, Payment Card Industry Data Security Standard (PCI DSS), the Health Information Trust Alliance Common Security Framework (HITRUST CSF), and others.

FIGURE 5-1 Azure Firewall features.
Azure Firewall features
Some key features and concepts of Azure Firewall include the following:
High availability by design Azure Firewall is highly available by design. The service uptime standard is 99.95%. Organizations need not perform additional setup or configuration to achieve high availability.
Unlimited scaling capabilities Azure Firewall has unlimited scaling capabilities to handle higher volumes of traffic as needed. So, organizations need not plan for or manually scale the firewall to handle peak loads.
Support for availability zones Azure Firewall supports deployment across multiple availability zones, allowing for 99.99% uptime. Azure Firewall costs remain the same regardless of the availability zone configuration. If a firewall spans multiple availability zones, there are additional charges associated with inbound and outbound data transfers between availability zones.
Fully stateful service Azure Firewall is a fully stateful service that provides layer 3 and 4 monitoring and filtering capabilities. Defining rules for what traffic should be allowed or denied based on source, destination IPs, protocols, or ports protects resources spread across multiple Azure subscriptions and vNETs.
Centralized management Azure Firewall allows for centralized management using Azure Firewall Manager. This makes it easy to configure and manage multiple Azure Firewalls from a single location.
Threat Intelligence Azure Firewall supports the automatic blocking of traffic from known malicious IPs and sources based on Microsoft Threat Intelligence feeds. You can easily enable this functionality if your organization requires it.
NAT support Azure Firewall service provides both inbound and outbound network address translation (NAT) capabilities, allowing traffic to be securely routed to and from internal resources without requiring public exposure for critical services.
Support for multiple IP addresses As many as 250 IP addresses can be assigned to Azure Firewall. So, you can configure inbound and outbound NAT for multiple virtual resources on the same ports using different IP addresses.
Centralized logging Azure Firewall supports centralized logging to Azure Monitor, enabling long-term retention of firewall and traffic logs for analysis and alerting.
Multiple deployment methods You can deploy and manage Azure Firewall using the Azure Portal and Azure PowerShell. You can also deploy Azure Firewall using ARM templates.
Design concepts and deployment considerations
It’s important to gain a better understanding of the various features of Azure Firewall to design and deploy the service most effectively for your environment. The following sections discuss several firewall features in detail.
Support for availability zones
An availability zone is a unique physical location encompassing one or more datacenters. Multiple availability zones comprise each Azure region.
You can deploy Azure Firewall across multiple availability zones in a region when you create the firewall, but not after it has been created. Any firewall you’ve already created that needs to be part of an availability zone must be deleted and re-created in the availability zone.
The cost of the firewall is the same, whether it’s within an availability zone or not. However, if a firewall spans multiple availability zones, additional charges apply for inbound and outbound data transfers across the availability zones.
Inbound DNAT
Azure Firewall supports destination network address translation (DNAT). This allows the firewall to route incoming traffic for a specific public IP associated with the firewall, to an internal service. This allows secure publishing of internal services over the public internet.
DNAT allows traffic to be routed from standard public ports to non-standard internal ports, thereby obscuring the internal application ports. Internal applications can be securely exposed without fear of exposing the application front end to malicious attacks.
You can set up as many as 250 public IP addresses on Azure Firewall, making it possible to associate different public IPs with different internal services. This makes it easier to use the same ports for multiple internal applications if required.
Outbound SNAT
Azure Firewall also supports source network address translation (SNAT) for outbound traffic that originates from resources inside the network. With SNAT, traffic going to the public internet can be masked with a specific public IP or a set of public IPs. This makes it possible for people (such as remote employees) to access resources over the public internet. It also makes it possible to set up routing rules to enable specific SNAT configurations access to known-partner or third-party networks that require static IP associations.
SNAT can take advantage of Azure Firewall’s multi-IP support, using multiple public IPs to limit the impact of port exhaustion for a single public IP. All public IPs associated with the firewall are randomly chosen at the time of the SNAT. Hence, any filtering performed downstream will require that all associated public IPs or the public IP prefix be allowed for any services that rely on this filtering.
Traffic filtering
With Azure Firewall, you can create different types of traffic-filtering rules to protect your environment and back-end services. You can perform traffic filtering in different ways:
Network traffic-filtering rules using incoming network packet details
Web-traffic filtering rules using web categories
Application FQDN traffic-filtering rules to protect outbound traffic to pre-defined Microsoft-managed application FQDNs
Network traffic filtering
Azure Firewall can filter network traffic through the creation of rules that allow or deny traffic based on source IPs, destination IPs, port, or protocol. Because Azure Firewall is a fully stateful service, capable of monitoring and filtering layer 3 and layer 4 traffic, it can constantly analyze the context of traffic and data packets traversing the firewall. This enables it to filter based on not just source and destination IPs but also by port and protocol, providing more control over the network traffic allowed in and out of the network.
Web-traffic filtering
Azure Firewall also supports web-traffic filtering, allowing or restricting traffic based on pre-defined categories such as social media, search engine, religion, sports, and so on.
The standard Azure Firewall supports categorization and filtering up to the primary domain level of a web request only. For example, web requests for www.bing.com and www.bing.com/news would be categorized under search engine because the primary domain in both cases (bing.com) is a search engine.
Application FQDN traffic filtering
Azure Firewall enables you to limit outbound HTTP, HTTPS, and Azure SQL traffic to a pre-defined set of fully qualified domain names (FQDNs). This includes the ability to allow traffic based on wildcards to these FQDNs that are managed by Microsoft.
Groupings
Azure provides various methods to simplify grouping well-known services. These are frequently used for IP ranges, infrastructure services, and website categories, to enable them to be used effectively in filtering rules.
Tags
Tags make it easier to group resources, services, or objects to apply specific actions on them. There are two different types of tags available for use with Azure Firewall service: fully qualified domain name (FQDN) tags and service tags.
FQDN tags
An FQDN tag is applied to a pre-defined set of well-known Azure services to easily allow traffic to them. For example, the Windows Diagnostics FQDN tag is applied to all Windows Diagnostics endpoints. You can enable this tag to allow traffic to the Windows Diagnostics service instead of setting up all the IPs associated with this service to allow traffic.
The FQDN tags currently available in Azure include the following (Microsoft will add more FQDN tags in the future as the need arises):
Windows Update This FQDN tag allows access to all Microsoft Update endpoints.
Windows Diagnostics This FQDN tag allows access to all Windows Diagnostics endpoints.
Microsoft Active Protection Service (MAPS) This FQDN tag allows access to all MAPS endpoints.
App Service Environment (ASE) This FQDN tag allows access to ASE platform traffic. This tag, however, does not cover customer-specific storage and SQL endpoints created by ASE. Those need to be enabled via service endpoints or added manually.
Service tags
Service tags are created by Microsoft to manage groups of IP address prefixes associated with specific Azure services. For example, the AppService service tag applies to the Azure App Service, and any rules set up to use this tag would apply to all instances of that Service.
Other service tags include the following:
Storage This applies to the Azure Storage service.
SQL This applies to the Azure SQL service.
AzureActiveDirectory This applies to the Azure Active Directory service.
Infrastructure FQDNs
Every Azure Firewall instance contains a built-in collection of rules for infrastructure FQDNs that are set up to allow traffic for different Azure services and enabled by default. The following services are included in these FQDNs, are specifically for the Azure platform, and cannot be used for any other reason:
Compute access to the storage Platform Image Repository (PIR)
Managed disks status storage access
Azure Diagnostics and Logging (MDS)
IP groups
You can use IP groups to assemble different IP addresses or IP ranges for use in Azure Firewall rules. An IP group could be used as a source address or destination address in network traffic rules, or as a source address in DNAT or application rules.
The same IP group can be used in multiple rules. This makes it easier to maintain and manage them and reduces management overhead. Each IP group can contain a single IP address, multiple IP addresses, or a range of IP addresses.
Web categories
Web categories are pre-defined sets of categories that contain a list of websites that are related based on their content or purpose. These categories make it easy for administrators to allow or deny traffic based on organizational policies. You can set up exceptions or exclusions for specific websites in a category to override your organization’s policy for that category.
Forced tunneling
Forced tunneling involves routing all outbound internet traffic through a designated edge device or network virtual appliance instead of through the default internet gateway. This helps organizations process outbound traffic for compliance, audit, or security reasons before sending it to the internet.
You can set up forced tunneling only when you create an Azure Firewall instance. If you want to configure an existing Azure Firewall instance to use forced tunneling, you must delete that instance and re-create it with forced tunneling enabled. Similarly, if you want to disable forced tunneling for an Azure Firewall instance, you must delete the instance and re-create it with that setting disabled.
Traffic to manage the firewall service must be separated from client traffic to allow operational activities for the service to continue uninterrupted. You must use a dedicated subnet, AzureFirewallManagementSubnet, with a minimum subnet size of /26. This subnet requires a dedicated public IP address. Once this configuration is in place, you can set the AzureFirewallSubnet to route all traffic to any on-premises or dedicated appliance for processing as required.
Threat intelligence
Threat intelligence–based filtering is an advanced security feature available with Azure Firewall that sources information about malicious IPs and domains from the Microsoft Threat Intelligence feed. This feature is enabled by default in alert-only mode, although you can set it to alert-and-deny mode to alert you to a potential threat and block that threat when necessary.
When alert-and-deny mode is enabled, other network or application-filtering rules are ignored. This is because if this setting is enabled, Azure Firewall always analyzes Threat Intelligence rules for incoming or outgoing traffic first. Note that this order of operations cannot be changed.
In contrast, in alert mode, Azure Firewall also analyzes the traffic first, but because the service need only raise an alert, the rest of the network and application traffic-filtering rules continue to be applied for that traffic.
Azure Firewall Manager
Azure Firewall Manager is a management layer service that can be used to centrally configure policies and to route and manage instances of Azure Firewall deployed in multiple subscriptions and vNETs. For enterprises accustomed to employing a central console for firewall management, Azure Firewall Manager is the ideal solution for managing Azure Firewall instances. It can be used to centrally create, deploy, and manage network and application filtering rules across multiple Azure Firewall instances using firewall policies (discussed next).
Classic rules versus firewall policies
There are two ways to set up Azure Firewall rules:
Classic rules Classic rules are standard application or network rules that are set up for individual Azure Firewall instances. These are available only on the standard SKU. Newer Azure Firewall features do not support classic rules.
Firewall policies Firewall policies are collections of NAT rules, network traffic rules, application filtering rules, and Threat Intelligence settings that are stored on a global level and can be deployed across multiple Azure Firewall instances. This makes it easier to apply standards across an organization using policy inheritance and enforcement. New firewall policies can be created based on existing policies. In addition, you can create local policies for specific scenarios and apply them to individual Azure Firewall instances. To create and manage firewall policies, you use Azure Firewall Manager, Azure PowerShell, the Azure CLI, REST API, or ARM templates.
It is highly recommended to migrate away from classic rules to firewall policies. One easy way to do this is to select the Migrate to Firewall Policy option in the Azure Portal.
Firewall rule processing
Now that you know all the different ways Azure Firewall can manage traffic—Threat Intelligence, inbound and outbound NAT rules, network and application rules—it is important to grasp the order in which they are processed.
Incoming traffic
For incoming traffic, the order in which rules are processed depends on the type of firewall management in place.
For a firewall set up with classic rules, the order is as follows:
Threat Intelligence rules.
NAT rules.
Network rules, in order of priority (from the lowest number to the highest number).
For a firewall set up with firewall policies, the order is as follows:
Threat Intelligence rules.
NAT rules.
Rule collections or rule-collection groups, in order of priority (from the lowest number to the highest number). Inside each rule collection or rule collection group, network rules are processed using the same logic (from the lowest number to the highest number).
Outbound traffic
Like inbound traffic, the order in which rules for outbound traffic are applied depends on the type of firewall management in place. On each level, if there is a match to deny traffic, no further rules are applied. In addition:
Application rules are analyzed only if there is no match for network rules.
Infrastructure rules are analyzed only if there is no match for application rules.
If there is no match for infrastructure rules, traffic is denied.
For a firewall set up with classic rules, the order is as follows:
Threat Intelligence rules.
NAT rules.
Network rules, in order of priority (from the lowest number to the highest number).
Application rules in order of priority (from the lowest number to the highest number).
Infrastructure rule collections.
For a firewall set up with Firewall Policy, the order is as follows:
Threat Intelligence rules.
NAT rules.
Rule collections or rule-collection groups in order of priority (from the lowest number to the highest number). Inside each rule collection or rule-collection group, network and application rules are processed using the same logic (from the lowest number to the highest number).
Infrastructure rule collections.
DNS proxy
You can configure Azure Firewall as a DNS proxy to resolve client DNS requests as an intermediary, with the help of an authorized DNS server.
Active FTP support
Azure Firewall supports active FTP. Support for active FTP is disabled by default to protect against FTP bounce attacks, but you can enable it if the firewall is deployed using Azure PowerShell, the Azure CLI, or an ARM template.
Azure Monitor logging
You can integrate Azure Firewall with Azure Monitor. This integration also provides support for logging events, archiving logs to a storage account for long-term retention, sending logs to Log Analytics, and event streaming to Event Hub.
Microsoft provides a pre-built template for Azure Monitor called Azure Firewall Workbook that you can use to analyze firewall data and create visualizations for reporting purposes. There are also numerous firewall metrics, activity logs, and diagnostic logs that you can incorporate into your monitoring solution for deeper analysis of firewall performance and ongoing issues.
Firewall metrics
Azure Monitor provides numerous metrics for various Azure services that you can use to monitor specific aspects of the service. These metrics enable you to detect related performance issues and other problems related to the service better than generic metrics alone.
Azure Monitor includes Azure Firewall–specific metrics to collect service-related information and raise alerts if issues are detected. Key metrics include the following:
Firewall Health State Gauges the health of the firewall based on SNAT port availability.
Data Processed Tracks the total amount of data traversing the firewall at various periods of time.
Throughput Indicates the rate per second at which data is traversing the firewall.
Application Rules Hit Count Gauges the number of times an application rule has been triggered by a request.
Network Rules Hit Count Tracks the number of times a network rule has been triggered by a request.
SNAT Port Utilization Indicates the percentage of SNAT ports currently in use by the firewall.
Azure Activity logs
Azure automatically collects Activity logs for all deployed services. These logs contain operational and audit data that records all changes and actions performed on a service for a given period of time. You can collect and analyze these logs to track change-management activities or administrative actions over time.
Diagnostic logs
There are various types of diagnostic logs available for Azure Firewall to monitor various features of the service to identify ongoing issues. These include the following:
Application Rule log This records all connection requests that match an application rule.
Network Rule log This records all connection requests that match a network rule.
DNS Proxy log This records all DNS messages sent to a DNS server using the DNS proxy service configured on the firewall.
Each of these log types can be configured to store logs in one of three ways:
Store them in an Azure Storage account
Send them to Azure Monitor
Stream them to Event Hubs
Azure Firewall deployment walkthrough
The following sections walk you through the process of creating an Azure Firewall using the Azure Portal and Azure PowerShell. (The functionality needed to use the Azure CLI to complete this task is under development, so it is not covered here.) If you are following along, be sure to select resources and resource names based on your environment, including a unique Azure Firewall name for each deployment. Also be sure to delete any unwanted resources after you have completed testing to reduce charges levied by Microsoft for these resources.
Using Azure Portal
To create an Azure Firewall using the Azure Portal, follow these steps:
Log into the Azure Portal, type firewall in the search box to locate the service, and select it from the list that appears.
Click Create or Create Firewall to start the Create a Firewall wizard. (See Figure 5-2.)

FIGURE 5-2 Create a firewall.
In the Basics tab of the Create a Firewall wizard (see Figure 5-3), enter the following information and click Next:
Subscription Select the subscription to host the Azure Firewall instance.
Resource Group Select the resource group you want to host the firewall. Alternatively, click the Create New link and follow the prompts to create a new resource group.
Name Type a name for the firewall. If the name you type is already in use, the wizard will prompt you to enter a different name.
Region Select the Azure region in which you want to host the Azure Firewall instance.
Availability Zone Select an availability zone for the firewall.
Firewall Tier Select the Standard option button.
Firewall Management Select the Use a Firewall Policy to Manage This Firewall option button.
Firewall Policy Select the policy you want to associate with the firewall. Alternatively, click the Create New link and follow the prompts to create a new firewall policy.
Choose a Virtual Network Select an existing vNET on which to deploy the firewall. Alternatively, click the Create New link and follow the prompts to create a new vNET.
Public IP Address Select the public IP address you want to use. Alternatively, click the Add New link and follow the prompts (see Figure 5-4) to create a new IP address.
Forced Tunneling Leave this set to Disabled.

FIGURE 5-3 The Basics tab of the Create a Firewall wizard.

FIGURE 5-4 Adding a new public IP.
In the Tags tab of the Create a Firewall wizard (see Figure 5-5), enter any tags required for the firewall. Then click Next.
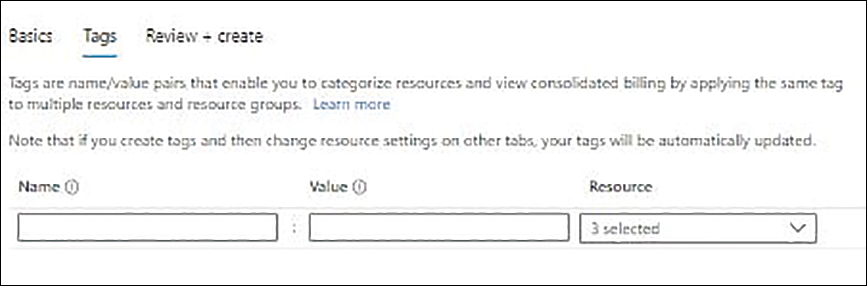
FIGURE 5-5 The Tags tab of the Create a Firewall wizard.
On the Review + Create tab, review your settings. Then click Create.
Now you need to create a default route and attach it to the required subnets to route traffic from resources in those subnets through the firewall.
In the Azure Portal, type route tables in the search box to locate the service and select it from the list that appears.
Click Create or Create Route Table to start the Create Route Table wizard. (See Figure 5-6.)

FIGURE 5-6 Create route table.
In the Basics tab of the Create Route Table wizard (see Figure 5-7), enter the following information and click Next:
Subscription Select the subscription to host the route table.
Resource Group Select the resource group in which you want to create the route table. Alternatively, click the Create New link and follow the prompts to create a new resource group.
Region Select the Azure region in which you want to create the route table.
Name Type a name for the route table. If the name you type is already in use, the wizard will prompt you to enter a different name.
Propagate Gateway Routes Select the Yes option button.

FIGURE 5-7 The Basics tab of the Create Route Table wizard.
In the Tags tab of the Create Route Table wizard (see Figure 5-8), enter any tags required for the route table. Then click Next.

FIGURE 5-8 Enter the tags.
On the Review + Create tab, review your settings. Then click Create.
When the route table has been created, click Go to Resource.
In the left pane of the new route table’s configuration blade, click Subnets. Then click the Associate button in the right pane. (See Figure 5-9.)

FIGURE 5-9 Associating the subnet in the route table.
In the Associate Subnet settings (see Figure 5-10), enter the following information. Then click OK:
Virtual Network Select the appropriate vNET.
Subnet Select the subnet you want to associate with the route table.

FIGURE 5-10 The Associate Subnet options.
After the subnet has been associated with the route table, click Routes on the left side of the route table’s configuration blade. Then click Add on the right side of the blade. (See Figure 5-11.)
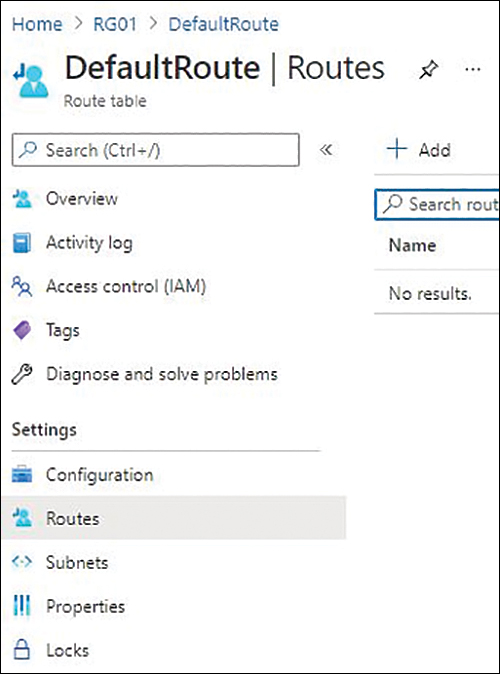
FIGURE 5-11 The Routes options.
In the Add Route settings, enter the following information and click Add:
Route Name Enter a unique name for the route. If the name you type is already in use, you’ll be prompted to enter a different name.
Address Prefix Type 0.0.0.0/0 to set it as the default gateway.
Next Hop Type Select Virtual Appliance.
Next Hop Address Enter the firewall’s private IP.
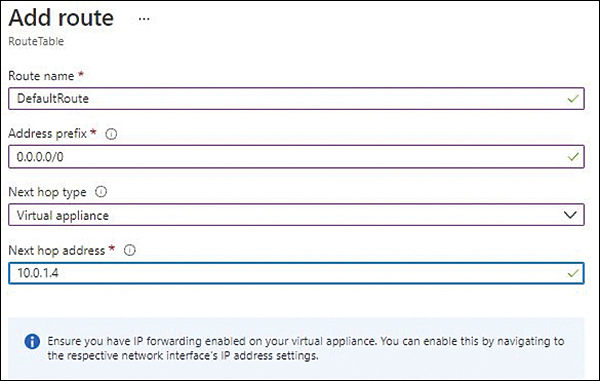
FIGURE 5-12 The Add Route options.
Type firewall policies in the Azure Portal search box. Then select FirewallPolicy01 (created earlier in this walkthrough) from the list that appears.
On the left side of the configuration blade for FirewallPolicy01, click Application Rules. Then click Add a Rule Collection on the right side of the blade. (See Figure 5-13.)

FIGURE 5-13 The Application Rules options for the firewall policy.
In the Add a Rule Collection dialog box (look ahead to Figure 5-14), enter the following information:
Name Enter a unique name for the rule collection—here, AppRule01. If the name you type is already in use, you’ll be prompted to enter a different name.
Rule Collection Type Select Application.
Priority Enter a priority for the rule collection type—in this example, 100.
Rule Collection Action Select Allow.
Rule Collection Group Leave this set to the default rule-collection group or select a different rule-collection group.
In the Rules section of the Add a Rule Collection dialog box (see Figure 5-14), enter the following information. When you’re finished, click Add:
Name Type a name for the first rule in the rule collection—here, AllowWebBrowsing.
Source Type Choose IP Address.
Source Enter the source’s IP address.
Protocol Enter the supported protocols in the Protocol box.
Destination Type Select the destination type—in this case, Web Categories.
Destination Select the destination. (You will see a list of destinations based on the destination type selected earlier.)

FIGURE 5-14 Adding an application rule collection.
On the left side of the FirewallPolicy01 blade, click Network Rules. Then click Add a Rule Collection on the right. (See Figure 5-15.)

FIGURE 5-15 The Network Rules options for the firewall policy.
In the Add a Rule Collection dialog box (look ahead to Figure 5-16), enter the following information:
Name Enter a unique name for the rule collection. If the name you type is already in use, you’ll be prompted to enter a different name.
Rule Collection Type Select Network.
Priority Enter a priority for the rule collection type—in this example, 100.
Rule Collection Action Select Allow.
Rule Collection Group Leave this set to the default rule-collection group or select a different rule-collection group.
In the Rules section of the Add a Rule Collection dialog box (see Figure 5-16), enter the following information. When you’re finished, click Add:
Name Type a name for the first rule in the rule collection—here, AllowDomainNameResolution.
Source Type Choose IP Address.
Source Enter the source’s IP address.
Protocol Enter the supported protocols in the Protocol box.
Destination Type Select the destination type—in this case, IP Address.
Destination Select the destination.

FIGURE 5-16 Adding a network rule collection.
On the left side of the FirewallPolicy01 blade, click DNAT Rules. Then click Add a Rule Collection on the right. (See Figure 5-17.)

FIGURE 5-17 The DNAT Rules for the firewall policy.
In the Add a Rule Collection dialog box (look ahead to Figure 5-18), enter the following information:
Name Enter a unique name for the rule collection—here, DNAT-AllowRDP-VM. If the name you type is already in use, you’ll be prompted to enter a different name.
Rule Collection Type Select DNAT.
Priority Enter a priority for the rule collection type—in this example, 100.
Rule Collection Type This is automatically set to Destination Network Address Translation (DNAT) and cannot be changed.
Rule Collection Group Leave this set to the default rule-collection group or select a different rule-collection group.
In the Rules section of the Add a Rule Collection dialog box (see Figure 5-18), enter the following information. When you’re finished, click Add:
Name Type a name for the first rule in the rule collection—here, AllowRDP-VM.
Source Type Choose IP Address.
Source Enter the source IP. (I typed * to choose all IPs.)
Protocol Enter the supported protocols in the Protocol box.
Destination Ports Enter the destination port.
Destination Type Select the destination type—in this case, IP Address.
Destination Select the destination.
Translated Address Enter the translated address of the destination address. I entered 10.0.0.4 (partially visible in Figure 5-18).
Translated Port Enter the translated address of the destination port. In my case, it was 3389 (not visible in Figure 5-18).
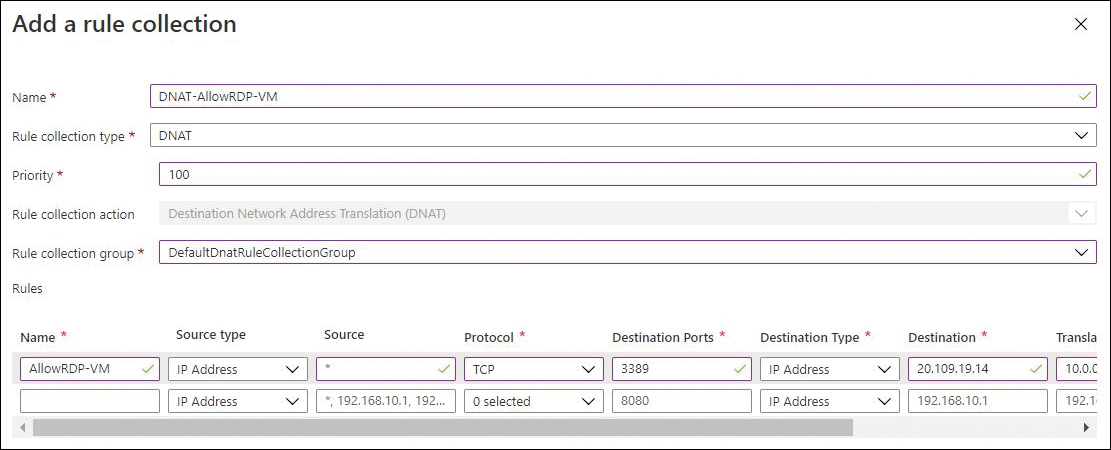
FIGURE 5-18 Adding a DNAT rule collection.
On the left side of the FirewallPolicy01 blade, click Rule Collections. Then, on the right, verify that the rule collections you created are listed and reflect your requirements. (See Figure 5-19.)

FIGURE 5-19 Rule collections listed in the FirewallPolicy01 blade.
On the left side of the FirewallPolicy01 blade, click Threat Intelligence.
Enter the following information on the right side of the blade (see Figure 5-20) and click Save:
Threat Intelligence Mode Choose between Off, Alert Only, and Alert and Deny, depending on your requirements.
Allow List Addresses In the IP Address, Range, or Subnet box under Allow List Addresses, enter any IP address, range, or subnet whose traffic you want to allow-list or allow to pass through your firewall.
FQDNs In the FQDNs box under FQDNs, enter any FQDNs you want to allow-list.
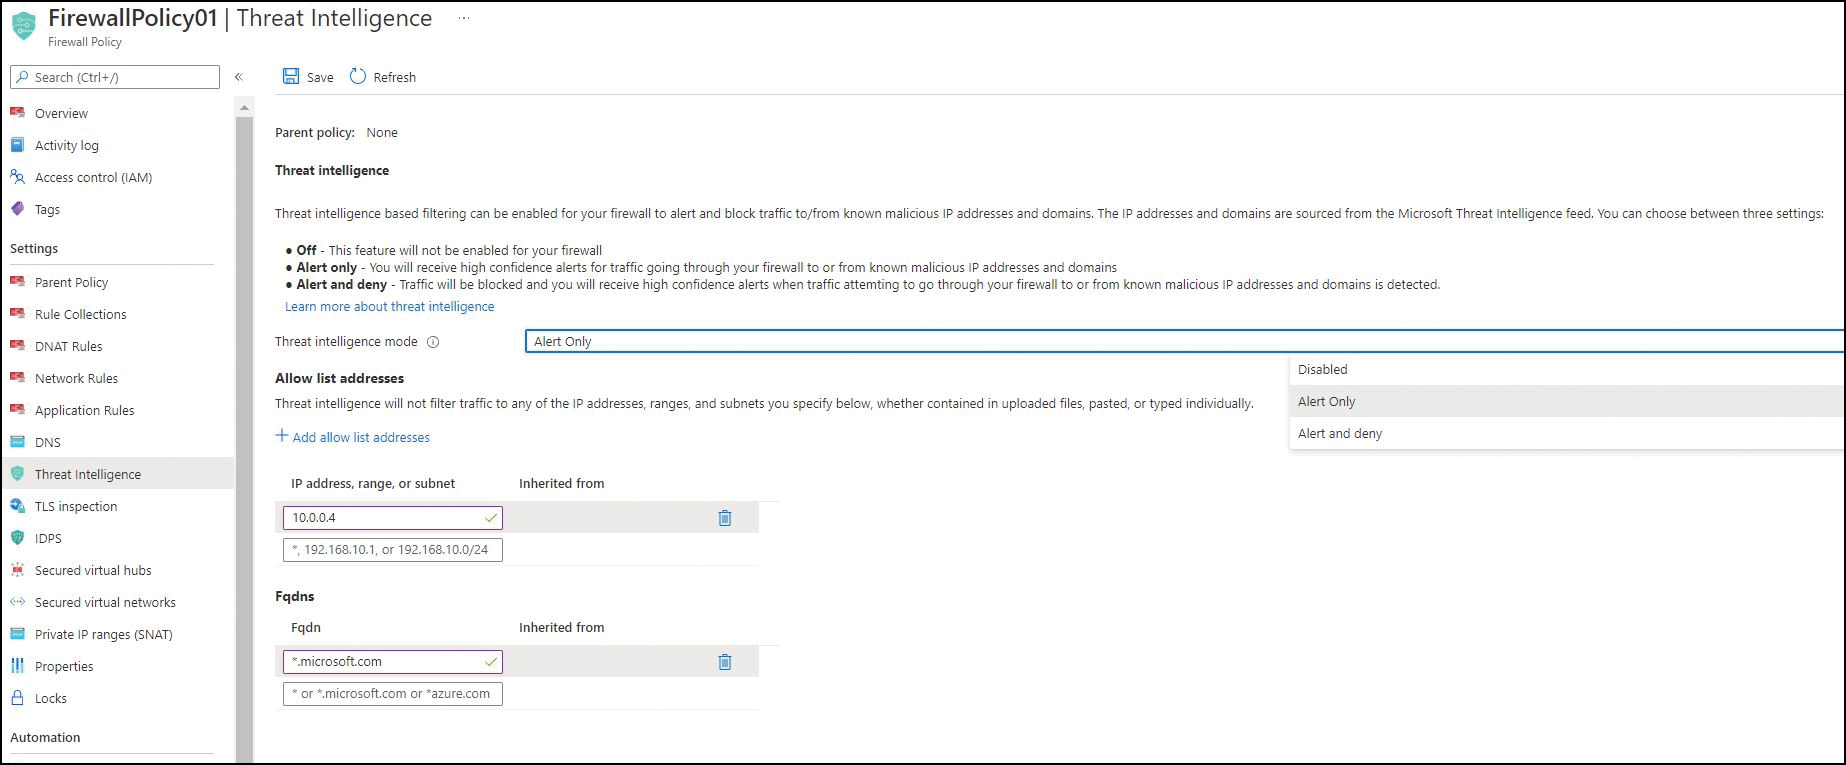
FIGURE 5-20 Applying Threat Intelligence settings.
Using Azure PowerShell
You can create an Azure Firewall instance using Azure PowerShell with the New-AzFirewall command and various switches. The following code shows you how. Use this snippet to create the same Azure Firewall instance as you did in the Azure Portal. (Replace all variables and configuration as per your environment.) When you do, be sure to either delete the previous firewall or give this firewall a different name:
#Define variables
$RG="RG01"
$Region="EastUS2"
#Create new Firewall Policy
$AzFirewallpolicy = New-AzFirewallPolicy -Name FirewallPolicy -ResourceGroupName $RG
-Location $Region
#Create and Configure a firewall policy application rule
$FWAppRuleGroup = New-AzFirewallPolicyRuleCollectionGroup -Name DefaultApplicationRuleCollectionGroup
-Priority 100 -FirewallPolicyObject $AzFirewallPolicy
$FWApprule01 = New-AzFirewallPolicyApplicationRule -Name AllowWebBrowsing -SourceAddress
10.0.1.0/24 -Protocol http, https -WebCategory "Business"
$FWAppCollection01 = New-AzFirewallPolicyFilterRuleCollection -Name AppRuleCollection01
-Priority 100 -Rule $FWAppRule01 -ActionType "Allow"
Set-AzFirewallPolicyRuleCollectionGroup -Name $FWAppRuleGroup.Name -Priority 100
-RuleCollection $FWAppcollection01 -FirewallPolicyObject $AzFirewallpolicy
#Create and configure a firewall policy network rule
$FWNWRuleGroup = New-AzFirewallPolicyRuleCollectionGroup -Name DefaultNetworkRuleCollectionGroup
-Priority 200 -FirewallPolicyObject $AzFirewallPolicy
$FWNetRule01 = New-AzFirewallPolicyNetworkRule -name CloudFlareDNS -protocol UDP
-sourceaddress 10.0.1.0/24 -destinationaddress 1.1.1.1,1.0.0.1 -destinationport 53
$FWNetCollection = New-AzFirewallPolicyFilterRuleCollection -Name AllowDomainNameResolution
-Priority 100 -Rule $FWNetRule01 -ActionType "Allow"
Set-AzFirewallPolicyRuleCollectionGroup -Name $FWNWRuleGroup.Name -Priority 200
-RuleCollection $FWNetCollection -FirewallPolicyObject $AzFirewallPolicy
#Deploy the Azure Firewall
# Create a Public IP for the firewall
$AzFWPubIP = New-AzPublicIpAddress -Name "AzFWPIP01" -ResourceGroupName $RG -Location
$Region -AllocationMethod Static -Sku Standard
# Create the firewall
$vnet = Get-AzVirtualNetwork -ResourceGroupName $RG -Name "vNET01"
$Azfirewall = New-AzFirewall -Name Firewall -ResourceGroupName $RG -Location $Region
-VirtualNetwork $vnet -PublicIpAddress $AzFWPubIP -FirewallPolicyId $AzFirewallpolicy.Id
$AzFWPrivIP = $AzFirewall.IpConfigurations.privateipaddress
#Create and configure DNAT policy
$FWNATRuleGroup = New-AzFirewallPolicyRuleCollectionGroup -Name DefaultDNATRuleCollectionGroup
-Priority 300 -FirewallPolicyObject $AzFirewallPolicy
$FWNATRule01 = New-AzFirewallPolicyNatRule -Name DNAT-AllowRDP-VM -SourceAddress * -Protocol
TCP -DestinationAddress $AzFWPubIP -DestinationPort 3389 -TranslatedAddress 10.0.0.4
-TranslatedPort 3389
$FWDNATCollection = New-AzFirewallPolicyNatRuleCollection -Name DNAT-Rules -Priority 100
-Rule $FWNATRule01 -ActionType "Dnat"
Set-AzFirewallPolicyRuleCollectionGroup -Name $FWNATRuleGroup.Name -Priority 300
-RuleCollection $FWDNATCollection -FirewallPolicyObject $AzFirewallPolicy
#Create route table
$RouteTbl = New-AzRouteTable -Name RouteTable -ResourceGroupName $RG -location $Region `
#Create the default route
 Add-AzRouteConfig -Name "DefaultRoute" `
  -RouteTable $RouteTbl `
  -AddressPrefix 0.0.0.0/0 `
  -NextHopType "VirtualAppliance" `
  -NextHopIpAddress $AzFWPrivIP
#Set route table
Set-AzRouteTable -routetable $RouteTbl
#Associate the route table to the subnet
Set-AzVirtualNetworkSubnetConfig -VirtualNetwork $vnet `
  -Name 'Servers' `
  -AddressPrefix 10.0.1.0/24 `
  -RouteTable $RouteTbl
Best practices
Following are several recommended best practices for Azure Firewall to help you better deploy and manage the service in your environment:
Integrate Azure Firewall with Azure Monitor As discussed, you can integrate Azure Firewall with Azure Monitor to store and analyze firewall logs. Doing so is highly recommended to monitor the firewall metrics to gauge its performance and identify issues. You can store your logs in a storage account, send them to Log Analytics, or stream them to Event Hub. Then, you can use tools like Log Analytics, Microsoft Excel, and Microsoft Power BI to analyze them. You can also set up alerts for various metrics to automatically identify attacks or performance issues.
Set priority of rules in increments of 100 When you create a new rule, it’s a good practice to set its priority to 100. That way, as you add more rules over time, you can easily insert them between existing rules without having to modify the priority of those rules.
Avoid wildcards as sources for DNATs It is better to specify source IPs for incoming DNATs, if possible, instead of using wildcards. That way, only traffic from the sources you specify is allowed in and routed to the internal application.
Consider global peering Azure Firewall is typically deployed using a hub-and-spoke model, in which the firewall is deployed in a central vNET, with all other vNETs in the region peered with the central network. This allows for centralized control of traffic for all peered vNETs without requiring the deployment of a firewall in each one. This works well for vNETs that spread globally, but if traffic traverses different Azure regions before reaching its final destination, performance or latency issues might crop up. To rectify this, consider using global peering for firewalls only. Just be sure to test it first to ensure it meets the latency and performance requirements of the application and your organization.
Use Azure Firewall side-by-side with network security groups (NSGs) Azure Firewall and NSGs work together in a complementary way to provide in-depth network security. Even if you are deploying Azure Firewall to protect resources across all subscriptions and vNETs, be sure to take advantage of the distributed network layer traffic filtering provided by NSGs to limit traffic to resources within vNETs.
Use Azure Security Center Azure Security Center provides better management of your security posture management as well as protection from specific threats. Consider following the network-protection recommendations provided by Security Center to secure network resources related to Azure Firewall. When combined with a Log Analytics Workspace, you can set up monitoring and alerting for anomalous activity so you can respond to threats in a timely manner.
Enable Threat Intelligence As noted, Threat Intelligence–based filtering can alert you to and block traffic from and to well-known malicious IP addresses and domains. Consider using this functionality to enhance protection for your environment.
Reduce administrative overhead, where possible Where possible, use service tags, IP groups, and FQDN tags instead of IP addresses or IP ranges when setting up network security rules. This reduces management and maintenance of the network configuration as well as administrative overhead.
Standardize security configurations Standardize the configuration of your organization’s security policies. Then, set up Azure services to ensure they are effectively maintained. Azure Firewall Manager and Azure Blueprints can help you achieve this objective. Azure Firewall Manager can help you standardize the security configuration, but Azure Blueprints goes much further by packaging all artifacts such as ARM templates, Azure RBAC controls, and policies in a single definition that, when deployed, can monitor and maintain your security policy standards.
Use automated tools to monitor network resource configurations and detect changes Azure Activity log keeps track of all configuration changes to an Azure resource. You can (and should) set up alerts in Azure Monitor to trigger if there are changes to critical resources.
Consider Azure Sentinel for advanced monitoring needs If your organization needs to monitor all security, diagnostic, and activity logs in a centralized repository—perhaps for monitoring and analyzing change-management efforts or to troubleshoot some future problem—consider using Azure Sentinel or a third-party SIEM solution. You can use these to capture all required logs for centralized storage, analysis, and review.
Configure security log storage retention as per organizational compliance requirements It is important to identify your organization’s compliance requirements regarding the retention of log data and ensure that the design of your environment takes them into consideration. With Log Analytics, you can store data for up to two years. However, you have two other options for storing logs for longer: storage accounts and SIEM solutions. You can use these to store logs for much longer durations if your organization requirements exceed the capabilities of Log Analytics. Furthermore, SIEM solutions can be customized to meet your organization’s needs.
Ensure regular automated backups Azure Firewall has no backup feature. However, you can ensure regular automated backups by using Azure Automation to export the firewall and related resources in a JSON template. You can also use the Export Template feature in the Azure Portal to manually export the Azure Firewall configuration in before change-management activities.
Enable locks You can enable locks on Azure Firewall and policy resources to ensure that they aren’t deleted accidentally or otherwise. Considering that a firewall is a critical resource in any environment—and that if it experiences an outage, it can bring the entire environment offline—it is advisable to protect it as best as you can.