Web Forms is the classical programming framework of ASP.NET. Nowadays, much of the concepts and improvements we will see are common to the other development frameworks such as ASP.NET, MVC, and Web Pages.
In this recipe we will see how to work with the new capabilities of ASP.NET 4.5 by creating a Web Forms application.
Now, we will create a Code First ASP.NET Web Forms application that will create the database from code. We will also add some seed data.
- First, open Visual Studio 2012 and create a new project. We will select the ASP.NET Web Forms Application template by going to visual C# | Web category, name it
wfSampleApp, and press OK to create the application. - After the project has been created, add and open the NuGet Package Manager by going to Tools | Library Package Manager | Manage NuGet Packages for Solution.
- Add the Entity Framework package to the project.
- Create a folder in the project root with the name
CodeFirst. We will put our related Code First files and models in this folder. - Place a new class item in the
CodeFirstfolder namedBookModel. Add the following class definition there:public class BookModel { [ScaffoldColumn(false)] Public int Id { get; set; } [Required, StringLength(260)] [Display(Name="Title", Description="The title of the book", Order=1)] public String Title { get; set; } [Display(Name = "Description", Description = "The description of the book", Order = 2)] public String Description { get; set; } public bool IsOnSale { get; set; } public int BookRating { get; set; } public int? CategoryId { get; set; } } - Create another model with the name of
CategoryModelwith the following code:public class CategoryModel { [ScaffoldColumn(false)] Public int Id { get; set; } [Required, StringLength(140)] [Display(Name = "Title", Description = "The title of the category", Order = 1)] public String Title { get; set; } [Display(Name = "Description", Description = "The descriptionof the category", Order = 2)] public String Description { get; set; } public virtual ICollection<BookModel> Books { get; set; } } - Next we will add the
Contextclass in the same location. Add aBooksContext.csclass with the following code in it:public class BooksContext : DbContext { Public DbSet<BookModel> Books { get; set; } Public DbSet<CategoryModel> Categories { get; set; } } - Finally we will add an
Initializerclass, namedBooksInitializer.cs, with the following content:public class BooksInitializer :DropCreateDatabaseIfModelChanges<BooksContext> { protected override void Seed(BooksContext context) { SeedCategories().ForEach(bc =>context.Categories.Add(bc)); SeedBooks().ForEach(b =>context.Books.Add(b)); } private List<CategoryModel> SeedCategories() { List<CategoryModel> BookCategories = new List<CategoryModel>() { NewCategoryModel(){ Id=1, Title = "Thriller" }, New CategoryModel(){ Id=2, Title = "Mystery" }, New CategoryModel(){ Id=3, Title = "Sci-fi" }, New CategoryModel(){ Id=4, Title = "Computer Science" } }; Return BookCategories; } private List<BookModel>SeedBooks() { List<BookModel> Books = new List<BookModel>() { new BookModel(){ Id=1, Title = ".NET 4.5 First Look", CategoryId = 4, Description = "A book to quickly and practically get into .NET 4.5" }, New BookModel(){ Id=2, Title = "The lost book of Agatha Christie", CategoryId=1 } }; return Books; } } - We will open the
Global.asaxcode behind the file and add the following line of code in theApplication_Startmethod (note that we will need to add twousingsclauses, one forSystem.Data.Entityfile and another to access the Code First files):Database.SetInitializer<BooksContext>(new BooksInitializer());
- Open the
Web.configfile and comment theDefaultConnectionconnection string and add a connection string that will create the database in theApp_Datafolder. The new connection string is the following:<add name="BooksContext"providerName="System.Data.SqlClient" connectionString="Data Source=(LocalDB)v11.0;AttachDbFilename=|DataDirectory|wfSampleApp.mdf;Integrated Security=True"/>
- Next we will add a new item of type Web Form using Master Page and name it
Books.aspx.
- On pressing the Add button, the following dialogue will appear, where we will select the default master page and click on OK:

- Add another item of the same type, with the name
Book.aspx. - We will open the
Site.Masterpage, look for the<nav>element in the header section, and change it to match the following code:<nav> <ul id="menu"> <li><a runat="server" href="~/">Home</a></li> <li><a id="A1" runat="server" href="~/Books.aspx">Books</a></li> <li><a runat="server" href="~/About.aspx">About</a></li> <li><a runat="server" href="~/Contact.aspx">Contact</a></li> </ul> </nav>
- Now open the
Site.Masterpage code and type the method that we will use to provide the information to our interface so that it can be rendered. Create a function with the nameGetBooksCategorieswith the following content:public IQueryable<CategoryModel> GetBookCategories() { BooksContext dbBooks = new BooksContext(); DbSet<CategoryModel> dbSetCategories = dbBooks.Categories; return (dbSetCategories as IQueryable<CategoryModel>); } - We will update our UI to provide a visual for this data, by opening the
Site.Masterpage and locating the<div id="body">section. Insert the following code just under that:<section style="text-align: center; background-color: #fff"> <asp:ListView ID="ListBookCategories" ItemType="wfSampleApp.CodeFirst.CategoryModel" runat="server" SelectMethod="GetBookCategories"> <ItemTemplate> <a href="Books.aspx?id=<%#: Item.Id %>"><%#: Item.Title %></a> </ItemTemplate> <ItemSeparatorTemplate> | </ItemSeparatorTemplate> </asp:ListView> </section>
- If we have named our project differently, we should be aware of the name changes and correct it on the
ItemTypeattribute in the previous code. - It would be interesting to go to
Item.Idline of code and delete the Id text. This can be easily accomplished with the following tip: place the cursor in front of the . and press Ctrl + the Space bar to call intelli-sense to our aid. We should see the intelli-sense's help popup as shown in the following screenshot: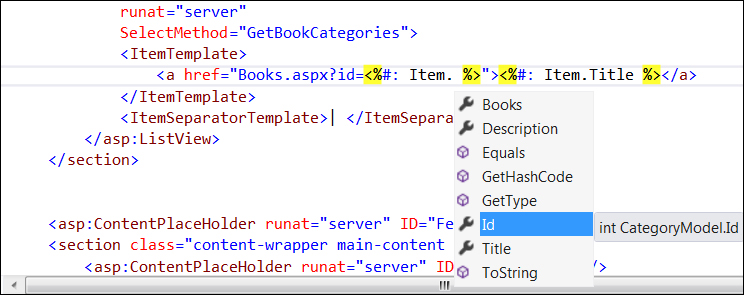
- We should execute the application, which will result in the database being created and the main page rendering as illustrated in the following image.

- Open the
Books.aspxfile and addListViewcontrolcode in the Featured Content section. - Add the following code to it:
<asp:ListView ID="BooksList" runat="server" DataKeyNames="Id" ItemType="wfSampleApp.CodeFirst.BookModel" SelectMethod="Books_GetData" > <EmptyDataTemplate> <asp:Label ID="EmptyBooksLabel" runat="server" Text="We found no books..."></asp:Label> </EmptyDataTemplate> <ItemTemplate> <br /> <b>Book :</b><a href="Book.aspx?Id=<%#: Item.Id %>"><%#: Item.Title %></a> <br /> <b>On sale: </b> <asp:CheckBox ID="CheckBox1" runat="server" Checked='<%# Item.IsOnSale %>' /> </ItemTemplate> </asp:ListView> - In the
Books.aspx.cscode, add the following method:Public IQueryable<BookModel> Books_GetData([QueryString("Id")] int? Id) { BooksContext dbBooks = new BooksContext(); IQueryable<BookModel> dbSetBooks = dbBooks.Books; if (Id.HasValue&& Id > 0) { dbSetBooks = from b in dbSetBooks where b.CategoryId == Id select b; } Return dbSetBooks; } - Note that we need to add the following
Usingstatements:Using System.Web.ModelBinding; Using wfSampleApp.CodeFirst;
- If we execute the application now, when we click on the top category, we should navigate to the
Books.aspx, passing the parameter of category ID. This should show the books of that category; if there are none, the We found no books… message should be shown. - Next we will open the
Book.aspxfile and its code. - In the
Book.aspxfile, we will add the following code in the Featured Content section:<asp:FormView ID="BookDetails" runat="server" DataKeyNames="Id" ItemType="wfSampleApp.CodeFirst.BookModel" SelectMethod="BookDetails_GetItem" > <ItemTemplate> <h1><%#: Item.Title %></h1><br /> <b>Description:</b><br /> <%#: Item.Description %><br /> <b>On Sale:</b><asp:CheckBox ID="CheckBox1" runat="server" Checked='<%# Item.IsOnSale %>' /><br /> <b>Rating:</b><%#: Item.BookRating %><br /> </ItemTemplate> </asp:FormView>
- In the code behind the file, we will add the following
selectmethod. We can automatically create its signature after entering theselectmethod property on theFormViewcontrol. Visual Studio's intelli-sense will ask us if we want to create the method. The code is as follows:Public BookModel BookDetails_GetItem([QueryString("Id")] int? Id) { BooksContext dbBooks = new BooksContext(); IQueryable<BookModel> dbSetBooks = dbBooks.Books; if (Id.HasValue && Id > 0) { dbSetBooks = from b in dbSetBooks where b.Id == Id select b; } Return dbSetBooks.First(); } - Finally we will select
Books.aspxas the default page and execute the application. Upon execution, we should see theBooks.aspxpage inside theSite.Masterpage, displaying all the books since we are not applying any filter by default:
- If we click on the Computer Science link at the top, we will be filtering by book category and displaying only the books from this category.
- Next we will click on a book link, located on its name, and we should see the
Book.aspxpage showing the details of that book, as shown in the following screenshot:
We created an ASP.NET Web Form using some of the new capabilities of ASP.NET 4.5.
We started by creating the CodeFirst model through Entity Framework, which we added through NuGet. Note that the previous chapter is dedicated to Entity Framework and is recommended to be read before the current one. We manually added the models for the book and for the categories of books. Next we created a BooksContext class that inherits from DbContext and an Initializer class that we will use to seed the database with initial data when it is created. Note that we use DropCreateDatabaseIfModelChanges<BooksContext>, which means this will be executed only when there is any change in the database.
We have also used some data annotations attributes on our model classes, which will directly affect the database and the user input validation. An example of this is the [Required] attribute, which adds the input validation rule that this property must not be null.
The DbContext base class we used is from the Entity Framework and handles most of the CodeFirst database creation and updates magic transparently for us.
The DropCreateDatabaseIfModelChanges base class provides a default implementation of a class to handle the creation phase of a database, which we will use for the seed method mainly.
Following that, we set up a connection string with the database context with BooksContext as the class name, so we will create a database file for this data context, in the App_Data folder.
In the Global.asax code in the Application_Start method, we define an instance of this class as the database initializer for BooksContext with Database.SetInitializer<BooksContext>(new booksInitializer()). This class will be executed every time the database is created and provides two methods that we can override, InitializeDatabase and Seed.
Next we set up the UI, creating two pages: Books.aspx and book.aspx. On the Site.Master page, we added a link to the Books.aspx page to its navigation menu, identified by the <nav> tag. <nav> is an HTML5 element, supported with full intelli-sense in Visual Studio 2012, among other languages.
We added a custom method to return the categories on the Site.Master page code, which gets an instance of BooksContext class and collects the list of the database categories into DbSet. They are then returned as IQueryable database categories so that the UI is able to consume them properly.
In order to use this, we are adding a ListView control into the body of the Site.Master page using model binding. The use of the proper item type enforces type validation in our strongly typed models, and we can rely on intelli-sense for help on properties, methods, and so on. We choose our previously defined GetBookCategories method as a select method, located in our Site.Master code.
If we take a look at the ASP.NET code containing the <%#: Item.Id%> data-binding expression, the : after the # indicates that the resulting expression must be HTML-encoded, which is good for avoiding HTML and XSS (Cross Site Scripting) attacks. The item expression determines the bound property from our bound object. We also checked that this item has full intelli-sense support for the data model/type it is bound to.
When we execute the application for the first time and create a DataContext instance, the database is created—that is, if it didn't exist previously.
Continuing with application development, we added the functionality for the Books and the Books pages, using the new model binding to bind the data to our UI elements. The only thing we need to do is to define the Select method to get the data, which is done automatically (well, we do have to associate the method with the UI but that's all it takes).
On the Books and Book pages, in the code behind the Select methods, we have used the QueryStringAttribute class to get the query string ID that we are passing from the Categories menu we built earlier. In fact, ASP.NET makes this really easy in the form of value providers that we can use directly for other usual sources such as query string parameters, cookies, and session state. This attribute is provided to us from the System.Web.ModelBinding namespace, as can be seen in the following screenshot:

With this, we have explored some of the new and most interesting features of ASP.NET 4.5, ending with a completely functional website.
We now have a grasp of the power of ASP.NET Web Forms, with model binding, the use of strongly typed data controls, HTML5 support, improved intelli-sense support, and its integration with CodeFirst.
It would be interesting to explore the rest of the data controls provided by ASP.NET to familiarize ourselves with the showcased features (strongly typed data controls and model binding) and to implement double binding with the BindItem element for data-input scenarios.