
Chapter 9. Working with List and Library Views

In this chapter, you will learn how to | |
✓ | Work with a Standard view. |
✓ | Work with a Datasheet view. |
✓ | Work with a Gantt view. |
✓ | Work with an Access view. |
✓ | Work with a Calendar view. |
✓ | Create and use a list template. |
✓ | Create a lookup column. |
✓ | Create Web Part connections. |
List and library views allow you to set up what information—and how—is displayed in a list or a library, thus making it easier for users of your site to find and work with the information. At least one default view is created for each list and library in Microsoft SharePoint Foundation. In some cases, the default view might not display the information that you think is most valuable to your users. By modifying a view or creating your own view, you can determine how the contents of a list or library are presented to the users. A view defines how the information in a list or library is displayed, including, for example, what columns are displayed and in what order. It also defines how to sort or group the contents of the list or library and what the contents should be filtered on.
Tip
Because a library can be thought of as a list of files, working with views for libraries is very similar to working with views for lists.
In the previous chapters of this book, we’ve been using lists and libraries in the default Standard view. However, there are different types of built-in views provided by SharePoint Foundation 2010 that you can use to display your data to provide the most value to the users of your site, including Standard view, Datasheet view, Calendar view, Gantt view, and Access view.

In this chapter, you will learn how to work with the different types of views in SharePoint Foundation.
Practice Files
Before you can complete the exercises in this chapter, you need to (1) download the Chapter 9 practice files from the book’s catalog page to the following folder on your computer: DocumentsMicrosoft PressSBS_SPFChapter09 and (2) install the Chapter 9 practice site using the Chapter09_Starter.wsp file. See Using the Practice Files at the beginning of this book for more information.
Important
Remember to use your SharePoint site location in place of http://wideworldimporters in the following exercises.
Working with a Standard View
A Standard view of a SharePoint Foundation 2010 list or library displays the contents of the container as a list on a web page. The Standard view is available for lists and libraries, but not for surveys and discussions.
In Chapter 8, we created a Standard view within a document library using the columns of a content type. In this chapter, we will look at more options that are available to you when creating a Standard view.
When creating a new view, you can choose whether you want to create a personal or a shared view. A personal view will be visible only to you, while a shared view will be visible to other users of the site as well. You can also decide to enable inline editing in a list or a library. This means that you will not have to go into the edit page of an item to change its properties, but instead you can simply click the Edit button in the view and edit the item.
In the following exercise, you will create two new library views based on a Standard view. The first view will group and sort the documents and also provide the inline editing capabilities. The second view will enable the preview pane to be displayed within the page.
Set Up
Open the SharePoint site that contains the library that you want to configure. The exercise will use the Shared Documents library on http://wideworldimporters site, but you can use whatever library you want. If prompted, type your user name and password, and click OK.
Note
BE SURE TO verify that you have sufficient rights to manage this library. If in doubt, see the Appendix A at the back of this book.
On the Quick Launch, click Shared Documents.
In the Library Tools, click the Library tab.
Click Create View in the Manage Views group on the Ribbon. The Create View page is displayed.
Under Choose a view format, click Standard View.
In the View name box, type a view name, such as Products.
In the Columns section, clear the check box in front of the Type (icon linked to document) column to remove the selection.
In the Sort section, set the First sort by the column field option to Modified, and select show items in descending order.
Expand the Inline Editing section and select Allow inline editing.
Expand the Group By section and set First group by the column to Type (icon linked to document). Set By default, show groupings to Expanded.
Click OK. The view has been created.
The library page displays in the new view and shows the documents grouped by document type and sorted on the date the documents were modified. Within the grouped documents, it will display the newest document first.
You will now verify that the inline editing is enabled. Hover the mouse over the white space to the left of an item’s name, such as OakNightStand, and then click the Edit inline icon that appears.
Change the name of the document to OakBedTable.
Click the Save icon that is displayed to the left of the item.
The name of the document has been changed.
So far, you have been working with the default style of the Standard view. You will now use an alternative style that allows you to change the way the list items or documents are displayed.
In the Library Tools, click the Library tab.
Click Create View in the Manage Views group on the Ribbon. The Create View page is displayed.
Under Choose a view format, click Standard View.
In the View name box, type a view name, such as Document Preview.
Click OK. The new view has been created.
You will now verify that the preview pane is enabled. Hover your mouse over a document name and note that the properties of the document are displayed in the preview pane on the right side of the screen.


Working with a Datasheet View
If you have installed the Microsoft Office 2010 Tools on your computer and your browser supports ActiveX controls, you can use the Datasheet view of a list. You can install the Office 2010 Tools with any Office 2010 application like Microsoft Word, Microsoft Excel, or Microsoft Access. Datasheet view presents all the list items in a grid, which facilitates easy editing across the entire table. Drop-down lists, check boxes, and column edits are all maintained. You can use the keyboard or your mouse to move from cell to cell to make changes to any row in the list. When you move off a row, the changes are saved automatically. In a library, you can only edit and delete items using the Datasheet view, while in a list, you can also add items using the Datasheet view. Even though Datasheet view is a lot more useful for some list types than others, you can use Datasheet view with almost any list or library type except for the Picture Library, External List, and Survey types.
When a list is displaying in Datasheet view, it is doing so in an Access Web Datasheet. Using the Access Web Datasheet is like editing a table in Excel 2010 or Access 2010. The datasheet consists of rows, and each row corresponds to a list item. A column corresponds to a list field. The down arrow in the column headings is used to filter and sort data.

The Access Web Datasheet in SharePoint Foundation 2010 works in a very similar way to the Datasheet view in the Access 2010 client application. An Access icon appears in the upper-left corner of the Access Web Datasheet, and the words “Access Web Datasheet” are displayed at the bottom of the page in what can be thought of as the status bar of the Datasheet view.
Note
If you are using an older version of Access, the icon displayed will be that of the Access version that you are using.
You can use the keyboard or mouse to move from cell to cell to make changes to any row in the list. The last row of a list in the Access Web Datasheet is always empty, and there is an asterisk (*) displayed in the left column. This empty row can be used to add list items to the list.
When you type a value in a cell or choose a value from a drop-down list, an Edit icon displays at the far left, indicating that changes have been made to the row. When you leave a row that has been modified or navigate away from the web page, a Saving icon flashes, indicating that SharePoint is updating the database with your changes. You can continue making changes to different rows, and SharePoint saves your changes in the background. If your changes result in a conflict or error, the datasheet will be updated with the necessary information to resolve it.
Tip
All items in the list are displayed on one web page in the Access Web Datasheet, regardless of the size of the list. Therefore, it isn’t practical to edit very large lists (more than 5,000 items) by using the Access Web Datasheet. If the SharePoint administrator has enabled the list throttling feature, then only the newest items up to the throttle limit will be returned; but using the Access Web Datasheet, there is no way for your user to retrieve the rest of the items from the list. To improve the performance of an Access Web Datasheet, or to improve the usability for the users of your site if you are using a throttle, create a view that hides unnecessary columns. Apply one or more filters to hide rows that are not relevant to the view, but do not hide the columns that are marked as Required because that will prevent users from adding list items using the Access Web Datasheet.
You can switch easily between Standard view and Datasheet view by clicking the Datasheet View button on the Library tab of an existing library or on the List tab of an existing list. If you don’t want to switch between Standard and Datasheet view but want to view your data in Datasheet view by default instead, you can create a Datasheet view from the Create View page.
Tip
Alternatively, you can create a Custom List in Datasheet view from the Create page that uses Datasheet view as the default view.
In the following exercise, you will work with the Datasheet view of a list. You will first display the items in a list in the Datasheet view, then create a new Datasheet view, set this view as the default view of the list, add, edit, and delete items using the Datasheet view, delete and add columns, and finally briefly explore the Task pane.
Set Up
Open the SharePoint site that contains the list that you want to configure. The exercise will use the http://wideworldimporters site, but you can use whatever site you want. If prompted, type your user name and password, and click OK.
Note
BE SURE TO verify that you have sufficient rights to manage the list. If in doubt, see the Appendix A at the back of this book.
On the Quick Launch, click Sales Figures.
In the List Tools, click the List tab.
Click the Datasheet View button in the View Format group on the Ribbon. The list is now displayed in Datasheet view instead of Standard view.
In the first row of the list, in the Product column, type Dinner tables.
Press ENTER. The new product name for the top item has now been saved to the database.
If you click the Sales Figures link on the Quick Launch again, it will take you back to Standard view because that is how the current default view was created. You will now create a new Datasheet view for the list and make it a default view.
In the List Tools, click the List tab, and then, in the Manage Views group on the Ribbon, click Create View. The Create View page is displayed.
Under Choose a view format, click Datasheet View.
In the View name box, type a view name, such as Grid View.
Click Make this the default view check box.
Click OK. The new default Datasheet view has been created.
Clicking the Sales Figures list link will now open the list in Datasheet view.
You will now create a new list item. In the last row of the list in the Product column, type Bench, and then press the right arrow key on the keyboard. Type 0, and press the right arrow five times. Press ENTER.
The new row changes to become the currently edited row, and the Edit icon displays on the left, indicating that the row is being edited. Another new row is added at the bottom of the list.
Position the mouse cursor on the boundary between the Product and the Q1 columns, and then drag the column boundary to reduce the size of the Product column.
Tip
Rows can be resized in much the same way. However, dragging one row’s boundary will resize all rows in the list. Both columns and rows can be resized based on their contents by double-clicking the boundary. You can also re-order columns by selecting them and simply dragging them to the desired location.
Click the far-left cell to highlight the entire Bench list item.
Click your right mouse button and click Delete Rows to remove the item from the list permanently.
In the message box that appears, click Yes to confirm deleting the list item and redisplay the Datasheet view of the list.
Tip
You can select and then delete multiple list items. Alternatively, you can copy and paste the highlighted list items into Office applications. You can select the entire list with a single click in the upper-left logo cell, where the list select icon appears.
Tip
By holding down the Shift key while selecting the far-left cell so that the row select pointer appears, and then clicking the far-left cell of another row, you can select all rows between the first row clicked and the second row clicked. Similarly, holding down the Shift key while selecting the top row of a column so that the column select pointer appears, and then clicking the top row of another column, will select all columns between the two clicks. However, holding down the CTRL key while selecting does not select or clear list items regardless of whether they are adjacent, as you might expect. Instead, it exclusively selects the clicked row and abandons all other selections, just as if you had clicked the items without holding down the CTRL key.
In the List Tools, click the List tab.
Click the Show Totals button in the Datasheet group on the Ribbon.
Click in the bottom cell in the Q1 column.
Open the drop-down list and select Sum.
Double-click the boundary between the Q1 and the Q2 column.
Repeat steps 18, 19, and 20 for the Q2, Q3, Q4, and Total columns.
Replace the $0.00 in the Q2 figures for Sofas with 10.
The view now displays the totals for the Q1, Q2, Q3, Q4, and Total columns. Changing a value in one of these columns will update the value in the Total row at the bottom of the view. Because the Total column on the right of the list is a Currency column, the values of this column are not updated automatically when the figures for one of the quarters change. To make the Total column update automatically, it must be of the Calculated data type. The data type of an existing column cannot be changed to a Calculated data type. Instead, you must delete the existing Total currency column and re-create it as a new column using the Calculated data type. You will do this next.
Right-click the Total column and select Edit/Delete Column.
Scroll to the bottom of the page and click the Delete button.
In the confirmation message box that appears, click OK to confirm the deletion of the list column and redisplay the Datasheet view of the list.
Right-click the Q4 column and click Add Column.
In the Name and Type area, in the Column Name text box, type Total Sales, and then select the Calculated (calculation based on other columns) option.
In the Additional Column Settings area, under Insert Column, double-click Q1, Q2, Q3, and Q4, and then add a plus sign (+) between each of the fields.
Make sure the formula in the Formula area reads [Q1]+[Q2]+[Q3]+[Q4].
Under The data type returned from this formula is, select Currency.
Click OK.
To display the total sales for all products, click in the bottom cell of the Total Sales column, open the drop-down menu, and select Sum.
The Total Sales column will now add up the sales figures automatically for all quarters for each product
You will now explore the Task pane. In the List Tools, click the List tab.
Click the Show Task Pane button in the Datasheet group on the Ribbon to display the Task pane, which allows you to integrate quickly with Excel 2010 and Access 2010.
Note that at the top of the Task pane, there is a series of buttons for common commands, such as Cut, Copy, Paste, Undo, Custom Sort, and Remove Filter/Sort. There is also a Help icon that provides access to the help topics for the Access Web Datasheet.
Tip
In addition to clicking the Help icon in the Task pane, you can get to the relevant help topics by clicking the Help link in the status bar of the Access Web Datasheet, or clicking a cell in the Access Web Datasheet and pressing F1, or right-clicking a cell inside the Access Web Datasheet and then clicking Help.


Working with a Gantt View
A Gantt chart is a horizontal bar chart that is used to provide a graphical illustration of a project timeline. The Gantt chart has a horizontal axis that represents the time span of the project, broken down into increments such as days, weeks, or months. The vertical axis represents the project tasks. The Gantt chart shows the start and finish dates of different tasks and can also show the dependencies between the tasks.
In SharePoint Foundation 2010, you can create a Gantt view for most SharePoint list and library types, although it would make the most sense to use the Gantt view for a Tasks or a Project Tasks list. When you create a Project Tasks list, the Gantt view is automatically created as the default view of that list. Several lists and libraries do not provide a Gantt view: Picture Library, External List, Discussion Board, and Survey.
For a Gantt view to be created successfully, the following columns need to be defined in a list or library:
Title. A required text field that contains a description of the task.
Start Date. A required date field that contains the date on which the task is supposed to start.
Due Date. A required date field that contains the date on which the task is supposed to be completed.
Percent Complete. An optional number field, the value of which indicates what percentage of a task is already completed. If you don’t want to define a Percent Complete column in your Gantt view, you can select Optional for this column, which means the Gantt chart won’t use it.
Predecessors. An optional lookup field that does a look up to the Title field of the same list. This column is used to show dependencies between tasks. The Predecessors column is optional; if you want to leave it out, you can select Optional for this column and the Gantt chart won’t show dependencies between tasks.
Tip
The data types of the columns are required and cannot be modified, while the names can be changed.
A Gantt view in SharePoint 2010 is split into two parts. The left side of the view shows a spreadsheet-like view of the data in the list. It is possible to add or hide columns in this view and to change the order in which the columns are displayed. In most cases, all columns will not fit on the screen, and you can use the arrow keys to move through the columns. The right side of the view shows the actual Gantt chart. It displays a timeline with tasks plotted against it. It may also display the percentage of completeness for each task by using a different color. In addition, it can display the dependencies between tasks by using arrows to connect the tasks. If the Gantt chart doesn’t fit on the screen, you cannot use your mouse or arrow keys to scroll through it. Instead, you can use the Zoom In, Zoom Out, and Scroll to Task buttons in the Gantt View group on the List tab.

In the following exercise, you will create a Gantt view for a Tasks list, hide columns, add and edit items in the Gantt view, and navigate through a Gantt chart.
Set Up
Open the SharePoint site that contains the list that you want to configure. The exercise will use the http://wideworldimporters site, but you can use whatever site you want. If prompted, type your user name and password, and click OK.
Note
BE SURE TO verify that you have sufficient rights to manage the list. If in doubt, see the Appendix A at the back of this book.
On the Quick Launch, click Tasks.
In the List Tools, click the List tab.
Click Create View in the Manage Views group. The Create View page is displayed.
Under Choose a view format, click Gantt View.
In the View name box, type a view name, such as Project Tasks.
Select Make this the default view.
In the Gantt Columns area, select Title from the Title drop-down list, select Start Date from the Start Date drop-down list, select Due Date from the Due Date drop-down list, select Optional from the Percent Complete drop-down list, and select Predecessors from the Predecessors drop-down list.
Click OK.
The Gantt view for the Tasks list is displayed. On the left side of the screen, there is a spreadsheet-like view of the list contents. On the right side of the screen, there is a Gantt chart. There is quite a lot of white space in the left section because not all columns in the list are being used.
Hover the mouse over the left column heading displaying the paperclip symbol and click the arrow next to it on the right. Select Hide Column. Repeat this step for the Type and Assigned To columns.
Hover the mouse over the Title column heading and click the arrow next to it on the right. Select Configure Columns....
Select the Priority entry and click Move Down three times to move the Priority column to the bottom of the list.
Click OK. The Priority column now has been moved to the far right of the screen.
Note that the changes made directly to the spreadsheet won’t be saved to the view. The next time you or another user browses to the view, the hidden columns will be back and the Priority column won’t be the far-right column anymore. To make lasting changes, you need to make changes to the view.
In the Draw Design row, click in the % Complete cell and type 50.
Press ENTER.
SharePoint Foundation automatically changes the 50 you just filled in to 50%. However, the Gantt chart won’t reflect the fact that the Draw Design task is 50% done because in step 7, the Percent Complete Gantt column was set to Optional. You will now modify the view to change this and a few other settings.
In the List Tools, click the List tab.
Click the Modify View button in the Manage Views group on the Ribbon. The Edit View page is displayed.
In the Columns area, clear the Attachments, Type (icon linked to document), and Assigned To check boxes. Change the value of Priority to 10 using the drop-down list. Click the check box next to Start Date and change the value to 3 using the drop-down list.
In the Gantt Columns area, from the Percent Complete drop-down list, select % Complete.
Click OK.
The Gantt chart now reflects the fact that the Draw Design task is 50% completed, and the changes to the columns are now persistent when you navigate away from the view.
Click in the Title cell in the bottom row of the spreadsheet and type Sell table. Press TAB and select Not Started in the Status row. Press TAB and select 12/4/2010 in the Start Date row. Press TAB and select 12/8/2010 in the Due Date row. Press TAB twice and select the Distribute table in the Predecessors row. Press ENTER.
The row has been added to the Tasks list, but depending on your screen resolution, you might not be able to see the horizontal bar for this task in the Gantt chart. You will now use the Gantt view tools to zoom in and out and scroll through the chart.
In the List Tools, click the List tab.
Click the Zoom Out button in the Gantt View group on the Ribbon. The complete Gantt chart for the list is now visible.
Click the Zoom In button in the Gantt View group to go back to the previous view.
Select the Distribute table row and click the Scroll to Task button in the Gantt View group. The Gantt chart will now scroll to the right so that the complete bar for the Distribute table task is visible.


Working with an Access View
In SharePoint Foundation 2010, you can use Access 2007 or 2010 to create a view of a list or library. Using Access, it is easy to create advanced views and reports based on the columns and data in the list or library. When editing the list data in Access view, the values will be updated in the SharePoint list automatically. The Access view is available for all list types except the External List and Survey.
Important
The option to create an Access view is available only if the Access client is installed on your computer.
See Also
For more information about using Access with SharePoint Foundation, see Chapter 14.
When creating an Access view, the list will be opened in the Access client application, and you can then choose what view you want to use to display the list data. When you are satisfied with the view, you need to save the file to a document library in the SharePoint environment.
Tip
In SharePoint Foundation 2010, Access view won’t appear in the existing views of the list for which the view was originally created. To use this view, a user would have to go to the document library where the Access file was saved and open it from there.
In the following exercise, you will create an Access view for a Tasks list and save it to a document library.
Set Up
Open the SharePoint site that contains the list that you want to configure. The exercise will use the http://wideworldimporters site, but you can use whatever site you want. If prompted, type your user name and password, and click OK.
Note
BE SURE TO verify that you have sufficient rights to manage the list. If in doubt, see the Appendix A at the back of this book.
On the Quick Launch, click Tasks.
In the List Tools, click the List tab.
Click Create View in the Manage Views group on the Ribbon. The Create View page is displayed.
Under Choose a view format, click Access View. The Access client application opens.
Save the file on your local machine. You can change the file name if you want.
Select the Split Form view and click OK. The Layout view for the form opens.
The Access form can be adjusted by using Layout or Design view. To switch between views, you can use the View button on the upper left of the screen. The Form view can be used to view and edit the data in the list.
Click the Save to SharePoint Site button on the yellow bar below the Ribbon.
Leave the file name unchanged. To save the file to the Shared Documents library, click Yes, and then click OK.
The Access database that contains the new view is now saved to the Shared Documents library. You can open it again by browsing to the library and clicking the file name.


Working with a Calendar View
SharePoint Foundation 2010 allows you to create a Calendar view for the data in your lists and libraries. You can use Calendar view in most lists and libraries, but the list will need to have at least one date field for the Calendar view to work properly. A Calendar view cannot be created for the following list types: External List, Discussion Board, and Survey.
When you create a Calendar list, the Calendar view is the default. The Calendar view can be very useful for actions such as plotting tasks on or entering announcements into a calendar.
In the following exercise, you will create a Calendar view for a Tasks list, and you will then modify the scope of the calendar.
Set Up
Open the SharePoint site that contains the list that you want to configure. The exercise will use the http://wideworldimporters site, but you can use whatever site you wish. If prompted, type your user name and password, and click OK.
Note
BE SURE TO verify that you have sufficient rights to manage the list. If in doubt, see the Appendix A at the back of this book.
On the Quick Launch, click Tasks.
In the List Tools, click the List tab.
Click Create View in the Manage Views group on the Ribbon. The Create View page is displayed.
Under Choose a view format, click Calendar View.
In the View name box, type a view name, such as Task Calendar.
In the Time Interval area, select Start Date from the Begin drop-down list and select Due Date from the End drop-down list.
In the Calendar Columns area, select Title from the Month View Title, the Week View Title, and the Day View Title drop-down lists. Leave the Week View Sub Heading and the Day View Sub Heading set to Optional.
Click OK.
The page displays the items from the Tasks list plotted onto a calendar. By default, the current month is displayed in Calendar view, and the current day is highlighted in blue. On the left side of the screen, the current day is also displayed. Above the current day, the months for this year are listed. Clicking one of the months will show the calendar for that month. You can navigate to different years by using the arrows to the left and right of the year at the top of the panel.
In the Calendar Tools, click the Calendar tab.
Click Week in the Scope group on the Ribbon. The calendar will now display the current week.
The calendar panel on the left of the screen now displays all dates in the current month. You can scroll through months by using the arrows next to the month at the top of the panel.
The Expand All and Collapse All buttons can be used when the Month scope is used if certain days have too many items in them to show them all at once. Expand All will show all items for all days, and Collapse all will go back to showing only three items per day.


Creating and Using a List Template
If you have done a lot of work on creating views for a certain list, as you have on the Tasks list in this chapter, you might want to reuse those views. By saving an existing list or library as a template, you can create new lists or libraries based on the template that contains the same columns and views. The template can be used not only in the site in which the template was created, but also in other sites within the same site collection. By saving a list template to the file system and uploading it again into another site collection, it is even possible to use the template in other site collections, web applications, or SharePoint farms.
To create a list template, you just save an existing list as a template. When saving the list, you can choose whether you want to include the contents of the list. If you include the contents, the list template will include the rows that are in the list at the time that you are saving this list as a template. If you just want to create a template that contains the columns and views of the list, you do not need to save the contents of the list to the template. However, if you want to use the template to copy or move the list to other sites, you can save the contents to the list template and use the template to create a list with the same structure and content on another site.
Tip
A list template is saved automatically to the List Templates gallery at the site collection level. You browse to the List Templates gallery by going to the Site Settings page and clicking List Templates under the Galleries heading. The List Templates gallery is a special kind of document library. A lot of what you can do on a document library is also available in the List Templates gallery; for instance, you can create your own views for the gallery. Two things that are different from a document library are that you can’t create your own List Templates gallery and that you can’t delete the existing List Templates gallery, even if you are an administrator on the site.
In the following exercise, you will save an existing Tasks list as a template, and then you will create a new list based on that template. You will then save the template file to your computer for reuse in another site collection, web application, or SharePoint farm.
Set Up
Open the SharePoint site that contains the list that you want to save as a template. The exercise will use the http://wideworldimporters site, but you can use whatever site you wish. If prompted, type your user name and password, and click OK.
Note
BE SURE TO verify that you have sufficient rights to manage the list and the list templates in the site collection, and to create lists. If in doubt, see the Appendix A at the back of this book.
On the Quick Launch, click Tasks.
In the List Tools, click the List tab.
Click List Settings in the Settings group on the Ribbon. The List Settings page is displayed.
Under Permissions and Management, choose Save list as template.
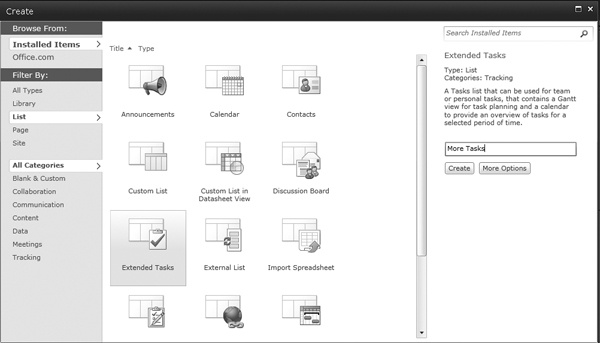
In the File name box, type a file name, such as ExtendedTasks.
In the Template name box, type a template name, such as Extended Tasks. This is the name that is displayed on the Create page, so make sure that the name accurately describes the template.
In the Template Description name box, type a description for the template, such as A Tasks list that can be used for team or personal tasks, that contains a Gantt view for task planning and a calendar to provide an overview of tasks for a selected period of time.
Leave the Include Content check box cleared. Click OK.
A message box appears, telling you that the template has been saved successfully in the List Templates gallery. Click OK.
Important
Saving a list as a template does not save the permissions for the list. This means that if you save a list as a template and you include the content, then any user that has sufficient permissions to create a list can create a list based on this template and view the data that you saved in it. If you are including sensitive content in your list template, make sure that only authorized users can get to it.
You will now create a new list based on the template that you’ve just saved. Click the All Site Content link in the left navigation area.
Click the Create link at the top. The Create dialog opens.
Under Filter By, click List.
Click the Extended Tasks template.
Type More Tasks in the Name box on the right of the page.
Click Create.
A new list is created that is based on the Tasks list you saved as a template. You can see that the default view is the Gantt view, and if you check out the other views, you will find that the Task Calendar view is also present. The list is empty and doesn’t contain any data because you did not include the content when saving the list as a template.
You will now save the list template file on your computer. Using the Navigate Up button in the upper-left corner of the screen, go to the top-level site in the site collection. In the top-level site, click Site Actions, and then click Site Settings.
In the Galleries section, click List templates.
The List Templates gallery is displayed. The template that you have just saved is displayed in the gallery. Notice the Documents and Library tabs on the Ribbon, which show that the List Templates gallery is in fact a document library.
Click the Extended Tasks template. A message box is displayed, asking if you want to save the ExtendedTasks.stp file to your computer.
Click Save.
Browse to a location on your computer where you want to store the file and click Save. Do not change the extension of the file.
You will now delete the template from the gallery. In the browser, select ExtendedTasks by clicking the check box to the left of its name
The Documents tab opens and displays the Ribbon. Click the Delete Document button, and then click OK in the confirmation message box that appears.
The list template has been deleted from the List Templates gallery. You or other users of your site are no longer able to create lists based on it. You will now upload the template to the gallery from your computer.
Click Upload Document.
Browse to the location on your computer where you saved the list template. Select the list template file and click Open.
In the Upload Document dialog, click OK.
In the List Templates Gallery – ExtendedTasks dialog, click Save.
The list template is now available within your site, and it once again can be used to create lists based on it. Even though it was uploaded back to the same site where it was originally created, you could have uploaded it to another site to make the template available to users of that site as well.


Relating List and Item Views
There are a couple of ways in which you can connect data in two different lists in SharePoint Foundation. One way to create a relationship between data in different lists is by creating lookup columns. A lookup column can be used to prevent the deletion of data from a list that still has items in another list that depend on it. You can also customize the display form of a list and show related items on it that are determined based on lookup columns.
Another way to display a relationship between data in two different lists is by using connected Web Parts. The list view Web Part in SharePoint Foundation 2010 is called the XSLT List View (XLV) Web Part. You can use lookup columns to create a connection between two list Web Parts, but you can also use columns based on other data types to create a connection so long as the contents of the columns in the two lists match. A Web Part connection allows one Web Part to pass data to another Web Part. The data doesn’t have to be limited to a cell. It can also be a complete row, or even an entire list. If you are configuring a Web Part connection using your browser, the Web Parts have to be on the same page. If you are using SharePoint Designer 2010, you can also connect Web Parts on different pages within the same site collection.
In the following exercise, you will create a lookup column, customize the display form of a list, add a list view Web Part to a page, and connect two list view Web Parts.
Set Up
Open the SharePoint site that contains the library that you want to configure, if it is not already open. The exercise will use the http://wideworldimporters site, but you can use whatever site you want. If prompted, type your user name and password, and click OK.
Note
BE SURE TO verify that you have sufficient rights to manage libraries. If in doubt, see the Appendix A at the back of this book.
On the Quick Launch, click Shared Documents.
In the Library Tools, click the Library tab.
Click Library Settings in the Settings group on the Ribbon. The Library Settings page is displayed.
You will now create a lookup column. In the Columns section, click Create Column.
In the Create Column page, in the Column name box, type a column name, such as Product Category. Set Lookup (information already on this site) to the Type of information in this column.
In the Additional Column Settings section, from the Get information from drop-down list, select Product Categories. From the In this column drop-down list, select Title.
Leave other settings unchanged and click OK.
Navigate to the Shared Documents library using the Quick Launch. On the right side of the screen, there is a new Product Category column, but it is empty.
Hover your mouse over the OakBedTable document and click the check box on the left to select it. The Documents tab opens, and the Ribbon is displayed.
In the Manage group on the Ribbon, click the Edit Properties button.
In the Shared Document - OakBedTable dialog, select Tables from the Product Category drop-down list and click Save.
Repeat steps 9–11 for the OakChest, OakDesk, and OakEndTable documents, setting Product Category to Chests, Desks, and Tables, respectively.
You will now look into the display form of a list. Click Product Categories on the Quick Launch.
In the List Tools, click the List tab.
Click the Modify Form Web Parts button in the Customize List group on the Ribbon, and select Default Display Form. The display form is displayed in Edit mode.
In the Page Tools, click the Insert tab.
Click the Related List button and choose Shared Documents.
Click the Page tab and then click the Stop Editing button on the Ribbon.
Click the Tables link.
The display form of the Tables product category is displayed. The page shows what documents are related to this product category. If you go to the display form of a different product category, like Desks, the documents that are related to that category will be displayed.
You will now add a list view Web Part to a page and then connect two list view Web Parts. Click the Browse tab, and then navigate to the home page of the site using the breadcrumb.
On the home page, click the Page tab. The Ribbon is displayed.
In the Edit group, click the Edit button. The page is displayed in Edit mode.
Scroll to the bottom of the page and position your cursor below the Shared Documents Web Part.
In the Editing Tools, click the Insert tab.
In the Web Parts group on the Ribbon, click the Existing List button.
In the Web Parts pane that appears, select Deadlines.
Click Add. The Deadlines list will now be displayed in its own Web Part below the Shared Documents Web Part.
The Deadlines list is a custom list that has been created for this exercise. It has a Title column that contains a product name and a Deadline column that contains a date.
Click the down arrow on the upper-right section of the Deadlines Web Part and select Edit Web Part.
Click the down arrow on the upper-right section of the Deadlines Web Part once again, hover the mouse over Connections, hover it over Get Filter Values From, and finally click Shared Documents.
In the Configure Connection dialog that appears, from the Provider Field Name drop-down list, select Title. From the Consumer Field Name drop-down list, select Title.
Click Finish. You now have connected the Web Parts.
Click the Page tab, and then click the Save & Close button in the Edit group on the Ribbon.
You will now verify the connection between two lists. In the Shared Documents Web Part, click the double arrow in the Select column for the OakDesk document. The corresponding deadline is displayed in the Deadlines Web Part.


Key Points
List and library views enable you to sort, filter, and group data, as well as to display data in different styles.
SharePoint Foundation provides several view types for lists and libraries, including Standard view, Datasheet view, Calendar view, Gantt view, and Access view.
You can create your own views to display data in a list or library in a way that makes the most sense to you.
A Datasheet view is very useful for bulk editing.
A Gantt view is used to display a work breakdown structure of a project and can best be used on a Tasks or a Project Tasks list.
A Calendar view has different scopes that allow you to choose whether you want to look at a day, a week, or a month at a time.
To reuse list views, you can create a list template.
Relationships between SharePoint lists in different views can be created by using lookup columns and Web Part connections.