
In this section:
Creating and Customizing Headers and Footers
Organizing Your Information
Reorganizing a Document
Creating a Master Document
Inserting a Cover Page
Creating Footnotes and Endnotes
Creating a Table of Contents
Creating an Index
Not all documents are short and simple to create. One of the great things about Microsoft Word 2010 is that it can be as straightforward or as powerful as you need it to be. Although creating basic documents such as memos, letters, and brief reports is a snap, Word also gives you a large variety of tools you can use when you want to create longer, more complex documents such as technical reports, books, dissertations, and more.
Longer documents often call for features that help readers find their way through the text—for example, running heads, footnotes, and bookmarks become important. Likewise, in a longer document, you may also need to add citations and perhaps a table of contents and an index. This section shows you how to add these features—and more—to the long documents you create in Word.
Most documents, if they are more than one page in length, include page numbers, either at the top or bottom of the page. In addition to page numbers, long documents usually have some type of identifying text—perhaps the title, section heading, or author’s name—at the top or bottom of each page. Typically you’ll see the terms header and footer used to describe these bits of repeating information, but you may also see the term running head. Word 2010 includes a special header and footer area on the page that appears when you click at the very top or bottom of the page; and this area brings with it the contextual tools you need to add, edit, and format headers and footers in your document.
Click the Print Layout icon if necessary.
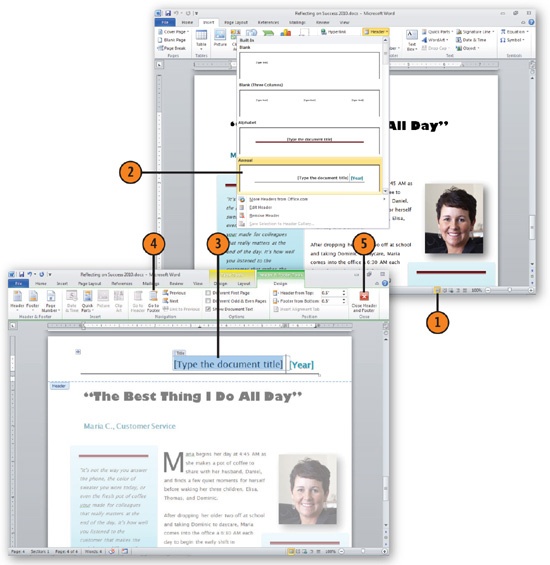
On the Insert tab, click the Header tool in the Header & Footer group. In the gallery that appears, click your choice.
Click the placeholder field or text, and enter the information you want to appear.
On the Header & Footer Tools Design tab, click the Go To Footer tool in the Navigation group, select the layout and content you want, and type the footer information.
Click the Close Header And Footer button to return to the main part of your document.
Tip
You may want to simply type information—such as title or author name—in the header or footer, but you can also add fields that insert your document’s properties in the text. For more about this, see Creating Variable Headers and Footers.
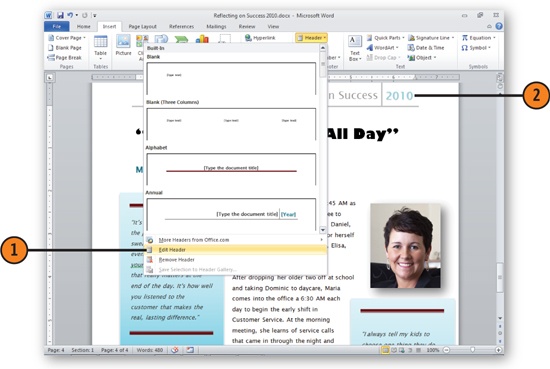
On the Insert tab, click the Header tool in the Header & Footer group and then click Edit Header in the gallery.
If there are items you don’t want in the header, delete them and then use any of the items on the Header & Footer Tools Design tab to add content and format the header. Type or add the content you want. Use tabs, paragraph spacing and alignment, and font settings to customize the layout.
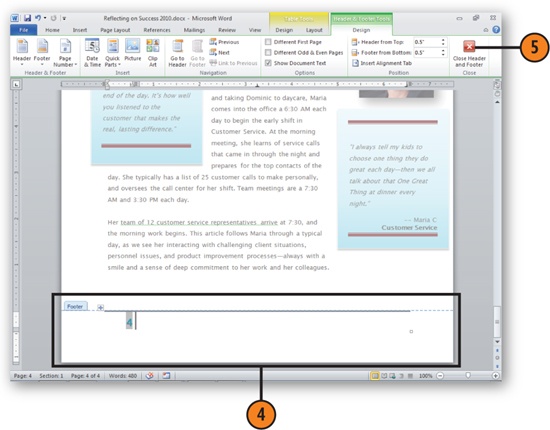
Click the Go To Footer tool.
Add and format the content you want in the footer.
Click the Close Header And Footer tool when you’ve finished.
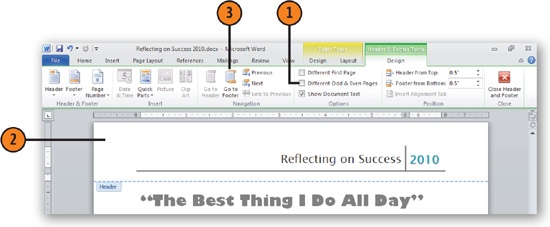
When you look through books—like this one—you’ll notice that the headers and maybe the footers alternate, depending on which page you’re looking at. The header on an even-numbered page looks different from the header on an odd-numbered page. You can set up this design easily in Word by creating different headers and footers that appear on right and left pages.

Double-click in the header or footer area, and click Different Odd & Even Pages in the Options group of the Header & Footer Tools Design tab.
Add a header or footer to the even-numbered page.
Move to an odd-numbered page and create a header and footer.
Click in the lower-right corner to reduce the Zoom control to 30 percent so that you can see multiple pages in the document window.
Review the headers and footers to ensure that they appear correctly.


Tables and lists give you easy ways to present information in a clear, bite-sized format. You can arrange both elements in whatever way you choose to give readers the best possible understanding of your ideas. One way you can help readers get your message is to sort the information and arrange it in alphabetic or numeric order—and Word makes doing that a snap.
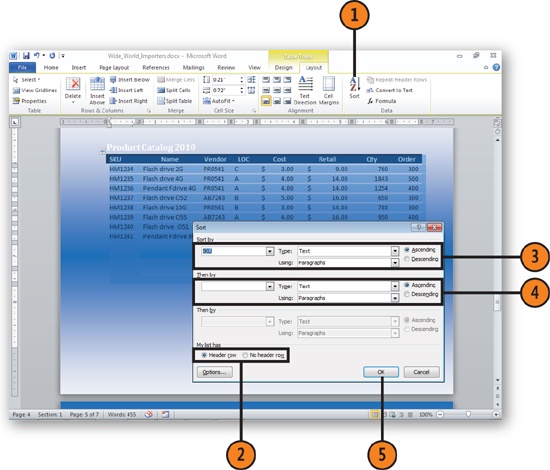
Click anywhere in the table, click the Table Tools Layout tab, and click Sort.
Specify whether the table will contain a header row (a row that shows the column titles).
Specify the title of the column you want to use to sort the table, the type of content in the column, and whether you want the information to be sorted in ascending or descending order.
If you want to conduct a second- or third-level sort, enter the criteria.
Click OK.
Review the results of the sort.
Tip
If you’re not happy with the results, either click the Undo tool on the Quick Access Toolbar or conduct another search with different search criteria.
See Also
Creating a Bulleted or Numbered List for information about creating lists.
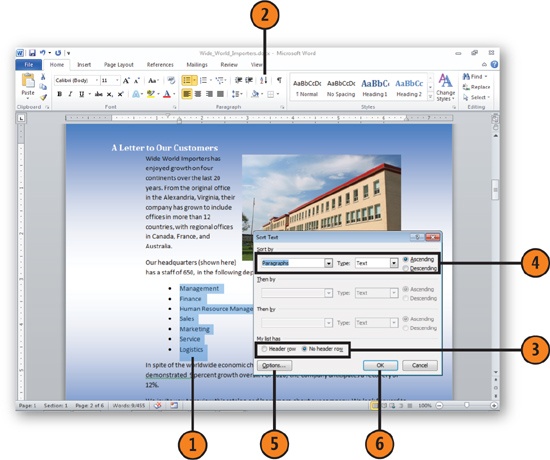
On the Home tab, click Sort in the Paragraph group to display the Sort Text dialog box.
Specify whether you want a header row for the list to be included in the selection.
To sort a simple list by the first letter, the number, or the date of the paragraph, in the Sort Text dialog box, specify whether you want to sort by paragraphs, the type of information that’s in the list, and whether you want the information to be sorted in ascending or descending order. Click OK.
To sort a more complex list—for example, one that contains columns—click Options to display the Sort Options dialog box, specify the character to be used to separate the columns, and click OK.
Click OK.
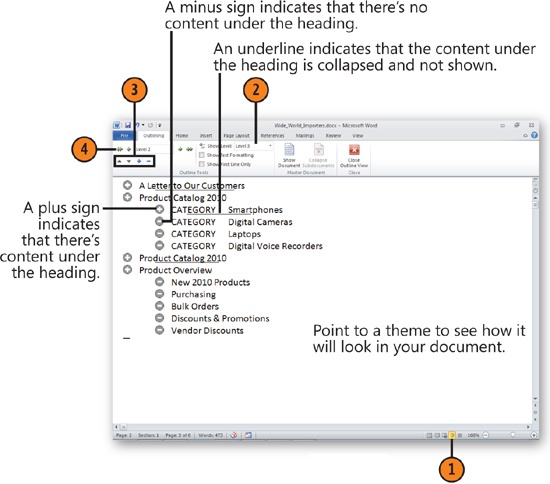
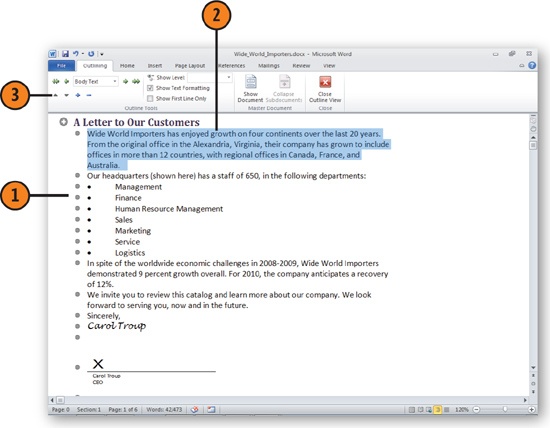
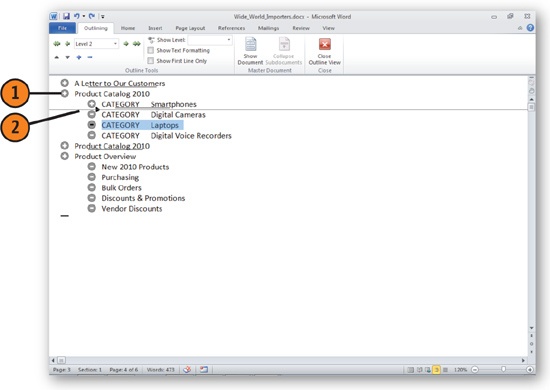
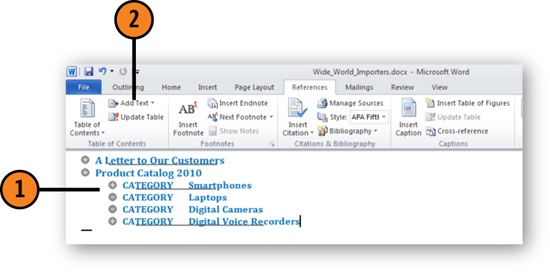
Outline view may be one of the unsung heroes in Word 2010 when it comes to working with long documents. Using Outline view, you can organize your thoughts, ensure that the overall structure of your document makes sense, and move sections from place to place. You can also change the level of different headings and sections if you like. The only trick to ensuring that your document appears correctly in Outline view is that you need to format the headings and body text using Word styles.
Click Outline view in the tools in the lower-right corner of the window.
On the Outlining tab, specify the lowest level of heading to be displayed.
Click to expand or collapse the content under the selected heading.
Click to change the outline level by promoting it one level or demoting it one level, or to change body text to a heading or a heading to body text.
Try This!
Drag a topic’s plus or minus sign to the left to quickly promote the topic’s outline level, to the right to demote it, or to the far right to turn it into body text. Changing the outline level also changes the style that’s assigned to that paragraph.
See Also
Applying and Saving Styles for the steps on applying Word’s styles to your text.
Caution
Be very careful about editing text in Outline view. For example, if the text of a section is collapsed under its heading, you might think that you’re deleting only the heading, but you’re actually deleting all the text in that section.
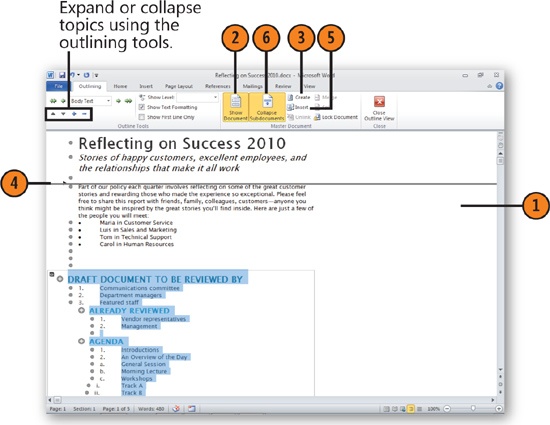
When you are working on a large document that has multiple authors, you may want to create a master document to keep everything organized and help others collaborate effectively. A master document contains subdocuments, in which individual authors work to make changes, edit content, and add formatting and illustrations as needed. All the changes are coordinated, so whether you edit documents separately or as part of the master document, all the changes are saved. When the separate documents are incorporated into the master document, you can easily establish common styles and formatting and can develop pagination, cross-references, and a table of contents.
Start a new document that will be used for the entire master document. Add any introductory text to the master document, save it, and switch to Outline view.
On the Outlining tab, click the Show Document button in the Master Document group.
Select the text you want to use to create a subdocument and click Create.
Move the subdocument to a new area in the document by dragging it to the new location.
Insert new text as a subdocument by clicking Insert and choosing the document file from the Insert Subdocument dialog box.
Collapse the display of the subdocument by selecting the subdocument section and clicking Collapse Subdocuments in the Master Document group.
Open any of the documents separately, and edit and save them. The next time you open the master document, you’ll see any editing changes that have been made to these documents.
When you’re creating a long document, designing a cover page that sets your project apart can help you make a great impression. A cover page might include the title, the authors’ names, your department, and a photo or logo, all set in a memorable design. Word 2010 offers a number of cover page templates you can customize to fit the way you want your publication to look.
Click the Insert tab, click Cover Page in the Pages group, and click the cover page design you want in the gallery that appears.
Switch to Print Layout view if necessary by clicking the view tool in the lower-right corner of the screen and press Ctrl+Home to move to the beginning of your document.
Click in one of the placeholder text boxes and type the information you want to include. Repeat for all the other areas that need to be completed.
You can change the design of the cover page by
Clicking Cover Page on the Insert tab and choosing another design.
Clicking Themes on the Page Layout tab and choosing a different theme.
Adding a picture, a drawing, fields, text, or other items to customize the page.
Changing the color of the page background.
Clicking Cover Page again, and choosing Remove Current Cover Page.
Save your document.

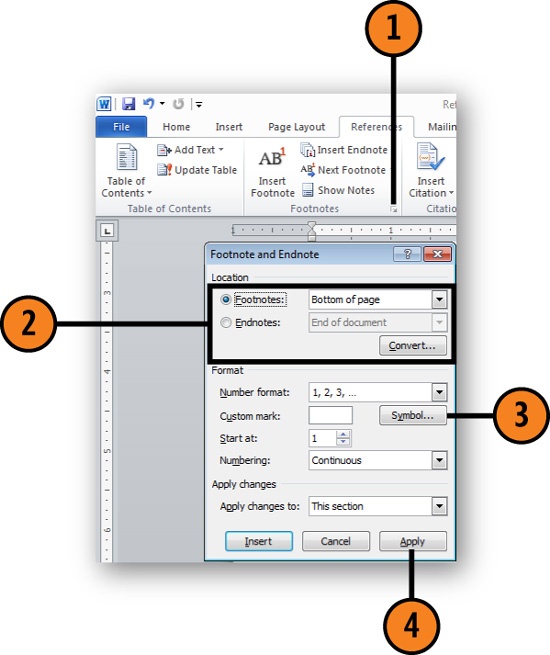
When you are working with long documents, you may need to add footnotes or endnotes to the text to provide additional information about resources you’ve used. Footnotes add the notes along the bottom of the page, and endnotes present all your notes at the end of the document or section. Word numbers the footnotes in one number series and the endnotes in a different series or format. If you add or delete a footnote or an endnote, Word automatically renumbers the appropriate series. Word also estimates how much space is required for the footnote and, if a footnote is too long for the page, automatically continues it on the next page.
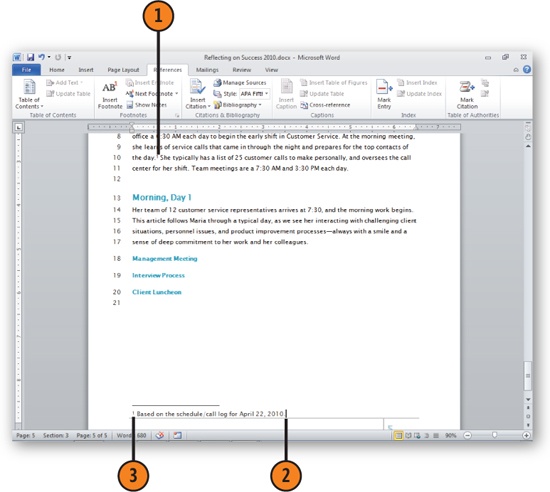
Click the References tab, with the insertion point located where you want the footnote or endnote reference mark to appear in your document; click Insert Footnote for a footnote or Insert Endnote in the Footnotes group for an endnote.
Type your footnote or endnote text.
Double-click the footnote or endnote number to return to the place in your document where you inserted the footnote.
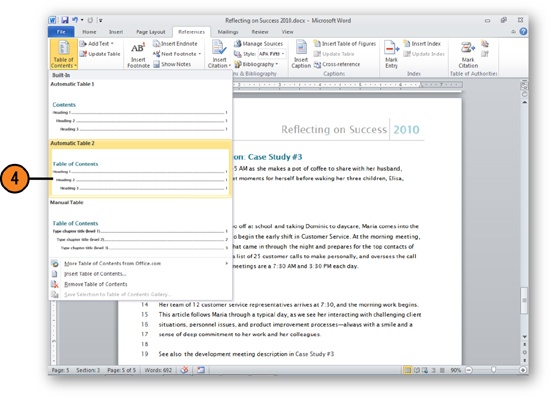
Word also includes a table of contents feature that creates a table based on the styles you’ve assigned to the headings in your document and displays the current page numbers so your readers can easily find the section they’re looking for. The table of contents is inserted as a field in a content control, so after you’ve created the table, you can change its layout by choosing a different design. You can also update the table if you change the content of your document.
Click Outline view in the lower-right corner of the screen and scroll through the document, verifying that any paragraph you want to appear in the table of contents has a style that uses the appropriate level 1, level 2, or level 3 outline level.
If you want to include or exclude a paragraph but don’t want to change its style, click the Add Text tool on the References tab and click the outline level you want to apply.
Switch to Print Layout view and click in the document where you want the table of contents to appear.
On the References tab, click the Table Of Contents tool in the Table Of Contents group, and select the style and type of table of contents you want to insert.
Tip
To update the table of contents after you’ve made changes to your document, click the Update Table tool on the References tab.
See Also
Applying and Saving Styles for information about assigning styles to your text.
Indexing can be fun. If you’re a word person and you like thinking of the many ways a person might be looking for something in your document, you’ll probably enjoy the puzzle creating an index presents. Word makes the process straightforward by automating the steps. When you mark an item to be included in your index, Word places a hidden-text tag next to the item, so no matter how the page numbers change, the index is kept current. Your index can include multiple levels, cross-references, and even a range of pages when an indexed item extends beyond a single page.
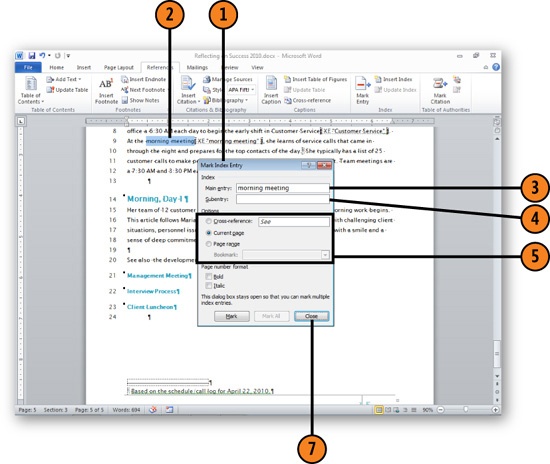
Click the References tab and click the Mark Entry tool in the Index group to display the Mark Index Entry dialog box.
In your document, select the text you want to index.
Click the Mark Index Entry dialog box to make it active. The text you selected appears in the Main Entry box.
Type any subentries. To specify more than one level of subentry, separate subentry levels with colons.
Specify options as follows:
Click Cross-Reference and type the topic to be cross-referenced.
Click Current Page to list the page number next to the entry.
Click Page Range and select the bookmark that marks the entire text of the entry. The text must be bookmarked before it can be included as an entry.
Click in the document, select your next index entry, and repeat steps 3 through 5.
When you’ve finished, click Close and save the document.
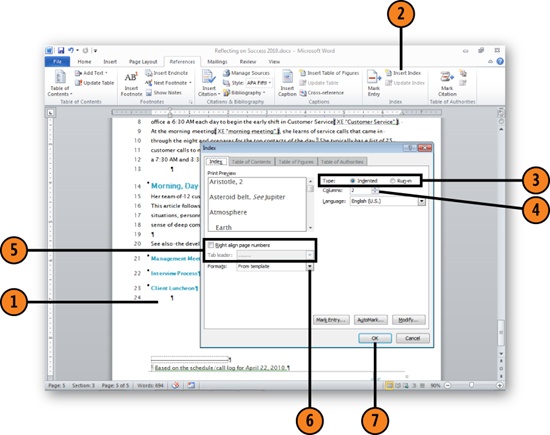
Click the References tab and click Insert Index to display the Index dialog box.
Select the type of index you want.
Specify the number of columns the index will occupy on the page.
Clear this check box to have the page numbers placed immediately next to the entry, or select the check box to have Word insert a tab and align the page numbers to the right edge of each column. If you selected the check box, choose the type of tab leader you want between the index entry and the page number.
Specify the format you want for the index. If you chose From Template, click the Modify button to change the styles used for the index.
Click OK.
Try This!
To cross-reference a related entry but still include a page number, tag the entry twice—once using See Also in the Cross-Reference box and again with the Current Page option selected.
Tip
The Mark All button in the Mark Index Entry dialog box finds every instance in your document of the text you’ve selected and marks each instance with the tag information you entered in the dialog box. The AutoMark button in the Index dialog box lets you specify a document that contains a list of items you want Word to mark automatically for your index. If you use either of these automated techniques, you’ll need to go through your document and carefully verify these index entries.