
In this section, we will describe how to implement some integrity checks to support the finding signs of system manipulation in Linux and similar (for example, BSD) systems.
These checks include the following:
- Searching for anomalies in the local user management
- Understanding and analyzing file metadata for special permissions and privileges
- Using clustering algorithms on file metadata to get indicators on where to look deeper
The information about local users in Linux is mostly stored in two files: /etc/passwd and /etc/shadow. The latter is optional and all the information about local users—including the hashed password—was originally stored in /etc/passwd. Soon, it was considered a security issue to store the password information in a file that is readable by every user. Therefore, the password hashes in /etc/passwd were replaced by a single x denoting that the corresponding password hash has to be looked up in /etc/shadow.
The side effect of this evolutionary process is that the password hashes in /etc/passwd are still supported and all the settings in /etc/passwd may override the credentials in /etc/shadow.
Both files are text files with one entry per line. An entry consists of multiple fields separated by colons.
The format of /etc/passwd is as follows:
- username: This field contains the human-readable username. It is not required for the username to be unique. However, most user management tools enforce unique usernames.
- password hash: This field contains the password in an encoded form according to the Posix
crypt()function. If this field is empty, then the corresponding user does not require a password to log on to the system. If this field contains a value that cannot be generated by the hash algorithm, for example, an exclamation mark, then the user cannot log on using a password. However, this condition does not render the account useless. A user with a locked password can still log on using other authentication mechanisms, for example, SSH keys.As mentioned earlier, the special value x means that the password hash has to be found in the shadow file.
Starting with the system library
glibc2, thecrypt()function supports multiple hash algorithms. In that case, the password hash has the following format:$id$salt$encryptedThe ID designates the hash algorithm that has been used to encode the password, for example, 1 for md5, 5 for sha256, and 6 for sha512. The salt is a randomly generated string in order to modify the hash algorithm. Consequently, even identical passwords result in different hash sums. The subfield "encrypted" holds the actual hash of the password (modified by the influence of the salt).
- numerical user ID: This field denotes the ID of the user. Internally, the Linux kernel uses only this numerical ID. The special ID 0 is assigned to the administrative root user. Per default, user ID 0 is granted unlimited privileges on the system.
- numerical group ID: This field refers to the primary group of the user.
- comment field: This field can contain the arbitrary information about the user and is mostly used to hold the full name of the user. Sometimes, it also contains a comma-separated list of the full username, phone number, and so on
- user home directory: The user home directory is a directory on the system's file system. After logging on, new processes are started with this directory as the working directory.
- default command shell: This optional field denotes the default shell that is to be started after a successful logon.
The format of /etc/shadow is as follows:
- The username field links the entry to the
passwdentry with the same username. - The password hash field contains the encoded password in the same format as described for the
passwdfile. - The next five fields contain the information about the password aging, such as the date of the last password change, minimum password age, maximum password age, password warning period, and password inactivity period.
- If the account expiration date field is nonempty, it will be interpreted as the account expiration date. This date is expressed in days since January 1st, 1970.
With this format description, a small Python routine is sufficient to parse the file into a list of entries, each containing a list of fields as shown in the following:
def read_passwd(filename):
    """Reads entries from shadow or passwd files and
       returns the content as list of entries.
       Every entry is a list of fields."""

    content = []
    with open(filename, 'r') as f:
        for line in f:
            entry = line.strip().split(':')
            content.append(entry)

    return content
On using this routine, typical manipulations in these files may be detected.
The first manipulation technique that we want to describe is the creation of multiple users who share the same numerical id. This technique can be used by attackers to plant a backdoor into the system. By creating an additional user for an existing ID, an attacker can create an alias with a separate password. The legitimate account owner would not be aware that there is an additional combination of username/password to log in to the account.
A small Python routine can detect this kind of manipulation, as follows:
def detect_aliases(passwd):
    """Prints users who share a user id on the console

       Arguments:
       passwd -- contents of /etc/passwd as read by read_passwd"""

    id2user = {}
    for entry in passwd:
        username = entry[0]
        uid = entry[2]
        if uid in id2user:
            print 'User "%s" is an alias for "%s" with uid=%s' % (username, id2user[uid], uid)
        else:
            id2user[uid] = username
During normal operation, the information in /etc/passwd and /etc/shadow is synced, that is, every user should appear in both the files. If there are users appearing in only one of these files, it is an indicator that the user management of the operating system has been bypassed. A manipulation like this can be detected with a similar script:
def detect_missing_users(passwd, shadow):
    """Prints users of /etc/passwd missing in /etc/shadow
       and vice versa.

       Arguments:
       passwd -- contents of /etc/passwd as read by read_passwd
       shadow -- contents of /etc/shadow as read by read_passwd"""

    passwd_users = set([e[0] for e in passwd])
    shadow_users = set([e[0] for e in shadow])

    missing_in_passwd = shadow_users - passwd_users
    if len(missing_in_passwd) > 0:
        print 'Users missing in passwd: %s' % ', '.join(missing_in_passwd)

    missing_in_shadow = passwd_users - shadow_users
    if len(missing_in_shadow) > 0:
        print 'Users missing in shadow: %s' % ', '.join(missing_in_shadow)
Just like the first function, this function should not produce any output on a normal system. If there is an output similar to Users missing in shadow: backdoor then there is a user account "backdoor" in the system without a record in the shadow file.
Users without a password should not exist in a normal system. Furthermore, all the password hashes should reside in the shadow file and all entries in the passwd file should refer to the corresponding shadow entry. The following script detects deviations from this rule:
def detect_unshadowed(passwd, shadow):
    """Prints users who are not using shadowing or have no password set

       Arguments:
       passwd -- contents of /etc/passwd as read by read_passwd
       shadow -- contents of /etc/shadow as read by read_passwd"""


    nopass = [e[0] for e in passwd if e[1]=='']
    nopass.extend([e[0] for e in shadow if e[1]==''])
    if len(nopass) > 0:
        print 'Users without password: %s' % ', '.join(nopass)

    unshadowed = [e[0] for e in passwd if e[1] != 'x' and e[1] != '']
    if len(unshadowed) > 0:
        print 'Users not using password-shadowing: %s' %
              ', '.join(unshadowed)
Our last example of bypassing the operating system in the creation and manipulation of user accounts is the detection of non-standard hash algorithms and reusing salts for multiple user accounts. While a Linux system allows specifying the hash algorithm for every entry in the shadow file, normally all user passwords are hashed using the same algorithm. A deviating algorithm is a signal for an entry being written to the shadow file without using the operating system tools, meaning, system manipulation. If a salt is reused across multiple password hashes, then the salt is either hardcoded into a manipulation tool or the cryptographic routines of the system have been compromised, for example, by manipulating the entropy source of the salt generation.
The following Python script is capable of detecting this kind of manipulation:
import re
def detect_deviating_hashing(shadow):
    """Prints users with non-standard hash methods for passwords

       Arguments:
       shadow -- contents of /etc/shadow as read by read_passwd"""

    noalgo = set()
    salt2user = {}
    algorithms = set()
    for entry in shadow:
        pwhash = entry[1]
        if len(pwhash) < 3:
            continue

        m = re.search(r'^$([^$]{1,2})$([^$]+)$', pwhash)
        if not m:
            noalgo.add(entry[0])
            continue

        algo = m.group(1)
        salt = m.group(2)

        if salt in salt2user:
            print 'Users "%s" and "%s" share same password salt "%s"' %
                  (salt2user[salt], entry[0], salt)
        else:
            salt2user[salt] = entry[0]

        algorithms.add(algo)

    if len(algorithms) > 1:
        print 'Multiple hashing algorithms found: %s' % ', '.join(algorithms)

    if len(noalgo) > 0:
        print 'Users without hash algorithm spec. found: %s' %
              ', '.join(noalgo)
Tip
Regular expressions
The last example uses the re module for regular expression matching to extract the algorithm specification and salt from the password hash. Regular expressions provide a fast and powerful way of text searching, matching, splitting, and replacing. Therefore, we highly recommend getting familiar with regular expressions. The documentation of the re module is available online at https://docs.python.org/2/library/re.html. The book Mastering Python Regular Expressions, Felix Lopez and Victor Romero, Packt Publishing provides further insights and examples on how to use regular expressions.
All of the detection methods in this section are examples of anomaly detection methods. Depending on the system environment, more specific anomaly detections can be used and implemented by following the schema of the examples. For example, on a server system, the number of users having a password set should be small. Therefore, counting all the users with passwords can be a reasonable step in the analysis of such systems.
In this section, we will discuss file meta information and provide examples on how it can be used in forensic analysis.
Linux systems store file meta information in structures called inodes (index nodes). In a Linux filesystem, every object is represented by an inode. The data stored per inode depends on the actual filesystem type. Typical contents of an inode are as follows:
- The index number is the identifier of an inode. The index number is unique per file system. If two files share the same index number, then these files are hard-linked. Consequently, hard-linked files only differ in their filename and always have the same contents as well as the same meta information.
- The file owner is defined by the numerical ID of the user (UID). There can be only one owner per file. The user IDs should correspond to the entries in
/etc/passwd. However, it is not guaranteed that there are only files with existing entries in/etc/passwd. Files can be transferred to the nonexisting users with administrative privileges. Furthermore, the owner of the file may have been removed from the system, making the file orphaned. For files on transportable media, for example, USB drives, there is no mechanism of mapping the user ID from one system to another. Consequently, the file owner seems to change when a USB drive is attached to a new system with different/etc/passwd. Furthermore, this can also lead to orphaned files if a UID does not exist on the system where the USB drive is attached. - The file group is defined by the numerical ID of the corresponding group (GID). A file is always assigned to exactly one group. All groups of a system should be defined in
/etc/groups. However, files with group IDs that are not listed in/etc/groupsmay exist. This indicates that the corresponding group has been deleted from the system, the medium has been transferred from another system where that group exists, or a user with administrative privileges reassigned the file to a nonexisting group. - The file mode (also known as "protection bits") defines a simple form of access rights to the corresponding file. It is a bit mask defining the access rights for the file owner, for users belonging to the group that the file is assigned to, and for all other users. For each of these cases, the following bits are defined:
- read (r): If this bit is set on a regular file, the affected user is allowed to read the file contents. If the bit is set on a directory, the affected user is allowed to list the names of the contents of the directory. The read access does not include the meta-information, which is the inode data of the directory entries. Consequently, the read permission to a directory is not sufficient to read files in that directory as this would require access to the file's inode data.
- write (w): If this bit is set on a regular file, the affected user is allowed to modify the contents of the file in arbitrary ways including manipulation and deletion of the content. If this bit is set on a directory entry, then the affected user is allowed to create, remove, and rename the entries in that directory. The existing files in the directory have their own protection bits that define their access rights.
- execute (x): For regular files, this allows the affected user to start the file as a program. If the file is a compiled binary, for example, in the ELF format, then the execute privileges are sufficient to run the program. If the file is a script that has to be interpreted, then read permission (r) is also required to run the script. The reason is that the Linux kernel determines how to load the program. If it detects that the file contains a script, it loads the script interpreter with the current user's privileges. For directories, this flag grants permission to read the meta-information of the directory contents, except the names of the entries. Therefore, this allows the affected user to change the working directory to this directory.
- sticky (t): This bit exists only once per inode. When it is set on directories, it limits the right to delete and rename entries to the user owning the entry. On regular files, this flag is ignored or has a file system specific effect. When set on executables, this flag is used to prevent the resulting process from being swapped out from RAM. However, this purpose of the sticky bit is deprecated and Linux systems do not obey the sticky bit on executables.
- set id on execution (s): This bit exists for the user and for the group. When set for the user (SUID bit) on an executable file, the corresponding file is always run with its owner as the effective user. Therefore, the program is run with the privileges of the user owning the executable that is independent from the user that is actually starting the program. If the file is owned by the root user (UID 0), then the executable always runs with unlimited privileges. When the bit is set for the group (SGID bit), the executable is always started with the group of the file as effective group.
- The size of the file in bytes.
- The number of blocks that are allocated for that file.
- A timestamp denoting the last change of the file content (mtime).
- A timestamp denoting the last read access to the file content (atime).
Access time stamp tracking can be disabled by the mount option noatime to limit write access to the media (for example, to extend the lifetime of the SD cards). Furthermore, read-only access (mount option ro) to the file system prevents atime tracking. Therefore, before analysis of atime information, it should be checked whether atime tracking was enabled for that file system. The corresponding initial mount options can be found in
/etc/fstab. - A timestamp denoting the last change of the inode data (ctime).
Notable extensions to these standard entries are POSIX Access Control Lists (POSIX ACLs). These access control lists are supported by the major Linux file systems and allow specifying additional access entries besides the three classes (user, group, and others). These entries allow defining the additional access rights (the previously listed bits r, w and x) for additional users and groups. Evaluating POSIX ACLs will be discussed in detail in a separate section.
Another extension consists of the specification of capability flags to an executable. This is used for a more granular specification of privileges than using the SUID bit. Instead of giving an executable owned by the root user the SUID bit and allowing it unlimited privileges, a set of required privileges can be specified. Capabilities will also be handled in detail in a separate section.
Python provides built-in functionality to read the file status information with the os module. The standard function to retrieve metadata from a file that is specified by its name is os.lstat(). In contrast to the more commonly used os.stat(), this function does not evaluate the targets of symbolic links but retrieves the information about the link itself. Therefore, it is not prone to run into infinite loops that are caused by circular symbolic links. Furthermore, it does not cause any errors on links that lack the link target.
The resulting object is platform dependent; however, the following information is always available: st_mode (protection bits), st_ino (inode number), st_dev (identifier of the device containing the file system object), st_nlink (number of hard links), st_uid (user ID of owner), st_gid (group ID of owner), st_size (file size in bytes), st_mtime (last modification), st_atime (last read access), st_ctime (last inode change). This information corresponds to the inode data that is described in the previous section.
Note
A detailed description about os.stat() and os.lstat() is available at https://docs.python.org/2/library/os.html#os.stat. This also includes the examples of platform-dependent attributes.
The st_mtime, st_atime, and st_ctime time stamps are specified in the Unix timestamp format, that is, the number of seconds since January 1st 1970. With the datetime module, this time format can be converted into a human readable form, using the following script:
from datetime import datetime as dt
from os import lstat

stat_info = lstat('/etc/passwd')

atime = dt.utcfromtimestamp(stat_info.st_atime)
mtime = dt.utcfromtimestamp(stat_info.st_mtime)
ctime = dt.utcfromtimestamp(stat_info.st_ctime)

print 'File mode bits:      %s' % oct(stat_info.st_mode)
print 'Inode number:        %d' % stat_info.st_ino
print '# of hard links:     %d' % stat_info.st_nlink
print 'Owner UID:           %d' % stat_info.st_uid
print 'Group GID:           %d' % stat_info.st_gid
print 'File size (bytes)    %d' % stat_info.st_size
print 'Last read (atime)    %s' % atime.isoformat(' ')
print 'Last write (mtime)   %s' % mtime.isoformat(' ')
print 'Inode change (ctime) %s' % ctime.isoformat(' ')
This code listing outputs the common return values of the lstat call. A typical output looks similar to the following:
File mode bits:      0100644
Inode number:        1054080
# of hard links:     1
Owner UID:           0
Group GID:           0
File size (bytes)    2272
Last read (atime)    2015-05-15 09:25:15.991190
Last write (mtime)   2014-09-20 10:40:46.389162
Inode change (ctime) 2014-09-20 10:40:46.393162
This sample output denotes that on the lab system, /etc/passwd is a regular file with read permission for all users. This information is derived from the st_mode member of the result. On using Python's oct() function, it is converted in its octal representation, that is, one decimal digit of the output represents exactly three bits of the protection bits. The leading zero in the output is a common indicator for the octal representation.
The lower three digits (644 in the example output) always denote the access rights for the owner of the file (6 in the example), for users belonging to the group of the file (left 4 in the example), and all other users (last digit).
Tip
How to interpret the file mode bits?
In its octal form, the bit values of the three least significant digits represent the access rights for the owner, group, and other users (last digit). For every digit, the read access (r) has bit value 4, write access (w) has bit value 2, and execution (x) has bit value 1.
Therefore, in our example, the digit 6 denotes read and write access (4 + 2) for the owner of the file. Members of the group 0 and all other users only have read access (4).
The next digit from the right denotes the sticky bit (value 1), the SGID bit (value 2), and the SUID bit (value 4).
Note
The stat module defines the constants for all bits of st_mode. Its documentation is available at https://docs.python.org/2/library/stat.html.
These constants can be used as a bit mask to retrieve information from st_mode. The earlier example could be extended to detect SGID, SUID, and sticky mode, as follows:
import stat

if stat.S_ISUID & stat_info.st_mode:
    print 'SUID mode set!'

if stat.S_ISGID & stat_info.st_mode:
    print 'SGID mode set!'

if stat.S_ISVTX & stat_info.st_mode:
    print 'Sticky mode set!'
For testing the code, you may use the example to evaluate the mode of /etc/passwd, /tmp, and /usr/bin/sudo on a standard Linux system. Typically, /tmp has the sticky flag set, /usr/bin/sudo has SUID set, and /etc/password has none of the special bits set.
The remaining bits denote the type of the file. The following file types may appear on a standard Linux filesystem:
|
File type |
Check function in module |
Description |
|---|---|---|
|
regular |
S_ISREG() |
This is used to store arbitrary data |
|
directory |
S_ISDIR() |
This is used to store lists of other files |
|
soft link |
S_ISLNK() |
This references one destination file via name |
|
character device |
S_ISCHR() |
This is the interface in the filesystem to access the character-oriented hardware, for example, terminals |
|
block device |
S_ISBLK() |
This is the interface in the filesystem to access the block-oriented hardware, for example, disk partitions |
|
fifo |
S_ISFIFO() |
This is the representation of a named, unidirectional interprocess interface in the filesystem |
|
socket |
S_ISSOCK() |
This is the representation of a named, bidirectional interprocess interface in the filesystem |
Hard links are not represented by a special file type but are merely multiple directory entries in the same filesystem sharing the same inode.
Unlike the tests for SGID, SUID, and sticky bit, the file type checks are implemented as functions of the stat module. These functions require the file mode bits as the parameter, for example:
from os import readlink,lstat
import stat

path = '/etc/rc5.d/S99rc.local'

stat_info = lstat(path)

if stat.S_ISREG(stat_info.st_mode):
    print 'File type: regular file'

if stat.S_ISDIR(stat_info.st_mode):
    print 'File type: directory'

if stat.S_ISLNK(stat_info.st_mode):
    print 'File type: symbolic link pointing to ',
    print readlink(path)
In this example, the os.readlink() function is used to extract the target filename if a symbolic link is encountered. Symbolic links may refer to an absolute path or a relative path starting from the location of the symbolic link in the filesystem. Absolute symbolic links have a target starting with the character /, that is, the target is to be searched starting with the root directory of the system.
A possible output of the previous example code could be - File type: symbolic link pointing to ../init.d/rc.local - , which is an example of a relative link.
The file mode bits, which are defined in the file's inode, only allow three addressees for permissions: the file owner, the users belonging to the file's group, and everybody else.
If a more granular set of permissions is required, the traditional solution will be to create a group that consists of all the users who should have access and transfer the file to that group. However, the creation of such groups has major disadvantages. First, the list of groups can become unnecessarily large. Second, the creation of such groups requires administrative privileges and therefore, breaks the Linux/Unix concept of discretionary access control.
Last but not least, file owners may just open up files and directories for everyone on the system if there is no group that is matching to the list of the users to authorize. This breaks the concept of least privilege, that is, not granting more permissions on a system than required for its operation.
To maintain the discretionary access control as well as the concept of least privilege, an optional extension to the file access mode was specified, that is, POSIX ACL. Besides allowing read, write, and execute permissions for the file owner, group, and others, POSIX ACLs allow to specify the following:
- Specific read, write, and execute permissions for arbitrary users
- Specific read, write, and execute permissions for arbitrary groups
- Every privilege that is not set in the access mask is not granted. Only the permissions of the file owner and others are not affected by the access mask.
On the command line, the getfacl and setfacl tools can be used to read and modify the POSIX ACL entries respectively:
user@lab:~$ touch /tmp/mytest
user@lab:~$ getfacl /tmp/mytest
getfacl: Removing leading '/' from absolute path names
# file: tmp/mytest
# owner: user
# group: user
user::rw-
group::r--
other::r--
This example also shows that the standard permission set is reflected in the POSIX ACL. Consequently, if POSIX ACLs are supported on a filesystem, then the complete permission set is contained in POSIX ACLs.
Let's revoke the read access to other users and add read/write access to the user games, as shown here:
user@lab:~$ setfacl -m o::0 -m u:games:rw /tmp/mytest
user@lab:~$ getfacl /tmp/mytest
getfacl: Removing leading '/' from absolute path names
# file: tmp/mytest
# owner: user
# group: user
user::rw-
user:games:rw-
group::r--
mask::rw-
other::---
user@lab:~$ ls -l /tmp/mytest
-rw-rw----+ 1 user user 0 May 16 16:59 /tmp/mytest
The -m o::0 parameter removes all the privileges from other users while –m u:games:rw grants read/write access to the user games. The subsequent call to getfacls shows the additional entry for user:games and the changed entry for other. Furthermore, a mask entry is automatically created to limit the access from all the listed groups and users (except the file owner) to read/write.
The output of the ls command shows a plus sign + to indicate the existence of the additional ACL entries. As also indicated by the output of ls, tools that only evaluate the mode bits of a file are unaware of the additional permissions, for example, the additional access privileges for the user games do not show up in the standard output of ls or other file management applications.
Fortunately, the Python library pylibacl can be used to read and evaluate POSIX ACLs and hence, avoid that pitfall. The library introduces the posix1e module, that is, a reference to the initial draft first mentioning POSIX ACLs. The detailed documentation about this library is available at http://pylibacl.k1024.org/.
The following script is an example of how to look for files with the additional ACL entries:
#!/usr/bin/env python

import os
from os.path import join
import posix1e
import re
import stat
import sys

def acls_from_file(filename, include_standard = False):
    """Returns the extended ACL entries from the given
       file as list of the text representation.

       Arguments:
       filename -- the file name to get the ACLs from
       include_standard -- if True, ACL entries representing
                           standard Linux permissions will be
                           included"""
    result = []
    try:
        acl = posix1e.ACL(file=filename)
    except:
        print 'Error getting ACLs from %s' % filename
        return []

    text = acl.to_any_text(options=posix1e.TEXT_ABBREVIATE | posix1e.TEXT_NUMERIC_IDS)

    for entry in text.split("
"):
        if not include_standard and
           re.search(r'^[ugo]::', entry) != None:
            continue
        result.append(entry)

    return result


def get_acl_list(basepath, include_standard = False):
    """Collects all POSIX ACL entries of a directory tree.

    Arguments:
    basepath -- directory to start from
    include_standard -- if True, ACL entries representing
                        standard Linux permissions will be
                        included"""
    result = {}

    for root, dirs, files in os.walk(basepath):
        for f in dirs + files:
            fullname = join(root, f)

            # skip symbolic links (target ACL applies)
            if stat.S_ISLNK(os.lstat(fullname).st_mode):
                continue

            acls = acls_from_file(fullname, include_standard)
            if len(acls) > 0:
                result[fullname] = acls

    return result

if __name__ == '__main__':
    if len(sys.argv) < 2:
        print 'Usage %s root_directory' % sys.argv[0]
        sys.exit(1)

    acl_list = get_acl_list(sys.argv[1], False)

    for filename, acls in acl_list.iteritems():
        print "%s: %s" % (filename, ','.join(acls))
The posix1e.ACL class represents all the permissions set on a specific object on the filesystem. When its constructor is called with a filename as the file parameter, it represents ACL of that file. In the acls_from_file() function, a regular expression is used to detect and optionally filter out the standard permissions from the text representation of the ACL set.
The os.walk() function is used to iterate over a subtree of the filesystem. If you iterate over os.walk() like in the example, you get a triple in each iteration denoting the following:
- The currently visited directory
- A list with all of its subdirectories (relative to the currently visited directory)
- A list with all of its nondirectory entries, for example, files and soft links (relative to the currently visited directory)
The check in the last highlighted line of the script is an example of the evaluating file type information as described in the previous section. It is used to detect and skip symbolic links. The symbolic links always use ACLs of their target and consequently, POSIX ACLs on symbolic links are not supported.
When invoked with /tmp as the parameter on our lab machine, it generates the following output:
/tmp/mytest: u:5:rw-,m::rw-
This output shows that the script detected the leftovers from our first tests with POSIX ACLs: An additional read/write permission for user (u) ID 5 (that is, user games on the lab machine) and a mask (m) entry that limits the effective privileges to read/write. The script outputs the numerical user IDs because pylibacl would otherwise use your workstation's /etc/passwd to look up the usernames.
If you run this script on a copy of the filesystem that contains your evidence, it will list every filesystem object with permissions beyond the Linux standard permission set.
Traditionally, in Linux, there are two types of administrative privileges: root and non-root. If a process is granted the root privileges, that is, it runs with UID 0, then it may bypass every security restriction of the Linux kernel. On the other hand, if a process does not run with these root privileges, then all security restrictions of the kernel apply.
In order to replace this all or nothing mechanism with a more fine-grained system, the Linux capabilities were introduced. The corresponding man page describes it as the following:
For the purpose of performing permission checks, traditional UNIX implementations distinguish two categories of processes: privileged processes (whose effective user ID is 0, referred to as superuser or root), and unprivileged processes (whose effective UID is nonzero).
Privileged processes bypass all kernel permission checks, while unprivileged processes are subject to full permission checking based on the process's credentials (usually: effective UID, effective GID, and supplementary group list).
Starting with kernel 2.2, Linux divides the privileges traditionally associated with superuser into distinct units, known as capabilities, which can be independently enabled and disabled. Capabilities are a per-thread attribute.
Tip
What capabilities exist?
The list of Linux capabilities can be found in the /usr/include/linux/capability.h file on a standard Linux system. A more human-readable form is provided in the capabilities man page. It can be viewed via man 7 capabilities. The Linux capabilities include every special permission granted to the root user, for example, overriding file permissions, using raw network connections, and so on.
Capabilities can be assigned to the threads of processes during the execution and to the executables on the filesystem. In either case, there are always three sets of capabilities:
- permitted set (p): The permitted set contains all capabilities that a thread may request. If an executable is started, its permitted set is used to initialize the permitted set of the process.
- inheritable set (i): The inheritable set of an execution set defines the capabilities that may be forwarded from the thread to a child process. However, only capabilities that are defined in the inheritable set of the executable file of the child process are forwarded to the child process. Therefore, a capability is only inherited if it is in the inheritable set of the parent process and in the file attribute of the child executable.
- effective set (e): This is the set of capabilities that the Linux kernel actually checks when a privileged operation is requested from an execution thread. By calling
cap_set_proc(), a process can disable or enable the capabilities. Only capabilities in the permitted set (p) may be enabled. On the filesystem, the effective set is represented by only one bit. If this bit is set, the executable is started with all of its permitted capabilities also being effective. If the bit is not set, the new process starts without the effective capabilities.
Using Python's ctypes, the shared libcap.so.2 library can be utilized to retrieve all the file capabilities from a directory tree, as follows:
#!/usr/bin/env python

import ctypes
import os
from os.path import join
import sys

# load shared library
libcap2 = ctypes.cdll.LoadLibrary('libcap.so.2')

class cap2_smart_char_p(ctypes.c_char_p):
    """Implements a smart pointer to a string allocated
       by libcap2.so.2"""
    def __del__(self):
        libcap2.cap_free(self)

# note to ctypes: cap_to_text() returns a pointer
# that needs automatic deallocation
libcap2.cap_to_text.restype = cap2_smart_char_p

def caps_from_file(filename):
    """Returns the capabilities of the given file as text"""

    cap_t = libcap2.cap_get_file(filename)
    if cap_t == 0:
        return ''
    return libcap2.cap_to_text(cap_t, None).value


def get_caps_list(basepath):
    """Collects file capabilities of a directory tree.

    Arguments:
    basepath -- directory to start from"""

    result = {}
    for root, dirs, files in os.walk(basepath):
        for f in files:
            fullname = join(root, f)
            caps = caps_from_file(fullname)
            if caps != '':
                result[fullname] = caps

    return result

if __name__ == '__main__':
    if len(sys.argv) < 2:
        print 'Usage %s root_directory' % sys.argv[0]
        sys.exit(1)

    capabilities = get_caps_list(sys.argv[1])

    for filename, caps in capabilities.iteritems():
        print "%s: %s" % (filename, caps)
The first highlighted line loads the libcap.so.2 library for direct use in Python. As the memory for the text representation of the capabilities is allocated in this library, it is the responsibility of the caller, that is, our script, to deallocate this memory after usage. The solution for this task, which was chosen here, is to extend the ctype default representation of pointer to character, that is, ctype.c_char_p. The resulting cap2_smart_char_p class is a simple version of the so-called smart pointer: If the Python representation of objects of this class is being destroyed, the objects will automatically call cap_free() to free the corresponding resources that are previously allocated by libcap.so.2.
With the cap_get_file()library function, the capabilities of a file can be retrieved. The subsequent call to cap_to_text() transforms this internal representation into human-readable text.
If the script is saved to chap03_capabilities.py, then it can be called on the lab machine as shown in the following:
user@lab:~$ python chap03_capabilities.py /usr
Of course, the output is highly dependent on the Linux version and distribution. It may look similar to the following:
/usr/bin/gnome-keyring-daemon: = cap_ipc_lock+ep
This output means that only one executable in /usr has the special capabilities set: /usr/bin/gnome-keyring-daemon. The name of the capability is given by the constant cap_ipc_lock, this capability is in the permitted set and is immediately effective on starting this program as denoted by +ep.
To resolve the meaning of cap_ipc_lock, we will call the following:
user@lab:~$ man 7 capabilities
Then we will search for CAP_IPC_LOCK. This reveals that the capability grants the right to lock the parts or all of a process memory in RAM and prevent the swapping of that process. As gnome-keyring-daemon stores user credentials in RAM, having the privilege to prevent these credentials from being written to the swap is highly advisable from a security perspective.
In the previous section, we showed you how to retrieve and collect file metadata from the Linux/Unix filesystem. In this section, we will provide examples to locate the changes in the filesystem metadata, which may be interesting for further inspection by the investigator.
Creating histograms is the process of clustering the data in bins of equal size and drawing the size of these bins. With Python, plotting these histograms can be easily achieved using the Python matplotlib module. A detailed documentation including the use cases, examples, and Python source code is available at http://matplotlib.org/.
The following Python script can be used to generate and display the histograms of file access times and file modification times of a directory tree:
#!/usr/bin/env python

from datetime import datetime
from matplotlib.dates import DateFormatter
import matplotlib.pyplot as plt
import os
from os.path import join
import sys

# max. number of bars on the histogram
NUM_BINS = 200

def gen_filestats(basepath):
    """Collects metadata about a directory tree.

    Arguments:
    basepath -- root directory to start from

    Returns:
    Tuple with list of file names and list of
    stat results."""

    filenames = []
    filestats = []

    for root, dirs, files in os.walk(basepath):
        for f in files:
            fullname = join(root, f)
            filenames.append(fullname)
            filestats.append(os.lstat(fullname))
    return (filenames, filestats)

def show_date_histogram(times, heading='', block=False):
    """Draws and displays a histogram over the given timestamps.

    Arguments:
    times -- array of time stamps as seconds since 1970-01-01
    heading -- heading to write to the drawing
    block --- if True, the graph window waits for user interaction"""

    fig, ax = plt.subplots()

    times = map(lambda x: datetime.fromtimestamp(x).toordinal(), times)

    ax.hist(times, NUM_BINS)
    plt.xlabel('Date')
    plt.ylabel('# of files')
    plt.title(heading)

    ax.autoscale_view()

    ax.xaxis.set_major_formatter(DateFormatter('%Y-%m-%d'))
    fig.autofmt_xdate()

    fig.show()
    if block:
        plt.show()

if __name__ == '__main__':
    if len(sys.argv) < 2:
        print 'Usage %s base_directory' % sys.argv[0]
        sys.exit(1)

    path = sys.argv[1]

    (names, stats) = gen_filestats(path)

    # extract time stamps
    mtimes = map(lambda x: x.st_mtime, stats)
    atimes = map(lambda x: x.st_atime, stats)

    show_date_histogram(mtimes, 'mtimes of ' + path)
    show_date_histogram(atimes, 'atimes of ' + path, True)
The gen_filestats() function iterates the directory tree and collects all inode data. The show_date_histogram() function is used to generate and display the data as a histogram.
In the first highlighted line of the code, the encoding of the timestamp is changed. This is required because the inode data gives us the timestamps as number of seconds since 1970-01-01. This format is what datetime.fromtimestamp() expects. However, Matplotlib needs timestamps in number of days since 0001-01-01 of the Gregorian calendar. Fortunately, the datetime class can provide this representation with its toordinal() method.
The next highlighted line is the actual generation and drawing of the histogram in the following figure. All the other statements of show_date_histogram() merely serve the purpose of adding labels and formatting to the drawing.
The following is a sample result of the /sbin directory on a standard Linux desktop system:

Here, the dates of the major system updates are clearly visible. An investigator should be aware that the file metadata and these histograms do not contain historic file information. Therefore, from the previous histogram, one cannot derive that there were little or no security updates before December 2011. It is more likely that most of the files that were patched before December 2011 have been modified later on, therefore, masking older patches in the histogram.
Let's take a look at the access time distribution of this directory:
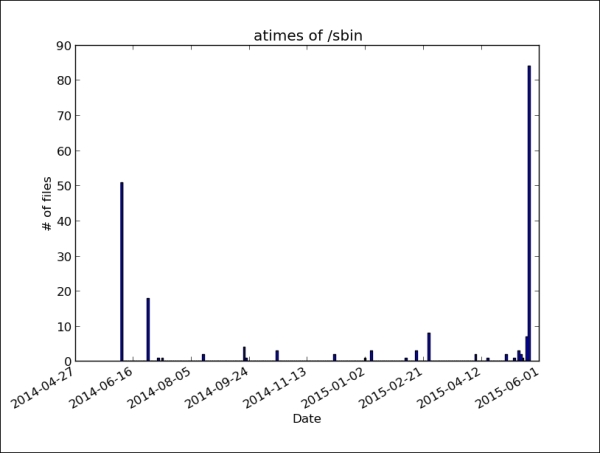
This histogram provides some insight about the access pattern of this directory. First, the atime timestamp tracking is enabled on the systems. Otherwise, no current access timestamps would be visible in the histogram. About half of the files have been read recently. This information can be used to verify the information about the time when the evidence was acquired or when the system operator claimed to have taken the system offline.
Furthermore, the contents of this directory were very likely not scanned regularly for viruses and were not recently packed into an archive. Both the actions usually update the atime timestamp.
If the following command is issued on the system, then /sbin is scanned for viruses. Of course, the scanner has to read every file in that directory to scan its contents:
user@lab:~$ clamscan –i /sbin
The atime diagram of /sbin reflects the changes, as follows:

The changes are obvious: Most of the bars have collapsed in one at the current time, that is, the time of the virus scan. The timescale is stretched to a single day. Consequently, the bar on the left can also be considered to be a result of the virus scan.
In the previous section, the histograms were used to learn about the filesystem metadata. However, these histograms have a number of disadvantages, as follows:
- All histogram bars are of equal width
- The bars are not placed according to the actual clustering of the data, for example, a cluster may be distributed over two bars
- The outliers disappear, that is, the low bars are easily confused with the empty bars
Therefore, this section presents an example of how to use simple machine learning algorithms for a smarter clustering of the data. A widely used machine learning library for Python is scikit-learn. Among other domains, it provides several algorithms for clustering the input data. We recommend visiting http://scikit-learn.org for an overview of all the algorithms and examples of their use. The following Python script uses the DBSCAN algorithm from scikit-learn to generate clusters of a given width (in days):
#!/usr/bin/python

from datetime import date
import numpy as np
import os
from os.path import join
from sklearn.cluster import DBSCAN
import sys

def gen_filestats(basepath):
    """Collects metadata about a directory tree.

    Arguments:
    basepath -- root directory to start from

    Returns:
    Tuple with list of file names and list of
    stat results."""

    filenames = []
    filestats = []

    for root, dirs, files in os.walk(basepath):
        for f in files:
            fullname = join(root, f)
            filenames.append(fullname)
            filestats.append(os.lstat(fullname))
    return (filenames, filestats)


def _calc_clusters(data, eps, minsamples):
    samples = np.array(data)
    db = DBSCAN(eps=eps, min_samples=minsamples).fit(samples)
    return (db.labels_, db.core_sample_indices_)

def calc_atime_clusters(stats, days=1, mincluster=5):
    """Clusters files regarding to their 'last access' date.

    Arguments:
    stats -- file metadata as returned as 2nd element by gen_filestats
    days  -- approx. size of a cluster (default: accessed on same day)
    mincluster -- min. number of files to make a new cluster

    Returns:
    Tuple with array denoting cluster membership
    and indexes of representatives of cluster cores"""

    atimes = map(lambda x: [x.st_atime], stats)
    return _calc_clusters(atimes, days * 24 * 3600, mincluster)

def calc_mtime_clusters(stats, days=1, mincluster=5):
    """Clusters files regarding to their 'last modified' date.

    Arguments:
    stats -- file metadata as returned as 2nd element by gen_filestats
    days  -- approx. size of a cluster (default: accessed on same day)
    mincluster -- min. number of files to make a new cluster

    Returns:
    Tuple with array denoting cluster membership
    and indexes of representatives of cluster cores"""

    mtimes = map(lambda x: [x.st_mtime], stats)
    return _calc_clusters(mtimes, days * 24 * 3600, mincluster)


def calc_histogram(labels, core_indexes, timestamps):
    # reserve space for outliers (label -1), even if there are none
    num_entries = len(set(labels)) if -1 in labels else len(set(labels))+1

    counters = [0] * num_entries
    coredates = [0] * num_entries

    for c in core_indexes:
        i = int(c)
        coredates[int(labels[i])+1] = timestamps[i]

    for l in labels:
        counters[int(l)+1] += 1

    return zip(coredates, counters)

def print_histogram(histogram):
    # sort histogram by core time stamps
    sort_histo = sorted(histogram, cmp=lambda x,y: cmp(x[0],y[0]))

    print '[date around] [number of files]'
    for h in sort_histo:
        if h[0] == 0:
            print '<outliers>',
        else:
            t = date.fromtimestamp(h[0]).isoformat()
            print t,
        print '    %6d' % h[1]


if __name__ == '__main__':
    if len(sys.argv) < 2:
        print 'Usage %s base_directory [number of days in one cluster]' % sys.argv[0]
        sys.exit(1)

    days = 1
    if len(sys.argv) > 2:
        days = int(sys.argv[2])

    names, stats = gen_filestats(sys.argv[1])

    print '%d files to analyze...' % len(names)

    atime_labels, atime_cores = calc_atime_clusters(stats, days)
    mtime_labels, mtime_cores = calc_mtime_clusters(stats, days)

    atimes = map(lambda x: x.st_atime, stats)
    mtimes = map(lambda x: x.st_mtime, stats)

    ahisto = calc_histogram(atime_labels, atime_cores, atimes)
    mhisto = calc_histogram(mtime_labels, mtime_cores, mtimes)

    print "
=== Access time histogram ==="
    print_histogram(ahisto)

    print "
=== Modification time histogram ==="
    print_histogram(mhisto)
The gen_filestats() function is identical to the version used for the basic histograms in the previous section. The calc_atime_clusters() and calc_mtime_clusters() functions extract the access and modification time of the collected information and pass it on to the cluster generation in _calc_clusters. The DBSCAN is initialized with two parameters: the size of a cluster (eps, in seconds) and the minimum number of sample data that can make a cluster (min_samples). After the parameters of the algorithm are set, the data is fed in for the purpose of clustering via the fit() method.
The result of this clustering is a tuple that consists of labels and a list of indices per label. A label correlates to a cluster that is found in the input data. Its value is the center, that is, the average date, of all dates of the cluster. The special label -1 acts as a container for all the outliers, that is, all the data that could not be assigned to a cluster.
The calc_histogram() function counts the size of each cluster and returns the histogram, that is, the labels and the number of entries as two-dimensional array.
We can run this Python script on the /sbin directory, as follows:
user@lab:~$ python timecluster.py /sbin
The output may look similar to the following:
202 files to analyze...

=== Access time histogram ===
[date around] [number of files]
<outliers>          0
2015-05-24        202

=== Modification time histogram ===
[date around] [number of files]
<outliers>         64
2011-11-20          9
2012-02-09          5
2012-03-02          6
2012-03-31         11
2012-07-26          6
2012-09-11         10
2013-01-18         15
2013-01-26          6
2013-03-07          8
2014-06-18         29
2014-11-20          7
2015-02-16         19
2015-05-01          7
Here, the access time histogram shows only one entry, reflecting our previous scan of the directory. Furthermore, all the major system updates in the recent past are shown in the modification time histogram.
With this tool, the investigator is able to cluster the filesystem information in order to detect the scanning or extraction of the directories as well as the neglected security patches. Furthermore, the special cluster -1 can be analyzed to get the names of the files, which were modified outside of the major system updates.