
If you followed the instructions in Chapter 3 and the installation procedure went well, X has already been configured. In that case, you don’t need to perform the procedure given in this section. However, sometimes the installation procedure doesn’t go well. In that case, you can use the procedure given in this section to configure X rather than redoing the installation procedure.
A
configuration file named /etc/X11/XF86Config or
/etc/X11/XF86Config-4 controls the operation of
X. As explained later in this chapter, you can edit this file using
pico or another text editor (such as vi or
Emacs), but it’s much easier to use Xconfigurator, which asks a
few questions about your system and then builds the file for you. To
launch Xconfigurator, log in as root and type the command:
Xconfigurator --expertXconfigurator displays its opening screen, shown in Figure D-1. The configuration process that ensues is very similar to the one performed by the install program, but as you’ll see, there are a few minor differences.
The biggest difference is that, unlike the install program, Xconfigurator’s user interface is entirely text-based. You can’t use the mouse to point or click. Instead, you must use the Tab and arrow keys to move the cursor and the spacebar or Enter key to “click” buttons.
To begin the configuration process, use the Tab key to select the OK button and press Enter.
Warning
Xconfigurator overwrites the contents of the
XF86Config file. If you already have a working X
setup, you should create a backup copy of XF86Config
before running Xconfigurator.

As shown in Figure D-2, Xconfigurator probes your system to determine the characteristics of your video card. The probe may fail. If so, don’t fret; Xconfigurator will allow you to specify the card installed in your system. Likewise, if Xconfigurator’s probe found an incorrect card, you can override the probe’s result in the next dialog box, shown in Figure D-3.


In the Choose a Card dialog box, you can choose from hundreds of popular video adapters. Use the up and down arrow keys to select an adapter. To quickly move to the neighborhood of your adapter, type the first letter of the manufacturer’s name. If your adapter is not listed, choose Unlisted Card. This prompts Xconfigurator to display the Pick a Server dialog box, shown in Figure D-4.

An X server provides the interface between X and your video adapter. An X server might be more aptly termed a video driver. The most basic X servers include:
-
XFree86-Mono A server that supports monochrome (black-and-white) monitors. The server runs with standard VGA graphics cards and supports a resolution of 640 x 480 or better.
-
XFree86-VGA16 A server that supports standard VGA cards and monitors, providing the standard 16 VGA colors. This server works with nearly all VGA and SVGA cards, but only in low resolution and with few colors.
-
XFree86-SVGA A server that supports most SVGA cards, including the Trident 8900 and 9400, Cirrus Logic, C&T, ET4000, S3 ViRGE, and others.
However, XFree86 also includes a variety of servers for accelerated graphics cards, as shown in Table D-1.
Tip
The list of available Linux drivers for advanced graphics cards expands regularly. For a complete list, check relevant online resources, such as those at http://www.xfree86.org.
Table D-1. X servers for Accelerated Graphics Cards
|
Package |
Server |
Supported cards and chipsets |
|---|---|---|
|
|
|
IBM 8514/A and other compatible cards |
|
|
|
All AGX cards |
|
|
|
#9 Imagine 128 (including Series II) cards |
|
|
|
ATI cards using the Mach32 chipset |
|
|
|
ATI cards using the Mach64 chipset |
|
|
|
ATI cards using the Mach8 chipset |
|
|
|
Diamond Viper and other P9000 cards (excluding cards using the 9100) |
|
|
|
#9 cards, most Diamond cards, some Orchid cards, and others |
|
|
|
Cards using the S3 ViRGE chipset, including the DX, GX, and VX |
|
|
|
ET4000/W32 cards, excluding standard ET4000 cards |
If you can’t decide which X server is appropriate for your
card, select the SVGA server, since most monitors support SVGA.
Later, you can try other drivers that may provide accelerated video.
On the other hand, if you can’t get your monitor to work with
the SVGA server, you can try either of the still more basic X
servers, XFree86-VGA16 or
XFree86-Mono.
After you specify the desired server, Xconfigurator displays the Monitor Setup dialog box, shown in Figure D-5. If you can’t find your monitor in that list, select the Custom option; Xconfiguratorwill then let you specify your monitor’s characteristics.

If you specified Custom, the Custom Monitor Setup dialog box, shown in Figure D-6, appears.
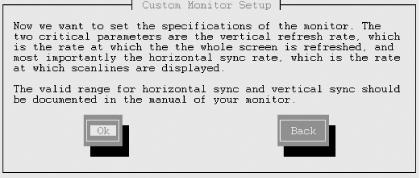
As the dialog box explains, two parameters are needed to configure your monitor: the vertical refresh rate and horizontal sync rate. You can find these values by:
Consulting your monitor’s documentation
Viewing the monitor manufacturer’s web support page
Posting a question to the newsgroup comp.os.linux.setup
Contacting the monitor manufacturer’s technical support group and requesting the information
Warning
Often, otherwise similar monitor models have significantly different horizontal sync rates. It is crucial that you accurately determine the horizontal sync rate of your monitor. You can permanently damage your monitor if you configure X to use an inappropriate horizontal sync rate.
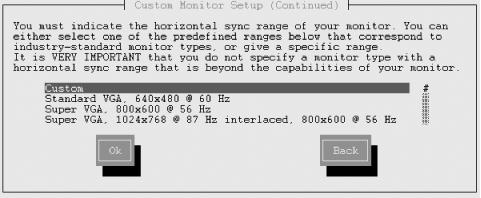
If you earlier specified a custom monitor setup, Xconfigurator next displays a second Custom Monitor Setup dialog box (Figure D-7). This dialog box asks you to choose the proper horizontal sync rate for your monitor. If you’re uncertain of your monitor’s characteristics, choose a conservative value, such as Standard VGA or Super VGA 800 x 600. If you want to type specific values for the sync rates, select Custom.
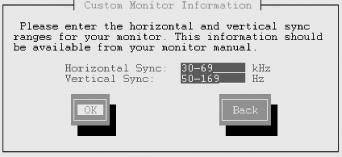
If you selected Custom as the horizontal sync rate of your monitor, Xconfigurator presents a dialog box, shown in Figure D-8, that lets you specify your monitor’s horizontal and vertical sync rates. Interlaced video modes provide a sync rate that is approximately double the specified rate; if your monitor’s documentation specifies two rates for an interlaced mode, specify the higher of the two rates.
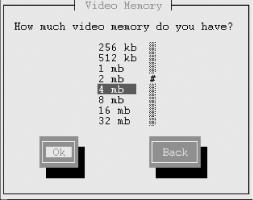
Xconfigurator may ask you to specify the amount of memory installed in your video adapter by presenting a dialog box like that shown in Figure D-9. If so, specify the proper amount of memory, select the OK button, and press Enter.
Xconfigurator will ask you to specify a Clockchip, by presenting the dialog box shown in Figure D-10. Unless you know that your video adapter has a specific Clockchip, select No Clockchip Setting, select the OK button, and press Enter. Most video adapters, even those with Clockchips, will function correctly with the No Clockchip setting.

After you’ve specified your monitor or its sync rates, Xconfigurator probes your system to discover additional video characteristics. It displays the dialog box shown in Figure D-11 before initiating the probe. Select the Probe button and press Enter to begin the probe. Your screen may flicker or blink while Xconfiguratorprobes your system. If you’re retrying a failed attempt to configure X and know that the probe will not succeed, avoid the probe by selecting the Skip button and pressing Enter.

If the probe fails, Xconfigurator displays the dialog box shown in Figure D-12. In that case, Xconfigurator makes some guesses concerning remaining configuration items and continues.

After Xconfigurator probes your system, it displays the dialog box shown in Figure D-13. The dialog box displays the default video mode or modes in which X will operate. Table D-2 shows the relationship between color depth and the number of displayed colors. You can use the Tab key to move from column to column and the up and down arrow keys to move within a column. To select a mode, press the Spacebar. You can select modes in multiple columns; you can even select multiple modes in a column. However, you shouldn’t select modes other than those supported by your video adapter and monitor.

Xconfigurator now asks permission to start X in order to test your configuration, as shown in Figure D-14. Normally, you should test your X configuration to make sure everything has been set properly. You can test the X configuration by selecting the OK button and pressing Enter.

If Xconfigurator cannot start X, it displays the message box shown in Figure D-15. The message box lets you return to previous steps, modify the values of configuration items, and try again.

Tip
It’s worth noting that it could take you several attempts to configure X properly if you don’t have all of the appropriate information about your monitor and video card.
When X starts, you’ll see a small dialog box that asks you to whether you can read its message. Use your mouse and click on Yes to dismiss the dialog box.[10] You’ll need to do so within 10 seconds or Xconfiguratorwill assume X failed.
Warning
This time limit is intended to avoid damage to your video hardware if the configuration is incorrect; however, some hardware can suffer damage even during such a brief interval.
After you respond that you can read the dialog box, Xconfigurator presents another dialog box, asking whether you’d like to automatically start X the next time you boot your system; answer Yes or No, according to your preference. For the purpose of this book, however, you should select the Yes option. Xconfigurator then presents its final dialog box, which explains that X has been successfully installed. Select the Ok button and press Enter to exit Xconfigurator.
[10] Yes, you can finally use your mouse again at this step of the X configuration process—but only on this one screen.