
Appendix B. Solutions to End-of-Part Exercises
Part I, Getting Started
See "Part I Exercises" in Chapter 3 for the exercises.
Interaction. Assuming Python s configured properly, the interaction should look something like the following (you can run this any way you like (in IDLE, from a shell prompt, and so on):
 %
% python...copyright information lines...>>>"Hello World!"'Hello World!' >>> # Use Ctrl-D or Ctrl-Z to exit, or close windowPrograms. Your code (i.e., module) file module1.py and the operating system shell interactions should look like this:
print 'Hello module world!'
% python module1.pyHello module world!Again, feel free to run this other ways—by clicking the file’s icon, by using IDLE’s Run → Run Module menu option, and so on.
Modules. The following interaction listing illustrates running a module file by importing it:
% python>>>import module1Hello module world! >>>Remember that you will need to reload the module to run it again without stopping and restarting the interpreter. The question about moving the file to a different directory and importing it again is a trick question: if Python generates a module1.pyc file in the original directory, it uses that when you import the module, even if the source code (.py) file has been moved to a directory not in Python’s search path. The .pyc file is written automatically if Python has access to the source file’s directory, and contains the compiled byte code version of a module. See Part V for more on modules.
Scripts. Assuming your platform supports the
#!trick, your solution will look like the following (although your#!line may need to list another path on your machine):
#!/usr/local/bin/python (or #!/usr/bin/env python)
print 'Hello module world!'
% chmod +x module1.py%module1.pyHello module world!Errors. The interaction below demonstrates the sorts of error messages you’ll get when you complete this exercise. Really, you’re triggering Python exceptions; the default exception-handling behavior terminates the running Python program, and prints an error message and stack trace on the screen. The stack trace shows where you were in a program when the exception occurred. In Part VII, you will learn that you can catch exceptions using
trystatements and process them arbitrarily; you’ll also see that Python includes a full-blown source code debugger for special error-detection requirements. For now, notice that Python gives meaningful messages when programming errors occur (instead of crashing silently):
% python>>>1 / 0Traceback (innermost last): File "<stdin>", line 1, in ? ZeroDivisionError: integer division or modulo >>> >>>xTraceback (innermost last): File "<stdin>", line 1, in ? NameError: xBreaks. When you type this code:
L = [1, 2]
L.append(L)
you create a cyclic data structure in Python. In Python releases before 1.5.1, the Python printer wasn’t smart enough to detect cycles in objects, and it would print an unending stream of
[1, 2, [1, 2, [1, 2, [1, 2, and so on, until you hit the break-key combination on your machine (which, technically, raises a keyboard-interrupt exception that prints a default message). Beginning with Python 1.5.1, the printer is clever enough to detect cycles and prints[[...]]instead.The reason for the cycle is subtle and requires information you will glean in Part II. But in short, assignments in Python always generate references to objects (which you can think of as implicitly followed pointers). When you run the first assignment above, the name
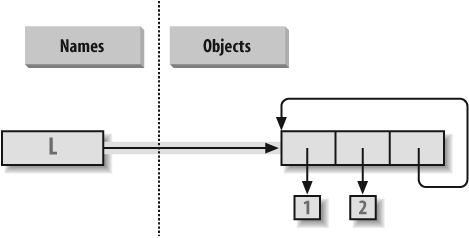
Lbecomes a named reference to a two-item list object. Python lists are really arrays of object references with anappendmethod that changes the array in-place by tacking on another object reference. Here, theappendcall adds a reference to the front ofLat the end ofL, which leads to the cycle illustrated in Figure B-1. In some programs that traverse arbitrary objects, you might have to detect such cycles yourself by keeping track of where you’ve been to avoid looping.Figure B-1. A cyclic object, created by appending a list to itself. By default, Python appends a reference to the original list, not a copy of the list.Believe it or not, cyclic data structures can sometimes be useful (but not when printed!).
Part II, Types and Operations
See "Part II Exercises" in Chapter 9 for the exercises.
The basics. Here are the sorts of results you should get, along with a few comments about their meaning. Note that
;is used in a few of these to squeeze more than one statement onto a single line; the;is a statement separator:
# Numbers
>>> 2 ** 16# 2 raised to the power 16 65536 >>>2 / 5, 2 / 5.0# Integer / truncates, float / doesn't (0, 0.40000000000000002) # Strings >>>"spam" + "eggs"# Concatenation 'spameggs' >>>S = "ham">>>"eggs " + S'eggs ham' >>>S * 5# Repetition 'hamhamhamhamham' >>>S[:0]# An empty slice at the front -- [0:0] '' >>>"green %s and %s" % ("eggs", S)# Formatting 'green eggs and ham' # Tuples >>>('x',)[0]# Indexing a single-item tuple 'x' >>>('x', 'y')[1]# Indexing a 2-item tuple 'y' # Lists >>>L = [1,2,3] + [4,5,6]# List operations >>>L, L[:], L[:0], L[-2], L[-2:]([1, 2, 3, 4, 5, 6], [1, 2, 3, 4, 5, 6], [], 5, [5, 6]) >>>([1,2,3]+[4,5,6])[2:4][3, 4] >>>[L[2], L[3]]# Fetch from offsets; store in a list [3, 4] >>>L.reverse( ); L# Method: reverse list in-place [6, 5, 4, 3, 2, 1] >>>L.sort( ); L# Method: sort list in-place [1, 2, 3, 4, 5, 6] >>>L.index(4)# Method: offset of first 4 (search) 3 # Dictionaries >>>{'a':1, 'b':2}['b']# Index a dictionary by key 2 >>>D = {'x':1, 'y':2, 'z':3}>>>D['w'] = 0# Create a new entry >>>D['x'] + D['w']1 >>>D[(1,2,3)] = 4# A tuple used as a key (immutable) >>>D{'w': 0, 'z': 3, 'y': 2, (1, 2, 3): 4, 'x': 1} >>>D.keys( ), D.values( ), D.has_key((1,2,3))# Methods (['w', 'z', 'y', (1, 2, 3), 'x'], [0, 3, 2, 4, 1], 1) # Empties >>>[[]], ["",[],( ),{},None]# Lots of nothings: empty objects ([[]], ['', [], ( ), {}, None])Indexing and slicing. Indexing out of bounds (e.g.,
L[4]) raises an error; Python always checks to make sure that all offsets are within the bounds of a sequence.On the other hand, slicing out of bounds (e.g.,
L[-1000:100]) works because Python scales out-of-bounds slices so that they always fit (the limits are set to zero and the sequence length, if required).Extracting a sequence in reverse—with the lower bound greater than the higher bound (e.g.,
L[3:1])—doesn’t really work. You get back an empty slice ([ ]) because Python scales the slice limits to make sure that the lower bound is always less than or equal to the upper bound (e.g.,L[3:1]is scaled toL[3:3], the empty insertion point at offset3). Python slices are always extracted from left to right, even if you use negative indexes (they are first converted to positive indexes by adding the sequence length). Note that Python 2.3’s three-limit slices modify this behavior somewhat:L[3:1:-1]does extract from right to left:
>>> L = [1, 2, 3, 4]>>>L[4]Traceback (innermost last): File "<stdin>", line 1, in ? IndexError: list index out of range >>>L[-1000:100][1, 2, 3, 4] >>>L[3:1][] >>>L[1, 2, 3, 4] >>>L[3:1] = ['?']>>>L[1, 2, 3, '?', 4]Indexing, slicing, and
del. Your interaction with the interpreter should look something like the following code. Note that assigning an empty list to an offset stores an empty list object there, but assigning an empty list to a slice deletes the slice. Slice assignment expects another sequence, or you’ll get a type error; it inserts items inside the sequence assigned, not the sequence itself:
>>> L = [1,2,3,4]>>>L[2] = []>>>L[1, 2, [], 4] >>>L[2:3] = []>>>L[1, 2, 4] >>>del L[0]>>>L[2, 4] >>>del L[1:]>>>L[2] >>>L[1:2] = 1Traceback (innermost last): File "<stdin>", line 1, in ? TypeError: illegal argument type for built-in operationTuple assignment. The values of
XandYare swapped. When tuples appear on the left and right of an assignment symbol (=), Python assigns objects on the right to targets on the left according to their positions. This is probably easiest to understand by noting that the targets on the left aren’t a real tuple, even though they look like one; they are simply a set of independent assignment targets. The items on the right are a tuple, which gets unpacked during the assignment (the tuple provides the temporary assignment needed to achieve the swap effect):
>>> X = 'spam'>>>Y = 'eggs'>>>X, Y = Y, X>>>X'eggs' >>>Y'spam'Dictionary keys. Any immutable object can be used as a dictionary key—including integers, tuples, strings, and so on. This really is a dictionary, even though some of its keys look like integer offsets. Mixed-type keys work fine, too:
>>> D = {}>>>D[1] = 'a'>>>D[2] = 'b'>>>D[(1, 2, 3)] = 'c'>>>D{1: 'a', 2: 'b', (1, 2, 3): 'c'}Dictionary indexing. Indexing a nonexistent key (
D['d']) raises an error; assigning to a nonexistent key (D['d']='spam') creates a new dictionary entry. On the other hand, out-of-bounds indexing for lists raises an error too, but so do out-of-bounds assignments. Variable names work like dictionary keys; they must have already been assigned when referenced, but are created when first assigned. In fact, variable names can be processed as dictionary keys if you wish (they’re made visible in module namespace or stack-frame dictionaries):
>>> D = {'a':1, 'b':2, 'c':3}>>>D['a']1 >>>D['d']Traceback (innermost last): File "<stdin>", line 1, in ? KeyError: d >>>D['d'] = 4>>>D{'b': 2, 'd': 4, 'a': 1, 'c': 3} >>> >>>L = [0, 1]>>>L[2]Traceback (innermost last): File "<stdin>", line 1, in ? IndexError: list index out of range >>>L[2] = 3Traceback (innermost last): File "<stdin>", line 1, in ? IndexError: list assignment index out of rangeGeneric operations. Question answers:
The
+operator doesn’t work on different/mixed types (e.g., string+list, list+tuple).+doesn’t work for dictionaries, as they aren’t sequences.The
appendmethod works only for lists, not strings, andkeysworks only on dictionaries.appendassumes its target is mutable, since it’s an in-place extension; strings are immutable.Slicing and concatenation always return a new object of the same type as the objects processed.
>>> "x" + 1Traceback (innermost last): File "<stdin>", line 1, in ? TypeError: illegal argument type for built-in operation >>> >>>{} + {}Traceback (innermost last): File "<stdin>", line 1, in ? TypeError: bad operand type(s) for + >>> >>>[].append(9)>>>"".append('s')Traceback (innermost last): File "<stdin>", line 1, in ? AttributeError: attribute-less object >>> >>>{}.keys( )[] >>>[].keys( )Traceback (innermost last): File "<stdin>", line 1, in ? AttributeError: keys >>> >>>[][:][] >>>""[:]''
String indexing. Because strings are collections of one-character strings, every time you index a string, you get back a string that can be indexed again.
S[0][0][0][0][0]just keeps indexing the first character over and over. This generally doesn’t work for lists (lists can hold arbitrary objects) unless the list contains strings:
>>> S = "spam">>>S[0][0][0][0][0]'s' >>>L = ['s', 'p']>>>L[0][0][0]'s'Immutable types. Either of the following solutions works. Index assignment doesn’t, because strings are immutable:
>>> S = "spam">>>S = S[0] + 'l' + S[2:]>>>S'slam' >>>S = S[0] + 'l' + S[2] + S[3]>>>S'slam'Nesting. Here is a sample:
>>> me = {'name':('mark', 'e', 'lutz'), 'age':'?', 'job':'engineer'}>>>me['job']'engineer' >>>me['name'][2]'lutz'Files. Here’s one way to create and read back a text file in Python (
lsis a Unix command; usediron Windows):
# File: maker.py
file = open('myfile.txt', 'w')
file.write('Hello file world!
') # Or: open( ).write( )
file.close( ) # close not always needed
# File: reader.py
file = open('myfile.txt') # 'r' is default open mode
print file.read() # Or print open( ).read( )
% python maker.py%python reader.pyHello file world! %ls -l myfile.txt-rwxrwxrwa 1 0 0 19 Apr 13 16:33 myfile.txtThe
dirfunction revisited. The following is what you get for lists; dictionaries do the same, with different method names. Note that thedirresult expanded in Python 2.2—you’ll see a large set of additional underscore names that implement expression operators and support the subclassing in Part VI. The_ _methods_ _attribute disappeared in 2.2 as well because it wasn’t consistently implemented—usedirto fetch attribute lists today instead:
>>> []._ _methods_ _['append', 'count', 'index', 'insert', 'remove', 'reverse', 'sort',...] >>>dir([])['append', 'count', 'index', 'insert', 'remove', 'reverse', 'sort',...]
Part III, Statements and Syntax
See "Part III Exercises" in Chapter 14 for the exercises.
Coding basic loops. As you work through this exercise, you’ll wind up with code that looks like the following:
>>> S = 'spam'>>>for c in S:...print ord(c)... 115 112 97 109 >>>x = 0>>>for c in S: x += ord(c)# Or: x = x + ord(c) ... >>>x433 >>>x = []>>>for c in S: x.append(ord(c))... >>>x[115, 112, 97, 109] >>>map(ord, S)[115, 112, 97, 109]Backslash characters. The example prints the bell character (
a) 50 times; assuming your machine can handle it, and when it’s run outside of IDLE, you may get a series of beeps (or one long tone, if your machine is fast enough). Hey—I warned you.Sorting dictionaries. Here’s one way to work through this exercise (see Chapter 8 if this doesn’t make sense). Remember, you really do have to split up the
keysandsortcalls like this becausesortreturnsNone. In Python 2.2 and later, you can iterate through dictionary keys directly without callingkeys(e.g.,for key in D:), but the keys list will not be sorted like it is by this code. In more recent Pythons, you can achieve the same effect with thesortedbuilt-in, too:
>>> D = {'a':1, 'b':2, 'c':3, 'd':4, 'e':5, 'f':6, 'g':7}>>>D{'f': 6, 'c': 3, 'a': 1, 'g': 7, 'e': 5, 'd': 4, 'b': 2} >>> >>>keys = D.keys( )>>>keys.sort( )>>>for key in keys:...print key, '=>', D[key]... a => 1 b => 2 c => 3 d => 4 e => 5 f => 6 g => 7 >>>for key in sorted(D):# In more recent Pythons ...print key, '=>', D[key]Program logic alternatives. Here’s some sample code for the solutions. Your results may vary a bit; this exercise is mostly designed to get you playing with code alternatives, so anything reasonable gets full credit:
L = [1, 2, 4, 8, 16, 32, 64]
X = 5

i = 0
while i < len(L):
    if 2 ** X == L[i]:
        print 'at index', i
        break
    i = i+1
else:
    print X, 'not found'


L = [1, 2, 4, 8, 16, 32, 64]
X = 5

for p in L:
    if (2 ** X) == p:
        print (2 ** X), 'was found at', L.index(p)
        break
else:
    print X, 'not found'


L = [1, 2, 4, 8, 16, 32, 64]
X = 5

if (2 ** X) in L:
    print (2 ** X), 'was found at', L.index(2 ** X)
else:
    print X, 'not found'


X = 5
L = []
for i in range(7): L.append(2 ** i)
print L

if (2 ** X) in L:
    print (2 ** X), 'was found at', L.index(2 ** X)
else:
    print X, 'not found'


X = 5
L = map(lambda x: 2**x, range(7))
print L

if (2 ** X) in L:
    print (2 ** X), 'was found at', L.index(2 ** X)
else:
    print X, 'not found'
Part IV, Functions
See "Part IV Exercises" in Chapter 17 for the exercises.
The basics. There’s not much to this one, but notice that using
print(and hence your function) is technically a polymorphic operation, which does the right thing for each type of object:
% python>>>def func(x): print x... >>>func("spam")spam >>>func(42)42 >>>func([1, 2, 3])[1, 2, 3] >>>func({'food': 'spam'}){'food': 'spam'}Arguments. Here’s a sample solution. Remember that you have to use
printto see results in the test calls because a file isn’t the same as code typed interactively; Python doesn’t normally echo the results of expression statements in files:
def adder(x, y):
return x + y
print adder(2, 3)
print adder('spam', 'eggs')
print adder(['a', 'b'], ['c', 'd'])
% python mod.py5 spameggs ['a', 'b', 'c', 'd']varargs. Two alternative
adderfunctions are shown in the following file, adders.py. The hard part here is figuring out how to initialize an accumulator to an empty value of whatever type is passed in. The first solution uses manual type testing to look for an integer, and an empty slice of the first argument (assumed to be a sequence) if the argument is determined not to be an integer. The second solution uses the first argument to initialize and scan items 2 and beyond, much like one of theminfunction variants shown in Chapter 16.The second solution is better. Both of these assume all arguments are of the same type, and neither works on dictionaries (as we saw in Part II,
+doesn’t work on mixed types or dictionaries). You could add a type test and special code to allow dictionaries, too, but that’s extra credit:
def adder1(*args):
print 'adder1',
if type(args[0]) == type(0): # Integer?
sum = 0 # Init to zero
else: # else sequence:
sum = args[0][:0] # Use empty slice of arg1
for arg in args:
sum = sum + arg
return sum
def adder2(*args):
print 'adder2',
sum = args[0] # Init to arg1
for next in args[1:]:
sum += next # Add items 2..N
return sum
for func in (adder1, adder2):
print func(2, 3, 4)
print func('spam', 'eggs', 'toast')
print func(['a', 'b'], ['c', 'd'], ['e', 'f'])
% python adders.pyadder1 9 adder1 spameggstoast adder1 ['a', 'b', 'c', 'd', 'e', 'f'] adder2 9 adder2 spameggstoast adder2 ['a', 'b', 'c', 'd', 'e', 'f']Keywords. Here is my solution to the first part of this exercise (file mod.py). To iterate over keyword arguments, use the
**argsform in the function header, and use a loop (e.g.,for x in args.keys( ): use args[x]), or useargs.values( )to make this the same as summing*argspositionals:
def adder(good=1, bad=2, ugly=3):
return good + bad + ugly
print adder( )
print adder(5)
print adder(5, 6)
print adder(5, 6, 7)
print adder(ugly=7, good=6, bad=5)
% python mod.py6 10 14 18 18(and 6.) Here are my solutions to exercises 5 and 6 (file dicts.py). These are just coding exercises, though, because Python 1.5 added the dictionary methods
D.copy( )andD1.update(D2)to handle things like copying and adding (merging) dictionaries. (See Python’s library manual or O’Reilly’s Python Pocket Reference for more details.)X[:]doesn’t work for dictionaries, as they’re not sequences (see Chapter 8 for details). Also, remember that if you assign (e = d) rather than copying, you generate a reference to a shared dictionary object; changingdchangese, too:
def copyDict(old):
new = {}
for key in old.keys( ):
new[key] = old[key]
return new
def addDict(d1, d2):
new = {}
for key in d1.keys( ):
new[key] = d1[key]
for key in d2.keys( ):
new[key] = d2[key]
return new
% python>>>from dicts import *>>>d = {1: 1, 2: 2}>>>e = copyDict(d)>>>d[2] = '?'>>>d{1: 1, 2: '?'} >>>e{1: 1, 2: 2} >>>x = {1: 1}>>>y = {2: 2}>>>z = addDict(x, y)>>>z{1: 1, 2: 2}More argument-matching examples. Here is the sort of interaction you should get, along with comments that explain the matching that goes on:
def f1(a, b): print a, b # Normal args
def f2(a, *b): print a, b # Positional varargs
def f3(a, **b): print a, b # Keyword varargs
def f4(a, *b, **c): print a, b, c # Mixed modes
def f5(a, b=2, c=3): print a, b, c # Defaults
def f6(a, b=2, *c): print a, b, c # Defaults and positional varargs
% python>>>f1(1, 2)# Matched by position (order matters) 1 2 >>>f1(b=2, a=1)# Matched by name (order doesn't matter) 1 2 >>>f2(1, 2, 3)# Extra positionals collected in a tuple 1 (2, 3) >>>f3(1, x=2, y=3)# Extra keywords collected in a dictionary 1 {'x': 2, 'y': 3} >>>f4(1, 2, 3, x=2, y=3)# Extra of both kinds 1 (2, 3) {'x': 2, 'y': 3} >>>f5(1)# Both defaults kick in 1 2 3 >>>f5(1, 4)# Only one default used 1 4 3 >>>f6(1)# One argument: matches "a" 1 2 ( ) >>>f6(1, 3, 4)# Extra positional collected 1 3 (4,)Primes revisited. Below is the primes example, wrapped up in a function and a module (file primes.py), so it can be run multiple times. I added an
iftest to trap negatives,0, and1. I also changed/to//to make this solution immune to the Python 3.0/true division changes we studied in Chapter 5, and to enable it to support floating-point numbers. The//operator works in the current and future division schemes, but the future/operator fails (uncomment thefromstatement, and change//to/to see the differences in 2.2 and 3.0):
#from _  _future_  _ import division

def prime(y):
    if y <= 1:                                       # For some y > 1
        print y, 'not prime'
    else:
        x = y // 2                                   # Future / fails
        while x > 1:
            if y % x == 0:                           # No remainder?
                print y, 'has factor', x
                break                                # Skip else
            x -= 1
        else:
            print y, 'is prime'

prime(13); prime(13.0)
prime(15); prime(15.0)
prime(3);  prime(2)
prime(1);  prime(-3)
Here is the module in action; the
//operator allows it to works for floating-point numbers too, even though it perhaps should not.
% python primes.py13 is prime 13.0 is prime 15 has factor 5 15.0 has factor 5.0 3 is prime 2 is prime 1 not prime -3 not primeThis function still isn’t very reusable, yet—it could return values, instead of printing—but it’s enough to run experiments. It’s also not a strict mathematical prime (floating-points work), and is still inefficient. Improvements are left as exercises for more mathematically minded readers. Hint: a
forloop overrange(y, 1, −1)may be a bit quicker than thewhile(in fact, it’s roughly twice as fast in 2.2), but the algorithm is the real bottleneck here. To time alternatives, use the built-intimemodule and coding patterns like those used in this general function-call timer (see the library manual for details):
def timer(reps, func, *args):
    import time
    start = time.clock(  )
    for i in xrange(reps):
        apply(func, args)
    return time.clock(  ) - start
List comprehensions. Here is the sort of code you should write; I may have a preference, but I’m not telling:
>>> values = [2, 4, 9, 16, 25]>>>import math>>>res = []>>>for x in values: res.append(math.sqrt(x))... >>>res[1.4142135623730951, 2.0, 3.0, 4.0, 5.0] >>>map(math.sqrt, values)[1.4142135623730951, 2.0, 3.0, 4.0, 5.0] >>>[math.sqrt(x) for x in values][1.4142135623730951, 2.0, 3.0, 4.0, 5.0]
Part V, Modules
See "Part V Exercises" in Chapter 21 for the exercises.
Import basics. This one is simpler than you may think. When you’re done, your file (mymod.py) and interaction should look similar to the following; remember that Python can read a whole file into a list of line strings, and the
lenbuilt-in returns the length of strings and lists.
def countLines(name):
file = open(name)
return len(file.readlines( ))
def countChars(name):
return len(open(name).read( ))
def test(name): # Or pass file object
return countLines(name), countChars(name) # Or return a dictionary
% python>>>import mymod>>>mymod.test('mymod.py')(10, 291)Note that these functions load the entire file in memory all at once, and so won’t work for pathologically large files too big for your machine’s memory. To be more robust, you could read line by line with iterators instead and count as you go:
def countLines(name):
    tot = 0
    for line in open(name): tot += 1
    return tot

def countChars(name):
    tot = 0
    for line in open(name): tot += len(line)
    return tot
On Unix, you can verify your output with a
wccommand; on Windows, right-click on your file to view its properties. But note that your script may report fewer characters than Windows does—for portability, Python converts Windows'rb'), or add the number of bytes corresponding to the number of lines.Incidentally, to do the “ambitious” part of this exercise (passing in a file object, so you only open the file once), you’ll probably need to use the
seekmethod of the built-in file object. We didn’t cover it in the text, but it works just like C’sfseekcall (and calls it behind the scenes):seekresets the current position in the file to a passed-in offset. After aseek, future input/output operations are relative to the new position. To rewind to the start of a file without closing and reopening it, callfile.seek(0); the filereadmethods all pick up at the current position in the file, so you need to rewind to reread. Here’s what this tweak would look like:
def countLines(file):
file.seek(0) # Rewind to start of file
return len(file.readlines( ))
def countChars(file):
file.seek(0) # Ditto (rewind if needed)
return len(file.read( ))
def test(name):
file = open(name) # Pass file object
return countLines(file), countChars(file) # Open file only once
>>> import mymod2>>>mymod2.test("mymod2.py")(11, 392)from/from *. Here’s thefrom *part; replace*withcountCharsto do the rest:
% python>>>from mymod import *>>>countChars("mymod.py")291_ _main_ _. If you code it properly, it works in either mode (program run or module import):
def countLines(name):
file = open(name)
return len(file.readlines( ))
def countChars(name):
return len(open(name).read( ))
def test(name): # Or pass file object
return countLines(name), countChars(name) # Or return a dictionary
if __name__ == '_ _main_ _':
print test('mymod.py')
% python mymod.py(13, 346)Nested imports. Here is my solution (file myclient.py):
from mymod import countLines, countChars
print countLines('mymod.py'), countChars('mymod.py')
% python myclient.py13 346As for the rest of this one,
mymod’s functions are accessible (that is, importable) from the top level ofmyclient, sincefromsimply assigns to names in the importer (it works almost as thoughmymod’sdefs appeared inmyclient). For example, another file can say this:
import myclient
myclient.countLines(...)

from myclient import countChars
countChars(...)
If
myclientusedimportinstead offrom, you’d need to use a path to get to the functions inmymodthroughmyclient:
import myclient
myclient.mymod.countLines(...)

from myclient import mymod
mymod.countChars(...)
In general, you can define collector modules that import all the names from other modules so they’re available in a single convenience module. Using the following code, you wind up with three different copies of the name
somename(mod1.somename,collector.somename, and_ _main_ _.somename); all three share the same integer object initially, and only the namesomenameexists at the interactive prompt as is:
# File: mod1.py
somename = 42

# File: collector.py
from mod1 import *                               # Collect lots of names here
from mod2 import *                               # from assigns to my names
from mod3 import *

>>> from collector import somename
Package imports. For this, I put the mymod.py solution file listed for exercise 3 into a directory package. The following is what I did to set up the directory and its required _ _init_ _.py file in a Windows console interface; you’ll need to interpolate for other platforms (e.g., use
mvandviinstead ofmoveandedit). This works in any directory (I just happened to run my commands in Python’s install directory), and you can do some of this from a file explorer GUI, too.When I was done, I had a mypkg subdirectory that contained the files _ _init_ _.py and mymod.py. You need an _ _init_ _.py in the mypkg directory, but not in its parent; mypkg is located in the home directory component of the module search path. Notice how a
printstatement coded in the directory’s initialization file fires only the first time it is imported, not the second:
C:python25> mkdir mypkgC:Python25>move mymod.py mypkgmymod.pyC:Python25>edit mypkg\_ _init_ _.py...coded a print statement...C:Python25>python>>>import mypkg.mymodinitializing mypkg >>>mypkg.mymod.countLines('mypkgmymod.py')13 >>>from mypkg.mymod import countChars>>>countChars('mypkgmymod.py')346Reloads. This exercise just asks you to experiment with changing the changer.py example in the book, so there’s nothing to show here.
Circular imports. The short story is that importing
recur2first works because the recursive import then happens at the import inrecur1, not at afrominrecur2.The long story goes like this: importing
recur2first works because the recursive import fromrecur1torecur2fetchesrecur2as a whole, instead of getting specific names.recur2is incomplete when imported fromrecur1, but because it usesimportinstead offrom, you’re safe: Python finds and returns the already createdrecur2module object, and continues to run the rest ofrecur1without a glitch. When therecur2import resumes, the secondfromfinds the nameYinrecur1(it’s been run completely), so no error is reported. Running a file as a script is not the same as importing it as a module; these cases are the same as running the firstimportorfromin the script interactively. For instance, runningrecur1as a script is the same as importingrecur2interactively, asrecur2is the first module imported inrecur1.
Part VI, Classes and OOP
See "Part VI Exercises" in Chapter 26 for the exercises.
Inheritance. Here’s the solution code for this exercise (file adder.py), along with some interactive tests. The
_ _add_ _overload has to appear only once, in the superclass, as it invokes type-specificaddmethods in subclasses:
class Adder:
def add(self, x, y):
print 'not implemented!'
def _ _init_ _(self, start=[]):
self.data = start
def _ _add_ _(self, other): # Or in subclasses?
return self.add(self.data, other) # Or return type?
class ListAdder(Adder):
def add(self, x, y):
return x + y
class DictAdder(Adder):
def add(self, x, y):
new = {}
for k in x.keys( ): new[k] = x[k]
for k in y.keys( ): new[k] = y[k]
return new
% python>>>from adder import *>>>x = Adder( )>>>x.add(1, 2)not implemented! >>>x = ListAdder( )>>>x.add([1], [2])[1, 2] >>>x = DictAdder( )>>>x.add({1:1}, {2:2}){1: 1, 2: 2} >>>x = Adder([1])>>>x + [2]not implemented! >>> >>>x = ListAdder([1])>>>x + [2][1, 2] >>>[2] + xTraceback (innermost last): File "<stdin>", line 1, in ? TypeError: _ _add_ _ nor _ _radd_ _ defined for these operandsNotice in the last test that you get an error for expressions where a class instance appears on the right of a
+; if you want to fix this, use_ _radd_ _methods, as described in "Operator Overloading" in Chapter 24.If you are saving a value in the instance anyhow, you might as well rewrite the
addmethod to take just one argument, in the spirit of other examples in Part VI:
class Adder:
    def _  _init_  _(self, start=[]):
        self.data = start
    def _  _add_  _(self, other):          # Pass a single argument
        return self.add(other)             # The left side is in self
    def add(self, y):
        print 'not implemented!'

class ListAdder(Adder):
    def add(self, y):
        return self.data + y

class DictAdder(Adder):
    def add(self, y):
        pass                           # Change me to use self.data instead of x

x = ListAdder([1, 2, 3])
y = x + [4, 5, 6]
print y                                # Prints [1, 2, 3, 4, 5, 6]
Because values are attached to objects rather than passed around, this version is arguably more object-oriented. And, once you’ve gotten to this point, you’ll probably find that you can get rid of
addaltogether, and simply define type-specific_ _add_ _methods in the two subclasses.Operator overloading. The solution code (file mylist.py) uses a few operator overloading methods that the text didn’t say much about, but they should be straightforward to understand. Copying the initial value in the constructor is important because it may be mutable; you don’t want to change or have a reference to an object that’s possibly shared somewhere outside the class. The
_ _getattr_ _method routes calls to the wrapped list. For hints on an easier way to code this in Python 2.2 and later, see "Extending Types by Subclassing" in Chapter 26:
class MyList:
def _ _init_ _(self, start):
#self.wrapped = start[:] # Copy start: no side effects
self.wrapped = [] # Make sure it's a list here
for x in start: self.wrapped.append(x)
def _ _add_ _(self, other):
return MyList(self.wrapped + other)
def _ _mul_ _(self, time):
return MyList(self.wrapped * time)
def _ _getitem_ _(self, offset):
return self.wrapped[offset]
def _ _len_ _(self):
return len(self.wrapped)
def _ _getslice_ _(self, low, high):
return MyList(self.wrapped[low:high])
def append(self, node):
self.wrapped.append(node)
def _ _getattr_ _(self, name): # Other members: sort/reverse/etc
return getattr(self.wrapped, name)
def _ _repr_ _(self):
return repr(self.wrapped)
if _ _name_ _ == '_ _main_ _':
x = MyList('spam')
print x
print x[2]
print x[1:]
print x + ['eggs']
print x * 3
x.append('a')
x.sort( )
for c in x: print c,
% python mylist.py['s', 'p', 'a', 'm'] a ['p', 'a', 'm'] ['s', 'p', 'a', 'm', 'eggs'] ['s', 'p', 'a', 'm', 's', 'p', 'a', 'm', 's', 'p', 'a', 'm'] a a m p sNote that it’s important to copy the start value by appending instead of slicing here because otherwise the result may not be a true list, and so will not respond to expected list methods, such as
append(e.g., slicing a string returns another string, not a list). You would be able to copy aMyListstart value by slicing because its class overloads the slicing operation, and provides the expected list interface; however, you need to avoid slice-based copying for objects such as strings. Also, note that sets are a built-in type in Python today, so this is largely just a coding exercise (see Chapter 5 for more on sets).Subclassing. My solution (mysub.py) appears below. Your solution should be similar:
from mylist import MyList
class MyListSub(MyList):
calls = 0 # Shared by instances
def _ _init_ _(self, start):
self.adds = 0 # Varies in each instance
MyList._ _init_ _(self, start)
def _ _add_ _(self, other):
MyListSub.calls = MyListSub.calls + 1 # Class-wide counter
self.adds = self.adds + 1 # Per-instance counts
return MyList._ _add_ _(self, other)
def stats(self):
return self.calls, self.adds # All adds, my adds
if __name__ == '_ _main_ _':
x = MyListSub('spam')
y = MyListSub('foo')
print x[2]
print x[1:]
print x + ['eggs']
print x + ['toast']
print y + ['bar']
print x.stats( )
% python mysub.pya ['p', 'a', 'm'] ['s', 'p', 'a', 'm', 'eggs'] ['s', 'p', 'a', 'm', 'toast'] ['f', 'o', 'o', 'bar'] (3, 2)Metaclass methods. I worked through this exercise as follows. Notice that operators try to fetch attributes through
_ _getattr_ _, too; you need to return a value to make them work:
>>> class Meta:...def _ _getattr_ _(self, name):...print 'get', name...def _ _setattr_ _(self, name, value):...print 'set', name, value... >>>x = Meta( )>>>x.appendget append >>>x.spam = "pork"set spam pork >>> >>>x + 2get _ _coerce_ _ Traceback (innermost last): File "<stdin>", line 1, in ? TypeError: call of non-function >>> >>>x[1]get _ _getitem_ _ Traceback (innermost last): File "<stdin>", line 1, in ? TypeError: call of non-function >>>x[1:5]get _ _len_ _ Traceback (innermost last): File "<stdin>", line 1, in ? TypeError: call of non-functionSet objects. Here’s the sort of interaction you should get. Comments explain which methods are called.
% python>>>from setwrapper import Set>>>x = Set([1, 2, 3, 4])# Runs _ _init_ _ >>>y = Set([3, 4, 5])>>>x & y# _ _and_ _, intersect, then _ _repr_ _ Set:[3, 4] >>>x | y# _ _or_ _, union, then _ _repr_ _ Set:[1, 2, 3, 4, 5] >>>z = Set("hello")# _ _init_ _ removes duplicates >>>z[0], z[-1]# _ _getitem_ _ ('h', 'o') >>>for c in z: print c,# _ _getitem_ _ ... h e l o >>>len(z), z# _ _len_ _, _ _repr_ _ (4, Set:['h', 'e', 'l', 'o']) >>>z & "mello", z | "mello"(Set:['e', 'l', 'o'], Set:['h', 'e', 'l', 'o', 'm'])My solution to the multiple-operand extension subclass looks like the class below (file multiset.py). It only needs to replace two methods in the original set. The class’ documentation string explains how it works:
from setwrapper import Set

class MultiSet(Set):
    """
    inherits all Set names, but extends intersect
    and union to support multiple operands; note
    that "self" is still the first argument (stored
    in the *args argument now); also note that the
    inherited & and | operators call the new methods
    here with 2 arguments, but processing more than
    2 requires a method call, not an expression:
    """

    def intersect(self, *others):
        res = []
        for x in self:                         # Scan first sequence
            for other in others:               # For all other args
                if x not in other: break       # Item in each one?
            else:                              # No: break out of loop
                res.append(x)                  # Yes: add item to end
        return Set(res)

    def union(*args):                          # Self is args[0]
        res = []
        for seq in args:                       # For all args
            for x in seq:                      # For all nodes
                if not x in res:
                    res.append(x)              # Add new items to result
        return Set(res)
Your interaction with the extension will look something like the following. Note that you can intersect by using
&or callingintersect, but you must callintersectfor three or more operands;&is a binary (two-sided) operator. Also, note that we could have calledMultiSetsimplySetto make this change more transparent if we usedsetwrapper.Setto refer to the original withinmultiset:
>>> from multiset import *>>>x = MultiSet([1,2,3,4])>>>y = MultiSet([3,4,5])>>>z = MultiSet([0,1,2])>>>x & y, x | y# Two operands (Set:[3, 4], Set:[1, 2, 3, 4, 5]) >>>x.intersect(y, z)# Three operands Set:[] >>>x.union(y, z)Set:[1, 2, 3, 4, 5, 0] >>>x.intersect([1,2,3], [2,3,4], [1,2,3])# Four operands Set:[2, 3] >>>x.union(range(10))# NonmultiSets work, too Set:[1, 2, 3, 4, 0, 5, 6, 7, 8, 9]Class tree links. Here is the way I changed the
Listerclass, and a rerun of the test to show its format. To display inherited class attributes, too, you’d need to do something like what theattrnamesmethod currently does, but recursively, at each class reached by climbing_ _bases_ _links. Becausedirincludes inherited attributes in Python 2.2, you might also simply loop through its result: sayfor x in dir(self)and usegetattr(self,x). This won’t directly help, though, if you wish to represent the class tree’s structure in your display (as in the classtree.py example in Chapter 24):
class Lister:
def _ _repr_ _(self):
return ("<Instance of %s(%s), address %s:
%s>" %
(self._ _class_ _._ _name_ _, # My class's name
self.supers( ), # My class's supers
id(self), # My address
self.attrnames( )) ) # name=value list
def attrnames(self):
...unchanged... def supers(self): result = "" first = 1 for super in self.__class__._ _bases_ _: # One level up from class if not first: result = result + ", " first = 0 result = result + super._ _name_ _ # name, not repr(super) return result C:pythonexamples>python testmixin.py<Instance of Sub(Super, Lister), address 7841200: name data3=42 name data2=eggs name data1=spam >Composition. My solution is below (file lunch.py), with comments from the description mixed in with the code. This is one case where it’s probably easier to express a problem in Python than it is in English:
class Lunch:
def _ _init_ _(self): # Make/embed Customer and Employee
self.cust = Customer( )
self.empl = Employee( )
def order(self, foodName): # Start a Customer order simulation
self.cust.placeOrder(foodName, self.empl)
def result(self): # Ask the Customer about its Food
self.cust.printFood( )
class Customer:
def _ _init_ _(self): # Initialize my food to None
self.food = None
def placeOrder(self, foodName, employee): # Place order with Employee
self.food = employee.takeOrder(foodName)
def printFood(self): # Print the name of my food
print self.food.name
class Employee:
def takeOrder(self, foodName): # Return a Food, with requested name
return Food(foodName)
class Food:
def _ _init_ _(self, name): # Store food name
self.name = name
if __name__ == '_ _main_ _':
x = Lunch( ) # Self-test code
x.order('burritos') # If run, not imported
x.result( )
x.order('pizza')
x.result( )
% python lunch.pyburritos pizzaZoo animal hierarchy. Here is the way I coded the taxonomy on Python (file zoo.py); it’s artificial, but the general coding pattern applies to many real structures, from GUIs to employee databases. Notice that the
self.speakreference inAnimaltriggers an independent inheritance search, which findsspeakin a subclass. Test this interactively per the exercise description. Try extending this hierarchy with new classes, and making instances of various classes in the tree:
class Animal:
    def reply(self):   self.speak(  )           # Back to subclass
    def speak(self):   print 'spam'             # Custom message

class Mammal(Animal):
    def speak(self):   print 'huh?'

class Cat(Mammal):
    def speak(self):   print 'meow'

class Dog(Mammal):
    def speak(self):   print 'bark'

class Primate(Mammal):
    def speak(self):   print 'Hello world!'

class Hacker(Primate): pass                   # Inherit from Primate
The Dead Parrot Sketch. Here’s how I implemented this one (file parrot.py). Notice how the
linemethod in theActorsuperclass works: by accessingselfattributes twice, it sends Python back to the instance twice, and hence invokes two inheritance searches—self.nameandself.says( )find information in the specific subclasses:
class Actor:
    def line(self): print self.name + ':', repr(self.says(  ))

class Customer(Actor):
    name = 'customer'
    def says(self): return "that's one ex-bird!"

class Clerk(Actor):
    name = 'clerk'
    def says(self): return "no it isn't..."

class Parrot(Actor):
    name = 'parrot'
    def says(self): return None

class Scene:
    def _  _init_  _(self):
        self.clerk    = Clerk(  )               # Embed some instances
        self.customer = Customer(  )            # Scene is a composite
        self.subject  = Parrot(  )

    def action(self):
        self.customer.line(  )                  # Delegate to embedded
        self.clerk.line(  )
        self.subject.line(  )
Part VII, Exceptions and Tools
See "Part VII Exercises" in Chapter 29 for the exercises.
try/except. My version of theoopsfunction (file oops.py) follows. As for the noncoding questions, changingoopsto raise aKeyErrorinstead of anIndexErrormeans that thetryhandler won’t catch the exception (it “percolates” to the top level, and triggers Python’s default error message). The namesKeyErrorandIndexErrorcome from the outermost built-in names scope. Import_ _builtin_ _, and pass it as an argument to thedirfunction to see for yourself:
def oops( ):
raise IndexError
def doomed( ):
try:
oops( )
except IndexError:
print 'caught an index error!'
else:
print 'no error caught...'
if _ _name_ _ == '_ _main_ _': doomed( )
% python oops.pycaught an index error!Exception objects and lists. Here’s the way I extended this module for an exception of my own (here a string, at first):
MyError = 'hello'
def oops( ):
raise MyError, 'world'
def doomed( ):
try:
oops( )
except IndexError:
print 'caught an index error!'
except MyError, data:
print 'caught error:', MyError, data
else:
print 'no error caught...'
if _ _name_ _ == '_ _main_ _':
doomed( )
% python oops.pycaught error: hello worldTo identify the exception with a class, I just changed the first part of the file to this, and saved it as oop_oops.py:
class MyError: pass

def oops(  ):
    raise MyError(  )

...rest unchanged...
Like all class exceptions, the instance comes back as the extra data; the error message now shows both the class and its instance (
<...>).%
python oop_oops.pycaught error: __main__.MyError <_ _main_ _.MyError instance at 0x00867550>Remember, to make this look nicer, you can define a
_ _repr_ _or_ _str_ _method in your class to return a custom print string. See Chapter 24 for details.Error handling. Here’s one way to solve this one (file safe2.py). I did my tests in a file, rather than interactively, but the results are about the same.
import sys, traceback
def safe(entry, *args):
try:
apply(entry, args) # Catch everything else
except:
traceback.print_exc( )
print 'Got', sys.exc_type, sys.exc_value
import oops
safe(oops.oops)
% python safe2.pyTraceback (innermost last): File "safe2.py", line 5, in safe apply(entry, args) # Catch everything else File "oops.py", line 4, in oops raise MyError, 'world' hello: world Got hello worldToday, I would probably code this as follows, using the newer
*argscall syntax andexc_info:
def safe(entry, *args):
    try:
        entry(*args)                       # Catch everything else
    except:
        traceback.print_exc(  )
        print 'Got', sys.exc_info(  )[0], sys.exc_info(  )[1]
Here are a few examples for you to study as time allows; for more, see follow-up books and the Web:
# Find the largest file in a single directory

dirname = r'C:Python25Lib'
import os, glob

allsizes = []
allpy = glob.glob(os.path.join(dirname, '*.py'))
for filename in allpy:
    filesize = os.path.getsize(filename)
    allsizes.append((filesize, filename))
allsizes.sort(  )
print allsizes[:2]
print allsizes[-2:]
# Find the largest file in an entire directory tree
import sys
if sys.platform[:3] == 'win':
dirname = r'C:Python25Lib'
else:
dirname = '/usr/lib/python'
import os, glob
allsizes = []
for (thisDir, subsHere, filesHere) in os.walk(dirname):
for filename in filesHere:
if filename.endswith('.py'):
fullname = os.path.join(thisDir, filename)
fullsize = os.path.getsize(fullname)
allsizes.append((fullsize, fullname))
allsizes.sort( )
print allsizes[:2]
print allsizes[-2:]# Find the largest Python source file on the module import search path
import sys, os, pprint
visited = {}
allsizes = []
for srcdir in sys.path:
for (thisDir, subsHere, filesHere) in os.walk(srcdir):
thisDir = os.path.normpath(thisDir)
if thisDir.upper( ) in visited:
continue
else:
visited[thisDir.upper( )] = True
for filename in filesHere:
if filename.endswith('.py'):
pypath = os.path.join(thisDir, filename)
try:
pysize = os.path.getsize(pypath)
except:
print 'skipping', pypath
allsizes.append((pysize, pypath))
allsizes.sort( )
pprint.pprint(allsizes[:3])
pprint.pprint(allsizes[-3:])# Sum columns in a text file separated by commas
filename = 'data.txt'
sums = {}
for line in open(filename):
cols = line.split(',')
nums = [int(col) for col in cols]
for (ix, num) in enumerate(nums):
sums[ix] = sums.get(ix, 0) + num
for key in sorted(sums):
print key, '=', sums[key]# Similar to prior, but using lists instead of dictionaries for sums
import sys
filename = sys.argv[1]
numcols = int(sys.argv[2])
totals = [0] * numcols
for line in open(filename):
cols = line.split(',')
nums = [int(x) for x in cols]
totals = [(x + y) for (x, y) in zip(totals, nums)]
print totals# Test for regressions in the output of a set of scripts
import os
testscripts = [dict(script='test1.py', args=''),
dict(script='test2.py', args='spam')]
for testcase in testscripts:
commandline = '%(script)s %(args)s' % testcase
output = os.popen(commandline).read( )
result = testcase['script'] + '.result'
if not os.path.exists(result):
open(result, 'w').write(output)
print 'Created:', result
else:
priorresult = open(result).read( )
if output != priorresult:
print 'FAILED:', testcase['script']
print output
else:
print 'Passed:', testcase['script']# Build a GUI with Tkinter with buttons that change color and grow
from Tkinter import *
import random
fontsize = 25
colors = ['red', 'green', 'blue', 'yellow', 'orange', 'white', 'cyan', 'purple']
def reply(text):
print text
popup = Toplevel( )
color = random.choice(colors)
Label(popup, text='Popup', bg='black', fg=color).pack( )
L.config(fg=color)
def timer( ):
L.config(fg=random.choice(colors))
win.after(250, timer)
def grow( ):
global fontsize
fontsize += 5
L.config(font=('arial', fontsize, 'italic'))
win.after(100, grow)
win = Tk( )
L = Label(win, text='Spam',
font=('arial', fontsize, 'italic'), fg='yellow', bg='navy',
relief=RAISED)
L.pack(side=TOP, expand=YES, fill=BOTH)
Button(win, text='press', command=(lambda: reply('red'))).pack(side=BOTTOM, fill=X)
Button(win, text='timer', command=timer).pack(side=BOTTOM, fill=X)
Button(win, text='grow', command=grow).pack(side=BOTTOM, fill=X)
win.mainloop( )# Similar to prior, but use classes so each window has own state information
from Tkinter import *
import random
class MyGui:
"""
A GUI with buttons that change color and make the label grow
"""
colors = ['blue', 'green', 'orange', 'red', 'brown', 'yellow']
def _ _init_ _(self, parent, title='popup'):
parent.title(title)
self.growing = False
self.fontsize = 10
self.lab = Label(parent, text='Gui1', fg='white', bg='navy')
self.lab.pack(expand=YES, fill=BOTH)
Button(parent, text='Spam', command=self.reply).pack(side=LEFT)
Button(parent, text='Grow', command=self.grow).pack(side=LEFT)
Button(parent, text='Stop', command=self.stop).pack(side=LEFT)
def reply(self):
"change the button's color at random on Spam presses"
self.fontsize += 5
color = random.choice(self.colors)
self.lab.config(bg=color,
font=('courier', self.fontsize, 'bold italic'))
def grow(self):
"start making the label grow on Grow presses"
self.growing = True
self.grower( )
def grower(self):
if self.growing:
self.fontsize += 5
self.lab.config(font=('courier', self.fontsize, 'bold'))
self.lab.after(500, self.grower)
def stop(self):
"stop the button growing on Stop presses"
self.growing = False
class MySubGui(MyGui):
colors = ['black', 'purple'] # Customize to change color choices
MyGui(Tk( ), 'main')
MyGui(Toplevel( ))
MySubGui(Toplevel( ))
mainloop( )# Email inbox scanning and maintenance utility
"""
scan pop email box, fetching just headers, allowing
deletions without downloading the complete message
"""
import poplib, getpass, sys
mailserver = 'your pop email server name here' # pop.rmi.net
mailuser = 'your pop email user name here' # brian
mailpasswd = getpass.getpass('Password for %s?' % mailserver)
print 'Connecting...'
server = poplib.POP3(mailserver)
server.user(mailuser)
server.pass_(mailpasswd)
try:
print server.getwelcome( )
msgCount, mboxSize = server.stat( )
print 'There are', msgCount, 'mail messages, size ', mboxSize
msginfo = server.list( )
print msginfo
for i in range(msgCount):
msgnum = i+1
msgsize = msginfo[1][i].split( )[1]
resp, hdrlines, octets = server.top(msgnum, 0) # Get hdrs only
print '-'*80
print '[%d: octets=%d, size=%s]' % (msgnum, octets, msgsize)
for line in hdrlines: print line
if raw_input('Print?') in ['y', 'Y']:
for line in server.retr(msgnum)[1]: print line # Get whole msg
if raw_input('Delete?') in ['y', 'Y']:
print 'deleting'
server.dele(msgnum) # Delete on srvr
else:
print 'skipping'
finally:
server.quit( ) # Make sure we unlock mbox
raw_input('Bye.') # Keep window up on windows# CGI server-side script to interact with a web browser
#!/usr/bin/python
import cgi
form = cgi.FieldStorage( ) # Parse form data
print "Content-type: text/html
" # hdr plus blank line
print "<HTML>"
print "<title>Reply Page</title>" # html reply page
print "<BODY>"
if not form.has_key('user'):
print "<h1>Who are you?</h1>"
else:
print "<h1>Hello <i>%s</i>!</h1>" % cgi.escape(form['user'].value)
print "</BODY></HTML>"
# Database script to populate and query a MySql database
from MySQLdb import Connect
conn = Connect(host='localhost', user='root', passwd='darling')
curs = conn.cursor( )
try:
curs.execute('drop database testpeopledb')
except:
pass # Did not exist
curs.execute('create database testpeopledb')
curs.execute('use testpeopledb')
curs.execute('create table people (name char(30), job char(10), pay int(4))')
curs.execute('insert people values (%s, %s, %s)', ('Bob', 'dev', 50000))
curs.execute('insert people values (%s, %s, %s)', ('Sue', 'dev', 60000))
curs.execute('insert people values (%s, %s, %s)', ('Ann', 'mgr', 40000))
curs.execute('select * from people')
for row in curs.fetchall( ):
print row
curs.execute('select * from people where name = %s', ('Bob',))
print curs.description
colnames = [desc[0] for desc in curs.description]
while True:
print '-' * 30
row = curs.fetchone( )
if not row: break
for (name, value) in zip(colnames, row):
print '%s => %s' % (name, value)
conn.commit( ) # Save inserted records# Database script to populate a shelve with Python objects
rec1 = {'name': {'first': 'Bob', 'last': 'Smith'},
'job': ['dev', 'mgr'],
'age': 40.5}
rec2 = {'name': {'first': 'Sue', 'last': 'Jones'},
'job': ['mgr'],
'age': 35.0}
import shelve
db = shelve.open('dbfile')
db['bob'] = rec1
db['sue'] = rec2
db.close( )# Database script to print and update shelve created in prior script
import shelve
db = shelve.open('dbfile')
for key in db:
print key, '=>', db[key]
bob = db['bob']
bob['age'] += 1
db['bob'] = bob
db.close( )