
Building Java Web Applications with Spring Web MVC
Anything you can do, I can do Meta.
—Daniel Dennett
Mark Twain once said, “In the spring, I have counted 136 different kinds of weather.” Almost certainly, he wasn’t referring to the Spring Framework. Or was he clairvoyant? The Spring Framework has grown to become an ecosystem of projects; it includes many distinct modules, integrates numerous frameworks and libraries, and provides a varied range of capabilities in diverse areas such as Flash, enterprise applications, web services, data stores, OSGi,1 and even .NET. Spring applications are supported on all popular cloud platforms such as Cloud Foundry,2 Google App Engine, and Amazon EC23 and can leverage traditional RDBMSs as well as new NoSQL4 solutions and data stores like PostgreSQL,5 MySQL, MongoDB,6 and Redis.7 Unlike many other frameworks such as Struts, which is confined to developing web applications, the Spring Framework can be used to build stand-alone, web, and JEE applications. Spring provides support for building modern web applications including REST, HTML5, and Ajax, as well as mobile client platforms including Android and iPhone. The Spring Framework has remarkably changed the enterprise Java landscape forever by connecting components with systems so that you do not have to write the plumbing code, thus allowing you to focus on the business of the application.
Spring Framework Overview
The Spring Framework consists of features in these categories:
- AOP and instrumentation
- Core container
- Data access/integration
- Web
- Test
The modules in each of these categories are described in the following sections.
AOP and Instrumentation
The AOP and instrumentation category consists of the AOP, Aspects, and Instrumentation modules, as described in Table 5-1.
Table 5-1. AOP Modules
Module |
Description |
|---|---|
AOP |
Spring’s AOP module provides an AOP Alliance-compliant aspect-oriented programming implementation. |
Aspects |
The Aspects module provides integration with AspectJ. |
Instrumentation |
The Instrumentation module provides class instrumentation support and classloader implementations. |
Core Container
The core container category consists of the Beans, Core, Context, and Expression Language modules, as described in Table 5-2.
Table 5-2. Core Modules
Module |
Description |
|---|---|
Beans |
The Beans module provides IoC and dependency injection features. |
Core |
The Core module provides IoC and dependency injection features. |
Context |
The Context module builds on the Core and Beans modules and adds support for internationalization, event propagation, resource loading, EJB, and JMX. |
Expression Language |
The Expression Language module provides the Spring expression language. |
Data Access/Integration
The data access/integration layer consists of the JDBC, ORM, OXM, JMS, and Transaction modules, as described in Table 5-3.
Table 5-3. Data Access/Integration Modules
Modules |
Description |
|---|---|
JDBC |
The JDBC module provides a JDBC abstraction layer that removes the need to use pure JDBC. |
ORM |
The ORM module provides integration for ORM frameworks, such as JPA, JDO, Hibernate, and iBatis. |
OXM |
The OXM module supports object/XML mapping implementations for JAXB, Castor, XMLBeans, JiBX, and XStream. |
JMS |
The JMS module provides features for producing and consuming messages. |
Transaction |
The Transaction module supports programmatic and declarative transaction management. |
Test
The test category consists of the Test module, as described in Table 5-4.
Table 5-4. Test Module
Modules |
Description |
|---|---|
Test |
The Test module supports the testing of Spring components with JUnit or TestNG. |
Web
The web layer consists of the Web, Web-Servlet, Web-Struts, and Web-Portlet modules, as described in Table 5-5.
Table 5-5. Web Modules
Modules |
Description |
|---|---|
Web |
Spring’s Web module provides basic web-oriented integration features and a web-oriented application context. It also provides several remoting options such as Remote Method Invocation (RMI), Hessian, Burlap, JAX-WS, and Spring’s own HTTP invoker. |
Web-Servlet |
The Web-Servlet module contains Spring’s Model-View-Controller (MVC) implementation for web applications. |
Web-Struts |
The Web-Struts module provides support for integrating a classic Struts web tier within a Spring application. Note that this support is now deprecated as of Spring 3.0. |
Web-Portlet |
The Web-Portlet module provides the MVC implementation to be used in a portlet environment. |
Note The core of the Spring Framework is based on the principle of Inversion of Control (IoC) that provides injection of dependencies. However, Spring is not the only framework offering dependency injection features; there are several other frameworks such as Seam8, Google Guice9, and JEE6 and newer that offer dependency injection.
At the time of writing, Spring 3.2.2 is expected to be released; Spring 3.1 was released in December 2011. Spring Framework 4.0 is expected by the end of 2013, with plans to support Java SE 8, Groovy 2, and some aspects of Java EE 7.
An application is composed of components such as web components and business logic components. These components need to collaborate with each other to fulfill the common business goals of the application, so these components depend on one another. This dependency, if uncontrolled, often leads to tight coupling between them, resulting in an unmaintainable application. Controlling this coupling so that it does not result in a tightly coupled application is a nontrivial task. By contrast, if a component of the application does not depend on another component, it will not have to look for it, all the components will be fully isolated, and the resulting application will be loosely coupled. But such an application will not do anything. Essentially, components should depend on other components but should not look for these components on which they depend. Instead, such dependencies should be provided to the dependent components. This is the essence of Inversion of Control. The Spring Framework is one such IoC framework, which provides the dependencies to the dependent components by means of dependency injection.
Note IoC is based on the Hollywood principle10: “Don’t call us; we’ll call you.”
Figure 5-1 is a high-level view of how Spring works.
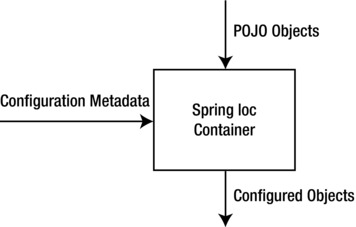
Figure 5-1. Spring IoC container
As illustrated in Figure 5-1, the Spring IoC container produces fully configured application objects by using application POJO objects and configuration metadata.
- Application POJO objects: In Spring, the application objects that are managed by the Spring IoC container are called beans. A Spring bean is an object that is instantiated, assembled, and managed by a Spring IoC container.
Note In Spring, components are also called beans. The Spring beans are different from the JavaBeans convention. The Spring beans can be any plain old Java objects (POJOs). A POJO is an ordinary Java object without any specific requirements, such as extending a specific class or implementing a specific interface.
- Configuration metadata: The configuration metadata specifies the objects that comprise your application and the interdependencies between such objects. The container reads the configuration metadata and figures out from it which objects to instantiate, configure, and assemble. The container then injects those dependencies when it creates the bean. The configuration metadata can be represented by either XML, annotations, or Java code.
In terms of implementation, the Spring container can inject objects in arguments of instance and static methods and can inject constructors via dependency injection. Say you have an application that has a component called ClassA that depends on ClassB. In other words, ClassB is the dependency. Your standard code would look like Listing 5-1.
Listing 5-1. Tightly Coupled Dependency
1.    public class ClassA {
2.       private ClassB classB;
3.       public ClassA() {
4.          classB = new ClassB();
5.       }
6.    }
We create a dependency between ClassA and ClassB in line 3-4 of Listing 5-1. This tightly couples ClassA with ClassB. This tight coupling can be circumvented using IoC, and in order to that, first we need to change the code in Listing 5-1 to Listing 5-2.
Listing 5-2. Removing the Tight Coupling Between ClassA and ClassB
1.    public class ClassA {
2.       private ClassB classB;
3.       public ClassA(ClassB classB) {
4.          this.classB = classB;
5.       }
6.    }
As you can see in Listing 5-2, ClassB is implemented independently, and the Spring container provides this implementation of ClassB to ClassA at the time of instantiation of ClassA, and the dependency (in other words, class ClassB) is injected into class ClassA through a constructor. Thus, the control has been removed from ClassA and kept elsewhere (that is, in an XML configuration file, illustrated in Listing 5-3) and thus “inverted” by dependency injection (DI) because the dependency is delegated to an external system, in other words, the configuration metadata. Listing 5-3 illustrates a typical Spring configuration metadata file.
Listing 5-3. Configuration Metadata
 1.    <?xml version="1.0" encoding="UTF-8"?>
 2.    <beans xmlns="http://www.springframework.org/schema/beans"
 3.        xmlns:xsi="http://www.w3.org/2001/XMLSchema-instance"
 4.        xsi:schemaLocation="http://www.springframework.org/schema/beans
 5.            http://www.springframework.org/schema/beans/spring-beans-3.2.xsd">
 6.
 7.
 8.    <bean id=" .." class=".."/>
 9.
10.    <!-- more bean definitions -- >
11.
12.    </beans>
- Line 2: To use tags such as <beans>, <bean>, and so on, certain namespaces need to be declared. The core Spring Framework comes with ten configuration namespaces. For now let’s concentrate on the beans namespace; as the chapter progresses, other namespaces will be used. However, in this book we require only the aop, beans, and context schemas, so if you are interested in using others, you can find them at http://static.springsource.org/spring/docs/3.2.2.RELEASE/spring-framework-reference/html/xsd-config.html.
- Line 2: When describing beans in an XML-based configuration, the root element of the XML file is <beans> from Spring’s bean schema. The entire Spring configuration, including <bean> declarations, is placed in the top-level <beans>.
- Line 8: <bean> is the most basic configuration unit in Spring. It tells Spring to create an object for the application. These <bean> definitions correspond to the actual objects that make up the application.
- Line 8: The id attribute is a string that helps identify the individual bean definition. The class attribute defines the type of the bean and uses the fully qualified class name. The value of the id attribute refers to the collaborating objects.
Note While XML is a classic way for defining configuration metadata, you can use annotations (from Spring 2.5 and newer) or Java code (from Spring 3.0 and newer).
Listing 5-4 illustrates the bean definition that should be included in the configuration metadata file illustrated in Listing 5-3 to inject the classB dependency in Listing 5-2.
Listing 5-4. Configuring Dependency
1.    <!-- Definition for classA bean -->
2.       <bean id="classA" class="ClassA">
3.          <constructor-arg ref="classB"/>
4.       </bean>
5.
6.       <!-- Definition for classB bean -->
7.       <bean id="classB" class="ClassB">
8.       </bean>
- Line 2: This specifies the classA bean to be created and managed by the Spring container.
- Line 3: <constructor-arg> configures bean properties via constructor injection by declaring them in the elements.
- Line 7: This specifies that classB bean should be created and managed by the Spring container.
The dependency injection depicted in Listing 5-4 is called constructor-based dependency injection. Constructor-based DI is accomplished when the container invokes a class constructor with a number of arguments, each representing a dependency on another class. There is another variant of DI called setter-based dependency injection. In setter-based DI, the container, after invoking a no-argument constructor or no-argument static factory method to instantiate your bean, calls the setter methods on your beans. To use setter-based DI, you need to modify Listing 5-2 to look like Listing 5-5.
Listing 5-5. Setter Method to Inject Dependency
 1.    public class ClassA{
 2.       private ClassB classB;
 3.
 4.       // a setter method to inject the dependency.
 5.       public void setClassB(ClassB classB) {
 6.          this.classB = classB;
 7.       }
 8.       // a getter method to return classB
 9.       public ClassB getClassB() {
10.          return classB;
11.       }
12.
13.    }
In Listing 5-5, the DI takes place through setter methods of the ClassA class in which the ClassB instance is created, and this instance is used to call setter methods to initialize ClassA’s properties. Listing 5-6 illustrates the bean definition that should be included in the configuration metadata file illustrated in Listing 5-3 to achieve the setter-based dependency injection required in Listing 5-5.
Listing 5-6. Configuring Dependency Through Setter-Based DI
<bean id="classA" class="ClassA">
<property name="classB" ref="classB" />
</bean>
<bean id="classB" class="ClassB" />
The <property> tag defines a property for dependency injection. Listing 5-6 can be translated into the Java code illustrated in Listing 5-7.
Listing 5-7. Java Code Equivalent of Listing 5-6
ClassA classA = new ClassA();
ClassB classB = new ClassB();
classA.setClassB(classB);
Tip Constructor-based and setter-based DI can be used simultaneously, but it is recommended to use constructor arguments for mandatory dependencies and setters for optional dependencies.
The Spring container is essentially a factory that creates objects encapsulating the creation of objects and configures these objects using the configuration metadata that contains information about the collaborating objects in the application that must be created. Spring provides two types of IoC container implementation.
- Bean factories (defined by the org.springframework.beans.factory.BeanFactory interface)
- Application contexts (defined by the org.springframework.context.ApplicationContext interface)
Bean factories are the simplest of containers and provide basic support for DI. ApplicationContext is a subinterface of BeanFactory that provides application framework services, such as the following:
- The ability to resolve textual messages from a properties file
- The ability to publish application events to interested event listeners
- The application-layer specific contexts such as the WebApplicationContext to be used in the web tier
Note Web applications have their own WebApplicationContext. The WebApplicationContext will be explained when we discuss web-based Spring applications later in this chapter.
Application Context
Spring comes with several implementations of the ApplicationContext interface out of the box. The three most commonly used are the following:
- ClassPathXmlApplicationContext: Loads a context definition from an XML file located in the class path
- FileSystemXmlApplicationContext: Loads a context definition from an XML file in the file system
- XmlWebApplicationContext: Loads context definitions from an XML file contained within a web application
In stand-alone applications, it is common to create an instance of ClassPathXmlApplicationContext or FileSystemXmlApplicationContext.
Following Figure 5-1, you have to instantiate the Spring IoC container (ApplicationContext) for it to create bean instances by reading their configurations (configuration metadata). Then, you can get the bean instances from the IoC container to use.
Listing 5-8 illustrates the instantiation of the ClassPathXmlApplicationContext, an implementation of ApplicationContext. The ClassPathXmlApplicationContext implementation builds an application context by loading an XML configuration file from the class path.
Listing 5-8. Instantiation of ClassPathXmlApplicationContext
ApplicationContext context = new ClassPathXmlApplicationContext("beans.xml");
Listing 5-9 illustrates the instantiation of the FileSystemXmlApplicationContext.
Listing 5-9. Instantiation of the FileSystemXmlApplicationContext
ApplicationContextcontext=new FileSystemXmlApplicationContext("c:/beans.xml");
Note The FileSystemXmlApplicationContext looks for beans.xml in a specific location within the file system, whereas ClassPathXmlApplicationContext looks for beans.xml anywhere in the class path (including JAR files).
In the section that follows, you will learn how to use the application context when you create your first Spring-based stand-alone application.
Key Objectives of the Spring Framework
Dependency injection is not the only key benefit of using the Spring Framework. The goal of the Spring Framework is to simplify the complexity of developing an enterprise application. This complexity manifests itself in an enterprise application in several ways, and most enterprise applications prior to the Spring Framework were inadvertently afflicted with few or even all of the following tribulations:
Fundamentally, Spring enables you to build applications from POJOs and apply enterprise services nonintrusively to POJOs so that the domain model has no dependencies on the framework itself. Thus, the driving force behind the Spring Framework was to promote best practices in Java EE development by enabling a POJO-based programming model.
Dealing with Tight Coupling Using Dependency Injection
Now let’s see how Spring enables loose coupling through dependency injection with the help of a simple stand-alone application. The code for this application is available in a downloadable archive on the Apress web site. In addition, this application will be a preamble into the Spring forest. Listing 5-10, 5-11, and 5-12 illustrate the hierarchy of service provider objects and the dependencies of the VehicleService illustrated in Listing 5-13.
Listing 5-10. Vehicle Interface
public interface Vehicle {
public String drive();
}
Listing 5-11. Vehicle Implementation: Bike
public class Bike implements Vehicle{
    public String drive() {
        return " driving a bike";
    }
}
Listing 5-12. Vehicle Implementation: Car
public class Car implements Vehicle {

    public String drive() {
        return " driving a car";
    }
}
These service provider objects are used by the class VehicleService, as illustrated in Listing 5-13, which is then used by the client object, as illustrated in Listing 5-14.
Listing 5-13. Vehicle Service
 1.    public class VehicleService {
 2.
 3.        private Vehicle vehicle = new Bike();
 4.
 5.        public void driver() {
 6.            System.out.println(vehicle.drive());
 7.
 8.        }
 9.
10.    }
- Line 3: In Listing 5-13, class Bike is the dependency of class VehicleService and is instantiated on line 3. This is a case of tight coupling because the class VehicleService is implementation-aware of the Vehicle object, which is Bike in this case.
Listing 5-14 illustrates the stand-alone VehicleApp.
Listing 5-14. Stand-Alone VehicleApp
1.    public class VehicleApp {
2.        public static void main(String[] args) {
3.            VehicleService service = new VehicleService();
4.            service.driver();
5.        }
6.    }
As illustrated in Listing 5-14, VehicleService is implementation-aware of the Vehicle object and hence tightly coupled to it. Now let’s decouple this application through the Spring Framework’s DI. The first step is to create a Java project using the Eclipse IDE. Select File ![]() New
New ![]() Project and then select Java Project Wizard from the wizard list. Name your project looselyCoupledApplication using the wizard, as illustrated in Figure 5-2.
Project and then select Java Project Wizard from the wizard list. Name your project looselyCoupledApplication using the wizard, as illustrated in Figure 5-2.
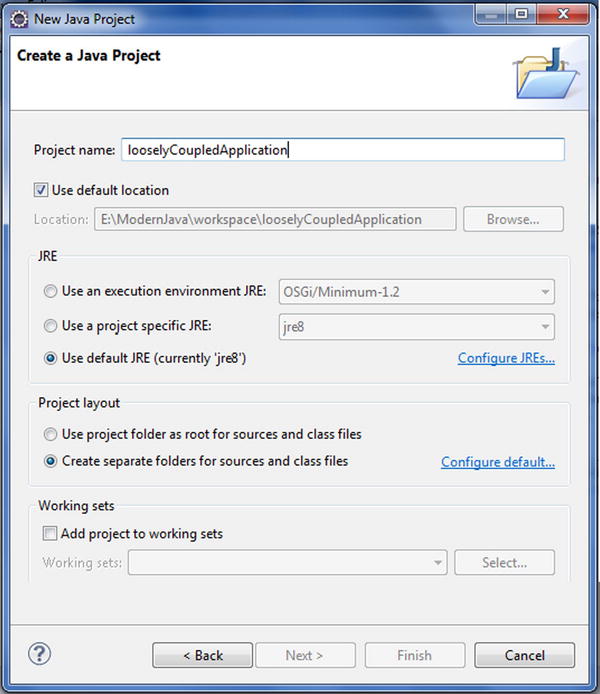
Figure 5-2. Creating the Java project
Now you need to add the Spring Framework and common logging API libraries in your project. You can download the Spring Framework libraries from http://projects.spring.io/spring-framework/. You can use Maven as explained in the previous chapter to configure the Spring Framework in your project. When using Maven, you need to add following to your pom.xml file:
<dependencies>
    <dependency>
        <groupId>org.springframework</groupId>
        <artifactId>spring-context</artifactId>
        <version>3.2.5.RELEASE</version>
    </dependency>
</dependencies>
Using Maven is much easier, but to know which key libraries are used for the three applications you will make in this section, you can manually configure the libraries in Eclipse. These libraries are available in the downloadable archive available from the Source Code/Download tab on the book’s Apress webpage (www.apress.com/9781430259831).
To add the Spring Framework to your project, right-click your project and select Build Path ![]() Configure Build Path to display the Java Build Path window as illustrated in Figure 5-3. Now add the external JARs that you downloaded in your file system from the Apress website.
Configure Build Path to display the Java Build Path window as illustrated in Figure 5-3. Now add the external JARs that you downloaded in your file system from the Apress website.
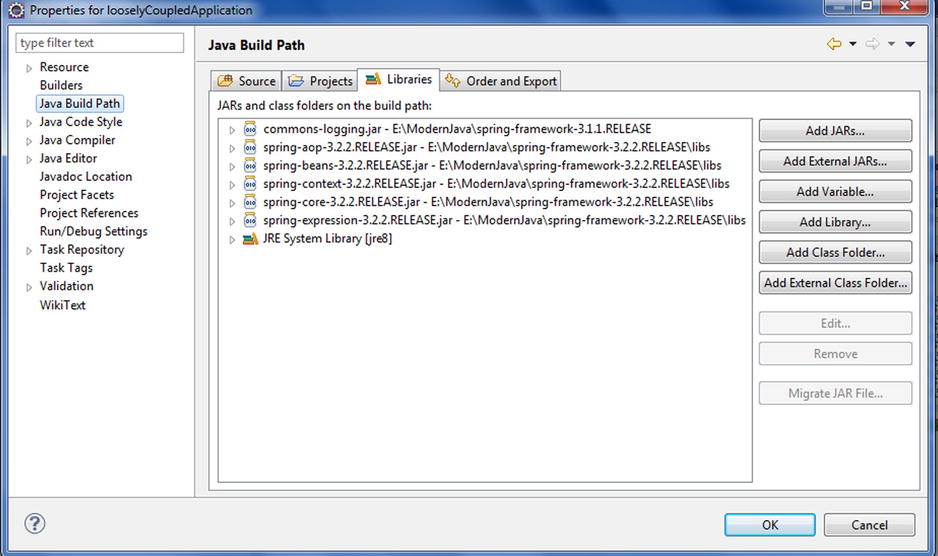
Figure 5-3. Adding external JARs
Now let’s create actual source files under the looselyCoupledApplication project. First we need to create a package called com.apress.decoupled. To do this, right-click src in the Package Explorer section, select New ![]() Package, and create the package com.apress.decoupled. Then create Vehicle.java, Car.java, and Bike.java, which is the code illustrated in Listings 5-10, 5-11, and 5-12, under the com.apress.decoupled package.
Package, and create the package com.apress.decoupled. Then create Vehicle.java, Car.java, and Bike.java, which is the code illustrated in Listings 5-10, 5-11, and 5-12, under the com.apress.decoupled package.
Then create the class VehicleService as illustrated in Listing 5-15.
Listing 5-15. Loosely Coupled VehicleService
1.    package com.apress.decoupled;
2.
3.    public class VehicleService {
4.
5.        private Vehicle vehicle;
6.
7.        public void setVehicle(Vehicle vehicle) {
8.            this.vehicle = vehicle;
9.        }
10.
11.        public void driver() {
12.            System.out.println(vehicle.drive());
13.
14.        }
15.
16.    }
17.
- Line 7: In Listing 5-15, we have removed total control from the class VehicleService and kept it in the XML configuration file, and the dependency is being injected into the class VehicleService through a setter method on line 7.
Now create a client class VehicleApp, as illustrated in Listing 5-16.
Listing 5-16. Vehicle Application
 1.    package com.apress.decoupled;
 2.    import org.springframework.context.ApplicationContext;
 3.    import org.springframework.context.support.ClassPathXmlApplicationContext;
 4.
 5.    public class VehicleApp {
 6.
 7.        public static void main(String[] args) {
 8.            ApplicationContext  context = new ClassPathXmlApplicationContext(
 9.                    "beans.xml");
10.            VehicleService contestService = (VehicleService) context
11.                    .getBean("vehicleService");
12.            contestService.driver();
13.        }
14.
15.    }
- Lines 8 to 9: These lines instantiate the application context and pass the configuration file.
- Lines 10 to 11: These lines get the bean from the configuration file. To get a declared bean from a bean factory or an application context, you make a call to the getBean() method, pass in the unique bean name, and cast the return type to its actual type before using it.
Now, you need to create a bean configuration file, which is an XML file (as illustrated in Listing 5-17), that connects the beans.
Listing 5-17. Configuration File
 1.    <?xml version="1.0" encoding="UTF-8"?>
 2.    <beans xmlns=" http://www.springframework.org/schema/beans"
 3.           xmlns:xsi="http://www.w3.org/2001/XMLSchema-instance"
 4.           xsi:schemaLocation="http://www.springframework.org/schema/beans
 5.           http://www.springframework.org/schema/beans/spring-beans-3.0.xsd">
 6.    <bean id="car" class="com.apress.decoupled.Car" />
 7.    <bean id="bike" class="com.apress.decoupled.Bike" />
 8.    <bean id="vehicleService" class="com.apress.decoupled.VehicleService">
 9.    <property name="vehicle">
10.    <ref local="car" />
11.    </property>
12.    </bean>
13.    </beans>
You can choose any name you like for beans.xml. You have to make sure that this file is available in CLASSPATH and use the same name in the main application while creating the application context, as shown in the VehicleApp.java file. Figure 5-4 shows the directory structure of the application.
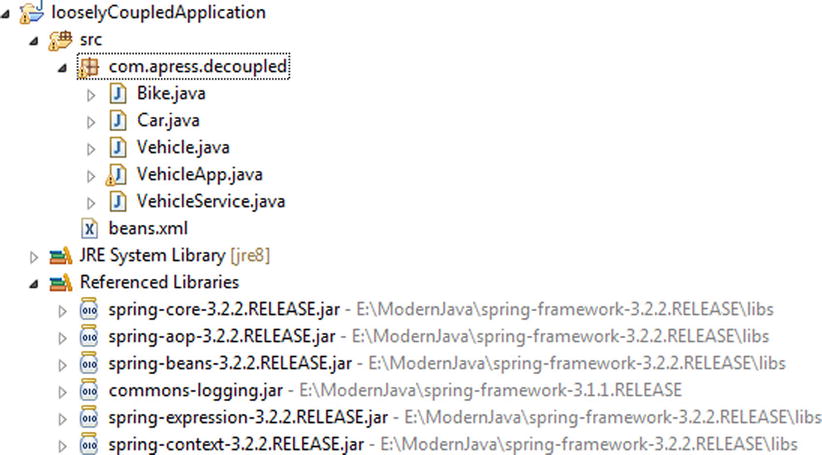
Figure 5-4. Directory structure
Addressing Cross-Cutting Concerns Using AOP
A separation of concerns is achieved in Spring by means of aspect-oriented programming (AOP). AOP encapsulates the cross-cutting concerns in separate, reusable components called aspects and adds them to the application. This process is called weaving. This results in the cohesive components that concentrate on the business functions and are totally unaware of system services such as logging, security, transaction, and so on. To understand how aspects can be applied in Spring, you will now create a simple BookService that retrieves a list of all books, adding a basic logging aspect to the BookService. The code for this application is available in a downloadable archive on the Apress web site. Listing 5-18 illustrates the BookService.
Listing 5-18. BookService Interface
package com.apress.aop;

import java.util.List;

public interface BookService {
    public List<Book> getAllBooks();

}
Listing 5-19 illustrates the implementation of this BookService.
Listing 5-19. BookService Implementation
 1.    package com.apress.aop;
 2.
 3.    import java.util.ArrayList;
 4.    import java.util.List;
 5.
 6.    public class BookServiceImpl implements BookService{
 7.        private static List<Book> bookList;
 8.        static {
 9.
10.            Book book1 = new Book();
11.            book1.setId((long)1);
12.            book1.setBookTitle("Modern Java");
13.
14.            Book book2 = new Book();
15.            book2.setId((long)2);
16.            book2.setBookTitle("Beginning Groovy");
17.
18.            Book book3 = new Book();
19.            book3.setId((long)2);
20.            book3.setBookTitle("Beginning Scala");
21.
22.            bookList = new ArrayList<Book>();
23.            bookList.add(book1);
24.            bookList.add(book2);
25.            bookList.add(book3);
26.        }
27.
28.
29.        public List<Book> getAllBooks() {
30.            for(Book b: bookList){
31.                System.out.println("Books:"+b.getBookTitle());
32.            }
33.            return bookList;
34.        }
35.    }
Logging is not the concern of BookServiceImpl. For logging, create an aspect as illustrated in Listing 5-20 that will be woven into the BookService object, providing the logging wherever needed.
Listing 5-20. Aspect for Logging
 1.    package com.apress.aop;
 2.
 3.    public class LoggingAspect {
 4.        public void logBefore() {
 5.
 6.            System.out.println("Before calling getAllBooks");
 7.        }
 8.
 9.        public void logAfter() {
10.            System.out.println("After calling getAllBooks");
11.        }
12.    }
13.
- Line 3: LoggingAspect is a simple class with two methods.
- Line 4: The logBefore() method that should be invoked before getAllBooks() is called.
- Line 9: the logAfter() method that should be invoked after the getAllBooks() is called.
The LoggingAspect does its job without the BookServiceImpl asking it to do so. Furthermore, because the BookServiceImpl does not need to know about the LoggingAspect, you are not required to inject the LoggingAspect into the BookServiceImpl. This removes the unneeded complexity from the BookServiceImpl code of having to inject LoggingAspect and having to check whether LoggingAspect is null. As you may have noticed, LoggingAspect is a POJO. It becomes an aspect when it is declared as an aspect in the Spring context. LoggingAspect can be applied to the BookServiceImpl without the BookServiceImpl needing to explicitly call on it. In fact, BookServiceImpl remains totally unaware of LoggingAspect’s existence. To make LoggingAspect work as an aspect, all you need to do is declare it as one in the Spring configuration file. Listing 5-21 illustrates the application context XML file that declares LoggingAspect as an aspect.
Listing 5-21. Configuration File
 1.    <?xml version="1.0" encoding="UTF-8"?>
 2.    <beans xmlns="http://www.springframework.org/schema/beans"
 3.        xmlns:xsi="http://www.w3.org/2001/XMLSchema-instance" xmlns:context=
           "http://www.springframework.org/schema/context"
 4.        xmlns:aop="http://www.springframework.org/schema/aop"
 5.        xsi:schemaLocation="http://www.springframework.org/schema/beans
 6.            http://www.springframework.org/schema/beans/spring-beans-3.2.xsd
 7.            http://www.springframework.org/schema/context
 8.            http://www.springframework.org/schema/context/spring-context-3.2.xsd
 9.            http://www.springframework.org/schema/aop
10.            http://www.springframework.org/schema/aop/spring-aop-3.2.xsd">
11.
12.
13.        <bean id="bookService" class="com.apress.aop.BookServiceImpl"/>
14.
15.        <bean id="logAspect" class="com.apress.aop.LoggingAspect"/>
16.
17.        <aop:config>
18.            <aop:aspect  ref = "logAspect">
19.                <aop:pointcut id = "log"
20.                    expression="execution(* *.getAllBooks())" />
21.                <aop:before  pointcut-ref = "log"
22.                    method="logBefore" />
23.                <aop:after  pointcut-ref = "log"
24.                    method="logAfter" />
25.            </aop:aspect>
26.        </aop:config>
27.    </beans>
- Lines 9 to 10: You use Spring’s aop configuration namespace to declare that the LoggingAspect bean is an aspect.
- Line 15: You declare the LoggingAspect as a bean. Even if the Spring Framework transforms a POJO to an aspect by declaring it as an aspect in the context, it still has to be declared as a Spring <bean>.
- Line 18: Then you refer to that bean in the <aop:aspect> element.
- Lines 19 to 20: The pointcut is defined in the preceding <pointcut> element with an expression attribute set to select where the advice should be applied. The expression syntax is AspectJ’s pointcut expression language.
- Lines 21 to 22: You declare (using <aop:before>) that before the getAllBooks() method is executed, the LoggingAspect’s logBefore method should be called. This is called before advice. The pointcut-ref attribute refers to a pointcut named log.
- Lines 23 to 24: You (using <aop:after>) declare that the logAfter method should be called after getAllBooks() has executed. This is known as after advice. The pointcut-ref attribute refers to a pointcut named log.
Listing 5-22 illustrates the stand-alone Java application.
Listing 5-22. Stand-Alone Java Application
1.    package com.apress.aop;
2.    import org.springframework.context.ApplicationContext;
3.    import org.springframework.context.support.ClassPathXmlApplicationContext;
4.
5.    public class Driver {
6.
7.            public static void main(String...args){
8.        ApplicationContext context = new ClassPathXmlApplicationContext("beans.xml");
9.
10.        BookService bookService = (BookService)context.getBean("bookService");
11.                bookService.getAllBooks();
12.
13.            }
14.    }
Figure 5-5 illustrates the directory structure of this application.

Figure 5-5. Directory structure
Thus, Spring AOP can be employed to provide services such as transactions and security declaratively without tangling up your code that, in first place, should remain concerned only with its business functions.
Removing Boilerplate Code Using Templates
In Chapter 1 we built the data access layer of the bookstore application and used pure JDBC in the BookDAOImpl to connect to the database. In this section, you will see how the Spring Framework, by means of Spring’s JDBCTemplate, transforms the BookDAOImpl, eliminating the boilerplate code that results from using pure JDBC to obtain a connection to a data store, and cleans up resources. The code for this application is available in the downloadable archive on the Apress web site. Listing 5-23 illustrates the BookService.
Listing 5-23. BookService
package com.apress.books.service;

import java.util.List;

import com.apress.books.model.Book;

public interface BookService {
    public List<Book> getAllBooks();

}
Listing 5-24 illustrates the BookService implementation.
Listing 5-24. BookService Implementation
package com.apress.books.service;

import java.util.List;

import com.apress.books.dao.BookDAO;
import com.apress.books.model.Book;

public class BookServiceImpl implements BookService{

    private  BookDAO bookDao ;


    public void setBookDao(BookDAO bookDao) {
        this.bookDao = bookDao;
    }


    public List<Book> getAllBooks() {
        List<Book> bookList = bookDao.findAllBooks();

        return bookList;
    }
}
Listing 5-25 illustrates the BookDAO.
Listing 5-25. BookDAO
package com.apress.books.dao;

import java.util.List;

import com.apress.books.model.Book;
import com.apress.books.model.Category;

public interface BookDAO {
    public List<Book> findAllBooks();

}
Listing 5-26 illustrates the BookDAO implementation.
Listing 5-26. BookDAO Implementation
 1.    package com.apress.books.dao;
 2.
 3.    import java.sql.Connection;
 4.    import java.sql.DriverManager;
 5.    import java.sql.PreparedStatement;
 6.    import java.sql.ResultSet;
 7.    import java.sql.SQLException;
 8.    import java.sql.Statement;
 9.    import java.util.ArrayList;
10.    import java.util.List;
11.
12.    import javax.sql.DataSource;
13.
14.    import org.springframework.beans.factory.annotation.Autowired;
15.    import org.springframework.jdbc.core.JdbcTemplate;
16.
17.    import com.apress.books.model.Author;
18.    import com.apress.books.model.Book;
19.    import com.apress.books.model.Category;
20.
21.    public class BookDAOImpl implements BookDAO {
22.
23.
24.        DataSource dataSource;
25.
26.
27.        public void setDataSource(DataSource dataSource) {
28.            this.dataSource = dataSource;
29.        }
30.
31.        public List<Book> findAllBooks() {
32.          List<Book> bookList = new ArrayList<>();
33.
34.        String sql = "select * from book inner join author on book.id = author.book_id";
35.
36.        JdbcTemplate jdbcTemplate = new JdbcTemplate(dataSource);
37.        bookList = jdbcTemplate.query(sql, new BookRowMapper());
38.          return bookList;
39.         }
40.
41.    }
Compare this findAllBooks() method of BookDAOImpl with the findAllBooks() method of Chapter 1, and you will see that JDBCTemplate eliminates the boilerplate code that results from using pure JDBC to obtain a connection to our data store and cleans up resources.
- Line 36: This creates a JDBCTemplate using the data source passed to it. Note the JDBCTemplate is instantiated this way for the sake of explanation. In a production ready application you should inject JDBCTemplate as a dependency like any other dependency as explained in Listing 5-15.
- Line 37: A row mapper implementation is used. The BookRowMapper is explained next.
Listing 5-27 illustrates the BookRowMapper object to query one or more rows and then transform each row into the corresponding domain object instead of retrieving a single value.
Listing 5-27. The BookMapper Object
 1.    package com.apress.books.dao;
 2.
 3.    import java.sql.ResultSet;
 4.    import java.sql.SQLException;
 5.
 6.    import org.springframework.jdbc.core.RowMapper;
 7.
 8.    import com.apress.books.model.Book;
 9.
10.    public class BookRowMapper implements RowMapper<Book> {
11.
12.         @Override
13.         public Book mapRow(ResultSet resultSet, int line) throws SQLException {
14.          BookExtractor bookExtractor = new BookExtractor();
15.          return bookExtractor.extractData(resultSet);
16.         }
17.
18.        }
- Line 10: Spring’s RowMapper<T> interface (under the package org.springframework.jdbc.core) provides a simple way for you to perform mapping from a JDBC resultset to POJOs.
- Line 14: This uses BookExtractor to extract the data.
Listing 5-28 illustrates the BookExtractor object.
Listing 5-28. BookExtractor Object
 1.    package com.apress.books.dao;
 2.
 3.    import java.sql.ResultSet;
 4.    import java.sql.SQLException;
 5.    import java.util.ArrayList;
 6.    import java.util.List;
 7.
 8.    import org.springframework.dao.DataAccessException;
 9.    import org.springframework.jdbc.core.ResultSetExtractor;
10.
11.    import com.apress.books.model.Author;
12.    import com.apress.books.model.Book;
13.
14.    public class BookExtractor implements ResultSetExtractor<Book> {
15.
16.         public Book extractData(ResultSet resultSet) throws SQLException,
17.           DataAccessException {
18.
19.          Book book = new Book();
20.          Author author = new Author();
21.        List<Author> authorList = new ArrayList<>();
22.
23.          book.setId(resultSet.getLong(1));
24.          book.setCategoryId(resultSet.getLong(2));
25.          book.setBookTitle(resultSet.getString(3));
26.          book.setPublisherName(resultSet.getString(4));
27.          book.setAuthorId(resultSet.getLong(5));
28.          author.setBookId(resultSet.getLong(6));
29.          author.setFirstName(resultSet.getString(7));
30.          author.setLastName(resultSet.getString(8));
31.          authorList.add(author);
32.          book.setAuthors(authorList);
33.
34.          return book;
35.         }
36.
37.        }
- Line 14: BookExtractor implements ResultSetExtractor provided by Spring (under the package org.springframework.jdbc.core). The RowMapper is suitable only for mapping to a single domain object. But since we are joining two tables in Listing 5-26 on line 34, we need to use the ResultSetExtractor interface to transform the data to a nested domain object.
Listing 5-29 illustrates the configuration file for this stand-alone application.
Listing 5-29. Configuration File
 1.    <?xml version="1.0" encoding="UTF-8"?>
 2.    <beans xmlns="http://www.springframework.org/schema/beans"
 3.        xmlns:xsi="http://www.w3.org/2001/XMLSchema-instance"xmlns:context=
           "http://www.springframework.org/schema/context"
 4.        xmlns:aop="http://www.springframework.org/schema/aop"
 5.        xsi:schemaLocation="http://www.springframework.org/schema/beans
 6.            http://www.springframework.org/schema/beans/spring-beans-3.2.xsd
 7.            http://www.springframework.org/schema/context
 8.            http://www.springframework.org/schema/context/spring-context-3.2.xsd
 9.            http://www.springframework.org/schema/aop
10.            http://www.springframework.org/schema/aop/spring-aop-3.2.xsd">
11.
12.            <!-- telling container to take care of annotations stuff -->
13.    <context:annotation-config />
14.
15.    <!-- declaring base package -->
16.    <context:component-scan base-package="com.apress.books" />
17.
18.
19.        <bean id="dao" class="com.apress.books.dao.BookDAOImpl" >
20.        <property name="dataSource" ref="dataSource">
21.            </property>
22.        </bean>
23.
24.        <bean id="service" class="com.apress.books.service.BookServiceImpl">
25.            <property name="bookDao" ref="dao">
26.            </property>
27.        </bean>
28.
29.        <bean id="dataSource"
30.      class="org.springframework.jdbc.datasource.DriverManagerDataSource">
31.    <property name="driverClassName" value="com.mysql.jdbc.Driver" />
32.    <property name="url" value="jdbc:mysql://localhost:3306/books" />
33.    <property name="username" value="root" />
34.    <property name="password" value="password" />
35.    </bean>
36.    </beans>
In this way, the Spring Framework eliminates the boilerplate code. Now with a stand-alone Java application you can query the new data access layer that we built using the Spring Framework. Listing 5-30 illustrates the stand-alone Java application that queries the data access through the service-layer component BookService.
Listing 5-30. Stand-Alone Application
package com.apress.books.client;
import java.util.List;
import org.springframework.context.ApplicationContext;
import org.springframework.context.support.ClassPathXmlApplicationContext;
import com.apress.books.model.Book;
import com.apress.books.service.BookService;

public class BookApp {

    public static void main(String[] args) {
        ApplicationContext context = new ClassPathXmlApplicationContext("beans.xml");
        BookService bookService = (BookService)context.getBean("service");
        // List all books
        System.err.println("Listing all Books:");
        List<Book> bookList= bookService.getAllBooks();
        for(Book b: bookList){
            System.out.println(b.getId()+"--"+b.getBookTitle());
        }
    }
}
In this section, you learned the key objectives of the Spring Framework, which aims to simplify the complexity that trickles into any enterprise application via tight coupling, cross-cutting concerns, and boilerplate code. In the next section, we will implement the web layer using the Web MVC module of the Spring Framework.
Building Web Application with Spring Web MVC
In Chapter 1, Spring Web MVC provided the Model-View-Controller architecture and myriad of components that together help you develop loosely coupled web applications built on the Spring IoC container.
Spring Web MVC Architecture
Spring’s Web MVC framework, like many other web MVC frameworks, is request-driven, designed around a central servlet called DispatcherServlet that dispatches requests to controllers and offers other functionality that facilitates the development of web applications. DispatcherServlet implements one of the Java EE web-tier patterns, called Front Controller. As such, DispatcherServlet acts as the front controller of the Spring MVC framework, and every web request has to go through it so that it can control and administer the entire request-handling process. The request-processing workflow of the Spring Web MVC DispatcherServlet is illustrated in Figure 5-6.
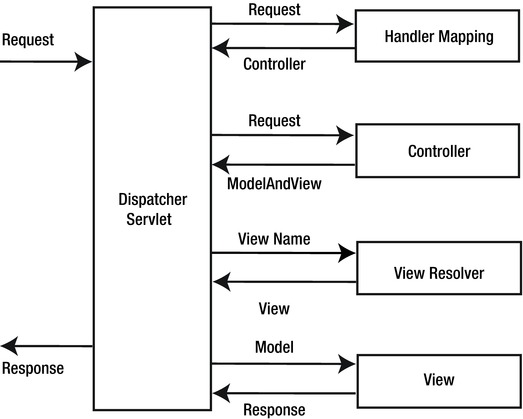
Figure 5-6. Request-processing workflow of the Spring Web MVC DispatcherServlet
Following from Figure 5-6, the high-level overview of the workflow is as follows:
- The client sends a request to the web container in the form of an HTTP request.
- DispatcherServlet intercepts the request to figure out the appropriate handler mappings.
- With the help of handler mappings thus figured out, the DispatcherServlet dispatches the request to the appropriate controller.
- The controller processes the request and returns the model and view objects to DispatcherServlet in the form of a ModelAndView instance.
- DispatcherServlet then resolves the View (which can be JSP, FreeMarker, Velocity, and so on) by consulting the ViewResolver object.
- The selected view is then rendered back to the client.
DispatcherServlet is the heart of Spring Web MVC framework, but before you dive into DispatcherServlet, first you must look at ApplicationContext in a web application. As mentioned earlier, a web application has its own specialized WebApplicationContext that must be loaded before DispatcherServlet is initialized. When the Spring Web MVC application starts and before the web application is ready to serve the requests, the WebApplicationContext and DispatcherServlet come into action, as explained here:
- The servlet container initializes the web application and then triggers the contextInitialized event, which is listened to by the ContextLoaderListener.
- ContextLoaderListener creates the root WebApplicationContext.
- The DispatcherServlet is initialized, creating its own WebApplicationContext and nesting it inside the root WebApplicationContext.
- DispatcherServlet searches for components such as ViewResolvers and HandlerMappings. If a component is found, it will be initialized; otherwise, the default for the component is initialized.
You will look at these steps in greater detail in the sections that follow.
WebApplicationContext
In web applications, the ApplicationContext used is called WebApplicationContext, and it is a specialized ApplicationContext that is aware of the servlet environment. It is the root ApplicationContext in a web application and must be loaded before DispatcherServlet initializes to ensure that all of the services such as the data source are available that are required by the web application. WebApplicationContext is configured in the web.xml file using ContextLoaderListener, as illustrated in Listing 5-31.
Listing 5-31. Configuring ContextLoaderListener in web.xml
<listener>
<listener-class>
org.springframework.web.context.ContextLoaderListener
</listener-class>
</listener>
By default, ContextLoaderListener loads the application context file stored in your WEB-INF directory. This location can be overridden by defining the contextConfigLocation context parameter in web.xml, as shown in Listing 5-32.
Listing 5-32. File Locations Using the contextConfigLocation Parameter
<context-param>
<param-name>contextConfigLocation</param-name>
<param-value>
classpath:service-context.xml
classpath:data-access-context.xml
</param-value>
</context-param>
At this point, the configuration of WebApplicationContext in web.xml looks like Listing 5-33.
Listing 5-33. Web.xml with ContextLoaderListener and contextConfigLocation
<context-param>
<param-name>contextConfigLocation</param-name>
<param-value>
classpath:service-context.xml
classpath:data-access-context.xml
</param-value>
</context-param>
<listener>
<listener-class>
org.springframework.web.context.ContextLoaderListener
</listener-class>
</listener>
Note ContextLoaderListener by default looks for a /WEB-INF/applicationContext.xml file if you do not specify a <context-param> named contextConfigLocation.
Now that you know how to configure WebApplicationContext in a web application, we can move on to the second object, DispatcherServlet, that is configured in the web.xml file.
The DispatcherServlet
Like any servlet, DispatcherServlet needs to be configured in web.xml to be able to handle requests. Configuring and using the DispatcherServlet requires the following:
- You have to indicate to the container to load DispatcherServlet and map it to URL patterns.
- After the DispatcherServlet is loaded, it creates its own org.springframework.web.context.WebApplicationContext.
- The DispatcherServlet then detects the SpringMVC components from this application context, and if not found, it will use the default. These SpringMVC components and their defaults will be explained later.
- DispatcherServlet then delegates tasks to each of the SpringMVC components (or their defaults) depending on the request.
Note DispatcherServlet creates its own WebApplicationContext, which contains the web-specific components such as Controllers and ViewResolver. This WebApplicationContext is then nested inside the root WebApplicationContext, which is loaded before the DispatcherServlet is initialized to ensure that the web components in WebApplicationContext of DispatcherServlet can find their dependencies.
DispatcherServlet, like any other servlet, is declared in the web.xml file of your web application. You need to map requests that you want DispatcherServlet to handle, by using a URL mapping in the same web.xml file. Listing 5-34 illustrates a DispatcherServlet declaration and mapping.
Listing 5-34. Declaring and Mapping DispatcherServlet
<web-app>
<servlet>
<servlet-name>bookstore</servlet-name>
<servlet-class>org.springframework.web.servlet.DispatcherServlet</servlet-class>
<load-on-startup>1</load-on-startup>
</servlet>
<servlet-mapping>
<servlet-name>bookstore</servlet-name>
<url-pattern>/bookstore/*</url-pattern>
</servlet-mapping>
</web-app>
In a Servlet 3.0 and newer environment, you can also use WebApplicationInitializer, an interface provided by the Spring MVC framework, to configure the servlet container programmatically. Listing 5-35 illustrates the programmatic equivalent of the previous web.xml example.
Listing 5-35. Programmatic Equivalent of Listing 5-43
public class ExampleWebApplicationInitializer implements WebApplicationInitializer {
    @Override
    public void onStartup(ServletContext container) {
        ServletRegistration.Dynamic registration = container.addServlet("dispatcher", new DispatcherServlet());
        registration.setLoadOnStartup(1);
        registration.addMapping("/bookstore/*");
    }
}
By default, DispatcherServlet looks for a file named WEB-INF/<servlet-name>-servlet.xml, where <servlet-name> is replaced with the value declared in web.xml in the <servlet-name> tag. DispatcherServlet uses this <servlet-name>-servlet.xml file to create WebApplicationContext.
Spring MVC Components
As mentioned earlier, DispatcherServlet searches the SpringMVC components from the WebApplicationContext it created, and if not found, it uses the default. These Spring MVC components are expressed as interfaces. Table 5-6 gives an overview of all the main component types involved in the request-processing workflow.
Table 5-6. Spring MVC Components
Bean type |
Explanation |
|---|---|
HandlerMapping |
Maps incoming requests to handlers and interceptors |
HandlerAdapter |
For extending DispatcherServlet to customize the web workflow |
HandlerExceptionResolver |
Maps exceptions to views |
ViewResolver |
Resolves logical view names to actual views |
LocaleResolver |
Resolves the locale a client is using for internationalized views |
ThemeResolver |
Resolves themes for personalizing layouts |
MultipartResolver |
Parses multipart for file uploads |
FlashMapManager |
Supports FlashMap to pass attributes from one request to another |
The Spring DispatcherServlet uses Spring MVC components that need to be configured in WebApplicationContext to process requests. However, if you don’t configure these components, Spring Web MVC uses the default. Table 5-7 lists the default implementation of the components.
Table 5-7. The DispatcherServlet’s Default Components
Component |
Default Implementation |
|---|---|
MultipartResolver |
No default; explicit configuration required |
LocaleResolver |
AcceptHeaderLocaleResolver |
ThemeResolver |
FixedThemeResolver |
HandlerMapping |
BeanNameUrlHandlerMapping |
HandlerAdapter |
HttpRequestHandlerAdapter |
HandlerExceptionResolver |
AnnotationMethodHandlerExceptionResolver |
RequestToViewNameTranslator |
DefaultRequestToViewNameTranslator |
ViewResolver |
InternalResourceViewResolver |
FlashMapManager |
SessionFlashMapManager |
Getting Started with a Spring Web MVC Application
In this section, I will walk you through the steps of creating a Hello World Spring MVC application using Spring Tool Suite (an Eclipse-based IDE). You will learn the fundamental concepts of Spring MVC while building the sample application. The tools used in this application include the following:
- Spring Framework 3.2.1
- Spring Tool Suite IDE 3.2.0 (based on Eclipse Juno 4.2.2)
- vFabric tc Server Developer Edition v2.8 (based on Apache Tomcat and optimized for Spring applications)
Spring Tool Suite (STS) is an Eclipse-based IDE that is actively developed and maintained by the SpringSource community. STS provides project templates such as Spring Batch, Spring Integration, Spring Persistence (Hibernate + JPA), Spring MVC, and so on. In addition, STS always gets the latest update of Spring artifacts from the Maven repository.
You can choose to download and install STS in one of three ways:
- Download and install STS from the installer program.
- Install STS through an Eclipse update.
- Download and extract the zip archive.
Start STS in your own workspace. From the main menu, select File ![]() New
New ![]() Spring Template Project (see Figure 5-7).
Spring Template Project (see Figure 5-7).

Figure 5-7. Selecting a SpringTemplate project
In the New Template Project dialog, select Spring MVC Project (see Figure 5-8).
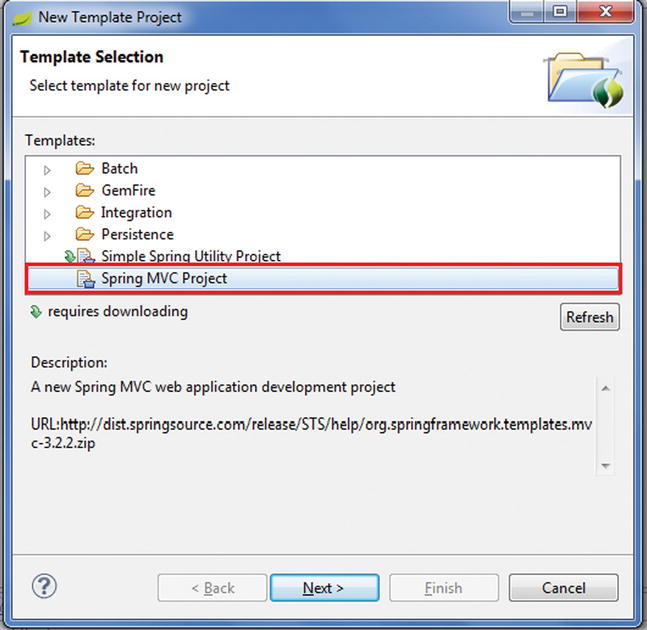
Figure 5-8. Selecting a SpringMVC project
Click Next, which requires downloading an update of the template, as shown in Figure 5-9 (for the first time you use this template or whenever an update is available).

Figure 5-9. Downloading the update
Click Yes to download the update, which should bring up the New Spring MVC Project dialog.
Enter the following information in the window illustrated in Figure 5-10:
- Project name: helloworld
- Top-level package: com.apress.helloworld
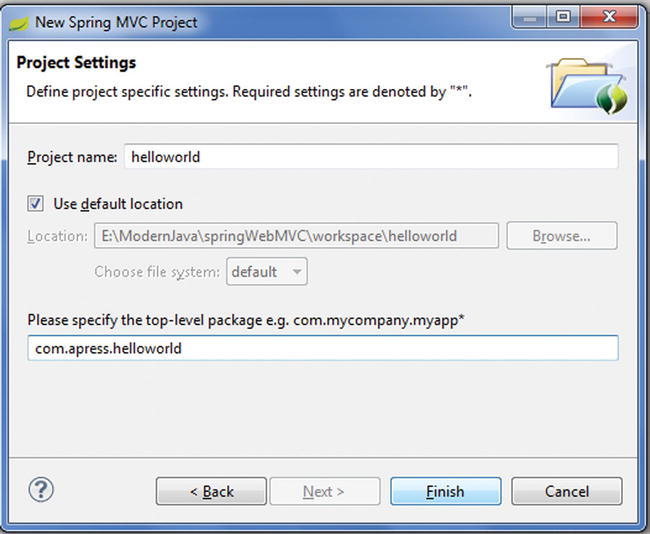
Figure 5-10. New Spring MVC Project dialog
Click Finish, and STS will create a Spring MVC-based project with some defaults for the controller, views, and configuration. We didn’t write any lines of code yet, but the application is ready to be deployed and run.
Right-click in the Servers view and select New ![]() Server.
Server.
In the New Server dialog, select VMware ![]() VMware vFabric tc Server..., as shown in Figure 5-11.
VMware vFabric tc Server..., as shown in Figure 5-11.
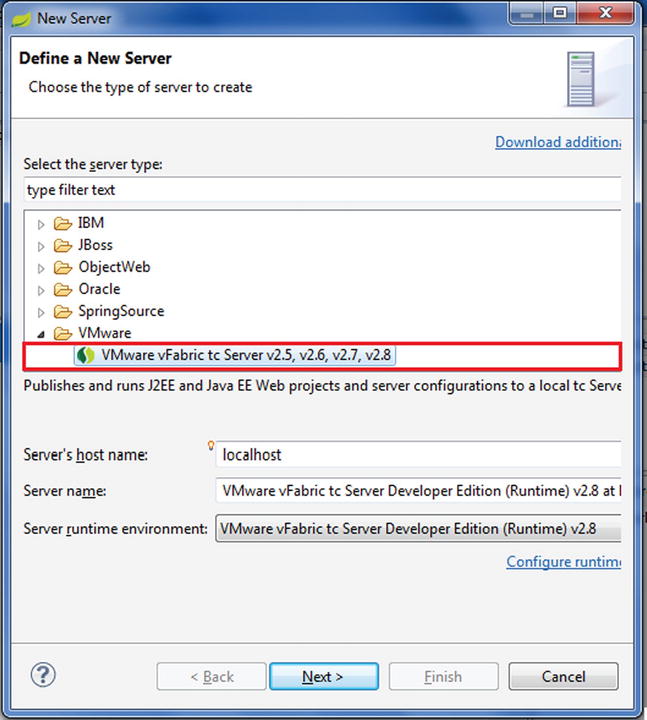
Figure 5-11. Defining a new server
Click Next. On the next screen, keep the option “Create new instance” selected (see Figure 5-12).
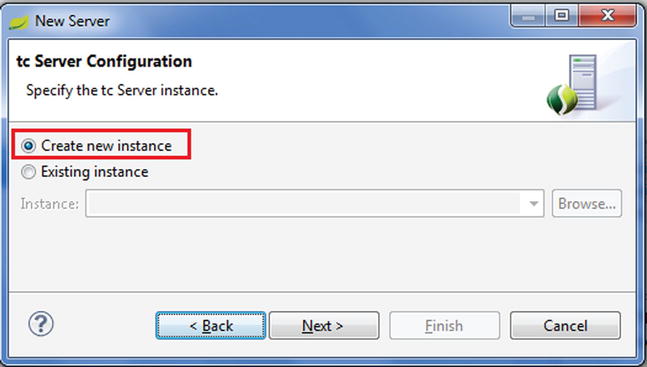
Figure 5-12. Creating a new instance
Click Next. On the next screen, type tcServer as name for the new instance and select base as the template (see Figure 5-13).
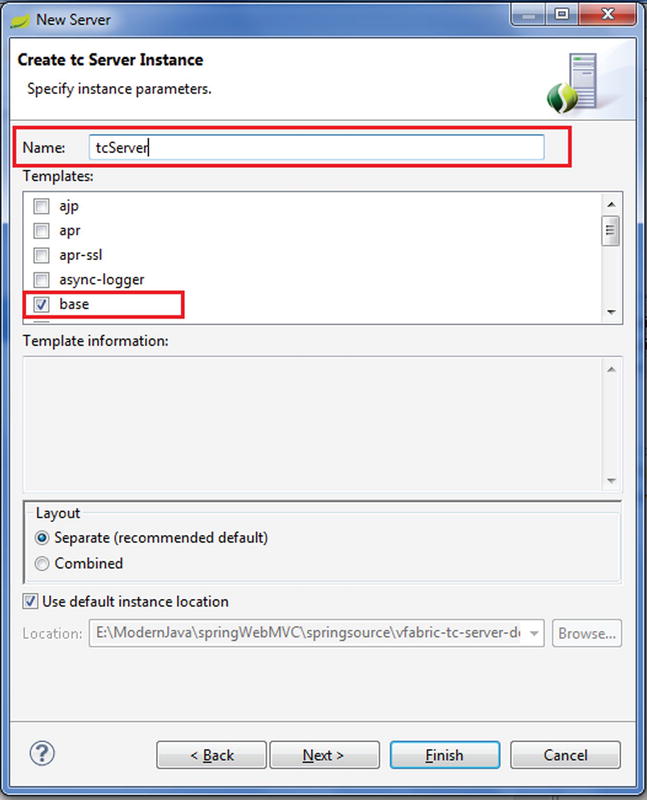
Figure 5-13. Specifying instance parameters
Add helloworld and click Finish to complete the server setup (see Figure 5-14). Now deploy the helloworld application.
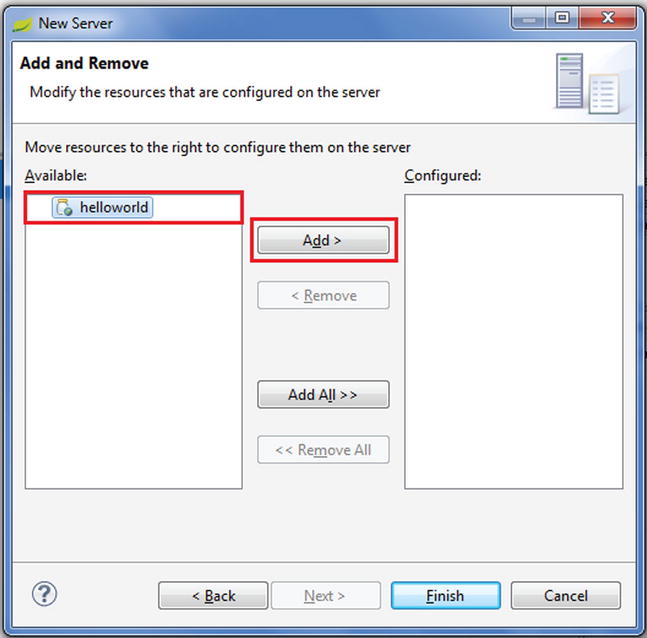
Figure 5-14. Configuring resources on the server
The application is deployed on the server if we see it under the server name, as illustrated in Figure 5-15.
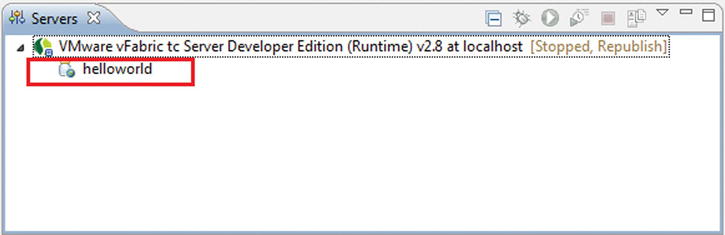
Figure 5-15. Deployed application
Start the server and run the application using the URLhttp://localhost:8080/helloworld (see Figure 5-16).
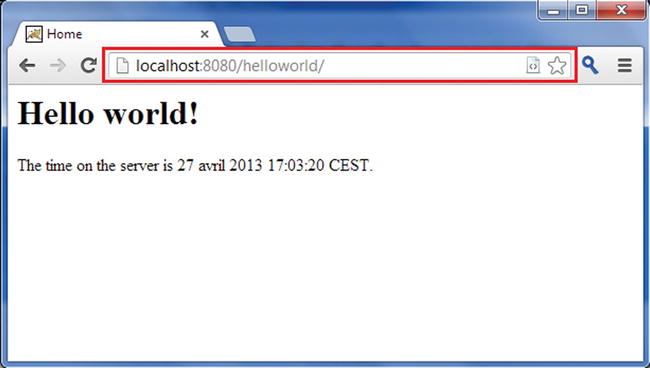
Figure 5-16. Running the application
Now let’s explore what has been created by the Spring MVC Project template. Expand the branches in the Project Explorer view to see how the project is structured, as illustrated in Figure 5-17.
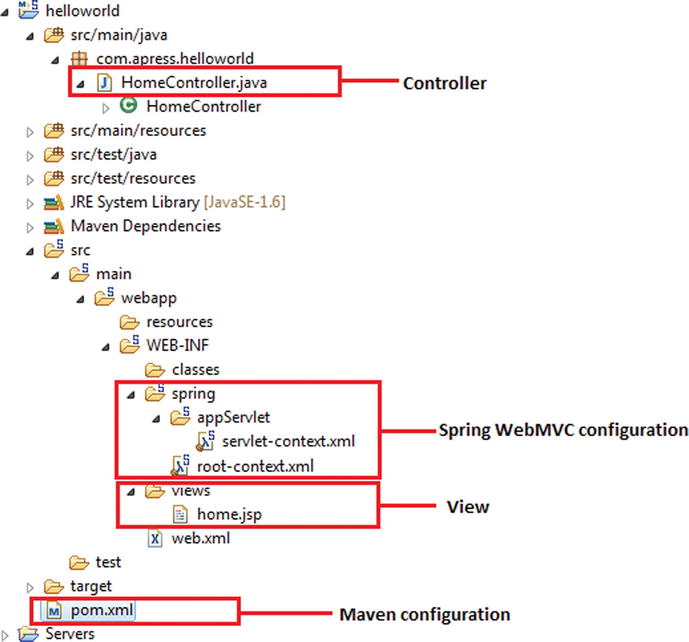
Figure 5-17. Directory structure of the Hello World application
We will go through each of the components illustrated in Figure 5-17. Figure 5-18 illustrates the content of the generated web.xml file.
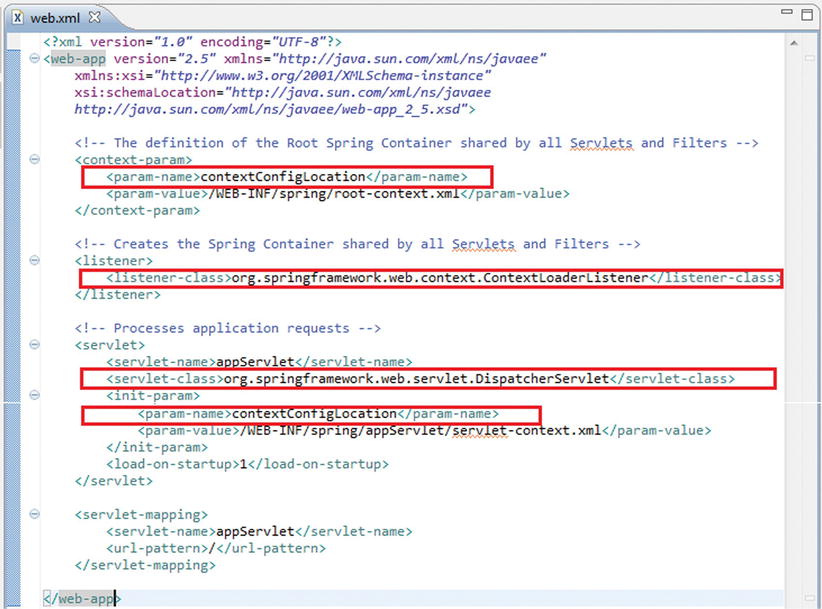
Figure 5-18. Generated web.xml
This is the typical configuration for a Spring MVC-based application with a declaration for the following:
- Spring’s ContextLoaderListener
- Spring’s DispatcherServlet
- Spring configuration file root-context.xml
- Spring configuration file servlet-context.xml
- The URL mapping for Spring’s DispatcherServlet
We will look at the use of each one of these, but before that, we will modify web.xml. In the Spring MVC template project, the web.xml file it generates supports Servlet 2.5. In this chapter, we will use Servlet 3.0 (the tcServer that comes with STS is built on top of Apache Tomcat 7, which already supports Servlet 3.0), so we need to change the XML header from 2.5 to 3.0 too. Listing 5-36 shows the revised <web-app> tag.
Listing 5-36. The Web Deployment Description for Spring MVC
 1.    <?xml version="1.0" encoding="UTF-8"?>
 2.    <web-app xmlns="http://java.sun.com/xml/ns/javaee" xmlns:xsi=
       "http://www.w3.org/2001/XMLSchema-instance"
 3.        xsi:schemaLocation="http://java.sun.com/xml/ns/javaee
           http://java.sun.com/xml/ns/javaee/web-app_3_0.xsd"
 4.        version="3.0">
 5.
 6.        <!-- The definition of the Root Spring Container shared by all Servlets and Filters -->
 7.        <context-param>
 8.            <param-name>contextConfigLocation</param-name>
 9.            <param-value>/WEB-INF/spring/root-context.xml</param-value>
10.        </context-param>
11.
12.        <!-- Creates the Spring Container shared by all Servlets and Filters -->
13.        <listener>
14.            <listener-class>org.springframework.web.context.ContextLoaderListener</listener-class>
15.        </listener>
16.
17.        <!-- Processes application requests -->
18.        <servlet>
19.            <servlet-name>appServlet</servlet-name>
20.            <servlet-class>org.springframework.web.servlet.DispatcherServlet</servlet-class>
21.            <init-param>
22.                <param-name>contextConfigLocation</param-name>
23.                <param-value>/WEB-INF/spring/appServlet/servlet-context.xml</param-value>
24.            </init-param>
25.            <load-on-startup>1</load-on-startup>
26.        </servlet>
27.
28.        <servlet-mapping>
29.            <servlet-name>appServlet</servlet-name>
30.            <url-pattern>/</url-pattern>
31.        </servlet-mapping>
32.
33.    </web-app>
- Lines 2 to 4: In the <web-app> tag, the version attribute and the corresponding URL are changed to version 3.0 to indicate to the web container that the web application will use Servlet 3.0.
- Lines 7 to 10: In the <context-param> tag, the contextConfigLocation param is provided, which defines the location of Spring’s root WebApplicationContext configuration file.
- Lines 13 to 15: A listener of class org.springframework.web.context.ContextLoaderListener is defined. This is for Spring to load the root WebApplicationContext.
- Lines 18 to 26: One dispatcher servlet (called appServlet) is defined. We use the one generated by the template project for the application’s presentation layer. The WebApplicationContext for the dispatcher servlet is located at /src/main/webapp/WEB-INF/spring/appServlet/servlet-context.xml.
The servlet-context.xml file is loaded by the Spring’s DispatcherServlet, which receives all requests coming into the application. Listing 5-37 illustrates servlet-context.xml.
Listing 5-37. The servlet-context.xml of the Hello World Application
 1.    <?xml version="1.0" encoding="UTF-8"?>
 2.    <beans:beans xmlns="http://www.springframework.org/schema/mvc"
 3.        xmlns:xsi="http://www.w3.org/2001/XMLSchema-instance"
 4.        xmlns:beans="http://www.springframework.org/schema/beans"
 5.        xmlns:context="http://www.springframework.org/schema/context"
 6.        xsi:schemaLocation="http://www.springframework.org/schema/mvc
 7.        http://www.springframework.org/schema/mvc/spring-mvc.xsd
 8.            http://www.springframework.org/schema/beans
 9.            http://www.springframework.org/schema/beans/spring-beans.xsd
10.            http://www.springframework.org/schema/context
11.            http://www.springframework.org/schema/context/spring-context.xsd">
12.
13.        <!-- DispatcherServlet Context: defines this servlet's request-processing
14.        infrastructure -->
15.
16.        <!-- Enables the Spring MVC @Controller programming model -->
17.        <annotation-driven />
18.
19.        <!-- Handles HTTP GET requests for /resources/** by efficiently serving up
20.        static resources in the ${webappRoot}/resources directory -->
21.        <resources mapping="/resources/**" location="/resources/" />
22.
23.        <!-- Resolves views selected for rendering by @Controllers to .jsp resources
24.        in the /WEB-INF/views directory -->
25.        <beans:bean class="org.springframework.web.servlet.view.InternalResourceViewResolver">
26.            <beans:property name="prefix" value="/WEB-INF/views/" />
27.            <beans:property name="suffix" value=".jsp" />
28.        </beans:bean>
29.
30.        <context:component-scan   base-package="com.apress.helloworld" />
31.
32.
33.
34.    </beans:beans>
- Line 17: <annotation-driven /> tells the framework to use an annotations-based approach to scan files in the packages. Thus, we can use the @Controller annotation for the controller class instead of declaring XML elements.
- Line 21: <resources mapping=.../> maps static resources directly with HTTP GET requests. For example, images, JavaScript, and CSS resources do not have to go through controllers.
- Lines 25 to 28: This bean declaration tells the framework how to find physical JSP files according to logical view names returned by the controllers, by attaching the prefix and the suffix to a view name. For example, if a controller’s method returns home as logical view name, then the framework will find a physical file home.jsp under the /WEB-INF/views directory.
- Line 30: <context:component-scan .../> tells the framework which packages to be scanned when using an annotations-based strategy. Here the framework will scan all classes under the package com.apress.helloworld. When the application grows, you can add more configurations for business beans, DAOs, transactions, and so on.
Now that we have the infrastructure in place to detect the controller that will handle the request, it’s time to look at the controller.
Note Prior to Spring 2.5, one of the interface-based controllers was used. As of Spring 3.0, the interface-based controllers have been deprecated in favor of annotated classes.
Listing 5-38 illustrates the code of the controller class HomeController generated by STS.
Listing 5-38. HomeController of the Hello World Application
 1.    package com.apress.helloworld;
 2.
 3.    import java.text.DateFormat;
 4.    import java.util.Date;
 5.    import java.util.Locale;
 6.
 7.    import org.slf4j.Logger;
 8.    import org.slf4j.LoggerFactory;
 9.    import org.springframework.stereotype.Controller;
10.    import org.springframework.ui.Model;
11.    import org.springframework.web.bind.annotation.RequestMapping;
12.    import org.springframework.web.bind.annotation.RequestMethod;
13.
14.    /**
15.     * Handles requests for the application home page.
16.     */
17.    @Controller
18.    public class HomeController {
19.
20.        private static final Logger logger = LoggerFactory.getLogger(HomeController.class);
21.
22.        /**
23.         * Simply selects the home view to render by returning its name.
24.         */
25.        @RequestMapping(value = "/", method = RequestMethod.GET)
26.        public  String  home(Locale locale, Model model) {
27.            logger.info("Welcome home! The client locale is {}.", locale);
28.
29.            Date date = new Date();
30.            DateFormat dateFormat = DateFormat.getDateTimeInstance(DateFormat.LONG,
               DateFormat.LONG, locale);
31.
32.            String formattedDate = dateFormat.format(date);
33.
34.            model.addAttribute("serverTime", formattedDate );
35.
36.            return "home";
37.        }
38.
39.    }
- Line 17: The @Controller annotation is used to specify that this class is a Spring controller. DispatcherServlet scans such annotated classes for mapped handler methods by means of @RequestMapping annotations.
- Line 25: The @RequestMapping annotation specifies that the home() method will handle a GET request with the URL / (the default page of the application).
- Line 26 to 37: The home() method creates a String object to hold the current date based on the current locale and adds this object to the model with the name serverTme. And finally the method returns a view named home, which will be resolved by the view resolver specified in the servlet-context.xml file, to find the actual view file. In one controller class, we can write many methods to handle different URLs.
@Controller and @RequestMapping and a number of other annotations form the basis for the Spring MVC implementation. To define a controller class in Spring 3.0 and newer, you have to mark the class with the @Controller annotation. When an @Controller-annotated class receives a request, it looks for an appropriate handler method to handle the request. Each method to which the request is to be mapped is decorated with the @RequestMapping annotation, making the method a handler method to which the request is mapped by means of handler mappings.
As you saw in Listing 5-38, the home() method in HomeController returns a view named home, which is resolved by the view resolver specified in servlet-context.xml. Now it is time to look at the view, which is the home.jsp file generated in the /WEB-INF/views directory. Listing 5-39 illustrates home.jsp.
Listing 5-39. home.jsp of the Hello World Application
 1.    <%@ taglib uri="http://java.sun.com/jsp/jstl/core" prefix="c" %>
 2.    <%@ page session="false" %>
 3.    <html>
 4.    <head>
 5.        <title>Home</title>
 6.    </head>
 7.    <body>
 8.    <h1>
 9.        Hello world!
10.    </h1>
11.
12.    <P>  The time on the server is ${serverTime}. </P>
13.    </body>
14.    </html>
Listing 5-39 looks familiar. This is a simple JSP file that uses an EL expression on line 12 to print the value of the variable serverTime that is passed by the controller.
As you may have noticed, STS created two Spring configuration files: root-context.xml and servlet-context.xml. We have not looked at root-context.xml yet because our Hello World application does not require this file to display the content of home.jsp. This file is empty by default, as illustrated in Figure 5-19.
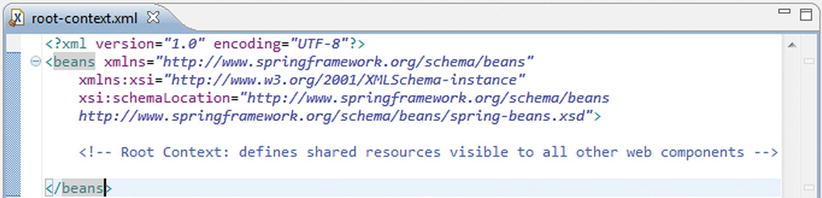
Figure 5-19. Generated root-context.xml
This file, as the name suggests, specifies the root configuration for the Spring container. The root-context.xml file is loaded by the Spring’s ContextLoaderListener upon the application’s start-up, as you learned in the previous section.
So far, we have gone through all the files generated by the Spring MVC Project template, so you should be equipped enough to dive deeper, building the bookstore application along the way.
Implementing Spring Web MVC in the Bookstore Application
In this section, you will learn how to develop the bookstore web application using the Spring Web MVC framework. The code for the application is available as a downloadable archive from the Apress web site. As mentioned earlier, all incoming requests flow through DispatcherServlet. Hence, like any other servlet in a Java EE application, the Java EE container needs to be informed to load this servlet on start-up via web.xml. You have to create a new Spring MVC project first. Listing 5-40 illustrates web.xml of the bookstore application.
Listing 5-40. web.xml
 1.    <?xml version="1.0" encoding="UTF-8"?>
 2.    <web-app xmlns="http://java.sun.com/xml/ns/javaee" xmlns:xsi=
       "http://www.w3.org/2001/XMLSchema-instance"
 3.        xsi:schemaLocation="http://java.sun.com/xml/ns/javaee
           http://java.sun.com/xml/ns/javaee/web-app_3_0.xsd"
 4.        version="3.0">
 5.        <!-- Processes application requests -->
 6.        <servlet>
 7.            <servlet-name>bookstore</servlet-name>
 8.            <servlet-class>org.springframework.web.servlet.DispatcherServlet</servlet-class>
 9.            <init-param>
10.                <param-name>contextConfigLocation</param-name>
11.                <param-value>/WEB-INF/spring/bookstore/bookstore-servlet.xml</param-value>
12.            </init-param>
13.            <load-on-startup>1</load-on-startup>
14.        </servlet>
15.
16.        <servlet-mapping>
17.            <servlet-name>bookstore</servlet-name>
18.            <url-pattern>*.html</url-pattern>
19.        </servlet-mapping>
20.
21.        <welcome-file-list>
22.            <welcome-file>/list_book.html</welcome-file>
23.        </welcome-file-list>
24.    </web-app>
- Lines 7 to 8: DispatcherServlet is registered as a servlet called bookstore.
- Line 10: The Spring configuration file can be explicitly specified in the contextConfigLocation servlet parameter to ask Spring to load the configurations besides the default <servletname>-servlet.xml.
Listing 5-41 illustrates bookstore-servlet.xml.
Listing 5-41. bookstore-servlet.xml
 1.    <?xml version="1.0" encoding="UTF-8"?>
 2.    <beans:beans xmlns="http://www.springframework.org/schema/mvc"
 3.        xmlns:xsi="http://www.w3.org/2001/XMLSchema-instance" xmlns:beans=
           "http://www.springframework.org/schema/beans"
 4.        xmlns:context="http://www.springframework.org/schema/context"
 5.        xsi:schemaLocation="http://www.springframework.org/schema/mvc
           http://www.springframework.org/schema/mvc/spring-mvc.xsd
 6.            http://www.springframework.org/schema/beanshttp://www.springframework.org/schema/
               beans/spring-beans.xsd
 7.            http://www.springframework.org/schema/contexthttp://www.springframework.org/schema/
               context/spring-context.xsd">
 8.
 9.        <!-- DispatcherServlet Context: defines this servlet's request-processing
10.            infrastructure -->
11.
12.        <beans:bean name="/list_book.html"
13.            class="com.apress.bookstore.controller.BookController" />
14.
15.        <!-- Resolves views selected for rendering by @Controllers to .jsp resources
16.            in the /WEB-INF/views directory -->
17.        <beans:bean
18.            class="org.springframework.web.servlet.view.InternalResourceViewResolver">
19.            <beans:property name="prefix" value="/WEB-INF/views/" />
20.            <beans:property name="suffix" value=".jsp" />
21.        </beans:bean>
22.    </beans:beans>
23.
As soon as the user requests a list of books using http://localhost:8080/bookstore, the request hits the servlet engine, which routes the call to the bookstore web app, which is deployed in the servlet container. The web.xml file shown in Listing 5-40 provides the welcome file that should serve the request.
21.        <welcome-file-list>
22.            <welcome-file>/list_book.html</welcome-file>
23.        </welcome-file-list>
The URL in the welcome file matches the URL pattern that has been registered for DispatcherServlet, and the request is routed to it. Based on the configuration available in bookstore-servlet.xml, the request is routed to a specific controller, illustrated in line 12 of Listing 5-41. Here the list_book.html file is declared as a bean and mapped to the BookController class. This means if a URL with /list_book.html is requested, it will ask the BookController to handle the request. Listing 5-42 illustrates the interface-based BookController. Later you will see how to replace this interface-based controller with an annotated controller.
Listing 5-42. Interface-Based Controller for the Bookstore Application
 1.    package com.apress.bookstore.controller;
 2.
 3.    import javax.servlet.http.HttpServletRequest;
 4.    import javax.servlet.http.HttpServletResponse;
 5.
 6.    import org.springframework.web.servlet.ModelAndView;
 7.    import org.springframework.web.servlet.mvc.Controller;
 8.
 9.    import com.apress.bookstore.service.BookService;
10.
11.    public class BookController implements Controller{
12.
13.        @Override
14.        public ModelAndView handleRequest(HttpServletRequest arg0,
15.                HttpServletResponse arg1) throws Exception {
16.            BookService bookservice = new BookService();
17.            ModelAndView modelAndView = new ModelAndView("bookList");
18.            modelAndView.addObject("bookList", bookservice.getBookList());
19.            return modelAndView;
20.        }
21.    }
The controller instantiates the BookService that is responsible for returning the required book data. ModelAndView("booklist") calls the view named bookList by passing bookList to Spring’s view resolver to identify which view should be returned to the user. In this case, the BookController returns a ModelAndView object named bookList. The fragment of the view resolver in bookstore-servlet.xml (from Listing 5-41) is shown here:
17.        <beans:bean
18.            class="org.springframework.web.servlet.view.InternalResourceViewResolver">
19.            <beans:property name="prefix" value="/WEB-INF/views/" />
20.            <beans:property name="suffix" value=".jsp" />
21.        </beans:bean>
Based on the definition, the view resolver finds the file using the following mechanism:
Prefix + ModelAndView name + suffix, which translates to : /WEB-INF/jsp/bookList.jsp
ModelAndView.addObject("bookList", bookService.getBookList()) adds the book data returned by getBookList() to the model named bookList, which is formatted and rendered by the view.
Finally, the servlet engine renders the response via the specified JSP illustrated in Listing 5-43.
Listing 5-43. View
 1.    <%@page contentType="text/html" pageEncoding="UTF-8"%>
 2.    <%@ taglib prefix="c" uri="http://java.sun.com/jsp/jstl/core"%>
 3.    <!DOCTYPE html>
 4.    <html>
 5.    <head>
 6.    <meta http-equiv="Content-Type" content="text/html; charset=UTF-8">
 7.    <title>Your Book store</title>
 8.    </head>
 9.    <body>
10.        <h1>Books List</h1>
11.        <table border="1">
12.            <tr>
13.                <th align="left">Author</th>
14.                <th align="left">Book Title</th>
15.            </tr>
16.            <c:forEach items="${bookList}" var="book">
17.                <tr>
18.                    <td>${book.author.authorName}</td>
19.
20.                    <td>${book.bookTitle}</td>
21.                </tr>
22.            </c:forEach>
23.        </table>
24.    </body>
25.    </html>
Figure 5-20 illustrates the directory structure of the bookstore application.
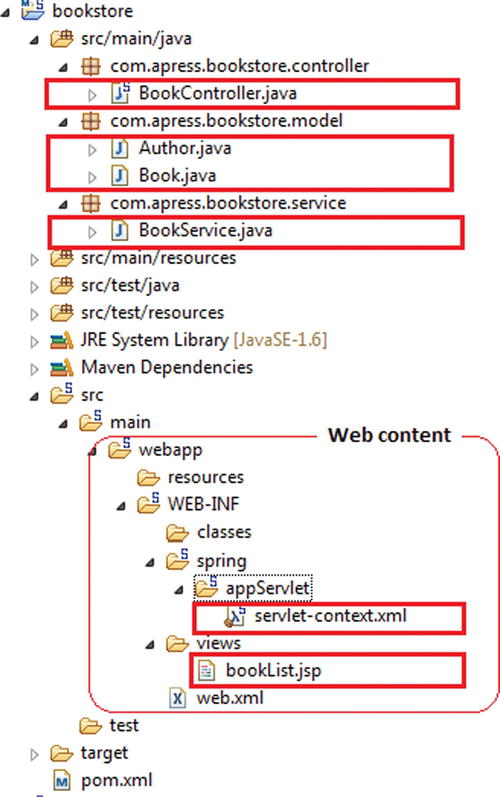
Figure 5-20. Directory structure of the bookstore application
Let’s replace the interface-based controller in Listing 5-42 with an annotations-based controller. Listing 5-44 illustrates the annotations-based BookController.
Listing 5-44. Annotations-Based BookController
1.    package com.apress.bookstore.controller;
2.    import com.apress.bookstore.service.BookService;
3.    import org.springframework.stereotype.Controller;
4.    import org.springframework.web.bind.annotation.RequestMapping;
5.    import org.springframework.web.bind.annotation.RequestMethod;
6.    import org.springframework.web.servlet.ModelAndView;
7.
8.    @Controller
9.    @RequestMapping("/list_book.html")
10.    public class BookController {
11.        @RequestMapping(method = RequestMethod.GET)
12.        public ModelAndView bookListController() {
13.            BookService bookManager = new BookService();
14.            ModelAndView modelAndView = new ModelAndView("bookList");
15.            modelAndView.addObject("bookList", bookManager.getBookList());
16.            return modelAndView;
17.        }
18.    }
- Line 8: In an annotations-based application, a form controller is created using @Controller. @Controller indicates that a particular class serves the role of a controller. @Controller also allows for autodetection, aligned with Spring’s general support for detecting the component classes in the class path and autoregistering bean definitions for them. In this example, the @Controller annotation indicates that the BookListControler class is a controller class.
- Line 9: @RequestMapping is used to map URLs such as /list_book.html onto an entire class or a particular handler method. @RequestMapping on the class level indicates that all handling methods on this controller are relative to the /list_book.html path.
- Line 13: @RequestMapping on the method level indicates that the method accepts only GET requests; in other words, an HTTP GET for /list_book.html involves bookListController().
Listing 5-45 illustrates the modified bookstore-servlet.xml to have the annotations-based BookController discovered.
Listing 5-45. bookstore-servlet.xml to Support Annotations-Based Controller
 1.    <?xml version="1.0" encoding="UTF-8"?>
 2.    <beans:beans xmlns="http://www.springframework.org/schema/mvc"
 3.        xmlns:xsi="http://www.w3.org/2001/XMLSchema-instance" xmlns:beans=
           "http://www.springframework.org/schema/beans"
 4.        xmlns:context="http://www.springframework.org/schema/context"
 5.        xsi:schemaLocation="http://www.springframework.org/schema/mvc
           http://www.springframework.org/schema/mvc/spring-mvc.xsd
 6.            http://www.springframework.org/schema/beanshttp://www.springframework.org/schema/
               beans/spring-beans.xsd
 7.            http://www.springframework.org/schema/contexthttp://www.springframework.org/schema/
               context/spring-context.xsd">
 8.
 9.        <!-- DispatcherServlet Context: defines this servlet's request-processing
10.            infrastructure -->
11.
12.        <context:component-scan base-package="com.apress.bookStore.controller" />
13.        <beans:bean name="/list_book.html"
14.            class="com.apress.bookstore.controller.BookController" />
15.
16.
17.        <!-- Resolves views selected for rendering by @Controllers to .jsp resources
18.            in the /WEB-INF/views directory -->
19.        <beans:bean
20.            class="org.springframework.web.servlet.view.InternalResourceViewResolver">
21.            <beans:property name="prefix" value="/WEB-INF/views/" />
22.            <beans:property name="suffix" value=".jsp" />
23.        </beans:bean>
24.    </beans:beans>
- Line 12: <context:component-scan> of the dispatcher servlet registers @Controller-annotated classes as beans. The BookListController class is automatically discovered and registered as a bean.
Working with Forms Using Annotations
Form processing is greatly simplified with annotations-driven configuration in Spring Web MVC. Spring removes the need for traditional form handling via the data binding mechanism that automatically populates Java objects from the submitted form and by supporting validation and error reports. Listing 5-46 demonstrates using a form and then processing the user-entered data. Figure 5-21 illustrates the new files added to the bookstore directory structure.
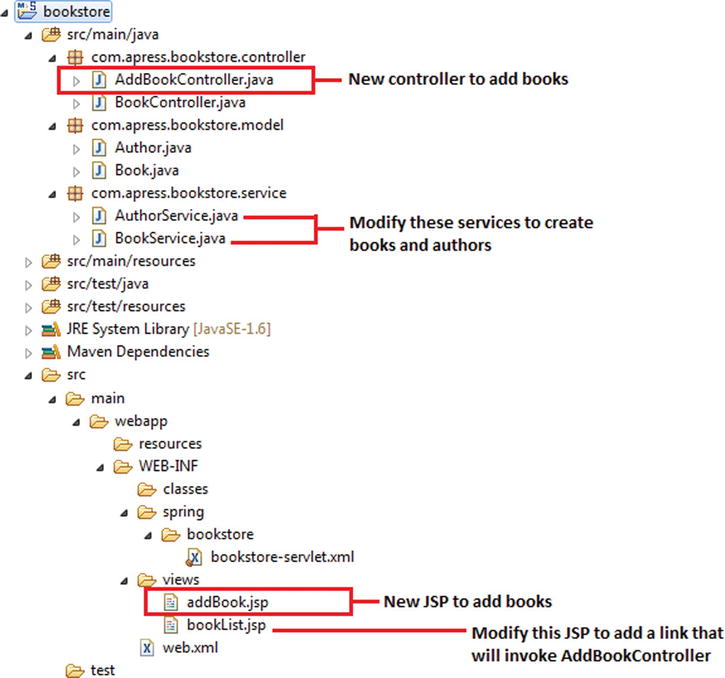
Figure 5-21. New files in the application for form processing
A new controller, AddBookController, is added that takes care of all the form processing using annotations. Listing 5-46 illustrates the AddBookController.
Listing 5-46. AddBookController for Form Processing
 1.    package com.apress.bookstore.controller;
 2.
 3.    import java.util.List;
 4.
 5.    import org.springframework.stereotype.Controller;
 6.    import org.springframework.ui.ModelMap;
 7.    import org.springframework.validation.BindingResult;
 8.    import org.springframework.web.bind.WebDataBinder;
 9.    import org.springframework.web.bind.annotation.InitBinder;
10.    import org.springframework.web.bind.annotation.ModelAttribute;
11.    import org.springframework.web.bind.annotation.RequestMapping;
12.    import org.springframework.web.bind.annotation.RequestMethod;
13.    import org.springframework.web.bind.support.SessionStatus;
14.    import org.springframework.web.context.request.WebRequest;
15.
16.    import com.apress.bookstore.model.Author;
17.    import com.apress.bookstore.model.Book;
18.    import com.apress.bookstore.service.AuthorService;
19.    import com.apress.bookstore.service.BookService;
20.
21.    @Controller
22.    @RequestMapping("/addBook.html")
23.    public class AddBookController {
24.        @RequestMapping(value="/addBook.html", method = RequestMethod.GET)
25.        public String initForm(ModelMap model) {
26.        Book book = new Book();
27.        book.setBookTitle("Add  Book :");
28.            model.addAttribute("book", book);
29.        return "addBook";
30.        }
31.
32.        @InitBinder
33.        public void initBinder(WebDataBinder binder, WebRequest request) {
34.        binder.setDisallowedFields(new String[] {"author"});
35.            Book book = (Book)binder.getTarget();
36.        AuthorService authorService = new AuthorService();
37.        Long authorId = null;
38.        try {
39.                authorId = Long.parseLong(request.getParameter("author"));
40.            } catch (Exception e) {}
41.            if (authorId != null) {
42.                Author author = authorService.getAuthorById(authorId);
43.                book.setAuthor(author);
44.            }
45.        }
46.
47.        @ModelAttribute("authorList")
48.        public List<Author> populateAuthorList() {
49.        AuthorService authorService = new AuthorService();
50.        return authorService.getAuthorList();
51.        }
52.
53.        @RequestMapping(method = RequestMethod.POST)
54.        public String processSubmit(@ModelAttribute("book") Book book, BindingResult result,
           SessionStatus status) {
55.            BookService bookService = new BookService();
56.            bookService.createBook(book);
57.        return "redirect:/list_book.html";
58.        }
59.    }
- Line 22: The AddBookController class is annotated with @RequestMapping("/addBook.html"), which means that all the methods in this class will handle the request for the URL"/ addBook.html".
- Line 24: The initialization for binding is done by annotating the method name with @RequestMapping(method=RequestMethod.GET).
- Line 25: initForm() handles the GET request type and shows the add new book form.
- Line 28: initForm() also adds a new instance to the model map so that the new instance can be associated with the form.
- Line 32: Binding is defined by annotating the method name with @InitBinder.
- Annotating controller methods with @InitBinder allows configuring the web data binding directly within the controller class. @InitBinder identifies methods that initialize the WebDataBinder that is used to populate the command and form object arguments of annotated handler methods. Such init-binder methods support all arguments that @RequestMapping supports, except for command/form objects and the corresponding validation result objects. Init-binder methods that are declared must not have a return value. Thus, they are usually declared as void.
- Line 33: Typical arguments include WebDataBinder in combination with WebRequest or java.util.Locale, allowing code to register context-specific editors.
- Data binding is configured using the WebDataBinder class. WebDataBinder is a special DataBinder for data binding from web request parameters to JavaBean objects.
- Spring injects an instance of this class into any controller method that has been annotated with @InitBinder. This object is then used to define the data binding rules for the controller.
- WebRequest allows for generic request parameter access as well as request/session attribute access without ties to the native Servlet API.
- Line 34: setDisallowedFields() registers the fields that are not allowed for binding.
- Line 47: The reference data is put into the model so that the form view can access it, by annotating the method name with @ModelAttribute.
- When @ModelAttribute is placed on a method parameter, it maps a model attribute to the specific annotated method parameter. This is how the controller gets a reference to the object holding the data entered in the form.
- @ModelAttribute annotation informs the Spring MVC framework that the authorList instance should be assigned as an instance of the Author class and should be passed to populate the AuthorList().
- Line 53: The form submission is handled by annotating the method name with @RequestMapping(method= RequestMethod.POST).
- Line 54: processSubmit() accepts POST requests; that is, an HTTP POST for /new_book.html invokes processSubmit(). processSubmit() processes the form data. processSubmit() takes three parameters:
- @ModelAttribute(value="book") Book book: The model attribute annotation informs the Spring MVC framework that the Book model instance should be assigned as an instance of the Book class and should be passed to the method processSubmit().
- BindingResult result: Spring determines errors, if any, during the creation of the Book class. If it finds errors, its description is passed to the method as a BindingResult instance.
- SessionStatus status: SessionStatus is a status handle for marking form processing as complete.
- Line 57: The redirect: prefix in the return statement triggers an HTTP redirect back to the browser. This is necessary when delegating the response to another controller, rather than just rendering the view.
Listing 5-47 illustrates the modified service layer of the bookstore application for form processing.
Listing 5-47. BookService
package com.apress.bookstore.service;

import java.util.LinkedList;
import java.util.List;

import com.apress.bookstore.model.Author;
import com.apress.bookstore.model.Book;

public class BookService {

    private static List<Book> bookList;

    static {

        Author author1 = new Author();
        author1.setAuthorId((long) 1);
        author1.setAuthorName("Vishal Layka");
        Book book1 = new Book();
        book1.setBookId((long) 1);
        book1.setBookTitle("Beginning Groovy, Grails and Griffon");
        book1.setAuthor(author1);

        Book book2 = new Book();
        book2.setBookId((long) 2);
        book2.setBookTitle("Modern Java Web Development");
        book2.setAuthor(author1);

        bookList = new LinkedList<Book>();
        bookList.add(book1);
        bookList.add(book2);
    }

    public List<Book> getBookList() {
        return bookList;
    }

     public Book createBook(Book b) {
            Book book = new Book();
            book.setBookId((long)bookList.size() + 1);
            book.setAuthor(b.getAuthor());
            book.setBookTitle(b.getBookTitle());
            bookList.add(book);
            return book;
            }

}
Listing 5-48 illustrates the modified bookList.jsp of the bookstore application for form processing.
Listing 5-48. bookList.jsp
 1.    <%@page contentType="text/html" pageEncoding="UTF-8"%>
 2.    <%@ taglib prefix="c" uri="http://java.sun.com/jsp/jstl/core"%>
 3.    <!DOCTYPE html>
 4.    <html>
 5.    <head>
 6.    <meta http-equiv="Content-Type" content="text/html; charset=UTF-8">
 7.    <title>Your Book store</title>
 8.    </head>
 9.    <body>
10.        <h1>Books List</h1>
11.        <table border="1">
12.            <tr>
13.                <th align="left">Author</th>
14.                <th align="left">Book Title</th>
15.            </tr>
16.            <c:forEach items="${bookList}" var="book">
17.                <tr>
18.                    <td>${book.author.authorName}</td>
19.
20.                    <td>${book.bookTitle}</td>
21.                </tr>
22.            </c:forEach>
23.        </table>
24.        <br/>
25.        <a href="addBook.html">Add books.</a>
26.    </body>
27.    </html>
- Line 25: The form controller is called using addBook.html, which is mapped on lines 22 and 24 of the AddBookController in Listing 5-46.
Listing 5-49 illustrates the new JSP page of the bookstore application for form processing that will be displayed when the AddBookController is invoked using <a href="addBook.html">Add books.</a> on line 25 of Listing 5-48.
Listing 5-49. addBook.jsp
 1.    <%@page contentType="text/html" pageEncoding="UTF-8"%>
 2.    <%@ taglib prefix="c" uri="http://java.sun.com/jsp/jstl/core" %>
 3.    <%@ taglib prefix="form" uri="http://www.springframework.org/tags/form" %>
 4.
 5.    <!DOCTYPE html>
 6.    <html>
 7.    <head>
 8.    <meta http-equiv="Content-Type" content="text/html; charset=UTF-8">
 9.    <title>Your Book store</title>
10.    </head>
11.    <body>
12.    <h1>Add  Book</h1>
13.        <form:form method="post" commandName="book">
14.                Author<br />
15.    <form:select path="author">
16.    <form:options items="${authorList}" itemValue="authorId" itemLabel="authorName" />
17.    </form:select>
18.    <br /><br />
19.                Book Name<br />
20.    <form:input path="bookTitle"/><br /><br />
21.    <br />
22.    <input type="submit" value="Submit">
23.        </form:form>
24.    </body>
25.    </html>
Listing 5-49 illustrates the form displayed. It also shows the usage of Spring form tags.
Annotations-Based Validation
The following section demonstrates how you can validate the user-entered data using annotations. Figure 5-22 illustrates the modified files and newly added files in the application.
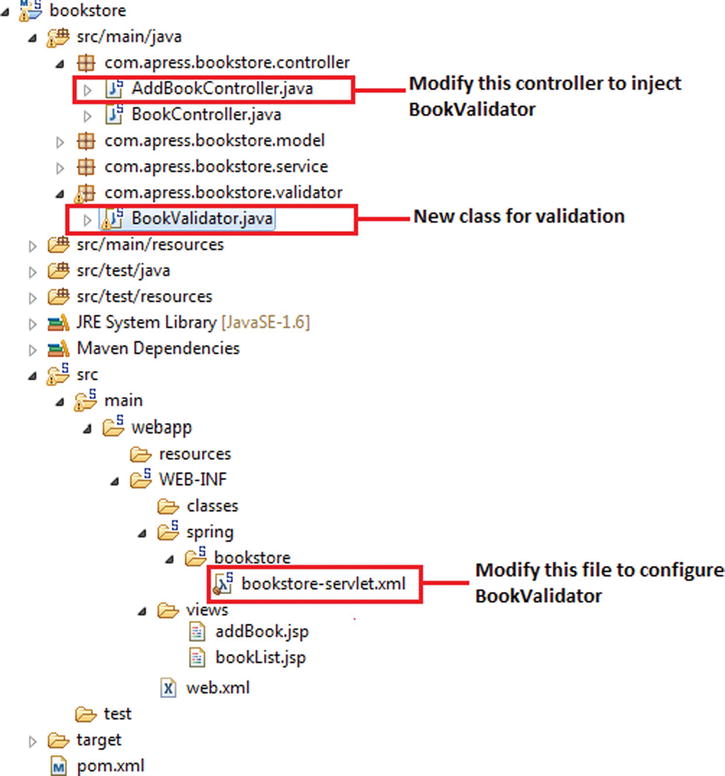
Figure 5-22. Modified files and new files in the directory structure for annotations-based validation
Listing 5-50 illustrates the BookValidator.
Listing 5-50. Validations in the BookValidator
 1.    package com.apress.bookstore.validator;
 2.
 3.    import org.springframework.validation.Errors;
 4.    import org.springframework.validation.ValidationUtils;
 5.    import org.springframework.validation.Validator;
 6.
 7.    import com.apress.bookstore.model.Book;
 8.
 9.    public class BookValidator implements Validator {
10.        @Override
11.        public boolean supports(Class clazz) {
12.            return Book.class.equals(clazz);
13.        }
14.
15.        @Override
16.        public void validate(Object obj, Errors errors) {
17.            Book book = (Book) obj;
18.            ValidationUtils.rejectIfEmptyOrWhitespace(errors, "bookTitle", "field.required",
               "Required Field");
19.            if ( ! errors.hasFieldErrors("bookTitle")) {
20.                if (book.getBookTitle().isEmpty())
21.                    errors.rejectValue("Title", "", "Cannot be left empty!");
22.            }
23.        }
24.
25.
26.    }
- Lines 19 to 23: Typical validations in the application
The controller named AddBookController is updated for the validation, as shown in Listing 5-51.
Listing 5-51. Updating the AddBookController
 1.    package com.apress.bookstore.controller;
 2.
 3.    import java.util.List;
 4.
 5.    import org.springframework.beans.factory.annotation.Autowired;
 6.    import org.springframework.stereotype.Controller;
 7.    import org.springframework.ui.ModelMap;
 8.    import org.springframework.validation.BindingResult;
 9.    import org.springframework.web.bind.WebDataBinder;
10.    import org.springframework.web.bind.annotation.InitBinder;
11.    import org.springframework.web.bind.annotation.ModelAttribute;
12.    import org.springframework.web.bind.annotation.RequestMapping;
13.    import org.springframework.web.bind.annotation.RequestMethod;
14.    import org.springframework.web.bind.support.SessionStatus;
15.    import org.springframework.web.context.request.WebRequest;
16.
17.    import com.apress.bookstore.model.Author;
18.    import com.apress.bookstore.model.Book;
19.    import com.apress.bookstore.service.AuthorService;
20.    import com.apress.bookstore.service.BookService;
21.    import com.apress.bookstore.validator.BookValidator;
22.
23.    @Controller
24.    @RequestMapping("/addBook.html")
25.    public class AddBookController {
26.        BookValidator bookValidator;
27.
28.        @Autowired
29.        public AddBookController(BookValidator bookValidator) {
30.            this.bookValidator = bookValidator;
31.        }
32.
33.        @RequestMapping(value="/addBook.html", method = RequestMethod.GET)
34.        public String initForm(ModelMap model) {
35.        Book book = new Book();
36.        book.setBookTitle("Add  Book :");
37.            model.addAttribute("book", book);
38.        return "addBook";
39.        }
40.
41.        @InitBinder
42.        public void initBinder(WebDataBinder binder, WebRequest request) {
43.        binder.setDisallowedFields(new String[] {"author"});
44.            Book book = (Book)binder.getTarget();
45.        AuthorService authorService = new AuthorService();
46.        Long authorId = null;
47.        try {
48.                authorId = Long.parseLong(request.getParameter("author"));
49.            } catch (Exception e) {}
50.            if (authorId != null) {
51.                Author author = authorService.getAuthorById(authorId);
52.                book.setAuthor(author);
53.            }
54.        }
55.
56.        @ModelAttribute("authorList")
57.        public List<Author> populateAuthorList() {
58.        AuthorService authorService = new AuthorService();
59.        return authorService.getAuthorList();
60.        }
61.
62.        @RequestMapping(method = RequestMethod.POST)
63.        public String processSubmit(@ModelAttribute("book") Book book, BindingResult result,
           SessionStatus status) {
64.            BookService bookService = new BookService();
65.            bookService.createBook(book);
66.            if(result.hasErrors()) {
67.                return "addBook";
68.            } else {
69.        bookService.createBook(book);
70.                return "redirect:/list_book.html";
71.            }
72.
73.        }
74.    }
- Line 29: The BookValidator class is injected using the setter method.
- Line 63: In processSubmit(), validate() of the BookValidator is called to check whether the book details are entered by the user. validate() is passed the value of the Book model and the BindingResult object to hold errors, if any.
- Line 66: A check is made whether the result variable holds any errors. If there are errors, then the application displays the same page with the error messages. If there are no errors, that is, the user has entered all the correct data, then the application displays the list of the book details along with the newly entered book details.
Configuring the Validator
Now you have to declare the validator for the URL addBook.html in bookstore-servlet.xml, as illustrated in Listing 5-52.
Listing 5-52. Declaring the BookValidator
 1.    <?xml version="1.0" encoding="UTF-8"?>
 2.    <beans:beans xmlns="http://www.springframework.org/schema/mvc"
 3.        xmlns:xsi="http://www.w3.org/2001/XMLSchema-instance" xmlns:beans=
           "http://www.springframework.org/schema/beans"
 4.        xmlns:context="http://www.springframework.org/schema/context"
 5.        xsi:schemaLocation="http://www.springframework.org/schema/mvc http://www.springframework.org/
           schema/mvc/spring-mvc.xsd
 6.            http://www.springframework.org/schema/beanshttp://www.springframework.org/schema/
               beans/spring-beans.xsd
 7.            http://www.springframework.org/schema/contexthttp://www.springframework.org/schema/
               context/spring-context.xsd">
 8.
 9.        <!-- DispatcherServlet Context: defines this servlet's request-processing
10.            infrastructure -->
11.
12.        <context:component-scan base-package="com.apress.bookstore.controller" />
13.        <beans:bean class="com.apress.bookstore.validator.BookValidator" />
14.
15.        <!-- Resolves views selected for rendering by @Controllers to .jsp resources
16.            in the /WEB-INF/views directory -->
17.        <beans:bean
18.            class="org.springframework.web.servlet.view.InternalResourceViewResolver">
19.            <beans:property name="prefix" value="/WEB-INF/views/" />
20.            <beans:property name="suffix" value=".jsp" />
21.        </beans:bean>
22.    </beans:beans>
- Line 13: The BookValidator class is defined. The container creates the BookValidator class by calling its constructor.
Summary
This chapter first briefly introduced the Spring Framework and went on to show how you can deal with tight coupling, cross-cutting concerns, and boilerplate code. This chapter transformed the data access layer built in Chapter 1 to eliminate the boilerplate code resulting from using pure JDBC. Then it discussed Spring MVC’s architecture, including its request-handling life cycle. Next it showed you how to develop a Hello World application using Spring Web MVC. Then it began implementing the bookstore application using Spring Web MVC, and as the application progressed, it introduced the annotations programming model of Spring Web MVC and processing forms in the web application.