
You discovered in Chapter 8 how to access the PIM databases using the BlackBerry 10 PIM APIs. This chapter shows you another way of accessing third-party functionality using the invocation framework. The invocation framework is a very powerful way of integrating external applications directly into your own app (including UI elements called cards). The invocation framework is a two-sided coin: you can also use it to expose some of your own application’s functionality to client apps. This is an extremely important concept because it provides seamless integration between applications, thus avoiding the necessity to develop from scratch functionality that is already available in a core or third-party app. Here are some typical scenarios where you should consider using the invocation framework:
- Invoking core BlackBerry 10 apps for displaying or updating information
- Viewing files such as images and documents in PNG, PDF or DOC format
- Playing multimedia content
You should also consider making your own app invocable if it can handle very specific MIME types. For example, a medical-imaging application capable of handling X-ray images would be an ideal invocable target for displaying DICOM images. The invocation framework gives you all the means for registering your application, as well as your app’s supported MIME types with the BlackBerry 10 OS. As a result, when your users try to open a document with a MIME type managed by your application, the invocation framework will transparently call your app and display the corresponding application card.
After having read this chapter, you will be able to
- Use the invocation framework to call other applications from your own app, including the BlackBerry 10 core applications.
- Make your own application invocable.
Before getting into the details of invoking other applications from your own app, I want to introduce some terminology that will help you understand the concepts behind the invocation framework:
- A client application invokes a target application with some content and, optionally, metadata. The target can be either launched as a separate app or as a UI fragment such as a Page or a Sheet, which will be displayed in your application. If the target application is launched independently, your application will be minimized and the target app will come to the foreground.
- The UI fragment “exposed” by the target app is called a card. It is displayed on top of your application’s main UI. When you are finished with the card, your application’s main UI is displayed again. It is important to keep in mind that a card is not part of your app’s UI, but something provided by the target app (note that the user can also reveal your app’s UI by “peeking” behind the card).
- A client invocation can be bound or unbound. In the case of a bound invocation, the client app specifies the exact target application to be called (this is achieved by setting a target application ID in the request). In the case of an unbound invocation, the invocation framework chooses the most appropriate application for handling the request using brokering.
The parameters passed in an invocation request are summarized as follows:
- Target ID: Sets the identity of the invocation receiver. The invocation is bound if you set the target ID and it is unbound if you don’t.
- Action ID: Defines the action to perform on the invocation data. Examples of default actions are bb.action.View or bb.action.OPEN. For an unbound invocation, the framework uses the action ID to select the most suitable target app in a process called brokering.
- URI: Indicates where the content is located (for example, file:///accounts/1000/shared/photos/palance.png).
- MIMEtype: Sets the format of the data sent to the target application (for example, “image/png”). The MIME type is usually a mandatory field but you can omit it in the special case of a URI pointing to a file where the MIME type can be inferred from the file extension (and only if the file extension is known by the framework).
- Data: Defines additional data that might or might not be used by the target (note that you are limited to about 16KB of data). If you don’t specify the data, the MIME type, action, and URI must be sufficient for the target to complete the request.
- MetaData: Additional information, usually in JSON format, passed to the invocation request. For example, if a target application accepts multiple files, the URI could specify the root folder where the files are located and the metadata could be a JSON array of file names. As you will see in the following section about the InvokeRequest object, the JSON object is created using a QVariantMap.
To illustrate how the previous parameters are used in practice, the code samples given in Listings 10-1 and 10-2 show you how to perform a bound invocation (in other words, the target application ID is specified and no brokering is involved by the invocation framework).
Listing 10-1. AppInvoker::viewImage
void AppInvoker::viewImage(QString fileName){
    InvokeRequest request;
    request.setTarget("sys.pictures.card.previewer");
    request.setAction("bb.action.VIEW");
    request.setUri(fileName);
    InvokeTargetReply *reply = m_invokeManager->invoke(request);
    if(reply){
        bool result = connect(reply, SIGNAL(finished()), this,
                              SLOT(onInvocationFinished()));
        Q_ASSERT(result);
    }else{
        // error handling goes here
    }
}
Note The code samples presented in this chapter are located in the Invoker and InvokerTarget projects in the BB10Apress GitHub repository (https://github.com/aludin/BB10Apress). Invoker is the client app for performing invocations and InvokerTarget is the corresponding target app. Deploy both apps on the simulator and use Invoker to perform the invocations.
The AppInvoker class can be used to call target applications from you own app (in the code samples shown in this chapter, the Invoker app is used to perform the invocations). For example, the AppInvoker::viewImage(QString fileName) method is used to view a picture from your app using the picture viewer card. To call a target app, you need to initialize an InvokeRequest object and pass it to an InvokeManager instance using the InvokeManager::invoke(InvokeRequest request) method. The return value for the method is a pointer to an InvokeTargetReply object, which will emit the finished signal when the invocation has completed. You can use the signal to check for any errors, as well as get the opportunity to cleanup all allocated resources. Finally, note that the call to InvokeManager::invoke() is asynchronous and will return immediately.
The AppInvoker::onInvocationFinished() slot, which is called when a InvokeTargetReply message is received, is given by Listing 10-2.
Listing 10-2. AppInvoker::onInvocationFinished( )
void AppInvoker::onInvocationFinished(){
    InvokeTargetReply* reply = qobject_cast<InvokeTargetReply*>(sender());
    if(reply->error()){
            // error handling goes here
    }
    reply->deleteLater();
}
Note the call to reply->deleteLater(), which “schedules” the reply object for deletion once the event loop has completed. (If you don’t call reply->deleteLater(), you will effectively have a memory leak. Also, as mentioned in Chapter 3, you can’t delete the InvokeTargetReply object immediately from a slot using operator delete because other slots might need to reference the object).
Let’s include the possibility to view an HTML page by adding an openBrowser method to the AppInvoker class (see Listing 10-3).
Listing 10-3. AppInvoker::openBrowser( )
void AppInvoker::openBrowser(const QString& url) {
    InvokeRequest request;
    request.setAction("bb.action.OPEN");
    request.setTarget("sys.browser");
    request.setUri(url);

    InvokeTargetReply* reply = m_invokeManager->invoke(request);
    if (reply) {
        bool result = connect(reply, SIGNAL(finished()), this,
                               SLOT(onInvocationFinished()));
        Q_ASSERT(result);
     } else {
         // error handling goes here
     }
}
Note that AppInvoker::openBrowser () and AppInvoker::viewImage() methods are very similar. As a matter of fact, you could very easily refactor them in a single generic method taking the action, target and uri parameters and capable of invoking any kind of target application.
It is now time to call AppInvoker from QML. As usual, you can either register the class with the QML type system and use it as an attached object in QML, or set an AppInvoker instance as a QML document context property. I have chosen the former approach by registering AppInvoker with the QML type system in main.cpp (see Listing 10-4).
Listing 10-4. main.cpp
Q_DECL_EXPORT int main(int argc, char **argv)
{

    Application app(argc, argv);
    qmlRegisterType<AppInvoker>("com.ludin.utils", 1, 0, "AppInvoker");

    // Create the Application UI object, this is where the main.qml file
    // is loaded and the application scene is set.
    new ApplicationUI(&app);

    // Enter the application main event loop.
    return Application::exec();
}
Make sure to register the AppInvoker type before instantiating the application delegate (the type needs to be known by the QML declarative engine before the app delegate instantiates the QML scene graph). As illustrated in Figure 10-1, the Invoker app’s UI is mostly designed using buttons.

Figure 10-1. Invoker UI (main.qml)
Each button triggers a different invocation target. For the moment you can focus on the Invoke Picture Viewer button (see Listing 10-5).
Listing 10-5. main.qml
import bb.cascades 1.2
import bb.cascades.pickers 1.0
import com.ludin.utils 1.0
Page {
    Container {
        leftPadding: 10
        rightPadding: 10
        topPadding: 10
        bottomPadding: 10
        Button {
            text: "Invoke Picture Viewer"
            horizontalAlignment: HorizontalAlignment.Fill
            onClicked: {
                filePicker.open();
            }
        }
        Button {
            text: "Invoke Browser"
            horizontalAlignment: HorizontalAlignment.Fill
            onClicked: {
                appInvoker.openBrowser("http://www.apress.com");
            }
        }
        Button {
            text: "Create Calendar Event"
            horizontalAlignment: HorizontalAlignment.Fill
            onClicked: {
                var participants = [ "[email protected]", "[email protected]" ];
                appInvoker.createEvent("Ride", "Specs for the R cloud editor", participants);
            }
        }
        Button {
            text: "Take Picture"
            horizontalAlignment: HorizontalAlignment.Fill
            onClicked: {
                appInvoker.takePicture();
            }
        }
        Button {
            text: "Invoke com.riskcetera.card.previewer"
            horizontalAlignment: HorizontalAlignment.Fill
            onClicked: {
                appInvoker.invokeTargetWithUri("com.riskcetera.card.previewer",
                    "bb.action.VIEW", "file:///accounts/1000/shared/photos/leevancleef.jpg")
            }
        }
        Button {
            text: "Invoke com.riskcetera.card.picker"
            horizontalAlignment: HorizontalAlignment.Fill
            onClicked: {
                appInvoker.invokeTargetWithUri("com.riskcetera.card.picker", "bb.action.VIEW",
                    "file:///accounts/1000/shared/photos/leevancleef.jpg")
            }
        }
        attachedObjects: [
            AppInvoker {
                id: appInvoker
                onTargetsChanged: {
                    for (var i = 0; i < appInvoker.targets.length; i ++) {
                        var targetId = appInvoker.targets[i];
                        console.log(targetId);
                    }
                }
            },
            FilePicker {
                id: filePicker
                type: FileType.Picture
                title: "Select Picture"
                directories: [ "/accounts/1000/shared/photos" ]
                onFileSelected: {
                    //make sure to prepend "file://"
                    appInvoker.viewImage("file://" + selectedFiles[0]);
                }
            }
        ]
    }
}
When you press the Invoke Picture Viewer button, a FilePicker is launched by the application so that you can select a picture (see Figure 10-2).

Figure 10-2. FilePicker
Note that, at this point, the target invocation has not yet occurred. When you actually select an image, the picture viewer application’s card is invoked and displayed on top of the Invoker app’s UI (see Figure 10-3).

Figure 10-3. Picture viewer card displayed
You can check that the main UI is still running in the background by partially sliding the picture viewer’s card to the right in order to reveal your Invoker’s UI (this is called peeking). You can also press the Back button to close the card and return to your application’s main UI. Note that while the card is open, you can effectively leverage the previewer app’s functionality (for example, by sharing a picture by pressing the Share button)!
Going back to the Invoker application, you can try to launch the browser app by pressing the Invoke Browser button. You will notice that unlike the picture viewer example, the browser does not provide a displayable card. Instead, your application is minimized and the browser appears with the HTML content at the foreground.
Now that you have got the gist of calling apps using the invocation framework, let’s delve into the details.
The InvokeManager object plays the role of dispatcher between client and target applications. The invocations methods are all asynchronous and return immediately. You will therefore have to check for a signal to determine whether the invocation has completed successfully.
The InvokeRequest class encapsulates all the information required for performing an invocation. The class methods are summarized as follows:
- InvokeRequest.setTarget(const QString& name): Sets the identity of the target receiver as defined in the target’s bar-descriptor.xml.
- InvokeRequest.setAction(const QString& action): Sets the operation the client is asking the target to perform. If omitted, the invocation framework will use the MIME type to determine the action.
- InvokeRequest.setMimeType(const QString& mimeType): Sets the format of the data sent to the target application.
- InvokeRequest.setUri(const QUrl& url): Sets the URI sent to the target application. If omitted, the data, MIME type, and action must be sufficient for the target to do its work.
- InvokeRequest.setMetaData(const QVariantMap& metaData): sets the metadata sent to the target. The metadata usually specifies additional information required in order to handle the invocation. The metaData parameter is encoded as a JSON object before being sent to the target. As mentioned in Chapter 3, a QVariantMap is defined as a map of (key,value) pairs. The keys are QString objects and the values are QVariants. You can basically build an arbitrarily complex JSON object using a QVariantMap.
Target IDs, Actions, URIs, and MIME Types
A target ID uniquely identifies an invocable application that has been previously registered with the invocation framework. For your own applications, you should prefix your application’s name with your company’s reverse DNS name (for example, com.riskcetera.Ride). Some common IDs for the BlackBerry core apps are com.rim.bb.app.adobeReader (Adobe Reader), sys.browser (BlackBerry Browser), and sys.pictures.card.previewer (Picture Viewer). Note that the same target application can potentially have different target IDs, depending on the kind of action and cards it will provide to the client application.
Actions also use the reverse DNS style (for example, com.riskcetera.action.OPEN) and have to be unique across all actions registered with the invocation framework. You can register your own actions and verbs with the invocation framework. However, you are encouraged to use the standard built-in actions for common tasks such as viewing or editing content (the built-in actions all start with bb.action followed by a verb in capital letters; for example, bb.action.OPEN). A list of standard actions is given below:
- bb.action.VIEW: Used for viewing content such as a picture, calendar entry, or a contact’s details (this is also the default action when you don’t specify an action in the invocation request.)
- bb.action.OPEN: Used for opening (for example, an HTML document).
- bb.action.CREATE: Used for creating new content.
- bb.action.EDIT: Used for editing or updating existing content.
You can either transfer data “in-memory” to the target application using the InvokeRequest::setData(const QByteArray& data) method or specify a URI with a MIME type. When you specify a URI, you are actually telling the invocation framework to transfer the data identified by the URI to the target application’s private inbox (for more details, see the following section about data transfer). Depending on the target application and action, the URI can either specify a single item upon which the action is invoked (for example, a file; see Listing 10-1), or a list of items, upon which the action should be carried out (in this case, the URI will define a base directory containing multiple files; the specific files are provided as additional metadata in JSON format). To further illustrate the points discussed earlier, let us consider invocation attributes for the calendar and camera core apps.
To create a new event in the Calendar database, you need to do the following:
- Set the target ID of the InvokeRequest object to sys.pim.calendar.viewer.event.create.
- Set the action ID to bb.action.CREATE.
- Set the MIME type to text/calendar.
- Provide the event details as PPS-encoded in-memory data (see Listing 10-6).
Listing 10-6. AppInvoker::createEvent( )
void AppInvoker::createEvent(const QString& subject, const QString& body,
                const QVariantList& participants) {
    QPair<AccountId, FolderId> defaultAccount =
        m_calendarService.defaultCalendarFolder();

    QVariantMap map;
    map.insert("accountid", defaultAccount.first);
    map.insert("folderid", defaultAccount.second);
    map.insert("participants", participants);
    map.insert("subject", subject);
    map.insert("body", body);

    QByteArray requestData = bb::PpsObject::encode(map, NULL);

    InvokeRequest request;
    request.setTarget("sys.pim.calendar.viewer.event.create");

    request.setAction("bb.action.CREATE");
    request.setMimeType("text/calendar");
    request.setData(requestData);

    InvokeTargetReply* reply = m_invokeManager->invoke(request);
    if (reply) {
        bool result = connect(reply, SIGNAL(finished()), this,
                               SLOT(onInvocationFinished()));
        Q_ASSERT(result);
    } else {
        // error handling goes here
    }
}
To test the invocation, you can use the Create Calendar Event button in the Invoker application.
Listing 10-7. Create Calendar Event Button
Button {
    text: "Create Calendar Event"
    horizontalAlignment: HorizontalAlignment.Fill
    onClicked: {
        var participants = ["[email protected]", "[email protected]"];
        appInvoker.createEvent("Ride","Specs for the R cloud editor", participants);
    }
}
When you touch the Create Calendar Event button, the Calendar app’s card is displayed on top of Invoker’s main UI. You can then use the card to create a new event (as soon as you have completed and saved the event, the card is closed and once again Invoker’s main UI is displayed, see Figure 10-4).
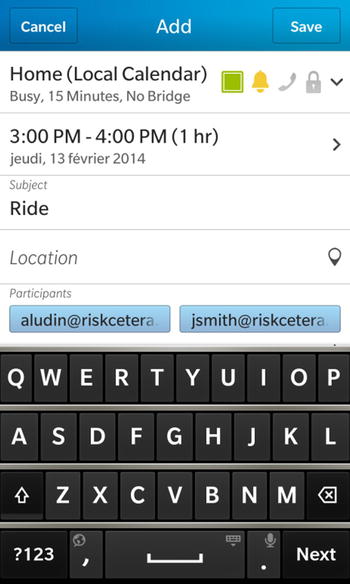
Figure 10-4. Calendar card displayed
The next example shows you how to use the camera card in order to take a picture. You will also see how to handle a response from the card using a CardDoneMessage instance.
To take a picture with the camera card, you need to:
- Set the target ID of the InvokeRequest object to sys.camera.card.
- Set the action ID to bb.action.CAPTURE.
- Set the data attribute to photo.
Once the picture has been taken by the user, you need to handle the InvokeManager::childCardDone signal in order to determine the picture’s path on the file system (see Listing 10-8 and Listing 10-9).
Listing 10-8. AppInvoker::takePicture( )
void AppInvoker::takePicture() {
    InvokeRequest request;
    request.setTarget("sys.camera.card");
    request.setMimeType("image/jpeg");
    request.setAction("bb.action.CAPTURE");
    request.setData("photo");
    InvokeTargetReply* reply = m_invokeManager->invoke(request);
    if (reply) {
        bool result = connect(reply, SIGNAL(finished()), this,
                               SLOT(onInvocationFinished()));
        Q_ASSERT(result);
        result = connect(m_invokeManager,
                          SIGNAL(childCardDone(const bb::system::CardDoneMessage&)),
                          this, SLOT(onCardDone(const bb::system::CardDoneMessage&)));
        } else {
                // error handling goes here
        }
    }
}
Listing 10-9. AppInvoker::onCardDone( )
void AppInvoker::onCardDone(const CardDoneMessage& message){
    if(message.reason() == "save"){
        QString picturePath = message.data();
        // handle picture
        qDebug() << picturePath;
    }
}
You can test the invocation using the Take Picture button (see Listing 10-10).
Listing 10-10. Take Picture Button
Button {
    text: "Take Picture"
    horizontalAlignment: HorizontalAlignment.Fill
    onClicked: {
        appInvoker.takePicture();
    }
}
Figure 10-5 illustrates the resulting card displayed on top of Invoker’s UI. You can either take a picture by touching the screen or touch the back button. In both cases the card will be closed and Invoker’s main UI will be displayed again.
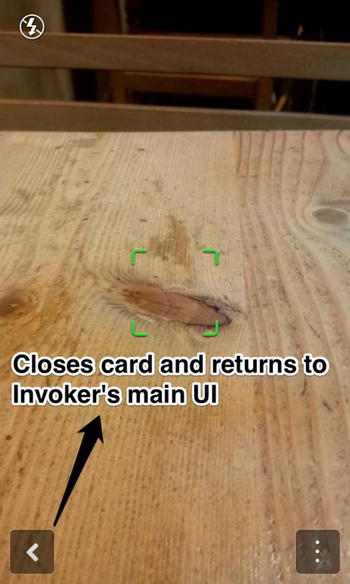
Figure 10-5. Camera card displayed
Note You can use the URL shown below to determine the parameters for invoking the BlackBerry 10 core apps from your own application: http://developer.blackberry.com/native/documentation/cascades/device_platform/invocation/invoking_core_apps.html
I have informally described data transfer during an invocation. This section gives you further details about the process. The invocation framework essentially supports two data transfer modes. You can either transfer data in-memory using the InvokeRequest’s data property, or use a file transfer (when you transfer data in-memory, the invocation request URI is automatically set to data://local for you but you still have to specify the data’s MIME type). Note that you have seen both transfer methods in action in the examples provided in the previous sections.
To transfer a file to the target application, you need to specify the file’s location by setting the URI property of the InvokeRequest object. The URI must start with file:// and provide the file’s full path, including the extension. As mentioned previously, you can also transfer multiple files to the target application. In this case, the URI identifies a base directory and the files are given by additional metadata encoded in JSON format (since the JSON format is very specific to each target application, you will have to consult the online BlackBerry documentation to see how to create the corresponding QVariantMap).
You can also control how the invocation framework handles the file(s) transferred to the target application’s private inbox by using the InvokeRequest::setFileTransferMode(FileTransferMode::TypefileTransferMode) method. The FileTransferMode::Type enumeration can take one of the following values:
- FileTransferMode::Preserve: Delivers the file as-is to the target application.
- FileTransferMode::CopyReadOnly: Creates a read-only copy of the file in the target application’s private inbox.
- FileTransferMode::CopyReadWrite: Creates a read/write copy of the file in the target application’s private inbox.
- FileTransferMode::Link: Creates a hard link to the file in the target application’s private inbox. The client application must own the file and set read-write permissions on it.
The examples shown until now have always specified the target application for a given invocation. At some point, however, you will want to query all targets available for a given URI and/or MIME type (perhaps because you would want to give the user the opportunity to choose the appropriate target application for a given invocation). To achieve this, you must create an InvokeQueryTargetsRequest object and pass it to the InvokeManager::queryTargets() method. You can then use the InvokeQueryTargetsReply::finished signal to handle the results (see Listing 10-11).
Listing 10-11. Querying targets
void AppInvoker::queryTargets(const QString& mimeType, const QString& action) {
    InvokeQueryTargetsRequest request;
    request.setMimeType(mimeType);
    request.setAction(action);
    InvokeQueryTargetsReply* reply = m_invokeManager->queryTargets(request);

    if (reply) {
        bool result = connect(reply, SIGNAL(finished()), this,
                               SLOT(onQueryTargetsResponse()));
        Q_ASSERT(result);
    }

}
As shown below, the query results are returned in the InvokeQueryTargetsReply object (see Listing 10-12).
Listing 10-12. QueryTargetsResponse
void AppInvoker::onQueryTargetsResponse() {
    InvokeQueryTargetsReply* reply = qobject_cast<InvokeQueryTargetsReply*>(sender());
    if(!reply->error()){
        m_targetIDs.clear();
                QList<InvokeAction> invokeActions = reply->actions();
                for(int i=0; i<invokeActions.size(); i++){
                         QList<InvokeTarget> targets = invokeActions[i].targets();
                         for (int j=0; j < targets.size(); j++){
                                 QString targetId = targets[j].name();
                                 m_targetIDs.append(targetId);
                         }
                }
                emit targetsChanged();
        }
        reply->deleteLater();
}
Unbound Invocations
An unbound invocation lets the invocation framework figure out the most appropriate target application. In other words, you don’t need to specify a target ID for the invoked application. You can even omit the target action. If you do not specify the target action, the invocation framework will try to find a target application for the bb.action.VIEW action. If no target application is found, the framework will fall back to the bb.action.OPEN action. If once again no suitable application is found, the invoke request fails. As mentioned previously, the MIME type can also be omitted, but only if the URI is pointing to a file with an extension known to the invocation framework.
Now let’s turn our attention to the flip side of the coin and see how you can make your own applications invocable. For your application to be invocable, you need to handle the following steps:
- Register your application with the BlackBerry 10 operating system so that it can receive invocations (this is done by declaring an invocation target in your application’s bar-descriptor.xml file).
- Listen for the invoked signal to handle invocations in your application.
- Check whether your application was launched by an invocation or if the user launched your application and displayed the corresponding UI (you will find out more about this in the following section about cards).
Declaring an Invocation Target
The first step in making your application invocable is to declare one or several invocation targets in your application’s bar-descriptor.xml file. For example, Listing 10-13 illustrates how to add an invocation target for viewing images.
Listing 10-13. Invocation Target Definition in bar-descriptor.xml
<invoke-target id="com.riskcetera.app.previewer">
    <invoke-target-type>application</invoke-target-type>
    <filter>
        <action>bb.action.VIEW</action>
        <action>bb.action.OPEN</action>
        <mime-type>image/png</mime-type>
        <mime-type>image/jpeg</mime-type>
        <property var="uris" value="file://,data://local"/>
    </filter>
</invoke-target>

<invoke-target id="com.riskcetera.card.previewer">
<invoke-target-type>card.previewer</invoke-target-type>
        <filter>
            <action>bb.action.VIEW</action>
            <action>bb.action.OPEN</action>
                <mime-type>image/png</mime-type>
                <mime-type>image/jpeg</mime-type>
                <property var="uris" value="file://,data://local"/>
        </filter>
</invoke-target>

<invoke-target id="com.riskcetera.card.picker">
    <invoke-target-type>card.picker</invoke-target-type>
    <filter>
        <action>bb.action.VIEW</action>
        <action>bb.action.OPEN</action>
        <mime-type>image/png</mime-type>
        <mime-type>image/jpeg</mime-type>
        <property var="uris" value="file://,data://local"/>
    </filter>
</invoke-target>
An invocation target defines a target ID, an invocation type, and one or more filters. The invoke-target-type is by default an application, but you can also define card types, which I will explain shortly (for example, the second invoke-target-type definition is a card). The filter definition essentially tells the invocation framework which kind of actions, MIME types, and URIs your application can handle through invocation. By adding invocation target definitions to your application’s bar-descriptor.xml file, you are registering them with the BlackBerry 10 OS but you still need to handle the actual invocation in your application’s code, which is the topic of the next section.
The first step in handling invocations in your application is to connect the InvocationManager::invoked(const bb::system::InvokeRequest&) signal to a corresponding slot in your application. Listing 10-14 illustrates how to setup this in the application delegate’s constructor.
Listing 10-14. Application Delegate Constructor
ApplicationUI::ApplicationUI(bb::cascades::Application *app) :
                QObject(app), m_invokeManager(new InvokeManager(this)), m_uri("") {

        // Listen to incoming invocation requests
        bool result = connect(m_invokeManager,
                         SIGNAL(invoked(const bb::system::InvokeRequest&)), this,
                         SLOT(onInvokeRequest(const bb::system::InvokeRequest&)));
        Q_ASSERT(result);

        result = connect(m_invokeManager,
        SIGNAL(cardResizeRequested(const bb::system::CardResizeMessage&)),
        this, SLOT(onCardResized(const bb::system::CardResizeMessage&)));
        Q_ASSERT(result);
        result = connect(m_invokeManager,
                         SIGNAL(cardPooled(const bb::system::CardDoneMessage&)), this,
                         SLOT(onCardPooled(const bb::system::CardDoneMessage&)));
        Q_ASSERT(result);

        switch (m_invokeManager->startupMode()) {
        case ApplicationStartupMode::LaunchApplication:
            this->initFullUI();
            break;
        default:
            // Wait for the invoked signal to initialize UI
            break;
        }

}
You can safely ignore the other signals for the moment. You should however notice that unlike the previous examples in this book, where the default main UI was created in the application delegate’s constructor, this time the application delegate checks the app’s start-up mode and only creates the main UI if the startup mode is ApplicationStartupMode::LaunchApplication. The ability to check the application’s start-up mode essentially gives you the possibility to customize your UI. If the user launches the application, you can display the entire UI, otherwise if the application is launched by a target invocation, you can display a subset of the UI.
Let’s now turn our attention to the ApplicationUI::onInvokeRequest() slot implementation given in Listing 10-15.
Listing 10-15. ApplicationUI::onInvokeRequest
void ApplicationUI::onInvokeRequest(const bb::system::InvokeRequest& request) {
    QString target = request.target();
    QString action = request.action();
    QString mimeType = request.mimeType();
    if (target == "com.riskcetera.app.previewer") {
        this->initFullUI();
        this->m_uri = request.uri().toString();
        emit uriChanged();
    } else if (target == "com.riskcetera.card.previewer") {
        this->initPreviewerUI();
        this->m_uri = request.uri().toString();
        emit uriChanged();
    } else if (target == "com.riskcetera.card.picker") {
        this->initPickerUI();
    }
}
To find out whether the application has been invoked as a card or a target application, the ApplicationUI::onInvokeRequest() method retrieves the target attribute of the invocation request and compares it with the values defined in the bar-descriptor.xml file. The UI is also initialized differently, depending on the invocation method: if the invocation is a target application invocation, the method loads the application’s full UI from main.qml; otherwise, a card UI is created using previewer.qml or picker.qml. Note that both QML documents are located in the assets folder of the application (see Listing 10-16 and Listing 10-17).
Listing 10-16. previewer.qml
import bb.cascades 1.2
NavigationPane {
    backButtonsVisible: true
    peekEnabled: true
    Page {
        titleBar: TitleBar {
            title: "Previewer Card"
        }
        Container {
            Layout: DockLayout{}
            ImageView {
                horizontalAlignment: HorizontalAlignment.Center
                verticalAlignment: VerticalAlignment.Center
                imageSource: _app.uri
                scalingMethod: ScalingMethod.AspectFit
            }
        }
    }
}
Listing 10-17. picker.qml
import bb.cascades 1.2

Page {
    Container {
        layout: StackLayout {
            orientation: LayoutOrientation.LeftToRight
        }
        leftPadding: 10
        ImageButton {
            horizontalAlignment: HorizontalAlignment.Fill
            verticalAlignment: VerticalAlignment.Center
            id: palance
            defaultImageSource: "file:///accounts/1000/shared/photos/jackpalance.jpg"
            preferredWidth: 300
            preferredHeight: 300
            onClicked: {
                _app.onPickDone(eastwood.defaultImageSource.toString());
            }
        }
        ImageButton {
               topMargin: 10
            horizontalAlignment: HorizontalAlignment.Fill
            verticalAlignment: VerticalAlignment.Center
            id: vancleef
            defaultImageSource: "file:///accounts/1000/shared/photos/leevancleef.jpg"
            preferredWidth: 300
            preferredHeight: 300
            onClicked: {
                _app.onPickDone(vancleef.defaultImageSource.toString());
            }
        }

    }
}
Note that for a picker, when the user selects an image, the application’s onPickDone slot is called (see Listing 10-18).
Listing 10-18. picker.qml
void ApplicationUI::onPickDone(const QString& uri) {

        CardDoneMessage message;
        message.setData(uri);
        message.setDataType("text/plain");
        message.setReason("Success!");

        // Send message
        m_invokeManager->sendCardDone(message);
}
The method creates a CardDoneMessage, which is sent back to the client using the InvokeManager instance, thus notifying the client that the card should be closed (the data passed to the client contains the URI of the selected image, as well as an indication on whether the invocation was successful).
You can expose three card styles to the client application: composers, pickers, and previewers (for example, Listing 10-13 defined both a previewer and a picker using the <invoke-target-type/> tag). You can use a composer for creating content, a picker for choosing existing content, and a previewer for viewing existing content. Each style defines a different transition between your application’s main UI and the card. For example, previewers slide in from the right side, whereas composers and pickers slide in from the bottom of the screen. Figure 10-6 illustrates all three styles.

Figure 10-6. Picker, composer, and previewer
To optimize usage, the BlackBerry 10 OS can pool cards and reuse them when required, instead of creating new instances of your application. You must therefore be ready to handle the InvokeManager::cardPooled(const bb::system::CardDoneMessage&) signal and clear your application’s internal state, as illustrated in Listing 10-19.
Listing 10-19. ApplicationUI::onCardPooled( )
void ApplicationUI::onCardPooled(
    const bb::system::CardDoneMessage& cardDoneMessage) {
    m_uri = "";
    emit uriChanged();
}
When a target is invoked as an application, there can only be a single instance of the app running. In other words, if the application has already been launched and is minimized, the app will go back to the foreground and the InvokeManager will emit the invoked signal. When a card is invoked, a new instance of the application is created and launched (unless, of course, the card is pooled). You could therefore potentially have multiple instances of the target application running at the same time (for example, when multiple client applications invoke the same card). Since the application sandbox is shared by all running instances of an application, you should take extra care by correctly synchronizing sandbox data access (for additional information about the application’s sandbox, see Appendix).
Summary
This chapter showed you how to use the invocation framework in order to leverage services provided by target applications in your own apps. Target invocation is an extremely powerful concept because not only does it enable you to leverage another app’s functionality, but also to use UI elements called cards directly in your own application. Application invocation can be bound or unbound. In the case of a bound invocation, you specify the target application ID. In the case of an unbound invocation, you basically let the framework figure out the most appropriate target for you. You can also use the invocation framework to expose your app’s functionality, including UI fragments.