
Chapter 5: Authentication: Protecting Private Content
In this chapter, we will:
- set up a backend to authenticate against
- add a sign-in method to our existing
ApiService - set up an authentication service to handle authentication logic
- set up a session service to store session data
- create a
SignInComponentto display a sign-in form - set up a route guard to protect parts of our application from unauthorized access.
By the end of this chapter, you’ll understand:
- the difference between cookies and tokens
- how to create an
AuthServiceto implement authentication logic - how to create a
SessionServiceto store session data - how to create a sign-in form using an Angular reactive form
- how to create a route guard to prevent unauthorized access to parts of your application
- how to send a user’s token as an Authorization Header in an HTTP request to your API
- why you should never send your user’s token to a third party.
Our application will look like this:

So, let’s get started!
Authentication Strategy
Server-side web applications typically handle user sessions on the server. They store session details on the server and send the session ID to the browser via a cookie. The browser stores the cookie and automatically sends it to the server with every request. The server then grabs the session ID from the cookie and looks up the corresponding session details from its internal storage (memory, database, etc). The session details remain on the server and are not available in the client.
In contrast, client-side web applications, such as Angular applications, typically manage user sessions in the client. The session data is stored in the client and sent to server when needed. A standardized way to store sessions in the client are JSON Web Tokens, also called JWT tokens. If you’re unfamiliar with how tokens work, check out this simple metaphor to easily understand and remember how token-based authentication works and you’ll never forget again.
More on Cookies and Tokens
If you want to get a deeper understanding of cookies and tokens, make sure to check out Philippe De Ryck’s talk on Cookies versus tokens: a paradoxial choice.
Due to the popularity of JSON Web Tokens in today’s ecosystem, we’ll use a JWT-based authentication strategy.
Setting Up the Backend
Before we can add authentication to our Angular application, we need a back end to authenticate against.
In the previous parts of this series, we use json-server to serve back end data based on the db.json file in the root of our project.
Luckily, json-server can also be loaded as a node module, allowing us to add custom request handlers.
Let’s start by installing the body-parser npm module, which we’ll need to parse the JSON in our HTTP requests:
$ npm install --save body-parser
Next, we create a new file json-server.js in the root of our project:
const jsonServer = require('json-server');
 const server = jsonServer.create();
 const router = jsonServer.router('db.json');
 const middlewares = jsonServer.defaults();
 const bodyParser = require('body-parser');

 // Sample JWT token for demo purposes
 const jwtToken = 'eyJhbGciOiJIUzI1NiIsInR5cCI6IkpXVCJ9.eyJuYW1lIjoiU2l0ZVBvaW50IFJ' +
   'lYWRlciJ9.sS4aPcmnYfm3PQlTtH14az9CGjWkjnsDyG_1ats4yYg';

 // Use default middlewares (CORS, static, etc)
 server.use(middlewares);

 // Make sure JSON bodies are parsed correctly
 server.use(bodyParser.json());

 // Handle sign-in requests
 server.post('/sign-in', (req, res) => {
   const username = req.body.username;
   const password = req.body.password;
   if(username === 'demo' && password === 'demo') {
     res.json({
       name: 'SitePoint Reader',
       token: jwtToken
     });
   }
   res.send(422, 'Invalid username and password');
 });

 // Protect other routes
 server.use((req, res, next) => {
   if (isAuthorized(req)) {
     console.log('Access granted');
     next();
   } else {
     console.log('Access denied, invalid JWT');
     res.sendStatus(401);
   }
 });

 // API routes
 server.use(router);

 // Start server
 server.listen(3000, () => {
   console.log('JSON Server is running');
 });

 // Check whether request is allowed
 function isAuthorized(req) {
   let bearer = req.get('Authorization');
   if (bearer === 'Bearer ' + jwtToken) {
     return true;
   }
   return false;
 }
This article is not meant to be a tutorial on json-server, but let’s quickly have a look at what’s happening.
First we import all json-server machinery:
const jsonServer = require('json-server');
 const server = jsonServer.create();
 const router = jsonServer.router('db.json');
 const middlewares = jsonServer.defaults();
 const bodyParser = require('body-parser');
In a real-world application, we would dynamically generate a JWT token when a user authenticates, but for the purpose of this demo, we define a JWT token statically:
// Sample JWT token for demo purposes
 const jwtToken = 'eyJhbGciOiJIUzI1NiIsInR5cCI6IkpXVCJ9.eyJuYW1lIjoiU2l0ZVBvaW50IFJ' +
   'lYWRlciJ9.sS4aPcmnYfm3PQlTtH14az9CGjWkjnsDyG_1ats4yYg';
Next, we configure json-server to run its own default middlewares:
// Use default middlewares (CORS, static, etc)
 server.use(middlewares);
and to parse incoming JSON requests properly:
// Make sure JSON bodies are parsed correctly
 server.use(bodyParser.json());
Json-server’s default middlewares are request handler functions that deal with static files, CORS, etc. For more detailed information, check out the documentation.
We then define a request handler for sign-in requests:
// Handle sign-in requests
 server.post('/sign-in', (req, res) => {
   const username = req.body.username;
   const password = req.body.password;
   if(username === 'demo' && password === 'demo') {
     res.json({
       name: 'SitePoint Reader',
       token: jwtToken
     });
   }
   res.send(422, 'Invalid username and password');
 });
We tell json-server to listen for HTTP POST requests on /sign-in. If the request contains a username field with a value of demo and password field with a value of demo, we return an object with the JWT token. If not, we send an HTTP 422 response to indicate that the username and password are invalid.
In addition, we also tell json-server to authorize all other requests:
// Protect other routes
 server.use((req, res, next) => {
   if (isAuthorized(req)) {
     console.log('Access granted');
     next();
   } else {
     console.log('Access denied, invalid JWT');
     res.sendStatus(401);
   }
 });

 // Check whether request is allowed
 function isAuthorized(req) {
   let bearer = req.get('Authorization');
   if (bearer === 'Bearer ' + jwtToken) {
     return true;
   }
   return false;
 }
If the client’s HTTP request contains an Authorization header with the JWT token, we grant access. If not, we deny access and send an HTTP 401 response.
Finally, we tell json-server to load the API routes from db.json and start the server:
// API routes
 server.use(router);

 // Start server
 server.listen(3000, () => {
   console.log('JSON Server is running');
 });
To start our new back end, we run:
$ node json-server.js
For our convenience, let’s update the json-server script in package.json:
"json-server": "node json-server.js"
Now we can run:
$ npm run json-server

 > [email protected] json-server /Users/jvandemo/Projects/sitepoint-editors/angular-todo-app
 > node json-server.js

 JSON Server is running
And voila, we have our own API server with authentication running.
Time to dig into the Angular side.
Adding Authentication Logic to our API Service
Now that we have an API endpoint to authenticate against, let’s add a new method to our ApiService to perform an authentication request:
@Injectable()
 export class ApiService {

   constructor(
     private http: Http
   ) {
   }

   public signIn(username: string, password: string) {
     return this.http
       .post(API_URL + '/sign-in', {
         username,
         password
       })
       .map(response => response.json())
       .catch(this.handleError);
   }

   // ...

 }
When called, the signIn() method performs an HTTP POST request to our new /sign-in API endpoint, including the username and password in the request body.
Creating a Session Service
Now that we have an API method to authenticate against our back end, we need a mechanism to store the session data we receive from the API, namely the name and token.
Because the data will be unique across our entire application, we’ll store it in a service called SessionService.
So let’s generate our new SessionService:
$ ng generate service session --module app.module.ts
   create src/app/session.service.spec.ts
   create src/app/session.service.ts
   update src/app/app.module.ts
The --module app.module.ts part tells Angular CLI to automatically register our new service as a provider in AppModule so that we don’t have to register it manually. Registering a service as a provider is needed so that the Angular dependency injector can instantiate it when needed. If you’re not familiar with the Angular dependency injection system, make sure the check out the official documentation.
Open up src/app/session.service.ts and add the following code:
import { Injectable } from '@angular/core';

 @Injectable()
 export class SessionService {

   public accessToken: string;
   public name: string;

   constructor() {
   }

   public destroy(): void {
     this.accessToken = null;
     this.name = null;
   }
 }
We keep things very simple. We define a property to store the user’s API access token and a property to store the user’s name.
We also add a method destroy() to reset all data in case we wish to sign out the current user.
Notice how SessionService is not aware of any authentication logic. It’s only responsible for storing session data.
We’ll create a separate AuthService to implement the actual authentication logic.
Creating an Authentication Service
Putting the authentication logic in a separate service promotes a nice separation of concern between the authentication process and the storage of session data.
This ensures that we don’t have to change the SessionService if the authentication flow changes and allows us to easily mock session data in unit tests.
So let’s create a service called AuthService:
$ ng generate service auth --module app.module.ts
   create src/app/auth.service.spec.ts
   create src/app/auth.service.ts
   update src/app/app.module.ts
Open src/app/auth.service.ts and add the following code:
import { Injectable } from '@angular/core';
 import { SessionService } from './session.service';

 @Injectable()
 export class AuthService {

   constructor(
     private session: SessionService,
   ) {
   }

   public isSignedIn() {
     return !!this.session.accessToken;
   }

   public doSignOut() {
     this.session.destroy();
   }

   public doSignIn(accessToken: string, name: string) {
     if ((!accessToken) || (!name)) {
       return;
     }
     this.session.accessToken = accessToken;
     this.session.name = name;
   }

 }
We inject the SessionService and add a few methods:
isSignedIn(): returns whether or not the user is signed indoSignOut(): signs out the user by clearing the session datadoSignIn(): signs in the user by storing the session data.
Again, notice how the authentication logic is defined in AuthService, while SessionService is used to store the actual session data.
Now that we have our authentication service in place, let’s create a sign-in page with an authentication form.
Creating a Sign-in Page
Let’s create a SignInComponent using Angular CLI:
$ ng generate component sign-in
   create src/app/sign-in/sign-in.component.css
   create src/app/sign-in/sign-in.component.html
   create src/app/sign-in/sign-in.component.spec.ts
   create src/app/sign-in/sign-in.component.ts
   update src/app/app.module.ts
Our sign-in form is going to be an Angular reactive form, so we must import ReactiveFormsModule in our application module in src/app/app.module.ts:
// ...
 import { ReactiveFormsModule } from '@angular/forms';

 @NgModule({
   declarations: [
     // ...
   ],
   imports: [
     // ...
     ReactiveFormsModule
   ],
   providers: [
     // ...
   ],
   bootstrap: [AppComponent]
 })
 export class AppModule {
 }
Next, we add our TypeScript code to src/app/sign-in/sign-in.component.ts:
import { Component, OnInit } from '@angular/core';
 import { ApiService } from '../api.service';
 import { FormBuilder, FormGroup, Validators } from '@angular/forms';
 import { AuthService } from '../auth.service';
 import { Router } from '@angular/router';

 @Component({
   selector: 'app-sign-in',
   templateUrl: './sign-in.component.html',
   styleUrls: ['./sign-in.component.css']
 })
 export class SignInComponent implements OnInit {

   public frm: FormGroup;

   public isBusy = false;
   public hasFailed = false;
   public showInputErrors = false;

   constructor(
     private api: ApiService,
     private auth: AuthService,
     private fb: FormBuilder,
     private router: Router
   ) {
     this.frm = fb.group({
       username: ['', Validators.required],
       password: ['', Validators.required]
     });
   }

   ngOnInit() {
   }

   public doSignIn() {

     // Make sure form values are valid
     if (this.frm.invalid) {
       this.showInputErrors = true;
       return;
     }

     // Reset status
     this.isBusy = true;
     this.hasFailed = false;

     // Grab values from form
     const username = this.frm.get('username').value;
     const password = this.frm.get('password').value;

     // Submit request to API
     this.api
       .signIn(username, password)
       .subscribe(
         (response) => {
           this.auth.doSignIn(
             response.token,
             response.name
           );
           this.router.navigate(['todos']);
         },
         (error) => {
           this.isBusy = false;
           this.hasFailed = true;
         }
       );
   }

 }
First, we instantiate a reactive form in the constructor:
this.frm = fb.group({
   username: ['', Validators.required],
   password: ['', Validators.required]
 });
We define a reactive form as a form group that contains two form controls — one for the username and one for the password. Both controls have a default value of an empty string '', and both controls require a value.
If you’re not familiar with reactive forms, make sure to check out the official documentation on the Angular website.
Next, we define a doSignIn() method:
public doSignIn() {

   // Make sure form values are valid
   if (this.frm.invalid) {
     this.showInputErrors = true;
     return;
   }

   // Reset status
   this.isBusy = true;
   this.hasFailed = false;

   // Grab values from form
   const username = this.frm.get('username').value;
   const password = this.frm.get('password').value;

   // Submit request to API
   this.api
     .signIn(username, password)
     .subscribe(
       (response) => {
         this.auth.doSignIn(
           response.token,
           response.name
         );
         this.router.navigate(['todos']);
       },
       (error) => {
         this.isBusy = false;
         this.hasFailed = true;
       }
     );
 }
First, we check if the form is in a valid state. In the constructor, we configured the username and password form controls with Angular’s built-in Validators.required validator. This marks both controls as required and causes the form to be in an invalid state as soon as one of the form controls has an empty value.
If the form is in an invalid state, we enable showInputErrors and return without calling the API.
If the form is in a valid state (both username and password have a value), we set isBusy to true and call the the signIn() method of our ApiService. We’ll use the isBusy variable to disable the sign-in button in the view while the API call is being made.
If the API call succeeds, we call the doSignIn() method of the AuthService with the token and name from the API’s response and navigate the user to the todos route.
If the API call fails, we mark isBusy as false and hasFailed as true so we can re-enable the sign-in button and show an error message in the view.
Now that we have our component’s controller in place, let’s add its corresponding view template to src/app/sign-in/sign-in.component.ts:
<div class="sign-in-wrapper">
<form [formGroup]="frm">
<h1>Todos</h1>
<!-- Username input -->
<input type="text" formControlName="username" placeholder="Your username">
<!-- Username validation message -->
<div
class="input-errors"
*ngIf="(frm.get('username').invalid && frm.get('username').touched) || showInputErrors"
>
<div *ngIf="frm.get('username').hasError('required')">
Please enter your username
</div>
</div>
<!-- Password input -->
<input type="password" formControlName="password" placeholder="Your password">
<!-- Password validation message -->
<div
class="input-errors"
*ngIf="(frm.get('password').invalid && frm.get('password').touched) || showInputErrors"
>
<div *ngIf="frm.get('password').hasError('required')">
Please enter your password
</div>
</div>
<!-- Sign-in error message -->
<div class="sign-in-error" *ngIf="hasFailed">
Invalid username and password.
</div>
<!-- Sing-in button -->
<button (click)="doSignIn()" [disabled]="isBusy">
<ng-template [ngIf]="!isBusy">Sign in</ng-template>
<ng-template [ngIf]="isBusy">Signing in, please wait...</ng-template>
</button>
<!-- Tip -->
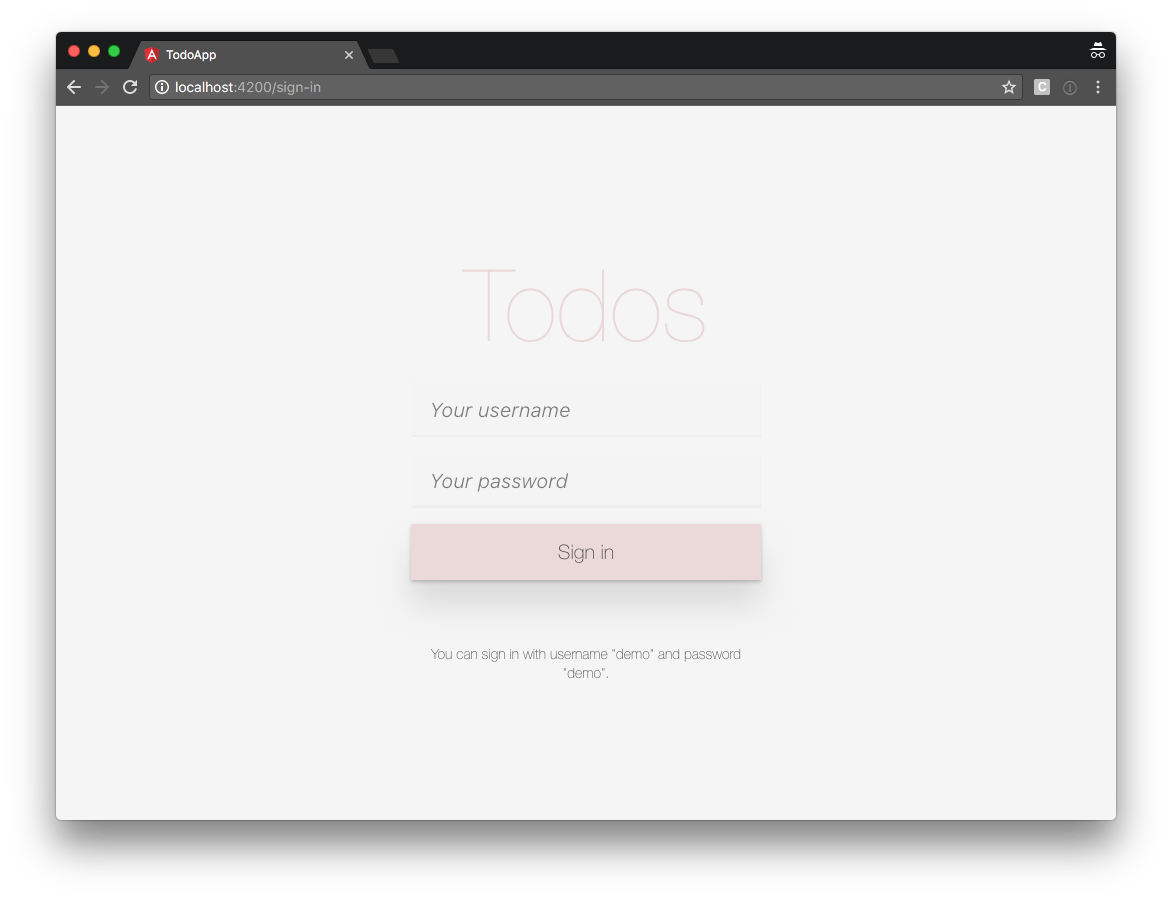
<p class="tip">You can sign in with username "demo" and password "demo".</p>
</form>
</div>
First of all, we define a form element and bind it to our reactive form in the controller using [formGroup]="frm".
Inside the form, we add an input element for the username and we bind it to its corresponding form control using formControlName="username".
Next, we add a validation error to display if the username is invalid. Notice how we can use convenient properties (provided by Angular) such as valid, invalid, pristine, dirty, untouched and touched to narrow down the conditions in which we want to show the validation message. Here, we want to display the validation error when the username is invalid and the user touched the input. In addition, we also want to display the validation error when the user clicks the “Sign in” button and the input has no value.
We repeat the same pattern for the password input and add a general error message to display in case the username and password are not valid credentials.
Finally, we add the submit button:
<button (click)="doSignIn()" [disabled]="isBusy">
   <ng-template [ngIf]="!isBusy">Sign in</ng-template>
   <ng-template [ngIf]="isBusy">Signing in, please wait...</ng-template>
 </button>
When the user clicks the button and an API call is made, we disable the button using [disabled]="isBusy" and change its text so that the user has a visual indication that the sign-in process is busy.
Now that we have our sign-in page in place, let’s reconfigure our routes in `src/app/app-routing.module.ts:
import { NgModule } from '@angular/core';
 import { Routes, RouterModule } from '@angular/router';
 import { SignInComponent } from './sign-in/sign-in.component';
 import { PageNotFoundComponent } from './page-not-found/page-not-found.component';
 import { TodosComponent } from './todos/todos.component';
 import { TodosResolver } from './todos.resolver';

 const routes: Routes = [
   {
     path: '',
     redirectTo: 'sign-in',
     pathMatch: 'full'
   },
   {
     path: 'sign-in',
     component: SignInComponent
   },
   {
     path: 'todos',
     component: TodosComponent,
     resolve: {
       todos: TodosResolver
     }
   },
   {
     path: '**',
     component: PageNotFoundComponent
   }
 ];

 @NgModule({
   imports: [RouterModule.forRoot(routes)],
   exports: [RouterModule],
   providers: [
     TodosResolver
   ]
 })
 export class AppRoutingModule { }
We define a new sign-in route:
{
   path: 'sign-in',
   component: SignInComponent
 }
and redirect the default URL to our new sign-in route:
{
   path: '',
   redirectTo: 'sign-in',
   pathMatch: 'full'
 }
so that the user is automatically redirected to the sign-in page when loading our application.
If you run:
$ ng serve
and navigate your browser to http://localhost:4200, you should see:
So far, we’ve already covered a lot:
- set up our back end
- added a method to our ApiService to sign in
- created an AuthService for our authentication logic
- created a SessionService to store our session data
- created a SignInComponent to sign in users.
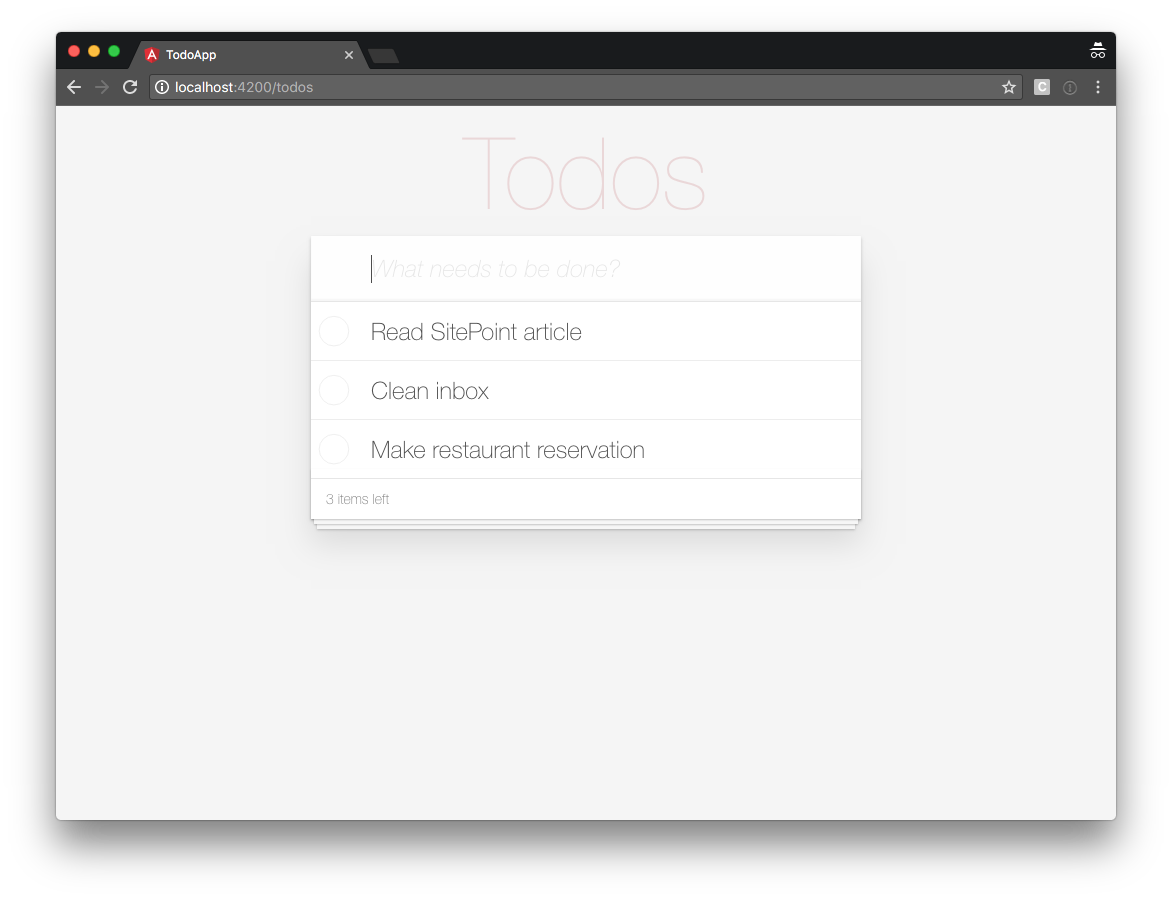
However, if we sign in with username demo and password demo, the API returns an error 401 when we request the todo items:

In addition, Angular still allows us to navigate our browser directly to http://localhost:4200/todos, even if we’re not signed in.
To fix both issues, we will now:
- protect the private area of our application from unauthorized access by users who aren’t signed in
- send the user’s token with API requests that require authentication.
Let’s start by securing our application’s private area.
Protecting Our Application’s Private Area From Unauthorized Access
In part 4, we already learned how to use Angular Router to resolve data. In this section, we explore route guards, a feature by Angular Router that allows us to control route navigation.
In essence, a route guard is a function that returns either true to indicate that routing is permitted or false to indicate that routing is not permitted. A guard can also return a Promise or an Observable that evaluates to a truthy or falsy value. In that case, the router will wait until the Promise or Observable completes.
There are 4 types of route guards:
CanLoad: determines whether or not a lazy-loaded module can be loadedCanActivate: determines whether a route can be activated when the user navigates to the routeCanActivateChild: determines whether a route can be activated when the user navigates to one of its childrenCanDeactivate: determines whether a route can be deactivated.
In our application, we wish to make sure the user is signed in when they navigate to the todos route. Therefore, a CanActivate guard is a good fit.
Let’s create our guard in a new file called src/app/can-activate-todos.guard.ts:
import { Injectable } from '@angular/core';
 import { AuthService } from './auth.service';
 import { ActivatedRouteSnapshot, CanActivate, Router, RouterStateSnapshot } from '@angular/router';
 import { Observable } from 'rxjs/Observable';

 @Injectable()
 export class CanActivateTodosGuard implements CanActivate {

   constructor(
     private auth: AuthService,
     private router: Router
   ) {
   }

   public canActivate(
     route: ActivatedRouteSnapshot,
     state: RouterStateSnapshot
   ): Observable<boolean> | Promise<boolean> | boolean {
     if (!this.auth.isSignedIn()) {
       this.router.navigate(['/sign-in']);
       return false;
     }
     return true;
   }

 }
Because our guard is a CanActivate guard, it needs to implement the CanActivate interface, provided by @angular/router.
The CanActivate interface requires that our guard implements a canActivate() method:
public canActivate(
   route: ActivatedRouteSnapshot,
   state: RouterStateSnapshot
 ): Observable<boolean> | Promise<boolean> | boolean {
   if (!this.auth.isSignedIn()) {
     this.router.navigate(['/sign-in']);
     return false;
   }
   return true;
 }
The canActivate() method receives the activated route snapshot and the router state snapshot as arguments, in case we need them to make a smart decision whether or not we wish to permit navigation.
In our example, the logic is very simple. If the user isn’t signed in, we instruct Angular router to navigate the user to the sign-in page and stop further navigation.
In contrast, if the user is signed in, we return true allowing the user to navigate to the requested route.
Now that we created the route guard, we must tell Angular router to actually use it.
So let’s add it our routing configuration in src/app/app-routing.module.ts:
import { NgModule } from '@angular/core';
 import { Routes, RouterModule } from '@angular/router';
 import { SignInComponent } from './sign-in/sign-in.component';
 import { PageNotFoundComponent } from './page-not-found/page-not-found.component';
 import { TodosComponent } from './todos/todos.component';
 import { CanActivateTodosGuard } from './can-activate-todos.guard';
 import { TodosResolver } from './todos.resolver';

 const routes: Routes = [
   {
     path: '',
     redirectTo: 'sign-in',
     pathMatch: 'full'
   },
   {
     path: 'sign-in',
     component: SignInComponent
   },
   {
     path: 'todos',
     component: TodosComponent,
     canActivate: [
       CanActivateTodosGuard
     ],
     resolve: {
       todos: TodosResolver
     }
   },
   {
     path: '**',
     component: PageNotFoundComponent
   }
 ];

 @NgModule({
   imports: [RouterModule.forRoot(routes)],
   exports: [RouterModule],
   providers: [
     CanActivateTodosGuard,
     TodosResolver
   ]
 })
 export class AppRoutingModule { }
We tell Angular router to use our guard for the todos route, by adding a canActivate property to the route:
{
   path: 'todos',
   component: TodosComponent,
   canActivate: [
     CanActivateTodosGuard
   ],
   resolve: {
     todos: TodosResolver
   }
 }
The canActivate property accepts an array of CanActivate guards so you can easily register multiple guards if your application requires it.
Finally, we need to add CanActivateTodosGuard as a provider so Angular’s dependency injector can instantiate it when the router asks for it:
@NgModule({
   imports: [RouterModule.forRoot(routes)],
   exports: [RouterModule],
   providers: [
     CanActivateTodosGuard,
     TodosResolver
   ]
 })
 export class AppRoutingModule { }
With our route guard in place, our application now redirects the user to the sign-in page when they aren’t signed in and try to navigate directly to the todos route.
In contrast, when the user is signed in, navigation to the todos route is permitted.
How sweet is that!
Sending The User’s Token With API Requests
So far, our signed-in user can access the todos route, but the API still refuses to return any todo data because we aren’t sending the user’s token to the API.
So let’s open up src/app/api.service.ts and tell Angular to send our user’s token in the headers of our HTTP request when neeeded:
import { Injectable } from '@angular/core';
 import { Http, Headers, RequestOptions, Response } from '@angular/http';
 import { environment } from 'environments/environment';
 import { Todo } from './todo';
 import { Observable } from 'rxjs/Observable';
 import 'rxjs/add/operator/map';
 import 'rxjs/add/operator/catch';
 import 'rxjs/add/observable/throw';
 import { SessionService } from 'app/session.service';

 const API_URL = environment.apiUrl;

 @Injectable()
 export class ApiService {

   constructor(
     private http: Http,
     private session: SessionService
   ) {
   }

   public signIn(username: string, password: string) {
     return this.http
       .post(API_URL + '/sign-in', {
         username,
         password
       })
       .map(response => response.json())
       .catch(this.handleError);
   }

   public getAllTodos(): Observable<Todo[]> {
     const options = this.getRequestOptions();
     return this.http
       .get(API_URL + '/todos', options)
       .map(response => {
         const todos = response.json();
         return todos.map((todo) => new Todo(todo));
       })
       .catch(this.handleError);
   }

   public createTodo(todo: Todo): Observable<Todo> {
     const options = this.getRequestOptions();
     return this.http
       .post(API_URL + '/todos', todo, options)
       .map(response => {
         return new Todo(response.json());
       })
       .catch(this.handleError);
   }

   public getTodoById(todoId: number): Observable<Todo> {
     const options = this.getRequestOptions();
     return this.http
       .get(API_URL + '/todos/' + todoId, options)
       .map(response => {
         return new Todo(response.json());
       })
       .catch(this.handleError);
   }

   public updateTodo(todo: Todo): Observable<Todo> {
     const options = this.getRequestOptions();
     return this.http
       .put(API_URL + '/todos/' + todo.id, todo, options)
       .map(response => {
         return new Todo(response.json());
       })
       .catch(this.handleError);
   }

   public deleteTodoById(todoId: number): Observable<null> {
     const options = this.getRequestOptions();
     return this.http
       .delete(API_URL + '/todos/' + todoId, options)
       .map(response => null)
       .catch(this.handleError);
   }

   private handleError(error: Response | any) {
     console.error('ApiService::handleError', error);
     return Observable.throw(error);
   }

   private getRequestOptions() {
     const headers = new Headers({
       'Authorization': 'Bearer ' + this.session.accessToken
     });
     return new RequestOptions({ headers });
   }
 }
First, we define a convenience method to create our request options:
private getRequestOptions() {
   const headers = new Headers({
     'Authorization': 'Bearer ' + this.session.accessToken
   });
   return new RequestOptions({ headers });
 }
Next, we update all methods that communicate with an API endpoint that requires authentication:
public getAllTodos(): Observable<Todo[]> {
   const options = this.getRequestOptions();
   return this.http
     .get(API_URL + '/todos', options)
     .map(response => {
       const todos = response.json();
       return todos.map((todo) => new Todo(todo));
     })
     .catch(this.handleError);
 }

 public createTodo(todo: Todo): Observable<Todo> {
   const options = this.getRequestOptions();
   return this.http
     .post(API_URL + '/todos', todo, options)
     .map(response => {
       return new Todo(response.json());
     })
     .catch(this.handleError);
 }

 public getTodoById(todoId: number): Observable<Todo> {
   const options = this.getRequestOptions();
   return this.http
     .get(API_URL + '/todos/' + todoId, options)
     .map(response => {
       return new Todo(response.json());
     })
     .catch(this.handleError);
 }

 public updateTodo(todo: Todo): Observable<Todo> {
   const options = this.getRequestOptions();
   return this.http
     .put(API_URL + '/todos/' + todo.id, todo, options)
     .map(response => {
       return new Todo(response.json());
     })
     .catch(this.handleError);
 }

 public deleteTodoById(todoId: number): Observable<null> {
   const options = this.getRequestOptions();
   return this.http
     .delete(API_URL + '/todos/' + todoId, options)
     .map(response => null)
     .catch(this.handleError);
 }
We instantiate the request options using our convenience helper and pass the options as the second argument in our HTTP call.
Be Very Careful!
Always make sure you only send the token to your trusted API. Don’t just blindly send the token with every outgoing HTTP request.
For example: if your application communicates with a third-party API and you accidentally send your user’s token to that third-party API, the third party can use the token to sign in to query your API on behalf of your user. So be very careful and only send the token to trusted parties and only with the requests that require it.
To learn more about the security aspects of token-based authentication, make sure to check out Philippe De Ryck’s talk on Cookies versus tokens: a paradoxial choice.
If you navigate your browser to http://localhost:4200, you should now be able to sign in with username demo and password demo.
Adding a Sign-out Button to Our TodosComponent
For the sake of completeness, let’s also add a sign-out button under our list of todos.
Let’s open up src/app/todos/todos.component.ts and add a doSignOut() method:
import { Component, OnInit } from '@angular/core';
 import { TodoDataService } from '../todo-data.service';
 import { Todo } from '../todo';
 import { ActivatedRoute, Router } from '@angular/router';
 import { AuthService } from '../auth.service';

 @Component({
   selector: 'app-todos',
   templateUrl: './todos.component.html',
   styleUrls: ['./todos.component.css']
 })
 export class TodosComponent implements OnInit {

   todos: Todo[] = [];

   constructor(
     private todoDataService: TodoDataService,
     private route: ActivatedRoute,
     private auth: AuthService,
     private router: Router
   ) {
   }

   // ...

   doSignOut() {
     this.auth.doSignOut();
     this.router.navigate(['/sign-in']);
   }

 }
First, we import the AuthService and Router.
Next, we define a doSignOut() method that signs out the user and navigates the user back to the sign-in page.
Now that we have the logic in place, let’s add the button to our view in src/app/todos/todos.component.html:
<!-- Todos -->
 <section class="todoapp">
   <app-todo-list-header
     (add)="onAddTodo($event)"
   ></app-todo-list-header>
   <app-todo-list
     [todos]="todos"
     (toggleComplete)="onToggleTodoComplete($event)"
     (remove)="onRemoveTodo($event)"
   ></app-todo-list>
   <app-todo-list-footer
     [todos]="todos"
   ></app-todo-list-footer>
 </section>

 <!-- Sign out button -->
 <button (click)="doSignOut()">Sign out</button>
If you refresh your browser and sign in again, you should see:
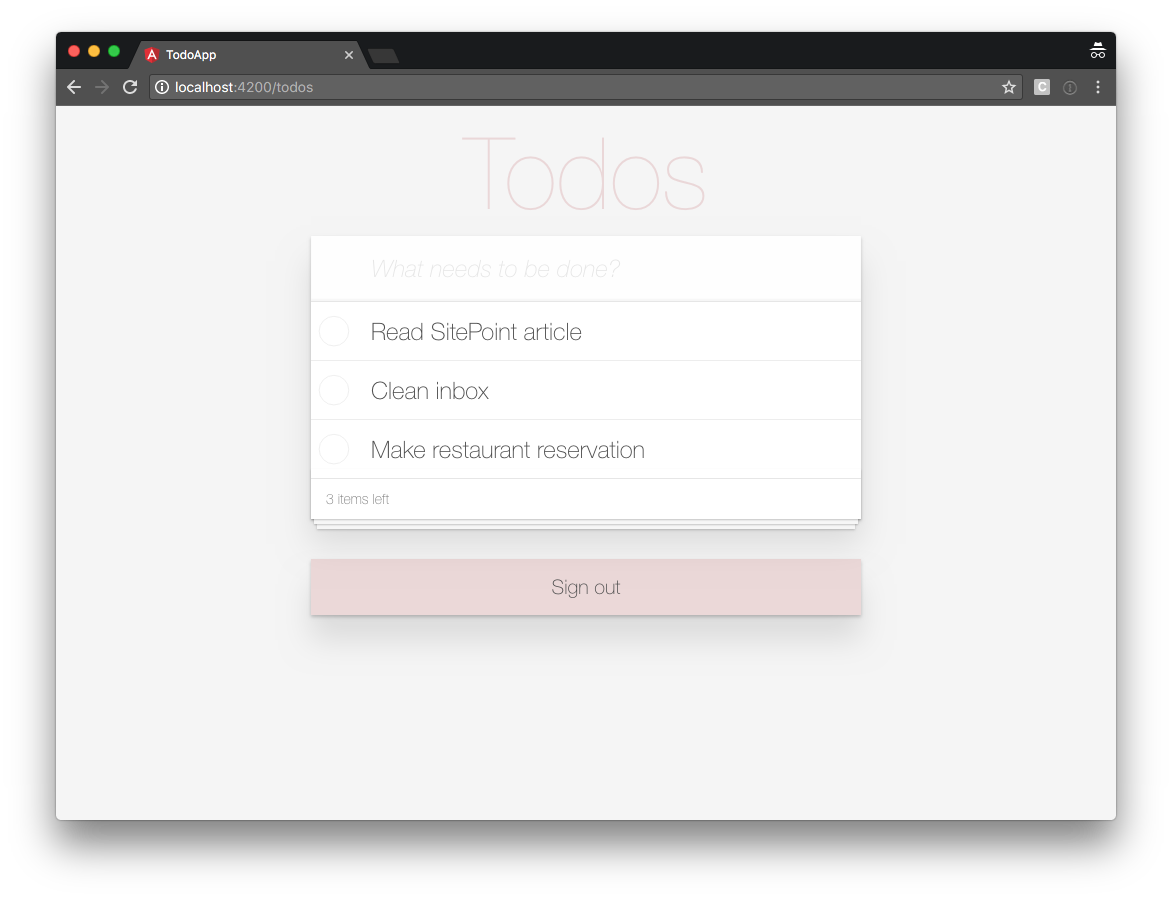
Clicking the sign-out button triggers the doSignOut() method in the component controller, sending you back to the sign-in page.
Also, if you sign out and you try to navigate your browser directly to http://localhost:4200/todos, the route guard detects that you are not signed in and sends you to the sign-in page.
How sweet is that!
We covered a lot in this Angular series, so let’s recap what we’ve learned.
Summary
In this chapter, we learned:
- the difference between cookies and tokens
- how to create an
AuthServiceto implement authentication logic - how to create a
SessionServiceto store session data - how to create a sign-in form using an Angular reactive form
- how to create a route guard to prevent unauthorized access to parts of your application
- how to send a user’s token as an Authorization Header in an HTTP request to your API
- why you should never send your user’s token to a third party.
All code from this chapter is available at https://github.com/sitepoint-editors/angular-todo-app/tree/part-5.