The final stage of photography is to present your results in the most effective way possible. If you made your own prints, either digitally or traditionally, they must be dried and finished, but even if you have received work back from a processing and printing lab, several decisions still have to be made before proceeding to the presentation stage.
Shots need to be edited down to your very best, cropped to the strongest composition, and then framed as individual pictures or laid out as a sequence in an album or wall display. Slides can similarly be edited and prepared for projection either traditionally or viewed as a digital slide show on a computer or television screen. At the same time, negatives, slides, contact prints and digital files deserve protective storage and a good filing system, so that you can locate them again when required.
Now you have the opportunity to review what has been achieved and assess your progress in picture making since starting photography. But how should you criticize the work … and also learn to listen to the criticism of others?
Final cropping
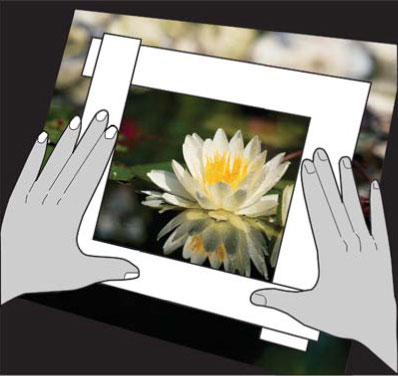
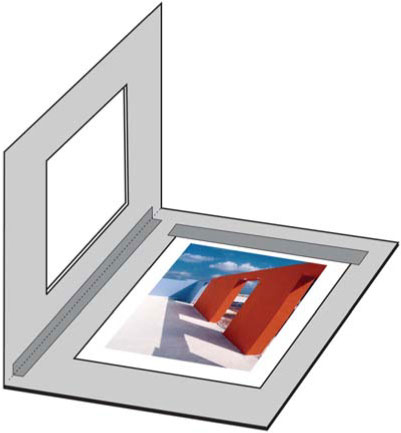
This is the final stage in deciding how each picture should be cropped. What began as the original framing up of a subject in the viewfinder concludes here by your deciding whether any last trims will strengthen the composition further. Don’t allow the height- to-width proportions of photographic paper to dictate results. Standard size enlargements from a processing lab, for example, show the full content of each negative – and however careful you were in the original framing, individual pictures are often improved by cropping to a squarer or a more rectangular shape. Placing L-shaped cards on the print surface (Figure 44.1) is the best way to preview any such trim. Then, put a tiny pencil dot into each new corner to guide you in either cropping the print itself before mounting, or preparing a ‘window mat’ cut-out the correct size to lay on top (see Figure 44.2).
Mounts and mounting
If your finished print is to be shown mounted with a border, choose this carefully, because pictures are strongly affected by the tone or color of their immediate surround. Compare the two identical black and white prints (Figure 44.3). On a white mount dark parts such as the shadows form a strong comb shape, whereas on a black mount the pools of sunlight become more emphasized. Even a thin white border left from the masking easel can change the picture by enclosing and separating it from a dark mount – just as a black edge-line drawn on it would do the same on the white mount.
Don’t overdo colored mounts or they may easily dominate your pictures. Color prints usually look best against a mid-gray or a muted color surround in harmony with the picture. If the dominant color scheme of the shot is, say, green, try a gray–green mount. Always use archival quality photographic display board – other card may contain chemicals which in time will stain your picture.
Figure 44.1 Using L-shaped cards to decide trim.
Figure 44.2 Print taped along one edge to card and covered by a cut-out window mat.
Figure 44.3 How final picture appearance is influenced by different colored mounts and image size in relationship to whole frame.
A window mat form of presentation is relatively simple and effective. You attach your (untrimmed) print to the mount along one edge only with high-quality adhesive tape and then secure another card with a correctly measured cut-out ‘window’ on top. Use a firm, really sharp blade when cutting the window – make sure corners are left clean and free from bits.
If, instead, you simply want to mount directly onto board (surface mount), trim the print first and coat the back with a spray-on or paint-on photo-adhesive, or use wide double-sided self-adhesive sheeting. Then, position your picture accurately on a mounting board, allowing the same width of surround at the top and sides. Some spray adhesives are designed to allow repositioning after mounting and so are useful if you need to adjust the position of the picture.
For the cleanest, flattest most professional-looking mounted result, it is difficult to beat dry mounting. However, to do this job properly you need access to a dry-mounting press and an electric tacking iron. As the image quality of some digitally produced prints will deteriorate when heat mounted, always test a scrap of the printing paper first to make sure that the image is unaffected by the process.
As shown in Figure 44.4, there are four main steps:
1 Cover the back of your print with an oversize sheet of heat-sensitive mounting tissue. Briefly touch the center of the tissue with the heated iron, to tack them together.
2 Trim print and tissue to the exact size you need.
3 Position your print accurately on the mount, then carefully lifting each print corner, tack the tissue to the board. Keep one hand on the print center to keep it steady.
4 The mounting press must be set to the recommended temperature for your mounting tissue. This may be between 66 and 95ºC, according to the type of heat tissue that you are using. Cover your print and board with a sheet of non-stick silicon release paper, insert the whole sandwich into the heated press and close it for about 15 seconds.
Figure 44.4 Dry mounting. (1) Tacking mounting tissue onto the back of the print. (2) Trimming print plus tissue. (3) Tacking onto mount. (4) Inserting into heated press.
Sometimes, otherwise perfect enlargements show one or more tiny white dust spots. The simplest approach is to spot these in with black watercolor applied almost dry on the tip of a size 0 sable brush. You can also buy spotting dye in gray and sienna, as well as neutral black.
Alternatively, use a retouching pen that has a brush tip and contains its own dye (pens come in different shades of gray). Checking through a magnifier, stipple tiny gray specks into the white area until it disappears. Gray is successful for tiny spots on color prints too, but multi-color sets of pens are also made for this purpose.
Digital photographs should never be printed until the whole image is checked carefully on screen (magnified to at least 100 per cent) for dust and scratch marks. Any such problems should be removed from the file using either the Dust and Scratches filter or the Clone Stamp tool. The same approach can be used when spotting a marked print or slide. Start by scanning the original into a computer system and then use retouching software to correct the fault. You can then print out the mark-free result through any high-resolution digital printer. See Part 7 for more details on digital retouching techniques.
Mounting and display tips
For most photographers, the final result of their picture-making activities is the print. The origins of the picture may be digital, or film, but the end product is very similar. The print is the culmination of all your skill and hard work, and if you are like me then you like to show it off. Good presentation is about showcasing the photography not the presentation.
Some new photographers spend a lot of time and money putting together elaborate mounts or frames that contain bright colors, strong textures and/or a high degree of decoration. The net effect is that the picture is overwhelmed by the visual power of the frame. The following tips have been collated to help you present your images in such a way that the viewer will be left in no doubt that the picture is what is important, not the framing.
1 Try to create a visual space between the picture and the wall. This is usually achieved by surrounding the image with a neutral mat board. This is a device that professionals use all the time. Even when they are working with small prints they make sure that the photograph is surrounded by plenty of visual space. This device draws the viewer in towards the picture and makes sure that his or her attention is not distracted by the surroundings.
2 Provide more space at the bottom than the top and sides. When positioning your image on a backing or mat board, place it in the center from side to side but move it slightly higher than center from top to bottom. It is an optical illusion, but when pictures are placed absolutely in the center there will always appear to be less space at the bottom than on the sides and the top; counteract the illusion by adding more space to the bottom.
3 Choose colored surrounds carefully. Though very attractive when admiring them in the arts supply shop, choosing a vibrantly colored board to surround your picture is a very risky business. It is very easy for the color to dominate the presentation and in some cases make the photograph’s colors seem strange in contrast. Neutral tones tend to recede and therefore provide a better presentation platform for your pictures.
4 Don’t use black or white without good reason. As we have already seen, our eyes automatically adapt to the spread of tones in a scene. Placing your pictures against a brilliant white or deep black background can make them seem too dark, too light, too contrasty or not contrasty enough in comparison to their surrounds. Instead, try to choose light or midtoned hues so that the rich black and delicate white tones in your picture can really shine.
5 Keep your pictures flat. There is nothing worse than trying to appreciate the quality of a well-produced photograph if it has become rippled in its frame. As the humidity changes throughout the year, the moisture content of your mounted print will change also. In the more humid months your print will absorb extra moisture from the air and will grow slightly in dimension. When the picture has been mounted by securing the photograph on all four sides, this change will result in the wrinkling of the print’s surface. To stop this occurring either:
– surface mount the picture (so that all the print surface is adhered to the board) to a sturdy backing board; or
– loosely tack the photograph at the top edges only and then cover with a window mount (this gives the picture three sides to expand).
6 Protect the images from deterioration. To fully protect your pictures from the ravages of time, use a framing sandwich of glass, window mat, picture and backing board. These layers are then sealed into the frame using framing staples and tape on all edges. All the parts of the sandwich should be acid free and the picture should be loosely attached to the backing board (on one edge only remember) with acid-free tape (or a couple of 1 penny stamps).
7 Use the same frames and mounts for a series. To help unify a group of pictures, use the same size, type and color frame and mounts on all images. The pictures within the frames can change in orientation (portrait or landscape) and size within the frame, but the external dimensions of the frames should remain the same.
45 Presenting pictures in sets
Print sequences and photo-essays
If you have shot some form of narrative picture sequence, you must decide the minimum number of prints needed to tell your story. Perhaps the series of pictures was planned right from the start, set up and photographed like scenes from a movie. Sometimes, though, it evolves from part of a heavily photographed event or outing, which becomes a narrative story once you begin to sort out the prints.

Often, the only way of making a documentary-type story is simply to photograph an event from beginning to end. All the images taken on the day are then laid out (or viewed on screen) and the best group of six or seven selected. Make your choice based on how well each picture tells the story individually and as part of the greater series. Ensure that all the technical aspects of the images (focus, exposure, depth of field, lighting) are suitable as well. Once you have made a selection, check the sequence of the images. Make sure that each links to each other and they logically fit all together. Be prepared to add, subtract and replace pictures from the group that you originally started with until you are sure that you have the strongest mix of photographs.
When it comes to presenting the series, it may help with the continuity of the group if all the prints are trimmed to the same shape and size. Then, you can present them in rows on one mount so that they read like a cartoon strip, or run them one to a page in a small album or a handmade book, or even hang them as an exhibition at a local library or café.
If you want to caption the photographs, be sparing in what you write. As a photographer it is often best to let your pictures speak for themselves, even though some viewers may differ slightly in the story they read from the sequence. People don’t like to have ideas rammed into their heads; unless you can write brilliant copy you will probably only be repeating what can be seen anyway and this can seem precious or patronizing.
Figure 45.1 Part of a documentary series on a British country town. Differing print sizes help to give variety.
Sets of pictures that share a common theme but are not based on a narrative often don’t need to be read in a set order. This approach offers you much freedom of layout. Follow some of the layout ideas on the pages of picture magazines and display your work more as a ‘photo-essay’, presenting half a dozen prints on an exhibition board or page of a large format album. As Figure 45.1 shows, you can make all the picture proportions different in a documentary series, to give variety and best suit each individual composition.
Don’t be tempted to slip one or two dull or weak pictures into a photo-essay just because their subject content ought to be included. Every shot should be good enough to stand on its own and each should add strength to the whole series. If you feel that there are gaps in the sequence, then it may be necessary to take some more pictures. Similarly, if one print is a bit too small or large relative to others, be prepared to print it again at a different size.
When laying out your set of pictures, take care over the way you relate one print to another – the lines, colors, textures and shapes, as well as the subject matter they contain, should flow together well, not conflict and confuse.
Storage options
Digital images
One of the real advantages of working digitally is that there is little cost (after your initial equipment purchase) involved in shooting as many images as you like. So, obviously, with no film and printing costs to worry about, many digital photographers are amassing hundreds if not thousands of images each year. This is great for the photographer, but once you have saved your pictures to the hard drive, locating an individual image later can be a major drama.
Figure 45.2 Most image editing programs contain special browsing features that are designed to help locate individual images amongst the thousands stored on photographers’ hard drives. Bridge, pictured here, is the browser application that ships with Photoshop.
Recently, editing programs like Photoshop and Photoshop Elements have included image browsing features that make searching for specific photographs as simple as hunting through an electronic ‘contact sheet’ displayed on screen (see Figure 45.2). The trick to taking full advantage of these programs is making sure that the sets of images taken for different occasions are stored in aptly named folders. Do not just load all the photographs that you make into the one folder tilted My Photographs, as very quickly you will find that searching for images will become a tedious process of scrolling through hundreds of thumbnails. Instead, make a new folder for each shooting occasion. Name the folder with a title that makes sense and include a date – ‘Bill’s Birthday, October 2004’.
Most new computers have very large hard drives that can store many thousands of digital photographs, but even with this amount of space, if you are a dedicated photographer there will come a time when you will need to add extra storage. The simplest option is to have another hard drive added to your machine by a technician at the local computer store.
Figure 45.3 Your digital photographs are stored as individual files in folders on drives in your computer. You can aid the location of individual pictures by creating new folders for each photographic session and labelling these with titles that reflect their contents.
Where does my image file go when I save it? (see Figure 45.3)
One of the most difficult concepts for new computer users is the fact that so much of the process seems to happen inside a small obscure box. Unlike traditional photography, where you can handle the product at every stage – film, negative and print – the digital production cycle can seem a little unreal. Knowing where your image goes when you store it is one such part of this mysterious process.
• Windows machines. All devices that are used to store digital information are usually called drives. In Windows computer terms they are labelled with letters – the ‘A’ drive is for your floppy disk drive and the ‘C’ drive your hard disk. It is possible to have a different drive for every letter of the alphabet, but in reality you will generally only have a few options on your machine. If, for instance, you have a CD or DVD drive, then this will probably be called the ‘D’ drive, with any card readers attached to your machine being labelled ‘E’.
• Macintosh computers. If your platform of choice is the Macintosh system, then you need not concern yourself about the letter names above. Each drive area is still labelled but a strict code is not used.
Within each drive space you can have directories (Windows) or folders (Macintosh). These act as an extra way to organize you files. To help you understand, think of the drives as drawers within a filing cabinet and the directories as folders within the drawers.
When you save your files from inside an image editing program, the picture is held within a folder on a specific drive. To locate and open the picture again, you must navigate to this place and select the image that you want to edit, so make sure that when you are making folders and naming files that you use labels that make sense.
Backing up of important images is another consideration that many new digital photographers need to make. Unlike the situation with traditional photographic images, where new prints can be easily made from the original negatives if the first ones are damaged or misplaced, digital files, once lost, damaged or accidentally overwritten, are gone forever. From the moment that you start making digital photographs you should ensure that your best pictures are always stored in a second place other than your computer’s hard drive. This can be as simple as copying your pictures to a data CD or DVD, or even saving them on an external hard drive. Any of these options will guarantee that you pictures are preserved if your main hard drive fails or is infected with a computer virus. Ensuring that you keep up-to-date duplicates of all your important pictures is one of the smartest work habits that the digital photographer can learn.
Decide what to backup
Ask yourself ‘What images can’t I afford to lose – either emotionally or financially?’ The photos you include in your answer are those that are in the most need of backing up. If you are like most image makers then every picture you have ever taken (good and bad) has special meaning and therefore is worthy of inclusion. So let’s assume that you want to secure all the photos you have accumulated.
Organizing your files is the first step to guaranteeing that you have backed up all important pictures. To make the task simpler store all your photos in a single space. This may be a particular drive dedicated to the purpose or a ‘parent’ directory set aside for image data only. If currently your pictures are scattered across your machine then set about rearranging the files so that they are stored in a single location. Now from this time forward make sure that newly added files or older images that you are enhancing or editing are always saved back to this location. See Figure 45.4.
Figure 45.4 Organizing your image files into one central location will make it much easier to back up or archive all your pictures in one go.
Gone are the days when creating a backup of your work involved costly tape hardware and complex server software. Now there are a variety of simpler ways to ensure that your files are secure.

Create duplicate CD-ROM or DVD discs –
The most basic approach employed by many photographers is to write extra copies of all imaging files to CD-ROM or DVD disc. It is easy to create multi-disk archives that can store gigabytes of information using software like Roxio Creator Classic or Toast.
The program divides up the files into disc size sections and then calculates the number of blanks needed to store the archive. As each disc is written, the software prompts the user for more discs and sequentially labels each DVD in turn. In this way whole picture libraries can be stored on a set of disks.
Backup from your editing program –
Both Photoshop Elements and Photoshop CS2 (in conjunction with Version Cue) have backup options.
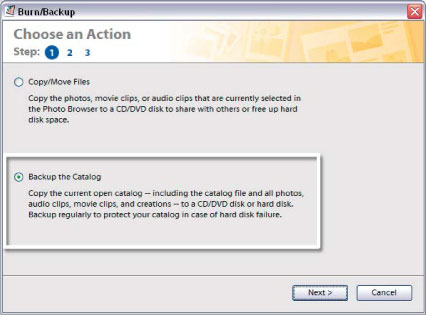
The Backup feature (Organizer: File > Backup) in Photoshop Elements is designed for copying your pictures (and catalog files) onto DVD, CD or an external hard drive for archiving purposes. To secure your work simply follow the steps in the wizard. The feature includes the option to back up all the photos you currently have cataloged in the Photo Browser along with the ability to move selected files from your hard disk to CD or DVD to help free up valuable hard disk space.
Adobe has also included sophisticated backup options in its Creative Suite release. By placing your Photoshop files in a Version Cue project you can take advantage of all the archive features that this workspace provides. Backups are created via the Version Cue administration screen. Here individual archive strategies can be created for each of your projects with the user selecting what to back up, where the duplicate files will be saved and when the automated system will copy these files.
Use a dedicated back up utility –
For the ultimate in customized backup options you may want to employ the abilities of a dedicated backup utility. Until recently many of these programs were designed for use with high-end networked environments and largely ignored the smaller home or SOHO users, but recent releases such as Roxio’s BackUp MyPC are both affordable and well suited to the digital photographer. The program provides both wizard and manual approaches to backing up your photos, includes the option to compress the archive file and gives you the choice of Full (all files duplicated) or Incremental (only backs up changed files since last backup) backup types.
Back up regularly
There is no point having duplicate versions of your data if they are out of date. Base the interval between backups on the amount of work you do. In heavy periods when you are downloading, editing and enhancing many images at a time, back up more often; in the quieter moments you won’t need to duplicate files as frequently. Most professionals back up on a daily basis or at the conclusion of a work session.
Store the duplicates securely
In ensuring the security of your images you will not only need to protect you photos from the possibility of a hard drive crash but also from such dramatic events as burglary and fire. Do this by storing one copy of your files securely at home and an extra copy of your archive disks or external backup drives somewhere other than your home or office. I know that this may sound a little extreme but swapping archive disks with a friend who is just as passionate about protecting their images will prove to be less painful than losing all your hard work.
CD-ROM or DVD writer –
This option is very economical when coupled with writing software that is capable of writing large numbers of files over multiple discs. The sets of archive discs can easily be stored off site, ensuring you against theft and fire problems, but the backup and restore process of this approach can be long and tedious (see Figure 45.5).
Figure 45.5 DVD writers are available in both external and internal versions and provide a cheap and generally reliable method of backing up your important images. Once your photo collection grows beyond 4.7 Gb then it is a good idea to use spanning software to split the backup across several discs.
External hard drive –
Connect via USB or Firewire these external self-contained units are both fast and efficient and can also be stored offsite, providing good all-round protection. Some, like the Maxtor One Touch models, are shipped with their own backup software. Keep in mind that these devices are still mechanical drives and that care should be taken when transporting them (see Figure 45.6).
Figure 45.6 External hard drives are now far more affordable than ever before. They provide a fast, reliable and portable backup solution for photographers with many gigabytes of image files to protect.
Backup glossary:
Multi-disk archive – A process, often called spanning, by which chunks of data that are larger than one disc, can be split up and saved to multiple CD-ROMs or DVDs using writing software. The files can be recompiled later using utility software supplied by the same company whose software wrote the discs.
Version Cue – Version Cue and the backup features it includes is included free when you purchase the Adobe Creative Suite and is not supplied when you buy Photoshop as an individual product.
Full backup – Duplicates all files even if they haven’t changed since the last time an archive was produced.
Incremental backup – Backs up only those files that have changed since the last archive was produced. This makes for faster backups but means that it takes longer to restore files as the program must look for the latest version of files before restoring them.
Restore – Reinstates files from a backup archive to their original state on your hard drive.
Adding an extra hard drive inside your computer that can be used for backing up provides a fast and efficient way to archive your files but won’t secure them against theft, fire or even some electrical breakdowns such as power surges.
Online or web-based backup –
Not a viable option for most image makers as the number of files and their accumulative size makes transfer slow and the cost of web space exorbitant (see Figure 45.7).
Figure 45.7 More and more people are turning to web solutions for their online backup. Given the size of many photo archives though, this can often be a slow way to back up your images. Storing copies of your work online does provide the added benefit that the photos can be accessed anywhere in the world and programs like Photoshop Elements now provide an online backup feature inside the program.
Figure 45.8 Some ways of showing work. (1) Cling film album. (2) Glass frame. (3) Pocket file. (4) Photo CD. (5) Print box.
Negatives and prints
Smaller family albums give you less scope for layout ideas but they are a quick, convenient way to sort out your best shots. Most albums are geared to the print sizes produced by the photo labs, laying out two or three to a page. The type that have a ‘cling film’ overlay on each page allow you to insert, reposition or remove prints at any time without adhesive or mounting equipment. A pocket file (Figure 45.8) is also a handy way of carrying around small prints.
Unframed enlargements on individual board mounts are most safely stored in boxes made of archival material. You can keep to one standard mount size and buy or make a box that opens into two halves so that anyone viewing your pictures can move them from one half to the other.
Don’t overlook the importance of filing negatives and contact prints efficiently too – otherwise you may spend hours searching for an important shot you want enlarged. A ring file with loose-leaf sleeved sheets (negative sleeves), each accepting up to 36 negatives, is ideal. If you make a contact sheet off all your pictures, punch each one and file it next to its set of negatives.
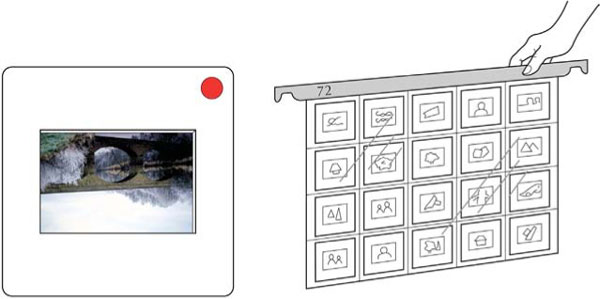
Processed slides are normally returned to you in plastic, glassless mounts. For maximum protection from finger-marks and scratches it is advisable to transfer your best slides into glass mounts. If you have your own projector, these selected shots can be stored in a magazine, ready for use. Each slide should have a large spot stuck on its mount at the bottom left when you hold the picture correct way up, exactly as it should look on the screen. This gives you a visual guide for loading the slide into the projector. Always make sure that the image is loaded with this spot in the top right facing the lamp. To store a large slide collection, keep them in pocketed clear plastic sheets (Figure 45.9), which can be numbered and hung in any standard filing cabinet.
Figure 45.9 (Left) Spot the slide mount top right (image upside down) when loading the projector. (Right) Clear plastic hanging sheets have individual pouches for slides and can be numbered for filing.
When projecting slides pick a matt white surface for your screen, as even a slightly tinted wall will distort colors. The slight presence of light will dull colors and turn blacks into flat grays, so make sure that your room is darkened.
46 Non-traditional presentation
As well as the traditional ways of presenting your work, such as albums, boxes or exhibitions, the world of digital has opened up a whole new range of display options for the photographer who wants to share his or her work. Some, like the digital slide show, mimic traditional techniques whilst others such as web presentations offer completely new ways of presenting and viewing your photographs.
Slide shows without the slides
I’m sure that it wouldn’t take too much prompting for many readers to recall the dreaded family slide shows that seem to occur regularly on lazy Sunday evenings in many households around the country. Everyone’s favorite uncle would present a selection of the family archives, and we would all sit around amazed at how much we had changed and try not to make rude comments about clothing styles and receding hairlines.
Well, the days when most photographers recorded the family history on slide film are slowly going, but the slide show events that accompanied these images are starting to make a comeback – thanks, in part, to the ease with which we can now organize and present our treasured digital photos on new media like CD and DVD discs. Gone too are the dusty projectors, being replaced instead by DVD players linked to widescreen ‘tellies’.
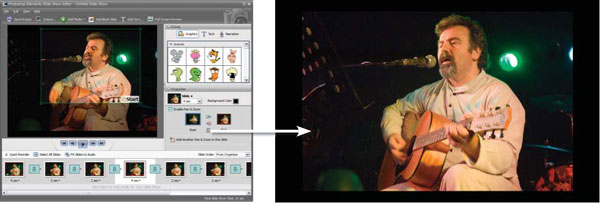
Figure 46.1 With the advent of digital photography, the traditional slide show has been given a new twist. The images are sequenced on the computer and then recorded to CD or DVD ready for showing on a computer or television.
Products like Photoshop Elements handle the initial image processing, editing and enhancing, and then the slide show creation, picture sequencing and recording to disc all in the one program suite. Using the following steps, you can produce a CD-based slide show complete with main menu that can be shown on TV or computer screen.
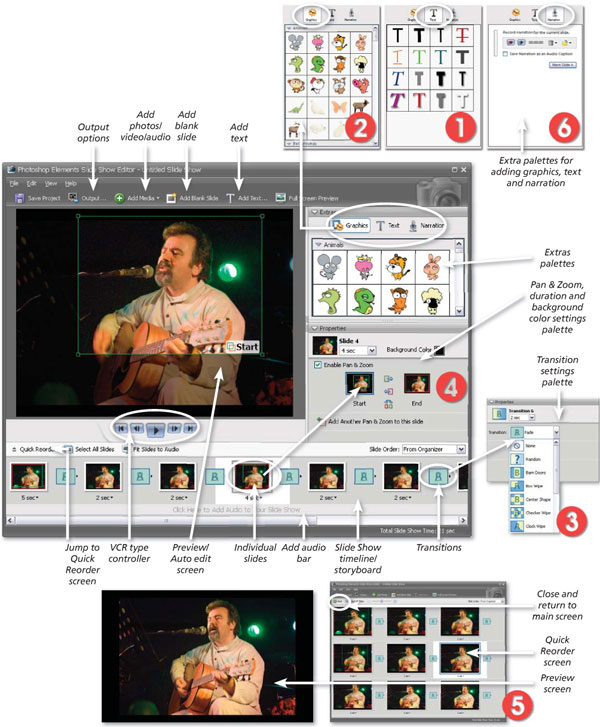
Figure 46.2 The fully featured Slide Show editor in Photoshop Elements provides a variety of output options.
Creating your own slide shows
The Slide Show editor inside Photoshop Elements can produce no less than five different types of presentations. The editor contains an easy-to-use interface and options that allow users to create true multimedia slide shows complete with music, narration, pan and zoom effects, transitions, extra graphics, and backgrounds and titles. The finished presentations can be output as a file, burnt to CD or DVD, e-mailed as a slide show, sent directly to your television (Windows XP Media Center Edition users only) or sent to Premiere Elements for further editing.
Creating presentations Photoshop Elements uses an approach that centers all production activities around a single editor interface and it is only at the time of outputting that you choose the type of slide show that you want to create. In this way you can create (and save) a single slide show project and then repurpose the presentation in many different forms (online, DVD, PDF slide show or direct to TV) by simply selecting different output options (see Figures 46.2 and 46.3).
Figure 46.3 The Photoshop Elements Slide Show editor provides a single workspace for the creation and editing of your presentation creations.
Features of the Photoshop Elements Slide Show editor
Though the Slide Show editor may at first seem a little complex, having all the controls in one place certainly means that you can create great multimedia presentations easily and efficiently. The following key features are included in the editor (see Figure 46.3):
• Automatic editing: Rotate, size, change to sepia, black and white or back to color and apply Smart Fix and Red Eye Fix to your photos without leaving the Slide Show editor. Click the Preview image to display the Edit options in the Properties palette.
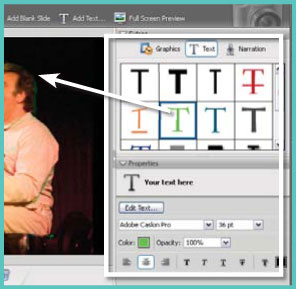
• Styled text: Select from a range of text styles with click, drag and drop convenience.
• Add graphics: The Slide Show editor now includes a variety of clip art that can be added to your presentations. Double-click or click-drag to place a selected graphic onto the current slide.
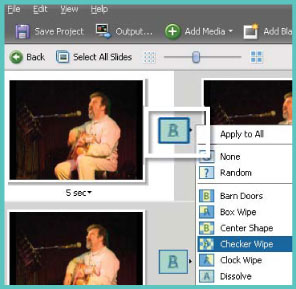
• Transitions: Add individual transitions between slides by clicking the area in the middle of the slides in the storyboard and then selecting the transition type from those listed in the Properties pane.
• Pan and Zoom: Add movement to your still pictures by panning across or zooming into your photos. Simply select the slide in the storyboard and then check the Enable Pan & Zoom option in the Properties pane. Click on the left thumbnail (Start) and set the starting marquee’s (green) size and position, then switch to the right thumbnail and adjust the ending marquee’s (red) size and position.
• Quick Reorder: This new sequencing screen enables you to quickly and easily adjust the position of any one photo in the presentation sequence using click and drag.
• Music and narration: Add music and extra audio to the show using the Add Media button and incorporate narration using the built-in slide show recorder.
Creating your first slide show
The Slide Show feature in Photoshop Elements is one of the Photo Creations options. Like all of these output projects you multi-select the images to include first inside the Organizer space before opening the feature.

Step 1: Select images and settings
Preselect the photos to include in the show from within the Photo Browser and then select Organizer: File > Create > Slide Show. Set the defaults for the presentation in the Slide Show Preferences dialog.
Step 2: Adjust sequence and transitions
Adjust the slide sequence by click-dragging thumbnails within the storyboard or Quick Reorder workspaces. Insert transitions by clicking the space in between slides and selecting a type from the menu in the Properties pane.
Step 3: Add audio
Add graphics and text by click-dragging from the Extras pane. Record voice-over by selecting a slide and then using the Narration option in the Extras pane. Add existing audio by clicking the soundtrack bar at the bottom of the storyboard.
Step 4: Produce the show
Produce the slide show by selecting File > Output Slide Show and picking the type of presentation to produce from the Slide Show output dialog. The option to send the presentation to Premiere Elements is only available if this extra program is installed.
Disc types explained
Most CD and DVD writing software including the recording utilities built into Photoshop Elements can burn slide shows in a variety of disc formats.
The most common formats are VCD, SVCD and DVD. The VCD or Video Compact Disc stores shows with the lowest resolution of the three. SVCD or Super Video Compact Disc is next with DVD (Digital Versatile Disc) storing the highest quality presentation. Most DVD players can read and display the content of any of these formats, but to be sure that your machine is compatible, check the equipment’s manual.
Figure 46.4 Clicking the photo in the Preview area of the editor switches the contents of the Properties palette to contain simple editing tools. These include rotate left and right, Scale and Crop options, Auto Smart Fix, convert to black and white or sepia and Auto Red Eye Fix. For more advanced editing tasks click the More Editing button to transfer the photo to the Full Edit workspace.
E-mail photocards (see Figure 46.5)
Sending e-mails is nothing new, but adding your favorite pictures as attachments is a great way to share your photographs. Add some true spice to your next e-mail message by adding a picture postcard featuring images of a recent party or sites from your latest holiday. Or why not combine your love of photography with the speed and convenience of e-mail to produce the twenty-first century equivalent of the ‘carte de visite’ showcasing the latest family portrait.
Many software packages now make the process of making the photograph suitable for the task by playing around with pixel dimensions, compression settings and special web file formats a simple affair. Operating systems like Windows XP allow you to e-mail pictures (as attachments) directly from the folder they are stored in. If you want a little more control, then many of the image editing packages provide this level of flexibility too.
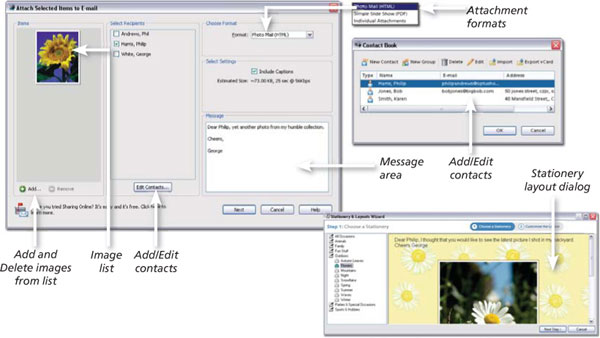
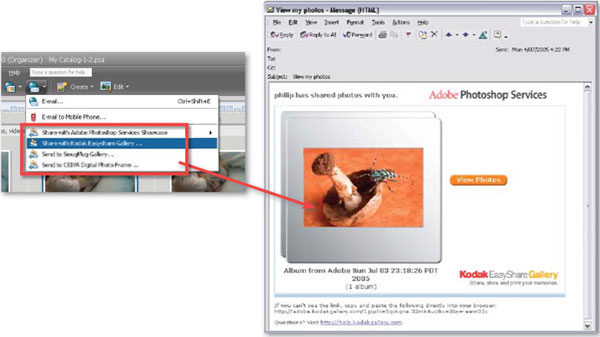
Figure 46.5 The File > E-mail dialog provides a range of ways that you can attach your pictures to e-mails. You can also add and remove contacts, via the Contact Book, and type your message directly into the window. Pressing OK opens your e-mail program, adds in your message and recipient details, and attaches an optimized version of your picture to the new e-mail document. If you have selected the PhotoMail format then you will be prompted to choose the stationery and decide on the layout of the message as part of the e-mailing process.
In fact Photoshop Elements includes a special Attach to E-mail function designed just for this purpose. The latest version contains a Contact Book dialog where you can add individual contacts, make groups from several e-mail addresses, and import and export to and from common e-mail contact formats such as vCards or Microsoft Outlook.
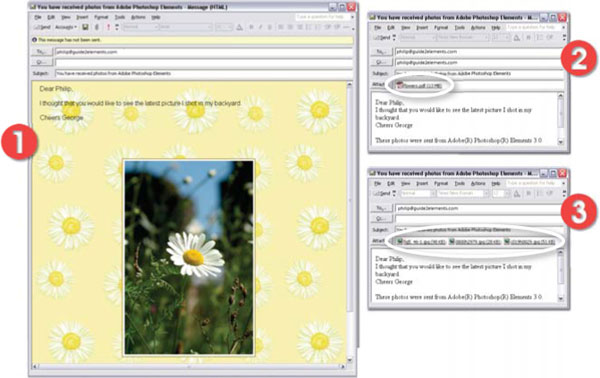
Figure 46.6 With the Organizer: File > E-mail feature you can choose between (1) HTML, (2) PDF slide show and (3) Individual file e-mail formats.
The Attach to E-mail dialog is the center of the e-mailing process. Here you can attach photographs as individual files (the way you do through your e-mail program), as a PDF slide show (that Elements makes on the fly for you) or you can add the photos to an HTML e-mail complete with choice of a range of fancy backgrounds and borders. The images that will be attached to the e-mail can be selected in the Organizer workspace before opening the feature or can be added or removed via the thumbnail listing on the left of the dialog (see Figures 46.5 and 46.6).

Step 1: Select image(s) to include
You can elect to use a photo that is currently open in the Editor workspace or multi-select images from inside the Organizer workspace. Then select the File > E-mail to start the feature and display the new dialog.

Step 2: Add or remove photos
Add or delete photos from the thumbnail list of those to include with the buttons at the bottom left of the dialog.

Step 3: Choose recipients and format
Choose an existing recipient from the contacts list or add a new contact to the list. Pick the format that the pictures will appear in from the drop-down menu.

Step 4: Adjust settings for PDF format
For PDF Slide Show and Individual Attachment options select the size that the pictures will be converted to as part of the attachment process.
Step 5: Pick stationery for Photo Mail format
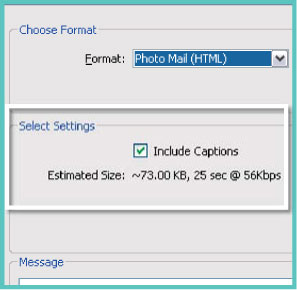
For the Photo Mail (HTML) option click next and then select the stationery to use as a background for the e-mail. Customize the layout of the e-mail and click Next.

Step 6: Add message and send
Add in your message and click OK. When your e-mail program displays the new message click Send to e-mail the message.
Putting your pictures onto the web is a great way to create a permanent, ‘open all hours’ gallery of your work. For many photographers new to the web, the steps involved in putting together a series of linked web pages can seem a little daunting, but there are many software packages on the market that can help make the process easier.
Both Photoshop Elements and Photoshop have wizard-based web gallery production features. In Elements the feature is called Photo Galleries and in Photoshop it is titled the Web Photo Gallery.
The Photoshop Elements Photo Galleries feature can be found under the File > Create menus in both the Editor and Organizer workspaces. The wizard contains sections where you can set the template and style of the website, the heading and colors used on the pages, where you want the project saved and more importantly how the website is to be shared.
Users are able to multi-select pictures from the Photo Browser first, before entering the feature, rather than having to use all the pictures located in a single folder or directory as was the case in previous versions. In the same vein the revised Photo Galleries dialog contains a very useful Add/Remove Pictures section which displays a thumbnail list of those photos currently selected for inclusion in the website. In addition, the order that pictures appear in the web gallery can be changed by clicking and dragging thumbnails to new spots in the list (see Figure 46.7).
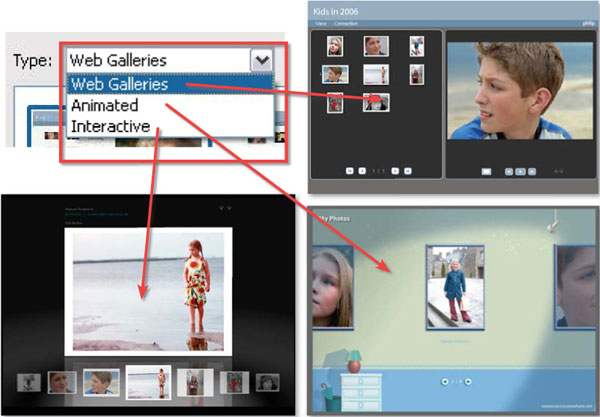
The latest version of the feature includes animated and interactive gallery types as well as the more traditional static thumbnail and display image templates. Selecting which gallery type to produce is a choice made at the beginning of the Photo Galleries wizard (see Figure 46.8). The options are:
• Web Galleries – A set of thumbnail images together with a larger display photo. Clicking on a thumbnail displays the selected photo in the preview space.
• Animated – A selection of animated galleries placing framed images against colorful sets or backgrounds. Images change by clicking Forward and Back buttons.
• Interactive – A variety of designs that allow the user to navigate through the sequence of images or move the photos on screen.
Built for speed
In the process of creating the site, all your images will be converted to JPEG files, so there are also options in the Photo Galleries dialog to alter the level of compression that is applied. Rather than having to select the exact compression and image dimensions, the values for these variables are set via the site style selected as well as the entry chosen in the Optimize settings.
Going live
With the site completed, the next step is to transfer all the files to some server space on the Net. Companies called ISPs, or Internet Service Providers, host the space. The company that you are currently using for ‘dial-up’ or cable connection to the Net will probably provide you with 5–10 Mb of space as part of your access contract. As an alternative there are a range of hosting businesses worldwide that will store and display your gallery for free, as long as you allow them to place a small banner advertisement at the top of each of your pages. Whatever route you take, you will need to transfer your site’s files from your home machine to the ISP’s machine. In previous versions of Elements this process was handled by a small piece of software called an FTP or File Transfer Protocol program. Thankfully the new Photo Galleries feature contains an integrated FTP utility within the Share To section of the dialog (see Figure 46.9). You can choose between the following Share options:
Figure 46.7 The Photo Galleries wizard contains two main dialogs. (1) The first features photo Add and Remove buttons, the ability to change the position of the photo in the gallery sequence, and Type, Template and Style options. (2) The next dialog provides a range of settings where the user can customize the gallery, and the Save and Share options that will be used in its production.
Figure 46.8 The websites created with the Photoshop Elements Photo Galleries wizard move beyond simple static pages and now include Animated and Interactive options.
• Photoshop Showcase – Upload to a free online sharing area provided by Adobe Photoshop Services.
• My FTP Site – Transfer to your own ISP or Net space provider.
• CD – An option for burning the gallery to a CD.
• Do Not Share – The option used for just saving the gallery.
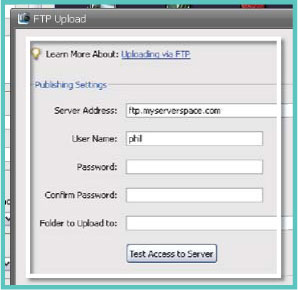
Figure 46.9 The My FTP Site option uses a File Transfer Protocol (FTP) utility to upload your files to a server on the web.
Creating your own photo gallery
Use these steps to guide you through creating your first photo website using Photoshop Elements:

Step 1: Select image(s) to include
Select the pictures you want to include in the site from those thumbnails displayed in the Organizer workspace. Hold down the Ctrl key to multi-select individual files and the Shift key to select all the files in a list.

Step 2: Add or remove photos
Select Organizer: File > Create > Photo Galleries. Add or remove photos from the list of those to be included in the gallery (thumbnails on the left). Adjust the position of the images in the presentation sequence by click-dragging the thumbnail within the group.

Step 3: Choose template type and style
Choose the Type and Template from those listed in the Template section of the first dialog in the wizard. Next select a style from those thumbnails displayed in the Choose a Template section of the dialog. Varying styles are not available when you select animated or interactive gallery types. Click the Next Step button to proceed to the second dialog.

Step 4: Add site details
Select the Show Title Bar option and input Gallery Title, Caption and About details. Also type in the gallery owner’s name and contact e-mail address. The exact options for adding gallery details will change according to the gallery type and style you select. The next step if you opted to produce a web galleries style is to adjust the Slideshow settings. You can alter the Duration and Transition Effect settings.

Step 5: Select download speed
Select the download speed used by the majority of the viewers who will be surfing your site. Broadband creates a site with better quality and larger photos whereas dial-up makes smaller files for faster loading.
Step 6: Adjust site settings and preview
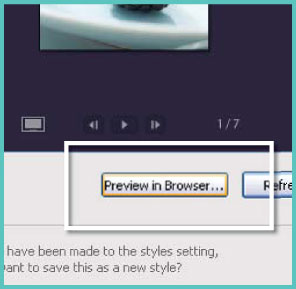
Adjust the color, opacity and text that will be used for the site and then choose whether you want to include any captions or file names under the display pictures. With all the options set, preview the website in the computer’s default browser by clicking the Preview in Browser option.
Step 7: Save new site style
If you have changed any of the basic style settings and wish to save them as a new style then click the Yes radio button and add in a name to the Save Style As area. You can reuse this setting later by selecting it from the Style section in the first dialog.

Step 8: Save the Photo Galleries project
Input the file name for the gallery and the location of the saved files before selecting the Output option from the Share To menu. Here the My FTP Site option was selected. Click the Next Step button. This action saves the project, produces the site and opens the FTP utility.
Step 9: Share the site online
Add in the details for your FTP site, which can be obtained from your service provider, and then click Upload to transfer the website to the web server.
 In Photoshop:
Photoshop’s Web Photo Gallery tool is a purpose-built feature designed to take a folder full of images and produce a multi-page, fully linked, gallery site in the matter of a few minutes. The process is as simple as navigating your way through a series of choices, inputting some text, selecting some pictures and pressing OK.

The result is a website that contains both thumbnails (small index images) and gallery photographs (larger versions of your pictures). Each of the thumbnails is hot linked and, when clicked, opens a larger version of the image or transports the viewer to one of several gallery pages. You can choose to include file name, titles or even security watermarks for each image and viewers can navigate between pictures with a few simple button clicks. Overall, not bad work for a few minutes spent selecting folders and inputting text.
Figure 46.10 The files produced by the Web Photo Gallery feature need to be uploaded to the web in exactly the same arrangement (folder and files) as they were created in order for your site to function correctly.
Website tips
When Photoshop or Elements creates your site, the program makes three folders or directories, titled ‘images’, ‘thumbnails’ and ‘pages’. These are placed in your designated Destination folder along with one or two extra files (depending on the style of site you choose) – index.html and thumbnailFrame.html. Together, these are the core components of your website (see Figure 46.10).
To ensure that your site works without any problems, all of these components need to be uploaded to your ISP. You also shouldn’t move, or rename, any of the folders, or their contents, as this will cause a problem when the pages are loaded into a web browser. If you want to add extra images to your site, or change the ones you have, then it is easiest to make a completely new site to replace the old version.
Sharing online – the Web Photo Galleries alternative
The online sharing facilities that are available inside Elements are an interesting alternative to creating a web photo gallery. Multi-selected pictures or even whole catalogs can be uploaded and shared online.
The pictures are stored on the web in an album format that has options to run as a slide show via space provided by third parties such as the Kodak Easy Share Gallery service. Selected friends and relatives are automatically e-mailed and invited to view (and, of course, buy prints) as part of the sharing process. This approach is a lot easier than creating your own web pages and then having to upload them to an ISP server space that you have to organize. The downside to e-sharing your photos this way is that you have few choices over the way that the pictures are displayed (see Figure 46.11).
Other online sharing sites include www.SmugMug.com and www.Flickr.com. The uploads to these sites are not linked to any particular image editing software. Instead the process of transferring the pictures from your machine to the web space is handled via a series of web browser pages.
Figure 46.11 The Elements online sharing options allow you to upload and share several pictures or even whole collections of photos with your friends over the Internet.

Step 1: Select images to share
Multi-select the files to include from the Organizer workspace then choose a Sharing option from those listed in the Share menu accessed via the Share shortcut button. Register for the sharing service using the next few screens or if you are already a member simply log in.
Step 2: Choose recipients
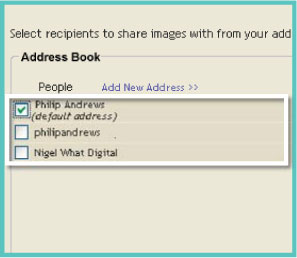
Select the recipients that you want to invite to share you online album from those in your contact book. Add extra names and contact details if need be. Add a subject heading and message to be included in the notification e-mail and choose whether the viewers need to sign in to see the album.

Step 3: Upload photos and notify participants
The photos will then be uploaded and the invitation e-mails sent out to the people in your contact list that you selected. At the same time a confirmation e-mail is sent to your own e-mail address letting you know that the album has been shared.
Is your photography improving, and if so, on what basis can you tell? It’s important to develop some way of assessing the success of picture making. One very practical approach is to put prints up on the wall at home for a while and see if you can keep on enjoying them – perhaps seeing something new each time you come back to look.
Another way is to discuss your pictures with other people – both photographers and non-photographers. By this route you may also discover if and why others reach different interpretations of the same photograph, and how these vary from what you aimed to express.
Discussion is easiest if you are a member of a group, club or class, putting up several people’s latest work and then getting everyone to contribute comments. At worst, it allows you to see your own pictures afresh and also discover what others have been doing. At best, you can get down to learning why pictures are taken and the reaction and influence they can exert on others.
But how do you criticize photographs, deciding what is ‘good’ and what ‘bad’? There are at least three aspects to consider, each varying in its importance according to the stage you have reached and the type of photography you undertake.
Technical quality
This has greatest importance when you are a beginner, needing to gain experience in the use of equipment and processes. It involves questions of whether exposure and focusing were correct. Could the print have better color, be darker or less contrasty, and is there too much grain (or digital noise)? As well as improving your technical ability, this form of criticism is especially valid in photography used for accurate record-making. It is mostly concerned with facts (the negative is either sharp or unsharp, grainy or grain free), but if overdone the danger is that you apply the same rules to every picture, irrespective of subject and approach. This in itself can be a problem.
For instance, some photographs more concerned with expression than strict accuracy should be dark and gray or light and contrasty, to strengthen and carry through the emotional content of the particular image. To criticize these images heavily because of ‘incorrect’ printing technique would be to miss the point of the photographs in the first place.
Communication of ideas
Here results are judged mainly in terms of the approach you have used to express your ideas. This means establishing (or imagining) the purpose of the picture – factual, persuasive, etc. – and then deciding whether your result succeeds in this visual intention.
Maybe it is concerned with expressing the relationship between two people. Perhaps the picture is making a broader comment on society in general … or captures the peak of some action or event. Again, most of the interest may be in the content of the photograph and what can be read into a picture.
Formal structuring
Another concern is how effectively the visual ‘building blocks’ of pictures have been used. Your photograph’s overwhelming strength may lie in its design – compositional aspects such as framing, use of perspective, color, pattern, tonal values and so on. Relative to these imaginatively used elements, the precise nature of the subject itself might take second place. On the other hand, you may have chosen to allow the subject to remain a key element but made much stronger (in dramatic appeal, for example) through the way you planned and constructed your picture.
Whatever approach to criticism you adopt, and, of course, several can be used at once, your photograph is a sort of catalyst. On the one hand, there is you the photographer with your own attitudes and interests, and the physical problems you remember overcoming to get this result. In the middle is the photograph itself, which may or may not communicate the facts and ideas. On the receiving end, there is the viewer with his or her interests and background experience, the way they feel at that particular moment and the physical conditions under which your photographs are seen. All these elements contribute to the judgement of just how successful the photograph is deemed to be.
Discussing photography as a whole area, as well as individual photographs, is very much a part of studying the subject. What things can photography do well, and what can painting or drawing do better? How many ways might a particular theme or type of subject be approached? Educate yourself and make your ‘eye’ more visually literate by looking at the work of other photographers, in exhibitions and collections of their work printed in books.
Photography is essentially a medium, like writing or speaking, for expressing ideas and communicating information. In the hands of an artist, it provides an outlet for personal feelings and offers almost as much freedom as drawing or painting. Used by a scientist, it can report and measure in a detailed, factual way. Thanks to modern technology, everyone can now take photographs which ‘come out’ – giving unfettered opportunities to develop visual skills and so make pictures with an individual, personal style.


