PDA User Interface
The PDA user interface is based on the J2SE Abstract Window Toolkit (AWT). This section of the chapter is structured as follows: First, we compare the PDA AWT subset with other AWT versions. Then, a short general introduction to the AWT programming is given. The sections “Custom Components” and “Custom Layout Managers” cover some aspects with special importance for programming limited devices. The section “Multiple Threads in the PDAP AWT Subset” shows how you can build multithreaded AWT programs, although the PDAP AWT subset is limited to a SWING-like single thread model. Finally, we'll implement an AWT application combining some of the discussed concepts.
Comparison of the PDAP AWT Subset to Other AWT Versions
The java.awt classes included in PDAP are based on the (CDC-based) Personal Profile AWT building block. The Personal Profile AWT is a clean subset of Java 2.0 AWT. It covers the complete Java 1.1 AWT, and contains several additions from Java 2, such as buffered images, support for thread-safe access and several convenience methods. Thread-safe AWT programming is discussed in more detail in the section “Multiple Threads in the PDAP AWT Subset.” Additionally, some methods helping to reduce creation of intermediate objects introduced with Java 2.0 were taken over into the Personal Profile. Examples for this type of methods are getWidth(), which replaces a call to getSize()returning an intermediate dimension object.
Compared to the Personal Profile AWT, the PDAP AWT is slightly more restricted. The PDAP AWT subset contains only the packages java.awt, java.awt.event, and java.awt.image. Moreover, those packages are not complete; several classes and methods are missing. For example, more Java 2 additions such as buffered images and Graphics2D support were left out. The Cloneable, Serializable, and Externalizable interfaces are not supported in CLDC. Also, the AWTPermission was left out because the implied security model is not part of CLDC. A complete comparison of the PDAP AWT subset to the Java 2 AWT API can be found in Appendix B,“Comparison Charts.” Figure 4.1 illustrates the relations between the different AWT versions.
The PDAP AWT subset supports an unlimited number of frames, but the device might show only the top frame on the screen. The frames may be restricted to a fixed size. When using both LCDUI screens and AWT frames, the LCDUI display behaves similar to an additional frame. Mixing LCDUI and AWT isn't recommended, and it isn't possible to mix AWT and LCDUI components in a single Frame or Screen.
Note
PDA applications that don't rely on special microedition packages other than midlet can run on the desktop without an emulation environment by implementing a dummy javax.microedition.midlet.MIDlet class like that shown in the following code snippet:
package javax.microedition.midlet;

public class MIDlet {

    protected abstract void startApp ();
    protected abstract void pauseApp ();
    protected abstract void destroyApp (boolean unconditional);

    public void notifyDestroyed () {
        System.exit (0);
    }
}
In addition, you need to add a main method to the actual MIDlet implementation that creates a corresponding instance and calls the startApp() method.
The corresponding main() method for the HelloPdap example is
A Short Introduction to AWT Programming
Although this book is targeted at programmers who have some basic Java experience, a short introduction to AWT programming is included here. The motivation is that modern Java desktop applications are mostly based on SWING, and servlets are based on an HTML interface, so a large fraction of Java programmers might not have much experience with AWT. Also, Rapid Application Development tools contained in several J2SE IDEs might not yet be able to generate PDAP-compatible code.
For a more detailed explanation of AWT, refer to a general Java book covering AWT or to the online tutorials provided by Sun http://java.sun.com/docs/books/tutorial/. An overview about AWT is available from Sun's AWT Web site at http://java.sun.com/products/jdk/awt/.
Basic Component Model
Graphical user interfaces usually consist of a number of components like buttons, text fields, or check boxes. In the Abstract Window Toolkit, these elements are represented by Java classes such as Button, TextField, and Checkbox. These classes handle the drawing of the corresponding components, as well as basic handling of user interactions. Most elements of the user interface are derived from the abstract base class Component. The Component class provides access methods for the common properties of the user interface classes, such as the size and position.
A special subclass of Component is Container, which can contain a set of other components—including containers. A special example of a container is a Frame. The Frame class represents a regular screen window. Other containers are Panels, which are used for grouping components, and dialog windows.
Using a Frame and a Label, you are already able to build an AWT-based “Hello World” program (see Listing 4.1). In the constructor, a Frame with the title "Hello World" is created and then a Label showing "Hello World" is added to the Frame.
Listing 4.1. ComponentSample.java
User Interaction and Event Handling
The original ComponentSample MIDlet doesn't allow user interaction. However, some kind of exit button would be useful. Buttons are represented by the component class Button. The only parameter of the constructor is the button label text. The following lines add a button to the south area of the frame (the layout areas will be described in more detail in the next section):
Button b = new Button ("Exit");
frame.add (b, BorderLayout.SOUTH);
When the program is started with the additional lines, a button will appear at the bottom of the Frame, but nothing will happen when the button is clicked. The button still needs to be linked to the desired action, in this case leaving the program. In AWT, all kinds of user interface interactions—like clicking a button—are represented by event objects. In the case of a Button, the corresponding event object is an instance of ActionEvent. If an application is interested in some kind of event, it must implement the corresponding listener interface, containing one or more callback methods. For ActionEvents, the listener interface is
public interface ActionListener {
   public void actionPerformed (ActionEvent e);
}
Both the event classes and listener interfaces are contained in the package java.awt.event.
In order to handle events, an object implementing the listener interface must be registered with the component that is the source of the events. For registering an action listener, the button class provides the method addActionListener(ActionListener l).
In order to keep your sample program simple, you can add the actionPerformed() method to the MIDlet class directly and thus let it implement the ActionListener interface (see Listing 4.2).
Listing 4.2. ComponentSample2.java—Enhanced Version of the ComponentSample Handling User Interaction
AWT contains lots of other active components and events. Introducing them all here would exceed the scope of this book. Table 4.1 gives an overview of the AWT components. Please note that the component events apply to all other (derived) components, although listed only once in the component description. Table 4.2 gives an overview of all events that are available in PDAP and the corresponding listener interfaces that are needed for handling those events.
Containers and Layout
As soon as the user interface consists of more than one or two components, the screen layout of the components becomes an issue. For some devices, it would be possible to place the components at fixed pixel positions. However, for portable Java applications, this approach isn't really suitable. In addition to the different screen sizes and layouts, the components might also have different sizes on different PDAs.
Fortunately, Java provides a powerful mechanism to cope with layout problems: Layout Managers. Layout Managers can be assigned to subclasses of Container such as Frame, Dialog, or Panel using the setLayoutManager() method. Layout Managers place the components contained in the assigned Container with respect to special rules determined by the concrete subclass of LayoutManager used. For example, GridLayout arranges all contained components in a grid where each component has exactly the same size. BorderLayout divides the Container into five regions as shown in Figure 4.2. The desired region is given as a parameter to the add() method when adding components to the container. The border region takes the minimum space that is required for displaying the contained components, and the remainder goes to the center area. The BorderLayout is the default layout manager of Dialogs and Frames. The FlowLayout arranges all components in a horizontal line where the width of the components is minimized and the height is aligned to the minimal height of the highest component. FlowLayout is the default layout manager of Panel.
Although the layout managers provide basic layout options, quite flexible layouts can be achieved by nesting containers and thus combining layout managers. For example, in order to show a list of aligned labels and input elements, two panels with a grid layout can be placed in the west and center areas of a border layout. If the number of labels in the west grid matches the number of input components in the center grid, the labels and input components are vertically aligned automatically. Furthermore, the space for the labels is limited to the minimum, whereas the input components get all the remaining space. Dialog buttons are usually placed in a panel with flow layout in the south area of the dialog.
As a sample application demonstrating nested Panels (and BorderLayout and FlowLayout), you will implement a PDA user interface for the British Museum Algorithm. Basically, the idea behind the British Museum Algorithm is that, given a set of monkeys typing on typewriters, eventually all existing literature in the world would be generated—you just need to wait long enough. We simulate a monkey typing a line by randomly generating characters. The user interface should consist of a button for generating a sentence, an exit button, and a list of sentences generated so far. How can we distribute the screen space in a way that the buttons are displayed and all the remaining space goes to the list of sentences? The answer is quite simple: We put the list in the center of a BorderLayout, which gets all remaining space not taken by the other regions. In the south area, we put a Panel with FlowLayout, where we add the buttons. Fortunately, BorderLayout is the default layout of frames and FlowLayout is the default layout of Panels, so we do not need to explicitly set a layout. (We will do so in an extended example.)
Listing 4.3 shows the implementation of the application. The components are created with the corresponding variables and arranged in the constructor of the MIDlet. The call of the pack() method performs the layout of the components and adjustment of the frame size. (Some PDAs might have a fixed frame size covering the whole screen.) The actionPerformed() method terminates the application or generates a new sentence by calling generateSentence(), depending on the button pressed. Figure 4.3 shows the actual layout of the application on a Palm Pilot.

Listing 4.3. GhostWriter.java—The Typing Monkeys Source Code
Another common layout is, as we mentioned earlier, a list of labels and corresponding fields, such as the input mask of an address book. Suppose that we want to log only the good sentences typed by the simulated monkeys because of the limited memory of a PDA. Additionally, we have two monkeys to choose from. In order to display these options, we would like to show a label “generated,” a TextField with the generated sentence, a label “monkey,” and a choice containing the names of the monkeys, as shown in Figure 4.4.

In order to achieve this layout, we create a new control panel having the layout set to BorderLayout. In the east area of the new control panel we put a grid-layout label panel, and in the center area we put a grid-layout field panel. Because both subpanels will contain the same number of components and GridLayout distributes space equally between the components, the components will be aligned vertically as desired. The new control panel is then inserted in the north area of the application Frame.
Listing 4.4 shows our enhanced typing monkeys application. The new layout code is marked bold in order to highlight the interesting additions to the previous example. Figure 4.5 shows the complete user interface of the extended application.

Listing 4.4. GhostWriter2.java—Enhanced Typing Monkeys Source Code
When you're designing PDA applications, saving the limited screen space is especially important. For cases in which the screen is too small to hold all the required information, the ScrollPane and CardLayout classes are provided. The CardLayout class is a layout manager that allows distribution of components over several cards. The cards are denoted by a String, and only one card is shown at once. For example, using a Choice component, the user can be allowed to switch between cards. The ScrollPane can contain an area that is larger than its space on the screen by using scrollbars for navigation. Both classes are described in more detail in the section “Switching Layouts Depending on the Screen Resolution Available.”
Dialogs and Menus
In larger applications, the user interface might become overloaded with buttons and other widgets for invoking different program actions. In order to minimize the space that is occupied by those widgets, pull-down menus can be used instead, especially for less important actions or configuration options. This approach gives you the opportunity to add many menu items to a menu without wasting the scarce screen space of a mobile device. An AWT menu consists of at least three classes:
One MenuBar containing a set of Menus
Some Menus consisting of multiple Menuitems
MenuItems sending ActionEvents to registered Listeners
This coherence is illustrated in Figure 4.6.

Another opportunity to save screen space is to move widgets to dialogs. Dialog is a class similar to Frame. Both classes are direct subclasses of the Window class. Like a frame, a dialog represents a rectangular area of the screen and can hold a set of widgets. In contrast to frames, dialogs can be modal and are designed as a temporary display for obtaining user input or similar purposes. A dialog needs to have a frame as a parent.
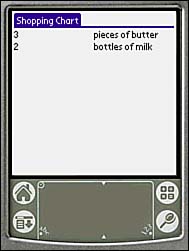
In order to show how menus and dialogs can be used in a PDAP application, we create a small shopping chart application, showing a list consisting of Amount and Item columns (see Listing 4.5).
For displaying the list, we use a Panel with GridLayout. In order to get as much space as possible for the user data, we create a separate dialog class for adding new rows, InsertItemDialog. The dialog is invoked by selecting the menu item Insert of the Item menu. As already illustrated in Figure 4.6, there is a 1-to-n relation between MenuBar, Menu, and MenuItem. The following code snippet creates a MenuBar, registers the MenuItem insert with the ActionListener of the Frame, and finally concatenates the MenuBar with the frame:
MenuBar menuBar = new MenuBar();
Menu menu = new Menu ("Items");
MenuItem insertItem = new MenuItem ("insert");
insertItem.addActionListener (this);
menu.add (insertItem);
menuBar.add (menu);
frame.setMenuBar (menuBar);
If the user selects the menu item insert, the actionPerformed() method of the registered handler is called, where the generated ActionEvent is handled. In the actionPerformed() method, a dialog will be shown enabling the user to add text into two columns labeled Amount and Item. The following code snippet is responsible for creating an instance of our InsertItemDialog, showing the dialog and adding the results to the main panel:
public void actionPerformed(ActionEvent ae) {
    InsertItemDialog dialog = new InsertItemDialog(frame);
    dialog.show();
    textPanel.add (new Label (dialog.getAmount()));
    textPanel.add (new Label (dialog.getItem()));
    frame.validate();
}
Because the dialog is modal, it will block the event handler of the frame until the dialog is dismissed using the OK button. In this case, the event handler switches back to the frame. To make sure that the new content of the grid layout is arranged properly, we call the invalidate() method of the frame.
Listing 4.5. ShoppingChart.java
Figure 4.7 shows a shopping chart that is displayed using the GridLayout of the java.awt package.
Note
This introduction gives a rough overview of the PDAP subset of AWT only. Appendix B contains a general comparison of the J2SE AWT and the AWT subset contained in PDAP.
Custom Components
Compared to SWING, the component set of AWT is quite limited. Most additional third-party AWT components probably won't fit to the constraints of the subset contained in the PDA Profile in most cases. In order to close this gap, it is often necessary to create custom components.
In order to be prepared for this task, you need to recall the main functionality that is provided by a component:
Displaying the component on the screen
Handling user events
In this section, we will start with a passive component not handling user events. Implementing a progress bar component, we describe all steps necessary to display a custom component on the screen. After we have created the non-interactive progress bar component, we will implement an image button capable of handling user events.
The Component class is the abstract super class of all non-menu related AWT components. It can be extended directly to create a customized component necessary for our progress bar and image button component as well.
The ProgressBar should provide a graphical representation of integer values in a bar graph style, comparable with a non-interactive Gauge of the MIDP lcdui package.
Listing 4.6 contains the source code of our ProgressBar implementation. The current progress value in the range from 0 to 100 is stored in the value variable. The method setValue() is used to change the state of the ProgressBar during application runtime.
In order to create a component that is capable of displaying itself, we need to overwrite the paint method. The paint method is responsible for drawing the component itself. In the progress bar paint() method, we use the given graphic object to draw a progress bar depending on the value variable and the current size of the component.
Most custom components need to overwrite two additional methods that are important for the appropriate layout of the component. The methods getMinimumSize() and getPreferredSize() are used by layout managers to query the size information of the component. Overwriting these methods with custom implementations makes sure that the component is displayed in an appropriate size.
Listing 4.6. ProgressBar.java
For testing purposes, we provide a small application shown in Listing 4.7 to show how the ProgressBar can be integrated into a MIDlet; the application is shown in Figure 4.8. The application just provides a Scrollbar for setting the current progress value and the ProgressBar itself. Real applications using the progress bar will probably be multithreaded. Note that for thread-safe access to AWT, it is necessary to use the EventQueue.invokeLater() method, described in the section “Multiple Threads in the PDAP AWT Subset.”
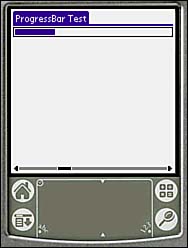
Listing 4.7. ProgressTest.java
After the implementation of the ProgressBar, we will now focus on an active component that is capable of handling user events. In order to show how this can be achieved, we will implement a button that displays an image instead of a text label. When the button is pressed by tapping the stylus on it, it will create an ActionEvent and send it to all registered listeners.
As in the ProgressBar implementation, we derive our ImageButton component from the Component class. Listing 4.8 contains the source code of the ImageButton. The paint(), getPreferredSize(), and getMinimumSize() methods correspond to their counterparts of the ProgressBar implementation. The constructor takes an image object and a command string and stores the parameters in object variables.
For handling user input, one possibility would be to register a mouse listener. However, for custom components, it is more appropriate to overwrite the processMouseEvent() method, which receives all mouse events when enabled. Enabling the events roughly corresponds to the registration process of the listener interface. This is done by calling the enableEvents() method of the Component class with the parameter AWTEvent.MOUSE_EVENT_MASK. Without this call, our implemented processMouseEvent() method would never be called by the event handler.
In addition to handling mouse events, it is necessary to enable users of the component to register action listeners, just like for regular buttons. Thus, the methods addActionListener() and removeActionListener() must be provided. The listeners variable contains a Vector that keeps track of the listeners registered with the ImageButton component.
In the processMouseEvent() method, a check for the event ID MOUSE_CLICKED is performed. If the mouse event passes the test, an ActionEvent object is created and sent to the actionPerformed() methods of all registered listeners by iterating through the listeners.
Listing 4.8. ImageButton.java
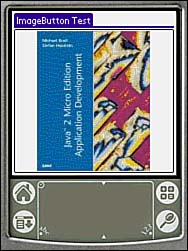
For testing purposes, we provide a small application shown in Listing 4.9 to show how the ImageButton can be integrated into a MIDlet. The application uses an ImageButton that is registered to an ActionListener of the Frame. When the ImageButton is clicked, we increment a clickCount variable and display its value in the frame title.
Listing 4.9. ImageTest.java
Figure 4.9 shows the ImageTest application containing the ImageButton component created in this section.
Switching Layouts Depending on the Screen Resolution Available
The screen sizes of PDAs differ significantly between different models. Figure 4.10 illustrates a set of different PDAs from various vendors showing diverse screen formats and orientations. The Nokia 9210 has a horizontal display with a resolution of 640x240 pixels. Regular Palms have a screen resolution of 160x160 pixels. The HandEra 330 has a vertical screen format with a resolution of 240x320 pixels similar to the screen of most PocketPCs such as the Compaq IPaq.

In some cases, to make optimal use of the screen space available, a layout that dynamically adopts to the screen resolution available might make the most sense. In order to demonstrate this concept, assume that we would like to display two components with a fixed size. Depending on the screen format, there might be space enough for both components, or only one component might fit on the screen. If both components fit, they might fit only if horizontally or vertically arranged. It might also be possible that not even a single component will fit in the available space. Clearly, we want to make optimal use of the screen space available, so if both components fit, both should be displayed. If one component fits, we need a control to switch the displayed component, similar to a JTabbedPane in Swing. Finally, if not even one component fits, a scrollbar should allow the user to select a region of the component(s) to be displayed.
How can this goal be achieved? It isn't as difficult as it might seem. Fortunately, there is a special method doLayout() that the AWT system calls whenever an arrangement of a component is required. So it is possible to overwrite this method, look at the space available, and then arrange the child components accordingly.
For the example code, assume that width and height are the actual dimensions of the components to be displayed. The following subclass of Panel arranges the two components rect1 and rect2 with respect to the width and height variables as described in the previous paragraph.
We start the implementation of doLayout() by removing all contained components, disabling a choice control for switching between the images, and storing the actual dimensions in a local variable d:
class DynPanel extends Panel {

      public void doLayout () {
          removeAll ();
          cardChoice.setEnabled (false);
          Dimension d = getSize ();
Now we can figure out if enough space is available for displaying at least one of the images by comparing the actual size with the image width and height. If one image fits, further tests are performed to determine whether both images can fit in the space available. If so, the images are arranged accordingly by setting the layout manager to a corresponding grid layout, and both images, rect1 and rect2, are added to the panel:
if (d.width >= width && d.height >= height) {

    boolean dw = d.width >= 2 * width;
    boolean dh = d.height >= 2 * height;
            if (dw | dh) {
                if ((dw && !dh) || (dw && dh && d.width > d.height))
                    setLayout (new GridLayout (1, 2));
                else
                    setLayout (new GridLayout (2, 1));

                add (rect1);
                add (rect2);
            }
If there is enough space for one image but not enough for both of them, only one is displayed, depending on the state of a choice in the main frame. Also, the choice is enabled in order to let the user select the component she would like to view:
    else {
        setLayout (new BorderLayout ());
        add (cardChoice.getSelectedIndex () == 0 ?
             rect1 : rect2);
        cardChoice.setEnabled (true);
    }
}
Finally, if not even one image fits in the space available, we create a ScrollPane that contains the two child components in a subpanel with a grid layout:
    else {
        setLayout (new BorderLayout ());
        ScrollPane scroll = new ScrollPane ();
        Panel panel = new Panel (new GridLayout (2, 1));
        panel.add (rect1);
        panel.add (rect2);
        scroll.add (panel);
        add (scroll);
    }

    super.doLayout ();
}
For the case in which the application is running on a system with flexible window sizes, we need to add a method returning the desired size of the dynamic panel. Here, the dimensions allowing a horizontal arrangement of the child components are returned:
    public Dimension getPreferredSize () {
        return new Dimension (2 * width, height);
    }
}
Listing 4.10 contains the code for the complete DynLayout example. The inner class RectComponent is a custom component that is inserted into the DynPanel, showing the effects. It just draws an empty or filled rectangle, depending on the boolean value given to the constructor. Besides the DynLayout with the two instances of RectComponent (rect1 and rect2), the application frame contains text fields for setting the width and height variables. These are useful for demonstrating the effects of the dynamic layout because the screen size itself is usually fixed. The constructor of the DynLayout arranges the control components and sets the listener. The itemSelected() method is responsible for changing the displayed RectComponent if the choice control is switched.
Although this example is limited to a special case, it serves as a demonstration for some principles of dynamic layout. Feel free to extend it as needed, for example by querying the actual sizes of child components instead of using the width and height variables or by adding support for more than two child components.
Listing 4.10. DynLayout.java
Custom Layout Managers
Although the PDAP AWT subset contains all AWT layout managers including the flexible GridBagLayout, there may still be cases that cannot be handled by the standard layout managers. Although nesting panels with different layout managers helps in many situations, this approach isn't suitable for all scenarios and is also very resource consuming. Thus, the design of custom layout managers, generating application dependent layouts, is of special importance for developing PDAP applications.
If we look back to the DialogMenuDemo application created in the section “Dialogs and Menus,” the amounts and items are arranged using a GridLayout. Thus, the horizontal space is equally distributed to both columns regardless of their actual size. Using a GridBagLayout, it would be possible to distribute the space in a more flexible way. However, here you will learn the creation of custom layout managers by the example of a layout manager similar to GridLayout, but allowing different column widths and row heights. Because the layout is similar to the layout policy of HTML tables, this layout manager is called TableLayout.
The first step of creating a custom layout manager is to implement the LayoutManager interface, consisting of the methods listed in Table 4.3. Those methods are responsible for the interaction of the layout and the container it is assigned to.
In addition to the LayoutManager interface methods, the TableLayout needs a constructor. The TableLayout constructor takes the number of columns as parameter and stores it in the cols object variable. The number of rows isn't required because it can be calculated by dividing the total number of components by the number of columns. The following code snippet shows the TableLayout constructor and a helper method for calculating the row count:
public TableLayout (int cols) {
    this.cols = cols;

    if (cols < 1)
        throw new RuntimeException
            ("cols must be > 0");
}

int getRowCount (Container container) {
    return (container.getComponentCount () + cols - 1) / cols;
}
Before we can implement the methods for calculating the minimal or preferred layout size or performing the actual layout itself, it makes sense to think about a helper method caring about the common calculations of all those methods.
For both calculating the minimum layout sizes and performing the actual layout task, it is necessary to know the minimum sizes of the rows and columns. The height of a row is determined by the maximum cell height of that row. The width of a column is determined by the maximum cell width of that column. The helper method getMinimumSizes() fills the given int arrays with the corresponding calculations and returns the sums in a Dimension object:
public Dimension getMinimumSizes (Container container,
                                  int [] mcw, int [] mrh) {
    int count = container.getComponentCount ();

    Dimension sum = new Dimension (0, 0);
    int i = 0;

    for (int y = 0; y < mrh.length; y++) {
        for (int x = 0; x < cols && i < count; x ++) {
            Dimension ms = container.getComponent (i++).getMinimumSize ();
            mcw [x] = Math.max (mcw [x], ms.width);
            mrh [y] = Math.max (mrh [y], ms.height);
        }
        sum.height += mrh [y];
    }

    for (int x = 0; x < cols; x++)
        sum.width += mcw [x];

    return sum;
}
Using this getMinimumSizes() method, the minimumLayoutSize() method of the LayoutManager interface can be implemented easily by just adding the container insets to the returned dimensions:
public Dimension minimumLayoutSize (Container container) {

    Insets insets = container.getInsets ();
    int rows = getRowCount (container);

    Dimension result = getMinimumSizes
        (container, new int [cols], new int [rows]);

    result.width += cols - 1 + insets.left + insets.right;
    result.height += rows - 1 + insets.top + insets.bottom;

    return result;
}
For the limited screen sizes of PDAs, it seems appropriate to return the minimumLayoutSize also as a preferred layout size:
public Dimension preferredLayoutSize (Container container) {
    return minimumLayoutSize (container);
}
The main job of the TableLayout is done in the layoutContainer() method. The method resizes each component that is added to the container according to its height and width and the container size. If there is remaining space, all components are scaled with an equal factor, calculated by dividing the space available by the minimum layout size:
public void layoutContainer (Container container) {

    int count = container.getComponentCount ();
    int rows = getRowCount (container);

    if (count == 0) return;

    Insets insets = container.getInsets ();
    Dimension size = container.getSize ();

    int x0 = insets.left;
    int y0 = insets.top;

    int w0 = size.width - x0 - insets.right;
    int h0 = size.height - y0 - insets.bottom;

    int [] mcw = new int [cols];
    int [] mrh = new int [rows];

    Dimension min = getMinimumSizes (container, mcw, mrh);

    // calculate a scale factor

    int scx = ((w0-cols+1) << 8) / min.width;
    int scy = ((h0-rows+1) << 8) / min.height;
    int i = 0;

    for (int y = 0; y < rows; y++) {
        int x1 = x0;
        int h = (mrh [y] * scy) >> 8;
        for (int x = 0; x < cols && i < count; x++) {
            int w = (mcw [x] * scx) >> 8;
            container.getComponent (i++).setBounds (x1, y0, w, h);
            x1 += w + 1;
        }
        y0 += h + 1;
    }
}
Because we don't need additional layout constraints such as NORTH or CENTER for the BorderLayout, we don't need to keep track of adding and removing components. Thus, the implementations of addLayoutComponent() and removeLayoutComponent() are left empty:
public void addLayoutComponent (String where, Component component) {
}

public void removeLayoutComponent (Component component) {
}
Note that if layout constraints are important, in most cases it is more appropriate to implement the improved LayoutManager2 class, which can handle arbitrary objects as layout constraints instead of Strings.
Listing 4.11 contains the full source code of the TableLayout. You can try the TableLayout by replacing the GridLayout in the ShoppingChart application. Figure 4.11 shows a corresponding screenshot. As you can see in the picture, in contrast to the original application, more space is distributed to the items and less to the amounts, resulting in a more adequate layout.

Listing 4.11. TableLayout.java
Multiple Threads in the PDAP AWT Subset
As mentioned in the beginning of this chapter, one of the main restrictions of the PDAP AWT subset is that AWT methods might be called from the event dispatching thread only. This restriction is necessary because the implementation of a thread-safe AWT subset is more complex and slower than an AWT subset based on the single thread model. Actually, the modern J2ME SWING user interface doesn't allow calls from multiple threads for the same reasons. However, this does not mean that the PDAP AWT cannot work with threads at all. It is just necessary to take some extra steps when making calls to AWT methods from separate threads.
For calls from separate threads, the AWT class EventQueue provides two static methods, invokeLater() and invokeAndWait(). Both methods take an object implementing the Runnable interface as parameter. Calls to these methods can be performed from threads other than the event handling thread. AWT automatically ensures that the run() method of the given Runnable class is then called from the AWT event thread. The difference between invokeLater() and invokeAndWait() is that invokeLater() returns immediately, whereas invokeAndWait() does not return until the run() method of the given object has been executed.
An example using multiple threads is a simulation running in a separate thread, which needs to update some components showing the simulation state from time to time.
The PdaLander application is a simplified simulation of a lunar landing. It displays the landing parameters such as altitude, velocity, and fuel remaining and allows the user to set the thrust of the engine to a value between 0 and 100%.
The core of the application, the simulation thread can be implemented as an inner class of the PdaLander application, accessing the simulation state variables velocity, height, fuel, and thrust. The constants GRAVITY and ACCELERATION reflect the gravity of the moon and the acceleration available at 100% thrust. Note that all values are measured in fine-grained units in order to avoid slow floating-point operations. All values are measured in metric units in order to simplify the calculations and to save our lunar lander from the fate of the Mars Polar lander.
The simulation is performed by measuring the elapsed time since the last simulation step and then updating all variables accordingly. The current velocity is recalculated based on the acceleration and time, the height is calculated based on the velocity and time, and finally the remaining fuel is adjusted. Then the invokeAndWait() method is called in order to update the user interface, ensuring synchronization with the AWT event thread:.
import java.awt.*;
import java.awt.event.*;
import javax.microedition.midlet.*;

public class PdaLander extends MIDlet {

    static final long GRAVITY = 1620; // mm/s2
    static final long ACCELERATION = 2*GRAVITY;

    long velocity = 0;      // 0 mm/s (= 0 m/s)
    long height = 1000000;  // 1000000 mm = 1000 m = 1 km
    long fuel = 100000;     // ms = 120 s = 2 min
    long thrust = 0;

    class Simulation extends Thread {

        long time = System.currentTimeMillis ();

        public void run () {
            do {
                long dt = System.currentTimeMillis () - time;

                velocity += ((GRAVITY - (ACCELERATION * thrust)
                              / 100) * dt) / 1000;
                height -= (velocity * dt) / 1000;
                time  += dt;
                fuel -= (thrust * dt) / 100;

                try {
                    EventQueue.invokeAndWait (screenManager);
                }
                catch (Exception e) {
                    throw new RuntimeException (e.toString ());
                }
            }
            while (height > 0);
        }
    }
The screenManager, which contains the run method indirectly called from the Simulation object, is responsible for updating the user interface according to the simulation state. It also reads the new thrust setting and determines if the lander has landed safely or crashed into the ground. The helper method milliToStr() just converts the fine grained units to the usual units by dividing them by 1000. The maximum allowable landing speed is one meter per second:
static final long MAX_VELOCITY = 1099;

Label velocityDisplay = new Label ();
Label heightDisplay = new Label ();
Label fuelDisplay = new Label ();
Scrollbar thrustSlider =
    new Scrollbar (Scrollbar.HORIZONTAL, 0, 0, 0, 100);

ScreenManager screenManager = new ScreenManager ();

class ScreenManager implements Runnable {

    public String milliToStr (long milli) {
        return (milli / 1000) + "." + Math.abs ((milli % 1000) / 100);
    }

    public void run () {

        if (height <= 0)
            heightDisplay.setText
                (velocity <= MAX_VELOCITY ? "Landed" : "Crashed!");
        else
            heightDisplay.setText (milliToStr (height));

        velocityDisplay.setText (milliToStr (velocity));
        fuelDisplay.setText (milliToStr (fuel < 0 ? 0 : fuel));

        thrust = fuel <= 0 ? 0 : thrustSlider.getValue ();
    }
}
The constructor just sets up the user interface by adding the controls and labels to the application frame:
    public PdaLander () {

        Panel intermediate = new Panel (new BorderLayout ());
        Panel controlPanel = new Panel (new GridLayout (0, 2));

        controlPanel.add (new Label ("Height:"), Label.LEFT);
        controlPanel.add (heightDisplay);
        controlPanel.add (new Label ("Velocity:"));
        controlPanel.add (velocityDisplay);
        controlPanel.add (new Label ("Fuel:"));
        controlPanel.add (fuelDisplay);
        controlPanel.add (new Label ("Thrust:"));
        controlPanel.add (thrustSlider);

        intermediate.add (controlPanel, BorderLayout.NORTH);
        frame.add (intermediate, BorderLayout.CENTER);
        frame.addWindowListener (new WindowAdapter () {
                public void windowClosing (WindowEvent ev) {
                    notifyDestroyed ();
                }
            } );

        frame.pack ();
    }
When the application is brought on the screen and not yet running, the simulation thread is started:
public void startApp () {
    frame.show ();
    if (simulation == null) {
        simulation = new Simulation ();
        simulation.start ();
    }
}
When the application is paused by the Application Management System (AMS), we do nothing. This behavior could be improved by suspending the ScreenManager thread.
public void pauseApp() {
}
When the application is terminated, the height is set to a negative value in order to make sure that the simulation thread terminates immediately. Then the frame is disposed:
    public void destroyApp (boolean unconditional) {
        height = -100000000;
        frame.dispose ();
    }
}
A simple approach to master the landing is to let the lander fall to 550 meters and then go to full thrust. When the speed is reduced to 1 m/s, go to 50% thrust.
A full listing of an improved lunar lander example without inserted text is contained in the next section.
Combined Application Example: A Lunar Lander with Graphical Display
As an example of combining some of the techniques demonstrated in this chapter, we will enhance the lunar lander example from the previous section by adding a graphical display and slightly modifying the screen layout depending on the ratio between height and width.
For the external camera view component of the lander, we create a new inner class ExternalView derived from Canvas. In the paint method, we draw a triangle representing the lander and three lines representing the engine exhaust, depending on the thrust level. The screen position of the lander is calculated in the getScrY() method by multiplying the real height with the screen height and then dividing by the maximum height. The old thrust level and display position are saved in order to be able to determine if the values have changed in the check method. The check method is called from the ScreenManager. It forces a repaint only if the thrust level or screen height has changed in order to avoid unnecessary flickering.
The animation could be improved further by repainting only the area of the ExternalView component that was actually affected by the move of the lander. Even smoother animation would be possible by using an offscreen buffer as in the MIDP stopwatch example. However, for games MIDP is probably the more appropriate profile anyway, so we do not repeat the corresponding code here:
    class ExternalView extends Canvas {

        int oldY;
        long oldThrust;

        public void paint (Graphics g) {

            int x = getSize ().width / 2;
            int y = getScrY ();

            g.drawLine (x-5, y-1, x+5, y-1);
            g.drawLine (x-5, y-1, x, y - 10);
            g.drawLine (x+5, y-1, x, y - 10);

            if (thrust > 10) {
                g.drawLine (x-3, y+1, x-3, (int) (y + 1 + thrust / 20));
                g.drawLine (x+3, y+1, x+3, (int) (y + 1 + thrust / 20));
                g.drawLine (x, y+1, x,  (int) (y + 1 + thrust / 15));
            }

            oldY = y;
            oldThrust = thrust;
        }

        public Dimension getPreferredSize () {
            return new Dimension (50, 100);
        }

        public Dimension getMinimumSize () {
            return new Dimension (20, 50);
        }

        int getScrY () {
            int scrH = getSize ().height;
            return scrH - (int) (height * scrH / START_HEIGHT);
        }

        public void check () {
            if (thrust != oldThrust || oldY != getScrY ())
                repaint ();
        }

    }
The second improvement of our new PdaLander version is an automatic adoption to the screen size ratio. Because the graphical display takes some additional space to the right of the controls, the labels are automatically displayed above the controls instead of to the left if the height of the screen is greater than the width:
    public PdaLander2 () {

        Dimension d = Toolkit.getDefaultToolkit ().getScreenSize ();
        boolean vertical = d.height > d.width;

        Panel intermediate = new Panel (new BorderLayout ());
        Panel controlPanel = new Panel (new GridLayout (0, vertical ? 1 : 2));

        int align = vertical ? Label.LEFT : Label.RIGHT;

        controlPanel.add (new Label ("Height:", align));
        controlPanel.add (heightDisplay);
        controlPanel.add (new Label ("Velocity:", align));
        controlPanel.add (velocityDisplay);
        controlPanel.add (new Label ("Fuel:", align));
        controlPanel.add (fuelDisplay);
        controlPanel.add (new Label ("Thrust:", align));
        controlPanel.add (thrustSlider);

        intermediate.add (controlPanel, BorderLayout.NORTH);
        frame.add (intermediate, BorderLayout.WEST);
        frame.add (externalView, BorderLayout.CENTER);

        frame.addWindowListener (new WindowAdapter () {
                public void windowClosing (WindowEvent ev) {
                    notifyDestroyed ();
                }
            } );

        frame.pack ();
    }
Listing 4.12 shows the complete source code of the enhanced PdaLander example and Figure 4.12 shows a screenshot of the PdaLander running on a Palm Pilot.

Similar to the other examples, there is much room for your own improvements. For example, the display of a crashed lander could be designed differently from a successful landing. A more sophisticated extension would be to allow vertical movements and to add some kind of terrain structure. Another possible improvement would be to add a double buffered display, eliminating any screen flickering.