The JMenu Bar and JMenu classes in Swing work almost the same as those in the AWT. However, the JMenuItem class adds constructors that allow you to include an image alongside the menu text. To create a menu, you create a menu bar, add top-level menus, and then add menu items to each top-level menu.
    JMenuBar mbar = new JMenuBar();            //menu bar
    setJMenuBar(mbar);                         //add it to JFrame
    JMenu mFile = new JMenu("File");           //top-level menu
    mbar.add(mFile);                           //add it to the menu bar

    JMenuItem Open = new JMenuItem("Open");    //menu items
    JMenuItem Exit = new JMenuItem("Exit");
    mFile.add(Open);                           //add them to the menu

    mFile.addSeparator();                      //put in a separator
    mFile.add(Exit);
The JMenuItem object also generates an ActionEvent, and thus menu clicks cause these events to be generated. As with buttons, you simply add ActionListeners to each of them.
    Open.addActionListener(this);              //for example
    Exit.addActionListener(this);
Menus and toolbars are really two ways of representing the same thing: a single click interface to initiate some program function. Swing also provides an Action interface that encompasses both.
public void putValue(String key, Object value);
public Object getValue(String key);
public void actionPerformed(ActionEvent e);
You can add this interface to an existing class or create a JComponent with these methods and use it as an object that you can add to either a JMenu or a JToolBar. The most effective way is simply to extend the AbstractAction class. The JMenu and JToolBar will then display it as either a menu item or a button, respectively. Further, since an Action object has a single ActionListener built in, you can be sure that selecting either one will have exactly the same effect. In addition, disabling the Action object has the advantage of disabling both representations on the screen.
Let's see how this works. We start with a basic abstract ActionButton class and use a Hashtable to store and retrieve the properties.
public abstract class ActionButton extends AbstractAction {
    Hashtable properties;

    public ActionButton(String caption, Icon img) {
        properties = new Hashtable();
        properties.put(DEFAULT, caption);
        properties.put(NAME, caption);
        properties,put(SHORT_DESCRIPTION, caption);

        properties.put(SMALL_ICON, img);

    }
    public void putValue(String key, Object value) {
        properties.put(key, value);
    }
    public Object getValue(String key) {
        return properties.get(key);
    }
    public abstract avoid actionPerformed(ActionEvent e);
}
Following are the properties that Action objects recognize by key name:
DEFAULT
LONG_DESCRIPTION
NAME
SHORT_DESCRIPTION
SMALL_ICON
The NAME property determines the label for the menu item and the button. The LONG_DESCRIPTION
is not used at present. The SMALL_ICON property does work correctly.
Now we can derive an ExitButton from the ActionButton like this.
public class ExitButton extends ActionButton {

    JFrame fr;
    public ExitButton(String caption. Icon img) {
        super(caption, img);
    }
    public void actionPerformed(ActionEvent e) {
        System.exit(0);
    }
}
We do the same for the FileButton, adding these to the toolbar and menu as follows:
//add the File menu
        JMenu mFile = new JMenu("File");
        mbar.add(mFile);

        //create two Action Objects
        Action Open = new FileButton("Open",
                new ImageIcon("open.gif"), this);
        mFile.add(Open);

        Action Exit = new ExitButton("Exit",
                new ImageIcon("exit.gif"));
        mFile.addSeparator();
        mFile.add(Exit);
//now create a toolbar that fixes up the buttons as you add them
        toolbar = new JToolBar();
        getContentPane().add(jp = new JPanel());
        jp.setLayout(new BorderLayout());
        jp.add("North", toolbar);

        //add the two action objects
        toolbar.add(Open);
        toolbar.addSeparator();
        toolbar.add(Exit);
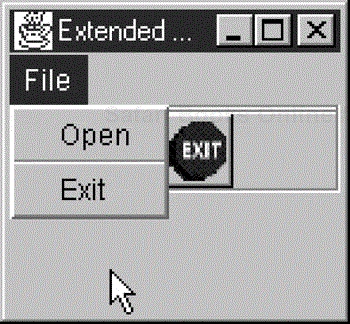
This code produces the program window shown in Figure 30.1.
The problem with this approach is that we don't usually want the images in the menu or the text on the toolbar. However, the add methods of the toolbar and menu have a unique feature when used to add an action object: They return an object of type JButton or JMenuItem, respectively. We can use these to set the features the way that we want them. For the menu, we want to remove the icon.
    Action Open = new FileButton("Open",
                new ImageIcon("open.gif"), this);
    menuitem = mFile.add(Open);
    menuitem.setIcon(null);
For the button, we want to remove the text and add a tooltip.
    JButton button = toolbar.add(act);
    button.setText("");
    button.setToolTipText(tip);
    button.setMargin(new Insets(0,0,0,0));
This gives us the screen look that we want, shown in Figure 30.2.
Objects that implement the Action interface deserve discussion because they exemplify at least two design patterns. First, each Action object must have its own actionListener method and thus can directly launch the code to respond to that action. In addition, even though these Action objects might have two (or more) visual instantiations, they provide a single point that launches this code. This is an excellent example of the Command pattern.
In addition, the Action object takes on different visual aspects depending on whether it is added to a menu or to a toolbar. In fact, you could decide that the Action object is a Factory pattern, which produces a button or menu object depending on where it is added. It does seem to be a Factory because the toolbar and menu add methods return instances on those objects. On the other hand, the Action object seems to be a single object and gives different appearances depending on its environment. This is a description of the State pattern, according to which an object seems to change class (or methods) depending on the object's internal state.
One interesting and challenging aspect of the design patterns discussed in this book is that once you start looking at a pattern, you discover that it is represented far more widely that you first assumed. In some cases, the application and implementation are obvious; in other cases, the implementation is more subtle. In these cases, you step back, tilt your head, squint, and realize that from that angle it looks like a pattern where you hadn't noticed one before. Again, being able to label the code as exemplifying a pattern makes it easier for you to remember how it works and easier for you to communicate to others how that code is constructed.


