
Chapter 14. SharePoint Enterprise Content Management
In Microsoft SharePoint 2013, Microsoft has again improved and extended SharePoint’s Enterprise Content Management (ECM) capabilities. This chapter explains the different components that can be used with document management and records management in SharePoint and how they can be extended. There are many different features and components that can be used to create document management and records management solutions in SharePoint. If you are designing one of these solutions, you will have to decide which features and components are useful in your scenario. Just having a lot of document and records management–related capabilities available to you in SharePoint doesn’t mean you should use them in every document or records management solution. For every solution that you are creating, you should carefully evaluate the options that SharePoint offers out of the box and use the ones that will offer the most value. Don’t only use the options that look shiny and new.
Understanding the Managed Metadata Service Application
The first thing we examine in this chapter is the Managed Metadata Service Application. This is a service application that was introduced in SharePoint 2010 and that has enabled users to create more serious document and records management solutions in SharePoint. The Managed Metadata Service Application introduces several capabilities that allow you to scale your ECM solutions across site collections, web applications, or even farms in a consistent way. The two most important features of the Managed Metadata Service Application are the term store that contains the managed metadata terms, and the content type syndication capabilities that allow users to distribute content types across the site collection boundary.
Managed metadata in SharePoint allows you to do exactly what the name suggests: to manage the metadata in your environment. The managed metadata is stored in the term store, which is part of the Managed Metadata Service Application. Every site collection in every web application that is connected to the Managed Metadata Service Application can use the metadata stored in the term store. If the service application is published and used in multiple farms, site collections in the farms that consume the services from the published service application can also use the same metadata.
Understanding managed metadata
There is only one term store per Managed Metadata Service Application. The term store can be accessed from Central Administration by clicking the Managed Metadata Service Application or Service Application Proxy link on the Manage Service Applications page, and also by clicking the Term Store Management link on the Site Settings page in a site collection. Whether a user accessing the term store can manage the contents of the term store depends on whether the user is a term store administrator.
A term store contains term groups, which contain term sets, which contain terms. A term store will generally contain a limited number of term groups. Usually there are between 4 and about 20 term groups. By default, there are three term groups in the term store that are all used by SharePoint itself:
The People term group, which contains term sets and terms used in user profile properties.
The Search Directories term group, which contains information and settings related to the Search Service Application.
The System term group, which contains the Hashtags, Keywords, and Orphaned Terms term sets. The Keywords term set is also called a folksonomy; it is open and users can add terms to it at all times. This will happen automatically when a user fills in a value that is not in the term set yet in the Keywords column in a library or list.
In most environments, you will add at least one term group yourself. At the term group level, a description, administrators, and contributors can be selected. This means that a term group can be used as a security boundary in the term store. You can add more than just one enterprise-wide term group if different people or departments will have to manage different parts of the managed metadata. You could, for instance, create a separate term group for Human Resources, one for Legal, and one for Finance.
When term groups are created by term store or term group administrators or contributors, the terms in the term group are available in site collections that are connected to the managed metadata service application that the term store is part of. Term sets that are created in this way are called global term sets.
A site collection administrator, without specific access to the term store, can also add term sets to the term store, either directly or by creating a term set to bind to a site column in the site. These term sets will be added to a new term group, the name of which is the URL of the site collection. Term sets that are created by site collection administrators are available only within the site collection and are called local term sets. Local term sets cannot be seen or managed from the term store when it’s accessed from outside the site collection, not even by term store administrators.
Within a term group you can create many different term sets. Term sets are logical collections of terms. Examples of term sets are Country, Language, Department, Document Status and Document Type. You can have up to 1,000 term sets in a term store. At the term set level it is possible to set:
Description
Owner
Contact. This is an email address to which suggestions and feedback about the term set can be sent. If no contact is filled in, the suggestion feature is disabled for that term set.
Stakeholders. This is a list of users and groups that should be notified when changes to the term set are made.
Submission Policy This policy setting determines whether users can add terms to this term set, or whether only users with specific permissions on the term store or term group can add terms. If the term set is Open, it will behave like a folksonomy; if it is Closed, it is called a taxonomy.
Available for Tagging If this is set to True, users can use terms from this term set in their sites and libraries.
Use This Term Set for Site Navigation This setting enables this term set for usage in the new Managed Navigation features such as friendly URLs, target page settings, and catalog item page settings. This is not related to the Managed Metadata Navigation that is available in lists and libraries.
Custom Sort Order A term set can either be ordered alphabetically or manually. If Use custom sort order is selected, an administrator will have to go in to manually select the position of each term in the term set. Depending on the number of terms in a term set and on how often the terms in the term set change, this can be a very labor-intensive task. This option is new in SharePoint 2013.
Custom Properties Another new feature in SharePoint 2013 is the ability to add custom properties to a term set. This can be very useful if additional information has to be stored with a term or, for instance, if the terms are used in a custom application. Instead of having to use (or possibly misuse) the description to store this information, it is now possible to create your own custom properties.
A term set can contain up to 30,000 individual terms. Each term can have several properties added to it, which don’t count toward the number of terms:
Available for Tagging
Language This setting is relevant only if more than one language pack is installed in the environment.
Description
Default Label This is the actual label of the term.
Member Of This specifies the term sets that the term is part of. There can be more than one term set in this collection if the term is reused.
Shared Properties These are custom properties that are available on each instance of this term in the term store, and thus they are available in the original term and also in the reused terms.
Local Properties These are custom properties available only on this instance of the term.
A term store can contain a total of 1 million term sets and terms. If your environment needs more than a million term sets and terms, you will have to create a second Managed Metadata Service Application.
One thing that you might have noticed when reading this chapter, or when looking at the term store in your SharePoint environment, is that there is no recycle bin and that there are no versioning options. This means that there is no history of changes made to the term store, there is no audit trail, and it is also not possible to reverse or undo a change made to the term store. This can be a real problem, especially in a large environment, because changes made to term sets and terms in the term store can affect users when they are editing documents or items in their sites.
If a managed metadata site column is a mandatory column in a list or library, users have to select a valid term from the term set that the column is linked to before they can check in a document or list item. Suppose a user has done this; imagine the following scenario:
After the user selected a term from the term store and checked in the document, a term group administrator removes the term that the user selected from the term store, because it is no longer seen as a valid value.
The user comes back to the document and makes a small change—let’s say the table of contents was updated.
The user now wants to save the document and check it back in.
Because the previously selected term is no longer a valid term and the managed metadata site column is a mandatory column in the library, the user won’t be able to check the document back in until a different term (one that is still valid) has been selected from the term set.
This kind of behavior can be very frustrating for an end user and very hard to explain. The same behavior will occur when a term is deprecated or moved to a different term set, but it is easier to undo these changes because the term is still in the term store. If the term set were deleted completely it would have been worse, because that would have meant that the user wouldn’t be able to select a valid term and thus would not be able to check the document back in.
Besides the lack of history and auditing options, there is another challenge with the user interface of the term store: it doesn’t scale very well. If you have many terms in a term set, administrators will have to scroll through a lot of them to get to the terms that they want to adjust. To overcome the challenges of the term store user interface, you will have to create both a process and a technical solution for managing terms in the term store. Because this is a development book, we will not go into detail about the process around managing metadata, but we will look at some examples around a possible technical solution for managing the contents of the term store.
Using managed metadata in a custom solution
SharePoint offers the option of importing term sets and terms by using a .csv file. This allows administrators to import large numbers of term sets and terms without having to use the user interface of the term store. This doesn’t provide a solution for most of the problems described in the previous section, though, because you can use only the .csv file for importing terms and not for managing and deleting terms. You also can’t use all properties that are available for term sets and terms when you import them by using a .csv file. The properties in the .csv file are:
Term Set Name
Term Set Description
LCID
Available for Tagging
Term Description
Level 1 Term
Level 2 Term
Level 3 Term
Level 4 Term
Level 5 Term
Level 6 Term
Level 7 Term
As the preceding list shows, the .csv file also reflects the maximum depth of the term store. The term store has a supported depth limit of seven levels of terms. Technically you could create more by using the term store user interface, but Microsoft doesn’t support this, so you should stick to a maximum of seven, which is more than you will want to make users traverse anyway.
The only way to allow an organization to properly manage the contents of the term store is by creating a custom solution. For a real solution, you would have to include business users and set up a change process that allows users to request changes to the metadata. You would also need a user interface that allows a term store manager to make changes, preferably both for large sets of changes and for individual changes. You would need a proper sign-off before changes could be processed, and a good auditing system to be able to track who changed what. You would also have to be able to at least make changes to all or most properties of term sets and terms. In the following example, a SharePoint list will be used to add, update, delete, deprecate, and restore terms. This is not a complete and production-ready solution, but it should give you enough inspiration to get started.
Managing the contents of the term store
The downloadable .zip archive of companion code for this book contains a sample SharePoint project named WingtipToysTermStoreManager. This project contains working samples of the solution that you are going to examine over the next few pages. The solution uses a SharePoint list that can be used to add, update, delete, deprecate, and restore terms in the term store. The list has an event handler attached to it that will fire when items are added or updated. Figure 14-1 shows the list designer that is part of the SharePoint Developer Tools, showing the columns that were added to the TermStoreManagerList.

Because not all properties are available in the designer, you will also have to open up the list’s Schema.xml file to add the missing properties. The DisplayName and Type of a column and whether it’s required can be set in the list designer. However, to specify a Description, a MaxLength, and whether the column should show up in the Edit and New forms through ShowInEditForm or ShowInNewForm, you will need to edit Schema.xml. The fields are defined in the Fields element. Example 14-1 shows the fields as they are defined in the Elements.xml file, including the Description of the Term element and the ShowInNewForm and ShowInEditForm attributes for the Processed field. It also shows the choices for the Action column added through the Choice element.
<Fields>
 <Field ID="{fa564e0f-0c70-4ab9-b863-0177e6ddd247}" Type="Text"
   Name="Title" DisplayName="Term" Required="TRUE"
 SourceID="http://schemas.microsoft.com/sharepoint/v3"
 StaticName="Title" MaxLength="255" />
 <Field Name="TermID" ID="{6be4f6cb-fa19-464a-ad07-0cbeebb8b6ed}"
   DisplayName="TermID" Type="Text"
   Description="You can leave this empty if you are creating a new term.
   To update, delete, deprecate, restore, or recreate an existing term,
   please use the existing TermID" />
 <Field Name="TermSet" ID="{0a05f0ce-1159-4a6f-ae23-88778afdb6f5}"
 DisplayName="TermSet" Type="Text" Required="TRUE" />
 <Field Name="TermGroup" ID="{9bc3fa00-60e0-40de-a05d-fec8fa5755fc}"
 DisplayName="TermGroup" Type="Text" Required="TRUE" />
 <Field Name="Action" ID="{0c0d3817-1415-44eb-b5ae-4718855b72d6}"
 DisplayName="Action" Type="Choice" Required="TRUE">
   <CHOICES>
     <CHOICE>Create</CHOICE>
     <CHOICE>Update</CHOICE>
     <CHOICE>Deprecate</CHOICE>
     <CHOICE>Restore</CHOICE>
     <CHOICE>Delete</CHOICE>
   </CHOICES>
 </Field>
 <Field Name="Processed" ID="{45a7e18b-b5dc-400a-a7f0-f1177776d50a}"
 DisplayName="Processed" Type="Boolean" ShowInEditForm="FALSE"
 ShowInNewForm="FALSE" />
</Fields>
Figure 14-2 shows the edit form of the list.

Next you can add the event handler to the list. The event handler will be configured to fire on the ItemAdded and the ItemUpdated events. The code makes sure that an item isn’t processed yet (the Processed field should be False). Then it makes sure that the term store is available. If there is more than one term store—because you might be using more than one managed metadata service application—you should also make sure you are making the changes to the correct term store. Make sure to add a reference to the Microsoft.SharePoint.Taxonomy assembly, because the classes that allow you to work with the term store and its terms are in it. Next, it’s time to determine what action is required by checking the value selected in the Action column. For all actions, the code tests whether a TermID is already specified. If the action is Create and the TermID is not specified, a new TermID will be generated. For all other actions, no changes will be processed when the TermID isn’t specified. When a new TermID is generated for a new term, the ID will be written back to the TermID column in the list. The methods that can be used to update the terms in the term store, including sample values for the parameters, are listed here:
To create a new term, you have to add it to the term set: TermSet.CreateTerm(termValue, 1033, termGuid).
To update a term, you have to first retrieve the label of a term: Label updatedLabel = TermSet.GetTerm(termGuid).Labels[0]. Then you must update the label of that term: updatedLabel.Value = termValue.
To deprecate a term, you can simply set the Deprecate property of a term to true: TermSet.GetTerm(termGuid).Deprecate(true).
To restore a term, you can simply set the Deprecate property of a term to false TermSet.GetTerm(termGuid).Deprecate(false).
To delete a term, you call the Delete method of that term: TermSet.GetTerm(termGuid).Delete().
Example 14-2 shows the code used in the event handler. Make sure to commit any changes that you have made to the term store. If you are making a lot of changes in a batch, make sure you commit changes in batches of reasonable size.
/// <summary>
/// An item was added.
/// </summary>
public override void ItemAdded(SPItemEventProperties properties)
{
   if (properties.List.Title.Contains("Term Store Updates"))
   {
       SPListItem itemToProcess = properties.ListItem;
       Guid siteId = properties.SiteId;

       ProcessChanges(itemToProcess, siteId);

       base.ItemAdded(properties);
   }
}

/// <summary>
/// An item was updated.
/// </summary>
public override void ItemUpdated(SPItemEventProperties properties)
{
   if (properties.List.Title.Contains("Term Store Updates"))
   {
       SPListItem itemToProcess = properties.ListItem;
       Guid siteId = properties.SiteId;

       ProcessChanges(itemToProcess, siteId);

       base.ItemUpdated(properties);
   }
}

/// <summary>
/// Process list item changes in the term store
/// </summary>
/// <param name="itemToProcess"></param>
/// <param name="siteId"></param>
public void ProcessChanges(SPListItem itemToProcess, Guid siteId)
{
   if (!Convert.ToBoolean(itemToProcess["Processed"]))
   {
       using (SPSite site = new SPSite(siteId))
       {
           TaxonomySession taxonomySession = new TaxonomySession(site);
           if (taxonomySession.TermStores.Count > 0)
           {
               TermStore termStore = taxonomySession.TermStores[0];

               // Check to make sure that the termstore is online
               if (termStore.IsOnline)
               {
                   Group termGroup;
                   TermSet termSet;
                   string action = itemToProcess["Action"].ToString().ToLower();
                   bool itemUpdated = false;

                   // TermGroup
                   try
                   {
                       // Get the term group
                       termGroup =
                       termStore.Groups[itemToProcess["TermGroup"].ToString()];
                   }
                   catch (ArgumentOutOfRangeException ex)
                   {
                       termGroup =
                       termStore.CreateGroup(itemToProcess["TermGroup"].ToString());
                   }

                   // TermSet
                   try
                   {
                       termSet = termGroup.TermSets[itemToProcess["TermSet"].ToString()];
                   }
                   catch (ArgumentOutOfRangeException ex)
                   {
                       termSet =
                       termGroup.CreateTermSet(itemToProcess["TermSet"].ToString());
                   }

                   string termValue = itemToProcess["Term"].ToString();
                   Guid termGuid;

                   switch (action)
                   {
                       case "create":
                           if (itemToProcess["TermID"] != null)
                           {
                               termGuid = new Guid(itemToProcess["TermID"].ToString());
                           }
                           else
                           {
                               termGuid = Guid.NewGuid();
                           }

                           Term newTerm = termSet.CreateTerm(termValue, 1033, termGuid);
                           itemToProcess["TermID"] = termGuid;
                           itemUpdated = true;

                           break;
                       case "update":
                           if (itemToProcess["TermID"] != null)
                           {
                               termGuid = new Guid(itemToProcess["TermID"].ToString());
                               Term updatedTerm = termSet.GetTerm(termGuid);
                               Label updatedLabel = updatedTerm.Labels[0];
                               updatedLabel.Value = termValue;
                               itemUpdated = true;
                           }
                           break;
                       case "deprecate":
                           if (itemToProcess["TermID"] != null)
                           {
                               termGuid = new Guid(itemToProcess["TermID"].ToString());
                               Term deprecatedTerm = termSet.GetTerm(termGuid);
                               deprecatedTerm.Deprecate(true);
                               itemUpdated = true;
                           }
                           break;
                       case "restore":
                           if (itemToProcess["TermID"] != null)
                           {
                               termGuid = new Guid(itemToProcess["TermID"].ToString());
                               Term deprecatedTerm = termSet.GetTerm(termGuid);
                               deprecatedTerm.Deprecate(false);
                               itemUpdated = true;
                           }
                           break;
                       case "delete":
                           if (itemToProcess["TermID"] != null)
                           {
                               termGuid = new Guid(itemToProcess["TermID"].ToString());
                               Term deletedTerm = termSet.GetTerm(termGuid);
                               deletedTerm.Delete();
                               itemUpdated = true;
                           }
                           break;
                       default:
                           break;
                   }

                   termStore.CommitAll();
                   if (itemUpdated)
                   {
                       itemToProcess["Processed"] = true;

                       itemToProcess.Update();
                   }

               }
           }
       }
   }
}
Now that you can manage the term store in a custom solution, it is time to look at how you can use the term store’s contents in a site or list.
Creating managed metadata site columns
The most common way to use managed metadata in sites and lists is to add managed metadata site columns to them. Adding a managed metadata column though the SharePoint user interface is exactly the same as adding any other column. When you are using custom code, there a few things that are worth noting, though. Creating a managed metadata site column by using a declarative approach with Collaborative Application Markup Language (CAML) is not supported. To create a managed metadata site column from a custom solution, you will have to use code-behind. To do this, you can use the TaxonomyField class. This class inherits from SPFieldLookup, which inherits from the generic SPField class. The fact that the TaxonomyField class inherits from the SPFieldLookup class also means that it counts toward the List view lookup threshold. The List view lookup threshold is part of the List Throttling functionality. The threshold has been established to prevent users from creating list views that create database queries behind the scenes with more than eight joins. By creating views that add many joins to a single query, users could severely hamper the performance of the SharePoint environment, without being aware of doing so. The default value of the List view lookup threshold is 8, which means that eight columns that cause joins can be returned in a single query. Apart from lookup and managed metadata columns, field types that count toward the List view lookup threshold are person/group fields and workflow status fields.
A TaxonomyField has several properties that are specific to a managed metadata field:
SspId. The ID of the term store that this managed metadata column is linked to.
TermSetId. The ID of the term set from which a value should be selected.
AnchorId. The ID of the only term from which descendants can be selected. This is relevant if the selected term set has multiple levels and if only subterms of a specific term should be selectable.
CreateValuesInEditForm. If this property is set to True, values that are filled in that aren’t in the term set will be added to the term set, providing the term set itself is open.
Open. If this property is set to True, the user will be given the option to add new terms to the term set, providing that the term set itself is open.
Example 14-3 shows the code that can be used to create a managed metadata site column.
using (SPSite site = new SPSite("http://teamsite.wingtiptoys.com/"))
{
   TaxonomySession taxonomySession = new TaxonomySession(site);
   TermStore termStore = taxonomySession.TermStores[0];
   Group termGroup = termStore.Groups["Enterprise"];
   TermSet termSet = termGroup.TermSets["ToyTypes"];

   using (SPWeb web = site.OpenWeb())
   {
       web.AllowUnsafeUpdates = true;

       TaxonomyField taxonomyField = null;

       taxonomyField =
         web.Fields.CreateNewField("TaxonomyFieldType", "Type of Toys")
           as TaxonomyField;
       taxonomyField.StaticName = "ToyType";
       // Sets whether the field accepts multiple values or not
       taxonomyField.AllowMultipleValues = false;
       // The GUID of the term of which only descendants of the term can be picked
       taxonomyField.AnchorId = termSet.Id;
       // If this is set to true terms that are not validated will be created
       taxonomyField.CreateValuesInEditForm = false;
       // If this is set to true the user will be given the option
       // to add new terms
       taxonomyField.Open = false;
       // Id of the term store
       taxonomyField.SspId = termStore.Id;
       // Id of the term set from which a value can be selected
       taxonomyField.TermSetId = termSet.Id;
       taxonomyField.Required = false;
       taxonomyField.ShowInDisplayForm = true;
       taxonomyField.ShowInEditForm = true;
       taxonomyField.ShowInNewForm = true;
       taxonomyField.Group = "Wingtip Toys Columns";

       // After creating the taxonomy field you have to add it to the list
       web.Fields.Add(taxonomyField);

       taxonomyField.Update();

       web.AllowUnsafeUpdates = false;
   }
}
Using a TaxonomyWebTaggingControl
If you want to use managed metadata fields on a custom Web Part or a custom page, you will need to use a specific control. This control is the TaxonomyWebTaggingControl. When a TaxonomyWebTaggingControl is added to a page, the control will look like a managed metadata column on the page. The properties that have to be set on a TaxonomyWebTaggingControl are very similar to those that are set on the TaxonomyField:
SSPList. A string of term store GUIDs, delimited by semicolons (;), that the control should validate against.
GroupId. A GUID that represents the ID of the group that the control will validate against. The documentation states that this is IDs, plural, but because the data type of the property is GUID, it will have to be a single ID. This property is optional, though, because you could get by with using SSPList and TermSetList.
TermSetList. A string of term set GUIDs, delimited by semicolons (;), that the control should validate against.
AnchorId. A GUID that represents the ID of the only term from which descendants can be selected. This is relevant if the selected term set has multiple levels and if only subterms of a specific term should be selectable.
AllowFillIn. A Boolean that, if set to True, gives the user the option to add new terms to the term set, providing that the term set itself is open.
IsAddTerms. A Boolean that, if set to True, allows unvalidated values to be added to the term set, providing the term set itself is open and only one term set is listed in the TermSetList.
Example 14-4 shows the code that can be used to set the properties of a TaxonomyWebTaggingControl. The code also sets the value of the control to the default value of the ToyType field that was created in Example 14-3. If you want to use the code in Example 14-4, you will have to add the TaxonomyWebTaggingControl to a page by using <Taxonomy:TaxonomyWebTaggingControl runat= “server” ID=“WebTaggingControl” />. An in-depth description of all TaxonomyWebTaggingControl properties can be found on MSDN at http://msdn.microsoft.com/en-us/library/microsoft.sharepoint.taxonomy.taxonomywebtaggingcontrol.aspx.
using (SPSite site = new SPSite("http://teamsite.wingtiptoys.com/"))
{
   TaxonomySession taxonomySession = new TaxonomySession(site);
   TermStore termStore = taxonomySession.TermStores[0];
   Group termGroup = termStore.Groups["Enterprise"];
   TermSet termSet = termGroup.TermSets["ToyTypes"];

   WebTaggingControl.SSPList = termStore.Id.ToString();
   WebTaggingControl.TermSetList = termSet.Id.ToString();
   // This controls whether you can add new terms to the term set
   WebTaggingControl.AllowFillIn = false;
   // This controls whether we use an anchor term
   WebTaggingControl.AnchorId = termSet.Id;
   // This controls whether unresolved terms will be added to the term set
   WebTaggingControl.IsAddTerms = false;
   // This setting allows you to use the picker to browse the term set
   WebTaggingControl.IsDisplayPickerButton = true;
   // This setting enables/disables validation highlighting
   WebTaggingControl.IsIgnoreFormatting = false;
   WebTaggingControl.IsIncludeDeprecated = false;
   WebTaggingControl.IsIncludeUnavailable = false;
   // This setting modifies what is shown in/returned by the control,
   // if you want the GUIDS of parent terms then set this to true
   WebTaggingControl.IsIncludePathData = true;
   // This setting will include term set name resolution as well
   WebTaggingControl.IsIncludeTermSetName = false;
   WebTaggingControl.ID = termSet.Id.ToString();

   TaxonomyField taxonomyField =
     (TaxonomyField)site.RootWeb.Fields.GetFieldByInternalName("ToyType");
   WebTaggingControl.Text = taxonomyField.DefaultValue;
}
Putting a control that allows users to select values from the term store on a page is not much good if you can’t process the value that is selected. To work with the values selected in a TaxonomyWebTaggingControl or a TaxonomyField, you should use the TaxonomyFieldValue class. This class has four properties and one method that you should use when saving a taxonomy value:
Label. A string representing the actual label of the selected term.
TermGuid. A string representing the GUID of the selected term. This GUID must be lowercased. If the GUID is uppercased, it will work fine within SharePoint, but it might cause the Document Information Panel in programs in the Microsoft Office suite, such as Microsoft Word or Excel, to not recognize your term as a valid term in the term store. The term will be marked as if it doesn’t exist in the term store and will be displayed in red. This will mean that the document can’t be saved or checked in until the term is selected again from the term store.
ValidatedString. A read-only, validated, serialized string representation of the TaxonomyFieldValue object.
WssId. An integer that uniquely identifies the list item containing the taxonomy field in a list.
PopulateFromLabelGuidPair(text). A method to update the value of the TaxonomyFieldValue object with the value specified as the text parameter. The text parameter is a formatted string that contains the label, path GUIDs, and term GUID.
Example 14-5 shows an example in which the value selected in the TaxonomyWebTaggingControl from Example 14-4 is stored as the default value of the TaxonomyField from Example 14-3. You first get the value that was selected in the TaxonomyWebTaggingControl and use that as input for the PopulateFromLabelGuidPair method. Then you select a WssId, which is the ID of the list item that the value has to be saved to. In this example, no list item is involved, because you are storing the value as the default value of a site column. In this case, you select -1 as the WssId. Even if you are saving a value to a list item, you can use -1 instead of the real list item ID, as long as you make sure that you store the value with the correct SPListItem. The next thing to do is define the GUID of the selected term and use this as input for the TermGuid property of the TaxonomyFieldValue object. Note that you convert the GUID to lowercase to make sure the value is recognized by the Office Document Information Panels. After you have properly set the value of the TaxonomyFieldValue object, you can use the ValidatedString property to save the value to the default value of the TaxonomyField.
using (SPSite site = new SPSite("http://teamsite.wingtiptoys.com/"))
{
   TaxonomySession taxonomySession = new TaxonomySession(site);

   using (SPWeb web = site.OpenWeb())
   {
       TaxonomyField taxonomyField =
         site.RootWeb.Fields.GetFieldByInternalName("ToyType")
         as TaxonomyField;
       TaxonomyFieldValue defaultValue =
         new TaxonomyFieldValue(taxonomyField);

       try
       {
           defaultValue.PopulateFromLabelGuidPair(WebTaggingControl.Text);
           defaultValue.WssId = -1;
           // GUID should be stored lowercase, otherwise it will
           // not work in Office DIPs
           defaultValue.TermGuid = defaultValue.TermGuid.ToLower();
           // Set the selected default value for the site column
           taxonomyField.DefaultValue = defaultValue.ValidatedString;
       }
       catch (ArgumentNullException ex)
       {
           ErrorMessage.Text = "Creating a new value is not allowed "
           ErrorMessage.Text += "in this term set, please select from "
           ErrorMessage.Text += "the existing terms.";
           taxonomyField.DefaultValue = String.Empty;
       }

       taxonomyField.Update(true);
   }
}
Understanding content type syndication
In the previous sections you have looked at the Managed Metadata Service Application term store and how its contents can be used in custom solutions. The Managed Metadata Service Application is more than just the term store, though. One of its other important features is the content type syndication feature. Content type syndication can be used to synchronize content types across site collections. The content type syndication feature uses one site collection as the central storage point for content types. This site is called the Content Type Hub. A site collection can be promoted to a Content Type Hub by activating the site collection–scoped Content Type Syndication Hub feature. The hub will then have to be registered as the hub in the properties of the Managed Metadata Service Application. This will enable the service application to publish the content types to all site collections that are set as consumers (see Figure 14-3).

In the properties of the Managed Metadata Service Application Proxy, the hub can be selected so that site collections in web applications that are using the service application will consume the published content types (see Figure 14-4).

After syndication has been set up, content types can be created in the site collection that has been defined as the Content Type Hub. Content types can be created either manually or by using CAML or code-behind. Because content types have to be created only once and are distributed to other site collections by using the syndication functionality, they will usually be created manually in the Content Type Hub. If you wanted to use the same content types in multiple site collections without using content type syndication, you would have to create a custom solution and activate the feature that creates the content types on all sites where the content types should be used.
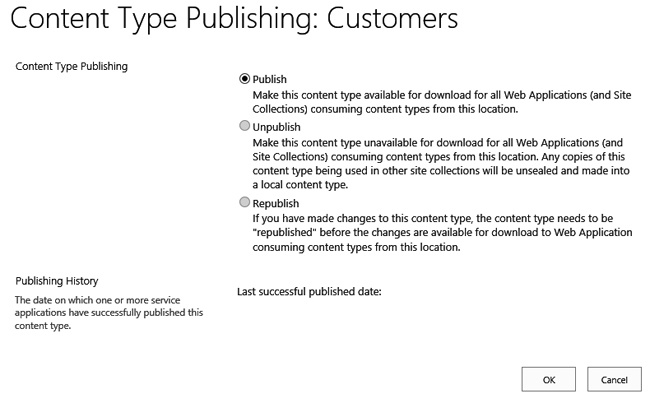
When a content type has been created in the Content Type Hub, the content type can be published. Figure 14-5 shows the content type publishing user interface. When a published content type is changed, it can be republished, and if a published content type should no longer be used, it can be unpublished. A published content type doesn’t become available in the site collections that are consuming content types from the Content Type Hub immediately. Before content types are available to the site collections, there are two timer jobs that have to run. The first one is the Content Type Hub timer job. This job only has to run once after a Content Type Hub has been registered with the Managed Metadata Service Application. By default, it runs once per day at 1:00 A.M. If you have access to the SharePoint server and to Central Administration, it will be worth it to start this job manually so that you can use the Content Type Hub on the day that you create it, instead of having to wait until the next day. The second timer job is the Content Type Subscriber job. This job is responsible for picking up the published content types from the Content Type Hub and pushing them to the consuming site collections. The Content Type Subscriber job runs once per hour by default.
In summary, to use published content types in a site collection, you have to register the Content Type Hub with the Managed Metadata Service Application and the Managed Metadata Service Application Proxy. If this didn’t happen automatically (in which case SharePoint will warn you), you have to activate the Content Type Syndication Hub. Then you will have to create and publish the content type you want to use and, as a last step, both the Content Type Hub timer job and the Content Type Subscriber timer job have to run.
Using document services
SharePoint has a long list of simple and complex features that are related to document and records management. In this section, a couple of them will be discussed, either because they have changed in SharePoint 2013 or because they are the more complex features.
Understanding versioning
When versioning is enabled on a library or list, it enables users to keep track of changes that were made to a document or list item, and it allows users to look at previous versions of the document or item. You can choose whether you want to keep major or minor versions and how many major and minor versions you want to keep. Generally speaking, a major version is a published version (1.0, 2.0, 3.0), and a minor version is a work in progress (1.3, 2.1, 3.4). If you do enable versioning, it is a best practice to set a maximum number of major and minor versions that should be kept. If you don’t explicitly set this, all versions of all documents or items in the list will be stored, which, especially for documents, could add up to quite a lot of storage. Former versions do count toward the storage quota of a site.
You can use the versioning–specific security settings to determine who can view draft items or documents. You can choose between Readers and Contributors. You can also select to require content approval. If content approval is required, items have to be approved before they can be published and made visible to all users. If content approval is required, an extra versioning security option is enabled that allows you to make draft items visible to only Approvers and the author. Figure 14-6 shows the versioning settings page of a document library. The page for a list looks almost the same, except for the fact that it doesn’t have the Require Check Out option on it. Setting Require Check Out to Yes is a good idea in many cases. Though it might be a little annoying for users to have to check documents in and out, it is nowhere near as annoying as running into saving conflicts when two people are working on the same document without realizing they are working on the same document. When check out is not required, users can check out a document manually, but most users will not remember to do so.

When using CAML to create a list, as shown in the following code, you can enable versioning by setting the VersioningEnabled attribute to true. With CAML it is not possible to add the nuances such as the number of major and minor versions and who can view draft items, though:
<ListInstance Title="Products List"
             OnQuickLaunch="TRUE"
             TemplateType="10000"
             Url="Lists/WingtipToysProductsList"
             Description="Wingtip products list"
             VersioningEnabled="TRUE"
             Hidden="FALSE">
</ListInstance>
With code-behind you have a lot more flexibility than when you are using CAML. The following properties would cause the same behavior as the settings from Figure 14-6:
SPList.EnableModeration = false;
SPList.EnableVersioning = true;
SPList.EnableMinorVersions = true;
SPList.MajorVersionLimit = 5;
SPList.MajorWithMinorVersionsLimit = 5;
SPList.DraftVersionVisibility = DraftVisibilityType.Author;
SPList.ForceCheckout = true;
The settings are further described in the following list:
EnableModeration. Enables or disables content approval
EnableVersioning. Enables versioning using only major versions
EnableMinorVersions. Also enables the use of minor versions
MajorVersionLimit. Limits the number of major versions that are stored to the number that is assigned to it, for lists and libraries on which minor versioning is not enabled
MajorWithMinorVersionsLimit. Limits the number of major versions that are stored to the number that is assigned to it, for lists and libraries on which minor versioning is enabled
DraftVersionVisibility. Allows you to use the DraftVisibilityType enumeration to select who can view draft versions of documents and items
ForceCheckOut. Can be used to force users to check out a document before they can edit the document
In Figure 14-6, the obvious property that is missing is the one to limit the number of minor versions. You can’t set a maximum number of minor versions that should be stored by using the object model. This is one of the few places where the SharePoint user interface can do more than what you can achieve by using the object model.
If versioning is enabled on a library or list, updating items by using the object model can have an impact on versions that are created. If a maximum number of major and minor versions is set, creating a new version might cause a user’s version to be deleted. The following list describes how the different methods in the object model that allow you to update items influence the creation of new versions and version numbers.
SPListItem.Update(). Updates the item, creates a new version, and increases the version number.
SPListItem.UpdateOverwriteVersion(). Does the same as Update(), but without creating a new version and version number.
SPListItem.SystemUpdate(true). Updates the item, but doesn’t change the Modified or Modified By field. It does create a new version and will increment the version number.
SPListItem.SystemUpdate(false). Updates the item, but doesn’t change the Modified or Modified By field. It also doesn’t create a new version and will not increment the version number.
SPListItem.SystemUpdate(). Calling SystemUpdate() is the same as calling SystemUpdate(false).
When working with SharePoint sites, users can use the shortcut menu and the Version History button to get to previous versions of the item or document. The equivalent is also available through the object model by using the SPListItemVersion class, as shown in Example 14-6.
using (SPSite site = new SPSite("http://teamsite.wingtiptoys.com/"))
{
 SPWeb web = site.OpenWeb();
 SPListItemCollection listitems =
   web.GetList("http://teamsite.wingtiptoys.com/Shared Documents").Items;
 string versionNr;
 bool isCurrentVersion;
 SPListItem versionItem;
 string createdBy;

 foreach (SPListItem listitem in listitems)
 {
   foreach (SPListItemVersion itemVersion in listitem.Versions)
   {
     versionNr = itemVersion.VersionLabel;
     isCurrentVersion = itemVersion.IsCurrentVersion;
     versionItem = itemVersion.ListItem;
     createdBy = itemVersion.CreatedBy.User.Name;
   }
 }
}
Understanding Document IDs
When users create a document in a document library, or add a document to a document library, they can share it with their colleagues by sending them a URL that points to the document. This is a great way to find the document at a later date. If the document is moved or renamed, though, its URL will change. The URL that users were using to access the document will no longer work and will become useless.
In SharePoint 2010, Document IDs were introduced to address this challenge. When the Document ID Service feature is activated on a site collection, the Document and Document Set content types in that site collection get three new columns added to them:
DocID. Contains the Document ID
Static URL. Contains a URL that includes the Document ID that can be used to access the document
PersistID. Used to determine whether a Document ID should be kept, or whether it should be reassigned
After the columns have been added to the content types, all documents and Document Sets that are added to the site collection are automatically assigned a unique Document ID that is stored in the DocID column. A Static URL is generated and stored as well. The Static URL stays with the document, even if it is renamed or moved, provided that the Move or Send To functionality from SharePoint is used. When a document is saved to a local hard disk and then uploaded again to a different site, it will effectively have been moved, but SharePoint will not be aware that this was a move and not a Delete and Add, so SharePoint will assign the document a new Document ID and Static URL. Propagating the DocID, Static URL, and PersistID columns to all content types in all subsites of the site collection is done by the Document ID Enable/Disable timer job. This job runs once per day at 9:00 P.M. by default.
Any existing documents already in the site collection when the Document ID Service feature is activated will be assigned Document IDs and Static URLs in a deferred batch process implemented by the Document ID Assignment Job timer job. By default, this job runs once per day at 10:00 P.M. If you do activate the Document ID Service feature and you have access to Central Administration, you can start the timer job manually. Don’t increase the frequency of the timer job, though, because you need it to run only after you have activated the Document ID Service feature on a site; if you increase the frequency, you will waste valuable resources on your server.
To enable users to use the Document ID to access documents, SharePoint contains a special application page, DocIdRedir.aspx, which accepts the Document ID as a query string value and redirects the requester to the document. The URL will look similar to this: http://teamsite.wingtiptoys.com/sites/hr/_layouts/15/DocIdRedir.aspx?ID=ZTWDNX7TXESH-3-1. Translated, this URL tells you that the document was originally stored in the /sites/hr site collection, of which the Document ID prefix is ZTWDNX7TXESH. The document is stored in a library with an ID of 3, and this document is the first document in this library. When this URL is requested, the DocIdRedir.aspx page first tries to use the SharePoint out-of-the-box search functionality to find the document by searching for the Static URL. The search functionality won’t be able to find the document unless it is indexed, though, meaning that depending on your crawl schedule, it might take a while before the document can be found by using search. If the document can’t be found by using search, SharePoint will use the Document ID provider lookup logic to try to find the document. This will work only if the document is still stored in the site collection that is part of the Static URL.
A Document ID consists of three parts:
A Document ID prefix. A site collection–scoped unique string value. When the Document ID Services feature is activated, this prefix is automatically generated by SharePoint, but it can be changed by the site collection administrator to something more meaningful. When changing the Document ID prefix manually, the site collection administrator will have to make sure that the prefix is still unique across all site collections that use the same Search Service Application (usually this means all site collections in the farm), otherwise the Document ID functionality will not function properly.
A list ID. An ID that is automatically assigned to every list. Within each site collection, lists are numbered 1 to x, with x being the number of lists in the site collection.
A Document ID. An ID that is automatically assigned to every document and Document Set in the site collection. Within each list, documents are numbered 1 to x, x being the number of documents in the list.
A Document ID is formatted as [Document ID prefix]-[List ID]-[Document ID]. Because the list ID is unique only within a site collection and the document ID is unique only within a list, it is very important that the Document ID prefix is unique across all site collections, because otherwise you’ll end up with duplicate Document IDs.
Creating custom Document ID providers
Developers can create custom Document ID providers when they want to override either the default Document ID string pattern or how documents are found. This is done by first creating a provider and then registering it with a site collection.
To create a new Document ID provider, create a new class that inherits from the Microsoft.Office.DocumentManagement.DocumentIdProvider class. This class has four members that should be overridden:
GenerateDocumentId(). This method is responsible for creating the unique Document ID string. Overriding this allows the developer to change how new Document IDs are generated. It is the responsibility of the developer to ensure that the generated ID is unique across the site collection. Also note that, if desired, this method could be used to generate an ID that is unique at a scope higher than site collection, such as web applications or even the whole farm.
GetDocumentUrlsById(). This method accepts a Document ID string and returns a list of URLs for the corresponding document. It can return multiple values, because developers can copy documents programmatically from one location to another and specify that the Document ID be retained on the copied instance.
GetSampleDocumentIdText(). This method generates a sample Document ID string that is displayed in the Find By Document ID Web Part, giving users a hint as to what the ID looks like.
DoCustomSearchBeforeDefaultSearch. This Boolean property tells SharePoint whether it should default to using the SharePoint search feature or the Document ID provider to find the URL of the Document ID string.
The code shown in Example 14-7 demonstrates a custom Document ID provider that uses the first part of the hosting web application, site collection, site, list, and list item’s ID as the Document ID string.
public class MoreUniqueDocumentIDProvider : DocumentIdProvider
{
 private const string DOCID_FORMAT = "{0}-{1}-{2}-{3}-{4}";

 public override bool DoCustomSearchBeforeDefaultSearch
 {
   get { return false; }
 }

 public override string GenerateDocumentId(SPListItem listItem)
 {
   string listItemID = listItem.ID.ToString();
   string listID = listItem.ParentList.ID.ToString().Substring(0, 4);
   string webID = listItem.Web.ID.ToString().Substring(0, 4);
   string siteID = listItem.Web.Site.ID.ToString().Substring(0, 4);
   string webAppID =
          listItem.Web.Site.WebApplication.Id.ToString().Substring(0, 4);
   return string.Format(DOCID_FORMAT, webAppID, siteID,
                        webID, listID, listItemID);
 }

 public override string[] GetDocumentUrlsById(SPSite hostingSiteCollection,
                                              string documentId)
 {
   List<string> possibleURLs = new List<string>();
   string[] brokenDownDocID = documentId.Split("-".ToCharArray()[0]);

   // find the Web application
   SPWebService webService = hostingSiteCollection.WebApplication.WebService;

   foreach (SPWebApplication webAppplication in webService.WebApplications)
   {
     if (webAppplication.Id.ToString().StartsWith(brokenDownDocID[0]))
     {
       // find the SPSite (if multiple, won't matter as it will go to next one...)
       foreach (SPSite site in webAppplication.Sites)
       {
         if (site.ID.ToString().StartsWith(brokenDownDocID[1]))
         {
           // find the SPWeb
           // (if multiple, won't matter as it will go to next one...)
           foreach (SPWeb web in site.AllWebs)
           {
             if (web.ID.ToString().StartsWith(brokenDownDocID[2]))
             {
               foreach (SPList list in web.Lists)
               {
                 if (list.ID.ToString().StartsWith(brokenDownDocID[3]))
                 {
                   // find the item in the list
                   SPListItem targetItem = list.GetItemById(
                                                Int32.Parse(brokenDownDocID[4]));


                   if (targetItem != null)
                   {
                     possibleURLs.Add(String.Format("{0}//{1}", web.Url, targetItem.Url));
                   }
                 }
               }
             }
             web.Dispose();
           }
         }
         site.Dispose();
       }
     }
   }
   return possibleURLs.ToArray();
 }

 public override string GetSampleDocumentIdText(Microsoft.SharePoint.SPSite site)
 {
   return string.Format(DOCID_FORMAT, "55DA526F",
   "FD9D4836", "FD0910DC", "15B4AD8A", "ABDC1A45");
 }
}
After the Document ID provider has been created, it needs to be registered with a site collection. This can be done by using the Feature receiver of a site collection–scoped feature. Use the Microsoft.Office.DocumentManagement.DocumentId class to set the provider for a specified site collection, as shown in Example 14-8.
public override void FeatureActivated(SPFeatureReceiverProperties properties)
{
 SPSite site = properties.Feature.Parent as SPSite;
 MoreUniqueDocumentIDProvider docIDProvider = new MoreUniqueDocumentIDProvider();
 DocumentId.SetProvider(site, docIDProvider);
}

public override void FeatureDeactivating(SPFeatureReceiverProperties properties)
{
 SPSite site = properties.Feature.Parent as SPSite;
 DocumentId.SetDefaultProvider(site);
}
Understanding Document Sets
SharePoint document libraries allow users to create and interact with individual files. These individual files can be the targets of workflows and event receivers, support versioning, or have unique permissions applied to them. A single document, however, does not always represent a complete work product. A work product might consist of multiple documents, such as a proposal with an invoice with supporting timesheets, travel receipts, a statement of work, and other resources. SharePoint includes a capability that supports creating and managing sets of documents as a single work product: the Document Set.
A Document Set is a specific content type that inherits from the Folder content type. It allows users to group documents in the same way that folders do; however, it also adds the following characteristics:
Allowed content types. The types of content that are permitted within the Document Set. Documents within the Document Set can use these content types.
Shared fields. Common columns that exist on the Document Set and child content types. Values for these columns can be set on the Document Set level and are propagated to all documents within the Document Set.
Welcome page. SharePoint implements a Document Set as a Web Part page when users view it with a browser. The Welcome page displays specified fields from the Document Set content type, in addition to the individual documents that are part of the Document Set.
Default content. When users create a new instance of the Document Set, the default content can provision new content that is associated with one of the allowed content types automatically.
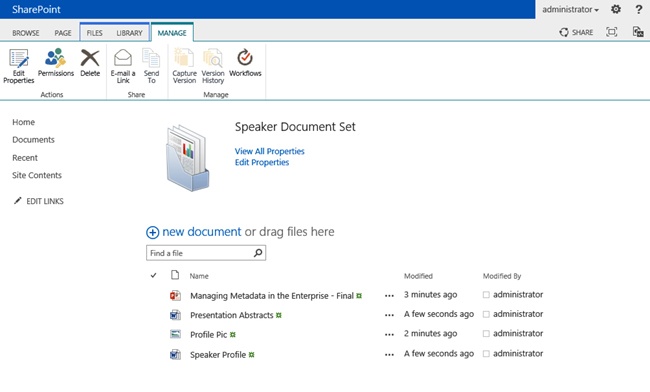
To make the Document Set content type available in a site collection, you have to activate the Document Sets site collection–scoped feature. After the feature has been activated, you can add the Document Set content type to libraries in the site collection, or you can create your own content type that inherits from the Document Set content type. When interacting with a Document Set, the SharePoint interface adds a new tool tab group called Manage that provides additional buttons that allow you to manage the Document Set as a whole. The buttons are mostly the same as the some of the ones that are available for items and files, such as Edit Properties, Delete, Version History, and Workflows, except for the fact that they all apply to the Document Set as a whole and not to a single document. Figure 14-7 shows a Document Set Welcome page and the Manage tab and its buttons.
Creating a new Document Set by using the browser is straightforward. After making sure that the Document Sets feature is activated, you can create a new content type that derives from the Document Set content type and configure its settings. As with any content type, you can add site columns to it; however, for a Document Set, you can also determine what columns should be displayed on the Welcome page and what columns should be shared columns. Shared columns and their values are automatically synchronized to all files in the Document Set.
The new content type can be added to a document library in the same way that regular content types are added. Creating a new Document Set based on the new content type can be done by clicking the arrow below the New Document button on the Files tab and selecting the new Document Set content type. After a Document Set has been created, documents can be added to it, in addition to metadata.
Creating Document Sets declaratively
Creating Document Set content types by using the browser is simple, but it is not a very reusable approach. If you want to use a Document Set content type in multiple sites and you don’t want to use content type syndication, the best approach is to create them declaratively in Microsoft Visual Studio and package them in a .wsp file. The first step in creating a Document Set content type in Visual Studio is the same as the first step in creating any other content type. You create a new project, based on the SharePoint 2013 - Empty Project template. Then you add a new content type to it. In the SharePoint Customization Wizard, you can select the content type that your content type should inherit from. Here you can select the Document Set content type. The Document Set content type will be created in exactly the same way that other content types are created in Visual Studio. The only thing that might reveal that you just created a content type that inherits from the Document Set content type is the ContentType ID. The Document Set ContentType ID is 0x0120D520, which means that the ContentType ID of all content types inheriting from Document Set will start with 0x0120D520.
Because Visual Studio creates all content types as equal, you will have to add the extra plumbing and features that are specific to a Document Set yourself. If you want to add allowed content types and custom site columns to the Document Set, you will have to create those first. You can do this in the same solution, or in a different one. It is easier to create all the parts of the Document Set content type in the same solution, so that you don’t create two solutions that are dependent on one another. The allowed content types can only be the Document content type, or any content types that inherit from the Document or Folder content type.
Either you can set the Name, Description, and Group on the Content Type tab in Visual Studio, or you can adjust the CAML in the Elements.xml file. The same is true for the site columns, but for site columns it is a lot quicker to use the Columns tab, so that you can simply select the columns instead of having to write a lot of CAML and look up the IDs and internal names of the columns that have to be added to the new Document Set content type. Adding columns by using the form will automatically update the Elements.xml file. Example 14-9 shows the CAML in the Elements.xml file after the Keywords and Categories columns have been added to the content type.
<Elements xmlns="http://schemas.microsoft.com/sharepoint/">
 <!-- Parent ContentType: Document Set (0x0120D520) -->
 <ContentType ID="0x0120D52000A0DD237060674E6D803E68B19DB425A2"
   Name="Toy Specification Doc Set"
   Group="Wingtip Toys Content Types"
   Description="Document Set used to store all information that specifies a toy."
   Inherits="FALSE">
   <FieldRefs>
     <FieldRef ID="{b66e9b50-a28e-469b-b1a0-af0e45486874}"
               Name="Keywords"
               DisplayName="Keywords" />
     <FieldRef ID="{9ebcd900-9d05-46c8-8f4d-e46e87328844}"
               Name="Categories"
               DisplayName="Categories" />
 </ContentType>
</Elements>
The rest of the content type definition is specific to creating a Document Set. SharePoint sets the Document Set–specific characteristics via the <XmlDocuments /> section of the content type. First, add all the content types that are allowed in the Document Set, referencing them by their ContentTypeId, as shown in Example 14-10.
<XmlDocument NamespaceURI=
 "http://schemas.microsoft.com/office/documentsets/allowedcontenttypes">
 <act:AllowedContentTypes xmlns:act=
 "http://schemas.microsoft.com/office/documentsets/allowedcontenttypes"
 LastModified="1/1/1 0:00:01 AM">
   <!-- Document -->
   <AllowedContentType id="0x0101" />
   <!-- Picture -->
   <AllowedContentType id="0x010102" />
   <!-- Summary Tasks-->
   <AllowedContentType id="0x012004" />
 </act:AllowedContentTypes>
</XmlDocument>
There are three columns in the toy specification Document Set that should be kept in sync with all other content types in the collection:
Description
Keywords
Categories
These fields are defined as shared fields, referencing the ID of the Site Column definition, as shown in Example 14-11.
<XmlDocument
 NamespaceURI="http://schemas.microsoft.com/office/documentsets/sharedfields">
 <sf:SharedFields
   xmlns:sf="http://schemas.microsoft.com/office/documentsets/sharedfields"
   LastModified="1/1/1 0:00:01 AM">
   <!-- Categories -->
   <SharedField id="9ebcd900-9d05-46c8-8f4d-e46e87328844" />
   <!-- Description -->
   <SharedField id="cbb92da4-fd46-4c7d-af6c-3128c2a5576e" />
   <!-- Keywords -->
   <SharedField id="b66e9b50-a28e-469b-b1a0-af0e45486874" />
 </sf:SharedFields>
</XmlDocument>
Next, specify the fields in the Document Set content type that should be displayed on the Welcome page when users view an instance of the toy specification Document Set, again referencing the ID of the Site Column definition, as shown in Example 14-12.
<XmlDocument
 NamespaceURI=
   "http://schemas.microsoft.com/office/documentsets/welcomepagefields">
 <wpf:WelcomePageFields xmlns:wpf=
     "http://schemas.microsoft.com/office/documentsets/welcomepagefields"
     LastModified="1/1/1 0:00:01 AM">
   <!-- Categories -->
   <WelcomePageField id="9ebcd900-9d05-46c8-8f4d-e46e87328844" />
 </wpf:WelcomePageFields>
</XmlDocument>
When users create new instances of the Document Set, those instances should contain a toy specification sheet and a toy specification guidelines PDF file. Both files are attached to the Document content type. Before you can add these files, you should define where they can be found. You can do this by defining the toy specification Document Set content type’s folder directly underneath the <ContentType> element, as shown here:
<Folder TargetName="_cts/Toy Specification Doc Set" />
Example 14-13 shows how to provision the default content for the Document Set.
<XmlDocument
 NamespaceURI=
   "http://schemas.microsoft.com/office/documentsets/defaultdocuments">
 <dd:DefaultDocuments xmlns:dd=
   "http://schemas.microsoft.com/office/documentsets/defaultdocuments"
   LastModified="1/1/1 0:00:01 AM"
   AddSetName="True">
   <DefaultDocument name"Toy Specification Guidelines.pdf"
     idContentType="0x0101" />
   <DefaultDocument name="Toy Specification Sheet.xlsx"
     idContentType="0x0101" />
 </dd:DefaultDocuments>
</XmlDocument>
Because SharePoint won’t be able to make up the default content out of nothing, you have to make sure that the specification sheet and guideline documents are provisioned in the SharePoint site. The best way to do this is by using a Module. Add a new Module project item in the Visual Studio 2012 project that contains an Excel file and a PDF file, and provision them to the folder referenced in Example 14-13. Example 14-14 shows how to add the default content.
<Elements xmlns="http://schemas.microsoft.com/sharepoint/">
 <Module Name="ToySpecificationDefaultContent">
   <File Path="ToySpecificationDefaultContentToy Specification Sheet.xlsx"
         Url="_cts/Toy Specification Doc Set/Toy Specification Sheet.xlsx" />
   <File Path=
         "ToySpecificationDefaultContentToy Specification Guidelines.pdf"
         Url="_cts/Toy Specification Doc Set/Toy Specification Guidelines.pdf" />
 </Module>
</Elements>
At this point, the Document Set is complete. An optional step is to create a custom Welcome page that users will be taken to when they view the Document Set. When showing the Document Set, SharePoint looks for a file named DocSetHomePage.aspx in the Document Set’s folder. If it exists, it will be used as the Welcome page for that Document Set. If it doesn’t exist, a generic Welcome page will be shown instead.
In the case of the toy specification Document Set, the Welcome page could display Wingtip Toy’s tagline: More fun with Wingtip Toys! To create a custom Welcome page, create a copy of the default Welcome page that is provisioned by the Document Set Feature found in {SharePoint Root}TEMPLATEFEATURESDocumentSet and provision it by using a Module SharePoint project item, as shown in Example 14-15.
<Module Name="ToySpecificationWelcomePage" RootWebOnly="TRUE">
 <File Path="ToySpecificationWelcomePageDocSetHomePage.aspx"
       Url="_cts/Toy Specification Doc Set/DocSetHomePage.aspx">

   <AllUsersWebPart WebPartOrder="0" WebPartZoneID="WebPartZone_TopLeft">
     <!-- WebPart element omitted for clarity -->
   </AllUsersWebPart>

   <AllUsersWebPart WebPartOrder="0" WebPartZoneID="WebPartZone_CenterMain">
     <!-- WebPart element omitted for clarity -->
   </AllUsersWebPart>

   <AllUsersWebPart WebPartOrder="0" WebPartZoneID="WebPartZone_Top">
     <!-- WebPart element omitted for clarity -->
   </AllUsersWebPart>

 </File>
</Module>
The three <AllUsersWebPart /> elements provision an Image Web Part with the default Document Set image, a Document Set Contents Web Part that shows the contents of the Web Part, and the Document Set Properties Web Part that shows all the Welcome page properties. The easiest way to get these values is to copy them from the element manifest in the out-of-the-box Document Set Feature.
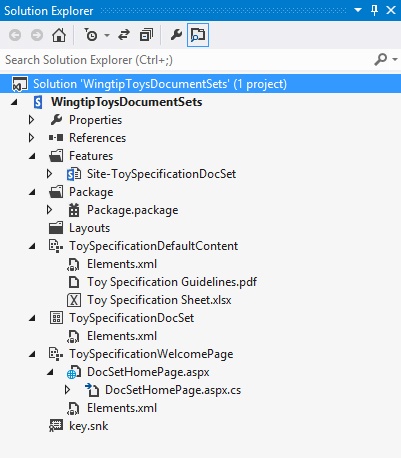
The final step is to make sure that there is one feature in the project that is set to site scope and that is named appropriately. The content type and modules should all be added to this one feature. At this point, the Visual Studio 2012 project should look similar to the one shown in Figure 14-8.
Now that the solution is ready, you can package and deploy it. This will activate the feature that provisions the Toy Specification Document Set on your target site. To start using it, you just have to add the Toy Specification Document Set content type to a library, and you will be able to create a new instance of the Document Set to view the result. Figure 14-9 shows the result, a Toy Specification Document Set for a doll called Aglaia.

Using the Content Organizer
Designing a large document repository in SharePoint requires proper planning to make sure that the repository is set up in a way that is scalable. Content in large repositories is often organized based on its metadata. In a repository with millions of documents, users will need help to store their documents in the right place. Help could be provided by document librarians or content stewards, but it would be easier if the support for users were automated. To help manage the contents of large document repositories in SharePoint, the Content Organizer can be used. The Content Organizer assists by checking the metadata of a new document against some predefined and prioritized rules and, if a matching rule is found, routing or moving the content to the document library and folder specified in the rule. The Content Organizer can even manage large libraries by automatically creating new folders if the content in the target folder grows beyond a specified threshold.
The Content Organizer functionality can be enabled on a site by activating the site-scoped Content Organizer feature. This adds a library to the site called the Drop Off library, and it adds two new links to the Site Administration section in the Site Settings page: the Content Organizer Settings and Content Organizer Rules links. The Content Organizer Settings page allows the site owner to determine how the Content Organizer feature should be used, for instance, whether users should be redirected to the Drop Off library when they try to upload a document to libraries that have Content Organizer rules pointed at them, whether a Content Organizer rule can route documents to a different site collection, and whether a folder’s size should be managed automatically. The Content Organizer Rules page shows a special type of list that stores all the Content Organizer rules that are created for the site. The list is called the RoutingRules list, and items that are added to it are based on the Rule content type.
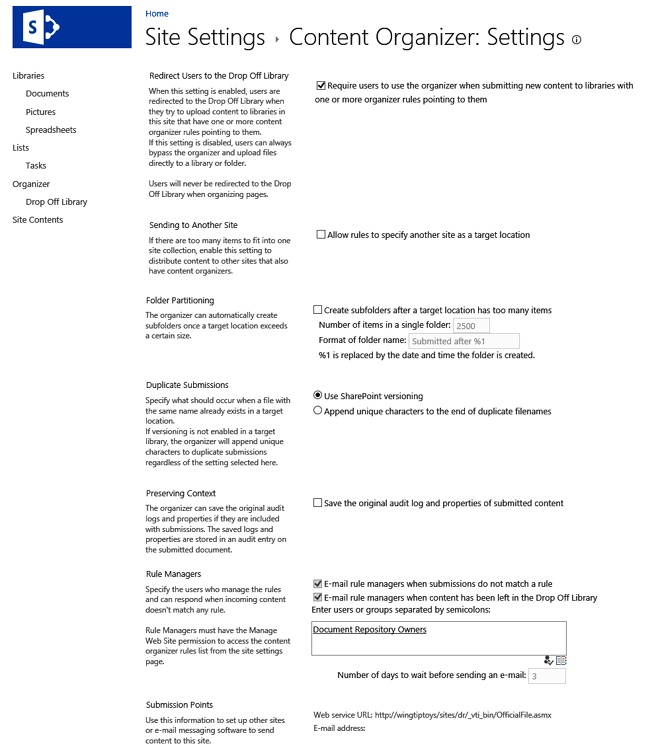
The site used for this example is based on the Document Center template (the template is BDR#0, in case you want to create the site by using code or Windows PowerShell). A document library called Spreadsheets has been added to the site, in addition to a picture library called Pictures. A new Choice site column called Document Type has been created with two possible values: Document and Spreadsheet. The column has been added to the Document content type. For most Content Organizer settings, the defaults are used, except for the Rule Managers, for which the Owner group of the site is used, as shown in Figure 14-10.
The next step is to create the Content Organizer rules. The first rule (shown in Figure 14-11) will pick up all documents that are linked to the Document content type and that have the Document Type property set to Document, to move the documents to the Document library.

Not only can Content Organizer rules be created through the user interface, they can also be created programmatically by using the classes from the Microsoft.Office.RecordsManagement.RecordsRepository namespace. Example 14-16 shows the code that creates a rule to route documents, where Document Type is set to Spreadsheet.
SPSite currentSite = new SPSite("http://teamsite.wingtiptoys.com/");
SPWeb currentWeb = currentSite.OpenWeb();
currentWeb.AllowUnsafeUpdates = true;

EcmDocumentRoutingWeb contentOrganizerWeb = new EcmDocumentRoutingWeb(currentWeb);

EcmDocumentRouterRule newRule = new EcmDocumentRouterRule(currentWeb);
newRule.Name = "Spreadsheets";
newRule.Priority = "5";

SPContentType documentContentType = currentWeb.ContentTypes["Document"];
newRule.ContentTypeString = documentContentType.Name;

SPField documentTypeField = currentWeb.Fields.GetField("Document Type");
string ruleOperator = "IsEqual";
string ruleValue = "Spreadsheet";
string conditionString = String.Format(@"<Condition Column=""{0}|{1}|{2}""
                                          Operator=""{3}""
                                          Value=""{4}"" />",
                          documentTypeField.Id,
                          documentTypeField.InternalName,
                          documentTypeField.Title,
                          ruleOperator,
                          ruleValue);

string conditionsXml = String.Format("<Conditions>{0}</Conditions>", conditionString);

newRule.ConditionsString = conditionsXml;

SPList spreadSheetLibrary = currentWeb.Lists["Spreadsheets"];
newRule.TargetPath = spreadSheetLibrary.RootFolder.ServerRelativeUrl;

newRule.Enabled = true;

contentOrganizerWeb.RoutingRuleCollection.Add(newRule);
currentWeb.AllowUnsafeUpdates = false;

currentWeb.Dispose();
currentSite.Dispose();
If you look at the code in Example 14-16, you might notice that all properties are strings that you have to compose yourself. There are no enumerators to help you by letting you choose a rule operator, for instance, or by letting the type of the ContentTypeString be an SPContentType instead of a string. This means that you will have to pay close attention to make sure that you format all properties correctly yourself.
When a user now uploads a new document to the Drop Off library, or to one of the libraries that has rules pointed at it, the Submit Document dialog box displays a message stating that the content will be moved according to the defined rules, as shown in Figure 14-12.

When the uploaded document is linked to the Document content type and a Document Type is selected, the document will be redirected to the appropriate library based on the Content Organizer rules. When a document is uploaded for which a different content type is selected, or for which no document type is selected, the document will be stored in the Drop Off library. The owners of the site will get an email message warning them that there is content in the Drop Off library that cannot be routed to a location based on the currently existing rules. At 11:30 P.M. each night, the Content Organizer Processing timer job will run to reevaluate the documents in the Drop Off library. If during the day a new rule has been added that matches the document in the Drop Off library, the document will be sent to the appropriate location by the timer job. Documents that still don’t match a rule will stay in the Drop Off library. If the metadata of a document in the Drop Off library is adjusted, the document will be reevaluated against all existing rules right away.
A typical usage of the Content Organizer is to create large, distributed records centers. The content organizer can help to keep the size of individual records centers manageable by allowing you to spread the documents over multiple records centers in different site collections or even different web applications.
Understanding Word Automation Services
Word Automation Services, introduced in SharePoint 2010, is primarily intended to provide format conversion services. Indeed, in numerous places you will notice that the service application is referred to as Word Conversion—for example, in its API and Windows PowerShell cmdlets. Although conversion is the primary use case of Word Automation Services, it can also be combined with Open XML APIs to build powerful document assembly solutions.
Word Automation Services is a service application that can be created by using the Manage Service Applications page in Central Administration, or by using Windows PowerShell. There is also a Word Automation Services service that can be started through the Services On Server page and Windows PowerShell. Creating the service application and starting the service doesn’t add any functionality to a SharePoint farm, though; it allows a developer only to create a custom farm solution that can initiate a conversion.
Word Automation Services supports conversions from and to the most common file formats. The service can read the following types of files:
Office Open XML (.docx, .docm, .dotx, .dotm)
Word 97-2003 document (.doc) and Word 97-2003 template (.dot)
Older versions of Word (as far back as Word 2.0 for Windows)
Rich Text Format (.rtf)
Single File Web Page (.mhtml)
HTML
Word 2003 XML
Word 2007/2010 XML
The services can convert files of the file formats just listed into files of the following file formats:
PDF
XPS
Office Open XML (.docx, .docm)
Word 97-2003 document (.doc)
Rich Text Format (.rtf)
Single File Web Page (.mhtml)
Word 2007/2010 XML
File formats that expose extended options (for example, Accessible PDF) can also be saved by Word Automation Services.
When Word Automation Services was introduced in SharePoint 2010, it was built to asynchronously convert documents in bulk, by using a timer job. Only documents that were stored in SharePoint could be converted. This functionality still exists in SharePoint 2013, but because of feedback from users and developers, the SharePoint 2013 version of Word Automation Services now also allows you to convert document streams, which don’t have to be stored in SharePoint. These streams can be converted synchronously, or on demand, and thus without having to wait for a timer job to run. Only one document can be converted at a time with this approach. Asynchronous bulk conversions can still only be done on documents that are stored in SharePoint.
Synchronous and asynchronous conversion can be used at the same time. To manage this, Word Automation Services creates and manages two separate queues, one for the synchronous or on-demand conversions and one for asynchronous conversions. When a document enters the on-demand queue, conversions in the asynchronous queue will be paused. In principle, Word Automation Services will keep processing on-demand conversions until that queue is empty. Then it will continue to process asynchronous conversions. If there is an endless stream of on-demand conversions coming in, eventually SharePoint will allow some documents from the asynchronous queue to be processed. Exact numbers in terms of when this override behavior will kick in and how many documents it will allow to get processed are not documented.
The queues are “first in, first out” queues that are managed by the document queue manager, which resides on the servers running the Word Automation Launcher service instances. The manager moves incoming requests into the document queue and sends requests to the Word Automation Services engine for processing. On a database server, in the Word Automation database, the Word Automation Services engine stores a persistent queue of requested, current, and completed conversions. Storing the history of the queue in a database gives the queue improved scalability, reliability, and availability for tracking large sets of conversions for long periods of time.
Word Automation Services doesn’t just allow developers to convert documents from one type to another, it can also make some other changes to documents, such as:
Updating the table of contents and index fields.
Recalculating all field types.
Importing “alternate format chunks.”
Changing the compatibility mode version.
To allow you to use Word Automation Services and to build on top of it, the services expose two APIs. There is an API for synchronous conversions and an API for asynchronous conversions. The Word Automation Services functionality for synchronous services can be found in the Microsoft.Office.ConversionServices.Conversions namespace (see Table 14-1). The functionality for the asynchronous services can be found in the Microsoft.Office.Word.Server.Conversions namespace (see Table 14-2).
Class | Description |
ConversionItemInfo | Contains information about a conversion |
ConversionJob | Is a conversion job |
ConversionJobInfo | Contains information about a conversion job |
ConversionJobStatus | Provides information about the status of the conversion job |
SyncConverter | Is a synchronous conversion |
Description | |
ConversionInfo | Contains information about a single conversion within a conversion job |
ConversionJob | Is a collection of file conversions that are tracked together as one |
ConversionJobInfo | Contains information about a single conversion job |
ConversionJobSettings | Defines the settings for all conversions in a single conversion job |
ConversionJobStatus | Provides information about the status of all conversion items in a single conversion job |
FixedFormatSettings | Defines the settings for all fixed-format output in a single job |
For doing on-demand conversions, the SyncConverter class is the most important class, because you can do a complete conversion just by using SyncConverter. The most important class when creating asynchronous conversions is the ConversionJob class, because that is responsible for doing the actual conversions.
The following example shows how to add a Convert To PDF link to the shortcut menu of Word documents with a .docx extension and how to convert the Word document to a PDF file. The link to the shortcut menu is added by a custom action. Example 14-17 shows the XML that creates the custom action.
<?xml version="1.0" encoding="utf-8"?>
<Elements xmlns="http://schemas.microsoft.com/sharepoint/">
 <CustomAction Id="WingtipToys.ConversionMenuItem"
               RegistrationType="FileType"
               RegistrationId="docx"
               Location="EditControlBlock"
               ImageUrl="/_layouts/IMAGES/DOCLINK.GIF"
               Sequence="20000"
               Title="Convert to PDF"
               Description="Converts this document to a PDF." >
   <UrlAction
     Url="~site/_layouts/wingtiptoyswordconversion/convertmetopdf.aspx?ItemUrl={ItemUrl}"/>
 </CustomAction>
</Elements>
Figure 14-13 shows the Convert To PDF link on the shortcut menu of a .docx file.
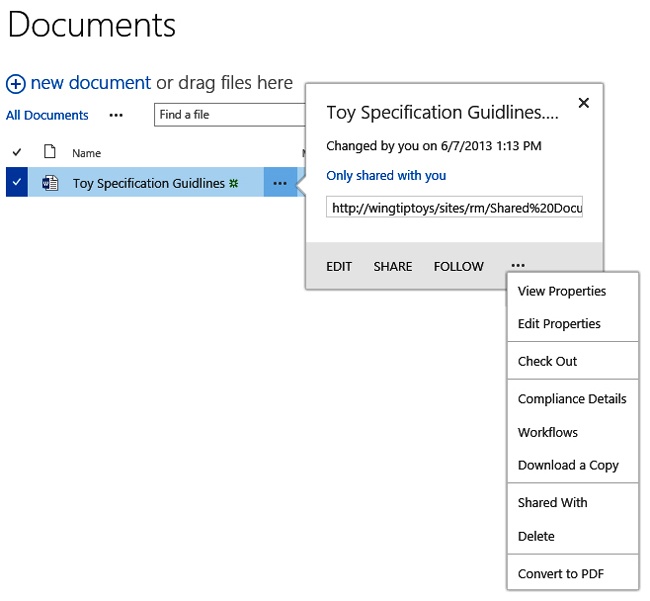
The custom action from Example 14-17 links to a custom .aspx page. The code-behind of the .aspx page converts the .docx file into a PDF file by using the SyncConverter class. Example 14-18 shows the code-behind that converts the document.
using System;
using Microsoft.SharePoint;
using Microsoft.SharePoint.WebControls;
using Microsoft.Office.Word.Server.Conversions;
using Microsoft.Office.Word.Server.Service;

namespace WingtipToysWordConversion.Layouts.WingtipToysWordConversion
{
 public partial class ConvertMeToPDF : LayoutsPageBase
 {
   protected void Page_Load(object sender, EventArgs e)
   {
     // Only run the conversion when the page is first loaded
     if (!IsPostBack)
     {
       SPSite currentSite = SPContext.Current.Site;
       SPServiceContext serviceContext = SPServiceContext.Current;

       string itemUrl = Request.QueryString["ItemUrl"];
       string siteUrl =
         currentSite.Url.Replace(currentSite.ServerRelativeUrl, "");
       string sourceFile = siteUrl + itemUrl;
       string targetFile = sourceFile.ToLower().Replace("docx", "pdf");
       string libraryUrl = sourceFile.Remove(sourceFile.LastIndexOf('/'));

       //Get default Word Automation Service Application Proxy
       //for the site collection
       WordServiceApplicationProxy wordProxy =
         serviceContext.GetDefaultProxy(typeof(WordServiceApplicationProxy))
         as WordServiceApplicationProxy;

       ConversionJobSettings jobSettings = new ConversionJobSettings();
       //SaveFormat.Automatic will try to select the format
       //based on the extension of outPuthPath
        jobSettings.OutputFormat = SaveFormat.Automatic;

        SyncConverter converter = new SyncConverter(wordProxy, jobSettings);
        converter.UserToken = currentSite.RootWeb.CurrentUser.UserToken;

        ConversionItemInfo result = converter.Convert(sourceFile, targetFile);

        Response.Redirect(libraryUrl);
     }
   }
 }
}
Figure 14-14 shows the converted document and the original document.
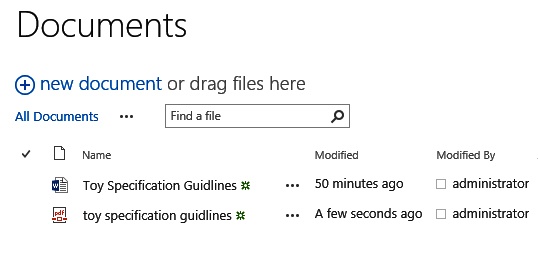
Records management
Records management is all about maintaining and eventually disposing of formal information (records) within an organization. It might include identifying, classifying, archiving, and disposing of records. In most cases, when information is identified as a record, the information can’t change anymore. One of the roles of a records management system is to ensure and to be able to prove that the record hasn’t been tampered with. Records also can’t be deleted, unless they are disposed of as part of a retention policy.
The most important part of records management is about policies and organization. The role of systems such as SharePoint is just to support the organization’s policies. Many of the features described earlier in this chapter can be used to support records management in SharePoint. Two SharePoint features that are specifically created for records management are in-place records and records centers. Records can either be stored in their original location—for instance, in a project or department site—or they can be stored in a central archive called a records center. When a document is declared as a record, it is then either moved or copied to the records center.
In-place records management
With in-place records management, records are stored in their original location. When a document is identified and declared as a record, it will be protected. Users can no longer modify or delete the document. To indicate to users that the document is now a record, the icon of the document changes when the document is declared.
The advantage of in-place records management is that it is easier for users to find the records. It will be more difficult for the person who is in charge of managing all records, though, because he or she will have to keep track of records that are scattered throughout the SharePoint environment. Another downside is that if the original project site has records stored in it, the site cannot be disposed of after the project has finished.
The SharePoint In-Place Records Management Feature enables users to declare records in a document library alongside other collaborative content. Though this Feature can be configured to allow users to declare (and undeclare) records manually, it is better to automatically declare records as part of the business process. This way, the important act of protecting the information as a record doesn’t depend on a user remembering to declare it. A workflow could, for instance, declare a document as a record when a document is approved as part of an approval workflow. Documents can also be declared as records by using an event receiver that runs when a document is updated and that declares the document to be a record when certain metadata properties are found—for instance, when the status of the document changes to Final. To programmatically work with SharePoint’s records management features, you can use the Microsoft.Office.RecordsManagement.RecordsRepository namespace. Declaring a record programmatically involves only a single line of code. Example 14-19 shows the code of a highly simplified event receiver that declares a document as a record when the status is set to Final.
using System;
using Microsoft.SharePoint;
using Microsoft.Office.RecordsManagement.RecordsRepository;

namespace WingtipToysRecordsManagement.CheckDeclareItemAsRecord
{
 /// <summary>
 /// List Item Events
 /// </summary>
 public class CheckDeclareItemAsRecord : SPItemEventReceiver
 {
   /// <summary>
   /// An item was updated.
   /// </summary>
   public override void ItemUpdated(SPItemEventProperties properties)
   {
     base.ItemUpdated(properties);

     SPListItem updatedItem = properties.ListItem;
     if (updatedItem["Status"] == "Final")
     {
       Records.DeclareItemAsRecord(updatedItem);
     }
   }
 }
}
Figure 14-15 displays a document library that contains a document that has been declared as a record in place. The ribbon shows that the buttons that are related to modifying a document are all unavailable. The document is now protected from users making changes to it, even if those users have contributor permissions on the document.

Records archives
If an organization decides that it wants to store all records in a central location dedicated to records, a site collection can be created in SharePoint based on the Records Center site definition. Records can be added to the records center manually or automatically, for instance, by using the Content Organizer. If a very large number of records need to be stored in the records center and you feel that it would be better to spread out the records across multiple site collections, multiple records centers can be created. The Content Organizer can be used to submit records to a central records center site and to then distribute records across records centers based on metadata values. Document libraries in records centers can be configured to declare files as records automatically when they are added.
eDiscovery
eDiscovery is the process that allows records managers and people performing an audit to discover and preserve electronic information, usually related to a legal case. eDiscovery can encompass every type of electronic information, such as email messages stored on laptops and servers,; and documents stored in SharePoint, on laptops, and on file shares. But also blogs and audio and instant messaging chats can be relevant. There is an eDiscovery standard that is called the Electronic Discovery Reference Model (EDRM) (http://www.edrm.net/). This standard includes models and guides in addition to XML schemas. The SharePoint 2013 eDiscovery features are implemented according to the EDRM model and XML schemas.
In large organizations that have a lot of data that is stored in a lot of different systems, it is often very difficult and labor-intensive to discover and preserve all relevant information across possibly thousands of laptops and personal computers and hundreds of other systems. An additional challenge is that when the information has to be put on hold, it often has to be put on hold quickly.
The eDiscovery features in SharePoint 2013 can be used to discover and preserve all content in SharePoint and content in Microsoft Exchange mailboxes. New additions to SharePoint 2013 are the eDiscovery Center and eDiscovery Case site definitions. The eDiscovery Center is a central site collection that can be used to manage eDiscovery holds. You will need one eDiscovery Center per Search Service Application. Under an eDiscovery Center, several eDiscovery Cases can be created as subsites. Figure 14-16 shows the home page of a specific eDiscovery Case called Case 1.

On an eDiscovery Case subsite, eDiscovery sets can be created. A set can be named and sources can be selected for it. Sources can be Exchange mailboxes, SharePoint site collections, subsites, or folder and file shares. SharePoint content will have to be selected per site collection, which can be a bit inconvenient in large organizations, because it might mean that a lot of site collections will have to be added to the set. It is also possible to select a subsite, library, or folder as a source location in SharePoint. The container that is selected in SharePoint will have to be indexed by the Search Service Application. When you try to save the eDiscovery set, SharePoint checks to make sure that the SharePoint sources are present in the search index. Figure 14-17 shows the eDiscovery set after it has been created. To view what information is put on hold as part of the eDiscovery set, you can click the Preview Results button. The content that is put on hold can be limited by using a query filter. If no filter is applied, all content in the source will be put on hold.

When creating an eDiscovery set, you also have to decide whether the hold should be in place. If the hold is created in place, the content will be preserved in its original location, for instance, in a SharePoint site or an Exchange mailbox. Content that is placed on hold in a SharePoint site can still be modified or deleted by users. When content that is placed on hold is modified, a new library is created, called the Preservation Hold library, on the SharePoint site where the content was modified. The original content (as it was put on hold) is copied to this library automatically before the original copy is modified. Content that is not modified or deleted stays in its original location and is not copied to the Preservation Hold library. This approach reduces the amount of storage that is needed to put a source on hold.
Instead of being put on hold, the results of an eDiscovery set can also be exported. The results can then be imported into a review tool. You can export all of the content that is associated with an eDiscovery case. This includes:
Documents. Both documents and their versions can be exported from SharePoint 2013.
Lists. When a list item is included in an eDiscovery set, the entire list is exported as a .csv file.
Pages. SharePoint 2013 pages are exported as .mht (MIME HTML) files.
Exchange objects. Exchange objects are exported as .pst files.
An XML manifest that complies with the EDRM specification provides an overview of the exported information.
In most cases, eDiscovery settings will be configured by using the SharePoint user interface, but there is also an API that can be used to build custom solutions using the SharePoint eDiscovery functionality. The namespace where the eDiscovery classes can be found is Microsoft.Office.Server.Discovery, which in turn can be found in the Microsoft.Office.Policy.dll file.
Summary
In this chapter, a mix of several different features related to document and records management were explored. The first one was the Managed Metadata Service Application and managed metadata itself. The features that come with SharePoint out of the box were discussed, in addition to how to use managed metadata in custom solutions. Both the features and the extensibility options are very powerful, but both have a few quirks in them as well, and understanding what those quirks are can save you a lot of time and frustration.
Several document services that aren’t new in SharePoint 2013, but that can still provide great value in your solutions, were discussed, such as versioning, Document IDs, Document Sets, and the Content Organizer. The Content Organizer can help you to distribute documents across folders, libraries, sites, site collections, web applications, or even farms. It is a feature that enables creating large-scale records repositories using out-of-the-box SharePoint features.
A feature that improved significantly in SharePoint 2013 is Word Automation Services. In particular, the ability to synchronously convert documents and the ability to convert documents that aren’t stored in SharePoint means that Word Automation Services can be used in more scenarios.
The records management features didn’t change significantly between SharePoint 2010 and SharePoint 2013. Documents can still be declared as records in place in their original location, and also be sent to a central records center. Both approaches have pros and cons, and the best one depends on aspects such as the amount of data, what will happen to the sites in which documents are created, who manages the records, and who needs to be able to access the records.
The eDiscovery features, though, got a good redesign in SharePoint 2013. The new eDiscovery Center and eDiscovery Case site definitions can be used to manage cases and holds. eDiscovery sets can be created to select locations in SharePoint or Exchange, or on file shares. You can choose to put all information in the selected location on hold, or use a query to determine what information should be put on hold. Holds can be created in place in the original location, or information that is part of a hold can be exported so that it can be reviewed outside of SharePoint.