NetScaler is equipped with many security features that can fend off attacks, which we have talked about earlier in this chapter. These features include:
- SYN DoS Protection
- ACL
- HTTP DoS
These are just some of the features that can be used, but most of these features only look at the connection or further down the ISO layer, and not so much on what kind of content is in there. In today's IT environment, the most common form of attack occurs using SQL injections, HTTP brute forcing, CSRP attacks, and so on. This is where the application firewall comes in.
The application firewall is used to secure services running behind NetScaler. It consists of policies and profiles. Here, we use the policy to identify patterns in the traffic. Profiles—like most features in NetScaler—are used to specify what we are going to do with the traffic.
The application firewall delivers protection in two ways. The first is signature-based. This means that NetScaler recognizes a pattern based on a signature and, depending on the action, may drop the connection. So this method is useful if it is a known vulnerability that a hacker is trying to exploit.
The second way the application firewall can offer protection is with deep protection features that are used for unknown attacks. Here we can configure it with a learning feature. This learning feature can be a useful way to see, for example, which websites the users are allowed to access internally and which they are not. This allows NetScaler to adapt a standard behavior.
We can also define filters in deep protection features. For example, users are allowed to access a website but not a URL starting with /mysite or /sales, and we can define an action when someone tries to access a URL with /mysite.
Thus, deep protection is useful for URL masking, SQL injections, buffer overflows, managing forms, and so on.
Note
It is important to note that application firewall is only part of NetScaler Platinum and can be purchased as an add-on in Enterprise. It is also recommended that you update the signature file when a new version is released. If your NetScaler is allowed to communicate externally using NSIP, it is also possible to configure auto update. This can be done by navigating to Signatures | Action | Auto Update Settings and enabling Signatures Auto Update. After this is enabled, go to Action and trigger the update version.
Now that we have talked a little bit about how application firewall works, let us go deeper and see how it operates. However, we cannot go through every feature within the application firewall, since it contains so much advanced functionality. We are only going to go through the basic features and some of the deep protection features. If you are interested in knowing more about the features not covered in this book, I suggest you head over to the eDocs article available at https://docs.citrix.com/en-us/netscaler/11/security/application-firewall/security-checks-overview.html; it contains information about all the different deep protection features.
Before we start using the application firewall feature, it must be enabled. This can be done by using the GUI under System | Settings | Basic Features | Application Firewall or by using the following CLI command:
Enable ns feature appfw
Then, go to Security | Application Firewall and start configuring the features. To see how to enable the different protection features, go through Application Firewall Wizard.
This will start a wizard where we first need to define the name of a web application. This is not linked to vServers but is used just for descriptive purposes. We also need to define a web application type that defines what choices we get in protection features. So as an example, let us say that we want to secure a regular IIS site running on Windows Server 2012, which is basic HTML. Then we can enter the name IIS and choose regular web application HTML under Type.
Next, under Rule, define a rule that allows NetScaler to identify what traffic it should look at. Here we can use many of the same expressions we use on the other features, and we can also type in true. Then this rule will apply for every connection made to NetScaler. If we want application firewall to only protect a certain site, we must define a rule expression, for instance, based on the hostname of the site: HTTP.REQ.HOSTNAME.CONTAINS("ecommerce").
Next, define signatures that we want to enable for this particular site. So, choose Create New Signature and then click on the Simple Edit mode and click on Continue. This will list different categories of built-in signatures, as shown in the following screenshot:

As we can see, by default these categories are enabled, but they will never block any traffic. What they will do is just log anyone that has, for instance, triggered an attack within these signatures. If we, for example, were setting up an application firewall rule for an IIS site, we could activate block for all Microsoft IIS rules by right-clicking on Microsoft IIS and choosing Enable Block for this category.
Now, in order to see what all the different signature files for IIS do, navigate to Signatures | Default Signatures and choose Edit. From there, filter the view based on web-iis, following which of the 100+ rules should appear. From there choose a rule and click on Edit. Here we can see the particular pattern match that the signature looks for, as in the following screenshot:

After we have defined which signatures are to be part of the web application protection, we can continue with the deep protection feature.
Remember that these features are enabled to deal with an unknown attack, so we can use the learning feature to define a baseline or go in and change the default behavior. This feature applies for XSS, SQL injections, and more, but for now let's just leave it at the defaults, as shown in the following screenshot, where we can take a closer look at some of the protection features:

The Start URL action defines which URL a client is allowed to use to start a connection against a service. This means that the first connection from our client can go directly to http://mycompany.com/index.html but not directly to http://mycompany.com/employee/me.
This function is used to prevent forceful browsing, which means preventing repeated attempts at random URLs. So URLs entered here cannot be used with, for example, bookmarks, since they are direct URLs.
By default, the feature is set with the following values:
- Log: NetScaler will log the violations made
- Stat: This will maintain the statistics for the rule
- Block: NetScaler will block all URLs that do not match the rule
We can also enable Learn, this enables NetScaler to learn what the default start URLs made to a website are, which makes it easier to deploy rules based on what the most accessed start URL is. NetScaler will then eventually mark that URL as the Start URL and users will then be able to only use that URL to access the start page.
But for now, we can click on Continue and OK to finish the wizard setup. If we go back to Application Firewall | Profiles, we can continue with the customization of the different deep protection features.
If we click on Edit on our newly created profile, we are presented with security checks. Here we see deep protection features that are active for our profile and what values are set for each feature. We also have a pane called Relaxation Rules, where we can define different parameters for each deep protection feature. For instance, if we go into Start URL under Relaxation Rules and click on Edit.
If we do not have the learning feature enabled, we need to predefine a start URL here. If we want all our users to start on index.html, we can add this by choosing Add and entering the URL.
Note
These features use regex to search through the URLs to see if they violate a rule. Regex uses a sequence of characters to form a search pattern. Using these features within NetScaler requires a bit of knowledge about them. Fortunately, NetScaler includes a regex tester that allows us to test our expressions. This can be accessed within a feature by going to Profile | Open Start URL | Add | Regex Editor. If you are unsure how an expression should look, you can find a good list of examples at https://docs.citrix.com/en-us/netscaler/11/security/application-firewall/url-protections/starturl-check.html.
However, we can enable the blocking action and leave the rest at its default, and make sure that the Learn action is enabled.
If we go back to Deep Actions under Relaxation Rules, we also have the Deny URL action. This is basically an allow/deny action. If we click open, we get a list of URLs where we can define the users that are not allowed to browse, as shown in the following screenshot:

Now, here we can add different URLs that the users are not allowed to browse. We can also define different regex queries to not allow users to directly access scripts, such as this query:
http://www[.]example[.]com/(([0-9A-Za-z]|\x[0-9A-Fa-f][0-9A-Fa-f])
([0-9A-Za-z_-]|\x[0-9A-Fa-f][0-9A-Fa-f])*/)*([0-9A-Za-z]|\x[0-9A-Fa-f][0-9A-Fa-f])
([0-9A-Za-z_-]|\x[0-9A-Fa-f][0-9A-Fa-f])*[.](bat|js|sql)$
Now, by default, this policy will be bound at a global level, meaning that it will apply to every service on NetScaler. If we want to bind it to a specific service, we should unbind it at a global level and bind it to a specific service.
Now, to change the bindings, go to Application Firewall | Policy Manager | Default Global. Here you can see that the application profile you created is now bound there. Choose Unbind and then run the Policy Manager again, and this time choose the load balancing vServer or the content switching vServer that you wish to bind the profile to.
If we now start to do some random requests against the web service, we can see that the statistics start to fill up. These can be viewed by navigating to Application Firewall | Statistics. Here we can see that the different security checks will have their own statistics pane.
Now, let's deploy some rules for the deep protection features. First, we can define for deny URL that we can disallow access to the /admin /setup URL. Go into Application Firewall | Profiles, choose the newly created profile, and click on Edit. From here, go into Security Checks and choose Deny URL, then mark the Block action. Next, go into the Relaxation Rules, choose Deny URL, and click on Edit. Then, enter the different URLs to deny access.
Every user who tries to access a random URL on the service that triggers a violation rule will automatically get redirected to the main page. We can define a custom redirect URL for those who try to access random URLs or a custom HTML page
This can be done by navigating to Profile, then click on the newly created profile and choose Edit | Profile Settings, and then under HTML settings, define either a Redirect URL or HTML Error Object. When a user now tries to log in to the URL of the vServer with an /admin or /setup, they will be redirected to the custom error object.
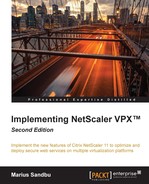
Now, since we also specified that the start URL feature should use the learning capability, we can see what it has learned from the different web requests. This can be seen by going into the Application Firewall Profile, choosing Edit, and going into Learned Rules. From here, choose the Start URL and click on Edit.
Here we can view a list of URLs that have been learned and those that have been accessed. We can, from here, click on a rule and choose Deploy, which will take the URL and make it the Start URL, as shown in the following screenshot:
Under Learned Rules, we also have an option called Trusted Learning Clients, which allows us to restrict the learning module to only apply to a certain number of IP addresses. After we have defined a start URL, we only need to apply the Block option under Security Checks and then click on Apply. So when a user opens a new connection to the vServer, the start URL must match the one we defined. If not, the user's request is violated and will therefore be sent to the redirect page or the HTML custom error page.
We have now seen a small portion of what application firewall has to offer; it offers a wide range of different features that can be used to prevent Cross Side Scripting, SQL injections, and so on. As mentioned earlier, if you wish to learn more about the different features within application firewall, head over to this eDocs article at https://docs.citrix.com/en-us/netscaler/11/security/application-firewall.html.