[A.9.1, A9.2] Eclipse is a free software/open source platform-independent software framework for delivering what the project calls “rich-client applications,” as opposed to “thin client” browser-based applications. So far this framework has typically been used to develop IDEs (Integrated Development Environments), such as the highly regarded Java IDE called Java Development Toolkit (JDT) and compiler that comes as part of Eclipse (and which are also used to develop Eclipse itself). However, it can be used for other types of client application as well. See the popular BitTorrent client Azureus for example.
Eclipse was originally developed by IBM as the successor of its VisualAge family of tools. Eclipse is now managed by the Eclipse Foundation, an independent not-for-profit consortium of software industry vendors. Many notable software tool vendors have embraced Eclipse as a future framework for their IDEs, among them Borland, BEA Systems and IBM Rational.
—Wikipedia[1]
[A.9.3] One of the newest features of ClearQuest is the Eclipse plug-in, which allows you to take full advantage of the Eclipse interface for multisite teams. Eclipse began as an IBM project; in late 2003, an IBM-independent foundation was formed to further the development of Eclipse. Here’s a quick overview from the Eclipse Foundation website.
The Eclipse technology is a vendor-neutral, open development platform supplying frameworks and exemplary, extensible tools. Eclipse Platform tools are exemplary in that they verify the utility of the Eclipse frameworks, illustrate the appropriate use of those frameworks, and support the development and maintenance of the Eclipse Platform itself; Eclipse Platform tools are extensible in that their functionality is accessible via documented programmatic interfaces. The purpose of Eclipse Foundation Inc. is to advance the creation, evolution, promotion, and support of the Eclipse Platform and to cultivate both an open source community and an ecosystem of complementary products, capabilities, and services.
Eclipse has formed an independent open eco-system around royalty-free technology and a universal platform for tools integration. Eclipse based tools give developers freedom of choice in a multi-language, multi-platform, multi-vendor environment. Eclipse provides a plug-in based framework that makes it easier to create, integrate and utilize software tools, saving time and money. By collaborating and exploiting core integration technology, tool producers can leverage platform reuse and concentrate on core competencies to create new development technology. The Eclipse Platform is written in the Java language and comes with extensive plug-in construction toolkits and examples. It has already been deployed on a range of development workstations including Linux, HP-UX, AIX, Solaris, QNX, Mac OS X and Windows based systems.[2]
A history of the Eclipse Foundation’s charter is available at the website as well.
Before you jump into the Eclipse client, we’ll share a few of the pros and cons to this solution.
In favor of the Eclipse client are the following benefits.
Your developers can use the same tool for development as they use to track defects.
They can easily change Eclipse tasks into trackable tasks within ClearQuest.
One tool is easier to manage and maintain.
The Eclipse client can have multiple ClearQuest login sessions open simultaneously—something the native Windows ClearQuest client cannot do.
On the other hand, consider these issues.
The Eclipse client requires a lot of memory (buy stock in memory manufacturers).
It can—and does—slow down Eclipse on underpowered machines (due to a lack of memory and CPU speed).
It’s yet another tool to manage and maintain. While this seems to rebuff one of the items on the list of pros, just remember that setting things up on hundreds of machines can be difficult to manage.
The Eclipse client doesn’t currently allow the “drilldown” into chart data that the native Windows client provides.
As with any new tool or architectural decision, make sure you understand all of the issues before you make a technical and financial commitment.
The first step is downloading and installing the plug-in onto your system. You can download the GA (general availability) version of Rational ClearQuest Client for Eclipse at http://www-1.ibm.com/support.
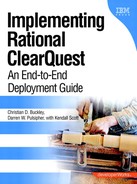
Before you can use the ClearQuest Eclipse plug-in, you must connect to a ClearQuest database. To connect and log in to a database, you will need to follow along with the steps in the Login Wizard. The wizard walks through the process of logging into a connection; you can invoke it from the ClearQuest Navigator view (1), the Eclipse main toolbar (2), or the ClearQuest menu (3), as shown in Figure 9-1.
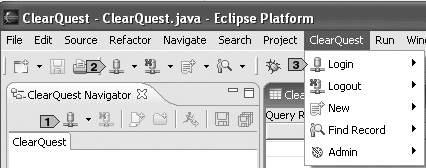
[S.9.1] Once you have chosen one of these three methods, a Login Wizard dialog will appear. The first page will prompt you for a schema repository (Figure 9-2). A combo box shows all the available schema repositories. Select the schema repository you wish to connect to and click Next.
Now the wizard will prompt you for a user ID (Figure 9-3). This is the user ID for the database that contains the schema repository. Don’t forget to click Finish to complete execution of the wizard.

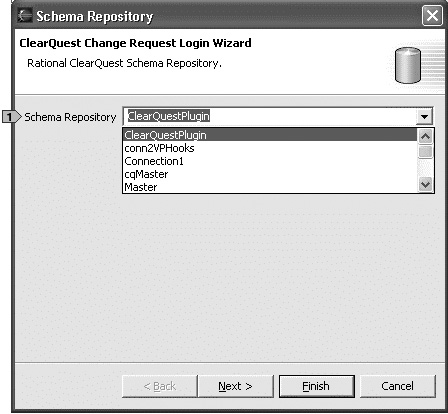
Another dialog will pop up that will prompt you for the password and database to connect to (Figure 9-4).
The “Remember the password” option allows you to save the password for subsequent logins. If you select this option, ClearQuest encrypts and stores the password and uses it on subsequent logins.
Once you have successfully logged in, you will notice changes to the Eclipse ClearQuest Navigator view and the Eclipse ClearQuest Query Results view. As shown in Figure 9-5, a new ClearQuest tab is added to the ClearQuest Navigator view.

The connection information is also shown in the ClearQuest Navigator view (2). You can expand the connection information node to view the public and personal queries. Note also that the ClearQuest Query Results view title has been changed to reflect the connection information based on your last successful login. The connection that you created using the Login Wizard is persisted for future use.
[S.9.2–S.9.6] The ClearQuest Eclipse plug-in also allows you to perform a couple of administrative options while still inside Eclipse: changing e-mail options and changing user profiles.
Just as with the native client, changing the e-mail options enables notifications when actions are performed. As shown in Figure 9-6, you start the E-mail Options Wizard by going to the main menu and selecting ClearQuest → Admin → E-mail Options.

The wizard has two pages that walk you through changing your e-mail options. The first page allows you to change e-mail provider information; the second page allows you to configure the e-mail provider. Make sure that you click Finish to apply the changes you have made. ClearQuest will make your changes available right away.
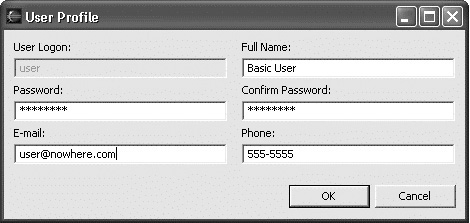
User profiles contain information about your users, including login names, full user names, passwords, e-mail addresses, and phone numbers. You can edit user information using the ClearQuest Eclipse plug-in. To access the user profile and make changes, select ClearQuest → Admin → Change User Profile from the main menu (Figure 9-7).

The User Profile dialog will appear (Figure 9-8). This dialog allows you to modify the password, full name, e-mail, and phone number of the logged-in user. (This is the only user for whom you can change information.) ClearQuest immediately applies changes you make to the user profile to the User database.
ClearQuest MultiSite is supported within the ClearQuest Eclipse plug-in. You perform basic actions in the same way as you do within a non-multisite environment, except available actions are restricted depending on mastership. This is shown with a lock icon in all of the Eclipse views that show ClearQuest record information (Figure 9-9).
Workspace objects in the ClearQuest Navigator view display mastership information with the addition of a lock icon.
The Query Results view, as shown in Figure 9-10, displays mastership information in an additional column. Again, a lock icon indicates the record is mastered remotely.

Mastership for records in the ClearQuest Record Details view, as shown in Figure 9-11, is not apparent. In fact, you will only be notified when you try to perform a Record action and ClearQuest displays “Mastership Required,” which indicates that the record is mastered remotely. (This, of course, is not the ideal way to find out something is not writable but is the only one currently available.)

As with most Eclipse plug-ins, the ClearQuest plug-in allows you to customize some of the behavior of the plug-in. To access the preferences, select Window → Preferences from the Eclipse menu bar. Navigate to the Team → ClearQuest node and expand it. An additional Rational ClearQuest Preferences page appears.
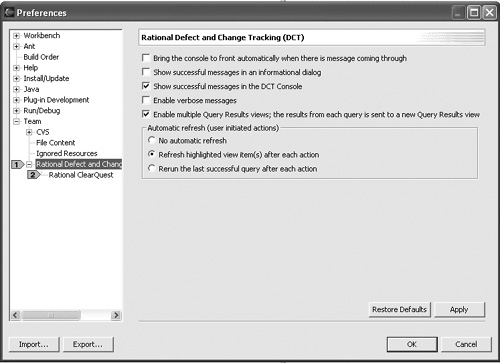
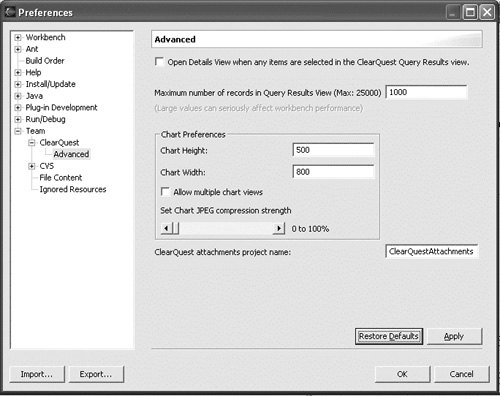
There are two Preferences windows available to change: the Rational Defect and Change Tracking window (Figure 9-12) and the Rational ClearQuest Advanced window (Figure 9-13). The Advanced window contains configuration items that help the plug-in display records more effectively.
The defaults in these Preferences windows are typically good enough to run the application sufficiently. You will want to make changes to the preferences if performance is an issue or if you want something other than the default look and feel of the plug-in.
Eclipse has two pervasive ideas: views and perspectives.
Views show the project, or more specifically the data in the project, in different ways. For example, there is typically a Navigator or Explorer view that shows the files in the file system, and an Editor view that shows the contents of the file.
Perspectives are made up of one or more views. Perspectives can be switched back and forth, in order to reveal different views of the same data.
You can easily create custom views by adding views to a current perspective. Eclipse saves these views in a copy of the perspective to be used at a later time.
The ClearQuest plug-in has a perspective for working with ClearQuest in Eclipse. It contains a set of Eclipse views that show ClearQuest data and allows for several ClearQuest actions to be performed (Figure 9-14).

To use the ClearQuest perspective, go to the main menu bar and select Window → Open Perspective → Other → ClearQuest.
The following subsections describe the various views built into ClearQuest.
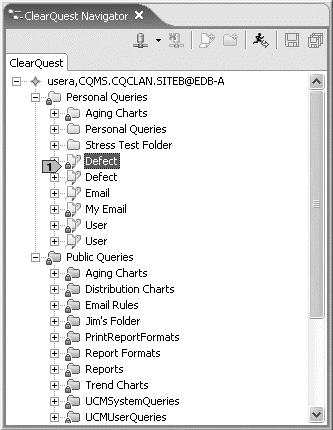
The ClearQuest Navigator view, illustrated in Figure 9-15, displays queries, charts, reports, and report formats.

The Navigator view is analogous to the Workspace view in the Windows client. You can create, modify, rename, delete, and execute queries, reports, and charts. The top-level node in the navigator is named after the connected user and the database to which the user is connected.
The Eclipse ClearQuest Navigator view is very similar to the Workspace view in the ClearQuest native client. However, there are some subtle differences between the two.
In the Eclipse ClearQuest Navigator, you can view the structure of the workspace object without editing it. For example, you can view the filters and display fields of a query just by expanding a query node.
Editing components of a workspace object can be performed directly in the Navigator view. You can delete display fields by deleting the corresponding display field node in the Navigator view.
Auto-generated workspace object names allow you to create copies of workspace objects under the same location. You can copy a query under a folder and paste it under the same folder. The copied query would be assigned an autogenerated name “Copy of {query name}.”
The results of queries are displayed in the ClearQuest Query Results view, in a table tree format. You can browse to an associated child record from the parent record.
Figure 9-16 shows how you can expand a defect node to view attachments, history information, and duplicates (1). You can perform actions directly on the records displayed on the query results (2). Selecting multiple records will allow you to perform batch actions on those records.

You can view the details of a record using the ClearQuest Record Details view, as shown in Figure 9-17.

The form is shown exactly as defined by the ClearQuest schema. You can perform actions on the record displayed in the view.
The Console view is an integral Eclipse view that the Rational ClearQuest plug-in uses to display success and failure messages. You can filter the messages shown in the Console view by using Rational ClearQuest preference settings, as shown in Figure 9-18.

The Tasks view, shown in Figure 9-19, is an integral Eclipse view that displays the tasks if you are doing any development that uses the default Tasks list in Eclipse. This includes tags in your code like the TODO and FIXME code tags that automatically add tasks to the Tasks view.

Alternately, you can create a new task using the Add Task toolbar button and then associate a task with a resource. You can easily turn a task into a ClearQuest record by right-clicking on the task and selecting the ClearQuest menu item (1) and then New ClearQuest Record (2).
Next, a record selection dialog will pop up, listing the connections that are logged into ClearQuest and the types of records that you can create (Figure 9-20).

You can choose to use a logged-in location (1) or create a new location using the New Connection (2) button. Choose the record type (3) and click OK to invoke the new record dialog. The integration automatically populates the Headline and Description fields of the record with task information, provided that the record type has those fields. You can save this type of record and subsequently select it using the same dropdown menu as before.
The ClearQuest Eclipse plug-in allows you to manage and run queries just like in the native tool. The following subsections show the basic steps involved in working with queries.
To create a new query, open the Query Wizard. Then select a folder in the ClearQuest Navigator view within which you want to create the query. Use the context menu (right-click on a folder to view the context menu). Select New Query (Figure 9-21) to invoke the Query Wizard.
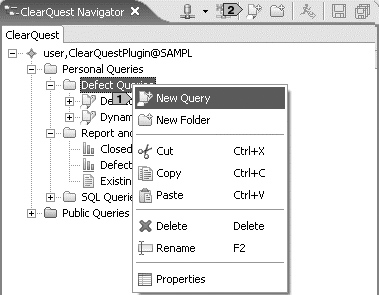
You can also invoke the Query Wizard from the New Query toolbar item.
Select the record type and the query name on the Query Name and Record Type page.
The query’s Name field is prefilled with a unique query name. The Next button is disabled if you don’t choose a record type or if you provide an invalid query name.
What appears as the next page of the wizard depends on whether you select Create Query from an existing query check box (Figure 9-22).
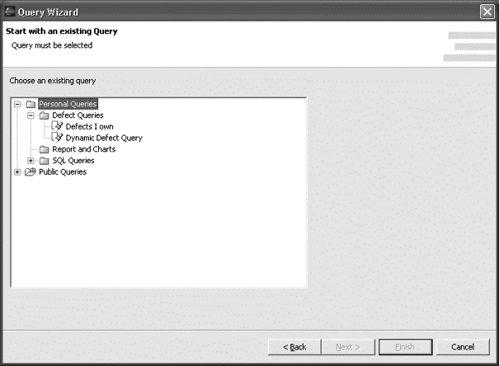
If you wish to create the query from an existing query, enable Create Query from an existing query check box and click on the Next button. You can select an existing query on which you want to base your new query by using the Query Wizard page shown in Figure 9-22.
On the following page (Figure 9-23), you choose the query filters. The valid filter fields for a record type are shown in the left side of the page (1). You can add filters by double-clicking on the filters that are present. You can group the filters added to the right side by using the Group context menu action (2). The context menu actions also allow you to delete filters and groups (3) and change the grouping between And and Or (4). You can set the default filters using the current settings by checking the Set as Default Filters check box. By setting this, ClearQuest sets those filters initially for every new query created for that record type.

The Define Query Filters page (Figure 9-24) does not appear if you didn’t select a filter on the previous page. You can define the filter values using this page; ClearQuest persists the filter values when you change the selection here.

Choose the display fields in the Define Display Fields page (Figure 9-25).

Add display fields by dragging and dropping the fields (1) or double-clicking on the fields. You can change the title (2), show information for a display field (3), change the sort type (4), or change the sort order (5) by clicking on the appropriate table cell. To run the newly created query, select the Run Query check box (6).
You can set the default display fields using the current settings by checking the Set as Default Columns check box (7). ClearQuest then initially sets the display fields for every new query created for that record type.
The new query is selected and shown in the ClearQuest Navigator view (Figure 9-26).
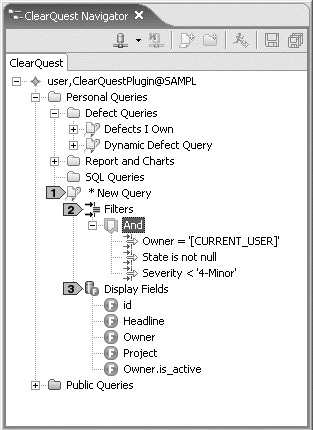
The query is decorated with an asterisk decoration (1) to indicate that the query needs to be created or saved in the database. The filters (2) and the display fields (3) contained in a query are shown in the ClearQuest Navigator view, too.
You can also create queries from the ClearQuest main toolbar or the ClearQuest menu. Select New → <connection> → New Query. The first page of this Query Wizard is slightly different. In order to create a query using this wizard, you need to specify the location where the query will be created.
There are some important differences between the ClearQuest Eclipse plug-in and the native Windows client.
The record type is shown in the first page of the Query Wizard. In the native Rational ClearQuest client, users choose the record type and proceed to choose the filters and display fields in a wizard. This approach does not allow users to change the record type of the query after it has been selected. Within the Eclipse client, the record type is shown in the first page of the wizard. By allowing users to choose the record type as part of the wizard, the client allows you to change the record type even after choosing the filters and display fields corresponding to a different record type.
The Name field is prefilled with a unique name.
When you are creating a query based on another query, the page for starting with an existing query is shown only when users choose to create a query from an existing query.
The filter selection page is shown before the Define Display Fields page. When creating a new query, users usually decide what records are shown before choosing how the records are shown. Hence, the Define Display Fields page is shown after the filter selection page. This also goes hand in hand with a SQL statement where the Select clause (display fields) is shown after the Where (filters) clause.
The Define Query Filters page is shown only if you selected filters using the filter selection page. This speeds up the creation of queries that return all the records of a particular record type.
ClearQuest does not automatically save a new query to the server. Unlike the native client, the new query created is not automatically created on the server. An asterisk decoration on the query is added to indicate that the query is not saved to the database. This feature allows users to create temporary queries without saving them to the server.
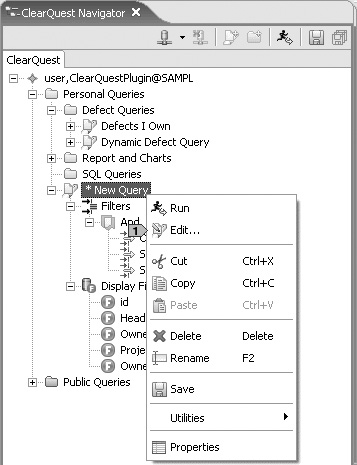
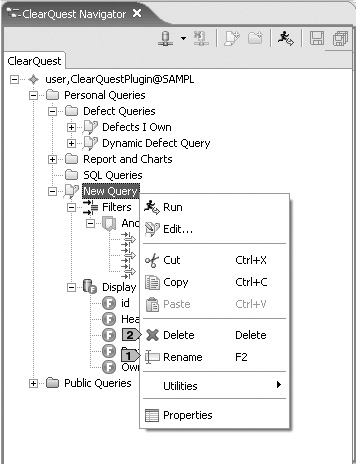
You can edit a query by using the Edit Query Wizard. To invoke the Edit Query Wizard, highlight the query and choose Edit (1) from the context menu (Figure 9-27).
The Edit Query Wizard allows users to edit the structure of the query. This wizard shows the Select fields to use as the Query Filters, Define Query Filters, and Define Display Fields pages of the wizard. The asterisk decoration on a query indicates that changes to a query need to be saved to the ClearQuest database.
The ClearQuest Navigator view shows the structure of the query; in other words, the filters and display fields contained under the query appear within the ClearQuest Navigator view. If you want to edit only the filters, you can invoke the Edit Filter Wizard by selecting Edit from the context menu on a filter node. The Select fields to use as the Query Filters page and the Define Query Filters page are the two pages contained in an Edit Filter Wizard. Similarly, to edit the display field, you can invoke the Edit Display Field Wizard by selecting the Edit action on a display field. The Edit Display Field Wizard shows only the Define Display Fields page.
As discussed earlier, unsaved queries are displayed with an asterisk decoration. To save an unsaved query to the database, highlight the query (1) and select the Save context menu action (2), as shown in Figure 9-28.
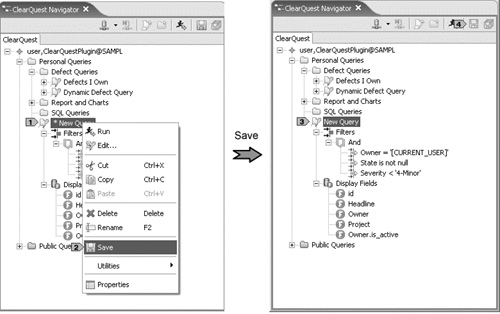
After the save operation, the asterisk decoration is removed (3), which indicates that the unsaved changes have been committed to the ClearQuest database. You can also save all the unsaved queries belonging to a connection by highlighting the connection node and using the Save All context menu action. (You can also save a query by using the Save toolbar item.)
You can rename or delete a query using the Rename (1) or Delete (2) actions from the query’s context menu, as shown in Figure 9-29.
ClearQuest displays a confirmation dialog that prompts you to confirm a delete operation (but not a rename).
To view the SQL version of a query, highlight the query and select View SQL from the context menu (1), as shown in Figure 9-30. The SQL is shown in the SQL Query view (2).

You can only edit SQL queries from inside the SQL Query view. To convert a query to a SQL query, highlight the query and select Utilities → View SQL.
Note that you cannot convert a query to a SQL query if you don’t have permission to create a new SQL query. The SQL query created by the conversion process is not automatically saved to the server. You can save the query by using the Save Query action. To edit a SQL query, view the SQL of the query by using the View SQL menu action, and select the Edit toolbar button in the SQL Query view. To save the changed SQL statement, use the Save toolbar button in the SQL Query view.
Note that the SQL Query view is not part of the default ClearQuest perspective. You can open the SQL Query view by using Window → Show View → Other → ClearQuest → SQL Query View.
If you want to execute a query when you connect to a Rational ClearQuest database, you need to set the query as a startup query. To set the query as a startup query, highlight the query and select Utilities → Run at Startup. A startup query is indicated by the checkmark decoration (1), as shown in Figure 9-31.
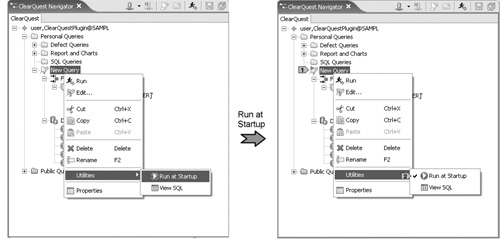
To reverse that setting, use Utilities → Run at Startup again. The checkmark is removed when you unset the startup nature of the query. (Note that the beta version of the Rational ClearQuest Client for Eclipse does not allow users to run a chart or a report at startup.)
There are two ways to execute a query: Double-click on a selected query, or right-click on a query and select the Run action from the context menu. After execution, ClearQuest displays the query results in the ClearQuest Query Results view (Figure 9-32).
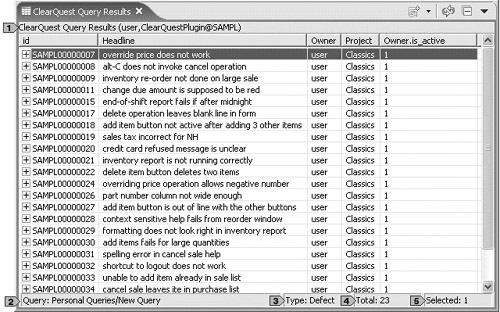
The columns and the order of the records are formatted according to the query’s display field settings. After executing the query, you will notice additional changes in the ClearQuest Query Results view. The database information is displayed in the title of the view (1). The name of the query executed (2), the type of record (3), the number of records returned (4), and the number of selected records (5) appear in the status bar of the Query Results view.
You can expand the records to view the record types referenced by the parent. Expanding the record types further will result in ClearQuest displaying the referenced records. For example, expanding a defect record will show three nodes: Attachments, Duplicates, and History. Expanding these nodes will show the attachments, duplicates, and history records, respectively, associated with the defect.
If the selected query contains dynamic filters, ClearQuest displays a dynamic query window that you can use to establish the criteria (Figure 9-33).
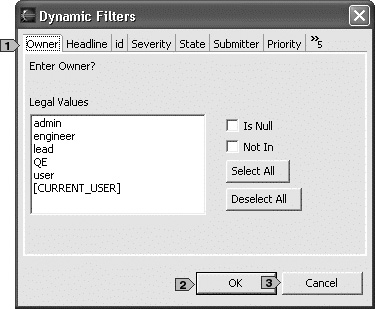
The tabs in the Dynamic Filters dialog correspond to the different dynamic filters present in the query (1). Click OK (2) to execute the query based on the criteria set within this dialog. You can cancel the execution of the query by using the Cancel button (3).
The Query Results view displays the query results retrieved by executing the query. To navigate back to the query from the Query Results view, use the Show Query in Navigator menu action.
If the number of results exceeds the maximum results count, a message appears confirming whether or not you want to execute the query. ClearQuest has implemented this measure because executing queries with a large number of results affects the performance adversely. To change the maximum results count, go to the Preferences window.
The Dynamic Filters window can show only a certain number of dynamic filters in the viewing area. If a query contains dynamic filters that can’t be accommodated in the viewing area of the Dynamic Filters window, the excess filters are displayed off-screen (1), as shown in Figure 9-34.

As we saw in the previous subsection, the results of an executed query are displayed within the ClearQuest Query Results view. Each executed query uses a different ClearQuest Query Results view to display the results. This means that when multiple queries are executed, multiple ClearQuest Query Results views will appear in the ClearQuest perspective.
The location information (1) and the query path name (2) appear in the title of the view and the status bar, respectively (Figure 9-35). When you execute a query, the results are shown in a new ClearQuest Query Results view if there is no such view already associated with the query. The different views are stacked on top of each other.

If a query is executed again, the results will appear in the ClearQuest Query Results view previously assigned to that query. When you log out of a database, ClearQuest automatically closes all the views assigned to queries from that database.
Designating a Rational ClearQuest Query Results view for every executed query is the default behavior of the Rational ClearQuest Client for Eclipse. You can choose to change the behavior in the Preferences window.
In this section, we look at the actions that you can perform on records using the Rational ClearQuest Client for Eclipse.
The ClearQuest Record Details view, shown in Figure 9-36, displays the complete information set for a given record.
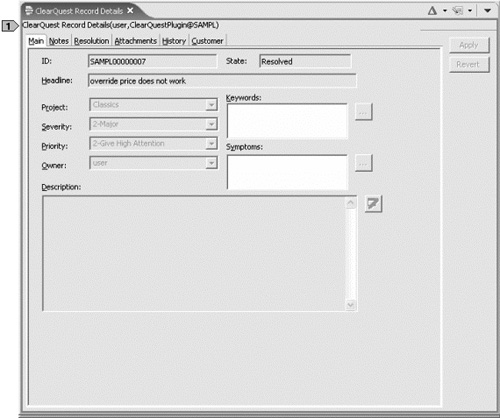
To display a record in the ClearQuest Record Details view, select the Details action from the record’s context menu. After the Record Details view is displayed, whenever you select a new record, the view will automatically display the information of the record you selected.
The record form is displayed exactly as it was designed in the schema. Selecting different tabs results in ClearQuest displaying the appropriate information. The selected record’s database information is shown in the view title (1).
You can change when and how the ClearQuest Record Details view is shown by changing the preferences.
You can perform actions on the records from either the ClearQuest Query Results view or the ClearQuest Record Details view.
The ability to perform record actions directly from the ClearQuest Query Results view means that it is very useful to add this view to your development perspective. You can then perform most ClearQuest activities without changing to the ClearQuest perspective.
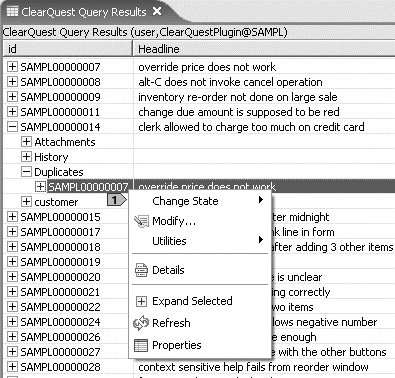
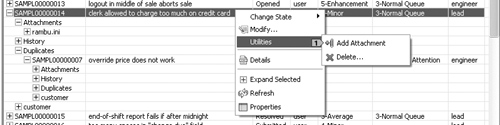
In the ClearQuest Query Results view, shown in Figure 9-37, the possible actions for a record are displayed in the record’s context menu.
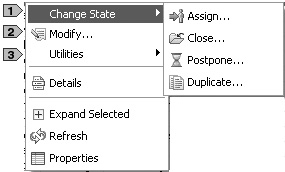
The context menu actions are organized into three categories.
Change State. Change State actions allow you to transition a record from one state to another
Modify. Modify actions allow you to modify the record information
Utilities. Utilities actions include Delete and Add Attachment
When you initiate an action from the menu, the window shown in Figure 9-38 appears.
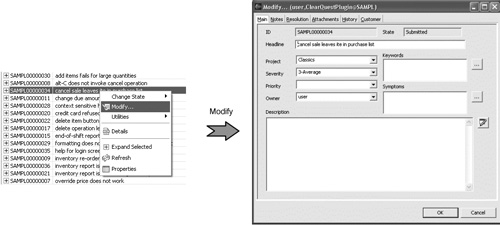
Fill in the required information and complete the action. The action determines what kind of window appears. For example, a modify form appears when you select the Modify action, while a duplicate action form appears when you initiate a Duplicate action.
You can also perform actions on referenced records (child nodes) from the ClearQuest Query Results view, as shown in Figure 9-39.
The available actions depend on the selected record. You can apply the same action that you perform on a record to multiple records: Highlight the records you want to perform the action on, and then initiate a common action. The usual window will appear, except instead of an Apply button, there is an Apply All button. Click the Apply All button to tell ClearQuest to perform the action on all of the selected records.
In the ClearQuest Record Details view, you perform actions within the view itself rather than from a context menu (Figure 9-40).
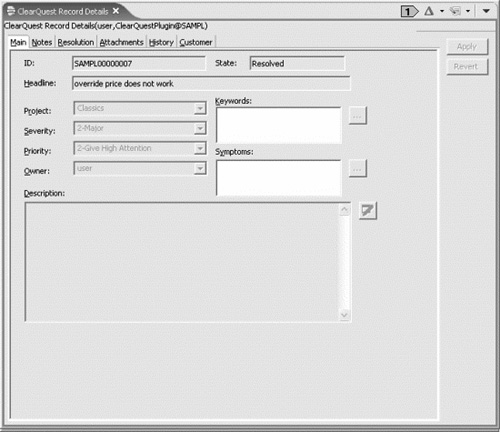
The actions are located in the upper-right corner of the view; they are organized in a way similar to the organization within the ClearQuest Query Results view. You initiate actions that are contained in a control (such as attachment actions) from within the form. Other actions, such as Modify, use the record form in the ClearQuest Record Details view to perform the action.
Take a look at the Edit icon. You will notice this button next to all multiline text controls. Clicking this icon brings up an edit text dialog, which provides you with a larger, resizable area within which you can edit the text.
ClearQuest refreshes a record within the ClearQuest Query Results view when you perform an action on the record. You can refresh a record manually by right-clicking the record and selecting the Refresh action from the context menu. You can refresh multiple records by using the Refresh action on multiple highlighted records.
You can refresh the entire result set by rerunning the query. You can do this quickly by using the Rerun Query action within the Rational ClearQuest Query Results view toolbar (Figure 9-41).

You can change how the ClearQuest Query Results view is refreshed by modifying the preferences.
Queries are worthless if there are no records to query. If you have create authority in one or more ClearQuest databases, you can perform a “submit record” action using the Eclipse toolbar Submit button or the New menu item under the ClearQuest main menu (Figure 9-42).
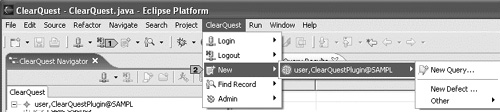
Click on the dropdown menu to display a context menu with active databases. The database you select will determine where the record is created. Expanding the database entry will show the different records you are allowed to create. The state-based record names are displayed as top-level menu actions, while the stateless entries can be accessed via the Other submenu.
Selecting the desired record type results in the appearance of a Create Record window. Fill in the required fields and submit the record.
You can also create records from the ClearQuest Query Results view, as shown in Figure 9-43. The “submit record” action is located within the ClearQuest Query Results view toolbar.

The “create” action allows you to submit records to the database linked to the particular ClearQuest Query Results view. Since you can create records only in the linked database, the context menu displays only record types for that database. In addition, you can click on the main “submit record” action to tell ClearQuest to invoke the submit dialog for the default record type of the current schema.
The Find Record action allows you to retrieve a specific record and view or perform actions on it. This prevents you from having to execute a query just to view or perform actions on a record.
You can initiate this action from either the Find Record button in the Eclipse toolbar or the Find Record menu item under the ClearQuest main menu (Figure 9-44).

The Find Record dialog consists of a dropdown list for choosing the record type (1), a Search All Record Types option (2), an ID search text box (3), and a Check button (4), as shown in Figure 9-45.
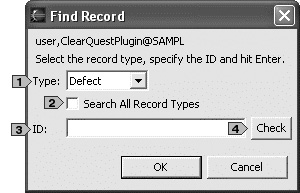
You can enter partial identifying strings in the ID text box. Clicking Check tells you what record will be shown based on your ID search string. The record is displayed within the ClearQuest Record Details view.
[S.9.7, S.9.8] You can open, add, delete, and edit an attachment using the Rational ClearQuest Client for Eclipse. You can perform actions on an attachment from either the ClearQuest Query Results view or the ClearQuest Record Details view. The ClearQuest Query Results view shows the attachments as a child node if the particular record type supports attachments.
The following subsections explore the different attachment actions.
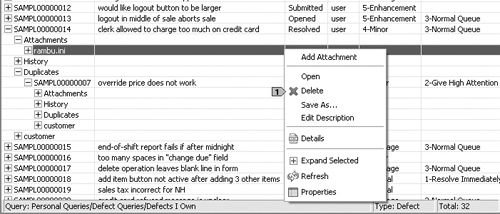
To create an attachment, highlight the record and select the Utilities → Add Attachment context menu action (Figure 9-46).
An Add Attachment window appears, allowing you to select the file that needs to be uploaded as an attachment.
To delete an attachment, highlight the attachment and select the Delete menu action (Figure 9-47).
To open an attachment, highlight the attachment and select Open from the context menu. The attachment file is temporarily stored under the ClearQuestAttachment project. You can open the file either in an Eclipse editor or in an external editor. (The value of the Window → Preferences → Workbench → File Associations preference determines whether the file is opened inside or outside the Eclipse shell.) You can modify the file opened in an Eclipse editor or an external editor. When you save the file, the attachment is automatically saved to the ClearQuest database. ClearQuest automatically deletes the temporary attachment file when you close the corresponding editor.
If you prefer to perform attachment actions from the ClearQuest Record Details view, just initiate the actions from the attachment control in the form.