
Chapter 5: Implementing the CDISC SDTM with SAS Clinical Data Integration
SAS Clinical Data Integration Introduction
SAS Clinical Data Integration Metadata
Classifications of SAS Clinical Data Integration Metadata
Setup of SAS Clinical Data Integration Metadata
SAS Clinical Data Integration Study Setup
Define the Clinical Study and Subfolders
Register Source Datasets and Define Target SDTM Datasets
Setting SAS Clinical Data Integration Defaults
Creating the Special-Purpose DM and SUPPDM Domain
Creating the AE (Adverse Events) Events Domain
Creating the XP Pain Scale Customized Findings Domain
Creating the EX Exposure Interventions Domain
Creating the LB Laboratory Findings Domain
Creating the Trial Design Model Domains
Using Customized Code in SDTM Production
Templating Your SDTM Conversion Jobs for Reuse
Using SAS Clinical Data Integration to Create Define.xml
This chapter provides an illustrated example of how you can implement the CDISC SDTM using SAS Clinical Data Integration 2.6. This chapter uses the metadata that was defined and loaded into the SAS Clinical Standards Toolkit as described in Chapter 4 as a prerequisite. First, you will see how to load that study metadata into SAS Clinical Data Integration. Then you will see how to set up your particular SDTM conversion study based on those standards and how to implement the SDTM conversions. Finally, you will be shown how to create define.xml using SAS Clinical Data Integration.
SAS Clinical Data Integration Introduction
For the clinical trials industry, the development of SAS Clinical Data Integration is a big step in the right direction. Instead of the historical technique of writing code by hand in Base SAS, SAS Clinical Data Integration provides a graphical interface to help you implement standard transformations based on the CDISC data standards. The graphical interface reduces the burden of generating code manually. The fact that SAS Clinical Data Integration is driven by the CDISC data standards helps ensure that the end product is compliant with the data standard.
The examples in this book use SAS Clinical Data Integration 2.6, which is built on top of SAS Data Integration Studio 4.9. SAS Data Integration Studio is a graphical interface-based ETL (extract, transform, load) tool similar to other ETL tools. The SAS Clinical Data Integration software is an add-on product to SAS Data Integration Studio to support those who work in clinical trials research and especially those who want to use the CDISC models. SAS has invested in helping the clinical trials research industry by developing SAS Clinical Data Integration as well as the complimentary SAS Clinical Standards Toolkit software shown in Chapter 4.
The use of SAS Clinical Data Integration itself could fill up a book and a course by itself, so this book cannot cover every aspect of its use. We will try to show as much detail as we can here, but some information has been left out to keep this book to a manageable size. Some setup topics have been left out, including but not limited to user management and authority settings, which are defined in SAS Management Console.
SAS Clinical Data Integration Metadata
This section shows how CDISC SDTM metadata is defined within SAS Clinical Data Integration. In Chapter 4, we saw how to use the SAS Clinical Standards Toolkit as a stand-alone product. However, the SAS Clinical Data Integration application is designed to work closely with the SAS Clinical Standards Toolkit. So we will now take our metadata definitions from Chapter 4 and use them here in Chapter 5 to feed the SAS Clinical Data Integration tool.
Classifications of SAS Clinical Data Integration Metadata
CDISC-Published Metadata
SAS Clinical Data Integration comes preloaded with the published CDISC standards as they exist when you install the software. That consists of the current standard domains for the published CDISC SDTM, CDISC-controlled terminology, and standard data classes for CDISC ADaM, CDISC SEND, the Operational Data Model, and define.xml. There are numerous metadata attributes, such as variable lengths in the CDISC SDTM, which are not defined by CDISC. Therefore, SAS makes a best guess as to what you might want for those. If you can use those data standards as SAS has defined them, then you are all set and you can start using SAS Clinical Data Integration very quickly.
Company-Specific Metadata
It is more likely that you have company-specific metadata based on the generic CDISC metadata that you will need to use in your data transformations to the SDTM. You might have a company-wide standard for SDTM implementations. You are also likely to have company-specific controlled terminology that you want to use. You might have drug compound standards or even study-specific standards that you want to use. If you work for a contract research organization, it is likely that you have numerous SDTM data standards to match the requirements of each sponsor organization. The good news is that SAS Clinical Data Integration enables you to have multiple data standards and to use them where you need them. In this book, we use the XYZ-SDTM-3.2 standard that we defined in Chapter 4 as our drug compound-specific SDTM standard, along with the default controlled terminology package loaded with SAS Clinical Data Integration. You can manually enter study metadata into SAS Clinical Data Integration. But it is easier to load the metadata into that tool via the SAS Clinical Standards Toolkit. Also, a newer feature of SAS Clinical Data Integration enables you to import standard metadata from a properly formed define.xml file. This can be especially helpful if you want to clone study metadata from another CDISC study into SAS Clinical Data Integration.
Setup of SAS Clinical Data Integration Metadata
You first need to import the XYZ-SDTM-3.2 standard that we defined in Chapter 4 as our drug compound-specific SDTM standard. To do this, go to the Clinical Administration tab and right-click the Data Standards folder to import the new standard.

In the Select Data Standard window, select the SDTM standard type to import the custom standard that was registered in SAS Clinical Standards Toolkit. Here, you also see the CDISC-SEND and ADaM standards that came with SAS Clinical Data Integration.

On the next screen, you see the new custom XYZ-SDTM-3.2 standard that you created in Chapter 4 as well as the other SDTM versions that the SAS Clinical Standards Toolkit has registered.

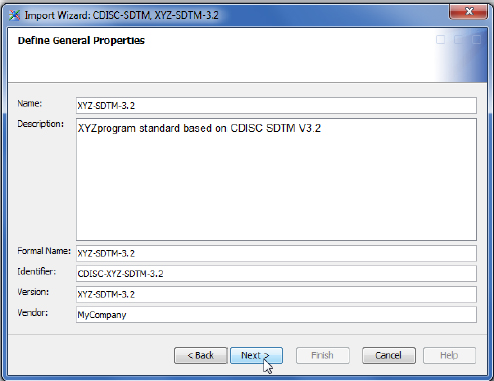
On the next screen, you define the general properties for the new custom XYZ-SDTM-3.2 standard. Most of that is populated with the data found in the SAS Clinical Standards Toolkit data. A few fields were modified, and the results look like this:
The screens that follow next—Verify Domain Properties, Verify Domain Column Properties, Validation Library, Verify Column Groups, Verify Columns in Column Group, Verify Domain Metadata, and Verify Domain Column Metadata—are left with the default values because they are populated by the SAS Clinical Standards Toolkit metadata for the XYZ-SDTM-3.2 standard from Chapter 4. If that work was not done as it was in Chapter 4, then SAS Clinical Data Integration would enable you to define that metadata on these screens. However, we suggest that you define your standards within the SAS Clinical Standards Toolkit in advance because there is a lot of metadata to edit, and editing those data on the fly on these few screens could be challenging. Once all of the metadata has been approved for use, register the XYZ-SDTM-3.2 standard into SAS Clinical Data Integration like this:

After you click Finish, the XYZ-SDTM-3.2 standard is registered into SAS Clinical Data Integration and can be used in SDTM data transformations. Notice how in the above screen capture the customized XP and SUPPDM domains have been loaded as well.
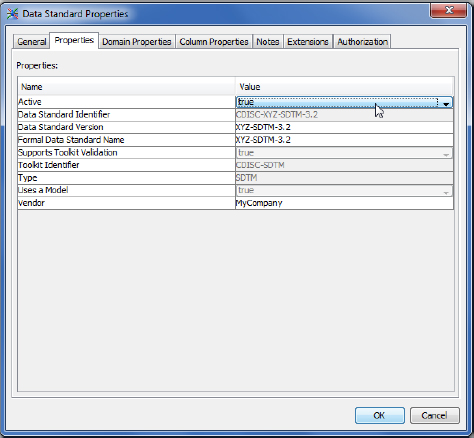
To use this standard, you must make it active. Go to the Clinical Administration tab, right-click the XYZ-SDTM-3.2 drug-program-specific standard, and then select Properties. Under the Properties tab, set the Active status to true, like this:
SAS Clinical Data Integration Study Setup
Before you start using SAS Clinical Data Integration for SDTM domain creation, a few study-specific setup steps are required. These are the items that you will want to do before beginning your data transformations to the SDTM:
1. Set up a clinical study object with standard subfolders to arrange your work.
2. Define SAS librefs to point at your source and target datasets.
3. Register your source datasets in SAS Clinical Data Integration.
4. Define your target datasets in SAS Clinical Data Integration.
5. Set general SAS Clinical Data Integration options.
Define the Clinical Study and Subfolders
To define a new study that you will call protocol XYZ123, you click the New tab and then select Study. The next screen is a General Information screen where you can enter a short name and a long name for the study. The next screen is the Data Standards Selection screen, which enables you to select the standard that is registered with SAS Clinical Data Integration that you want to use. Select the XYZ standard like this:

The following screens enable you to enter protocol information into the Properties, assign any SAS librefs in Library Selection, and assign a set of controlled terminology in the Controlled Terminology screen. For this study, just select the default SAS Clinical Data Integration Studio SDTM-controlled terminology package defined by CDISC and click Finish.
Now our new study XYZ123 is set up, and it looks like this:

The next step is to define some objects within the study XYZ123. We want to define a folder for our SDTM work that we will call SDTM, a folder for our source data called Source, a folder for our ADaM work called ADaM, and three SAS librefs that point to those three locations. When we are done, our study folder now looks like this:

You create the study subfolders by right-clicking the study XYZ123 study folder with the flask and select New ▶ Folder. The SAS librefs are defined by right-clicking the XYZ123 study folder; selecting New ▶ library; and then following the prompts for the SAS libref name and physical location. The XYZ123 SDTM libref points to the SDTM folder, and the XYZ123 Source libref points to the Source Data folder. The XYZ123 icon in the subfolder that is a flask represents metadata that is stored in the study folder that was created during the study creation process. You will not use this object directly.
Note that you can define a standard setup for how you define a new study within the Clinical Data Administration tab. Under the Defaults folder, you can define a type of template where you can create a study or submission template structure from which to copy and create new studies or submissions. For this book, we just defined a study object. However, you could create other object templates such as one for an integrated summary of efficacy, safety, or an NDA object. In this way, you can have a consistent definition for how you handle those other activities within SAS Clinical Data Integration as well.
Register Source Datasets and Define Target SDTM Datasets
The next step is to define your source data and target data within SAS Clinical Data Integration.
Register Source Datasets
The source data are registered when you right-click the Source Data folder and select Register Data. A Register Tables window appears, and you can select your data source like this:

You then select the associated SAS library:

Then you select the source dataset that will be used in creating the SDTM domains. Note here that we have selected a dataset called FORMATDATA as well. This dataset is a SAS dataset copy of the CODELISTS.xlsx file from Chapter 2. We will use that codelist data in our lookup transforms later in this chapter.

Click Next and then Finish to register these datasets. Now you should see the following within your study under the Source Data folder:

Define Target SDTM Datasets
Now that you have your source data visible in SAS Clinical Data Integration, you need to define your target SDTM datasets. Right-click the SDTM folder, select New, and then select Standard Domain(s), like this:

On the next screen, you are asked to select the domain location, which defaults to the folder selected. Then you have to assign the data standard to the domain like this:

Then you select the SDTM domains that you want to define. Because the XYZ-SDTM-3.2 standard contains more domains than we need for this example, the individual sample domains are selected like this:

The target libref is then assigned like this on the Library Selection screen:

Finally, the target SDTM datasets are defined by the metadata and look like this in SAS Clinical Data Integration:

Setting SAS Clinical Data Integration Defaults
SAS Clinical Data Integration has some default operating behavior that can be specified. Much of this behavior can be customized to user tastes in terms of how things are displayed on the screen and tool default behavior. However, there is one default setting that you should absolutely change. Go to the toolbar, select Tools, and then select Options. You should see a screen like this:

![]() If you click the Job Editor tab on the screen above, please be sure to turn off Automatically propagate columns under Automatic Settings. Automatic propagation tells SAS Clinical Data Integration to automatically include variables upstream or downstream from the step that you are working on. This can have very bad unintended and unexpected consequences to the data transformations in your SDTM conversion work. Make sure you turn off auto propagation.
If you click the Job Editor tab on the screen above, please be sure to turn off Automatically propagate columns under Automatic Settings. Automatic propagation tells SAS Clinical Data Integration to automatically include variables upstream or downstream from the step that you are working on. This can have very bad unintended and unexpected consequences to the data transformations in your SDTM conversion work. Make sure you turn off auto propagation.
Creating SDTM Domains
Up to this point, you have performed the setup tasks for SAS Clinical Data Integration. You have set default options, created a study and associated standard, registered the source data, and defined the target SDTM domain data tables. It is now time to populate those SDTM data tables with data. This section shows you how to build the CDISC SDTM domains DM, SUPPDM, AE, XP, EX, LB, and some trial design datasets. In the course of those transformations, the most common SAS Clinical Data Integration transformations used are explored. The most commonly used transformations are the Extract, Table Loader, Transpose, SQL Join, Lookup, and Subject Sequence Generator. At the end of this section, we make a point about using customized SAS code, as well as discuss the concept of templating your jobs.
Creating the Special-Purpose DM and SUPPDM Domain
The first step in building the DM and SUPPDM SDTM datasets is to create a SAS Clinical Data Integration job. Right-click the jobs folder, and then select New and Job. A blank job diagram appears. The job diagram is a graphical user interface to which you can drag source and target data tables as well as action tasks that SAS calls transformations. Here is the completed job called “Make DM” that we will dissect:


You can follow the job flow from the upper left to the lower right. In Step 1, an Extract transformation is used to take the raw dosing dataset and find the first date of dosing for the RFSTDTC and other dosing variables in DM. Step 2 joins that data with the source demographics dataset. Steps 3 to 5 use a Lookup transformation to define SEX, RACE, ARM, and ARMCD. Steps 6 to 8 use the Sort, Transpose, and Extract transformations to format the Other Race and Randomization Date data for SUPPDM use. Steps 9 and 10 use the Table Loader transformation to put the data content into the target SUPPDM and DM domain tables, respectively. We will look at some of these transformations in more depth now.
Extract Transformation
The Extract transformation is a common transformation that you can use to subset records and to keep, drop, and define new columns in the data table. Any transformation can be dragged from the Transformations tab in SAS Clinical Data Integration to the job diagram pane. If you drag a transformation and right-click it to select properties, the Mappings tab is the one where you do the majority of your data mapping work. For Step 1 in the above job, that Mappings tab looks like this:

You see that we keep the SUBJECT and UNIQUEID variables as is. But look at the Expression column in the target table for FIRSTDOSE and LASTDOSE. Those variables are defined as the minimum of the dosing start date (FIRSTDOSE) and the maximum of the dosing end date (LASTDOSE) for STARTDT and ENDDT respectively. The Expression text allows for any valid SAS SQL expression. You need to be fluent in SQL to use the Expression definitions effectively. For example, instead of a DATA step IF-THEN-ELSE statement for decision rule programming, you would use a CASE statement in SQL in the Expression text. In the above example, the expression derivation is small. If you needed a complex derivation, you could click in the Expression cell and the drop-down menu for an Advanced definition, which gives you a larger space to enter SQL expressions, or SAS will assist you with a list of SQL functions. Here is the Extract transformation from Step 3 that has a bit more mapping and definition in the Expression fields:

Note that the output dataset from this Extract Step 3 is a SAS work dataset called W61DZ20K. SAS Clinical Data Integration has a mechanism for naming datasets that results in system-derived dataset names that are not the easiest to remember. Fortunately, because you are not manually writing SAS code here, you generally do not have to know the names of the SAS work datasets. You can drag and make connections between data with your mouse.
SQL Join Transformation
The SQL Join transformation is used to join or merge datasets in SAS Clinical Data Integration. You see this transformation used in Step 2 of the job diagram above. After the SQL Join transformation has been dragged to the job diagram, you connect the datasets to be joined together. (In this case, these are the DEMOGRAPHIC dataset and the SAS work dataset from Step 1 called W61DYHEJ.) Then the SQL join can be defined. If you double-click the SQL Join transformation, you see a window like this:

The Join box enables you to define what type of join (inner, outer, left, right, and so on) and what the join variables are. If you double-click the Select box, you essentially get the same window as the Mappings window from the Extract transform where you can choose which columns end up in your output dataset. Finally, you can use the Where box for a WHERE clause subsetting definition. Because the SQL Join transformation is your primary way to bring datasets together in SAS Clinical Data Integration, you want to make sure you are fluent in SAS SQL to leverage the strengths of this transformation.
Lookup Transformation
The Lookup transformation in SAS Clinical Data Integration enables you to create a variable based on a source variable that is then compared and mapped to a codelist table. You could almost think of this as the equivalent of applying a SAS format to a source variable to create a new variable. We will explore this part of the job diagram here:

The FORMATDATA dataset is the SAS dataset equivalent of CODELISTS.xls from Chapter 3 because we are using the same lookup data. The extract step in Step 4 was necessary to create a numeric code value to compare with the numeric source data from Step 3. As a refresher, here is what that dataset looks like at the end of Step 4:

The Lookup transformation is designed so that you can perform multiple codelist lookups in a single transformation. In Step 5 above, you can right-click the Lookup transformation to add new input ports. This was done here for the three additional lookups. We will now explore the DM domain RACE derivation, which involves mapping the numeric _RACE source variable with the FORMATDATA dataset. You have three items to define here. A WHERE clause, a source to look up, and a lookup to target mapping. If we right-click the Lookup transformation and select Properties, there is a Lookups tab where the lookup mappings are defined. If we select the first lookup for RACE, we can click Lookup Properties and the Where tab and we see this:

This subsets your table lookup for where the SAS format name was RACE_demographic_race, which is the one to specify for the DM RACE variable mapping. Then, if you click Source to Lookup Mapping, you see:

In the lookup table, _RACE is mapped to NUMERIC_CODE. Finally, if you click Lookup to Target Mapping, you see:

Here you can see that the LABEL variable that holds the decoded RACE value is mapped to the eventual RACE variable in the DM domain. This lookup process is repeated for SEX, ARM, and ARMCD, as well as in the Lookup transformation Step 5.
Transpose Transformation
Because the SDTM contains datasets that often consist of name/value pairs, you will spend a lot of time flipping or transposing your data structures. In SAS Clinical Data Integration, the tool for flipping your data on end is the Transpose transformation. We will look at that here in the process of creating the SUPPDM qualifiers for other races and the randomization date. In our source datasets, these data are columns. But in SUPPDM, they exist as rows. If you right-click the Transpose transformation in Step 7 of the job diagram and then select the Options tab, you see a screen like this:

What you see here are the typical options that you have when you write PROC TRANSPOSE programming code. We have a simple case here, so ORACE and RANDDT are selected as the columns to transpose, and STUDYID and USUBJID are selected as the variables to transpose by. Then, if you click the Mappings tab, you see this:

You can see that STUDYID and USUBJID are mapped straight over to the target table. However, notice the new COL1 and _NAME_ variables. If you are familiar with PROC TRANSPOSE, you might recognize these as common output variables from the TRANSPOSE procedure. Unfortunately, these variables are not automatically generated by this transformation. You need to tell SAS what these variables are, and you have two choices for how to do it. One option is to insert a User Written Code transformation and do a PROC CONTENTS on the resulting W61158TW dataset to see what PROC TRANSPOSE generates. Then, you go back and update the target mapping with the appropriate metadata for COL1 and _NAME_. The other option is to have the Transpose transformation automatically update the output dataset metadata for you. You can do this on the Transpose transformations Options tab by selecting Additional Options and changing the No value shown in the following screen to Yes:

Hopefully, future iterations of the Transpose transform will make this task a bit easier, since data transposition is common in SDTM data creation. Now that ORACE and RANDDT have been transposed from columns to row values, the only task left is to map those values to the appropriate columns in SUPPDM. That Extract transformation, which is found in Step 8, looks like this:

Notice how variables COL1 and _NAME_ are used to populate QNAM, QLABEL, and QVAL with more complex CASE statements in the Expression field. Here is what that advanced Expression window looks like for the QVAL definition:

At this point, it is just a matter of dragging the Table Loader transformations to the job diagram and loading the data from Steps 9 and 10 into the target SUPPDM and DM datasets respectively.
Creating the AE (Adverse Events) Events Domain
The next SDTM domain to explore is the Adverse Events (AE) events model domain. The good news with most events-based data is that, in general, it is probably structured in your source data in a one-record-per-event data structure, similar to the structure that is needed in the SDTM events structure. The AE job diagram for study XYZ123 in SAS Clinical Data Integration looks like this:

In Step 1 of the diagram, the source dataset ADVERSE has a number of the key SDTM AE variables defined in the Extract transformation. The Lookup transformation is used in Step 3 much as it was in the DM job so that the AE SDTM variables AESEV, AEREL, and AEACN could be created based on a lookup table. Step 4 joins the adverse event data with the DM domain to get the RFSTDTC variable, which is needed to define SDTM study-day variables AESTDY and AEENDY in Step 5. The Advanced expression for AESTDY in Step 5 looks like this:

AEENDY is defined in the same way, with AESTDTC being replaced by AEENDTC above. Keep in mind that this expression works for dates only. If you had time components, then those would need to be added to the expression as well.
Subject Sequence Generator Transformation
SAS supplies you with a few SDTM-friendly custom transformations with SAS Clinical Data Integration. The Subject Sequence Generator transformation is a pre-built transformation supplied by SAS that defines SDTM --SEQ variables for you. You can drag this transformation from this location under the Transformations tab:

Drag that transformation to the make AE job as Step 6. If you double-click that transformation and select the Options tab, you see this:

You need to select the --SEQ variable that you are trying to define, which should exist as a blank variable in the incoming dataset. In this example, that is AESEQ. Then, you need to define the Business Keys, which is the sort sequence that you want to use to define the record order for AESEQ. Finally, you need to identify the variable that you want to initialize AESEQ with; in this case that is STUDYID. The Subject Sequence Generator transformation populates AESEQ on the resulting dataset.
This job ends with Step 7, which uses the Table Loader transformation to push the working dataset into the final SDTM AE dataset.
Creating the XP Pain Scale Customized Findings Domain
The custom XP pain scale data findings domain for study XYZ123 is probably the longest job in this study. This domain introduces us to a new data transformation issue that we will explore. The XP domain is a customized findings domain that was defined in the SAS Clinical Standards Toolkit and brought into SAS Clinical Data Integration to be populated for study XYZ123. Here is what that job diagram looks like from left to right and top to bottom:


The problem with the PAIN dataset is that it is somewhat flat in nature in that the three pain measurements and dates all exist on the same row. The PAIN source data look like this:

To structure this data like we need it for the XP domain, we need to split the data, transpose it, and then join it back together on the other side. This processing of the data is handled from Step 2 to Step 7 in the job diagram. Step 2 creates one work dataset that holds the pain measurement date variables RANDOMIZEDT, MONTH3DT, and MONTH6DT, and another work dataset that contains the pain measure variables PAINBASE, PAIN3MO, PAN6MO. Steps 3 and 5 flip or transpose that data so that those columns become rows. Steps 4 and 6 create an INDEX variable that goes from 1-3, based on the PROC TRANSPOSE variable called _NAME_, so that Step 7 can join the data back together.
The rest of this job is similar to what we have seen in previous jobs. Step 8 is a simple Extract transform that maps INDEX to VISITNUM and creates columns for XPSEQ, XPTESTCD, XPTEST, VISIT, and XPDY that will be defined downstream. Step 10 is used to create VISIT with the Lookup transform. Steps 11 and 12 are there to join the pain data with the SDTM DM file so that the study-day XPDY can be created. Step 13 creates XPSEQ with the Subject Sequence Generator transform, and Step 14 loads the pain data into the XP custom domain.
Creating the EX Exposure Interventions Domain
The next SDTM domain to explore is the EX exposure model domain. Here is what that job diagram looks like:

This is a fairly simple domain to generate in SAS Clinical Data Integration. Step 1 derives USUBJID, EXDOSE, EXDOSTOT, EXSTDTC, and EXENDTC. In Step 2, the temporary dataset from Step 1 is joined with the DM domain to get RFSTDTC so that EXSTDY and EXENDY can be derived in Step 3. Step 4 is the Subject Sequence Generator transform call, which creates EXSEQ. Finally, the dataset is loaded into the EX target domain in Step 5.
Creating the LB Laboratory Findings Domain
The last SDTM domain to look at that requires any real data manipulation is the LB domain. Here you will see transformations similar to ones that you have seen before. The job diagram for LB in SAS Clinical Data Integration looks like this:

As you have seen before, in Step 1 are the USUBJID target variable and other LB target variables. Steps 2 and 3 use the Lookup transform to define VISIT, LBCAT, LBTEST, and LBTESTCD, based on our controlled terminology. Step 4 defines baseline lab data in LBBLFL and reference range flagging in LBNRIND via fairly simple CASE statements. Steps 5 and 6 bring in the DM RFSTDTC variable so that LBDY can be created. Finally, LBSEQ is created in Step 7, and Step 8 loads the dataset into the LB domain.
Creating the Trial Design Model Domains
The majority of the Trial Design Model domains in the SDTM are pure study metadata and include no actual patient data. In this book, we did not derive the Subject Elements (SE) and Subject Visits (SV) domains, which are based on the subject data. For this book, we generated Trial Arms (TA), Trial Disease Assessments (TD), Trial Elements (TE), Trial Inclusion (TI), Trial Summary (TS), and Trial Visits (TV), which are trial metadata domains. In Chapter 3, we entered that information into Microsoft Excel spreadsheets and imported it into SAS with PROC IMPORT. For SAS Clinical Data Integration, we could do the same thing, assuming that the machine that has SAS Clinical Data Integration on it has SAS/ACCESS Interface to PC Files installed. For this book, we simply converted those spreadsheets into SAS datasets called **_FROMEXCEL and then registered those datasets as source data. The job diagram to create TA, TE, TI, TS, and TV looks like this:

This job is then just a matter of loading the six source datasets into the six target SDTM domains.
Using Customized Code in SDTM Production
SAS Clinical Data Integration has a User Written Code transform that enables you to create your own handwritten code if necessary. It is advisable to use this transform sparingly if at all because the manipulations that you do in it will generally be outside of the metadata control of the rest of your SAS Clinical Data Integration job. For example, if you write custom DATA step code and you define lengths and attributes for variables there, then SAS Clinical Data Integration will not be aware of those manually entered metadata elements. We suggest that you use the User Written Code transform for data and job checking and monitoring code, but otherwise you should stay with using the provided and metadata-controlled transforms.
There is a type of user-written code in SAS Clinical Data Integration that you should take full advantage of. SAS Clinical Data Integration gives you the ability to write your own user-written transformations. These transforms can be written so that they are metadata- and parameter-driven, just like the other SAS Clinical Data Integration transforms. An example of a user-written transform is the Subject Sequence Generator transform that is supplied by SAS. You can explore that to see how one of these transforms is created. If we drill down under the Clinical transformations and examine the Properties and Source Code of that transform, you see this:

You can see the DATA step code that defines the **SEQ SDTM variable in the &sequencevar macro variable. The majority of the code that SAS Clinical Data Integration generates is SQL-based code, but creating the **SEQ variable is easy to do using DATA step mechanics. The code that you see here is very much like what we saw in Chapter 3 in the solution that used only Base SAS. You can think of these SAS Clinical Data Integration user-written transformations as generic SAS macros that are metadata- and parameter-driven. If you wanted to create a new transformation, you can right-click in the folders area and select New Transformation to begin the process of defining a new user-written SAS Clinical Data Integration transform.
If you find yourself performing repetitive tasks in SAS Clinical Data Integration, then that is a good time to think about writing your own user-written transform. The Subject Sequence Generator is an obvious candidate that SAS has written for you. In the domains generated in this book, adding a transform that can easily join a source dataset with the SDTM DM file for study-day (**DY) variable generation would be a good choice. Another good automatic transform is one that automatically generates common variables such as USUBJID, STUDYID, or even **DTC dates. The nice thing is that if you have a repetitive task, then SAS Clinical Data Integration gives you a way to create a data-driven generic SAS macro or user defined transform to perform that task.
Templating Your SDTM Conversion Jobs for Reuse
You might want to reuse some of your SDTM data conversion jobs within SAS Clinical Data Integration. Perhaps you have two similar studies, and you want to copy a DM job from one study to the other to save time. To copy a job easily from one study to another, you will want to construct it in a certain way. Let’s call this construction templating your job. You might have noticed that many of the SDTM domain conversion jobs previously mentioned have a general approach that look like the following figure.
Figure 5.1: General SAS Clinical Data Integration Job Flow to Create an SDTM File

Note the Extract transformations shaded in the figure. These Extract transformations tend to be straight data mapping from the object on the top to the object on the bottom. These steps save the incoming and target variable lists so that any mappings or other processing are not lost when the sources and targets are changed. In addition, it makes any variable changes clear when applying new source or target tables. If you create your jobs in this fashion, then you can copy them from one place to another and simply change the source and target data. The Extract transformations will protect the work in between.
Using SAS Clinical Data Integration to Create Define.xml
When all of the SDTM domains have been generated in SAS Clinical Data Integration, you might want a define.xml file. Fortunately, there is an automated SAS Clinical Data Integration transformation called CDISC-DEFINE CREATION that performs this task. Here is the job diagram for creating the define file:

As simple as that looks, there are a few items that need definition before the define file can be created. If you right-click CDISC-DEFINE CREATION, you see that you can select the data standard, the study, and the specific domains that you want to be in your define file:

The Generation tab provides an option for using no style sheet, using the generic CDISC-supplied style sheet, or using your own custom style sheet. You can also select the version of define.xml that you would like. In this case, we chose define version 2. The only other piece to define is the actual define.xml file itself. That file can be defined by right-clicking the target SDTM folder and selecting New Document. Then, the output port on the CDISC-DEFINE CREATION transform can be connected to the define.xml file. You can see that connection in the job diagram, as well as the folders view on the left:

The result of this job is a define file and a style sheet called define2-0-0.xsl. A snapshot of the define file that is generated by SAS Clinical Data Integration looks like this:

Chapter Summary
This chapter described how you can use SAS Clinical Data Integration to create CDISC SDTM files and how to generate a define.xml file. The SAS Clinical Data Integration examples in this chapter were built on top of the SDTM metadata defined in Chapter 4. The metadata (found in the SAS Clinical Standards Toolkit) from Chapter 4 was used to populate the target SDTM datasets. Then we used the graphical user interface of SAS Clinical Data Integration to primarily point and click our way to SDTM production. The final task was to use a transformation provided by SAS to build the define.xml file. This general process can also be followed in SAS Clinical Data Integration to create ADaM datasets and define files as well.