
10Panels – create and use
In this chapter, I will explain how you can easily define and use ISPF panels. To control applications panels are suited much better than using the simple queries SAY and PULL. Therefore, if you want to create elegant applications in ISPF you should already dominate the creation and use of ISPF panels. The ISPF provides very simple methods and tools to create screens and to use these masks in programs. In ISPF, screens are referred consistently to as panels. There are two ways to create panels:
–Use the Dialog Tag Language (DTL).
–Use of panel definition statements.
10.1The Dynamic Tag Language (DTL)
The DTL was added to the ISPF later. Thus, you have the possibility to define the panel using a description language. This definition is converted using the Panel Conversion Utility in executable codes. The DTL is described in the brochure ISPF Dialog Tag Language Guide und Reference. That this is a very comprehensive tool, you can recognize by the fact that an extra brochure for this theme exists. Since the DTL is very extensive and we panel definitions for our purposes as quickly as possible, I will not use the DTL in this book. I do not want to deprive here, what benefits that IBM provides in the use of the DTL. That is why I copied the relevant passage from the DTL brochure below:
Why the Dialog Tag Language (DTL)?
If you are already familiar with a tag-based markup language, such as IBM Book Master*, you will find that DTL is very similar. We created DTL for many of the same reasons that we created Book Master:
Markup tags are easy to use. Because tag names are short and relate directly to the structure of the dialog elements, they are also easy to remember.
DTL lends flexibility to application development. Panels can be quickly changed without your having to tediously line up text and fields. This gives you greater control over application development and updates.
DTL provides consistency when many programmers are working on the same application, or when programmers who are new to your company must update existing applications. Since each programmer is using the same tags, only minor adjustments may be needed to achieve complete uniformity.
DTL techniques improve the way in which interactive programs, like ISPF applications, are developed. The language concentrates on the role of the various elements and their interrelationships, and ISPF takes care of their form and appearance at run time.
DTL also enforces some formatting rules defined by the Systems Application Architecture* Common User Access (CUA), so you do not have to be familiar with all of the CUA formatting rules. Therefore, the CUA skills required by programmers who are developing CUA-conforming applications are significantly reduced.
DTL enables National Language Support (NLS) and the conversion utility provides NLS translations for certain key words.
In other words, if you are looking for an application development and maintenance system that is sophisticated, flexible, and easy to use, that's DTL.
If you come to the conclusion that the DTL is the right tool for you to develop ISPF panels, you can use the DTL of course, because when calling the panel, there is no difference between the two development methods for panels.
10.2Panel types in ISPF
The following table shows which panel types in ISPF exist:
| Type | Description | |
| Standard panels | Standard panels in ISPF normally have a width of 80 characters and consist of up to 43 lines on a screen. When they are displayed, the currently displayed panel is completely replaced. | |
| HELP panels | Help panels will be formed using certain instructions in the panel definition. They can contain any number of rows and they have their own scrolling mechanism. | |
| POPUP panels | The dimensions of the pop-up panels are determined in the panel definition. When you call them, they will be embedded in the currently displayed panel. The rest of the underlying panel remains visible. POP Up panels can be moved while the display on the screen using the cursor. HELP panels are very often defined as POP UP panels. |
10.3Definition of panels
In the following chapters, I will explain the key elements of the panel definition using the Panel Definition Statements. I will discuss only those definition items that I constantly use when I develop panels. The panel definition statements are described in the brochure ISPF Dialog Developer's Guide and Reference.
10.3.1The structure of a panel
A panel definition generally consists of three elements:
–The attribute characters
–The text fields
–The data fields
The attribute characters
Attribute characters always occupy only ones character (byte). They determine the characteristics of the field behind them up to the next attribute character. The attribute character can consist of any characters. In practice, only special characters are used as an attribute character.
![]() Attention:
Attention:
A sign that is defined as an attribute character can be used throughout the panel definition text only as an attribute character. In other words, when a character below the )ATTR statement in the )BODY section of the panel definition exists, it will be used always as an attribute character, irrespective of whether this is intended or not. Therefore, if you for example want to use a colon (:) in the panel text, you cannot this define as an attribute character.
How to specify the attribute characters; see section 10.3.3.1 The Attribute section starting on page 193.
The text fields
They contain solid, non-rewritable texts. Text fields can be colored using attribute characters. How to specify the text fields; see section 10.3.3.2 The )BODY section on page 195.
Data fields
There are two types of data fields:
–Input fields. These are defined for entering data. Input fields can also be used for output.
–Output Fields. These fields are only defined for output of data. Output fields cannot be used for input.
How to specify the data fields; see section 10.3.3.2 The )BODY section on page 195.
The attribute character in front of the field defines the type of a data field.
10.3.2 Creation of panels and their call
ISPF panels are typically created using the ISPF editor. In the edit sessions to create ISPF panels it is essential to ensure that NUMBER OFF is set. If panel definition lines include line numbers on the right, the display of this panel ends with an error. Panels will be executed as they were created. A compiler or other conversion process is not necessary. (Except DTL panels. However, we do not want to discuss this here).
ISPF panels must be stored in a PDS/PDSE, which must be assigned during the execution of the panels under the DD name ISPPLIB. Panels can be displayed using the ISPF SELECT, DISPLAY or TBDISPL service. When called by the TBDISPL service, the panel must contain a )MODEL section.
ISPF panels should have the following basic structure:
–Line 1: Panel ID, Title, Short message area
–Line 2: A command / option field and the scroll definition
![]()
The remaining lines can be designed as desired. ISPF short messages are always displayed at the end of the first line from right to left in their current length. If necessary, parts of the title line are truncated on the right. Long messages will, if this is defined in the ISPF Settings menu, always be displayed at the bottom of the panel in a frame. The )BODY section defines the panel structure.
10.3.3The panel definition sections
A panel definition consists of several departments, the sections. Each section is intended for a very specific purpose. In the table below, I listed those sections that we want to deal with in this book. Each section starts at column one with a ) (right parentheses) character that is followed by a keyword identifying the type of section.
Table 10.1: Description of panel sections
| Section | Description | |
| )ATTR | The attr section defines the attribute characters for the fields of the panel. | |
| )BODY | The body section defines the panel layout. | |
| )MODEL | The model section defines a structure for the representation of variables of an ISPF table. | |
| )INIT | The init section will go through before the panel is displayed. Here, initial values can be set. | |
| )REINIT | The reinit section will go through when the panel is repeatedly displayed. | |
| )PROC | The proc section will go through when the panel display is exited by a command. Here, the processing of the input values is performed. Typically, the plausibility checks of the input values are performed here. | |
| )END | The end statement ends the panel definition. All lines behind this statement will be ignored. |
10.3.3.1The Attribute section
The )ATTR line is usually the first line of a panel definition. However, it is not always necessary. This is the case when the standard character attribute for this panel are sufficient.
The default attribute characters are as follows:
![]()
These default attribute characters can be replaced by other characters using the option DEFAULT(xyz) in the )ATTR line.
Example:
![]()
By defining this ATTR options, the following standard attribute characters are active in this panel:
![]()
The attribute characters can be defined in any number and any character in the )ATTR section. The following panel definition shows this:
Program 10.1: Panel definition of panel SLEP1
![]()
![]() Note:
Note:
If the )ATTR statement is needed in a panel, this must always be the first line. Comment lines can begin first after the )ATTR line.
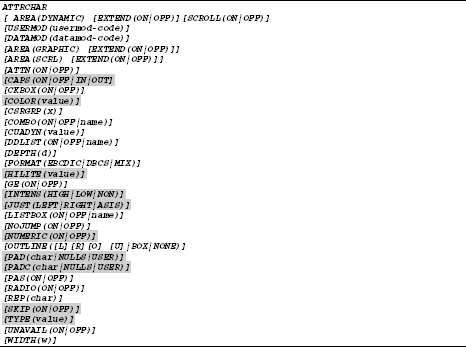
The table below comes from the brochure ISPF Dialog Developer's Guide and Reference. It contains all possible definitions for the attribute characters. The most important type definitions for everyday use are greyed. I will refrain from giving a complete description of all options. This is explained in the before mentioned booklet and occupies circa 30 pages. I recommend you read this when needed. Moreover, the options used in the above type commands are self-explanatory.
Table 10.2: )ATTR definitions list
10.3.3.2The )BODY section
The appearance of the panel is determined in the )BODY section. The panel appears later as it was designed in this section. The following coding contains all possible options:
Coding 10.1: )BODY section definitions

All information must be on the )BODY line. The greyed options are frequently used. I will explain these here.
This statement defines a pop up panel which is 50 columns wide and 20 rows depth. It is important to ensure that the in the )BODY section defined rows and columns fit the available framework.
![]()
With this statement, the expansion characters are determined. With these characters, you can fill text lines dynamically with padding characters. See the following example:
Example:
The panel definition of panel SLEP1 contains the following code:

When the panel is displayed, it looks like this.

The first and the last line are shown expanded with the expand character – (hyphen).
![]() Remark:
Remark:
The expansion characters must be unique (just like the attribute characters) within the panel definition. Therefore, this character can only be use for the definition of dynamic expanding.
10.3.3.3The )INIT section
In the )INIT section all measures can be taken that are necessary prior to the display of the panel. Such measures may include:
–Fill variables with initial values.
–Definition of the Z variables using the .ZVARS statement.
–Define the cursor position for the initial display of the panel.
–Specifying the general help panel. This panel appears when the PF1 key is pressed.
Coding 10.2: )INIT section example
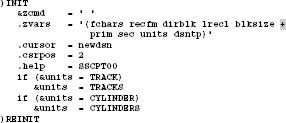
In the above .ZVARS definition can be seen how continuation lines are formed in panel definitions by the plus sign.
10.3.3.4The )PROC section
The )PROC section is run through when the input is terminated by pressing the ENTER or a PF key. In the )PROC section normally plausibility checks and some processing of the entered values are performed. For these purposes, a number of commands are available that are used for the following tasks.

When assignments are performed, the following functions are often used for the determination of the result:
![]()
If and ELSE:
Because no THEN is available, another rule must exist how commands are defined when an IF statement as true ends. This rule is very simple:
If an IF query is recognized as true, then all the instructions in the following lines are executed that are indented at least one column to the right.
Again, it is beyond the scope of this book to discuss the above listed statements and functions in detail. To explain the design of an ISPF screen, I will use the screen SSCPP01. The SSCPP01 screen is one screen of the SMART ISPF utilities. The SSC program calls it. The panel has a complex format and is therefore a good example to explain the functionality of an ISPF screen structure:
Coding 10.3: SSCPP01 – Panel definition example
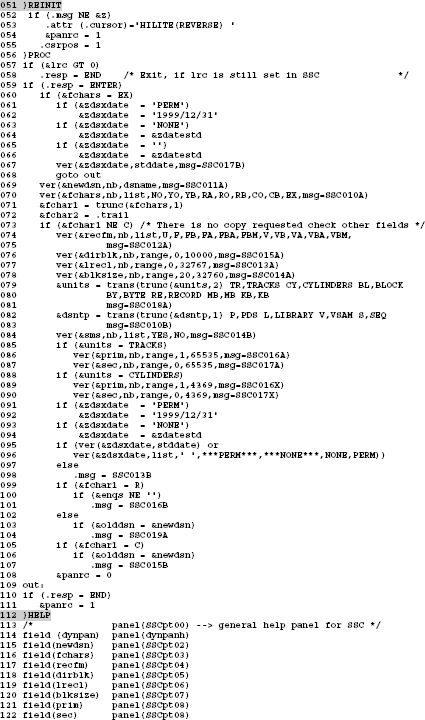

Explanations for some lines in this panel definition:
| Lines | Explanation | |
| 57+58: | If the variable LRC was set greater than zero in the calling procedure SSC, then the special variable .RESP will be filled with the text END. This means that the PANRC variable is set to 1 at the end in row 111. When after returning from the panel the variable PANRC is 1, the procedure SSC will be exited. | |
| 59: | If the special variable .RESP contains the text ENTER, the statements up to line 108 will be executed. Otherwise, the program is continued at line 109. | |
| 60–68: | When the function code is EX, then only the expiration date of the data set is changed. In these lines, the date variables that the function DSINFO has delivered will be checked and if necessary updated. Due to the statement go to out: in line 068 the execution of the panel continues at line 109. | |
| 69: | The variable NEWDSN will be verified. NB means NEWDSN must not be blank. DSNAME means that the variable must contain a valid DSN. If one of these conditions is not met, then the message CR011A is displayed on the screen. | |
| 70: | The variable FCHARS will be verified. FCHARS represents function characters. NB means FCHARS must not be blank. LIST means that the variable must contain only one of the values contained in the LIST option within the comma-separated text string. If one of these conditions is not met, then the message CR010A will be displayed. | |
| 71+72: | The variable FCHARS contains always two characters. The first character of FCHARS is extracted into the variable FCHAR1 using the TRUNC function and the second character is extracted in the variable FCHAR2 using the .TRAIL function. | |
| 73 | If the variable FCHAR1 does not contain C, then no copying operation will be performed. In this case, the statements until the line 108 is reached will be executed. | |
| 79–81: | Here the functions TRANS and TRUNC are combined. This has the following meaning: With TRUNC the first character of the variable UNITS will be extracted. Then the word following the comma is placed in the UNITS variable with TRANS. This means the full names are set by the TRANS function. The advantage of this method is that you always have to enter only the first letter of CYLINDERS, TRACKS or BLOCK at the input. When the content of the variable UNITS does not begin with one of the letters given in the list, the message CR018A will be displayed and the program will be exited |
The commands after line 81 contain further examinations and assignments. I think that the explanations of statements, which I made up to line 081 are sufficient as a guide to understand the other instructions.
10.3.4Variables in panel definitions
Behind every attribute character for an input or output field a variable must be named. The variable name can consist of up to eight alphanumeric characters. Everywhere in the panel definition, where only a variable name can stand, no ampersand must precede the variable name. For example, in the .ZVARS statement.
All variables in the panel definition and in the REXX program, which the panel displays, are known mutually in both elements. If variables are defined in a REXX procedure which are also used in screen definitions, it must be ensured that they are not longer than 8 characters.
The Z variables
Why are Z variables needed?
If a data field in a panel is shorter than the corresponding variable name, then the variable name cannot be written into the data field in the panel. In order to overcome this handicap, the so-called Z-variables were introduced. This works like this: Whenever behind an attribute character for an input or output field only a Z stands, the variable used in this field will be extracted from the corresponding variable name in the allocation of Z variables in the .ZVARS statement and assigned to this field.
The .ZVARS control variable can be set in the initialization section to a list of variable names that correspond to Z place-holders in the body and/or model lines.
Example:
The following excerpt from the panel Coding 10.3: SSCPP01 – Panel definition example on page 198 shows the allocation of the Z variables in the .ZVARS statement to the panel locations.

As you can see, 10 variable names are defined in the .ZVARS statement and 10 Z fields are defined in the panel. By the way, you can also address such variables as Z variables which name would not be too long for a direct placement (e.g. PRIM, SEC, UNITS).
When you insert or remove Z variables during the development of a panel, it is essential to adapt the .ZVARS statement accordingly.
10.3.5Panel processing
ISPF provides multiple services to call up panels:
–The DISPLAY service
–The SELECT service
–The TBDISPL service
10.3.5.1The DISPLAY Service
The DISPLAY service calls up a panel. It may be indeed some options given. However, these are largely theoretical.
Example 1: Call up a standard panel
The following coding shows a part of the program SSC of the SMART ISPF utilities. The SSC processing starts with the display of the main panel SSCPP01.
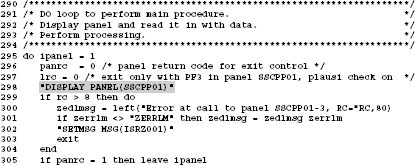
You can also see how the processing of the program is ended. When in panel SSCPP01 the PF3 key is pressed, then the variable PANRC is set to 1. At return from the panel display the IPANEL loop is left and the program exits (statement line 305).
Example 2: Display of a POP UP panel
When the program SSC copies a data set and records would be truncated, then a POP UP panel is issued which displays a warning and the operator can confirm the truncation and continue or exit the processing.

I simulated such a critical copy task. See the display of the POP UP panel:
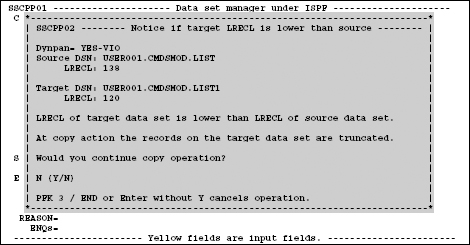
You can use the cursor to move a pop-up panel within the totally available display to another position. Proceed as follows: Place the cursor to a point of the frame of the pop up panel and then press ENTER. Then the text Window move pending appears in the upper right corner of the screen. If you now move the cursor to any position in the screen and press ENTER, the entire pop up panel will be moved to the new position. Using this method, you can make invisible parts of the surrounding panel visible again.
10.3.5.2The SELECT PANEL service
The SELECT service can also be used to call up panels. These panels must have a special structure. They are normally used to start an application. One of the typical panels of this type is the panel to display the ISPF Primary Option Menu. Its name is normally ISR@PRIM. This panel has been created with the ISPF Dynamic TAG language. Therefore, I will not discuss the panel here.
10.3.5.3The TBDISPL service
The TBDISPL service not only calls the panel in question; but also the content of the underlying ISPF table will be displayed. See section 10.3.5.1 The DISPLAY Service on page 202 and the section 10.3.5.3 The TBDISPL service on page 204.
10.3.6Help panels
There are four types of help panels:
–The general help panel for a screen.
–Help panels, which are assigned to a field in the screen.
–Full screen help panels.
–POP UP help panels.
1. The general help panel
Each screen definition may contain an entry for the display of a so called general help screen. The general help panel must be defined in the )INIT section. The general help screen is called when the PF1 key is pressed and the cursor is at a location of the screen for which no specific help panel is defined.
2. Field assigned help panels
For each data field in a panel a specific help panel can be defined. Such a panel is called, when the cursor is at any position within the data field in question and PF1 is pressed. Field assigned help panels must be defined in the )HELP section. See lines 114 to 138 of the Coding 10.3: SSCPP01 – Panel definition example on page 198.
3. Full screen help panels
As the name suggests, these panels replace the entire screen when they are displayed. This type is used the most for general help panels.
4. POP UP help panels
This type of panels is mostly used for field assigned help panels. See section 10.2 Panel types in ISPF on page 190.
The basic structure of a help panel looks like this:
Program 10.2: HELPMASK – Help panel template
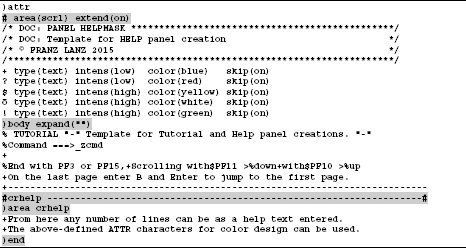
To define help panels the grayed lines are needed. I always use this template when I need to create a new help panel. The general help panel is entered in the )INIT section of the panel definition. Please note that help panels specified in the )INIT section act as general help panels. They appear when PF1 is pressed and the cursor stands at any position in the panel and not in a field for which an own help panel exists.
General help panels are defined in the )INIT section as follows:
![]()
10.3.7Panels to display ISPF tables
Table display panels are used to display and edit ISPF tables. ISPF tables are two- dimensional tables that are created by using ISPF table services. These services are also used for the data maintenance of the tables. A table display panel contains a )MODEL statement in which those variables from the ISPF table are defined which want to be displayed with this panel.
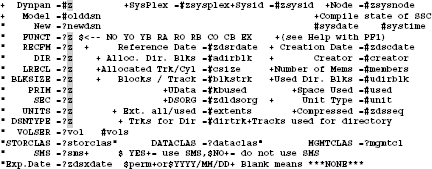
The panel SLEP1 is a typical table display panel. The SMART ISPF utility program SLE uses it:
Program 10.3: Definition of panel SLEP1

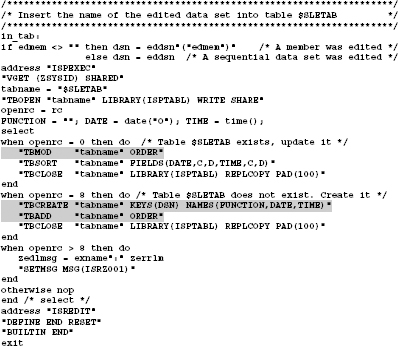
Excerpt from macro #IMACRO2:
Excerpt from macro #IMACRO2 where the table $SLETAB is updated respectively created and updated.
The following excerpt from program SLE shows the command, that displays the panel SLEP1 together with the contents of the table $SLETAB.

Finally yet importantly, here is a display of panel SLEP1 with the data in table $SLETAB.
Screen 10.1: Panel SLEP1 displayed by program SLE
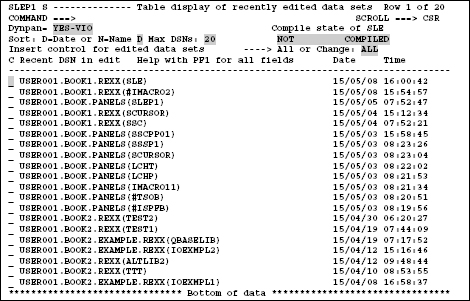
For each of the shaded boxes a dedicated help panel is defined.
Mnemonics to table display panels
Behind the )MODEL statement up to eight model lines may be defined.
–The table display panels are automatically SCROLLABLE. Therefore, you can handle ISPF tables of any length.
–Scrolling is done with keys PF7 and PF8. PF7 ˆ backward, PF8 ˆ forward.
–The display can only be performed in 80 columns.
–If you want to also edit the contents of the tables, you should define the first column as an input field for the operation code. See the above panel SLEP1.
–In the row behind the )MODEL line there is no need to be list all names of an ISPF table.