
1. New Structural Elements in HTML5
HTML5 is not just about interactive voodoo with JavaScript APIs and video coolness. There are more than 20 new elements you can use to author your web pages, adding semantics to deliver more accessible, reusable content.
In later chapters, you will learn about new HTML5 form controls and multimedia elements. In this chapter, you will learn about the new structural elements of header, hgroup, nav, footer, article, section, and aside, focusing on how, why, and when to use these new elements, both on their own and when combined. Essentially, you will be building a basic website template with the new elements, as shown in Figure 1.1.
Figure 1.1 Basic page structure with new HTML5 elements

Beginner Recipe: Building an HTML5 Starter Document
You are about to go HTML5, so let’s go to the top of the HTML document. Although the content in this immediate section does not contain new elements, there is a new way to write them, so it is best to be aware before we start getting into the body.
doctype
Does this look familiar?
<!DOCTYPE html PUBLIC "-//W3C//DTD XHTML 1.0 Strict//EN" "http://www.w3.org/TR/xhtml1/DTD/xhtml1-strict.dtd">
The doctype should be the very first line in an HTML document. Called a Document Type Definition (DTD), the doctype is a web standards requirement, and it tells the browser how to process the document, which is why it must be the first thing in your HTML document. If you didn’t use a doctype or you put any other code before the doctype, then the browser would be in quirks mode, and chances are the code you have written will not work properly in some browsers.
It’s unlikely that you would want to memorize the previous doctype. Why would you? It’s horrible and clunky. In HTML5, you now have a nice, easy-to-remember doctype:
<!DOCTYPE html>
Honestly, that’s all it is. This is all you need to tell the browser you are in standards mode. If a browser does not implement HTML5, the page will still work. If you used <!doctype html5>, it would trigger quirks mode as well. This doctype has been chosen so it will always work in browsers, no matter what the latest version of the language is.
Note
If you refer to http://infomesh.net/html/history/early/, you can see the earliest HTML document, from November 13, 1990. The markup is really simple, and its simplicity reminds us of the HTML5 doctype. In fact, if you added the new doctype to that page, it would validate!
Character Encoding
The first line you need inside the head is the charset declaration, which tells the browser how the file should be interpreted; in this case, you want to send it an HTML document.
In HTML 4, it looks like this:
<meta http-equiv="Content-Type" content="text/html; charset=utf-8">
But like the doctype, in HTML5 it is now much simpler:
<meta charset="utf-8" />
Easy! Remember, you need this and the doctype on your page.
JavaScript and CSS Links
We can breeze through this little section as well. HTML5 helps you reduce lots of markup from your page, and you can simplify the calls to JavaScript (and other client-side scripting file) and CSS. In HTML4, the script and link elements needed a type attribute, as follows:
<script type="text/javascript" src="my-javascript-file.js"></script>
<link rel="stylesheet" type="text/css" href="my-css-file.css" />
But in HTML5, those lines now look like this:
<script src="my-javascript-file.js"></script>
<link rel="stylesheet" href="my-css-file.css" />
You may be wondering why you can now get away with doing this. Well, one of the intentions of HTML5 is to make things more sensible when you are coding. So, if you are linking to a script, the browser assumes it is a JavaScript file, and if you are using rel=stylesheet, it can only mean you are linking to a CSS file. And don’t worry, not using the type attribute causes no issues in older browsers.
Syntax Writing Style
In HTML5, using the previous code examples, you can code the page in slightly various ways.
You can code in uppercase:
<SCRIPT SRC="MY-JAVASCRIPT-FILE"></SCRIPT>
You can code with no quotation marks:
<script src=my-javascript-file></script>
You can skip a closing slash:
<link rel="stylesheet" type=text/css href=my-css-file.css >
Or you can use a combination!
<LiNK rel="stylesheet" tYPe="text/css" href=my-css-file.css />
All these are fine to use; however, it is strongly encouraged that you pick a style and stay with it. This is useful not only to yourself but for other developers who may at some point have to use your code. The syntax style will be consistent. We come from XHTML backgrounds, so we will close all tags, use lowercase, and use quotation marks around attributes.
Bringing all the previous together gives you the HTML5 starting page in Listing 1.1.
Listing 1.1 A Simple HTML5 Starting Page
<!DOCTYPE html>
<html lang="en">
<head>
<meta charset="utf-8" />
<title>page title</title>
<script src="my-javascript-file.js"></script>
<link rel="stylesheet" href="my-css-file.css" />
</head>
<body>
<!-- new HTML5 elements are going to go here :) -->
</body>
That is it! Save the page as an .htm (or .html) file, and now you can start filling the page with great content.
Tip
Validation is a very useful tool for checking why things might be broken, and it is a great step to have in your development process. However, with HTML5 still developing, there are no official validator services. The W3C validator, http://validator.w3.org, will check for HTML5 conformance but does warn that is an experimental feature. Another validator to test your pages against is http://html5.validator.nu. It is worth testing your pages in both of these validators.
Where Do All the New Elements Come From?
The new structural elements have been designed to tell the browser what structure the page has and give the content semantic meaning, but where do their names come from?
In 2005, Google analyzed more than 1 billion web pages to find out what class names were being used by developers and web authors (http://code.google.com/webstats). This enabled Ian Hickson (“Hixie”), the editor of the main HTML5 Specification, to start thinking about these new elements. Even though this was five years ago, which is fairly old in Internet time, it recognizes what content is important and reused on websites.
The following are the 20 most popular class names used at the time:
footer
Small
Header
Button
Msonormal
Body
White
menu
Text
Nav
Main
Date
Style1
link
Title
Content
Copyright
Search
Smalltext
Top
Although several of these items are presentational (for example, white, style1, msnormal), others make up the elements included in the HTML5 specification (footer, nav, header).
So, why use these new elements? Well, HTML5 allows you to give your content semantic meaning, so, for example, if you have navigation on your page, you can use the nav element because that element provides meaning to its content.
Beginner Recipe: Using the header Element to Create a Site Header
Let’s start at the top of a “typical” web page.
The header element is often the first thing on a web page, and it usually contains things like a logo, the website name, or the main site navigation. It can be used more than once on a page, and as will be discussed, it can be used for navigation of a particular section, not just the overall page. Things like a search form or a table of contents can be included in a header element. Here is a basic example:
<header>
<img alt="HTML5 Cookbook logo" src="logo.png" />
<h1><a href="#">HTML5 Cookbook</a></h1>
</header>
As the HTML5 specification says, the header element can include navigation aids, so the element in Figure 1.2 could be marked up with a header that includes the logo, the main navigation links, and the search form. But depending on the design of the site, it might mean you have to mark up the nav outside of the header, which is fine.
Figure 1.2 A typical header element with a site title, logo, search, and navigation area

The following are the possible contents of the header element, several of which are shown in Figure 1.2:
• Logo
• Site name/title
• Site subtitle
• Search form
• Main navigation
You are not restricted to just one header element per page, and it does not have to be at the top of a page. As we will explain in further detail later, if you have several headings on a page, you might consider putting these in a header element. You can also use more than one h1 tag per page so you may have something like Listing 1.2 (you will learn about the article element later in this chapter).
Listing 1.2 Using Multiple Headers on One Page
<article>
<header>
<h1><a href="#">Chapter 1</a></h1>
<p>11.11.2011</p>
</header>
<p> Pellentesque habitant morbi tristique senectus et netus et malesuada fames ac turpis egestas. Vestibulum tortor quam, feugiat vitae, ultricies eget, tempor sit amet, ante...</p>
</article>
<article>
<header>
<h1><a href="#">Chapter 2</a></h1>
<p>11.12.2011</p>
</header>
<p>Pellentesque habitant morbi tristique senectus et netus et malesuada fames ac turpis egestas. Vestibulum tortor quam, feugiat vitae, ultricies eget, tempor sit amet, ante.</p>
</article>
<article>
<header>
<h1><a href="#">Chapter 3</a></h1>
<p>11.13.2011</p>
</header>
<p>Pellentesque habitant morbi tristique senectus et netus et malesuada fames ac turpis egestas. Vestibulum tortor quam, feugiat vitae, ultricies eget, tempor sit amet, ante.</p>
</article>
The code in Listing 1.2 will result in the display shown in Figure 1.3.
Figure 1.3 Multiple header elements on one page (no styling applied)

You could put an author and date within the header element as well. However, the HTML5 specification suggests that author information is more suited to the footer element.
If you have only a single heading (h1-6) in a header element, then there is no need to use header; the h1-6 on its own will suffice.
Beginner Recipe: Using the hgroup Element to Group Headings
Using another new HTML5 element, the hgroup element, you can add further information to your header element.
This element is used to group more than one related h1-6 headings. So, if your site has a subheading, you could use the element shown in Listing 1.3, which generates the layout in Figure 1.4. Although it is a useful grouping option, hgroup is primarily intended to tell the document outline (which we will discuss later) which of the headings is most important. In Listing 1.3, the document outline will exclude all headings except the highest one, in this case, the h1.
Figure 1.4 Website with a main logo and a subheader. These would be inside an hgroup element.

Listing 1.3 Excluding All Headings Except h1
<header>
<hgroup>
<h1><a href="#">HTML5 Cookbook</a></h1>
<h2>Delicious HTML5 recipes</h2>
</hgroup>
</header>
In Listing 1.3, the h2 is relevant to the content of the h1, so in this instance you can use an hgroup. If you have just one h1-6 heading, you do not need to use hgroup.
Beginner Recipe: Creating Navigation with the nav Element
The nav element, as you might expect from its name, is for navigational content. It is used to link to other pages within the site or to other parts of the page (a table of contents, for example).
The most common use of a nav is for the main navigation on a website. It is common practice to use an unordered list to code navigation, as shown in Listing 1.4.
Listing 1.4 Traditional Way of Marking Up Navigation
<ul id="nav">
<li><a href="#">Home</a></li>
<li><a href="#">About</a></li>
<li><a href="#">Meet the team</a></li>
<li><a href="#">News</a></li>
<li><a href="#">Contact</a></li>
</ul>
This code does not change too much when creating nav elements in HTML5. The code for Figure 1.5 would be something like that shown in Listing 1.5.
Figure 1.5 Sitewide navigation that would be inside a nav element

Listing 1.5 Navigation Markup in HTML5
<nav>
<ul>
<li><a href="#">Home</a></li>
<li><a href="#">About</a></li>
<li><a href="#">Meet the team</a></li>
<li><a href="#">News</a></li>
<li><a href="#">Contact</a></li>
</ul>
</nav>
You can put nav in the header as well, as shown in Listing 1.6, because the header allows for introductory and navigational content. However, it does not have to be in the header, and sometimes its placement might depend on styling issues. It is also quite common to see a navigation menu in the footer of a page, sometimes duplicating the main site navigation.
Listing 1.6 The nav Element Inside a header Element
<header>
<h1>My super HTML5 site</h1>
<nav>
<ul>
<li><a href="#">Home</a></li>
<li><a href="#">About</a></li>
<li><a href="#">News</a></li>
<li><a href="#">Contact us</a></li>
</ul>
</nav>
</header>
It is not necessary to put all links on a page in a nav element. The HTML5 specification warns that only blocks of “major navigation” are considered appropriate for the nav element.
On news or blog sites, it is common to see a sidebar with links to articles and other pages. The markup in Listing 1.7 is used to produce the element shown in Figure 1.6.
Figure 1.6 Example of grouped navigation in a sidebar. “Shared,” “Read,” and “Watched/Listened” would each be in a nav.

Listing 1.7 Multiple Navigation Groups in a Single nav Element
<nav>
<h2>Shared</h2>
<ul>
<li><a href="#">Pellentesque habitant</a></li>
<li><a href="#">Morbi tristique senectus</a></li>
<li><a href="#">Aenean ultricies mi vitae est</a></li>
</ul>
<h2>Read</h2>
<ul>
<li><a href="#">Pellentesque habitant</a></li>
<li><a href="#">Morbi tristique senectus</a></li>
<li><a href="#">Aenean ultricies mi vitae est</a></li>
</ul>
<h2>Watched/Listened</h2>
<ul>
<li><a href="#">Pellentesque habitant</a></li>
<li><a href="#">Morbi tristique senectus</a></li>
<li><a href="#">Aenean ultricies mi vitae est</a></li>
</ul>
</nav>
Notice that there is an h2 to separate groups of links in the nav. In Figure 1.6, the h2 tags can be used as tab headings, so when a heading is selected by the user, the content switches (this effect can be achieved with JavaScript). A heading element is not always necessary but should be used to break up and structure navigation groups when possible. For styling reasons, you may need to separate the previous example into two nav structures, which is also fine.
There is a big accessibility win when using the nav element. Assistive technology, such as screen readers, will be able to search and immediately use groups of navigation rather than waiting for them to appear on-screen. Traditionally, developers have used “skip” or “jump” links as the very first things in an HTML document, and they are usually links to the main navigation or main content. However, using the nav element means you will soon be able to drop such “skip” menus. The only problem is that currently assistive technologies have limited support for HTML5 elements. However, they will soon catch up.
Intermediate Recipe: Using the New article Element
The article element and the section element (discussed in the next section) are arguably the two most important new HTML5 structural elements, but they are also two of the most confusing.
The article element is an independent block of content; it is content that could exist in its own right and content that is reusable. Consider content you see in an RSS feed; the content is nearly always individual articles. You could take them out of the feed, and they make sense on their own.
The HTML5 specification suggests some examples of how an article element can be used, such as a forum post, a magazine or newspaper article, a blog entry, or a user-submitted comment.
Listing 1.8 uses the article element to mark up a news item, as displayed in Figure 1.7.
Figure 1.7 Basic article element with content (no styling applied)
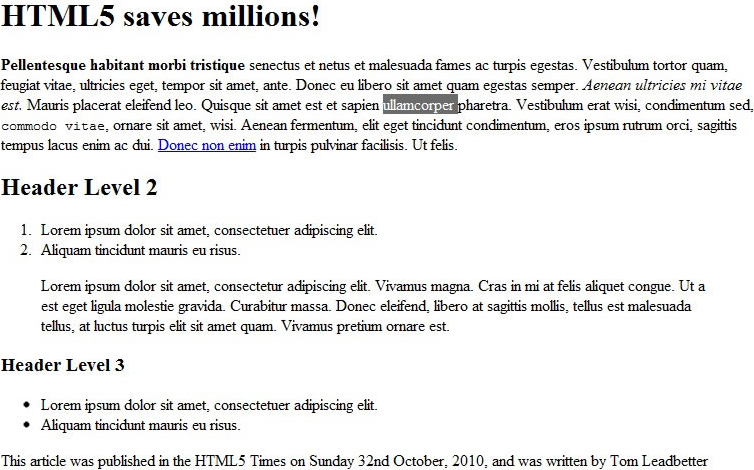
Listing 1.8 Marking Up a News Item in an article Element
<article>
<header>
<h1>HTML5 saves millions!</h1>
<p>32nd October 2010</p>
</header>
<p><strong>Pellentesque habitant morbi tristique</strong> senectus et netus et malesuada fames ac turpis egestas. Vestibulum tortor quam, feugiat vitae, ultricies eget...</p>
<h2>Another heading</h2>
<ol>
<li>Lorem ipsum dolor sit amet, consectetuer adipiscing elit.</li>
<li>Aliquam tincidunt mauris eu risus.</li>
</ol>
<blockquote><p>Lorem ipsum dolor sit amet, consectetur adipiscing elit. Vivamus magna. Cras in mi at felis aliquet congue. Ut a est eget ligula molestie gravida. ...p></blockquote>
<h3>And another heading</h3>
<ul>
<li>Lorem ipsum dolor sit amet, consectetuer adipiscing elit.</li>
<li>Aliquam tincidunt mauris eu risus.</li>
</ul>
<p>This article was published in the HTML5 Times on Sunday 32nd October, 2010, and was written by Tom Leadbetter</p>
</article>
This blog/news entry is an article because it is a separate piece of content. Would it appear in syndication (that is, an RSS feed)? Yes! Does it make sense on its own? Yes! It is an article then.
As you will discover in later chapters, you can nest a section within an article, and you can nest an article inside a section.
The HTML5 specification says an article is an “independent item of content,” and it even says that blog comments can be articles.
Intermediate Recipe: Grouping Content with the section Element
The section element is an area of content or an area of a page that nearly always requires a heading. It can be used to group a whole, well, section of content, and it can be broken down into further sections if required. It is not to be used as a generic wrapper for styling purposes. A section can contain article elements, and article elements can have their content split into sections. So, as you saw with the article element, you need to think about when to use either article or section. Listing 1.9 is an example of when to use section, as shown in Figure 1.8.
Figure 1.8 Basic news page with sections highlighted (no styling applied)

Listing 1.9 Creating a Basic News Page with Sections for Different Types of News
<h1>Loads News</h1>
<section>
<h1>Sports News</h1>
<p>We'll put sports news here.</p>
</section>
<section>
<h1>Entertainment News</h1>
<p>Entertainment news will go here.</p>
</section>
<section>
<h1>Nerdy News</h1>
<p>News for nerds will go in this section of the page.</p>
</section>
In Figure 1.8, each section has its own header, and each section is completely separate from the other. If there were other content on the page, you could wrap it all together in one section and give that a heading of “Types of news we do”:
<section>
<h1>Types of news we do</h2>
<section>
<h1>Entertainment News</h1>
<p>Entertainment news will go here.</p>
</section>
....
</section>
Additionally, you could split the “Nerdy News” section up into further sections:
<section>
<h1>Types of news we do</h2>
<section>
<h1> Nerdy News </h1>
<p>News for nerds will go in this section of the page.</p>
<section>
<h2>Gaming news</h2>
...
</section>
<section>
<h2>Gadget news</h2>
...
</section>
</section>
....
</section>
Which Should You Use: article or section?
The section element is used similarly to how you use the div tag now. But unlike div, section has semantic meaning; it is the grouping of related content.
A section can have articles within it. Think of a news page; it might have a news section and, then within that, different news categories.
You might have a heading of “News” and then all the different types of news, like a newspaper. In HTML4, you would wrap this in a div, but you can wrap this all in a section now. Each type of news would then be in its own section, with its own heading.
If you think the content would make sense on its own, then it is an article. The HTML5 flowchart is a handy tool that will help you decide what element to use: http://html5doctor.com/happy-1st-birthday-us.
Tip
As you’ll see later when we talk about the HTML5 outliner, it is important that you check you have used the correct markup.
A common mistake in early HTML5 uptake is using a section to wrap entire sites, such as <section class="container"> or <section class="wrap">. This is not the correct way to use section.
As the HTML5 specification says:
“Authors are strongly encouraged to view the div element as an element of last resort, for when no other element is suitable. Use of the div element instead of more appropriate elements leads to poor accessibility for readers and poor maintainability for authors.”
The div element “has no special meaning at all,” so you use this to group content that does not belong in one of the new HTML5 elements. Often a div is needed to style something where CSS cannot target the content by any other means. If you use a section, it will be added to the document outline because it is considered important to the document, whereas a div will not be added. So, if you are using a section for styling reasons, you should use a div instead.
Beginner Recipe: Creating a Sidebar with the aside Element
The aside element is for a group of content that is “tangentially” related to its surrounding content, such as a list of most popular posts, blog categories, or recent comments. This type of content is related to the main page content, but it is also separate from it.
In current web development, it is common for there to be a “sidebar” on the page. This does not necessarily mean it is physically on the side of the page, but it often contains things such as related links or a list of categories. The correct use of the aside depends on where you put it: If it is inside an article, the aside content should tangentially relate to the article content, such as a glossary. Or if the aside is outside an article or a section, its contents must be related to the page, such as related links, the site owner’s Twitter feed, or ads relating to the site. Listing 1.10 shows how to create a “related links” section, as displayed in Figure 1.9.
Figure 1.9 Basic layout of a page with a “sidebar”

Listing 1.10 Using aside to Mark Up a “Related Links” Section
<!DOCTYPE html>
<html lang="en">
<head>
<meta charset="utf-8">
<title>This has a nice outline</title>
<style>
article, aside, nav {display: block;}
article, aside {float: left;}
article {width: 500px;}
nav {width: 250px;}
</style>
</head>
<body>
<article>
<header>
<h1>10 things about HTML5</h1>
</header>
<p><strong>Pellentesque habitant morbi tristique</strong> ...</p>
...
</article>
<aside>
<h2>Related links</h2>
<nav>
<ul>
<li><a href="#">10 things about HTML4</a></li>
<li><a href="#">10 things about CSS3</a></li>
<li><a href="#">10 things about JavaScript</a></li>
</ul>
</nav>
</aside>
</body>
</html>
You can also nest the aside inside other elements, including the article element. Extending the previous example, you could provide the user with a glossary covering various phrases or content used in the main content that might not be known to the user:
<article>
<header>
<h1>10 things about HTML5</h1>
<p>Pellentesque habitant morbi tristique senectus et netus et malesuada fames ac turpis egestas. Vestibulum tortor quam, feugiat vitae, ultricies eget, tempor sit amet, ante. Donec eu libero sit amet quam egestas semper. Aenean ultricies mi vitae est. Mauris placerat eleifend leo.</p>
....
</header>
<aside>
<h2>Glossary</ h2>
<p>We have probably used lots of acronyms and abbreviations on this page, so here is the glossary</h2>
....
</aside>
</article>
Beginner Recipe: Using the footer Element
The footer element, as its name suggests, is typically at the bottom of the page. However, that is not always the case, although the footer will often be at the bottom of a section or a page. The footer element is intended for content about its section, including information about the author or site owner, copyright data, and site terms and conditions. If it is inside an article or section, it could contain the date the article was published, tags, categories, and other metadata.
The HTML5 specification suggests a solution to a very common web element: the copyright notice on a page:
<footer >
<small>© Copyright HTML5 Cookbook 2011</small>
</footer>
The previous example would likely be just before the closing </body> tag. (Also notice how the copyright message is in a small tag. We will come to that in the next chapter.)
Like the header element, you can use footer more than once on a page. You can put a footer inside an article. Listing 1.11 details a page with a sitewide footer and also uses nested footer elements with an article, as shown in Figure 1.10.
Figure 1.10 Page layout with multiple footer elements (no styling applied)

Listing 1.11 Page with a Sitewide footer and an article > footer Combination
<article>
<h1>10 things about HTML5</h1>
<footer>
<p>This news article was published on <time>1st April 2011</time> by <a href="#">Tom Leadbetter</a></p>
</footer>
<p><strong>Pellentesque habitant morbi tristique</strong>...</p>
<!-- general content -->
<footer>
<p>This news article was published on <time>1st April 2011</time> by <a href="#">Tom Leadbetter</a></p>
<a href="#">Read Tom's next article</a>
</footer>
</article>
<footer>
<small>© Copyright HTML5 Cookbook 2011</small>
</footer>
This example shows two footer elements within an article. It is common to see the author or date displayed at the top and bottom of a news item or blog post, and you can use footer as many times as you want.
In the previous example, we introduced the time element, which we will be covering in the next chapter.
You can include other pieces of content in the footer, such as navigation (yes, using a nav element), partner logos, and license agreements, and you might often see text such as “This site is powered by <cms name>.”
The HTML5 specification says the footer element can include links to related documents, and although previously you used a combination of aside and nav for that, you can also use the footer element for that content, if it is inside an article. It can contain other links, such as links to previous and next articles, which would look something like this:
<article>
... all the content for this article...
<footer >
<a href="#">Previous article</a> | <a href="#">Next article article</a>
</footer>
</article>
Intermediate Recipe: Using the HTML5 Outliner to Ensure the Correct Structure
With these new elements, you have the opportunity to make your content flow in a logical manner and to allow people to navigate through the content using the hierarchy (using screen readers, for example), rather like a table of contents. Testing against the outline allows you to check that you are using headings and sections correctly. There are various browser extensions and websites at your disposal, but here we will be using a Google Chrome extension: http://code.google.com/p/h5o/.
Download the Chrome extension, and once it is installed, you get an icon in the address bar, as shown in Figure 1.11.
Figure 1.11 Website in Google Chrome with the HTML5 Outliner extension icon
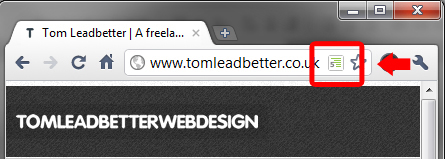
When you select this tool, you will see displayed data that looks like a table of contents, usually with the content indented.
If you have organized the content properly, you should have a structured and logical table of contents. You want to avoid “Untitled section/article.” If that message is displayed, chances are that you have used the wrong markup, so you need to reexamine your markup. Note, however, that nav and aside are allowed to have “Untitled section.”
A correct outline might look something like this:
1. Website name
a. Blog
i. Article title
ii. Article title
b. About me
i. My name
ii. My likes
iii. My dislikes
c. Contact me
Figure 1.12 shows an example document outline. The indents are correct, and there are no untitled sections (apart from the nav, but that is fine).
Figure 1.12 Basic HTML5 page in Google Chrome showing the results of the document outline

The outline you will create in this recipe is as follows:
1. Loads of News
a. Bringing you all kinds of news!
b. Untitled NAV
c. Sports News
d. Entertainment News!
e. Nerdy News
Listing 1.12 shows the source code for this page.
Listing 1.12 Making a Basic Document Outline
<header>
<hgroup>
<h1><a href="#">Loads of News</a></h1>
<h2>Bringing you all kinds of news</h2>
</hgroup>
</header>
<nav>
<ul>
<li><a href="#">Home</a></li>
<li><a href="#">About</a></li>
<li><a href="#">Contact</a></li>
<li><a href="#">Home</a></li>
</ul>
</nav>
<section>
<h1>Sports News</h1>
</section>
<section>
<h1>Entertainment News</h1>
</section>
<section>
<h1>Nerdy News</h1>
</section>
This has a header at the top of the page, which is used as the first node in the outline (not the page title) and then sections that also have headings. There is an hgroup element used in the header element with the text “Bringing you all kinds of news!” but you do not see the h2 in the outline because the outline reads the first heading (h1, h2, h3, h4, h5, or h6) in the element.
The section, article, nav, and aside elements begin the indents (sections) in the outline. The sections have an h1, which is displayed in the outline. You could use an h2 or h3 if you wanted; it does not matter. If you had a section with content but no heading, the outline would say “untitled section,” and you want to avoid that scenario.
Advanced Recipe: Using All the New Elements to Build a News Page
Figure 1.13 and the code in Listing 1.13 show how to use all the new HTML5 elements to build a layout for a news page. It includes some basic CSS to position the elements, but you are not doing anything too jazzy just yet; we will save all that for a later chapter.
Figure 1.13 A news page layout using new HTML5 elements

Listing 1.13 Creating a News Home Page
<!DOCTYPE html>
<html lang="en">
<head>
<meta charset="utf-8">
<title>Loads of News - the best news site there ever was</title>
<style>
header, nav, section, article, footer {display: block;}
header, nav {border-bottom: 1px dotted #000; clear: both; width: 100%;}
nav li {display: inline;}
section#headline {clear: both; border: 5px solid #000; padding: 1%; width: 97%;}
section#sports, section#entertainment, section#nerdy {float: left; margin: 0 5px;
padding: 1%; width: 30%;}aside, footer {clear: both;}
aside img {border: 1px solid #ccc; margin: 0 10px 0 0;}
</style>
</head>
<body>
<header>
<hgroup>
<h1>Loads of News</h1>
<h2>Bringing you all kinds of news!</h2>
</hgroup>
</header>
<nav>
<ul>
<li><a href="#">Home</a></li>
<li><a href="#">Sports news</a></li>
<li><a href="#">Entertainment news</a></li>
<li><a href="#">Nerdy news</a></li>
<li><a href="#">About</a></li>
<li><a href="#">Contact</a></li>
</ul>
</nav>
<section id="headline">
<h1>Headline article</h1>
<article>
<header>
<h2><a href="#">This is our most important article</a></h2>
<p>10th November 2010</p>
</header>
<p>Pellentesque habitant morbi tristique senectus et netus et malesuada fames ac turpis egestas.</p>
</article>
</section>
<section id="sports">
<h1>Sports news</h1>
<article> <!-- (x3) -->
<header>
<h2><a href="#">Sports headline 1</a></h2>
<p>10th November 2010</p>
</header>
<p>Pellentesque habitant morbi tristique senectus et netus et malesuada fames ac turpis egestas.</p>
</article>
</section>
<section id="entertainment">
<h1>Entertainment news</h1>
<article> <!-- (x3) -->
<header>
<h2><a href="#">Entertainment headline 1</a></h2>
<p>10th November 2010</p>
</header>
<p>Pellentesque habitant morbi tristique senectus et netus et malesuada fames ac turpis egestas.</p>
</article>
</section>
<section id="nerdy">
<h1>Nerdy news</h1>
<article><!-- (x3) -->
<header>
<h2><a href="#">Nerdy headline 1</a></h2>
<p>10th November 2010</p>
</header>
<p>Pellentesque habitant morbi tristique senectus et netus et malesuada fames ac turpis egestas.</p>
</article>
</section>
<aside>
<ul>
<li><a href="#"><img alt="Snazzy advert" src="snazzy-advert.gif" height="128" width="128" /></a></li><!-- (x4) -->
</ul>
</aside>
<footer>
<ul>
<li>Site powered by a <a href="#">CMS With No Name</a></li>
<li>Site hosted by a <a href="#">Host With No Name</a></li>
<li>The photos on this site are all owned by the photographer</li>
</ul> <small>© Copyright NoBody 2011</small>
</footer>
</body>
</html>
Now that you have the basic layout and the code sorted, you need to check the documents outline. The previous code will give you the following outline:
1. Loads of News
a. Untitled NAV
2. Headline article
a. This is our most important article
3. Sports news
a. Sports headline 1
b. Sports headline 2
c. Sports headline 3
4. Entertainment news
a. Entertainment headline 1
b. Entertainment headline 2
c. Entertainment headline 3
5. Nerdy news
a. Nerdy headline 1
b. Nerdy headline 2
c. Nerdy headline 3
6. Untitled ASIDE
This looks lovely! footer is not sectioning content, unlike section, article, nav, and aside, so it does not show up in the outline. nav and aside are untitled, but that is fine. You could possibly give the aside a title if you wanted, though does an external product advertisement warrant a heading?
Advanced Recipe: Using All the New Elements to Build a Search Results Page
In Listing 1.14 you will put together several new HTML5 elements to create the structure of a search results page (Figure 1.14). Bear in mind that there is no CSS for this recipe, just HTML.
Figure 1.14 A search results page

Listing 1.14 Elements Combined to Make a Search Results Page
<!DOCTYPE html>
<html lang="en">
<head>
<meta charset="utf-8">
<title>Search</title>
</head>
<body>
<nav>
<ul>
<li>Web</li>
<li><a href="#">Images</a></li>
<li><a href="#">Videos</a></li>
<li><a href="#">Maps</a></li>
<!-- etc -->
</ul>
</nav>
<header>
<h1>Search company name</h1>
</header>
<form>
<fieldset>
<legend>Search</legend>
<label for="searchinput">Search</label>
<input type="search" id="searchinput" name="searchinput" />
<input type="submit" value="Search" />
<a href="#">Advanced search</a>
</fieldset>
</form>
<nav>
<h2>Refine search</h2>
<ul>
<li><a href="#">Everything</a></li>
<li><a href="#">News</a></li>
<li><a href="#">More</a></li>
</ul>
<h3>The web</h3>
<ul>
<li><a href="#">Pages from the UK</a></li>
<li><a href="#">Pages from your area</a></li>
</ul>
<h3>Any time</h3>
<ul>
<li><a href="#">Latest</a></li>
<li><a href="#">Past 2 days</a></li>
<li><a href="#">More search tools</a></li>
</ul>
</nav>
<section>
<header>
<h1>Results for "test"</h1>
<p>About 1,410,000,000 results (0.21 seconds)</p>
</header>
<article>
<header>
<h1><a href="#">First result</a></h1>
</header>
<p>Pellentesque habitant morbi tristique senectus et netus et malesuada fames ac turpis egestas.</p>
<footer>
<p>www.pretendwebsite.com - <a href="#">Cached</a></p>
<ul>
<li><a href="#">News</a></li>
<li><a href="#">Shopping</a></li>
<li><a href="#">Images</a></li>
<li><a href="#">Sport</a></li>
<li><a href="#">Business</a></li>
<li><a href="#">Entertainment</a></li>
<li><a href="#">More results from pretendwebsite.com</a></li>
</ul>
</footer>
</article>
<article>
<header>
<h1><a href="#">Second result</a></h1>
</header>
<p>Pellentesque habitant morbi tristique senectus et netus et malesuada fames ac turpis egestas.</p>
<footer>
<p>www.pretendwebsite2.com - <a href="#">Cached</a></p>
</footer>
</article>
<article>
<header>
<h1><a href="#">Third result</a></h1>
</header>
<p>Pellentesque habitant morbi tristique senectus et netus et malesuada fames ac turpis egestas.</p>
<footer>
<p>www.pretendwebsite3.com - <a href="#">Cached</a></p>
</footer>
</article> <!-- and so on... -->
<aside>
<nav>
<h2>Searches related to "Test"</h2>
<ul>
<li><a href="#">Another <strong>site</strong></a></li>
<li><a href="#">Another <strong>site</strong></a></li>
<li><a href="#">Another <strong>site</strong></a></li>
<li><a href="#">Another <strong>site</strong></a></li>
<!-- etc -->
</ul>
</nav>
</aside>
</section>
<nav>
<ul>
<li class="currentpage">1</li>
<li><a href="#">2</a></li>
<li><a href="#">3</a></li>
<li><a href="#">4</a></li>
<li><a href="#">5</a></li>
<li><a href="#">6</a></li>
<!-- and so on... -->
</ul>
</nav>
<form>
<fieldset>
<legend>Search</legend>
<label for="searchinput2">Search</label>
<input type="search" id="searchinput2" name="searchinput2" />
<input type="submit" />
<a href="#">Advanced search</a>
</fieldset>
</form>
<footer>
<ul>
<li><a href="#">Terms and conditions</a></li>
<li><a href="#">Privacy policy</a></li>
<!-- etc -->
</ul>
</footer>
</body>
</html>
You might have other ideas about which markup to use, which is great; you should be thinking about making beautiful HTML.
The results are all within a section that has the heading <h1>Results for "test"</h1>. After that, each result is within its own article, each with a header and footer. The search results could go even further and be split into sections or articles again, depending on their content.
There is paging toward the bottom of the code that could be considered to be “major navigation” (remember what the HTML5 specification says), because the paging functionality is crucial to how a user navigates through their search results.
Summary
In this chapter, you learned about the new elements available in HTML5 that you can use when creating the main structure of a web page. Starting with a new docytpe and changes to how you call JavaScript and CSS files, you then used header, hgroup, nav, footer, article, section, and aside to create a page layout. Then, by examining the document outline, you checked that your structure made sense and that you used the correct elements.