Chapter 9. Working with Cameras
One of the advantages to using a platform like the Raspberry Pi for DIY technology projects is that it supports a wide range of peripheral devices. Not only can you hook up a keyboard and mouse, you can also connect accessories like printers, WiFi adapters (at least on the first two generations of Raspberry Pi—the Model 3 has its own built in), thumb drives, additional memory cards, cameras, and hard drives. In this chapter, we’re going to show you a few ways to use a camera in your Raspberry Pi projects.
While not quite as common as a keyboard and mouse, a webcam is almost a standard peripheral for computers these days. Most laptops sold have a tiny camera built into the bezel of the display. And if they don’t have a built-in camera, a USB webcam from a well-known brand can be purchased for as little as $25. You can even find webcams for much less if you take a chance on an unknown brand.
The folks at the Raspberry Pi Foundation have created their own camera peripheral that is designed to work with Raspberry Pi (Figure 9-1). Unlike a USB webcam, you’re unlikely to find the official Raspberry Pi camera module in an office supply store, but you should be able to buy it wherever Raspberry Pis are sold, for around $25.

Figure 9-1. Raspberry Pi’s camera module
Unlike a USB webcam, the camera board connects to Raspberry Pi’s Camera Serial Interface (CSI) connector (Figure 9-2). The reason is this: since the Broadcom chip at the core of the Raspberry Pi is meant for mobile phones and tablets, the CSI connection is how a mobile device manufacturer would connect a camera to the chip. Throughout this chapter, we’ll use the official camera board as our chief example, but many of the projects and tutorials can also be done with a USB webcam (Figure 9-3).

Figure 9-2. Raspberry Pi’s camera serial interface

Figure 9-3. A typical USB webcam
Connecting and Testing the Camera Module
Connecting the official camera module isn’t as straightforward as connecting a USB device, but once you get it working, it should be a piece of cake.
Warning
Make sure the Raspberry Pi is powered down before you do this.
Here are the steps you’ll need to take:
-
Pull up on edges of the CSI connector, which is right next to the Ethernet port. A piece of the connector will slide up and lean back toward the Ethernet port. (See Figure 9-4.)
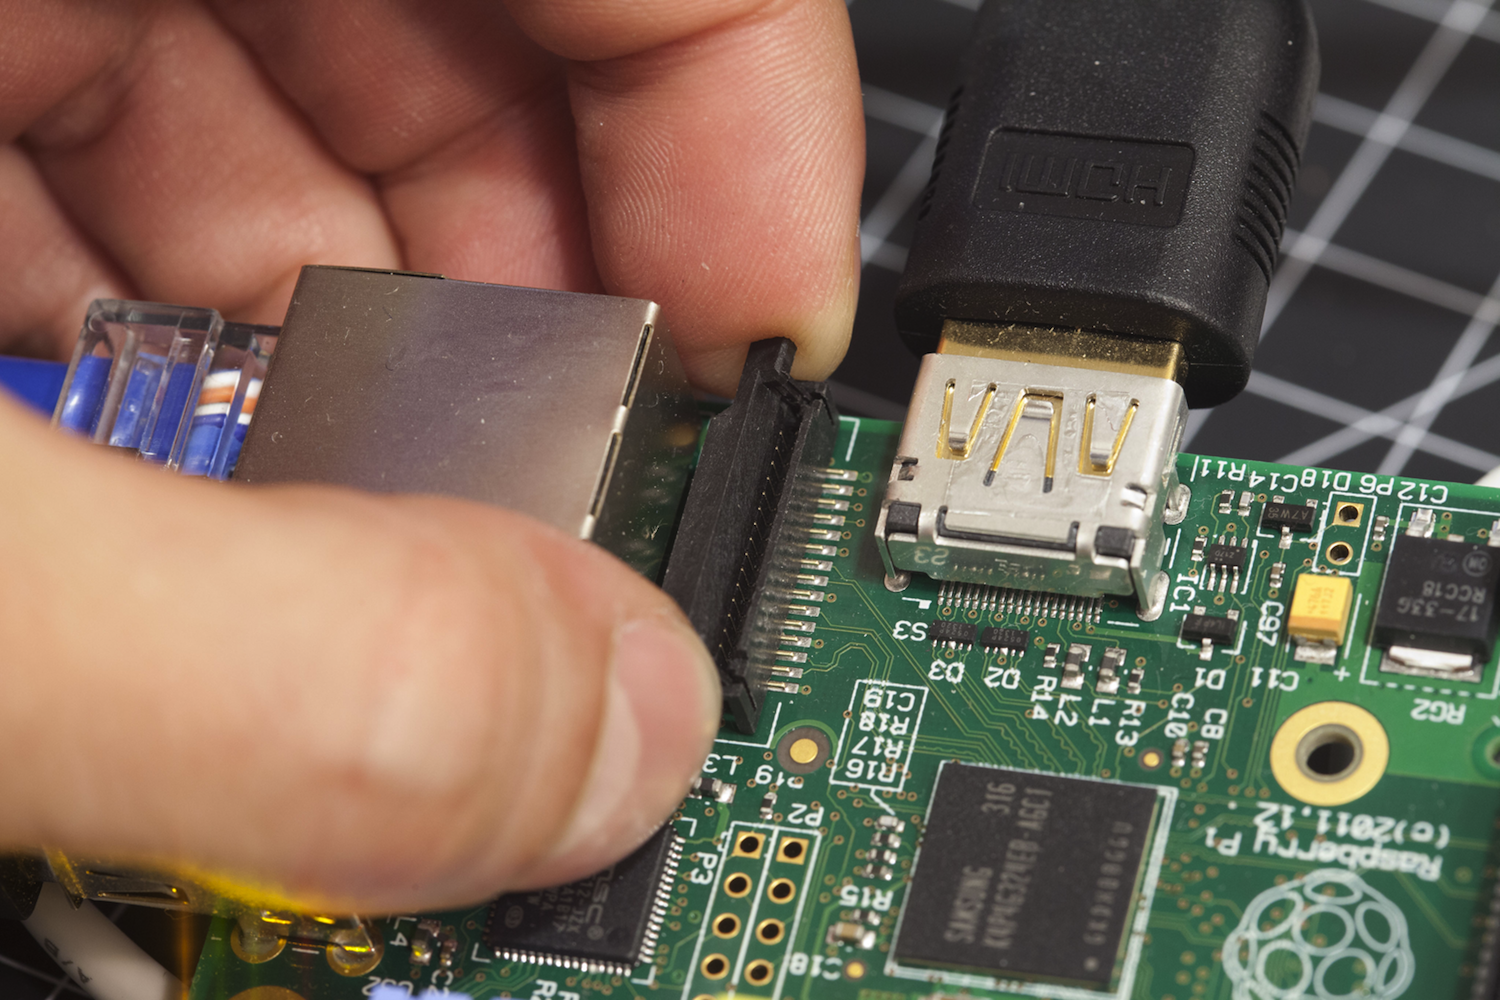
Figure 9-4. Opening the camera serial interface connector locking mechanism
-
Insert the camera module’s ribbon cable into the CSI connector so that its metal contacts are facing away from the Ethernet port.
-
Hold the ribbon cable into the CSI connector and press the moving part of the CSI connector down to lock and hold the ribbon cable in place. You’ll still see part of the metal contacts on the ribbon cable. (See Figure 9-5.)

Figure 9-5. After placing the ribbon cable into the camera serial interface connector and locking it down, you may still see metal contacts on the ribbon cable
-
Open the Raspberry Pi Configuration tool from the desktop Menu→Preferences. (See Figure 9-6)

Figure 9-6. Enabling the camera interface in the Raspberry Pi configuration tool.
-
Click the “Interfaces” tab.
-
Click the option to enable the camera.
-
Click OK and reboot your Raspberry Pi.
-
After you reboot, open a Terminal session and test the camera with:
$
raspistill -o test.jpg
If everything works, you’ll see a preview image from the camera appear on screen for a few seconds. After it disappears, a JPEG file of the captured image will be saved in your current directory.
raspistill is a powerful program with a lot of options. To see what’s possible with it, view all the command-line options by running the program and piping the output through less:
$ raspistill 2>&1 | less
Use the up and down arrow keys to scroll through the options, and press q when you want to get back to the command line.
Project: Making a GIF
One of the features of raspistill is that it can take a series of photos at a specific interval. We can use this feature, along with the command-line image converting and editing software ImageMagick, to create fun animated GIFs with the Raspberry Pi:
-
First, install ImageMagick:
$
sudo apt-get update$sudo apt-get install imagemagick -
Create a new directory to hold the images you capture and switch to that directory:
$
mkdir gif-test$cd gif-test -
With your camera ready, execute
raspistillto run for nine seconds, taking a 640 × 480 resolution image every three seconds, naming each file with an incrementing filename:$
raspistill -t 9000 -tl 3000 -o image%02d.jpg -w 640 -h 480 -
Next, input those files into ImageMagick outputting as the file test.gif:
$
convert -delay 15 *.jpg test.gif -
Now open the test.gif by double-clicking the file within the desktop environment, and you’ll see the GIF you made!
Capturing Video
There’s also a command-line utility called raspivid to capture video from the official Raspberry Pi camera module. Try capturing a five-second video and saving it to a file:
$ raspivid -t 5000 -o video.h264
You can play that file back with:
$ omxplayer video.h264
And just like raspistill, raspivid is a powerful program with a lot of options. To see what’s possible with it, view all the command-line options by running the program and piping the output through less:
$ raspivid 2>&1 less
Testing USB Webcams
With all the different models of webcams out there, there’s no guarantee that a camera will work right out of the box. If you’re purchasing a webcam for use with the Raspberry Pi, search online to make sure that others have had success with the model that you’re purchasing. You can also check the webcam section of eLinux.org’s page of peripherals that have been verified to work with the Raspberry Pi.
Be aware that you’ll need to connect a powered USB hub to your Raspberry Pi if you want to connect your webcam in addition to your keyboard and mouse. The hub must be powered because the Raspberry Pi only lets a limited amount of electrical current through its USB ports, and it likely won’t be able to provide enough power for your keyboard, mouse, and webcam. A powered USB hub plugs into the wall and provides electrical current to the peripherals that connect to it so that they don’t max out the power on your Raspberry Pi.
If you have a webcam that you’re ready to test out with the Raspberry Pi, use apt-get in the Terminal to install a simple camera viewing application called luvcview:
$ sudo apt-get install luvcview
After apt-get finishes the installation, run the application by typing luvcview in a Terminal window while you’re in the desktop environment. A window will open showing the view of the first video source it finds in the /dev folder, likely /dev/video0. Note the frame size that is printed in the Terminal window. If the video seems a little choppy, you can fix this by reducing the default size of the video. For example, if the default video size is 640 × 480, close luvcview and reopen it at half the video size by typing the following at the command line:
$ luvcview -s 320x240
If you don’t see video coming through, you’ll want to troubleshoot here before moving on. One way to see what’s wrong is by disconnecting the webcam, reconnecting it, and running the command dmesg, which will output diagnostic messages that might give you some clues as to what’s wrong.
Installing and Testing SimpleCV
In order to access the camera with Python code, we’ll use SimpleCV (Figure 9-7), which is a feature-packed open source computer vision library. SimpleCV makes it really easy to get images from the camera, display them on screen, or save them as files. But what makes SimpleCV really stand out are its computer vision algorithms, which can do some pretty amazing things. Besides basic image transformations, it can also track, detect, and recognize objects in an image or video. Later on in this chapter, we’ll try basic face detection with SimpleCV (“Face Detection”).

Figure 9-7. SimpleCV logo
To install SimpleCV for Python, you’ll need to start by installing the other libraries it depends on. For those, you can use apt-get:
$sudo apt-get install python-opencv python-scipy python-numpy python-pip$sudo pip install svgwrite
It’s a big install, and it may take a while before the process is complete. Next, you’ll install the actual SimpleCV library with the following command:
$ sudo pip install https://github.com/sightmachine/SimpleCV/
  zipball/master
When it’s done, check that the installation worked by going into the Python interactive interpreter and importing the library:
$pythonPython 2.7.3rc2 (default, May 6 2012, 20:02:25) [GCC 4.6.3] on linux2 Type "help", "copyright", "credits" or "license" for more information. >>>import SimpleCV>>>
If you get no errors after importing the library, you know you’ve got SimpleCV installed correctly. If you’re using a USB webcam, you can jump ahead to “Displaying an Image”. If you’re using the Raspberry Pi camera module, there are a few extra steps, which we’ll cover now.
Additional Steps for the Raspberry Pi Camera Module
Because SimpleCV uses something called the Video4Linux2 (V4L2) driver framework to access USB webcams, we’ll need to load an extra kernel driver so that the official camera board can be used with SimpleCV. If you’re using a regular USB webcam, you can skip these steps:
-
From the Terminal, run the following command to edit the configuration file:
$
sudo nano /etc/modules-load.d/modules.conf -
Add the following line to the end of that file:
bcm2835-v4l2
-
Exit
nanoby pressing Ctrl-X followed by y to save the file when it prompts you. -
After you reboot your Raspberry Pi, the V4L2 kernel driver for the Raspberry Pi Camera Module will be loaded.
Displaying an Image
For many of the examples in this chapter, you’ll need to work in the desktop environment so that you can display images on screen. You can work in IDLE, or save your code as .py files from Leafpad and execute them from the Terminal window.
We’re going to start you off with some SimpleCV basics using image files, and then you’ll work your way up to reading images from the camera. Once you’ve got images coming in from the camera, it will be time to try some face detection:
-
Create a new directory within your home directory called simplecv-test.
-
Open the web browser and search for an image that interests you. We used a photograph of raspberries from Wikipedia and renamed it raspberries.jpg.
-
Right-click on the image and click “Save Image As.”
-
Save the image within the simplecv-test folder.
-
In the File Manager (on the Accessories menu), open the simplecv-test folder and right-click in the folder. Choose Create New→Blank File.
-
Name the file image-display.py.
-
Double-click on the newly created image-display.py file to open it in Leafpad.
-
Enter the code in Example 9-1.
-
Save the image-display.py file and run it from the Terminal window. If you’ve got everything right, you’ll see a photo in a new window as in Figure 9-8. You can close the window itself, or in the Terminal, press Ctrl-C to end the script.

Figure 9-8. The raspberry photo displayed in a window
Example 9-1. Source code for image-display.py
from SimpleCV import Image, Displayfrom time import sleep myDisplay = Display()
raspberryImage = Image("raspberries.jpg")
raspberryImage.save(myDisplay)
while not myDisplay.isDone():
sleep(0.1)
Modifying an Image
Now that you can load an image into memory and display it on the screen, the next step is to modify the image before displaying it (doing this does not modify the image file itself; it simply modifies the copy of the image that’s held in memory):
-
Save the image-display.py file as superimpose.py.
-
Make the enhancements to the code that are shown in Example 9-2.
-
Save the file and run it from the command line.
-
You should see the same image, but now superimposed with the shape and the text.
Example 9-2. Source code for superimpose.py
from SimpleCV import Image, Display, DrawingLayer, ColorraspberryImage.save(myDisplay) while not myDisplay.isDone(): sleep(0.1)
-
Import SimpleCV’s drawing layer and color functions, in addition to the image and display functions you imported previously.
-
Create a new drawing layer that’s the same size as the image.
-
On the layer, draw a rectangle from the coordinates 50, 20 to 250, 60 and make it filled.
-
On the layer, write the text “Raspberries!” at 50, 20 in the color white.
-
Add
myDrawingLayertoraspberryImage. -
Merge the layers that have been added into
raspberryImage(Figure 9-9 shows the new image).

Figure 9-9. The modified raspberry photo
Instead of displaying the image on screen, if you wanted to simply save your modifications to a file, Example 9-3 shows how the code would look.
Example 9-3. Source code for superimpose-save.py
from SimpleCV import Image, DrawingLayer, Color
from time import sleep

raspberryImage = Image("raspberries.jpg")

myDrawingLayer = DrawingLayer((raspberryImage.width,
  raspberryImage.height))

myDrawingLayer.rectangle((50, 20), (250, 60), filled=True)
myDrawingLayer.setFontSize(45)
myDrawingLayer.text("Raspberries!", (50, 20), color=Color.WHITE)

raspberryImage.addDrawingLayer(myDrawingLayer)
raspberryImage.applyLayers()

raspberryImage.save("raspberries-titled.jpg")
-
Save the modified image in memory to a new file called raspberries-titled.jpg.
Because this code doesn’t even open up a window, you can use it from the command line without the desktop environment running. You could even modify the code to watermark batches of images with a single command.
And you’re not limited to text and rectangles. Here are a few of the other drawing functions available to you with SimpleCV (their full documentation is available from SimpleCV):
Accessing the Camera
Luckily, getting a camera’s video stream into SimpleCV isn’t much different than accessing image files and loading them into memory. To try it out, you can make your own basic camera viewer:
-
Create a new file named basic-camera.py and save the code shown in Example 9-4 in it.
-
With your camera plugged in, run the script. You should see a window pop up with a view from the camera, as in Figure 9-10.
-
To close the window, press Ctrl-C in the Terminal.

Figure 9-10. Outputting camera input to the display
Example 9-4. Source code for basic-camera.py
from SimpleCV import Camera, Display
from time import sleep

myCamera = Camera(prop_set={'width': 320, 'height': 240})

myDisplay = Display(resolution=(320, 240))

while not myDisplay.isDone():
   myCamera.getImage().save(myDisplay)
   sleep(.1)
-
Create a new camera object and set the height and width of the image to 320 × 240 for better performance.
-
Set the size of the window to be 320 × 240 as well.
-
Loop the indented code below until the window is closed.
-
Get a frame from the camera and display it in the window.
-
Wait one-tenth of a second between each frame.
You can even combine the code from the last two examples to make a Python script that will take a picture from the camera and save it as a .jpg file:
from SimpleCV import Camera
from time import sleep

myCamera = Camera(prop_set={'width': 320, 'height': 240})

frame = myCamera.getImage()
frame.save("camera-output.jpg")
Face Detection
One of the most powerful functions that comes with SimpleCV is called findHaarFeatures. It’s an algorithm that lets you search within an image for patterns that match a particular profile, or cascade. There are a few cascades included with SimpleCV, such as face, nose, eye, mouth, and full body. Alternatively, you can download or generate your own cascade file if need be. findHaarFeatures analyzes an image for matches, and if it finds at least one, the function returns the location of those matches within the image. This means that you can detect objects like cars, animals, or people within an image file or from the camera. To try out findHaarFeatures, you can do some basic face detection:
-
Create a new file in the simplecv-test directory called face-detector.py.
-
Enter the code shown in Example 9-5.
-
With your camera plugged in and pointed at a face, run the script from the command line.
-
In the Terminal window, you’ll see the location of the faces that
findHaarFeaturesfinds. Try moving around and watching these numbers change. Try holding up a photo of a face to the camera to see what happens.
Example 9-5. Source code for face-detector.py
from SimpleCV import Camera, Display
from time import sleep

myCamera = Camera(prop_set={'width':320, 'height': 240})

myDisplay = Display(resolution=(320, 240))

while not myDisplay.isDone():
   frame = myCamera.getImage()
   faces = frame.findHaarFeatures('face.xml')
   if faces:
      for face in faces:
         print "Face at: " + str(face.coordinates())
   else:
      print "No faces detected."
   frame.save(myDisplay)
   sleep(.1)
-
Look for faces in the image frame and save them into a
facesobject. -
If
findHaarFaturesdetected at least one face, execute the indented code below. -
For each
faceinfaces, execute the code below (theprintstatement) withfaceas an individual face.
If your mug is on screen but you still get the message “No faces detected,” try a few troubleshooting steps:
-
Do you have enough light? If you’re in a dark room, it may be hard for the algorithm to detect your face. Try adding more light.
-
This particular Haar cascade is meant to find faces that are in their normal orientation. If you tilt your head too much or the camera isn’t level, this will affect the algorithm’s ability to find faces.
Project: Raspberry Pi Photobooth
You can combine different libraries together to make Python a powerful tool to do some fairly complex projects. With the GPIO library you learned about in Chapter 7 and SimpleCV, you can make your own Raspberry Pi–based photobooth that’s sure to be a big hit at your next party (see Figure 9-11). And with the findHaarFeatures function in SimpleCV, you can enhance your photobooth with a special extra feature: the ability to automatically superimpose fun virtual props like hats, monocles, beards, and mustaches on the people in the photo booth. The code in this project is based on the Mustacheinator project in Practical Computer Vision with SimpleCV by Kurt Demaagd, Anthony Oliver, Nathan Oostendorp, and Katherine Scott (O’Reilly).

Figure 9-11. Output of the Raspberry Pi Photobooth
Here’s what you’ll need to turn your Raspberry Pi into a photobooth:
-
A USB webcam or Raspberry Pi Camera Module
-
A monitor
-
A pushbutton, any kind you like
-
Hookup wire, cut to size
-
1 resistor, 10K ohm
Before you get started, make sure that both the RPi.GPIO and SimpleCV Python libraries are installed and working properly on your Raspberry Pi. See “Testing GPIO in Python” and “Installing and Testing SimpleCV” for more details:
-
As you did in Chapter 7, connect pin 24 to the pushbutton. One side of the button should be connected to 3.3V, the other to pin 24. Don’t forget to use a 10K pull-down resistor between ground and the side of the switch that connects to pin 24.
-
Find or create a small image of a black mustache on a white background and save it as mustache.png in a new folder on your Raspberry Pi. You can also download our premade mustache file in the ch09 subdirectory of the downloads (see “How to Contact Us”).
-
In that folder, create a new file called photobooth.py, type in the code listed in Example 9-6, and save the file.
Example 9-6. Source code for photobooth.py
from time import sleep, time
from SimpleCV import Camera, Image, Display
import RPi.GPIO as GPIO
myCamera = Camera(prop_set={'width': 320, 'height': 240})
myDisplay = Display(resolution=(320, 240))
stache = Image("mustache.png")
stacheMask = stache.createBinaryMask(color1=(0,0,0),
color2=(254,254,254))
stacheMask = stacheMask.invert()
GPIO.setmode(GPIO.BCM)
GPIO.setup(24, GPIO.IN)
def mustachify(frame):
faces = frame.findHaarFeatures('face.xml')
if faces:
for face in faces:
print "Face at: " + str(face.coordinates())
myFace = face.crop()
noses = myFace.findHaarFeatures('nose.xml')
if noses:
nose = noses.sortArea()[-1]
print "Nose at: " + str(nose.coordinates())
xmust = face.points[0][0] + nose.x -
(stache.width/2)
ymust = face.points[0][1] + nose.y +
(stache.height/3)  else:
return frame
else:
return frame  frame = frame.blit(stache, pos=(xmust, ymust),
mask=stacheMask)
frame = frame.blit(stache, pos=(xmust, ymust),
mask=stacheMask)  return frame
  else:
return frame
else:
return frame  while not myDisplay.isDone():
inputValue = GPIO.input(24)
frame = myCamera.getImage()
if inputValue == True:
frame = mustachify(frame)
while not myDisplay.isDone():
inputValue = GPIO.input(24)
frame = myCamera.getImage()
if inputValue == True:
frame = mustachify(frame)  frame.save("mustache-" + str(time()) + ".jpg")
  frame = frame.flipHorizontal()
  frame.show()
sleep(3)
frame.show()
sleep(3)  else:
frame = frame.flipHorizontal()
else:
frame = frame.flipHorizontal()  frame.save(myDisplay)
sleep(.05)
frame.save(myDisplay)
sleep(.05)
-
Create a mask of the mustache, selecting all but black to be transparent (the two parameters,
color1andcolor2, are the range of colors as RGB values from 0 to 255). -
Invert the mask so that only the black pixels in the image are displayed and all other pixels are transparent.
-
Create a function that takes in a frame and outputs a frame with a superimposed mustache if it can find the face and nose.
-
Create a subimage of the face so that searching for a nose is quicker.
-
If there are multiple nose candidates on the face, choose the largest one.
-
Set the x coordinates of the mustache.
-
Set the y coordinates of the mustache.
-
If no nose is found, just return the frame.
-
Use the
blitfunction (short for BLock Image Transfer) to superimpose the mustache on the frame. -
Return the “mustachified” frame.
-
If no face is found, just return the frame.
-
Pass the frame into the
mustachifyfunction. -
Save the frame as a JPEG with the current time in the filename.
-
Before showing the image, flip it horizontally so that it’s a mirror image of the subject.
-
Hold the saved image on screen for three seconds.
-
If the button isn’t pressed, simply flip the live image and display it.
Now you’re ready to give it a try. Make sure your camera is connected. Next, go to the terminal, and change to the directory where the mustache illustration and photobooth.py are, and then run the script:
$ sudo photobooth.py
The output of the camera will appear on screen. When the button is pressed, it will identify any faces, add a mustache, and save the image. (All the images will be saved in the same folder with the script.)
Going Further
- Practical Computer Vision with SimpleCV
-
This book by Kurt Demaagd, Anthony Oliver, Nathan Oostendorp, and Katherine Scott is a comprehensive guide to using SimpleCV. It includes plenty of example code and projects to learn more about working with images and computer vision in Python.