
Chapter 2
Easy Subnetting

We’ll pick up right where we left off in the last chapter and continue to explore the world of IP addressing. I’ll open this chapter by telling you how to subnet an IP network—an indispensably crucial skill that’s central to mastering networking in general! Forewarned is forearmed, so prepare yourself because being able to subnet quickly and accurately is pretty challenging and you’ll need time to practice what you’ve learned to really nail it. So be patient and don’t give up on this key aspect of networking until your skills are seriously sharp. I’m not kidding—this chapter is so important you should really just graft it into your brain!
So be ready because we’re going to hit the ground running and thoroughly cover IP subnetting from the very start. And though I know this will sound weird to you, you’ll be much better off if you just try to forget everything you’ve learned about subnetting before reading this chapter—especially if you’ve been to an official Cisco or Microsoft class! I think these forms of special torture often do more harm than good and sometimes even scare people away from networking completely. Those that survive and persevere usually at least question the sanity of continuing to study in this field. If this is you, relax, breathe, and know that you’ll find that the way I tackle the issue of subnetting is relatively painless because I’m going to show you a whole new, much easier method to conquer this monster!
After working through this chapter, and I can’t say this enough, after working through the extra study material at the end as well, you’ll be able to tame the IP addressing/subnetting beast—just don’t give up! I promise that you’ll be really glad you didn’t. It’s one of those things that once you get it down, you’ll wonder why you used to think it was so hard!
Subnetting Basics
In Chapter 1, “Introduction to TCP/IP,” you learned how to define and find the valid host ranges used in a Class A, Class B, and Class C network address by turning the host bits all off and then all on. This is very good, but here’s the catch: you were defining only one network, as shown in Figure 2.1.

Figure 2.1 One network
By now you know that having one large network is not a good thing because the chapter you just read was veritably peppered with me incessantly telling you that! But how would you fix the out-of-control problem that Figure 2.1 illustrates? Wouldn’t it be nice to be able to break up that one, huge network address and create four manageable networks from it? You betcha it would, but to make that happen, you would need to apply the infamous trick of subnetting because it’s the best way to break up a giant network into a bunch of smaller ones. Take a look at Figure 2.2 and see how this might look.
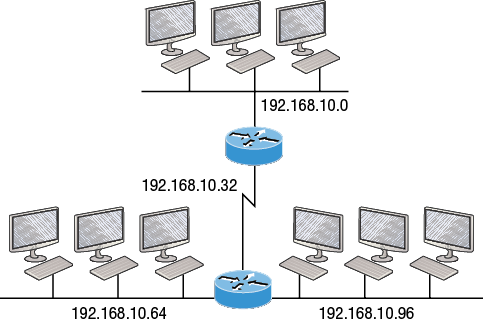
Figure 2.2 Multiple networks connected together
What are those 192.168.10.x addresses shown in the figure? Well that is what this chapter will explain—how to make one network into many networks!
Let’s take off from where we left in Chapter 1 and start working in the host section (host bits) of a network address, where we can borrow bits to create subnets.
How to Create Subnets
Creating subnetworks is essentially the act of taking bits from the host portion of the address and reserving them to define the subnet address instead. Clearly this will result in fewer bits being available for defining your hosts, which is something you’ll always want to keep in mind.
Later in this chapter, I’ll guide you through the entire process of creating subnets starting with Class C addresses. As always in networking, before you actually implement anything, including subnetting, you must first determine your current requirements and make sure to plan for future conditions as well.
To create a subnet, we’ll start by fulfilling these three steps:
Determine the number of required network IDs:
- One for each LAN subnet
- One for each wide area network connection
Determine the number of required host IDs per subnet:
- One for each TCP/IP host
- One for each router interface
Based on the previous requirements, create the following:
- A unique subnet mask for your entire network
- A unique subnet ID for each physical segment
- A range of host IDs for each subnet
Subnet Masks
For the subnet address scheme to work, every machine on the network must know which part of the host address will be used as the subnet address. This condition is met by assigning a subnet mask to each machine. A subnet mask is a 32-bit value that allows the device that’s receiving IP packets to distinguish the network ID portion of the IP address from the host ID portion of the IP address. This 32-bit subnet mask is composed of 1s and 0s, where the 1s represent the positions that refer to the network subnet addresses.
Not all networks need subnets, and if not, it really means that they’re using the default subnet mask, which is basically the same as saying that a network doesn’t have a subnet address. Table 2.1shows the default subnet masks for Classes A, B, and C.
Table 2.1 Default subnet mask
|
Class |
Format |
Default Subnet Mask |
|
A |
network.node.node.node |
255.0.0.0 |
|
B |
network.network.node.node |
255.255.0.0 |
|
C |
network.network.network.node |
255.255.255.0 |
Although you can use any mask in any way on an interface, typically it’s not usually good to mess with the default masks. In other words, you don’t want to make a Class B subnet mask read 255.0.0.0, and some hosts won’t even let you type it in. But these days, most devices will. For a Class A network, you wouldn’t change the first byte in a subnet mask because it should read 255.0.0.0 at a minimum. Similarly, you wouldn’t assign 255.255.255.255 because this is all 1s, which is a broadcast address. A Class B address starts with 255.255.0.0, and a Class C starts with 255.255.255.0, and for the CCNA especially, there is no reason to change the defaults!
Classless Inter-Domain Routing (CIDR)
Another term you need to familiarize yourself with is Classless Inter-Domain Routing (CIDR). It’s basically the method that Internet service providers (ISPs) use to allocate a number of addresses to a company, a home—their customers. They provide addresses in a certain block size, something I’ll talk about in greater detail soon.
When you receive a block of addresses from an ISP, what you get will look something like this: 192.168.10.32/28. This is telling you what your subnet mask is. The slash notation (/) means how many bits are turned on (1s). Obviously, the maximum could only be /32 because a byte is 8 bits and there are 4 bytes in an IP address: (4 × 8 = 32). But keep in mind that regardless of the class of address, the largest subnet mask available relevant to the Cisco exam objectives can only be a /30 because you’ve got to keep at least 2 bits for host bits.
Take, for example, a Class A default subnet mask, which is 255.0.0.0. This tells us that the first byte of the subnet mask is all ones (1s), or 11111111. When referring to a slash notation, you need to count all the 1 bits to figure out your mask. The 255.0.0.0 is considered a /8 because it has 8 bits that are 1s—that is, 8 bits that are turned on.
A Class B default mask would be 255.255.0.0, which is a /16 because 16 bits are ones (1s): 11111111.11111111.00000000.00000000.
Table 2.2 has a listing of every available subnet mask and its equivalent CIDR slash notation.
Table 2.2 CIDR values
|
Subnet Mask |
CIDR Value |
|
255.0.0.0 |
/8 |
|
255.128.0.0 |
/9 |
|
255.192.0.0 |
/10 |
|
255.224.0.0 |
/11 |
|
255.240.0.0 |
/12 |
|
255.248.0.0 |
/13 |
|
255.252.0.0 |
/14 |
|
255.254.0.0 |
/15 |
|
255.255.0.0 |
/16 |
|
255.255.128.0 |
/17 |
|
255.255.192.0 |
/18 |
|
255.255.224.0 |
/19 |
|
255.255.240.0 |
/20 |
|
255.255.248.0 |
/21 |
|
255.255.252.0 |
/22 |
|
255.255.254.0 |
/23 |
|
255.255.255.0 |
/24 |
|
255.255.255.128 |
/25 |
|
255.255.255.192 |
/26 |
|
255.255.255.224 |
/27 |
|
255.255.255.240 |
/28 |
|
255.255.255.248 |
/29 |
|
255.255.255.252 |
/30 |
The /8 through /15 can only be used with Class A network addresses. /16 through /23 can be used by Class A and B network addresses. /24 through /30 can be used by Class A, B, and C network addresses. This is a big reason why most companies use Class A network addresses. Since they can use all subnet masks, they get the maximum flexibility in network design.
IP Subnet-Zero
Even though ip subnet-zero is not a new command, Cisco courseware and Cisco exam objectives didn’t used to cover it. Know that Cisco certainly covers it now! This command allows you to use the first and last subnet in your network design. For instance, the Class C mask of 255.255.255.192 provides subnets 64 and 128, another facet of subnetting that we’ll discuss more thoroughly later in this chapter. But with the ip subnet-zero command, you now get to use subnets 0, 64, 128, and 192. It may not seem like a lot, but this provides two more subnets for every subnet mask we use.
Even though we don’t discuss the command-line interface (CLI), it’s important for you to be at least a little familiar with this command at this point:
Router#sh running-config
Building configuration...
Current configuration : 827 bytes
!
hostname Pod1R1
!
ip subnet-zero
!
This router output shows that the command ip subnet-zero is enabled on the router. Cisco has turned this command on by default starting with Cisco IOS version 12.x and now we’re running 15.x code.
When taking your Cisco exams, make sure you read very carefully to see if Cisco is asking you not to use ip subnet-zero. There are actually instances where this may happen.
Subnetting Class C Addresses
There are many different ways to subnet a network. The right way is the way that works best for you. In a Class C address, only 8 bits are available for defining the hosts. Remember that subnet bits start at the left and move to the right, without skipping bits. This means that the only Class C subnet masks can be the following:
Binary Decimal CIDR
---------------------------------------------------------
00000000 = 255.255.255.0 /24
10000000 = 255.255.255.128 /25
11000000 = 255.255.255.192 /26
11100000 = 255.255.255.224 /27
11110000 = 255.255.255.240 /28
11111000 = 255.255.255.248 /29
11111100 = 255.255.255.252 /30
We can’t use a /31 or /32 because, as I’ve said, we must have at least 2 host bits for assigning IP addresses to hosts. But this is only mostly true. Certainly we can never use a /32 because that would mean zero host bits available, yet Cisco has various forms of the IOS, as well as the new Cisco Nexus switches operating system, that support the /31 mask. The /31 is above the scope of the CCENT and CCNA objectives, so we won’t be covering it in this book.
Coming up, I’m going to teach you that significantly less painful method of subnetting I promised you at the beginning of this chapter, which makes it ever so much easier to subnet larger numbers in a flash. Excited? Good! Because I’m not kidding when I tell you that you absolutely need to be able to subnet quickly and accurately to succeed in the networking real world and on the exam too!
Subnetting a Class C Address—The Fast Way!
When you’ve chosen a possible subnet mask for your network and need to determine the number of subnets, valid hosts, and the broadcast addresses of a subnet that mask will provide, all you need to do is answer five simple questions:
- How many subnets does the chosen subnet mask produce?
- How many valid hosts per subnet are available?
- What are the valid subnets?
- What’s the broadcast address of each subnet?
- What are the valid hosts in each subnet?
This is where you’ll be really glad you followed my advice and took the time to memorize your powers of 2. If you didn’t, now would be a good time… Just refer back to the sidebar “Understanding the Powers of 2” earlier if you need to brush up. Here’s how you arrive at the answers to those five big questions:
- How many subnets? 2x = number of subnets. x is the number of masked bits, or the 1s. For example, in 11000000, the number of 1s gives us 22 subnets. So in this example, there are 4 subnets.
- How many hosts per subnet? 2y – 2 = number of hosts per subnet. y is the number of unmasked bits, or the 0s. For example, in 11000000, the number of 0s gives us 26 – 2 hosts, or 62 hosts per subnet. You need to subtract 2 for the subnet address and the broadcast address, which are not valid hosts.
- What are the valid subnets? 256 – subnet mask = block size, or increment number. An example would be the 255.255.255.192 mask, where the interesting octet is the fourth octet (interesting because that is where our subnet numbers are). Just use this math: 256 – 192 = 64. The block size of a 192 mask is always 64. Start counting at zero in blocks of 64 until you reach the subnet mask value and these are your subnets in the fourth octet: 0, 64, 128, 192. Easy, huh?
- What’s the broadcast address for each subnet? Now here’s the really easy part. Since we counted our subnets in the last section as 0, 64, 128, and 192, the broadcast address is always the number right before the next subnet. For example, the 0 subnet has a broadcast address of 63 because the next subnet is 64. The 64 subnet has a broadcast address of 127 because the next subnet is 128, and so on. Remember, the broadcast address of the last subnet is always 255.
- What are the valid hosts? Valid hosts are the numbers between the subnets, omitting the all-0s and all-1s. For example, if 64 is the subnet number and 127 is the broadcast address, then 65–126 is the valid host range. Your valid range is always the group of numbers between the subnet address and the broadcast address.
If you’re still confused, don’t worry because it really isn’t as hard as it seems to be at first—just hang in there! To help lift any mental fog, try a few of the practice examples next.
Subnetting Practice Examples: Class C Addresses
Here’s your opportunity to practice subnetting Class C addresses using the method I just described. This is so cool. We’re going to start with the first Class C subnet mask and work through every subnet that we can, using a Class C address. When we’re done, I’ll show you how easy this is with Class A and B networks too!
Practice Example #1C: 255.255.255.128 (/25)
Since 128 is 10000000 in binary, there is only 1 bit for subnetting and 7 bits for hosts. We’re going to subnet the Class C network address 192.168.10.0.
192.168.10.0 = Network address
255.255.255.128 = Subnet mask
Now, let’s answer our big five:
- How many subnets? Since 128 is 1 bit on (10000000), the answer would be 21 = 2.
- How many hosts per subnet? We have 7 host bits off (10000000), so the equation would be 27 – 2 = 126 hosts. Once you figure out the block size of a mask, the amount of hosts is always the block size minus 2. No need to do extra math if you don’t need to!
- What are the valid subnets? 256 – 128 = 128. Remember, we’ll start at zero and count in our block size, so our subnets are 0, 128. By just counting your subnets when counting in your block size, you really don’t need to do steps 1 and 2. We can see we have two subnets, and in the step before this one, just remember that the amount of hosts is always the block size minus 2, and in this example, that gives us 2 subnets, each with 126 hosts.
- What’s the broadcast address for each subnet? The number right before the value of the next subnet is all host bits turned on and equals the broadcast address. For the zero subnet, the next subnet is 128, so the broadcast of the 0 subnet is 127.
- What are the valid hosts? These are the numbers between the subnet and broadcast address. The easiest way to find the hosts is to write out the subnet address and the broadcast address, which makes valid hosts completely obvious. The following table shows the 0 and 128 subnets, the valid host ranges of each, and the broadcast address of both subnets:
|
Subnet |
0 |
128 |
|
First host |
1 |
129 |
|
Last host |
126 |
254 |
|
Broadcast |
127 |
255 |
Looking at a Class C /25, it’s pretty clear that there are two subnets. But so what—why is this significant? Well actually, it’s not because that’s not the right question. What you really want to know is what you would do with this information!
I know this isn’t exactly everyone’s favorite pastime, but what we’re about to do is really important, so bear with me; we’re going to talk about subnetting—period. The key to understanding subnetting is to understand the very reason you need to do it, and I’m going to demonstrate this by going through the process of building a physical network.
Okay—because we added that router shown in Figure 2.3, in order for the hosts on our internetwork to communicate, they must now have a logical network addressing scheme. We could use IPv6, but IPv4 is still the most popular for now. It’s also what we’re studying at the moment, so that’s what we’re going with.

Figure 2.3 Implementing a Class C /25 logical network
Looking at Figure 2.3, you can see that there are two physical networks, so we’re going to implement a logical addressing scheme that allows for two logical networks. As always, it’s a really good idea to look ahead and consider likely short- and long-term growth scenarios, but for this example in this book, a /25 gets it done.
Figure 2.3 shows us that both subnets have been assigned to a router interface, which creates our broadcast domains and assigns our subnets. Use the command show ip route to see the routing table on a router. Notice that instead of one large broadcast domain, there are now two smaller broadcast domains, providing for up to 126 hosts in each. The C in the router output translates to “directly connected network,” and we can see we have two of those with two broadcast domains and that we created and implemented them. So congratulations—you did it! You have successfully subnetted a network and applied it to a network design. Nice! Let’s do it again.
Practice Example #2C: 255.255.255.192 (/26)
This time, we’re going to subnet the network address 192.168.10.0 using the subnet mask 255.255.255.192.
192.168.10.0 = Network address
255.255.255.192 = Subnet mask
Now, let’s answer the big five:
- How many subnets? Since 192 is 2 bits on (1000000), the answer would be 22 = 4 subnets.
- How many hosts per subnet? We have 6 host bits off (1000000), giving us 26 – 2 = 62 hosts. The amount of hosts is always the block size minus 2.
- What are the valid subnets? 256 – 192 = 64. Remember to start at zero and count in our block size. This means our subnets are 0, 64, 128, and 192. We can see we have a block size of 64, so we have 4 subnets, each with 62 hosts.
- What’s the broadcast address for each subnet? The number right before the value of the next subnet is all host bits turned on and equals the broadcast address. For the zero subnet, the next subnet is 64, so the broadcast address for the zero subnet is 63.
- What are the valid hosts? These are the numbers between the subnet and broadcast address. As I said, the easiest way to find the hosts is to write out the subnet address and the broadcast address, which clearly delimits our valid hosts. The following table shows the 0, 64, 128, and 192 subnets, the valid host ranges of each, and the broadcast address of each subnet:
|
The subnets (do this first) |
0 |
64 |
128 |
192 |
|
Our first host (perform host addressing last) |
1 |
65 |
129 |
193 |
|
Our last host |
62 |
126 |
190 |
254 |
|
The broadcast address (do this second) |
63 |
127 |
191 |
255 |
Again, before getting into the next example, you can see that we can now subnet a /26 as long as we can count in increments of 64. And what are you going to do with this fascinating information? Implement it! We’ll use Figure 2.4 to practice a /26 network implementation.

Figure 2.4 Implementing a class C /26 (with three networks)
The /26 mask provides four subnetworks, and we need a subnet for each router interface. With this mask, in this example, we actually have room with a spare subnet to add to another router interface in the future. Always plan for growth if possible!
Practice Example #3C: 255.255.255.224 (/27)
This time, we’ll subnet the network address 192.168.10.0 and subnet mask 255.255.255.224.
192.168.10.0 = Network address
255.255.255.224 = Subnet mask
- How many subnets? 224 is 11100000, so our equation would be 23 = 8.
- How many hosts? 25 – 2 = 30.
- What are the valid subnets? 256 – 224 = 32. We just start at zero and count to the subnet mask value in blocks (increments) of 32: 0, 32, 64, 96, 128, 160, 192, and 224.
- What’s the broadcast address for each subnet (always the number right before the next subnet)?
- What are the valid hosts (the numbers between the subnet number and the broadcast address)?
To answer the last two questions, first just write out the subnets, then write out the broadcast addresses—the number right before the next subnet. Last, fill in the host addresses. The following table gives you all the subnets for the 255.255.255.224 Class C subnet mask:
|
The subnet address |
0 |
32 |
64 |
96 |
128 |
160 |
192 |
224 |
|
The first valid host |
1 |
33 |
65 |
97 |
129 |
161 |
193 |
225 |
|
The last valid host |
30 |
62 |
94 |
126 |
158 |
190 |
222 |
254 |
|
The broadcast address |
31 |
63 |
95 |
127 |
159 |
191 |
223 |
255 |
In practice example #3C, we’re using a 255.255.255.224 (/27) network, which provides eight subnets as shown previously. We can take these subnets and implement them as shown in Figure 2.5 using any of the subnets available.
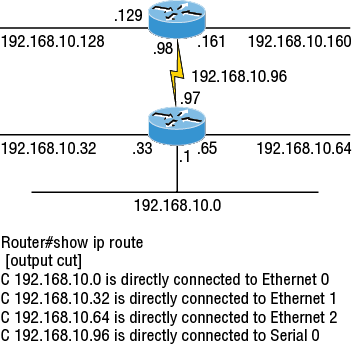
Figure 2.5 Implementing a Class C /27 logical network
Notice that used six of the eight subnets available for my network design. The lightning bolt symbol in the figure represents a wide area network (WAN) such as a T1 or other serial connection through an ISP or telco. In other words, something you don’t own, but it’s still a subnet just like any LAN connection on a router. As usual, I used the first valid host in each subnet as the router’s interface address. This is just a rule of thumb; you can use any address in the valid host range as long as you remember what address you configured so you can set the default gateways on your hosts to the router address.
Practice Example #4C: 255.255.255.240 (/28)
Let’s practice another one:
192.168.10.0 = Network address
255.255.255.240 = Subnet mask
- Subnets? 240 is 11110000 in binary. 24 = 16.
- Hosts? 4 host bits, or 24 – 2 = 14.
- Valid subnets? 256 – 240 = 16. Start at 0: 0 + 16 = 16. 16 + 16 = 32. 32 + 16 = 48. 48 + 16 = 64. 64 + 16 = 80. 80 + 16 = 96. 96 + 16 = 112. 112 + 16 = 128. 128 + 16 = 144. 144 + 16 = 160. 160 + 16 = 176. 176 + 16 = 192. 192 + 16 = 208. 208 + 16 = 224. 224 + 16 = 240.
- Broadcast address for each subnet?
- Valid hosts?
To answer the last two questions, check out the following table. It gives you the subnets, valid hosts, and broadcast addresses for each subnet. First, find the address of each subnet using the block size (increment). Second, find the broadcast address of each subnet increment, which is always the number right before the next valid subnet, and then just fill in the host addresses. The following table shows the available subnets, hosts, and broadcast addresses provided from a Class C 255.255.255.240 mask.

Practice Example #5C: 255.255.255.248 (/29)
Let’s keep practicing:
192.168.10.0 = Network address
255.255.255.248 = Subnet mask
- Subnets? 248 in binary = 11111000. 25 = 32.
- Hosts? 23 – 2 = 6.
- Valid subnets? 256 – 248 = 0, 8, 16, 24, 32, 40, 48, 56, 64, 72, 80, 88, 96, 104, 112, 120, 128, 136, 144, 152, 160, 168, 176, 184, 192, 200, 208, 216, 224, 232, 240, and 248.
- Broadcast address for each subnet?
- Valid hosts?
Take a look at the following table. It shows some of the subnets (first four and last four only), valid hosts, and broadcast addresses for the Class C 255.255.255.248 mask:
|
Subnet |
0 |
8 |
16 |
24 |
… |
224 |
232 |
240 |
248 |
|
First host |
1 |
9 |
17 |
25 |
… |
225 |
233 |
241 |
249 |
|
Last host |
6 |
14 |
22 |
30 |
… |
230 |
238 |
246 |
254 |
|
Broadcast |
7 |
15 |
23 |
31 |
… |
231 |
239 |
247 |
255 |
Practice Example #6C: 255.255.255.252 (/30)
Okay—just one more:
192.168.10.0 = Network address
255.255.255.252 = Subnet mask
- Subnets? 64.
- Hosts? 2.
- Valid subnets? 0, 4, 8, 12, etc., all the way to 252.
- Broadcast address for each subnet? (Always the number right before the next subnet.)
- Valid hosts? (The numbers between the subnet number and the broadcast address.)
The following table shows you the subnet, valid host, and broadcast address of the first four and last four subnets in the 255.255.255.252 Class C subnet:
|
Subnet |
0 |
4 |
8 |
12 |
… |
240 |
244 |
248 |
252 |
|
First host |
1 |
5 |
9 |
13 |
… |
241 |
245 |
249 |
253 |
|
Last host |
2 |
6 |
10 |
14 |
… |
242 |
246 |
250 |
254 |
|
Broadcast |
3 |
7 |
11 |
15 |
… |
243 |
247 |
251 |
255 |
Subnetting in Your Head: Class C Addresses
It really is possible to subnet in your head? Yes, and it’s not all that hard either—take the following example:
192.168.10.50 = Node address
255.255.255.224 = Subnet mask
First, determine the subnet and broadcast address of the network in which the previous IP address resides. You can do this by answering question 3 of the big 5 questions: 256 – 224 = 32. 0, 32, 64, and so on. The address of 50 falls between the two subnets of 32 and 64 and must be part of the 192.168.10.32 subnet. The next subnet is 64, so the broadcast address of the 32 subnet is 63. Don’t forget that the broadcast address of a subnet is always the number right before the next subnet. The valid host range equals the numbers between the subnet and broadcast address, or 33–62. This is too easy!
Let’s try another one. We’ll subnet another Class C address:
192.168.10.50 = Node address
255.255.255.240 = Subnet mask
What is the subnet and broadcast address of the network of which the previous IP address is a member? 256 – 240 = 16. Now just count by our increments of 16 until we pass the host address: 0, 16, 32, 48, 64. Bingo—the host address is between the 48 and 64 subnets. The subnet is 192.168.10.48, and the broadcast address is 63 because the next subnet is 64. The valid host range equals the numbers between the subnet number and the broadcast address, or 49–62.
Let’s do a couple more to make sure you have this down.
You have a node address of 192.168.10.174 with a mask of 255.255.255.240. What is the valid host range?
The mask is 240, so we’d do a 256 – 240 = 16. This is our block size. Just keep adding 16 until we pass the host address of 174, starting at zero, of course: 0, 16, 32, 48, 64, 80, 96, 112, 128, 144, 160, 176. The host address of 174 is between 160 and 176, so the subnet is 160. The broadcast address is 175; the valid host range is 161–174. That was a tough one!
One more—just for fun. This one is the easiest of all Class C subnetting:
192.168.10.17 = Node address
255.255.255.252 = Subnet mask
What is the subnet and broadcast address of the subnet in which the previous IP address resides? 256 – 252 = 0 (always start at zero unless told otherwise). 0, 4, 8, 12, 16, 20, etc. You’ve got it! The host address is between the 16 and 20 subnets. The subnet is 192.168.10.16, and the broadcast address is 19. The valid host range is 17–18.
Now that you’re all over Class C subnetting, let’s move on to Class B subnetting. But before we do, let’s go through a quick review.
What Do We Know?
Okay—here’s where you can really apply what you’ve learned so far and begin committing it all to memory. This is a very cool section that I’ve been using in my classes for years. It will really help you nail down subnetting for good!
When you see a subnet mask or slash notation (CIDR), you should know the following:
/25 What do we know about a /25?
- 128 mask
- 1 bit on and 7 bits off (10000000)
- Block size of 128
- Subnets 0 and 128
- 2 subnets, each with 126 hosts
/26 What do we know about a /26?
- 192 mask
- 2 bits on and 6 bits off (11000000)
- Block size of 64
- Subnets 0, 64, 128, 192
- subnets, each with 62 hosts
/27 What do we know about a /27?
- 224 mask
- 3 bits on and 5 bits off (11100000)
- Block size of 32
- Subnets 0, 32, 64, 96, 128, 160, 192, 224
- 8 subnets, each with 30 hosts
/28 What do we know about a /28?
- 240 mask
- 4 bits on and 4 bits off
- Block size of 16
- Subnets 0, 16, 32, 48, 64, 80, 96, 112, 128, 144, 160, 176, 192, 208, 224, 240
- 16 subnets, each with 14 hosts
/29 What do we know about a /29?
- 248 mask
- 5 bits on and 3 bits off
- Block size of 8
- Subnets 0, 8, 16, 24, 32, 40, 48, etc.
- 32 subnets, each with 6 hosts
/30 What do we know about a /30?
- 252 mask
- 6 bits on and 2 bits off
- Block size of 4
- Subnets 0, 4, 8, 12, 16, 20, 24, etc.
- 64 subnets, each with 2 hosts
Table 2.3 puts all of the previous information into one compact little table. You should practice writing this table out on scratch paper, and if you can do it, write it down before you start your exam!
Table 2.3 What do you know?
CIDR Notation |
Mask |
Bits |
Block Size |
Subnets |
Hosts |
/25 |
128 |
1 bit on and 7 bits off |
128 |
0 and 128 |
2 subnets, each with 126 hosts |
/26 |
192 |
2 bits on and 6 bits off |
64 |
0, 64, 128, 192 |
4 subnets, each with 62 hosts |
/27 |
224 |
3 bits on and 5 bits off |
32 |
0, 32, 64, 96, 128, 160, 192, 224 |
8 subnets, each with 30 hosts |
/28 |
240 |
4 bits on and 4 bits off |
16 |
0, 16, 32, 48, 64, 80, 96, 112, 128, 144, 160, 176, 192, 208, 224, 240 |
16 subnets, each with 14 hosts |
/29 |
248 |
5 bits on and 3 bits off |
8 |
0, 8, 16, 24, 32, 40, 48, etc. |
32 subnets, each with 6 hosts |
/30 |
252 |
6 bits on and 2 bits off |
4 |
0, 4, 8, 12, 16, 20, 24, etc. |
64 subnets, each with 2 hosts |
Regardless of whether you have a Class A, Class B, or Class C address, the /30 mask will provide you with only two hosts, ever. As suggested by Cisco, this mask is suited almost exclusively for use on point-to-point links.
If you can memorize this “What Do We Know?” section, you’ll be much better off in your day-to-day job and in your studies. Try saying it out loud, which helps you memorize things—yes, your significant other and/or coworkers will think you’ve lost it, but they probably already do if you’re in the networking field anyway. And if you’re not yet in the networking field but are studying all this to break into it, get used to it!
It’s also helpful to write these on some type of flashcards and have people test your skill. You’d be amazed at how fast you can get subnetting down if you memorize block sizes as well as this “What Do We Know?” section.
Subnetting Class B Addresses
Before we dive into this, let’s look at all the possible Class B subnet masks first. Notice that we have a lot more possible subnet masks than we do with a Class C network address:
255.255.0.0 (/16)
255.255.128.0 (/17) 255.255.255.0 (/24)
255.255.192.0 (/18) 255.255.255.128 (/25)
255.255.224.0 (/19) 255.255.255.192 (/26)
255.255.240.0 (/20) 255.255.255.224 (/27)
255.255.248.0 (/21) 255.255.255.240 (/28)
255.255.252.0 (/22) 255.255.255.248 (/29)
255.255.254.0 (/23) 255.255.255.252 (/30)
We know the Class B network address has 16 bits available for host addressing. This means we can use up to 14 bits for subnetting because we need to leave at least 2 bits for host addressing. Using a /16 means you are not subnetting with Class B, but it is a mask you can use!
The process of subnetting a Class B network is pretty much the same as it is for a Class C, except that you have more host bits and you start in the third octet.
Use the same subnet numbers for the third octet with Class B that you used for the fourth octet with Class C, but add a zero to the network portion and a 255 to the broadcast section in the fourth octet. The following table shows you an example host range of two subnets used in a Class B 240 (/20) subnet mask:
Subnet address |
16.0 |
32.0 |
Broadcast address |
31.255 |
47.255 |
Just add the valid hosts between the numbers and you’re set!
Subnetting Practice Examples: Class B Addresses
The following sections will give you an opportunity to practice subnetting Class B addresses. Again, I have to mention that this is the same as subnetting with Class C, except we start in the third octet—with the exact same numbers!
Practice Example #1B: 255.255.128.0 (/17)
172.16.0.0 = Network address
255.255.128.0 = Subnet mask
- Subnets? 21 = 2 (same amount as Class C).
- Hosts? 215 – 2 = 32,766 (7 bits in the third octet, and 8 in the fourth).
- Valid subnets? 256 – 128 = 128. 0, 128. Remember that subnetting is performed in the third octet, so the subnet numbers are really 0.0 and 128.0, as shown in the next table. These are the exact numbers we used with Class C; we use them in the third octet and add a 0 in the fourth octet for the network address.
- Broadcast address for each subnet?
- Valid hosts?
The following table shows the two subnets available, the valid host range, and the broadcast address of each:
Subnet |
0.0 |
128.0 |
First host |
0.1 |
128.1 |
Last host |
127.254 |
255.254 |
Broadcast |
127.255 |
255.255 |
Okay, notice that we just added the fourth octet’s lowest and highest values and came up with the answers. And again, it’s done exactly the same way as for a Class C subnet. We just used the same numbers in the third octet and added 0 and 255 in the fourth octet—pretty simple, huh? I really can’t say this enough: it’s just not that hard. The numbers never change; we just use them in different octets!
Question: Using the previous subnet mask, do you think 172.16.10.0 is a valid host address? What about 172.16.10.255? Can 0 and 255 in the fourth octet ever be a valid host address? The answer is absolutely, yes, those are valid hosts! Any number between the subnet number and the broadcast address is always a valid host.
Practice Example #2B: 255.255.192.0 (/18)
172.16.0.0 = Network address
255.255.192.0 = Subnet mask
- Subnets? 22 = 4.
- Hosts? 214 – 2 = 16,382 (6 bits in the third octet, and 8 in the fourth).
- Valid subnets? 256 – 192 = 64. 0, 64, 128, 192. Remember that the subnetting is performed in the third octet, so the subnet numbers are really 0.0, 64.0, 128.0, and 192.0, as shown in the next table.
- Broadcast address for each subnet?
- Valid hosts?
The following table shows the four subnets available, the valid host range, and the broadcast address of each:
Subnet |
0.0 |
64.0 |
128.0 |
192.0 |
First host |
0.1 |
64.1 |
128.1 |
192.1 |
Last host |
63.254 |
127.254 |
191.254 |
255.254 |
Broadcast |
63.255 |
127.255 |
191.255 |
255.255 |
Again, it’s pretty much the same as it is for a Class C subnet—we just added 0 and 255 in the fourth octet for each subnet in the third octet.
Practice Example #3B: 255.255.240.0 (/20)
172.16.0.0 = Network address
255.255.240.0 = Subnet mask
- Subnets? 24 = 16.
- Hosts? 212 – 2 = 4094.
- Valid subnets? 256 – 240 = 0, 16, 32, 48, etc., up to 240. Notice that these are the same numbers as a Class C 240 mask—we just put them in the third octet and add a 0 and 255 in the fourth octet.
- Broadcast address for each subnet?
- Valid hosts?
The following table shows the first four subnets, valid hosts, and broadcast addresses in a Class B 255.255.240.0 mask:
Subnet |
0.0 |
16.0 |
32.0 |
48.0 |
First host |
0.1 |
16.1 |
32.1 |
48.1 |
Last host |
15.254 |
31.254 |
47.254 |
63.254 |
Broadcast |
15.255 |
31.255 |
47.255 |
63.255 |
Practice Example #4B: 255.255.248.0 (/21)
172.16.0.0 = Network address
255.255.248.0 = Subnet mask
- Subnets? 25 = 32.
- Hosts? 211 – 2 = 2046.
- Valid subnets? 256 – 248 = 0, 8, 16, 24, 32, etc., up to 248.
- Broadcast address for each subnet?
- Valid hosts?
The following table shows the first five subnets, valid hosts, and broadcast addresses in a Class B 255.255.248.0 mask:
Subnet |
0.0 |
8.0 |
16.0 |
24.0 |
32.0 |
First host |
0.1 |
8.1 |
16.1 |
24.1 |
32.1 |
Last host |
7.254 |
15.254 |
23.254 |
31.254 |
39.254 |
Broadcast |
7.255 |
15.255 |
23.255 |
31.255 |
39.255 |
Practice Example #5B: 255.255.252.0 (/22)
172.16.0.0 = Network address
255.255.252.0 = Subnet mask
- Subnets? 26 = 64.
- Hosts? 210 – 2 = 1022.
- Valid subnets? 256 – 252 = 0, 4, 8, 12, 16, etc., up to 252.
- Broadcast address for each subnet?
- Valid hosts?
The following table shows the first five subnets, valid hosts, and broadcast addresses in a Class B 255.255.252.0 mask:
Subnet |
0.0 |
4.0 |
8.0 |
12.0 |
16.0 |
First host |
0.1 |
4.1 |
8.1 |
12.1 |
16.1 |
Last host |
3.254 |
7.254 |
11.254 |
15.254 |
19.254 |
Broadcast |
3.255 |
7.255 |
11.255 |
15.255 |
19.255 |
Practice Example #6B: 255.255.254.0 (/23)
172.16.0.0 = Network address
255.255.254.0 = Subnet mask
- Subnets? 27 = 128.
- Hosts? 29 – 2 = 510.
- Valid subnets? 256 – 254 = 0, 2, 4, 6, 8, etc., up to 254.
- Broadcast address for each subnet?
- Valid hosts?
The following table shows the first five subnets, valid hosts, and broadcast addresses in a Class B 255.255.254.0 mask:
Subnet |
0.0 |
2.0 |
4.0 |
6.0 |
8.0 |
First host |
0.1 |
2.1 |
4.1 |
6.1 |
8.1 |
Last host |
1.254 |
3.254 |
5.254 |
7.254 |
9.254 |
Broadcast |
1.255 |
3.255 |
5.255 |
7.255 |
9.255 |
Practice Example #7B: 255.255.255.0 (/24)
Contrary to popular belief, 255.255.255.0 used with a Class B network address is not called a Class B network with a Class C subnet mask. It’s amazing how many people see this mask used in a Class B network and think it’s a Class C subnet mask. This is a Class B subnet mask with 8 bits of subnetting—it’s logically different from a Class C mask. Subnetting this address is fairly simple:
172.16.0.0 = Network address
255.255.255.0 = Subnet mask
- Subnets? 28 = 256.
- Hosts? 28 – 2 = 254.
- Valid subnets? 256 – 255 = 1. 0, 1, 2, 3, etc., all the way to 255.
- Broadcast address for each subnet?
- Valid hosts?
The following table shows the first four and last two subnets, the valid hosts, and the broadcast addresses in a Class B 255.255.255.0 mask:
Subnet |
0.0 |
1.0 |
2.0 |
3.0 |
… |
254.0 |
255.0 |
First host |
0.1 |
1.1 |
2.1 |
3.1 |
… |
254.1 |
255.1 |
Last host |
0.254 |
1.254 |
2.254 |
3.254 |
… |
254.254 |
255.254 |
Broadcast |
0.255 |
1.255 |
2.255 |
3.255 |
… |
254.255 |
255.255 |
Practice Example #8B: 255.255.255.128 (/25)
This is actually one of the hardest subnet masks you can play with. And worse, it actually is a really good subnet to use in production because it creates over 500 subnets with 126 hosts for each subnet—a nice mixture. So, don’t skip over it!
172.16.0.0 = Network address
255.255.255.128 = Subnet mask
- Subnets? 29 = 512.
- Hosts? 27 – 2 = 126.
- Valid subnets? Now for the tricky part. 256 – 255 = 1. 0, 1, 2, 3, etc., for the third octet. But you can’t forget the one subnet bit used in the fourth octet. Remember when I showed you how to figure one subnet bit with a Class C mask? You figure this the same way. You actually get two subnets for each third octet value, hence the 512 subnets. For example, if the third octet is showing subnet 3, the two subnets would actually be 3.0 and 3.128.
- Broadcast address for each subnet? The numbers right before the next subnet.
- Valid hosts? The numbers between the subnet numbers and the broadcast address.
The following graphic shows how you can create subnets, valid hosts, and broadcast addresses using the Class B 255.255.255.128 subnet mask. The first eight subnets are shown, followed by the last two subnets:

Practice Example #9B: 255.255.255.192 (/26)
Now, this is where Class B subnetting gets easy. Since the third octet has a 255 in the mask section, whatever number is listed in the third octet is a subnet number. And now that we have a subnet number in the fourth octet, we can subnet this octet just as we did with Class C subnetting. Let’s try it out:
172.16.0.0 = Network address
255.255.255.192 = Subnet mask
- Subnets? 210 = 1024.
- Hosts? 26 – 2 = 62.
- Valid subnets? 256 – 192 = 64. The subnets are shown in the following table. Do these numbers look familiar?
- Broadcast address for each subnet?
- Valid hosts?
The following table shows the first eight subnet ranges, valid hosts, and broadcast addresses:
Subnet |
0.0 |
0.64 |
0.128 |
0.192 |
1.0 |
1.64 |
1.128 |
1.192 |
First host |
0.1 |
0.65 |
0.129 |
0.193 |
1.1 |
1.65 |
1.129 |
1.193 |
Last host |
0.62 |
0.126 |
0.190 |
0.254 |
1.62 |
1.126 |
1.190 |
1.254 |
Broadcast |
0.63 |
0.127 |
0.191 |
0.255 |
1.63 |
1.127 |
1.191 |
1.255 |
Notice that for each subnet value in the third octet, you get subnets 0, 64, 128, and 192 in the fourth octet.
Practice Example #10B: 255.255.255.224 (/27)
This one is done the same way as the preceding subnet mask, except that we just have more subnets and fewer hosts per subnet available.
172.16.0.0 = Network address
255.255.255.224 = Subnet mask
- Subnets? 211 = 2048.
- Hosts? 25 – 2 = 30.
- Valid subnets? 256 – 224 = 32. 0, 32, 64, 96, 128, 160, 192, 224.
- Broadcast address for each subnet?
- Valid hosts?
The following table shows the first eight subnets:
Subnet |
0.0 |
0.32 |
0.64 |
0.96 |
0.128 |
0.160 |
0.192 |
0.224 |
First host |
0.1 |
0.33 |
0.65 |
0.97 |
0.129 |
0.161 |
0.193 |
0.225 |
Last host |
0.30 |
0.62 |
0.94 |
0.126 |
0.158 |
0.190 |
0.222 |
0.254 |
Broadcast |
0.31 |
0.63 |
0.95 |
0.127 |
0.159 |
0.191 |
0.223 |
0.255 |
This next table shows the last eight subnets:
Subnet |
255.0 |
255.32 |
255.64 |
255.96 |
255.128 |
255.160 |
255.192 |
255.224 |
First host |
255.1 |
255.33 |
255.65 |
255.97 |
255.129 |
255.161 |
255.193 |
255.225 |
Last host |
255.30 |
255.62 |
255.94 |
255.126 |
255.158 |
255.190 |
255.222 |
255.254 |
Broadcast |
255.31 |
255.63 |
255.95 |
255.127 |
255.159 |
255.191 |
255.223 |
255.255 |
Subnetting in Your Head: Class B Addresses
Are you nuts? Subnet Class B addresses in our heads? It’s actually easier than writing it out—I’m not kidding! Let me show you how:
Question: What is the subnet and broadcast address of the subnet in which 172.16.10.33 /27 resides?
Answer: The interesting octet is the fourth one. 256 – 224 = 32. 32 + 32 = 64. You’ve got it: 33 is between 32 and 64. But remember that the third octet is considered part of the subnet, so the answer would be the 10.32 subnet. The broadcast is 10.63, since 10.64 is the next subnet. That was a pretty easy one.
Question: What subnet and broadcast address is the IP address 172.16.66.10 255.255.192.0 (/18) a member of?
Answer: The interesting octet here is the third octet instead of the fourth one. 256 – 192 = 64. 0, 64, 128. The subnet is 172.16.64.0. The broadcast must be 172.16.127.255 since 128.0 is the next subnet.
Question: What subnet and broadcast address is the IP address 172.16.50.10 255.255.224.0 (/19) a member of?
Answer: 256 – 224 = 0, 32, 64 (remember, we always start counting at 0). The subnet is 172.16.32.0, and the broadcast must be 172.16.63.255 since 64.0 is the next subnet.
Question: What subnet and broadcast address is the IP address 172.16.46.255 255.255.240.0 (/20) a member of?
Answer: 256 – 240 = 16. The third octet is important here: 0, 16, 32, 48. This subnet address must be in the 172.16.32.0 subnet, and the broadcast must be 172.16.47.255 since 48.0 is the next subnet. So, yes, 172.16.46.255 is a valid host.
Question: What subnet and broadcast address is the IP address 172.16.45.14 255.255.255.252 (/30) a member of?
Answer: Where is our interesting octet? 256 – 252 = 0, 4, 8, 12, 16—the fourth. The subnet is 172.16.45.12, with a broadcast of 172.16.45.15 because the next subnet is 172.16.45.16.
Question: What is the subnet and broadcast address of the host 172.16.88.255/20?
Answer: What is a /20 written out in dotted decimal? If you can’t answer this, you can’t answer this question, can you? A /20 is 255.255.240.0, gives us a block size of 16 in the third octet, and since no subnet bits are on in the fourth octet, the answer is always 0 and 255 in the fourth octet: 0, 16, 32, 48, 64, 80, 96. Because 88 is between 80 and 96, the subnet is 80.0 and the broadcast address is 95.255.
Question: A router receives a packet on an interface with a destination address of 172.16.46.191/26. What will the router do with this packet?
Answer: Discard it. Do you know why? 172.16.46.191/26 is a 255.255.255.192 mask, which gives us a block size of 64. Our subnets are then 0, 64, 128 and 192. 191 is the broadcast address of the 128 subnet, and by default, a router will discard any broadcast packets.
Subnetting Class A Addresses
You don’t go about Class A subnetting any differently than Classes B and C, but there are 24 bits to play with instead of the 16 in a Class B address and the 8 in a Class C address.
Let’s start by listing all the Class A masks:
255.0.0.0 (/8)
255.128.0.0 (/9) 255.255.240.0 (/20)
255.192.0.0 (/10) 255.255.248.0 (/21)
255.224.0.0 (/11) 255.255.252.0 (/22)
255.240.0.0 (/12) 255.255.254.0 (/23)
255.248.0.0 (/13) 255.255.255.0 (/24)
255.252.0.0 (/14) 255.255.255.128 (/25)
255.254.0.0 (/15) 255.255.255.192 (/26)
255.255.0.0 (/16) 255.255.255.224 (/27)
255.255.128.0 (/17) 255.255.255.240 (/28)
255.255.192.0 (/18) 255.255.255.248 (/29)
255.255.224.0 (/19) 255.255.255.252 (/30)
That’s it. You must leave at least 2 bits for defining hosts. I hope you can see the pattern by now. Remember, we’re going to do this the same way as a Class B or C subnet. It’s just that, again, we simply have more host bits and we just use the same subnet numbers we used with Class B and C, but we start using these numbers in the second octet. However, the reason Class A addresses are so popular to implement is because they give the most flexibility. You can subnet in the second, third or fourth octet. I’ll show you this in the next examples.
Subnetting Practice Examples: Class A Addresses
When you look at an IP address and a subnet mask, you must be able to distinguish the bits used for subnets from the bits used for determining hosts. This is imperative.
Practice Example #1A: 255.255.0.0 (/16)
Class A addresses use a default mask of 255.0.0.0, which leaves 22 bits for subnetting because you must leave 2 bits for host addressing. The 255.255.0.0 mask with a Class A address is using 8 subnet bits:
- Subnets? 28 = 256.
- Hosts? 216 – 2 = 65,534.
- Valid subnets? What is the interesting octet? 256 – 255 = 1. 0, 1, 2, 3, etc. (all in the second octet). The subnets would be 10.0.0.0, 10.1.0.0, 10.2.0.0, 10.3.0.0, etc., up to 10.255.0.0.
- Broadcast address for each subnet?
- Valid hosts?
The following table shows the first two and the last two subnets, the valid host range and the broadcast addresses for the private Class A 10.0.0.0 network:
Subnet |
10.0.0.0 |
10.1.0.0 |
… |
10.254.0.0 |
10.255.0.0 |
First host |
10.0.0.1 |
10.1.0.1 |
… |
10.254.0.1 |
10.255.0.1 |
Last host |
10.0.255.254 |
10.1.255.254 |
… |
10.254.255.254 |
10.255.255.254 |
Broadcast |
10.0.255.255 |
10.1.255.255 |
… |
10.254.255.255 |
10.255.255.255 |
Practice Example #2A: 255.255.240.0 (/20)
255.255.240.0 gives us 12 bits of subnetting and leaves us 12 bits for host addressing.
- Subnets? 212 = 4096.
- Hosts? 212 – 2 = 4094.
- Valid subnets? What is your interesting octet? 256 – 240 = 16. The subnets in the second octet are a block size of 1 and the subnets in the third octet are 0, 16, 32, etc.
- Broadcast address for each subnet?
- Valid hosts?
The following table shows some examples of the host ranges—the first three subnets and the last subnet:
Subnet |
10.0.0.0 |
10.0.16.0 |
10.0.32.0 |
… |
10.255.240.0 |
First host |
10.0.0.1 |
10.0.16.1 |
10.0.32.1 |
… |
10.255.240.1 |
Last host |
10.0.15.254 |
10.0.31.254 |
10.0.47.254 |
… |
10.255.255.254 |
Broadcast |
10.0.15.255 |
10.0.31.255 |
10.0.47.255 |
… |
10.255.255.255 |
Practice Example #3A: 255.255.255.192 (/26)
Let’s do one more example using the second, third, and fourth octets for subnetting:
- Subnets? 218 = 262,144.
- Hosts? 26 – 2 = 62.
- Valid subnets? In the second and third octet, the block size is 1, and in the fourth octet, the block size is 64.
- Broadcast address for each subnet?
- Valid hosts?
The following table shows the first four subnets and their valid hosts and broadcast addresses in the Class A 255.255.255.192 mask:
Subnet |
10.0.0.0 |
10.0.0.64 |
10.0.0.128 |
10.0.0.192 |
First host |
10.0.0.1 |
10.0.0.65 |
10.0.0.129 |
10.0.0.193 |
Last host |
10.0.0.62 |
10.0.0.126 |
10.0.0.190 |
10.0.0.254 |
Broadcast |
10.0.0.63 |
10.0.0.127 |
10.0.0.191 |
10.0.0.255 |
This table shows the last four subnets and their valid hosts and broadcast addresses:
Subnet |
10.255.255.0 |
10.255.255.64 |
10.255.255.128 |
10.255.255.192 |
First host |
10.255.255.1 |
10.255.255.65 |
10.255.255.129 |
10.255.255.193 |
Last host |
10.255.255.62 |
10.255.255.126 |
10.255.255.190 |
10.255.255.254 |
Broadcast |
10.255.255.63 |
10.255.255.127 |
10.255.255.191 |
10.255.255.255 |
Subnetting in Your Head: Class A Addresses
Again, I know this sounds hard, but as with Class C and Class B, the numbers are the same; we just start in the second octet. What makes this easy? You only need to worry about the octet that has the largest block size, which is typically called the interesting octet, and one that is something other than 0 or 255, such as, for example, 255.255.240.0 (/20) with a Class A network. The second octet has a block size of 1, so any number listed in that octet is a subnet. The third octet is a 240 mask, which means we have a block size of 16 in the third octet. If your host ID is 10.20.80.30, what is your subnet, broadcast address, and valid host range?
The subnet in the second octet is 20 with a block size of 1, but the third octet is in block sizes of 16, so we’ll just count them out: 0, 16, 32, 48, 64, 80, 96… voilà! By the way, you can count by 16s by now, right? Good! This makes our subnet 10.20.80.0, with a broadcast address of 10.20.95.255 because the next subnet is 10.20.96.0. The valid host range is 10.20.80.1 through 10.20.95.254. And yes, no lie! You really can do this in your head if you just get your block sizes nailed!
Let’s practice on one more, just for fun!
Host IP: 10.1.3.65/23
First, you can’t answer this question if you don’t know what a /23 is. It’s 255.255.254.0. The interesting octet here is the third one: 256 – 254 = 2. Our subnets in the third octet are 0, 2, 4, 6, etc. The host in this question is in subnet 2.0, and the next subnet is 4.0, so that makes the broadcast address 3.255. And any address between 10.1.2.1 and 10.1.3.254 is considered a valid host.
Summary
You probably really did get lost a couple of times. No worries because as I told you, that’s what usually happens. Don’t waste time feeling bad if you have to read each chapter more than once, or even 10 times, before you’re truly good to go. If you do have to read the chapters more than once, you’ll be seriously better off in the long run even if you were pretty comfortable the first time through!
This chapter provided you with an important understanding of IP subnetting—the painless way! And when you’ve got the key material presented in this chapter really nailed down, you should be able to subnet IP addresses in your head.
This chapter is extremely essential to your Cisco certification process, so if you just skimmed it, please go back, read it thoroughly, and don’t forget to do all the written labs too!