21. Using Access as a Back End to Enhance Multiuser Access to Data
The example near the end of Chapter 19, “Text File Processing,” proposed a method for storing 683 million records in an Excel worksheet. At some point, you need to admit that even though Excel is the greatest product in the world, there is a time to move to Access and take advantage of the Access Multidimensional Database (MDB) files.
Even before you have more than one million rows, another compelling reason to use MDB data files is to allow multiuser access to data without the headaches associated with shared workbooks.
Microsoft Excel offers an option to share a workbook, but you automatically lose a number of important Excel features when you share one. After you share a workbook, you cannot use automatic subtotals, pivot tables, Group and Outline mode, scenarios, protection, Styles, Pictures, Add Charts, or Insert Worksheets.
By using an Excel VBA front end and storing data in an MDB database, you have the best of both worlds. You have the power and flexibility of Excel and the multiuser access capability available in Access.
Tip
MDB is the official file format of both Microsoft Access and Microsoft Visual Basic. This means that you can deploy an Excel solution that reads and writes from an MDB to customers who do not have Microsoft Access. Of course, it helps if you as the developer have a copy of Access because you can use the Access front end to set up tables and queries.
The examples in this chapter make use of the Microsoft Jet Database Engine for reading from and writing to the Access database. The Jet engine works with access data stored in Access 97 through 2013. If you are sure that all the people running the macro will have Office 2007 or newer, you could instead use the ACE engine. Microsoft now offers a 64-bit version of the ACE engine, but not the Jet engine.
ADO Versus DAO
For several years, Microsoft recommended data access objects (DAO) for accessing data in an external database. DAO became very popular, and a great deal of code was written for it. When Microsoft released Excel 2000, it started pushing ActiveX data objects (ADO). The concepts are similar, and the syntax differs only slightly. I use ADO in this chapter. Realize that if you start going through code written a decade ago, you might run into DAO code. Other than a few syntax changes, the code for both ADO and DAO looks similar.
If you discover that you have to debug some old code using DAO, check out the Microsoft Knowledge Base articles that discuss the differences. You can find them at http://support.microsoft.com/kb/225048.
The following two articles provide the Rosetta Stone between DAO and ADO. The DAO code is shown at http://support.microsoft.com/kb/q146607. The equivalent ADO code is shown at http://support.microsoft.com/kb/q142938.
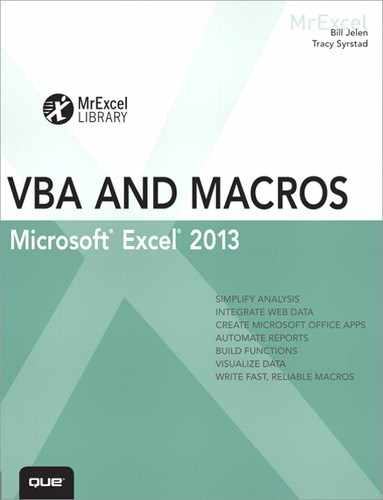
To use any code in this chapter, open the VB Editor. Select Tools, References from the main menu and then select Microsoft ActiveX Data Objects Library from the Available References list, as shown in Figure 21.1.
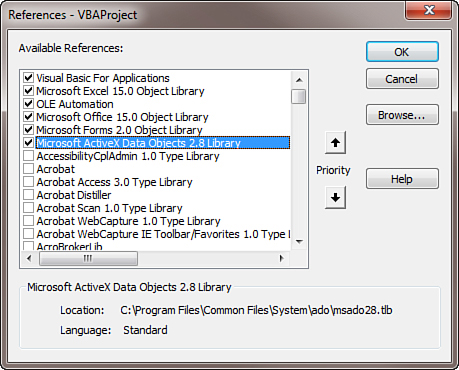
Figure 21.1. To read or write from an Access MDB file, add the reference for Microsoft ActiveX Data Objects Library or higher.
Note
If you have Windows 7 or newer, you have access to version 6.1 of this library. Windows Vista offered Version 6.0 of the library. If you will be distributing the application to anyone who is still on Windows XP, you should choose version 2.8 instead.
Case Study: Creating a Shared Access Database
1. Using Access on another PC, produce a new database called transfers.mdb and add a table called tblTransfer, as shown in Figure 21.2.
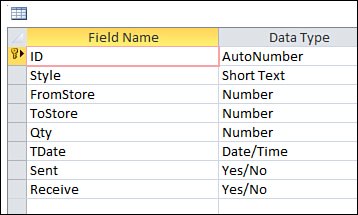
Figure 21.2. Multiple people using their own Excel workbooks will read and write to this table inside an MDB file on a network drive.
2. Move the Transfers.mdb file to a network drive. You might find that this common folder uses different drive-letter mappings on each machine. It might be H:Common on Linda’s machine and I:Common on Janine’s machine.
3. On both machines, go to the VB Editor and under Tools, References, add a reference to ActiveX Data Objects Library.
4. In both of their applications, find an out-of-the-way cell in which to store the path to transfers.mdb. Name this cell TPath.
The remainder of this chapter gives you the code necessary to allow the application included in the preceding case study to read or write data from the tblTransfer table.
The Tools of ADO
You encounter several terms when using ADO to connect to an external data source.
• Recordset—When connecting to an Access database, the recordset is either a table in the database or a query in the database. Most of the ADO methods reference the recordset. You might also want to create your own query on the fly. In this case, you write a SQL statement to extract only a subset of records from a table.
• Connection—Defines the path to the database and the type of database. In the case of Access databases, you specify that the connection is using the Microsoft Jet Engine.
• Cursor—Think of the cursor as a pointer that keeps track of which record you are using in the database. There are several types of cursors and two places for the cursor to be located (described in the following bullets).
• Cursor type—A dynamic cursor is the most flexible cursor. If you define a recordset and someone else updates a row in the table while a dynamic cursor is active, the dynamic cursor knows about the updated record. Although this is the most flexible, it requires the most overhead. If your database doesn’t have a lot of transactions, you might specify a static cursor—this type of cursor returns a snapshot of the data at the time the cursor is established.
• Cursor location—The cursor can be located either on the client or on the server. For an Access database residing on your hard drive, a server location for the cursor means that the Access Jet Engine on your computer is controlling the cursor. When you specify a client location for the cursor, your Excel session is controlling the cursor. On a very large external dataset, it would be better to allow the server to control the cursor. For small datasets, a client cursor is faster.
• Lock type—The point of this entire chapter is to allow multiple people to access a dataset at the same time. The lock type defines how ADO will prevent crashes when two people try to update the record at the same time. With an optimistic lock type, an individual record is locked only when you attempt to update the record. If your application will be doing 90 percent reads and only occasionally updating, then an optimistic lock is perfect. However, if you know that every time you read a record you will soon update the record, then you would use a pessimistic lock type. With pessimistic locks, the record is locked as soon as you read it. If you know that you will never write back to the database, you can use a read-only lock. This enables you to read the records without preventing others from writing to the records.
The primary objects needed to access data in an MDB file are an ADO connection and an ADO recordset.
The ADO connection defines the path to the database and specifies that the connection is based on the Microsoft Jet Engine.
After you have established the connection to the database, you usually use that connection to define a recordset. A recordset can be a table or a subset of records in the table or a predefined query in the Access database. To open a recordset, you have to specify the connection and the values for the CursorType, CursorLocation, LockType, and Options parameters.
Assuming that you have only two users trying to access the table at a time, I generally use a dynamic cursor and an optimistic lock type. For large datasets, the adUseServer value of the CursorLocation property allows the database server to process records without using up RAM on the client machine. If you have a small dataset, it might be faster to use adUseClient for the CursorLocation. When the recordset is opened, all the records are transferred to memory of the client machine. This allows faster navigation from record to record.
Reading data from the Access database is easy provided you have less than 1048576 records. You can use the CopyFromRecordset method to copy all selected records from the recordset to a blank area of the worksheet.
To add a record to the Access table, use the AddNew method for the recordset. You then specify the value for each field in the table and use the Update method to commit the changes to the database.
To delete a record from the table, you can use a pass-through query to delete records that match a certain criteria.
Note
If you ever find yourself frustrated with ADO and think, “If I could just open Access, I could knock out a quick SQL statement that will do exactly what I need,” then the pass-through query is for you. Rather than use ADO to read through the records, the pass-through query sends a request to the database to run the SQL statement that your program builds. This effectively enables you to handle any tasks that your database might support but that are not handled by ADO. The types of SQL statements handled by the pass-through query are dependent on which database type you are connecting to.
Other tools are available that let you make sure that a table exists or that a particular field exists in a table. You can also use VBA to add new fields to a table definition on the fly.
Adding a Record to the Database
Going back to our case study earlier in the chapter, the application we are creating has a userform where buyers can enter transfers. To make the calls to the Access database as simple as possible, a series of utility modules handles the ADO connection to the database. This way, the userform code can simply call AddTransfer(Style, FromStore, ToStore, Qty).
The technique for adding records after the connection is defined is as follows:
1. Open a recordset that points to the table. In the code that follows, see the sections commented Open the Connection, Define the Recordset, and Open the Table.
2. Use AddNew to add a new record.
3. Update each field in the new record.
4. Use Update to update the recordset.
5. Close the recordset and then close the connection.
The following code adds a new record to the tblTransfer table:
Sub AddTransfer(Style As Variant, FromStore As Variant, _
ToStore As Variant, Qty As Integer)
Dim cnn As ADODB.Connection
Dim rst As ADODB.Recordset
MyConn = "J: ransfers.mdb"
' Open the Connection
Set cnn = New ADODB.Connection
With cnn
.Provider = "Microsoft.Jet.OLEDB.4.0"
.Open MyConn
End With
' Define the Recordset
Set rst = New ADODB.Recordset
rst.CursorLocation = adUseServer
' Open the Table
rst.Open Source:="tblTransfer", _
ActiveConnection:=cnn, _
CursorType:=adOpenDynamic, _
LockType:=adLockOptimistic, _
Options:=adCmdTable
' Add a record
rst.AddNew
' Set up the values for the fields. The first four fields
' are passed from the calling userform. The date field
' is filled with the current date.
rst("Style") = Style
rst("FromStore") = FromStore
rst("ToStore") = ToStore
rst("Qty") = Qty
rst("tDate") = Date
rst("Sent") = False
rst("Receive") = False
' Write the values to this record
rst.Update
' Close
rst.Close
cnn.Close
End Sub
Retrieving Records from the Database
Reading records from the Access database is easy. As you define the recordset, you pass a SQL string to return the records in which you are interested.
Note
A great way to generate the SQL is to design a query in Access that retrieves the records. While viewing the query in Access, select SQL View from the View drop-down on the Query Tools Design tab of the ribbon. Access shows you the proper SQL statement required to execute that query. You can use this SQL statement as a model for building the SQL string in your VBA code.
After the recordset is defined, use the CopyFromRecordSet method to copy all the matching records from Access to a specific area of the worksheet.
The following routine queries the Transfer table to find all records in which the Sent flag is not yet set to True. The results are placed on a blank worksheet. The final few lines display the results in a userform to illustrate how to update a record in the next section.
Sub GetUnsentTransfers()
Dim cnn As ADODB.Connection
Dim rst As ADODB.Recordset
Dim WSOrig As Worksheet
Dim WSTemp As Worksheet
Dim sSQL as String
Dim FinalRow as Long
Set WSOrig = ActiveSheet
'Build a SQL String to get all fields for unsent transfers
sSQL = "SELECT ID, Style, FromStore, ToStore, Qty, tDate FROM tblTransfer"
sSQL = sSQL & " WHERE Sent=FALSE"
' Path to Transfers.mdb
MyConn = "J: ransfers.mdb"
Set cnn = New ADODB.Connection
With cnn
.Provider = "Microsoft.Jet.OLEDB.4.0"
.Open MyConn
End With
Set rst = New ADODB.Recordset
rst.CursorLocation = adUseServer
rst.Open Source:=sSQL, ActiveConnection:=cnn, _
CursorType:=AdForwardOnly, LockType:=adLockOptimistic, _
Options:=adCmdText
' Create the report in a new worksheet
Set WSTemp = Worksheets.Add
' Add Headings
Range("A1:F1").Value = Array("ID", "Style", "From", "To", "Qty", "Date")
' Copy from the recordset to row 2
Range("A2").CopyFromRecordset rst
' Close the connection
rst.Close
cnn.Close
' Format the report
FinalRow = Range("A65536").End(xlUp).Row
' If there were no records, then stop
If FinalRow = 1 Then
Application.DisplayAlerts = False
WSTemp.Delete
Application.DisplayAlerts = True
WSOrig.Activate
MsgBox "There are no transfers to confirm"
Exit Sub
End If
' Format column F as a date
Range("F2:F" & FinalRow).NumberFormat = "m/d/y"
' Show the userform -- used in next section
frmTransConf.Show
' Delete the temporary sheet
Application.DisplayAlerts = False
WSTemp.Delete
Application.DisplayAlerts = True
End Sub
The CopyFromRecordSet method copies records that match the SQL query to a range on the worksheet. Note that you receive only the data rows. The headings do not come along automatically. You must use code to write the headings to Row 1. Figure 21.3 shows the results.
Figure 21.3. Range("A2").CopyFromRecord Set brought matching records from the Access database to the worksheet.
Updating an Existing Record
To update an existing record, you need to build a recordset with exactly one record. This requires that the user select some sort of unique key when identifying the records. After you have opened the recordset, use the Fields property to change the field in question and then the Update method to commit the changes to the database.
The earlier example returned a recordset to a blank worksheet and then called a userform frmTransConf. This form uses a simple Userform_Initialize to display the range in a large list box. The list box’s properties have the MultiSelect property set to True:
Private Sub UserForm_Initialize()
' Determine how many records we have
FinalRow = Cells(Rows.Count, 1).End(xlUp).Row
If FinalRow > 1 Then
Me.lbXlt.RowSource = "A2:F" & FinalRow
End If
End Sub
After the initialize procedure is run, the unconfirmed records are displayed in a list box. The logistics planner can mark all the records that have actually been sent, as shown in Figure 21.4.
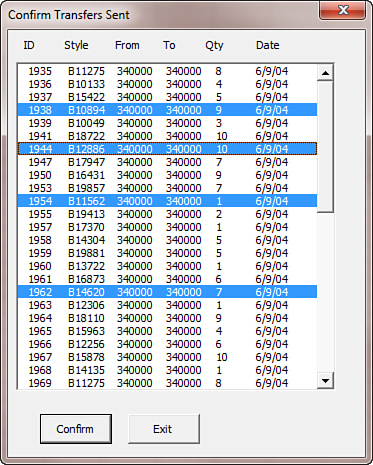
Figure 21.4. This userform displays particular records from the Access recordset. When the buyer selects certain records and then chooses the Confirm button, you have to use ADO’s Update method to update the Sent field on the selected records.
The code attached to the Confirm button follows. Including the ID field in the fields returned in the prior example is important if you want to narrow the information down to a single record.
Private Sub cbConfirm_Click()
Dim cnn As ADODB.Connection
Dim rst As ADODB.Recordset
' If nothing is selected, warn them
CountSelect = 0
For x = 0 To Me.lbXlt.ListCount - 1
If Me.lbXlt.Selected(x) Then
CountSelect = CountSelect + 1
End If
Next x
If CountSelect = 0 Then
MsgBox "There were no transfers selected. " & _
"To exit without confirming any transfers, use Cancel."
Exit Sub
End If
' Establish a connection to transfers.mdb
' Path to Transfers.mdb is on Menu
MyConn = "J: ransfers.mdb"
Set cnn = New ADODB.Connection
With cnn
.Provider = "Microsoft.Jet.OLEDB.4.0"
.Open MyConn
End With
' Mark as complete
For x = 0 To Me.lbXlt.ListCount - 1
If Me.lbXlt.Selected(x) Then
ThisID = Cells(2 + x, 1).Value
' Mark ThisID as complete
'Build SQL String
sSQL = "SELECT * FROM tblTransfer Where ID=" & ThisID
Set rst = New ADODB.Recordset
With rst
.Open Source:=sSQL, ActiveConnection:=cnn, _
CursorType:=adOpenKeyset, LockType:=adLockOptimistic
' Update the field
.Fields("Sent").Value = True
.Update
.Close
End With
End If
Next x
' Close the connection
cnn.Close
Set rst = Nothing
Set cnn = Nothing
' Close the userform
Unload Me
End Sub
Deleting Records via ADO
As with updating a record, the key to deleting records is being able to write a bit of SQL to uniquely identify the records to be deleted. The following code uses the Execute method to pass the Delete command through to Access:
Public Sub ADOWipeOutAttribute(RecID)
' Establish a connection to transfers.mdb
MyConn = "J: ransfers.mdb"
With New ADODB.Connection
.Provider = "Microsoft.Jet.OLEDB.4.0"
.Open MyConn
.Execute "Delete From tblTransfer Where ID = " & RecID
.Close
End With
End Sub
Summarizing Records via ADO
One of Access’s strengths is running summary queries that group by a particular field. If you build a summary query in Access and examine the SQL view, you’ll see that complex queries can be written. Similar SQL can be built in Excel VBA and passed to Access via ADO.
The following code uses a fairly complex query to get a net total by store:
Sub NetTransfers(Style As Variant)
' This builds a table of net open transfers
' on Styles AI1
Dim cnn As ADODB.Connection
Dim rst As ADODB.Recordset
' Build the large SQL query
' Basic Logic: Get all open Incoming Transfers by store,
' union with -1* outgoing transfers by store
' Sum that union by store, and give us min date as well
' A single call to this macro will replace 60
' calls to GetTransferIn, GetTransferOut, TransferAge
sSQL = "Select Store, Sum(Quantity), Min(mDate) From " & _
"(SELECT ToStore AS Store, Sum(Qty) AS Quantity, " & _
"Min(TDate) AS mDate FROM tblTransfer where Style='" & Style & _
"& "' AND Receive=FALSE GROUP BY ToStore "
sSQL = sSQL & " Union All SELECT FromStore AS Store, " & _
"Sum(-1*Qty) AS Quantity, Min(TDate) AS mDate " & _
"FROM tblTransfer where Style='" & Style & "' AND " & _
"Sent=FALSE GROUP BY FromStore)"
sSQL = sSQL & " Group by Store"
MyConn = "J: ransfers.mdb"
' open the connection.
Set cnn = New ADODB.Connection
With cnn
.Provider = "Microsoft.Jet.OLEDB.4.0"
.Open MyConn
End With
Set rst = New ADODB.Recordset
rst.CursorLocation = adUseServer
' open the first query
rst.Open Source:=sSQL, _
ActiveConnection:=cnn, _
CursorType:=AdForwardOnly, _
LockType:=adLockOptimistic, _
Options:=adCmdText
Range("A1:C1").Value = Array("Store", "Qty", "Date")
' Return Query Results
Range("A2").CopyFromRecordset rst
rst.Close
cnn.Close
End Sub
Other Utilities via ADO
Consider the application we created for our case study; the buyers now have an Access database located on their network but possibly no copy of Access. It would be ideal if you could deliver changes to the Access database on the fly as their application opens.
Note
If you are wondering how you would ever coax the person using the application to run these queries, consider using an Update macro hidden in the Workbook_Open routine of the client application. Such a routine might first check to see whether a field exists and then add the field if it is missing.
→ For details on the mechanics of hiding the update query in the Workbook_Open routine, see the “Using a Hidden Code Workbook to Hold All Macros and Forms” case study in Chapter 26, “Creating Add-Ins.”
Checking for the Existence of Tables
If the application needs a new table in the database, you can use the code in the next section. However, because you have a multiuser application, only the first person who opens the application has to add the table on the fly. When the next buyer shows up, the table might have already been added by the first buyer’s application. Because this code is a Function instead of a Sub, it returns either a True or False to the calling routine.
This code uses the OpenSchema method to actually query the database schema:
Function TableExists(WhichTable)
Dim cnn As ADODB.Connection
Dim rst As ADODB.Recordset
Dim fld As ADODB.Field
TableExists = False
' Path to Transfers.mdb is on Menu
MyConn = "J: ransfers.mdb"
Set cnn = New ADODB.Connection
With cnn
.Provider = "Microsoft.Jet.OLEDB.4.0"
.Open MyConn
End With
Set rst = cnn.OpenSchema(adSchemaTables)
Do Until rst.EOF
If LCase(rst!Table_Name) = LCase(WhichTable) Then
TableExists = True
GoTo ExitMe
End If
rst.MoveNext
Loop
ExitMe:
rst.Close
Set rst = Nothing
' Close the connection
cnn.Close
End Function
Checking for the Existence of a Field
Sometimes you want to add a new field to an existing table. Again, this code uses the OpenSchema method but this time looks at the columns in the tables:
Function ColumnExists(WhichColumn, WhichTable)
Dim cnn As ADODB.Connection
Dim rst As ADODB.Recordset
Dim WSOrig As Worksheet
Dim WSTemp As Worksheet
Dim fld As ADODB.Field
ColumnExists = False
' Path to Transfers.mdb is on menu
MyConn = ActiveWorkbook.Worksheets("Menu").Range("TPath").Value
If Right(MyConn, 1) = "" Then
MyConn = MyConn & "transfers.mdb"
Else
MyConn = MyConn & " ransfers.mdb"
End If
Set cnn = New ADODB.Connection
With cnn
.Provider = "Microsoft.Jet.OLEDB.4.0"
.Open MyConn
End With
Set rst = cnn.OpenSchema(adSchemaColumns)
Do Until rst.EOF
If LCase(rst!Column_Name) = LCase(WhichColumn) And _
LCase(rst!Table_Name) = LCase(WhichTable) Then
ColumnExists = True
GoTo ExitMe
End If
rst.MoveNext
Loop
ExitMe:
rst.Close
Set rst = Nothing
' Close the connection
cnn.Close
End Function
Adding a Table On the Fly
This code uses a pass-through query to tell Access to run a Create Table command:
Sub ADOCreateReplenish()
' This creates tblReplenish
' There are five fields:
' Style
' A = Auto replenishment for A
' B = Auto replenishment level for B stores
' C = Auto replenishment level for C stores
' RecActive = Yes/No field
Dim cnn As ADODB.Connection
Dim cmd As ADODB.Command
' Define the connection
MyConn = "J: ransfers.mdb"
' open the connection
Set cnn = New ADODB.Connection
With cnn
.Provider = "Microsoft.Jet.OLEDB.4.0"
.Open MyConn
End With
Set cmd = New ADODB.Command
Set cmd.ActiveConnection = cnn
'create table
cmd.CommandText = "CREATE TABLE tblReplenish " & _
"(Style Char(10) Primary Key, " & _
"A int, B int, C Int, RecActive YesNo)"
cmd.Execute , , adCmdText
Set cmd = Nothing
Set cnn = Nothing
Exit Sub
End Sub
Adding a Field On the Fly
If you determine that a field does not exist, you can use a pass-through query to add a field to the table:
Sub ADOAddField()
' This adds a grp field to tblReplenish
Dim cnn As ADODB.Connection
Dim cmd As ADODB.Command
' Define the connection
MyConn = "J: ransfers.mdb"
' open the connection
Set cnn = New ADODB.Connection
With cnn
.Provider = "Microsoft.Jet.OLEDB.4.0"
.Open MyConn
End With
Set cmd = New ADODB.Command
Set cmd.ActiveConnection = cnn
'create table
cmd.CommandText = "ALTER TABLE tblReplenish Add Column Grp Char(25)"
cmd.Execute , , adCmdText
Set cmd = Nothing
Set cnn = Nothing
End Sub
SQL Server Examples
If you have 64-bit versions of Office and if Microsoft does not provide the 64-bit Microsoft.Jet.OLEDB.4.0 drivers, you have to switch over to using SQL Server or another database technology:
Sub DataExtract()
Application.DisplayAlerts = False
'clear out all previous data
Sheet1.Cells.Clear
' Create a connection object.
Dim cnPubs As ADODB.Connection
Set cnPubs = New ADODB.Connection
' Provide the connection string.
Dim strConn As String
'Use the SQL Server OLE DB Provider.
strConn = "PROVIDER=SQLOLEDB;"
'Connect to the Pubs database on the local server.
strConn = strConn & "DATA SOURCE=a_sql_server;INITIAL CATALOG=a_database;"
'Use an integrated login.
strConn = strConn & " INTEGRATED SECURITY=sspi;"
'Now open the connection.
cnPubs.Open strConn
' Create a recordset object.
Dim rsPubs As ADODB.Recordset
Set rsPubs = New ADODB.Recordset
With rsPubs
' Assign the Connection object.
.ActiveConnection = cnPubs
' Extract the required records.
.Open "exec a_database..a_stored_procedure"
' Copy the records into cell A1 on Sheet1.
Sheet1.Range("A2").CopyFromRecordset rsPubs
Dim myColumn As Range
'Dim title_string As String
Dim K As Integer
For K = 0 To rsPubs.Fields.Count - 1
'Sheet1.Columns(K).Value = rsPubs.Fields(K).Name
'title_string = title_string & rsPubs.Fields(K).Name & Chr(9)
'Sheet1.Columns(K).Cells(1).Name = rsPubs.Fields(K).Name
'Sheet1.Columns.Column(K) = rsPubs.Fields(K).Name
'Set myColumn = Sheet1.Columns(K)
'myColumn.Cells(1, K).Value = rsPubs.Fields(K).Name
'Sheet1.Cells(1, K) = rsPubs.Fields(K).Name
Sheet1.Cells(1, K + 1) = rsPubs.Fields(K).Name
Sheet1.Cells(1, K + 1).Font.Bold = "TRUE"
Next K
'Sheet1.Range("A1").Value = title_string
' Tidy up
.Close
End With
cnPubs.Close
Set rsPubs = Nothing
Set cnPubs = Nothing
'clear out errors
Dim cellval As Range
Dim myRng As Range
Set myRng = ActiveSheet.UsedRange
For Each cellval In myRng
cellval.Value = cellval.Value
'cellval.NumberFormat = "@" 'this works as well as setting
'HorizontalAlignment
cellval.HorizontalAlignment = xlRight
Next
End Sub
Next Steps
In Chapter 22, “Advanced Userform Techniques,” you discover more controls and techniques you can use in building userforms.