
14. Inserting SmartArt, WordArt, and Pictures
In This Chapter
• Insert SmartArt.
• Design a WordArt logo.
• Add special effects to imported pictures.
You can add a little pizzazz to your workbooks by using graphic text and images. This chapter introduces you to SmartArt, which combines graphics and text to depict ideas, WordArt to twist colorful text, and the Picture tools to manipulate imported images.
Working with SmartArt
SmartArt is a collection of similar shapes, arranged to imply a process, a relationship, or a hierarchy. You can add text to SmartArt shapes, and for some shapes, include a small picture or logo. For example, you could use SmartArt to create an organization’s hierarchy chart with pictures of the employees. Excel 2013 has more than 130 available diagrams, grouped into nine categories of SmartArt:
• List—Designs for nonsequential lists of information.
• Process—Designs for sequential lists of steps.
• Cycle—Designs for steps that repeat.
• Hierarchy—Designs for organization charts, decision trees, and other hierarchical relationships.
• Relationship—Designs for showing the relationships between items.
• Matrix—Designs to show four quadrants of a list.
• Pyramid—Designs to show overlapping, proportional, containment, or interconnected relationships.
• Picture—Designs for use with pictures in either sequential or nonsequential layouts. The picture tools can be used to adjust the imported images.
• Office.com—Various designs that you can download from Microsoft. The available designs will change with time. Note that these designs will also appear in their specific categories.
 Caution
SmartArt diagrams are removed when you open a workbook in the Excel Web App. In legacy versions of Excel, SmartArt will be turned into Pictures.
Inserting a SmartArt Diagram
To insert a SmartArt diagram, go to Insert, Illustrations, SmartArt, and select the desired layout. Excel places the diagram in the middle of the screen with the Text pane to the left, as shown in Figure 14.1. When you’re done entering text, click any cell on the sheet and the Text pane disappears.
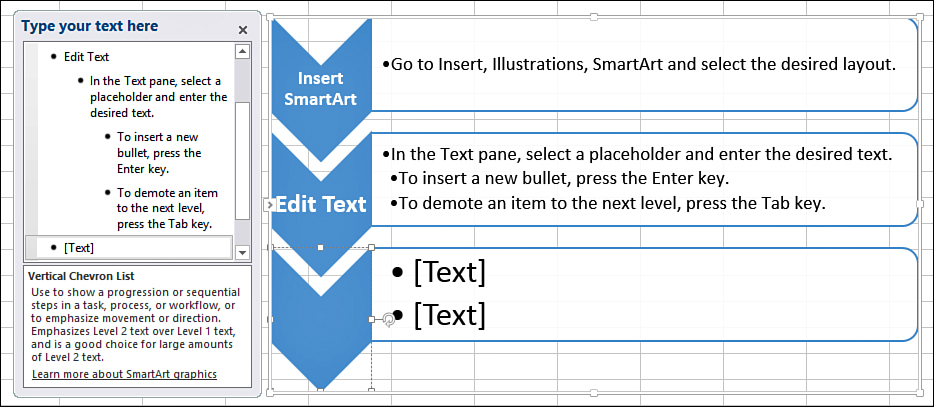
Figure 14.1. Use the Text pane to insert and organize the text in the SmartArt diagram.
Caution
Do not click the x in the upper-right corner of the Text pane to close it or the next time you place SmartArt, the Text pane will not automatically appear. If this happens, you can manually open the Text pane by going to SmartArt Tools, Design, Create Graphic, and selecting Text Pane.
You should keep a few things in mind concerning the Text pane:
• Click a bulleted placeholder to enter the text.
• Navigate between bulleted items by using the mouse or arrow keys.
• The Tab key will not work to move between the placeholders. Instead, use the Tab key to demote an item to the next level. Use Shift+Tab to promote an item.
• Press Enter to add a new item beneath the currently selected item.
• Deleting a bullet will promote the ones beneath it if they are of a lower level.
To insert a SmartArt layout and enter text, follow these steps:
1. Go to Insert, Illustrations, SmartArt, and select the desired layout.
2. In the Text pane, select a placeholder and enter the desired text.
3. Use the mouse to select the next placeholder or use the down-arrow key to move to the next placeholder for entering text.
• To insert a new bullet, press the Enter key.
• To demote an item to the next level, press the Tab key.
• To add a new graphic, select the last bullet, press the Enter key to insert a new bullet, and then click Promote, found under SmartArt Tools, Design, Create Graphic, as many times as necessary to make the selected bullet a level 1 item.
4. Repeat step 3 as many times as necessary.
5. When you are done entering information, click any cell on the sheet.
Inserting Images into SmartArt
Some SmartArt layouts include image placeholders, as shown in Figure 14.2. To insert an image, click the image placeholder and the Insert Pictures dialog box opens. Browse to and select the desired image. When an image in SmartArt is selected, the Picture Tools tab becomes visible in the ribbon and you can use any of the picture tools on the image.
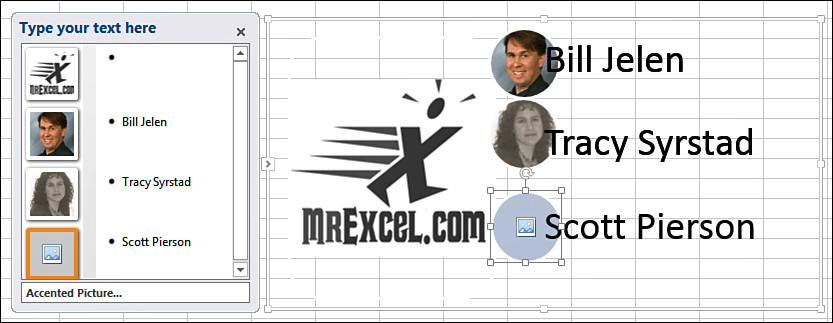
Figure 14.2. Use images in SmartArt diagrams to create a business organization chart.
 Note
Note
This section covers the specifics of working with images in SmartArt. If this is the first time you’ve inserted SmartArt, refer to the previous section “Inserting a SmartArt Diagram” for instructions on entering text, adding new SmartArt graphics, and promoting or demoting the bulleted items.
Keep the following in mind when working with SmartArt images:
• To change the image, select it and go to Picture Tools, Format, Adjust, Change Picture.
• You cannot delete the accompanying text placeholder, but if you do not need it, enter a space in the field.
To insert a SmartArt layout that includes images, follow these steps:
1. Go to Insert, Illustrations, SmartArt, and select a layout from the Picture category. Layouts from other categories include image placeholders, but they can more easily be found in the Picture category.
2. Click OK to place the layout on the sheet.
3. Click an image placeholder and the Insert Picture dialog box opens. Browse to the desired image and click Insert.
4. Use the options on the Picture Tools, Format tab to make any required changes to the image.
5. If you do not want any text in the image’s accompanying text placeholder, enter a space in the text’s placeholder.
6. Repeat steps 2 through 4 as many times as required.
Selecting SmartArt Diagrams
Selecting a SmartArt component must be done carefully. If you have the incorrect frame selected, you will move that shape instead of the entire SmartArt frame. You can tell if a shape is selected because the frame around it becomes visible. Only the frame around the entire SmartArt diagram is visible when you’ve selected the entire diagram. Also, nothing will be selected in the Text pane when the entire diagram is selected.
If a shape is selected, move your cursor over the frame until it turns into a four-headed arrow, then click on the frame and the entire diagram will be selected. When the frame is selected, you can move it to a new location, resize it, or delete it. Keep the following in mind when manipulating the SmartArt’s frame:
• When moving or resizing the diagram, the Text pane momentarily disappears.
• To move the diagram, place the cursor on the frame until it turns into a four-headed arrow; then click and drag the diagram to a new location.
• To resize the diagram, place the cursor in any corner or place it in the center of any edge until it turns into a double-headed arrow. You can then click and drag the diagram to a new size.
Adding and Deleting Shapes
Use Add Shape to add a new shape to the SmartArt diagram. The new shape will be added above the selected shape or at the bottom if the entire diagram is selected.
To delete a shape, select it so you see the frame around it and press the Delete key.
To add a new shape in the middle of the diagram, follow these steps:
1. Select the shape where you want the new shape.
2. Go to SmartArt Tools, Design, Create Graphic, and select Add Shape.
3. The shape selected in step 1 will be moved down and the new shape inserted in its location.
4. If the new shape is not in the correct location, select level 1 of the shape (the topmost bulleted item) and go to SmartArt Tools, Design, Create Graphic, and choose Move Up or Move Down.
Reordering Placeholders
To move a text or image placeholders to a new location, use Move Up and Move Down found under SmartArt Tools, Design, Create Graphic. Move Up and Move Down refer to the order of the items as shown in the Text pane, not their actual position in the diagram. To move an item to a new shape, it must be cut from its current location and pasted to the new location. Keep in mind the following when moving placeholders in the SmartArt:
• Any customized formatting of a placeholder will move with the placeholder.
• Each level can be moved individually, with any sublevels moving with their parent level.
• A level can be moved only within its group; it cannot be moved beyond its group. So if an item is level 2, it cannot be moved past its level 1 parent.
To change the order of text placeholders, follow these steps:
1. In the Text pane, place your cursor in the text of the level to be moved. Any children of the selected level will move with the parent. So if you’re moving an entire shape, select level 1. If a level 2 item includes level 3 items, place your cursor at level 2 and the level 3 items will also move.
2. Go to SmartArt Tools, Design, Create Graphic, and choose Move Up to move the selected item up the Text pane or Move Down to move the item down the Text pane.
3. If an item needs to be moved to an entirely different shape, highlight the text in the Text pane.
4. Press Ctrl+X to cut the text out of the Text pane.
5. Place your cursor in the new location for the text.
6. Press Ctrl+V to paste the text to the new location.
Formatting the Placeholder Text
The text formatting options found in the Font group of the Home tab can be applied to any selected item in SmartArt. If you select a shape, the formatting will be applied to all text entries in the shape. If you select a single word, the formatting will apply to just that word.
The exception to this formatting is font size. Selecting a single item in a shape, such as just one word in a sentence, will have unexpected results, as shown in Figure 14.3. But you can change the font size of all the text in a selected shape.
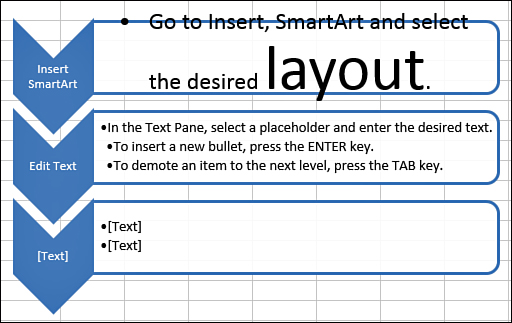
Figure 14.3. Changing the font size of “layout” to 54 changed the rest of the sentence’s font size from 11 to 18.
Changing the Selected Layout
You can change the layout of the current diagram to a new layout by going to the Layouts group of the SmartArt Tools, Design tab. The drop-down will show the available layouts of the current diagram’s category. As you place your cursor over a layout, your current layout temporarily changes, giving you a preview. You can access all the categories and their layouts by selecting the More Layouts option at the bottom of the drop-down. This opens the Choose a SmartArt Graphic dialog box with all available categories and layouts. Existing levels and text will transfer over to the new layout.
Changing an Individual Shape
You can change the shape of an individual shape in a diagram by selecting the shape and going to SmartArt Tools, Format, Shapes, Change Shape, and selecting a new shape in the drop-down. Every component in the diagram can be replaced, as shown in Figure 14.4.
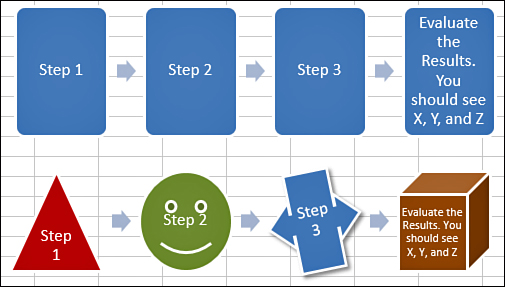
Figure 14.4. You can replace every shape in a diagram to create your own custom SmartArt.
Linking a Cell to a SmartArt Shape
You can’t actually link a SmartArt shape to a cell, but you can create the layout in SmartArt, convert it to shapes, and then replace the text with formulas linking the component to a cell. This allows the text in the layout to update automatically when the cell’s text updates.
Note
Your selected SmartArt can only have one placeholder per shape. If you need to show multiple placeholders, then you will have to design the linked cell with multiple lines.
There are two reasons why it’s important to make sure the SmartArt is designed perfectly before converting it. First, after you convert it to shapes, it’s no longer SmartArt and you will not have access to the SmartArt tools to make changes. The second reason is that it is much easier to select the correct frames when they have text in them already.
To link SmartArt to a cell, follow these steps:
1. Set up the data on the sheet, including the cells with dynamic text that you will link the shapes to.
2. Completely design the SmartArt, including the placement of sample text.
4. Go to SmartArt Tools, Design, Reset, Convert to Shapes. This converts the SmartArt to individual shapes.
5. Go to Drawing Tools, Format, Arrange, Selection Pane. The Selection pane opens on the right side of the window.
6. Many components in SmartArt consist of layers of shapes, which are all now visible in the Selection pane. Select one of the components called Freeform. The corresponding shape will be selected on the sheet. If this is not the desired shape, select another in the Selection pane until the shape you want is highlighted. Freeform is usually the shape used to hold text.
7. After the desired shape is selected, place your cursor in the formula bar, type an equal sign, and then type the cell address of the cell you want to link the shape to, as shown in Figure 14.5. Press Enter to save the change.
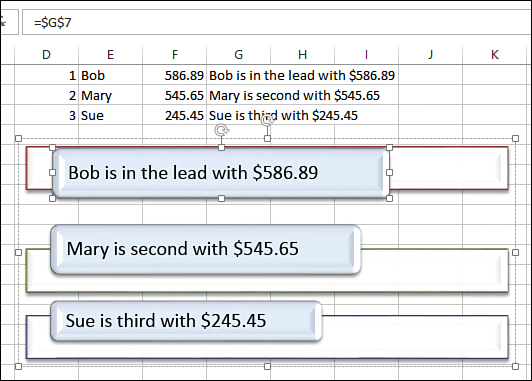
Figure 14.5. Insert the formula in the formula bar to link the shape to a cell.
8. Repeat steps 6 and 7 until all components are linked.
Caution
Converted SmartArt diagrams will be removed when you open a workbook in the Excel Web App.
Inserting WordArt
WordArt allows you to design text beyond the capabilities of the normal font settings on the Home tab, as shown in Figure 14.6. For example, you can use it to create a logo for the header of a report. After inserting the WordArt, go to the Drawing Tools, Format tab to access the various tools for modifying the color and shape.

Figure 14.6. Use WordArt to bend and twist text.
To insert WordArt and customize it, follow these steps:
1. Go to Insert, Text, WordArt, and select a text style from the drop-down. The WordArt will be added to the active sheet.
2. Excel adds generic text in the preset WordArt. Select the default text and type your own text.
3. To change the font style, select the text and choose a new font style from the Font group of the Home tab. As you move your cursor over the different font styles, your WordArt updates to reflect the style.
4. To add effects to the WordArt, such as the curve in Figure 14.6, go to Drawing Tools, Format, WordArt Styles, Text Effects. An option from Transform was used in the figure.
Caution
WordArt is removed when you open a workbook in the Excel Web App. In legacy versions of Excel, WordArt may not appear as designed.
Inserting Pictures
A picture is worth a thousand words. If you’re creating order sheets for new uniforms for various soccer teams, inserting a picture of the team’s uniform can differentiate the sheets at a glance.
To insert a picture, follow these steps:
1. Select the cell where you want the upper-left corner of the picture to be.
2. Go to Insert, Illustrations, Pictures to choose a picture from your local or network drive, or Online Pictures to search online or insert one from your SkyDrive.
3. Select the image to import and click Insert.
When an image on the sheet is selected, the Picture Tools, Format tab appears with tools for modifying your image, such as picture correction, cropping, and special effects.
If you right-click on the image and select Format Picture, the Format Picture task pane opens on the right side of the window. While some of the options found here can also be found on the Format tab, such as most of the Picture Effects, some options are only in the task pane, such as the Picture Position settings under the Picture, Crop option.
Resizing and Cropping Pictures
When you import a picture, it comes in it’s true size. That is, if the image is 8x10, then it will be 8x10 on the sheet. When you select the image, small squares appear in the corners and along the edge of the picture. These squares are called handles and are used to change the size of the picture.
To resize the selected image, click and drag one of the handles along the edge or in the corners of the picture. For more specific sizing, enter the size in the Shape Height or Shape Width fields of the Size group on the Picture Tools, Format tab.
If you want only a part of the imported picture, you can crop it, removing what you don’t need. You can manually crop an image or crop it to a specific shape, as shown in Figure 14.7. To crop the selected image, go to Picture Tools, Format, Size, and select an option from the Crop drop-down. If you later decide you’ve made a mistake, go to Picture Tools, Format, Adjust, Reset Picture, Reset Picture & Size, and the image will return to its original state.
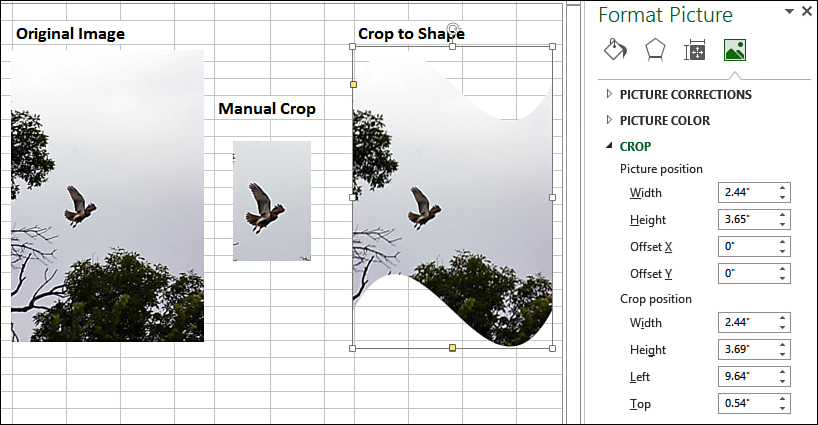
Figure 14.7. Use the cropping tools to crop an image to a particular size or place the image in a shape.
The Crop option is for a manual crop. On the image, black cropping handles appear in the corners and along each edge. Click and drag the handles to outline where you want the image cropped. The part of the picture you are cropping away will appear grayed out.
Choose Crop to Shape to crop the image to one of the shapes available in the drop-down. The image will be recut to the selected shape. To nudge the image within the shape, right-click the image and select Format Picture. In the task pane, select the Picture icon. Select the Crop category and under the Picture Position options, change the values in the Offset X and Offset Y fields. Adjusting the Offset X value moves the image left or right in the shape; adjusting the Offset Y value moves the image up or down in the shape.
Caution
Cropped images are removed when you open a workbook in the Excel Web App.
Applying Corrections, Color, and Artistic Effects
You can correct the brightness and contrast, change a color image to a black-and-white image, or apply artistic effects to the selected image through the options in the Adjust group of the Picture Tools, Format tab. As you move your cursor over an option in a drop-down, the image automatically adjusts, providing a preview of the option. Click the option to accept the change to the selected picture.
Corrections
The Corrections drop-down consists of options to sharpen and soften the image and to adjust brightness and contrast. If none of the predefined options are what you want, you can manually make the adjustments by selecting Picture Corrections Options at the bottom of the drop-down. This opens the Format Picture task pane to the Picture Corrections category. Changes made in the pane apply automatically to the image. To undo a change, click the Undo button in the Quick Access Toolbar.
Color
The Color drop-down includes options for adjusting color saturation, color tone, or recoloring the image. The More Variations option at the bottom of the drop-down is part of the Recolor group. The Set Transparent Color allows you to select a pixel in the image, and all pixels of the same color will become transparent, showing whatever is behind the image. For more control of saturation, tone, and recolor options, select Picture Color Options, which opens the Format Picture task pane to the Picture category. Changes made in the pane apply automatically to the image. To undo a change, click the Undo button in the Quick Access Toolbar.
Artistic Effects
Artistic effects include Glow Edges, Film Grain, Light Screen, and many other effects that will change the way an image looks, as shown in Figure 14.8. After you select an effect, you can fine-tune it through the Effects, Artistic Effects category of the Format Picture task pane. The fine-tuning options differ depending on the effect chosen. Changes made in the task pane apply automatically to the image. To undo a change, click the Undo button in the Quick Access Toolbar.
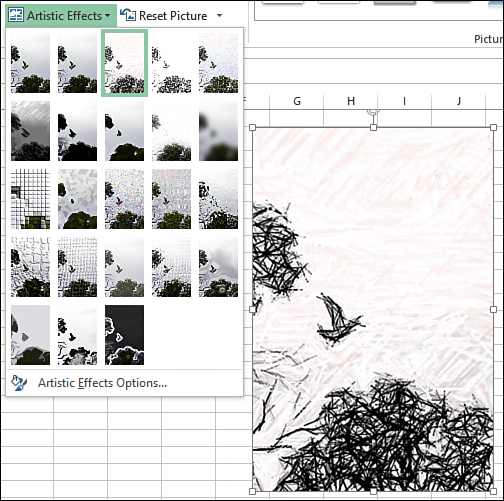
Figure 14.8. The Pencil Grayscale effect was used to change a photograph into an image that looks like a sketch.
Arranging Pictures
The Arrange group of the Picture Tools, Format tab consists of several options for arranging imported images:
• Bring Forward—Brings the selected image forward, placing it on top of other images it is stacked with. Includes Bring to Front, which places the selected image as the topmost image.
• Send Backward—Sends the selected image backward, placing it below other images it is stacked with. Includes Send to Back, which places the selected image behind all other images.
• Selection Pane—Opens a task pane that lists all the shapes on the active sheet. You can use this pane to select a specific shape.
• Align—Includes various alignment options, as shown in Figure 14.9, to quickly line up the selected images.
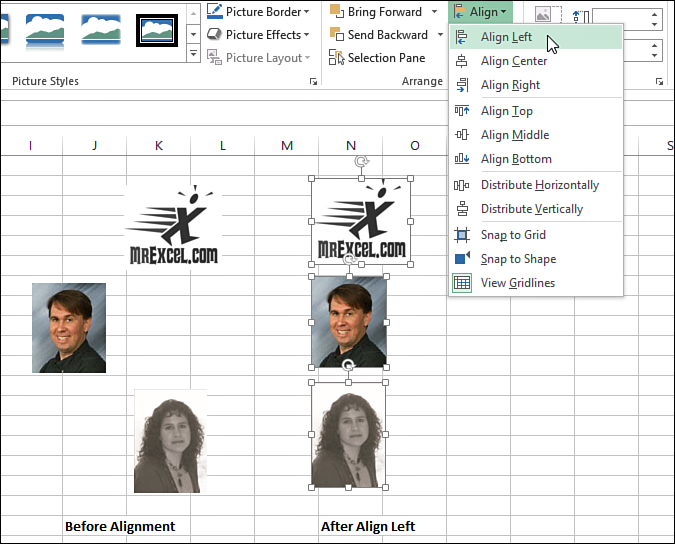
Figure 14.9. Align Left lines up the selected images based on the left edge of the topmost image.
• Group—Includes the options to group and ungroup the selected images. Grouping images allows you to move them together without losing their alignment or order. If selective images were grouped together at one point and then ungrouped, Regroup will re-create the group without your having to reselect all the images.
• Rotate—Rotates or flips the selected image.
To align selective images, follow these steps:
1. Place the images approximately how you want them. For example, if you want to align the images left, place them in a vertical layout. If you want to line them up by their centers, place them in a horizontal layout. Each command’s icon provides an example of how the images should be laid out.
2. Select the images by holding down the Ctrl key and clicking each image in turn.
3. Go to Picture Tools, Format, Arrange, and select the desired alignment from the Align drop-down.
Reducing a Picture’s File Size
Importing a picture into a workbook can dramatically increase the file size. Picture Tools, Format, Adjust, Compress Pictures offers multiple options for compressing images based on how you will be using the workbook, as shown in Figure 14.10. You can further reduce the file size by selecting the Delete Cropped Areas of Pictures option, but this means that you will be unable to return the image to its original state.
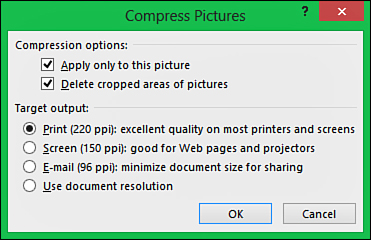
Figure 14.10. The Compress Pictures dialog box offers multiple options for how much the image resolution should be reduced based on how you will be distributing the workbook.