
10
Testing
In Part 2 of this book, we took an entirely synchronous application and transformed it into an asynchronous application using events and messaging. Our application is more resilient and agile but has gained some new libraries and dependencies as a result.
Testing an asynchronous application can pose some unique challenges but remains within reach by following testing best practices. In this chapter, we will look at testing the MallBots application from the unit test level and writing executable specifications using the Gherkin language.
In this chapter, we will cover the following topics:
- Coming up with a testing strategy
- Testing the application and domain with unit tests
- Testing dependencies with integration testing
- Testing component interactions with contract tests
- Testing the application with end-to-end tests
Technical requirements
You will need to install or have installed the following software to run the application or to try this chapter’s examples:
- The Go programming language version 1.18+
- Docker
The code for this chapter can be found at https://github.com/PacktPublishing/Event-Driven-Architecture-in-Golang/tree/main/Chapter10.
Coming up with a testing strategy
For applications such as MallBots, we should develop a testing strategy that tests whether the application code does what it is supposed to be doing. It should also check whether various components communicate and interact with each other correctly and that the application works as expected:

Figure 10.1 – Our testing strategy as a pyramid or ziggurat
Our testing strategy will have four parts:
- Unit tests
- Integration tests
- Contract tests
- End-to-end tests
Unit tests are a no-brainer addition to our strategy; we want to ensure the code we write does what we intend it to do. We want to test the input and output from the module core and include an integration test to test the dependencies that it uses. We will use contract tests to detect any breaking changes to the application’s many APIs and messages that tie the modules together. Finally, we want to run tests that check that the application is functioning as per stakeholder expectations and will use end-to-end (E2E) testing.
There are additional levels and forms of testing that we could include, such as component testing. This would be used to test each module in isolation – that is, like an E2E test but limited to just that module. We may also see some manual tests take place or have the testing or development teams work through scenarios to perform exploratory testing. We could also stress or load test the application, which could be added to the strategy later as the application matures.
Unit tests
Unit tests should make an appearance in any testing strategy. They are used to test code for correctness and to locate problems with application and business logic implementations. In a testing strategy, they should take up the bulk of the testing efforts. These tests should be free of any dependencies, especially any I/O, and make use of test doubles such as mocks, stubs, and fakes. The system under test for a unit test should be very small; for example, individual functions and methods.
System under test
At each level of testing, we use the term system under test (SUT) to describe the component or components being tested. For unit tests, the SUT may be a function, whereas for E2E testing, it would encompass the application and any external APIs involved. Generally, the SUT expands in scope or application coverage the higher up you go in the testing pyramid.
Any application can benefit from having unit tests in its testing strategy. If used sparingly, extremely fast-running tests can focus on logic and algorithms that are complex or critical to the success of the business.
Integration tests
Next up is integration testing where, instead of focusing on the logic, you will focus on testing the interactions between two components. Typically, you must test the interactions between a component with one of its dependencies. Testing that your ORM or repository implementations work with a real database would be an example of an integration test. Another example would be testing that your web interface works with application or business logic components. For an integration test, the SUT will be the two components with any additional dependencies replaced with mocks.
Applications with complex interactions in their infrastructure can benefit from the inclusion of integration tests in the testing strategy. Testing against real infrastructure can be difficult or too time-consuming, so teams may decide to not do so or only develop a few critical path tests.
Contract tests
A distributed application or a modular monolith like ours is going to have many connection points between the microservices or modules. We can use contract tests built by consumers’ expectations of an API or message to verify whether a producer has implemented those expectations. Despite being rather high on the testing pyramid, these contract tests are expected to run just as fast as unit tests since they do not deal with any real dependencies or test any logic. The SUT for a contract will be either the consumer and its expectation, or the producer and its API or message verification.
Distributed applications will benefit the most from adding contract tests to the testing strategy. These tests are not just for testing between microservices – they can also be used to test your UI with its backend API.
End-to-end tests
E2E tests are used to test the expected functionality of the whole application. These tests will include the entire application as the SUT. E2E tests are often extensive and slow. If your application includes a UI, then that too will become part of the tests because they intend to test the behaviors and correctness of the application from the point of view of the end user. The correctness being tested for is how the application performs and not like a unit test’s correctness of how the application does it.
Teams that take on the effort of maintaining fragile and costly tests are rewarded with confidence that the application is working as expected during large operations that can span the whole application.
In the upcoming sections, we will explore each of the testing methods present in our testing strategy.
Testing the application and domain with unit tests
The system under test for a unit test is the smallest unit we can find in our application. In applications that are written in Go, this unit will be a function or method on a struct:
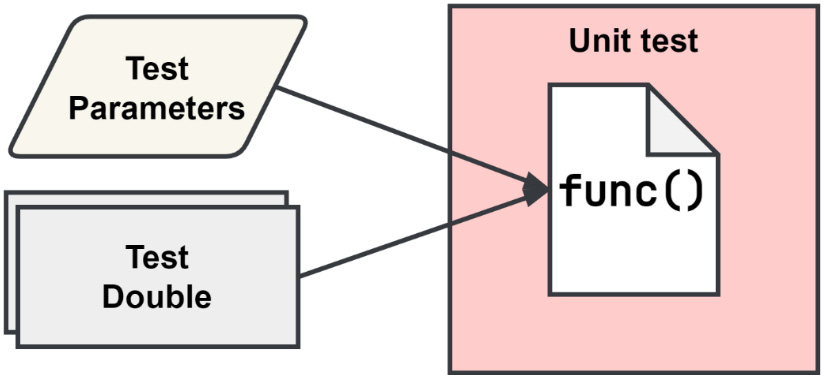
Figure 10.2 – The scope of a unit test
As shown in Figure 10.2, only the function code is being tested. Any dependencies that the code under test requires must be provided as a test double such as a mock, a stub, or a fake dependency. Test doubles will be explained a little later in the Creating and using test doubles in our tests section.
Each test should focus on testing only one path through the function. Even for moderately complex functions, this can result in a lot of duplication in your testing functions. To help with this duplication, the Go community has adopted table-driven tests to organize multiple tests of a single piece of code under test into a single test function.
Table-driven testing
This method of testing was introduced to the Go community by Dave Cheney in his similarly named blog post, Prefer table driven tests (https://dave.cheney.net/2019/05/07/prefer-table-driven-tests). Table-driven tests are made up of two parts – a table of test cases and the testing of those test cases.
The table of test cases
A slice of structs that contains the test inputs and outputs is called a test case. The following listing shows a table with two test cases using a map to build the table:
tests := map[string]struct {
    input string
    want  int
}{
    "word":  {input: "ABC", want: 3},
    "words": {input: "ABC ABC", want: 6},
}
If we used a slice instead of the map, then we would want to include an additional field in the struct to hold a string that is used as the subtest’s name.
Testing each test case
The actual testing will depend on how the unit needs to be tested. However, there is some simple boilerplate code that we should use so that we can make sense of the test failures, should they pop up.
In the following code block, the highlighted code is the simple boilerplate that is used to run through each test case:
for name, tc := range tests {
    t.Run(name, func(t *testing.T) {
        // arrange, act, and assert
    })
}
In the loop, we use the subtesting feature to run each test case under the heading of the original test function name. The following output is an example of running the AddItem application tests for the Shopping Baskets module:
--- PASS: TestApplication_AddItem (0.00s)
--- PASS: TestApplication_AddItem/NoBasket (0.00s)
--- PASS: TestApplication_AddItem/NoProduct (0.00s)
--- PASS: TestApplication_AddItem/NoStore (0.00s)
--- PASS: TestApplication_AddItem/SaveFailed (0.00s)
--- PASS: TestApplication_AddItem/Success (0.00s)
PASS
The AddItem test has five test cases that test how the input to the function might be handled under different conditions. This test can be found in the /baskets/internal/application/application_test.go file.
The application that AddItem is defined on has several dependencies, and each of those is replaced with test doubles so that we can avoid dealing with any real I/O. We also want to intercept calls into the dependencies to control which path through the AddItem method we are testing.
We will want to use a test double that is not only able to intercept the calls but also able to send back programmed responses. There are several kinds of test doubles, so let’s look at them and see which works best for us here.
Creating and using test doubles in our tests
Test doubles are tools we can use to isolate the system or code under test from the rest of the system around it.
These tools come in different forms, each useful for different testing scenarios:
- Fakes implement the same functionality as the real dependency. An in-memory implementation of a repository could stand in and take the place of a PostgreSQL implementation so that the test does not rely on any real I/O.
- Stubs are like fakes, but the stub implementation responds with static or predictable responses.
- Spies work like an observable proxy of the real implementation. A spy can be used to report back the input, return values, and the number of calls that it received. Spies may also help with recording the inputs and outputs that were seen for later use.
- Mocks mimic the real implementation, similar to a fake, but do not provide an alternative implementation. Instead, a mock is configured to respond in certain ways to specific inputs. Then, like a spy, it can be used to assert whether the proper inputs were received, the right number of calls were made, and no unexpected calls or inputs were encountered.
Fakes and stubs can be used when the interaction with the dependency is not important to the test, whereas spies and mocks should be used when the input and responses matter.
Working with mocks
For our unit test, we will use mocks. To create the mocks that we will use, we will use the Testify mocks package (https://github.com/stretchr/testify). This will provide the mocking functionality, along with the mockery tool (https://github.com/vektra/mockery) to make generating them a breeze. The mockery tool can be installed with the following command:
go install github.com/vektra/mockery/[email protected]
Each module that will be tested using mocks will have the following line added to its generate.go file; for example, /baskets/generate.go:
//go:generate mockery --all --inpackage --case underscoreThis go:generate directive will look for the interfaces defined within the directory and subdirectories and create mocks of them. --inpackage and --case underscore will configure the tool to create the mocks in the current package using underscores in the filename. The --all flag will make the tool generate a mock for each interface that is found. When mockery creates mocks next to the interface, it will add a Mock prefix to each interface that it found in a file with a prefix of mock_. For example, the Application interface is mocked as MockApplication, and that mock will be found in /baskets/internal/application/mock_application.go.
Organizing and naming test doubles comes down to preferences in most cases. My preference is to place them next to the interfaces and implementations that they double. Another preference is to keep the naming simple and use either a prefix or suffix to identify the type of test double that you are dealing with.
With the mocks created, we need to use them in our tests. To do that, we will include a new field in our test case structs so that they can be configured for each test case:
type mocks struct {
    baskets   *domain.MockBasketRepository
    stores    *domain.MockStoreRepository
    products  *domain.MockProductRepository
    publisher *ddd.MockEventPublisher[ddd.Event]
}
tests := map[string]struct {
    ...
    on      func(f mocks)
    wantErr bool
}{...}
In the previous listing, a named struct has been created with field types of the actual mocks; using the interfaces here will not help us since we want the concrete mock implementations. Then, in the anonymous struct that defines our test cases, we have added a function that accepts the mocks struct. With these additions, any test case that is expected to make calls into a mock can do so during the Arrange portion of the test function.
Arrange, act, and assert
The Arrange-Act-Assert (AAA) pattern is a simple yet powerful way to build your tests. It breaks up a test function into three parts for better maintainability and readability. The Arrange portion is where the test is set up, the Act portion is where the target is called or interacted with, and the Assert portion is where the final test or verification happens. By following this pattern, it is easy to spot test functions that are doing more than testing one thing at a time. This pattern is also known as Given-When-Then.
In the test function, we must set up the mocks, execute the method, and perform our assertions using the following code:
// Arrange
m := mocks{
    baskets:   domain.NewMockBasketRepository(t),
    stores:    domain.NewMockStoreRepository(t),
    products:  domain.NewMockProductRepository(t),
    publisher: ddd.NewMockEventPublisher[ddd.Event](t),
}
if tc.on != nil {
    tc.on(m)
}
a := New(m.baskets, m.stores, m.products, m.publisher)
// Act
err := a.AddItem(tc.args.ctx, tc.args.add)
// Assert
if (err != nil) != tc.wantErr {
    t.Errorf("AddItem() unexpected error = %v", err)
}
During each test case run, we will create new mocks but leave them alone if no function has been defined to configure them. A mock will fail the test if it is called and we have not configured any calls. This will be helpful because we do not need to remember which calls or mocks have been set up, nor which to change when we make changes to the code under test.
The Mockery package has generated constructors for our mocks that accept the test variable. Using the constructors, we do not need to include any additional assertions for the Assert portion of the test function. When the test completes, each mock will be automatically checked to ensure that the exact number of calls were made into it and that the calls included the correct inputs:

Figure 10.3 – The SUT for the AddItem method
To test the AddItem method on Application, we must provide an application instance with all the dependencies that it needs and then pass additional parameters to the AddItem method. The method only returns an error, so using a mock double instead of any of the others makes the most sense. Without mocks, we would not be able to see into the method.
Testing dependencies with integration testing
An application is made up of many different components; some of those components are external to the application. These external components can be other services, or they can be infrastructure that needs to be in place for the application to function properly.
It is hard to find any application built for the web that does not interact with infrastructure. Actually, it’s impossible – the web server or API gateway that the application would use to receive requests would fall into the definition of infrastructure.
We cannot test these dependencies using a unit test because if we replaced the dependency with any kind of test double, then it would not be a true test of that dependency.
In an integration test, both components are the SUT, which means we need to test with real infrastructure when possible:

Figure 10.4 – The scope of an integration test
Unlike the unit tests, which were expected to be very simple, at least in terms of what the environment must provide so that they can run, integration tests ramp up the complexity a great deal.
A wrong way to develop these tests is to assume each developer that might run them has the same environment as you do. That would mean the same OS, the same installed tools, and the same locally accessible services with the same configurations and permissions. You would then write the test leaving all of those environmental expectations out and leaving out how to run the tests in the documentation or some other form of knowledge share.
A better way to write integration tests would be to bring what is necessary to run the test into that test without requiring any test-specific environment and setup.
Incorporating the dependencies into your tests
A lot of the services and infrastructure in use today are available as a Docker container; this could be a real production-ready container such as the ones for many databases. Some containers are purpose-built to aid in development or testing efforts. An example of a container that can help with development would be LocalStack (https://localstack.cloud), a container that provides a local development and testing environment for many of the offerings from AWS.
Using Docker and containers is a great way to bring these dependencies into your local environment. However, the challenge in using them in tests is that we want to be able to control their state and may also want to set them up in different ways to support different tests. However, we need to know how to incorporate these containers into our tests.
Option 1 – manually by using Docker Compose files
We can create a Docker Compose file for our tests, such as test.docker-compose.yml, that will stand up everything we will need to connect to for the integration tests that we’ll write. This should make it easy for every developer to have the dependencies available, and so long as everyone remembers to start up the environment, they should also have no issues running the tests. Volumes can be destroyed during the environment teardown so that previous runs do not affect others.
The downsides of this option begin with the Compose file itself. If a problem exists when standing up the entire environment, then someone will need to make changes to it before they can test. There may also be issues running the tests multiple times, so tearing down the environment to stand it back up again might be necessary, which could take a considerable amount of time. To tackle this, we can take a different approach.
Option 2 – internalizing the Docker integration
There is a solution we can use that will not only allow us to use different containers or compose environments for different tests but also remove the step of having to run a Docker command before executing any integration tests.
Testcontainers-Go (https://golang.testcontainers.org) is a library that makes it possible to start up a container or compose an environment that is controlled by code that we can include in our tests.
The benefits of this option are that we will always have a pristine environment to run our tests in and subsequent runs will not need to wait for any containers or volumes to be reset. The other is the containers will always be started and removed when the test is run. This means that there is no longer any need to maintain documentation on how to prepare a local environment to run tests. This is the better option in my opinion, but it will require some initial setup, as well as some resetting or cleanup between each test.
Running tests with more complex setups
Our integration tests will likely end up being a little more complex than the unit tests we have previously worked with. We may require certain actions to occur at the start of the run and the end; likewise, we need actions to run before and after each test. This is not a difficult task by any stretch. We can write the test harness ourselves, but whatever we write should also contain tests. Instead, we can use an existing test harness that handles all of this for us.
This harness is the Testify suite package. When we are using this new harness, we can continue to use table-driven tests, but we need to manage the state setup and reset ourselves.
To start using Testify suites, create a new struct and include suite.Suite as an anonymous field. Then, create a simple test function to run the suite:
type productCacheSuite struct {
    suite.Suite
    // [optional] any additional fields
}
func TestProductCacheRepository(t *testing.T) {
    suite.Run(t, &productCacheSuite{})
}
We can include additional fields in the struct that can be accessed by the test methods.
Testing ProductCacheRepository
We will use all of the aforementioned methods to test the interaction between the PostgreSQL implementation of ProductCacheRepository and PostgreSQL:

Figure 10.5 – The integration test for ProductCacheRepository
This implementation uses a connection to the database and also has a dependency on the ProductRepository interface. In the application, this is implemented as a gRPC client, which will fetch a Product instance when we cannot find it in the database. For this integration test, that dependency will be mocked. Before we write our first test, we need to configure the suite so that our tests can use a real database and still be isolated from each other.
Suite composition
Inside the productCacheSuite struct, we will add the following additional fields:
- container, which will hold the reference to the PostgreSQL container we have started.
- db, which will be a real database connection to PostgreSQL. We will use it to reset the database in between tests.
- mock will be an instance of MockProductRepository. If we had other dependencies to mock or fake, we would have used a less generic name.
- repo, which is a real instance of the PostgreSQL implementation that we intend to test.
These fields will be accessible to our tests, as well as to the methods we will use to set up the suite and each test.
Suite setup
We must start by setting up the suite with some fields we want to make available to all tests. The first of those is the database connection. To make that connection, we need to have a database we can connect to. The following listing is how the PostgreSQL container is started up:
const dbUrl = "postgres://***:***@localhost:%s/mallbots"
s.container, err = testcontainers.GenericContainer(ctx,
    testcontainers.GenericContainerRequest{
        ContainerRequest: testcontainers.ContainerRequest{
            Image:        "postgres:12-alpine",
            ExposedPorts: []string{"5432/tcp"},
            Env: map[string]string{
                "POSTGRES_PASSWORD": "***",
            },
            Mounts: []testcontainers.ContainerMount{
                testcontainers.BindMount(
                    initDir,
                    "/docker-entrypoint-initdb.d",
                ),
            },
            WaitingFor: wait.ForSQL(
                "5432/tcp",
                "pgx",
                func(port nat.Port) string {
                    return fmt.Sprintf(
                        dbUrl,
                        port.Port(),
                    )
                },
            ).Timeout(5 * time.Second),
        },
        Started: true,
    },
)
This listing will start up a new container from the postgres:12-alpine image. Like the service entry in the docker-compose.yml file, we must give it a hostname and initialize it with some files we will mount in the container.
The WaitingFor configuration is used to block the startup process until the database is truly ready for requests. In the Compose file, we use a similar effect with a small wait-for script.
The testcontainers-go package can also stand up services defined in a Docker Compose file. We will not be making use of that feature, but you can learn more about it at https://golang.testcontainers.org/features/docker_compose/.
Once the container is running and we are waiting for it to become available, we can make that database connection.
Test setup
Before each test, a new mock is created, which is then injected along with the database connection into ProductCacheRepository:
func (s *productCacheSuite) SetupTest() {
    s.mock = domain.NewMockProductRepository(s.T())
    s.repo = NewProductCacheRepository(
        "baskets.products_cache",
        s.db,
        s.mock,
    )
}
We are keeping a reference to the mock because we will want to configure it during tests to expect calls. If we did not keep a reference, there would be no way to configure it from ProductCacheRepository.
Test teardown
Every test should have the same slate upon which it will run. In our tests for the database, we will be creating new rows, updating rows, or deleting them. Without resetting the database in between each test, we may find ourselves in situations where the order of the tests affects subsequent tests passing or failing:
func (s *productCacheSuite) TearDownTest() {
    _, err := s.db.ExecContext(
        context.Background(),
        "TRUNCATE baskets.products_cache",
    )
    if err != nil {
        s.T().Fatal(err)
    }
}
We will keep things simple and TRUNCATE any tables that we work with. This is safe if this test suite is always using a PostgreSQL container that exists only for this test suite.
Suite teardown
When all of the tests have finished running, we no longer need the connection to the database. The container should also be cleaned up and removed:
func (s *productCacheSuite) TearDownSuite() {
    err := s.db.Close()
    if err != nil {
        s.T().Fatal(err)
    }
    err := s.container.Terminate(context.Background())
    if err != nil {
        s.T().Fatal(err)
    }
}
In reverse order from what happened in the SetupSuite() method, we close the database connection and then terminate the container, which removes it and any volumes we might have created.
The tests
With all the setup and teardown taken care of, our tests are going to be simple and to the point, much like the unit tests were. The following listing shows the test for the rebranding functionality:
func (s *productCacheSuite) TestPCR_Rebrand() {
    // Arrange
    _, err := s.db.Exec("INSERT ...")
    s.NoError(err)
    // Act
    s.NoError(s.repo.Rebrand(
        context.Background(),
        "product-id",
        "new-product-name",
    ))
    // Assert
    row := s.db.QueryRow("SELECT ...", "product-id")
    if s.NoError(row.Err()) {
        var name string
        s.NoError(row.Scan(&name))
        s.Equal("new-product-name", name)
    }
}
We can access any of the fields defined in the suite and can even organize the tests in AAA fashion. During the Arrange phase of this test, we use the database connection to insert a new product cache record that is then acted upon in the next phase. The suite also has access to all the usual Testify assert functions, and we can skip importing that package in favor of using the assertion methods directly from the suite itself.
Breaking tests into groups
Integration tests do not need to run quickly, and for good reason. Integration tests will typically need to deal with I/O, which is not exactly fast or predictable. Skipping or excluding the longer-running tests will be necessary if you want to keep the wait for test feedback as low as possible when developing some new logic or feature.
There are three ways to break long-running tests into groups or exclude them when running fast-running unit tests.
Running specific directories, files, or tests
You can specify specific files, directories, and even individual tests when using the test command. This option will not permanently break your tests up into different groups that can be run separately, but outside of using your IDE, it presents the easiest way to target individual tests.
To run all the application tests for the Shopping Baskets module, you would use the following command:
go test ./baskets/internal/application
To run only the RemoveItem test, you would add -run "RemoveItem$" to the command:
go test ./baskets/internal/application -run "RemoveItem$"
We can target specific table-driven subtests as well. To run only the NoProduct subtest for the RemoveItem test, we can use "RemoveItem/NoProduct$". For the following command, I have moved into the internal directory:
go test ./application -run "RemoveItem/NoProduct$"
In the previous two command examples, I used a Regex to search for the test to run. You can target a group of tests with a well-written Regex. The test tool makes it very easy to target specific tests when we need to be very focused on a test or a collection of tests.
Go build constraints
We can use the conditional compilation build constraints to create groups of our tests. These constraints are normally used to build our programs for different OSs or CPU architectures, but we can also use them for our tests because the tests and the application are both compiled when we run the tests. Because this is accomplished by adding a special comment to the top of our files, we can only group tests together by files; we cannot create any subgroups of the tests within the files.
To group tests into an integration grouping, we can add the following with a second blank line to the top of the tests file:
//go:build integrationThe following are a few rules that need to be followed for the compiler to recognize the comment as a build constraint:
- There must not be any spaces between the single-line comment syntax and go:build. Multiline comment syntax will not work.
- The constraint must be followed by a blank line.
- The constraint must be the first line in the file.
The file will now be ignored when we run the test command. The examples from the previous section would all ignore the tests in this file, even if we were to target the file and tests specifically. To run the tests now, we will need to pass the -tags option into the test command, like so:
go test ./internal/postgres -tags integration
You can combine multiple tags to create subgroups using the build constraints by taking advantage of the Boolean operators that it supports. We can modify the constraint so that the database tests are run with all integration tests or can be run by themselves:
//go:build integration || databaseA file with this constraint could be run using any of the following commands:
go test ./internal/postgres -tags integration
go test ./internal/postgres -tags database
go test ./internal/postgres -tags integration,database
Using build constraints is a powerful and easy way to create groups of tests. Without the -tags option, any file that uses a build constraint will be ignored. This also has the downside of potentially skipping tests that are broken and not knowing it. The constraints at the top of the file can include typos or logical errors caused by incorrect operator usage.
When using build constraints, it is best to keep it simple.
Using the short test option
The final method we will look at is the short test mode, which is built into the test tool. To enable short mode, you can simply pass in the -short option to any test command that you run. By itself, nothing happens, but if you include a check in your tests, you can exclude the longer-running tests from running. The test tool itself is not able to determine which tests are long-running tests; that determination is up to you.
We can skip long-running tests by using a block of code such as this:
func TestProductCacheRepository(t *testing.T) {
    if testing.Short() {
        t.Skip("short mode: skipping")
    }
    suite.Run(t, &productCacheSuite{})
}
The entire suite of tests will be skipped when the following command is run:
go test ./internal/postgres -tags integration -short
Checking for short mode can be added to any individual tests and subtests as well; we do not need to limit ourselves to tests run via a suite. Skipping tests with short mode allows us to be more selective about which test or tests are ultimately skipped.
The downside to using short mode is that the long-running tests are included by default, and we need to enable short mode to skip them. Another downside is that the option can be either on or off; there is no way to split your tests into more than two groups.
All three options I’ve mentioned can be used together. You could treat short mode as a way to skip tests that are just a little longer when running unit tests, and likewise for the other kinds of tests when used with the -tags option.
By using Docker containers, we can test more of our application by including real infrastructure in our tests, and by grouping the tests, we can exclude them when we want to run very fast unit tests. This form of testing will be too fragile to test integrations much larger than infrastructure interactions. For that testing, we can turn to contract tests.
Testing component interactions with contract tests
We have chosen to create our application using the modular monolith pattern. Here, we have each module communicate with the others using either gRPC or by publishing messages into a message broker. These would be very common to see on any distributed application but would be rare or not used at all on a monolith or small application. What’s more common to see across all applications is the REST API we use. This demonstration application does not have any true UI, but we have the API to support one. This API represents a third form of communication in our application, which is between an API provider and the API consumer.
We could test these interactions using integration tests since the definition of what an integration test covers is testing the interactions or integration between two components. However, the integration tests we wrote before tested smaller components, and the scope for the system under test was not very large. They are larger than the unit tests before them but are still small:

Figure 10.6 – System under test for an integration test of two modules
Testing even two modules together using an integration test would be a very large jump regarding how much of the system under test would now be forced into the scope of the test. There may be several real dependencies that are too difficult to replace with a test double and a real dependency would need to be stood up and used for the test.
Another possible but very likely issue with using integration tests in this manner is that we could be testing two components that have entirely different development teams and release schedules.
We want to minimize the extraneous components that get included in the test scope. This means we should only target the REST API if that is what we are interested in testing. The same goes for messaging; we should test whether we are receiving the messages that we expect and leave the rest of the module out of the equation. Contract testing allows us to focus on the APIs between providers and consumers, just like the integration tests do, but it allows us to run the tests in isolation, similar to a unit test.
Contract testing comes in two forms:
- Consumer-driven contract testing (CDCT), which is when the contract is developed using the expectations of the consumers
- Provider-driven contract testing (PDCT), which is when the contract is developed using the provided API of the provider
We will be using CDCT for our testing:

Figure 10.7 – System under test for consumer-driven contract testing
Contract testing is broken down into two parts: consumer expectations and provider verifications. Between the two sits the contract that is produced by the consumer when using consumer-driven testing.
On the consumer side, real requests are made to the mock provider, which will respond with simulated responses. On the provider side, the real requests will now be used as simulated requests and the provider will respond with real responses that are verified against the expected responses recorded in the contract.
Because the consumer is creating expectations, there would be no value in only running the consumer side without the provider verifying those expectations. Each side, both consumer and provider, has different contract testing goals.
Consumer expectations
The consumers of an API will uniquely use that API. This could mean that it uses a fraction of the provided API endpoints or messages, and it could also mean that it is using only a portion of the data that it is provided.
Consumers should write their expectations based on what they use. This allows providers that are tested with contract testing to know what endpoints and data are being used by the consumers.
Consumers’ expectations will change over time, as will the contracts. Processes can be set up in your CI/CD pipeline so that these changed contracts can be automatically verified with the provider to ensure that there are no issues in deploying the updated consumer into production.
Provider verifications
Providers will be given one or more contracts to verify their API support. Each contract that they receive will expect different things from their API, different collections of endpoints, or different simulated requests.
The providers will be expected to implement the tests to verify the simulated requests against their real API. However, they may use whatever test doubles they need so that they don’t have to stand up their entire module or microservice.
When a consumer’s contract is verified, this can be shared with the consumer so that they know it will be OK to deploy with its API usage. Likewise, a provider, having passed all of the contract verifications it was presented with, will have the confidence in knowing it too can be deployed without any issues.
Not building any silos
Contract testing does not eliminate any necessary communication regarding the integrations between teams; it helps them know about and get to the issues quickly. With contract testing, we achieve a high level of confidence on both sides that the integration is working. When issues are discovered during verification, then it is expected that the teams will have some dialog. Consumers can make mistakes and have incorrect expectations, which could mean there is room to improve or add API documentation. Providers may make a breaking change and will need to cooperate with the affected consumers to coordinate updates and releases.
Contract testing with Pact
Just like using the Testify suite package for our more complex test setups, we will use a tool called Pact (https://pact.io) to handle a lot of the concerns outside of our tests. Pact provides libraries for many languages, which is handy for testing a JavaScript UI with your Go backend. Several tools can be used locally by the developers, as well as in the CI/CD process, to provide the promised confidence that deployments can happen with any issues.
Pact Broker
Pact Broker (https://docs.pact.io/pact_broker) is an application we can start up in our environment to share contracts, as well as provide feedback for consumers stating that their contracts have been verified by the provider:

Figure 10.8 – Pact Broker showing our example integrations
Pact Broker can also be integrated with your CI/CD process to automate the testing of providers when a consumer has created or updated a contract. Likewise, consumers can be automatically tested when a provider has made changes to their API:

Figure 10.9 – Contract creation and verification flow using Pact Broker
Pact Broker may be installed locally using a Docker image, though you may use the hosted version with a free account at https://pactflow.io/.
CLI tools
Pact will take care of creating and running the mock provider and consumer, but this functionality will require the necessary Pact CLI tools to be installed and available (https://docs.pact.io/implementation_guides/cli). You may choose either a Docker image or a Ruby-based standalone version.
Additional Go tools
The provider example for the asynchronous tests uses an updated version of the Go libraries. If you would like to follow along and run these tests, you will need to install the pact-go installer and use it to download some additional dependencies:
go install github.com/pact-foundation/pact-go/[email protected]
pact-go -l DEBUG install
The two preceding commands will download some files that will allow the updated provider verifications to run.
pact-go versioning
At the time of writing this book, the version used was tagged as v2.x.x. The minor and patch version values are x.
REST consumer and provider example
First, we will test a simple JavaScript client against the REST API provided by the Shopping Baskets module. We do not have a real UI to add tests to, but we can create a small JavaScript client library. For contract testing, we would only want to work with the client library anyhow, so this is not a big problem.
We will focus on a couple of endpoints for this demonstration:
const axios = require("axios");
class Client {
  constructor(host = 'http://localhost:8080') {
    this.host = host;
  }
  startBasket(customerId) {
    return axios.post(
      `${this.host}/api/baskets`,
      {customerId}
    )
  }
  addItem(basketId, productId, quantity = 1) {
    return axios.put(
      `${this.host}/api/baskets/${basketId}/addItem`,
      {productId, quantity}
    )
  }
}
module.exports = {Client};
This JavaScript client is ready to be used in the latest single-page application (SPA) frontend and deployed to production. Before we deploy this client, it needs to be tested against the REST API.
Now, instead of starting up the real REST API server and running tests, we want to create individual interactions and test those against a mock provider, then use them to produce a contract that is shared with the provider so that it may verify every interaction from its point of view. We will be able to test these interactions just as swiftly as our unit tests.
To better explain these interactions, we will look at one from /baskets/ui/client.spec.js for the UI consumer tests in the Shopping Baskets module:
provider.given('a store exists')
  .given('a product exists', {id: productId})
  .given('a basket exists', {id: basketId})
  .uponReceiving(
    'a request to add a product with a negative quantity'
  )
  .withRequest({
    method: 'PUT',
    path: `/api/baskets/${basketId}/addItem`,
    body: {
      productId: productId,
      quantity: -1,
    },
    headers: {Accept: 'application/json'},
  })
  .willRespondWith({
    body: MatchersV3.like({
      message: 'the item quantity cannot be negative',
    }),
    headers: {'Content-Type': 'application/json'},
    status: 400,
  });
In the previous listing, we are building an interaction for a call to the AddItem endpoint. We expect to receive an error when we include a negative quantity in our request.
Here is what each method is doing when building the interaction:
- given() is used to signal to the provider that a certain state should be configured or used to respond to the simulated request when it is verifying the contract. Of the four methods shown, only given() is optional. It is used in the code example three times, with two of the calls including static data that should be used in place of the state the provider would generate.
- uponReceiving() sets up a unique name for this expectation.
- withRequest() defines the exact request that will be used by both the consumer tests and provider verification tests. In the consumer tests, it is compared with the real request that will be made to the mock provider. Then, in the provider tests, it will be used as a simulated request from the mock consumer against the provider.
- willRespondWith() is the expected response. We build it using matchers, creating an expectation based on what is important to the consumer. In the consumer tests, this response will be returned by the mock provider and in the provider tests, the real response is verified against it. The real error response from the AddItem endpoint includes more than the message property, but we match only the one value that we care about.
The interaction is then tested using your preferred testing library. We will only be able to truly test one side of the interaction right now, which involves verifying that the request we send to the mock provider is exactly as we said it would be:
it('should return an error message', () => {
  return provider.executeTest((mockServer) => {
    const client = new Client(mockServer.url);
    return client.addItem(basketId, productId, -1)
      .catch(({response}) => {
        expect(response.status).to.eq(400);
      });
  });
});
To test the interaction with the consumer, we use the real client code to create and send a request to the mock provider. The response can be checked as well, and in this case, we catch the expected error response. If we don’t, then an uncaught exception could occur, and it will throw off our test.
When all of our consumer tests are passing, a contract will be generated using the consumer and provider names, such as baskets-ui-baskets-api.json. This contract will need to be shared with the provider somehow so that the other half of the tests can take place. Contracts can be shared via the filesystem, by hosting them, or they can be published to Pact Broker.
To verify a contract with a provider, we need to receive simulated requests. However, we need to return real responses from a real provider. This means that we need to stand up just enough of the provider so that real responses can be built and returned to the mock consumer. The provider tests are located in the /baskets/internal/rest/gateway_contract_test.go file.
For the Shopping Baskets module, we can start up the gRPC and HTTP servers, use test doubles for all of the application dependencies, and still be able to generate real responses. This provider will need to be running in the background so that the mock consumer can send the interactions that each consumer contract has defined.
When performing the verifications for simple APIs, we could start up the provider, configure the verifier, feed in contracts, and be done with our test:
verifier.VerifyProvider(t, provider.VerifyRequest{
    Provider:                   "baskets-api",
    ProviderBaseURL:            "http://127.0.0.1:9090",
    ProviderVersion:            "1.0.0",
    BrokerURL:                  "http://127.0.0.1:9292",
    BrokerUsername:             "pactuser",
    BrokerPassword:             "***",
    PublishVerificationResults: true,
})
The configured verifier in the prior listing will connect the mock consumer to the provider running on port 9090, then look for contracts published to our Pact Broker that belong to the baskets-api provider. If every interaction is verified for a contract, then we publish that success back to Pact Broker.
However, if any consumers have made interactions that make use of the provider state, as we did in our baskets-ui consumer using given(), then those states need to be supported; otherwise, the interactions cannot be verified.
For example, to verify the AddItem endpoint, we will need to populate the test doubles with a basket, product, and store records. Using provider states will require communication and collaboration between teams. Documentation could be written that lists the state options that the provider supports. Failing these verification tests could block a provider from deploying, so the use of new provider states should be communicated and documented in all cases.
Provider states may optionally accept parameters that allow consumers to customize the interactions that they send and expect to receive back. The following state is used by the consumer:
given('a basket exists', {id: basketId})This is supported by the provider with the following:
// ... inside provider.VerifyRequest{}
StateHandlers: map[string]models.StateHandler{
    "a basket exists": func(_ bool, s models.ProviderState)
          (models.ProviderStateResponse, error) {
        b := domain.NewBasket("basket-id")
        if v, exists := s.Parameters["id"]; exists {
            b = domain.NewBasket(v.(string))
        }
        b.Items = map[string]domain.Item{}
        b.CustomerID = "customer-id"
        if v, exists := s.Parameters["custId"]; exists {
            b.CustomerID = v.(string)
        }
        b.Status = domain.BasketIsOpen
        if v, exists := s.Parameters["status"]; exists {
            b.Status = domain.BasketStatus(v.(string))
        }
        baskets.Reset(b)
        return nil, nil
    },
},
Supporting this expected state, as well as the ones for products and stores, should be enough to verify the provider for the current UI consumer.
When the AddItem endpoint is verified against the interaction with the negative quantity value, it will produce the following result:
a request to add a product with a negative quantity
Given a store exists
And a product exists
And a basket exists
returns a response which
has status code 400 (OK)
includes headers
"Content-Type" with value "application/json" (OK)
has a matching body (OK)
This result comes from the simulated request being sent to our real provider, which responded exactly how it would under normal conditions. The real response was then compared with the expected response, and it all passed.
With that, we have tested both a real request and a real response and have confirmed that they will work both as intended and expected. The REST API will work for every consumer that has created a contract, giving the provider confidence that it can be deployed without it breaking any consumers.
Message consumer and provider example
Contracts can also be developed by the consumers of asynchronous messages. We will want to expect messages from the consumers and verify that the providers will send the right messages. With asynchronous messaging, there will be no request portion to the test but only an incoming message to process. Likewise, for the provider, we will not receive any request for a message, so the testing pattern changes slightly.
We will create tests for the messages that the Store Management module publishes, and test message consumption in both the Shopping Baskets and Depot modules.
The consumer tests are located in the /baskets/internal/handlers/integration_event_contract_test.go and /depot/internal/handlers/integration_event_contract_test.go files. These two modules receive messages from the Store Management module, which we will discuss later.
For each message that a consumer expects to receive, we must create an expected message entry in our contract with the following code:
message := pact.AddAsynchronousMessage()
for _, given := range tc.given {
    message = message.GivenWithParameter(given)
}
assert.NoError(t, message.
    ExpectsToReceive(name).
    WithMetadata(tc.metadata).
    WithJSONContent(tc.content).
    AsType(&rawEvent{}).
    ConsumedBy(msgConsumerFn).
    Verify(t),
)
The GivenWithParameter() and ExpectsToReceive() methods should be familiar to you if you read through the REST example.
WithJSONContent() is one of several methods we can use in Go to provide the expected message to the test. The content that we provide as our expected content is built using matchers. We can also use WithMetadata() to provide expectations for the headers or extra information that is published along with the content. This can be seen in the following example for the test of the StoreCreated event:
metadata: map[string]string{
    "subject": storespb.StoreAggregateChannel,
},
content: Map{
    "Name": String(storespb.StoreCreatedEvent),
    "Payload": Like(Map{
        "id":       String("store-id"),
        "name":     String("NewStore"),
        "location": String("NewLocation"),
    }),
}
The AsType() method is a convenient way to convert the JSON that results from the matchers into something we can more easily work with and is optional.
Contract testing messaging will not use a mock provider or consumer, which is what we did in the REST example. The consumers will only be receiving messages and are not expected to send anything back. We will not be using a mock provider this time; instead, we will use a function that we provide to ConsumedBy() to test that our expected message will work.
The idea remains the same as in the REST example: we want to test that the message can be consumed. If it cannot, then we need to fix the message, application, or test.
To test that the events we receive work, we will need to turn rawEvent into an actual ddd.Event event, which means also converting the JSON payload into a proto.Message protocol. First, we need to register the storespb.* messages using a JSON Serde instead of the Protobuf Serde we typically use:
reg := registry.New()
err := storespb.RegistrationsWithSerde(
    serdes.NewJsonSerde(reg),
)
Then, in the function that we provide to the ConsumedBy() method, we will deserialize the JSON into the correct proto.Message:
msgConsumerFn := func(contents v4.MessageContents) error {
    event := contents.Content.(*rawEvent)
    data, err := json.Marshal(event.Payload)
    if err != nil { return err }
    payload, err := reg.Deserialize(event.Name, data)
    if err != nil { return err }
    return handlers.HandleEvent(
        context.Background(),
        ddd.NewEvent(event.Name, payload),
    )
}
The test will fail if the built event is not handled as expected. For extra measure, we use mocks that are passed into the handlers to test whether the right calls are being made when we call down into the handlers.
The contracts that we produce from message testing will not contain interactions and cannot be verified using a provider test, which is what we used in the REST example. The providers will use the description and any provider states to construct the message that is expected by consumers. There will not be any requests coming in.
Like the Shopping Basket REST provider, we want to avoid manually generating the message and should stand up enough of the module to create messages for us. We should verify that the processes that produce messages will continue to produce the right messages into the right streams as the application changes.
Just as we did in the REST provider test, we will create a verifier that will connect to Pact Broker, fetch the contracts that belong to the provider, verify the messages, then publish the results of the verifications back to Pact Broker.
The Store Management module provider verification tests can be found in the /stores/internal/handlers/domain_events_contract_test.go file. The key differences between this test file and the one for the REST contracts are that we do not start any mock consumer or start the provider listening on any ports. Message verification will also require that we implement each description string that the consumers have used in their contracts, such as “a StoreCreated message,” as a message handler:

Figure 10.10 – Verifying the StoreCreated message
To verify the StoreCreated message, we can make a call into CreateStore() that will fire off the domain event, which, in turn, publishes the expected message. Using a FakeMessagePublisher test double, we can retrieve the last published message to complete the verification process.
The message payload, proto.Message, is serialized using a JSON Serde, similar to what we used in the consumer tests. We need to use the same methods for encoding when we create these messages tests, and JSON is currently the best option for the content that we want to verify. Other formats could be used but the Pact tools support JSON the best and the matchers only work with JSON.
Our entire message handler for the StoreCreated event message looks like this:
"a StoreCreated message": func(
        states []models.ProviderState,
    ) (message.Body, message.Metadata, error) {
    // Arrange
    dispatcher := ddd.NewEventDispatcher[ddd.Event]()
    app := application.New(
        stores, products, catalog, mall, dispatcher,
    )
    publisher := am.NewFakeMessagePublisher[ddd.Event]()
    handler := NewDomainEventHandlers(publisher)
    RegisterDomainEventHandlers(dispatcher, handler)
    cmd := commands.CreateStore{
        ID:       "store-id",
        Name:     "NewStore",
        Location: "NewLocation",
    }
    // Act
    err := app.CreateStore(context.Background(), cmd)
    if err != nil { return nil, nil, err }
    // Assert
    subject, event, err := publisher.Last()
    if err != nil { return nil, nil, err }
    return rawEvent{
            Name:    event.EventName(),
            Payload: reg.MustSerialize(
                event.EventName(), event.Payload(),
            ),
        }, map[string]any{
            "subject": subject,
        }, nil
},
The real, albeit rawEvent event, is returned, along with a map for the metadata containing the subject that the message, if it had been published, would have been published into.
With that, we have completed the message verification process. We have taken a contract containing the expected messages for a pair of consumers and verified them with the provider. The results are automatically published to Pact Broker. If configured, Pact Broker could then inform the CI/CD processes to allow deployments to proceed.
Contract testing allows us to test integrations between components very quickly and with a lot less effort than if we had used a more traditional integration test approach. We can test the integration between two components, but we still need to test the operations that span multiple interactions.
Testing the application with end-to-end tests
The final form of testing we will cover is end-to-end (E2E) testing. E2E testing will encompass the entire application, including third-party services, and have nothing replaced with any test doubles. The tests should cover all of the processes in the application, which could result in very large tests that take a long time to complete:
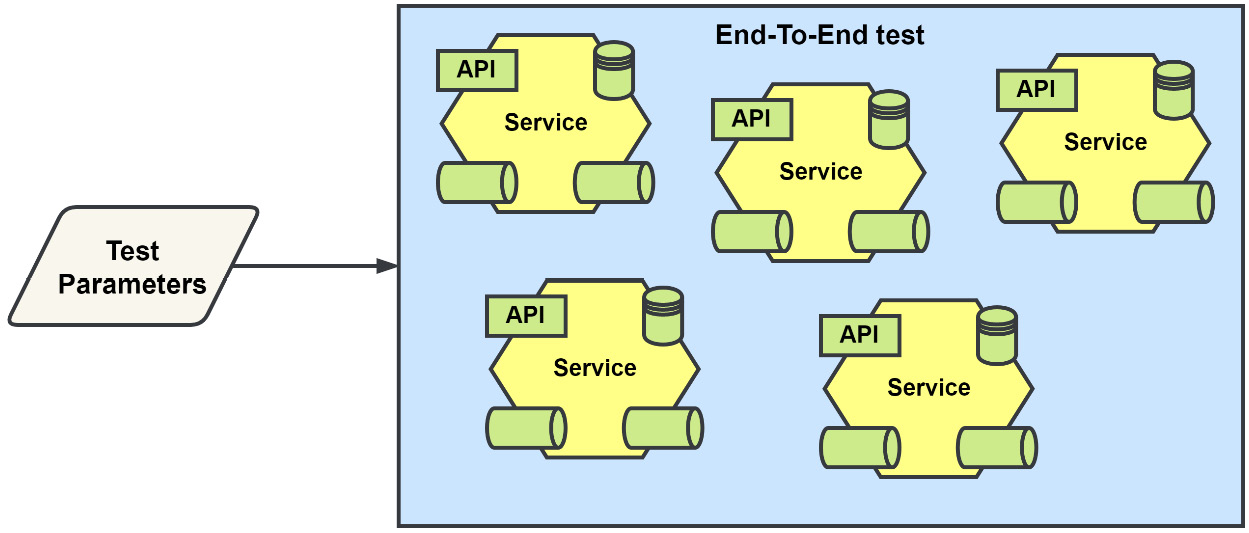
Figure 10.11 – The scope of an end-to-end test
E2E testing takes many forms, and the one we will be using is a features-based approach. We will use Gherkin, introduced in Chapter 3, Design and Planning, to write plain text scenarios that should cover all essential flows throughout the application.
Relationship with behavior-driven development
You can do behavior-driven development (BDD) without also doing E2E testing, and vice versa. These two are sometimes confused with each other or it’s thought that they are the same. BDD, as a practice, can be used at all levels of the testing pyramid and not just for the final E2E tests or the acceptance tests. Whether or not to also employ BDD, and perhaps TDD, is a tangential decision for any particular level of testing in your testing strategy:

Figure 10.12 – The double-testing loop with BDD and TDD
BDD is also associated with the Gherkin language, and it has become dominant because of how the user stories BDD uses are created. We will be using Gherkin to write our features and their related scenarios but again, this does not mean that we will be doing BDD. Gherkin can also be used for our unit or integration tests. Instead of using table-driven tests or a library to run tests as a suite, they could be written as plain text tests.
E2E test organization
Our first step in E2E testing is to create feature specifications and then record them in our feature test files using Gherkin. There is no standard for organizing these feature files, but if we consider that an application uses multiple repositories because it is a distributed application that also uses microservices, then organizing all of the features into a repository might make sense. We only have one repository, so we will organize all of the features and other E2E-related test files under /testing/e2e.
Making executable specifications out of our features
To make a feature file an executable specification, we will use the godog library, which is the official Cucumber (https://cucumber.io) library for Go. With this library, we can write a TestEndToEnd function that will be executed using the go test command.
We will also need clients for each of the REST APIs. Normally, E2E tests would involve interacting with some end user UI, but our little application has none to work with at the moment. The REST clients can be generated using the go-swagger (https://github.com/go-swagger/go-swagger) tool, which can be installed along with the other tools we have used in this book by running the following command from the root of the code for this chapter:
make install-tools
The actual command to generate the clients is then added to the generate.go file for each module. The added command looks something like the following, with added line breaks to make it easier to read:
//go:generate swagger generate client -q
  -f ./internal/rest/api.swagger.json
  -c storesclient
  -m storesclient/models
  --with-flatten=remove-unused
The generate command in the previous listing will create an entire REST client that is ready to be pointed at the Store Management REST API.
The final step of turning features into executable specifications is to implement each step and then register the implementation with the library.
Example step implementation
Let’s say we have the following feature:
Feature: Register Customer
  Scenario: Registering a new customer
    Given no customer named "John Smith" exists
    When I register a new customer as "John Smith"
    Then I expect the request to succeed
    And expect a customer named "John Smith" to exist
We have four steps that we need to implement and register. To implement the registration of a new customer, we can start with a function signature, like this:
func iRegisterANewCustomerAs(name string)The string that is enclosed within the double quotes would be passed as the name parameter. Steps can have several parameters, and those parameters can be of several different Go types. Gherkin Docstrings and Tables are supported and can be passed in as well. The name of the function does not matter to the library and can be anything.
The function can be standalone or be part of a struct if you want to capture and use some test state, for example. We can also have an error return value if the step should fail:
func iRegisterANewCustomerAs(name string) errorAfter we have implemented our step, we will need to register it so that when godog runs across the step statement, it knows what function will be expected to handle it:
// ctx is a *godog.ScenarioContext
ctx.Step(
    `^I register a new customer as "([^"]*)"$`,
    iRegisterANewCustomerAs,
)
The step statements may be provided as strings and are interpreted as regular expressions, or directly as a compiled *regexp.Regexp. This is so that the parameters can be parsed out and passed into the step function.
What to test or not test
E2E testing sits very high on the testing pyramid, and we should not try to write features covering everything that the application does or can do. Start with the critical flows to the business and then go from there. The identified flows will have several tests associated with them, not just one. You will want to consider what conditions can affect it and write tests to cover those conditions.
Some flows may not automate very well and should be left for the testers to run through manually.
Summary
Testing an event-driven application is no harder than testing a monolithic application when you have a good testing strategy. In this chapter, we covered the application, domain, and business logic using unit tests. These tests make up the bulk of our testing force. We follow up our unit tests with integration tests, which help uncover issues with how our components interact. Using tools such as Testcontainers-Go can help reduce the effort required to run the tests, and using libraries such as the Testify suite can help reduce the test setup and teardown complexities.
A distributed application, whether it is event-driven like ours or synchronous, gains a lot from including contract testing in the testing strategy. Having confidence in how you are using or have made expectations of a provider without the mess and complexities of standing the provider up is a time saver many times over. Finally, including E2E testing in any form will give the team and stakeholders confidence that the application is working as intended.
In the next chapter, we will cover deploying the application into a Kubernetes environment. We will be using Terraform so that our application can be deployed to any cloud provider that provides Kubernetes services. We will also break a module out of the monolith into a microservice so that we can deploy it.