
Work with Events
Whether you’re looking forward to your next watch party with friends or scheduling your kickball team’s practices, the heart of the Calendar experience is scheduling and working with events.
In addition to covering the basics of adding an event, which is often easily handled with Siri, I walk you through how to Include More Information. I also cover how to Add a Suggested Event from the special Siri Suggestions calendar, and look at how to Reschedule an Eventand Delete an Event.
Add an Event
When you’re itching to add an event, you have a lot of choices:
Create a quick event: Click or tap the Create Quick Event
 icon. You may have to add a date or time.
Click or click and drag in the calendar (macOS): Click to create an event with a default duration at the point you clicked; drag to control the duration starting at the click point.
Touch and hold in the calendar (iOS/iPadOS): Touch and hold to create a one-hour event you can drag to different starting points and then customize.
Tell Siri to add an event: Say “Set up a meeting with Buzz at 9” or “New appointment with Marita Cheng tomorrow at noon.” (Review How to Activate Siri, if Siri isn’t enabled.) Siri prompts you if it needs more information. You can use this method on all your Siri-enabled devices; a HomePod requires an additional step found in Set Up Personal Requests on a HomePod.
Use the Create Quick Event Icon
Click the Create Quick Event ![]() icon in the top-left corner and use natural language to describe your event: “Preserve pickles Saturday at 3.” As you type, Calendar creates a preview of the event as it will appear (Figure 25).
icon in the top-left corner and use natural language to describe your event: “Preserve pickles Saturday at 3.” As you type, Calendar creates a preview of the event as it will appear (Figure 25).
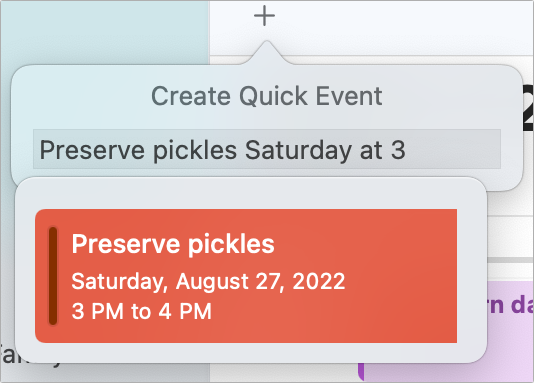
The menu that appears includes past and future events Calendar considers to be related. Selecting one adds a copy of it to your calendar, saving you the trouble of entering an event’s time or location details.
Click in a Calendar
If the day you want to add an event to is visible on the calendar, there’s no need to type everything in, just try one of the following techniques in macOS:
Double-click: Double-click at a time or in the “all-day” section in Day or Week view or double-click a day in an empty area in the Month view. You can also Control-click or right-click in Day, Week, or an empty area in Month and choose New Event. Calendar creates a New Event item you can fill out.
Click and drag across times: In the Day or Week view, you can click at a specific time of day and then drag to set its duration.
Click and drag across days: To make an all-day event that spans more than one day, click and drag across the all-day section at the top of Week view or across the days you want in Month view.
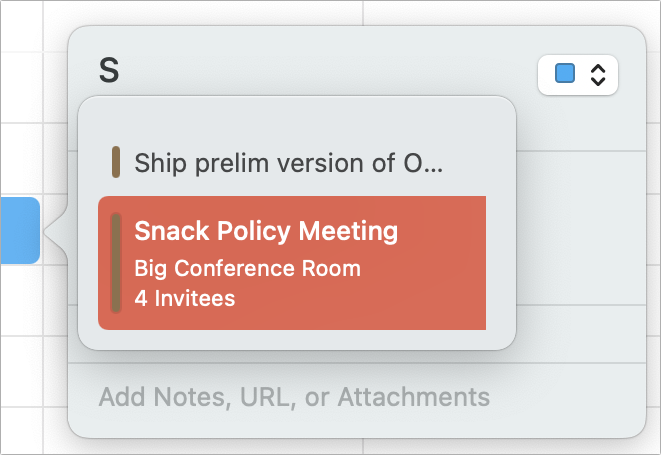
Select a matching previously entered meeting: As you begin to type the event’s title, a menu appears in most views that offers predicted matches for what you might intend to enter based on past events’ titles (Figure 26). For example, if I double-click next Friday and type
walk dog, a menu appears with the suggestion Walk dog with Gretchen at 10:30 a.m. If I select this, the event is created and—since an invitation was sent previously—Gretchen is invited.
Include More Information
A handy aspect of Calendar is that you can include more than just the bare-bones details of when a meeting will take place. These details are added in an event’s Info popover (Figure 27), or in Day view in the Info pane that’s always visible to the right. (I generally call this the “Info pane,” instead of writing out all the possibilities.)
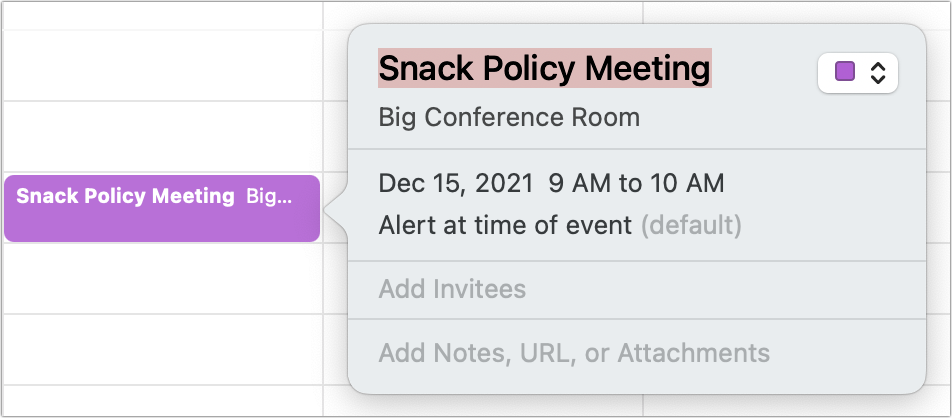
If you’ve already added an event to your calendar, you can open the Info pane in macOS by selecting the event in Day view. In Week or Month view, double-click it or, with a trackpad, force-click it. In iOS/iPadOS, tap the event in any view, then tap Edit to modify details. Let’s walk through which details you can add.
Calendar Name
Newly added events appear in your default calendar. To put your event on a different calendar, choose that calendar from the pop-up menu in macOS or tap the Calendar field in iOS/iPadOS.
Location
In the line below the event’s title, type the address where it will take place. Calendar creates a miniature map (Figure 28). This map includes the weather, and you can click it to jump straight to the Maps app for directions.

When you include the location in an event, you can double-check where you’re going using your HomePod as you walk out the door (“Hey Siri, where’s my next appointment?”) or get directions using your iPhone once you’re in the car (“Hey Siri, get directions to my 1 p.m. appointment”).
FaceTime and Other Video Call Links
You can add a FaceTime video call link to an event, allowing you or all participants in a shared calendar to join a call via the Calendar app on any platform.
To add a call:
Click the video
 icon in the event details to access its pop-up menu.
Select FaceTime. Apple invisibly creates the FaceTime Link.
The icon changes to a FaceTime
 icon and adds the label FaceTime, making it a pop-up menu. At the appropriate time, click Join.
The event in Day and Week views now shows a hollow video ![]() icon and FaceTime if there’s room in the layout to display it. At any point after you add a FaceTime link, you can click the FaceTime
icon and FaceTime if there’s room in the layout to display it. At any point after you add a FaceTime link, you can click the FaceTime ![]() icon in the event to reveal the URL (dimmed), and choose Open Link, Copy Link, or Share. (Open Link With doesn’t make sense for FaceTime calls: only FaceTime can open them.)
icon in the event to reveal the URL (dimmed), and choose Open Link, Copy Link, or Share. (Open Link With doesn’t make sense for FaceTime calls: only FaceTime can open them.)
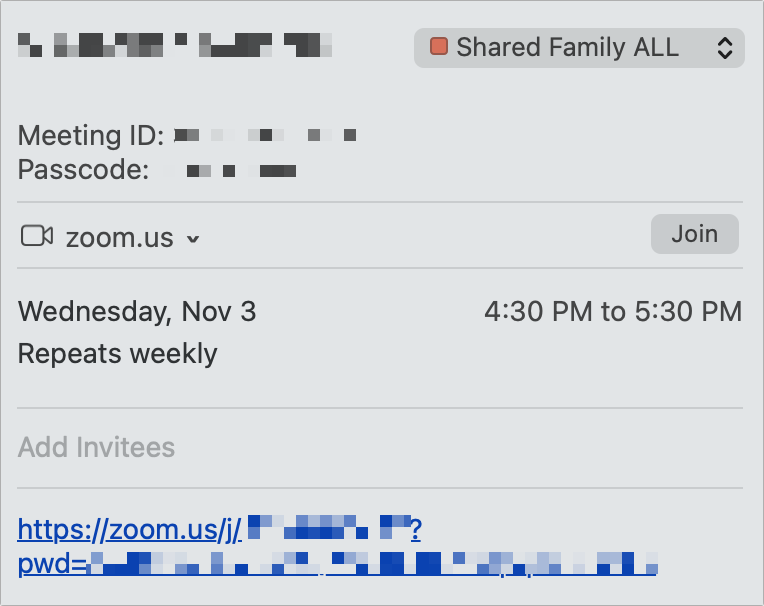
Calendar also recognizes when you paste a link into the URL field that points to a videoconferencing service, like Cisco Webex or Zoom. With a third-party service, Apple puts a hollow video ![]() icon in the event details, the service’s name, and a Join button (Figure 29). The same pop-up menu items appear as with a FaceTime meeting. The only difference from FaceTime? The icon doesn’t appear in entries in Day or Week views.
icon in the event details, the service’s name, and a Join button (Figure 29). The same pop-up menu items appear as with a FaceTime meeting. The only difference from FaceTime? The icon doesn’t appear in entries in Day or Week views.
Time
Click the event’s time to open the various time-related options. Select All-day for events like relatives visiting or family camping trips. Otherwise, fill in the Starts and Ends fields. Here are some notes on the remaining options:
Time Zone: You see a Time Zone field if you’ve turned on the Time Zone Preferences.
Repeat: Use this pop-up menu to create more than one instance of your event. Say your ukulele jam happens every fourth Saturday. Click the Repeat pop-up menu and choose Custom. Click Frequency and choose Monthly. Select the “On the” radio button and then adjust the pop-up menus to read: On the Fourth Saturday. Click OK (Figure 30).

Figure 30: Set an event to repeat according to a custom schedule. By tinkering with the options you can set up an event to repeat on specific days of the week (every Tuesday and Thursday), times in the month (first Monday of every month), or the same time every year (last Sunday of December). Just adjust the custom repeat settings to fit your event (Figure 31).

Figure 31: Here’s how to set up an event that repeats every week on Tuesday and Thursday. I clicked the T tiles to select both days. Travel Time: Set a travel time if you’d like your event to begin at the start of its travel time. For example, if it takes you 30 minutes to walk to a meeting that goes from 7:00 p.m. through 8:00 p.m., instead of blocking out only 1 hour, you can set 30 minutes of travel time and then the event starts at 6:30 p.m. with 30 minutes for travel.
If you’ve entered a Location for your event, the Travel Time pop-up menu even shows Apple’s estimates for driving, walking, and (if available) public transit (Figure 32).

Figure 32: To block off time in your schedule for getting where you’re going, use the Travel Time pop-up menu. Once you’ve chosen a time, you can pick from a variety of travel-time options in the Alert pop-up menu. So, if you need a 10-minute reminder at 6:20 to get ready to walk to your 7:00 meeting, just choose 10 Minutes before Travel Time from the Alert pop-up menu.
Alert: From the Alert pop-up menu, choose an option—At Time of the Event, 5 Minutes Before, At Start of Travel Time, and so on. With the exception of the custom alerts (available by choosing Custom), these alerts work through Apple’s Notifications feature, so check Set Up Notifications to make sure that’s set up correctly. I cover alerts more fully in Set Up Calendar Alerts, later.
Add Invitees
When you invite other people to your event, they can add an exact copy of the event to their calendar. I describe this feature more fully in Invite People to Events.
Notes, URL, or Attachments
Click “Add Notes, URL, or Attachments” to open fields where you can add special information that goes with the event:
Add Notes: You can type text here, such as agenda items for a meeting or how to pronounce a person’s name. If you add a phone number, you’ll be able to tap or click it later to dial on your iPhone or your Mac (if it’s set up to make FaceTime calls through your iPhone).
Add URL: URLs related to an event could be a website, a Google Doc you’ve used to take notes, or a registration form. The URLs you enter here are “hot.” In other words, you can click one to jump to the page in Safari. If Calendar recognizes a URL as a FaceTime link, it connects it and adds a FaceTime
icon; if it’s for another known videoconferencing service, Calendar adds a hollow video  icon. See FaceTime and Other Video Call Links, above, for more.
Add Attachment: You can attach a file—such as a contract, handout, or spreadsheet—to help you prepare for an event or that you need to view during it (Figure 33). Click Add Attachment, navigate to the file you want, and then click Open. Alternatively, drag a file onto the Info popover. To add a second file, click Add Attachment.

Add a Suggested Event
To save you time, macOS tries to do scheduling work for you. It can recognize dates, times, and event information in Mail and Messages. In Mail, it can extract those and place those in a special calendar for review. In Mail and Messages, macOS highlights and lets you choose to add them to any calendar.
View the Siri Suggestions Calendar
Mail automatically recognizes events and adds them to a calendar called Siri Suggestions for you to look over. For example, if you receive an email message in Apple Mail from Expedia about an upcoming flight, a suggested event appears in the Siri Suggestions calendar (see Tap into Special Calendars). The same thing happens when you receive email from other known providers like OpenTable, Airbnb, or Hertz, or when any Mail message arrives that includes dates and times.
Think of the Siri Suggestions calendar as a way station rather than a destination. Add suggested events in Siri Suggestions to another calendar if you want to keep them:
Suggested events appear with a background of angled stripes in Week and Day view, and in the calendar’s color in month view (Figure 34). Double-click an event to open its Info pane.

Figure 34: Suggested events, like this one for an Airbnb reservation, appear in the Siri Suggestions calendar. The number next to the calendar’s name indicates how many notifications there are for it. Choose the calendar you want to add it to from the pop-up menu in the upper-right corner. (If you do nothing, Calendar adds it to your default calendar.)
Click the Accept button.
The event moves to the calendar you chose. If you click Decline instead, the event disappears.
Add Calendar Events from Other Apps
If Mail or Messages identifies text that it thinks reflects a date, time, range, or event under discussion, it underlines the text. You can then click that text and have an Add to Calendar popover appear that lets you preview your calendar (Figure 35).

You can modify anything in the entry, including changing the proposed day and time or the title. You can also add a location (as I did in the figure) and set the calendar if you don’t want to use your default. Messages includes a link back to the message so you can find it later if need be. Click Summary to show fewer options, and click Add to Calendar to add the event.
Reschedule an Event
Alas, alack—the conference room is booked! Fortunately, you can reschedule your meeting for a different time.
To reschedule an event, do one of the following:
Double-click the event, and adjust the date or time in the Info pane.
In Week or Month view, drag the event to another day or time. (With a force-touch trackpad, drag lightly; don’t force-touch and drag or you’ll add a new event accidentally.)
In Day view, click the event and change the details in the Info pane.
Delete an Event
To remove an event, select it and press Delete. Or, Control-click or right-click the event and choose Delete.
To delete more than one event at the same time, Shift-click to select contiguous ones or ⌘-click to select noncontiguous ones, and then press Delete.