
Chapter 5. Learning advanced EJB concepts
This chapter covers
- EJB internals
- Dependency injection of the @Resource annotation
- Crosscutting concerns with interceptors
- Task scheduling with the EJB timer
In the previous two chapters we focused on developing session beans and message-driven beans (MDBs). Although we discussed a few bean type-specific features in detail, we generally avoided covering topics not closely related to introducing the basics. In this chapter we build on the material in the previous chapters and introduce advanced concepts applicable to MDBs and session beans. It is very likely that you’ll find these EJB 3 features extremely helpful while using EJB in the real world.
We begin by discussing the how containers provide the services behind the scenes and how to access environment information. We then move on to advanced use of dependency injection, JNDI lookups, EJB interceptors, and the EJB timer service. As you’ll learn, EJB 3 largely relieves you from these system-level concerns while providing extremely robust and flexible functionality.
As a foundation for the rest of the chapter, we briefly examine these EJB internals first.
5.1. EJB internals
Although we’ve talked about the role of the container and the concept of managed services, we haven’t explained how most containers go about providing managed services. The secret to understanding these and the other EJB services is knowing how the container provides them. Without going into too much detail, we’ll discuss EJB objects—which perform the magic of providing the service—and then examine the EJB context—which a bean can use to access runtime environment and use container services.
5.1.1. EJB behind the scenes
EJB centers on the idea of managed objects. As we saw in the previous chapters, EJB 3 beans are just annotated POJOs themselves. When a client invokes an EJB method using the bean interface, it doesn’t work directly on the bean instance. The container makes beans “special” by acting as a proxy between the client and the actual bean instance. This enables the container to provide EJB services to the client on behalf of the bean instance.
Note
For each bean instance, the container automatically generates a proxy called an EJB object. The EJB object has access to all the functionality of the container, including the JNDI registry, security, transaction management, thread pools, session management, and pretty much anything else that is necessary to provide EJB services. The EJB object is aware of the bean configuration and what services the POJO is supposed to provide.
Since all requests to the EJB instance are passed through the EJB object proxy, the EJB object can “insert” container services to client requests as needed, including managing all aspects of the bean lifecycle. Figure 5.1 is a typical representation of this technique.
Figure 5.1. The “magic” of EJB. The container-generated EJB object receives all EJB client requests as the proxy, and reads configuration and inserts container services as required before forwarding client requests to the bean instance.

As you’ve seen in the previous chapters, the beauty of this technique is that all the service details are completely transparent to bean clients and even to bean developers. In fact, a container implementation is free to implement the services in the most effective way possible and at the same time provide vendor-specific feature and performance enhancements. This is fundamentally all there is to the “magic” parts of EJB. For session beans, the client interacts with the EJB object through the business interface. For MDBs, however, the EJB object or message endpoint sits between the message provider and the bean instance.
Let’s now take a look at how EJBs access the container environment in which the EJB object itself resides.
5.1.2. EJB context: accessing the runtime environment
EJB components are generally meant to be agnostic of the container. This means that in the ideal case, EJB components should merely hold business logic and never access the container or use container services directly. As you’ll recall, services like transaction management, security, dependency injection, and so forth are meant to be “overlaid” on the bean through configuration.
However, in the real world, it is sometimes necessary for the bean to explicitly use container services in code. These are the situations the EJB context is designed to handle. The javax.ejb.EJBContext interface is essentially your backdoor into the mystic world of the container. In this section, we define EJBContext, explain its use, and show you how to use dependency injection to retrieve EJBContext.
Defining the EJBContext Interface
As you can see in listing 5.1, the EJBContext interface allows direct programmatic access to services such as transaction and security, which are typically specified through configuration and completely managed by the container.
Listing 5.1. javax.ejb.EJBContext interface
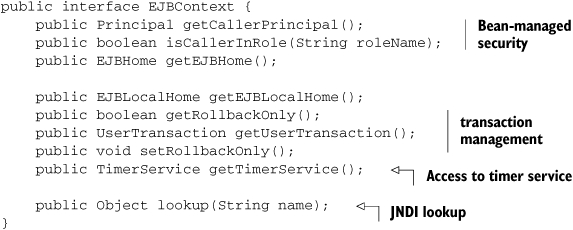
Let’s look briefly at what each of these methods do (table 5.1). We’ll save a detailed analysis for later, when we discuss the services that each of the methods is related to. For now, you should note the array of services offered through the EJB context as well as the method patterns.
Table 5.1. You can use javax.ejb.EJBContext to access runtime services.
|
Description |
|
|---|---|
|
getCallerPrincipalisCallerInRole |
These methods are useful when using in bean-managed security. We discuss these two methods further in chapter 6 when we discuss programmatic security. |
|
getEJBHome getEJBLocalHome |
These methods are used to obtain the bean’s “remote home” and “local home” interfaces, respectively. Both are optional for EJB 3 and are hardly used beyond legacy EJB 2.1 beans. We won’t discuss these methods beyond this basic introduction. They are mainly provided for backward compatibility. |
|
getRollbackOnly,setRollbackOnly |
These methods are used for EJB transaction management in the case of container-managed transactions. We discuss container-managed transactions in greater detail in chapter 6. |
|
getUserTransaction |
This method is used for EJB transaction management in the case of bean-managed transactions. We discuss bean-managed transactions in greater detail in chapter 6. |
|
getTimerService |
This method is used to get access to the EJB timer service. We discuss EJB timers later in this chapter. |
|
lookup |
This method is used to get references to objects stored in the JNDI registry. With the introduction of DI in EJB 3, direct JNDI lookup has been rendered largely unnecessary. However, there are some edge cases that DI cannot handle, or perhaps DI is simply not available. This method proves handy in such circumstances. We discuss this topic later in this section. |
Both session and message-driven beans have their own subclasses of the javax.ejb.EJBContext interface. As shown in figure 5.2, the session bean–specific subclass is javax.ejb.SessionContext, and the MDB-specific subclass is javax.ejb.MessageDrivenContext.
Figure 5.2. The EJB context interface has a subclass for each session and message-driven bean type.

Each subclass is designed to suit the particular runtime environment of each bean type. As a result, they either add methods to the superclass or invalidate methods not suited for the bean type. For example, it doesn’t make sense to call the isCallerInRole method from an MDB because the MDB is not invoked directly by a user.
Using EJBContext
As we discussed earlier, you can gain access to several container services such as transaction or security by using EJBContext. Interestingly, you can access EJBContext through DI. For example, a SessionContext could be injected into a bean as follows:
@Stateless
public class PlaceBidBean implements PlaceBid {
             @Resource
   SessionContext context;
   ...
}
In this code snippet, the container detects the @Resource annotation on the context variable and figures out that the bean wants an instance of its session context. The SessionContext adds a number of methods specific to the session bean environment, including getBusinessObject, getEJBLocalObject, getEJBObject, getInvokedBusinessInterface, and getMessageContext. All of these are fairly advanced methods that are rarely used. Note that the getEJBLocalObject and getEJBObject methods are meant for EJB 2 beans and will generate exceptions if used with EJB 3 beans. We won’t discuss these methods further and will leave them for you to explore on your own.
MessageDrivenContext adds no methods specific to MDB. Rather, it throws exceptions if the isCallerInRole, getEJBHome, or getEJBLocalHome methods are called since they make no sense in a messaging-based environment (recall that a message-driven bean has no business interface and is never invoked directly by the client). Much like a session context, a MessageDrivenContext can be injected as follows:
@MessageDriven
public class OrderBillingMDB {
             @Resource MessageDrivenContext context;
   ...
}
Note
It is illegal to inject a MessageDrivenContext into a session bean or a SessionContext into an MDB.
This is about as much time as we need to spend on the EJB context right now. Rest assured that you’ll see more of it in chapter 6. In the meantime, let’s turn our attention back to a vital part of EJB 3—dependency injection. We provided a brief overview of DI in chapter 2 and have been seeing EJB DI in action in the last few chapters. We just saw an intriguing use case in injecting EJB contexts. In reality, EJB DI is a like a Swiss army knife: it is an all-in-one tool that can be used in unexpected ways. Let’s take a look at some of these advanced uses next.
5.2. Accessing resources using DI and JNDI
We’ve seen EJB 3 DI in its primary incarnations already—the @javax.ejb.EJB and @javax.annotation.Resource annotations. EJB 3 DI comes in two more forms—the @javax.persistence.PersistenceContext and @javax.persistence.PersistenceUnit annotations. We’ll see these two annotations in action in part 3 of this book.
We’ve also witnessed only a small part of the power of the @Resource annotation. So far, we’ve used the @Resource annotation to inject JDBC data sources, JMS connection factories, and JMS destinations. Unlike some lightweight containers such as Spring, EJB 3 does not permit injection of POJOs that aren’t beans. However, the @Resource annotation allows for a variety of other uses, some of which we cover in the coming section. In this section we’ll show you how to use the @Resource annotation and its parameters. You’ll learn the difference between setter and field injection, and you’ll see the @Resource annotation in action when we inject a variety of resources such as e-mail, environment entries, and the timer service. Finally, you’ll learn how to look up resources using JNDI and the lookup method in EJBContext.
5.2.1. Resource injection using @Resource
The @Resource annotation is by far the most versatile mechanism for DI in EJB 3. As we noted, in most cases the annotation is used to inject JDBC data sources, JMS resources, and EJB contexts. However, the annotation can also be used for e-mail server resources, environment entries, ORB reference, or even EJB references. Let’s take a brief look at each of these cases. For convenience, we’ll use the familiar JDBC data source example to explain the basic features of the @Resource annotation before moving on to the more involved cases. The following code injects a data source into the PlaceBid bean from chapter 2:
@Stateless
public class PlaceBidBean implements PlaceBid {
    ...
    @Resource(name="jdbc/actionBazaarDB")
    private javax.sql.DataSource dataSource;
In this case, the container would not have to work very hard to figure out what resource to inject because the name parameter is explicitly specified. As we know, this parameter specifies the JNDI name of the resource to be injected, which in our case is specified as jdbc/actionBazaarDB. Although we didn’t mention this little detail before, the value specified by the name parameter is actually interpreted further by the container similar to a value specified in the res-ref-name in the <resource-ref> tag in the deployment descriptor, as in the following example:
<resource-ref>
      <res-ref-name>jdbc/actionBazaarDB</res-ref-name>
      <res-type>javax.sql.DataSource</res-type>
</resource-ref>
The value of the name parameter in @Resource (or res-ref-name) is translated to a fully qualified JNDI mapping in the form java:comp/env/[value of the name parameter] (see the accompanying sidebar). In our example, the complete JNDI path for the resource will be java:comp/env/jdbc/actionBazaarDB. If you don’t specify the name element in the @Resource annotation, the JNDI name for the resource will be of the form java:comp/env/[bean class name including package]/[name of the annotated field/property]. If we didn’t specify the name element in the @Resource annotation, the container would use java:comp/env/actionbazaar.buslogic.PlaceBidBean/dataSource as the JNDI name.
The environment naming context and resolving global JNDI names
If you know how JNDI references worked in EJB 2, you’re familiar with the environment naming context (ENC). ENC allows portability of the application without having to depend on global JNDI names. Global JNDI names for resources differ between application server implementations, and ENC allows you to use a JNDI location that starts with java:comp/env/ instead of hard-coding the actual global JNDI name. EJB 3 essentially assumes that all JNDI names used in code are local references and automatically prepends names with the java:comp/env/ prefix.
This automatic interpretation of EJB 3 JNDI names into local references is a nice alternative to mentioning the local ENC (java:comp/env) prefix over and over again. However, this convenience does come at a price. Since you cannot use global names with the name parameter, you have to make sure that you perform the mapping between the ENC and global JNDI names in all cases. Fortunately, many application servers will automatically resolve the ENC name to the global JNDI name if a resource with the same global JNDI name exists. For example, if you are using the Sun GlassFish or Oracle Application Server and you define a data source as shown here, the application server will automatically map the data source to the global JNDI resource bound to jdbc/ActionBazaarDS, even if you didn’t explicitly map the resource:
@Resource(name="jdbc/ActionBazaarDS")
private javax.jdbc.DataSource myDB;
Moreover, application servers allow you to explicitly specify a global JNDI name using the mappedName parameter of the @Resource annotation. For example, if you’re using the JBoss Application Server and you have a data source with a global JNDI name of java:/DefaultDS, you can specify the resource mapping as follows:
@Resource(name="jdbc/ActionBazaarDS", mappedName="java:/DefaultDS")
private javax.jdbc.DataSource myDB;
In this case, the container will look up the data source with the global JNDI name of java:/DefaultDS when the ENC java:comp/env/jdbc/ActionBazaarDS is resolved.
However, remember that using the mappedName parameter makes code less portable. Therefore, we recommend you use deployment descriptors for mapping global JNDI names instead.
Note that, similar to the @Resource annotation, the @EJB annotation has a mappedName parameter as well.
Behind the scenes, the container resolves the JNDI references to the resources and binds the resource to the ENC during deployment. If the resource is not found during injection, the container throws a runtime exception and the bean becomes unusable.
Beyond JNDI name mapping, the @Resource annotation is meant to be a lot more flexible when it needs to be than what is apparent in our deliberately straightforward data source injection example. To illustrate some of these robust features, let’s take a look at the definition for the annotation:
@Target({TYPE, METHOD, FIELD})
@Retention(RUNTIME)
public @interface Resource {
    public enum AuthenticationType {
        CONTAINER,
        APPLICATION
    }
    String name() default "";
    Class type() default Object.class;
    AuthenticationType authenticationType() default
AuthenticationType.CONTAINER;
    boolean shareable() default true;
    String mappedName() default "";
description() default "";
}
The first point you should note from the definition of the @Resource annotation is that it is not limited to being applied to instance variables. As the @Target value indicates, it can be applied to setter methods, and even classes.
Setter vs. field injection
Other than field injection, setter injection is the most commonly used option for injection. To see how it works, let’s transform our data source example to use setter injection:
@Stateless
public class PlaceBidBean implements PlaceBid {
    ...
    private DataSource dataSource;
    ...
    @Resource(name="jdbc/actionBazaarDB")
    public void setDataSource(DataSource dataSource) {
        this.dataSource = dataSource;
    }
As you can see, setter injection relies on JavaBeans property-naming conventions. In case you are unfamiliar with them, the conventions dictate that the instance variables of an object should always be private so that they cannot be externally accessible. Instead, an instance variable named XX should have corresponding nonprivate methods named getXX and setXX that allow it to be accessed and set externally. We’ve seen how the setter for the PlaceBidBean dataSource variable looks. The getter could look like this:
public DataSource getDataSource() {
    return dataSource;
}
Just as in instance variable injection, the container inspects the @Resource annotation on the setDataSource method before a bean instance becomes usable, looks up the data source from JNDI using the name parameter value, and calls the setDataSource method using the retrieved data source as parameter.
Note
Whether or not to use setter injection is largely a matter of taste. Although setter injection might seem like a little more work, it provides a couple of distinct advantages. First, it is easier to unit-test by invoking the public setter method from a testing framework like JUnit. Second, it is easier to put initialization code in the setter if you need it.
In our case, we can open a database connection in the setDataSource method as soon as injection happens:
private DataSource dataSource;
private Connection connection;
...
@Resource(name="jdbc/actionBazaarDB")
public void setDataSource(DataSource dataSource) {
    this.dataSource = dataSource;
    this.connection = dataSource.getConnection();
}
The optional type parameter of the @Resource annotation can be used to explicitly set the type of the injected resource. For example, we could have chosen to tell the container that the injected resource is of type javax.sql.DataSource:
@Resource(name="jdbc/actionBazaarDB",
          type=javax.sql.DataSource.class)
private DataSource dataSource;
If omitted, the type of the injected resource is assumed to be the same as the type of the instance variable or property.
The type element is mandatory when the @Resource annotation is used at the class level and uses JNDI to obtain a reference to the resource. Let’s take a closer look.
Using @Resource at the class level
You may recall from our earlier discussion that DI is supported only in the managed classes and that you cannot use injection in helper or utility classes. In most applications, you can use helper classes, and you have to use JNDI to look up a resource. (If you aren’t familiar with JNDI, refer to appendix A for a brief discussion.) To look up a resource from the helper class, you have to reference the resource in the EJB class as follows:
@Resource(name="jdbc/actionBazaarDB",mappedName="jdbc/actionBazaarDS",
          type=javax.sql.DataSource.class)
@Stateless
public class PlaceBidBean implements PlaceBid
You can look up the resource either from the EJB or the helper class as follows:
Context ctx = new InitialContext();
DataSource ds = (DataSource) ctx.lookup("java:comp/env/jdbc/ActionBazaarDB")
Before we conclude this section, let’s look at some remaining parameters of the @Resource annotation (table 5.2). The other parameters—authenticationType, shareable, description, and mappedName—are not used often and we won’t cover them in great detail.
Table 5.2. The @Resource annotation can be used to inject resources. The parameters in the table are not used regularly and are included for your reference in case you need them.
|
Parameter |
Type |
Description |
Default |
|---|---|---|---|
|
authenticationType |
enumAuthenticationType {CONTAINER, APPLICATION} |
The type of authentication required for accessing the resource. The CONTAINER value means that the container’s security context is used for the resource. The APPLICATION value means that authentication for the resource must be provided by the application. We discuss EJB security at greater length in chapter 6. |
CONTAINER |
|
shareable |
boolean |
Specifies whether the resource can be shared. |
true |
|
description |
String |
The description of the resource. |
"" |
|
mappedName |
String |
A vendor-specific name that the resource may be mapped to, as opposed to the JNDI name. See the sidebar “The environment naming context and resolving global JNDI names” for details on this parameter. |
"" |
Using injection for JDBC data sources is just the tip of the iceberg. We’ll look at the other uses of EJB DI next. In general, we avoid talking about how the resources are defined in the deployment descriptor for now; we’ll discuss that in much greater detail when we examine application packaging and deployment descriptor tags in chapter 11.
5.2.2. The @Resource annotation in action
In the previous sections we discussed the various parameters of the @Resource annotation, and you learned how to use field or setter injection with @Resource to inject JDBC data sources. Next you’ll see how to use the @Resource annotation to inject resources such as JMS objects, mail resources, EJBContext, environment entries, and the timer service.
Injecting JMS resources
Recall the discussion on messaging and MDBs in chapter 4. If your application has anything to do with messaging, it is going to need to use JMS resources such as javax.jms.Queue, javax.jms.Topic, javax.jms.QueueConnectionFactory, or javax.jms.TopicConnectionFactory. Just like JDBC data sources, these resources are stored in the application server’s JNDI context and can be injected through the @Resource annotation. As an example, the following code injects a Queue bound to the name jms/actionBazaarQueue to the queue field:
@Resource(name="jms/actionBazaarQueue")
private Queue queue;
EJBContext
Earlier (section 5.2) we discussed the EJBContext, SessionContext, and MessageDrivenContext interfaces. One of the most common uses of injection is to gain access to EJB contexts. The following code, used in the PlaceBid session bean, injects the EJB type specific context into the context instance variable:
@Resource SessionContext context;
Note that the injected session context is not stored in JNDI. In fact, it would be incorrect to try to specify the name parameters in this case at all and servers will probably ignore the element if specified. Instead, when the container detects the @Resource annotation on the context variable, it figures out that the EJB context specific to the current bean instance must be injected by looking at the variable data type, javax.ejb.SessionContext. Since PlaceBid is a session bean, the result of the injection would be the same if the variable were specified to be the parent class, EJBContext. In the following code, an underlying instance of javax.ejb.SessionContext is still injected into the context variable, even if the variable data type is javax.ejb.EJBContext:
@Resource EJBContext context;
Using this code in a session bean would make a lot of sense if you did not plan to use any of the bean-type specific methods available through the SessionContext interface anyway.
Accessing environment entries
If you have been working with enterprise applications for any length of time, it is likely you have encountered situations where some parameters of your application change from one deployment to another (customer site information, product version, and so on). It is overkill to save this kind of “semi-static” information in the database. This is exactly the situation environment entry values are designed to solve.
For example, in the ActionBazaar application, suppose we want to set the censorship flag for certain countries. If this flag is on, the ActionBazaar application checks items posted against a censorship list specific to the country the application deployment instance is geared toward. We can inject an instance of an environment entry as follows:
@Resource
private boolean censorship;
Environment entries are specified in the deployment descriptor and are accessible via JNDI. The ActionBazaar censorship flag could be specified like this:
<env-entry>
<env-entry-name>censorship</env-entry-name>
<env-entry-type>java.lang.Boolean</env-entry-type>
<env-entry-value>true</env-entry-value>
</env-entry>
Environment entries are essentially meant to be robust application constants and support a relatively small range of data types. Specifically, the values of the <env-entry-type> tag are limited to these Java types: String, Character, Byte, Short, Integer, Long, Boolean, Double, and Float. Because environment entries are accessible via JNDI they can be injected by name. We could inject the censorship flag environment entry into any EJB by explicitly specifying the JNDI name as follows:
@Resource(name="censorship")
private boolean censorship;
As you might gather, the data types of the environment entry and the injected variable must be compatible. Otherwise, the container throws a runtime exception while attempting DI.
Accessing e-mail resources
In addition to JDBC data sources and JMS resources, the other heavy-duty resource that enterprise applications often use is the JavaMail API, javax.mail.Session. JavaMail Sessions that abstract e-mail server configuration can be stored in the application server JNDI registry. The Session can then be injected into an EJB (with the @Resource annotation) and used to send e-mail. In the ActionBazaar application, this is useful for sending the winning bidder a notification after bidding on an item is over. The DI code to inject the mail Session looks like this:
@Resource(name="mail/ActionBazaar")
private javax.mail.Session mailSession;
We’ll leave configuring a mail session using the deployment descriptor as an exercise for you, the reader. You can find the one-to-one mapping between annotations and deployment descriptors in appendix D.
Accessing the timer service
The container-managed timer service gives EJBs the ability to schedule tasks in a simple way. (You’ll learn more about timers in section 5.4.) We inject the container timer service into an EJB using the @Resource annotation:
@Resource
javax.ejb.TimerService timerService;
Just as with the EJB context, the timer service is not saved in JNDI, but the container resolves the resource by looking at the data type of the injection target.
The @Resource annotation may be used for injecting EJB references accessible via JNDI into other EJBs. However, the @EJB annotation is intended specifically for this purpose and should be used in these circumstances instead. Refer to the discussion in chapter 3 for details about this annotation.
EJB 3 and POJO injection
As you might have noted, the one DI feature glaringly missing is the ability to inject resources into POJOs and to inject POJOs that are not EJBs. You can still indirectly accomplish this by storing POJOs in the JNDI context (not a particularly easy thing to do) or using proprietary extension of your container vendor. We hope that a future version of EJB 3 will provide expanded support for POJO injection similar to other lightweight DI-capable frameworks like Spring.
You can also use POJO injection with Spring-enabled EJB 3 beans if you really need POJO injection in your EJB applications. We’ll save the topic of EJB 3 and Spring for chapter 16. We have provided a workaround for POJO injection in chapter 12.
@Resource and annotation inheritance
In chapter 3, you learned that an EJB bean class may inherit from another EJB class or a POJO. If the superclass defines any dependencies on resources using the @Resource annotation, they are inherited by the subclass. For example, BidManagerBean extends another stateless EJB, PlaceBidBean, where PlaceBidBean defines a resource, as in this example:
@Stateless
public class PlaceBidBean implements PlaceBid{
@Resource(name="censorship")
   private boolean censorship;
..
}

@Stateless
public class BidManagerBean extends PlaceBidBean implements BidManager{
..
}
The environment entry defined in the PlaceBidBean will be inherited by the BidManagerBean and dependency injection will occur when an instance of BidManagerBean is created.
As useful as DI is, it cannot solve every problem. There are some cases where you must programmatically look up resources from a JNDI registry yourself. We’ll talk about some of these cases next, as well as show you how to perform programmatic lookups.
5.2.3. Looking up resources and EJBs
Although you can use the @EJB or @Resource annotation to inject resource instances, you may still need to look up items from JNDI in several advanced cases (if you are unfamiliar with JNDI itself, check out the brief tutorial in appendix A). You can use the @EJB or @Resource annotation at the EJB class level to define dependency on an EJB or a resource. There are two ways of using programmatic lookups—using either the EJB context or a JNDI initial context. We’ll look at both methods.
Recall from our earlier discussion that you can look up any object stored in JNDI using the EJBContext.lookup method (including session bean references). This technique can be used to accomplish one extremely powerful feature that DI cannot accomplish: using lookups instead of DI allows you to determine which resource to use dynamically at runtime instead of being constrained to using static configuration that cannot be changed programmatically. All you have to do is specify a different name in the lookup method to retrieve a different resource. As a result, program logic driven by data and/or user input can determine dependencies instead of deploy-time configuration.
The following code shows the EJB context lookup method in action:
@EJB(name="ejb/BidderAccountCreator", beanInterface =
  BidderAccountCreator.class)
@Stateless
public class GoldBidderManagerBean implements GoldBidderManager {
@Resource SessionContext sessionContext;
...
BidderAccountCreator accountCreator
    = (BidderAccountCreator)
        sessionContext.lookup(
            "ejb/BidderAccountCreator");
...
accountCreator.addLoginInfo(loginInfo);
...
accountCreator.createAccount();
Note that while using the class-level reference annotation you must explicitly specify the reference name as the complete JNDI pathname. Also note that once an EJB context is injected (as in the sample lookup code), it could be passed into any non-bean POJO to perform the actual lookup.
While both DI and lookup using the EJB context are relatively convenient, the problem is that they are only available inside the Java EE container (or an application client container). For POJOs outside a container, you are limited to the most basic method of looking up JNDI references—using a JNDI initial context. The code to do this is a little mechanical, but it isn’t too complex:
Context context = new InitialContext();
BidderAccountCreator accountCreator
    = (BidderAccountCreator)
        context.lookup("java:comp/env/ejb/BidderAccountCreator");
...
accountCreator.addLoginInfo(loginInfo);
...
accountCreator.createAccount();
The InitialContext object can be created by any code that has access to the JNDI API. Also, the object can be used to connect to a remote JNDI server, not just a local one.
Although this code probably looks harmless enough, you should avoid it if at all possible. Mechanical JNDI lookup code was one of the major pieces of avoidable complexity in EJB 2, particularly when these same bits of code are repeated hundreds of times across an application.
In the next section, we cover one of the most exciting new features in EJB 3: interceptors.
5.3. AOP in the EJB world: interceptors
Have you ever been in a situation in which your requirements changed toward the end of the project and you were asked to add some common missing feature, such as logging or auditing, for EJBs in your application? Adding logging code in each of your EJB classes would be time consuming, and this common type of code also causes maintainability issues and requires you to modify a number of Java classes. Well, EJB 3 interceptors solve this problem. In our example you simply create a logging interceptor that does the logging, and you can make it the default interceptor for your application. The logging interceptor will be executed when any bean method is executed. If the requirement for logging changes, then you have to change only one class. In this section, you’ll learn how interceptors work.
5.3.1. What is AOP?
It is very likely you have come across the term aspect-oriented programming (AOP). The essential idea behind AOP is that for most applications, common application code repeated across modules not necessarily for solving the core business problem are considered as infrastructure concerns.
The most commonly cited example of this is logging, especially at the basic debugging level. To use our ActionBazaar example, let’s assume that we log the entry into every method in the system. Without AOP, this would mean adding logging statements at the beginning of every single method in the system to log the action of “entering method XX”! Some other common examples where AOP applies are auditing, profiling, and statistics.
The common term used to describe these cases is crosscutting concerns—concerns that cut across application logic. An AOP system allows the separation of crosscutting concerns into their own modules. These modules are then applied across the relevant cross section of application code, such as the beginning of every method call. Tools like AspectJ have made AOP relatively popular. For great coverage of AOP, read AspectJ in Action by Ramnivas Laddad (Manning, 2003).
EJB 3 supports AOP-like functionality by providing the ability to intercept business methods and lifecycle callbacks. Now buckle up and get ready to jump into the world of EJB 3 interceptors, where you’ll learn what interceptors are and how to build business method and lifecycle callback interceptors.
5.3.2. What are interceptors?
Essentially the EJB rendition of AOP, interceptors are objects that are automatically triggered when an EJB method is invoked (interceptors are not new concepts and date back to technologies like CORBA). While EJB 3 interceptors provide sufficient functionality to handle most common crosscutting concerns (such as in our logging example), they do not try to provide the level of functionality that a full-scale AOP package such as AspectJ offers. On the flip side, EJB 3 interceptors are also generally a lot easier to use.
Recall our discussion in section 5.1 on how the EJB object provides services such as transactions and security. In essence, the EJB object is essentially a sophisticated built-in interceptor that makes available a whole host of functionality. If you wanted to, you could create your own EJB-esque services using interceptors.
In the pure AOP world, interception takes place at various points (called point cuts) including at the beginning of a method, at the end of a method, and when an exception is triggered. If you are familiar with AOP, an EJB interceptor is the most general form of interception—it is an around invoke advice. EJB 3 interceptors are triggered at the beginning of a method and are around when the method returns; they can inspect the method return value or any exceptions thrown by the method. Interceptors can be applied to both session and message-driven beans.
Let’s examine business method interceptors further by implementing basic logging on the PlaceBid session bean from chapter 2. Once you understand how this works, applying it to an MDB should be a snap. Figure 5.3 shows a business method interceptor that implements common logging code in the ActionBazaar application.
Figure 5.3. Business interceptors are typically used to implement common code. The ActionBazaarLogger implements common logging code used by all EJBs in the ActionBazaar system.
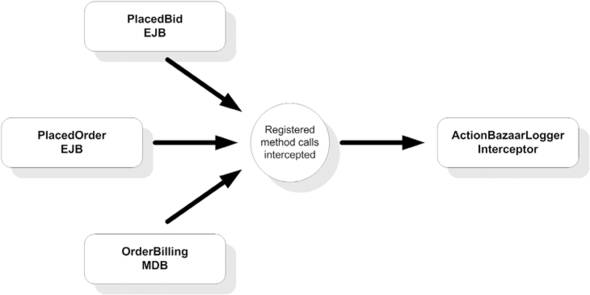
Listing 5.2 contains the code for our interceptors. The interceptor attached to the addBid method will print a log message to the console each time the method is invoked. In a real-world application, this could be used as debugging information (and perhaps printed out using java.util.logging or Log4J).
Listing 5.2. EJB business method interceptors

Let’s take a bird’s-eye view of this code before analyzing each feature in detail in the coming sections. The interceptor
class, ActionBazaarLogger, is attached to the addBid method of the PlaceBid stateless session bean using the @javax.interceptor.Interceptors annotation ![]() . The ActionBazaarLogger object’s logMethodEntry method is annotated with @javax.interceptor.AroundInvoke and will be invoked when the addBid method is called
. The ActionBazaarLogger object’s logMethodEntry method is annotated with @javax.interceptor.AroundInvoke and will be invoked when the addBid method is called ![]() . The logMethodEntry method prints a log message to the system console, including the method name entered using the javax.interceptor.InvocationContext. Finally, the invocation context’s proceed method is invoked to signal to the container that the addBid invocation can proceed normally.
. The logMethodEntry method prints a log message to the system console, including the method name entered using the javax.interceptor.InvocationContext. Finally, the invocation context’s proceed method is invoked to signal to the container that the addBid invocation can proceed normally.
We will now start a detailed analysis of the code, starting with attaching the interceptor using the @Interceptors annotation.
5.3.3. Specifying interceptors
The @Interceptors annotation allows you to specify one or more interceptor classes for a method or class. In listing 5.2 we attach a single interceptor to the addBid method:
@Interceptors(ActionBazaarLogger.class)
public void addBid (...
You can also apply the @Interceptors annotation to an entire class. When you do, the interceptor is triggered if any of the target class’s methods are invoked. For example, if the ActionBazaarLogger is applied at the class level as in the following code, our logMethodEntry method will be invoked when the PlaceBid class’s addBid or addTimeDelayedBid method is called by the client (imagine that the addTimeDelayedBid method adds a bid after a specified interval of time):
@Interceptors(ActionBazaarLogger.class)
@Stateless
public class PlaceBidBean implements PlaceBid {
    public void addBid (...
    public void addTimeDelayedBid (...
}
As we explained, the @Interceptors annotation is fully capable of attaching more than one interceptor either at a class or method level. All you have to do is provide a comma-separated list as a parameter to the annotation. For example, a generic logger and a bidding statistics tracker could be added to the PlaceBid session bean as follows:
@Interceptors({ActionBazaarLogger.class, BidStatisticsTracker.class})
public class PlaceBidBean { ... }
Besides specifying method- and class-level interceptors, you can create what is called a default interceptor. A default interceptor is essentially a catchall mechanism that attaches to all the methods of every bean in the EJB module. Unfortunately, you cannot specify these kinds of interceptors by using annotations and must use deployment descriptor settings instead. We won’t discuss deployment descriptors in any great detail at this point, but we’ll show you how setting the ActionBazaarLogger class as a default interceptor for the ActionBazaar application might look:
<assembly-descriptor>
    <interceptor-binding>
        <ejb-name>*</ejb-name>
        <interceptor-class>
            actionbazaar.buslogic.ActionBazaarLogger
        </interceptor-class>
    </interceptor-binding>
</assembly-descriptor>
An interesting question that might have already crossed your mind is what would happen if you specified default, class-, and method-level interceptors for a specific target method (yes, this is perfectly legal). In which order do you think the interceptors would be triggered?
Somewhat counterintuitive to how Java scoping typically works, the interceptors are called from the larger scope to the smaller scope. That is, the default interceptor is triggered first, then the class-level interceptor, and finally the method-level interceptor. Figure 5.4 shows this behavior.
Figure 5.4. The order in which business method interceptors are invoked. Default interceptors apply to all methods of all EJBs in an ejb-jar package. Class-level interceptors apply to all methods of a specific class. Method-level interceptors apply to one specific method in a class. Default application-level interceptors are invoked first, then class-level interceptors, then method-level interceptors.

If more than one interceptor is applied at any given level, they are executed in the order in which they are specified. In our ActionBazaarLogger and BidStatisticsTracker example, the ActionBazaarLogger is executed first since it appears first in the comma-separated list in the @Interceptors annotation:
@Interceptors({ActionBazaarLogger.class,
  BidStatisticsTracker.class})
Unfortunately, the only way to alter this execution order is to use the interceptor-order element in the deployment descriptor; there are no annotations for changing interceptor order. However, you can disable interceptors at the default or class levels if you need to. Applying the @javax.interceptor.ExcludeDefaultInterceptors annotation on either a class or a method disables all default interceptors on the class or method. Similarly the @javax.interceptor.ExcludeClassInterceptors annotation disables class-level interceptors for a method. For example, both default and class-level interceptors may be disabled for the addBid method using the following code:
@Interceptors(ActionBazaarLogger.class)
@ExcludeDefaultInterceptors
@ExcludeClassInterceptors
public void addBid (...
Next we’ll take a detailed look at the interceptor classes themselves.
5.3.4. Implementing business interceptors
Like the EJB lifecycle callback methods that we discussed in chapters 3 and 4, business interceptors can be implemented either in the bean class itself or in separate classes. However, we recommend that you create interceptor methods external to the bean class, because that approach allows you to separate crosscutting concerns from business logic and you can share the methods among multiple beans. After all, isn’t that the whole point of AOP?
As you can see in listing 5.2, following the general EJB 3 philosophy, an interceptor class is simply a POJO that may have a few annotations.
Around invoke methods
It’s important to realize that an interceptor must always have only one method that is designated as the around invoke (AroundInvoke) method. Around invoke methods must not be business methods, which means that they should not be public methods in the bean’s business interface(s).
An around invoke method is automatically triggered by the container when a client invokes a method that has designated it to be its interceptor. In listing 5.2, the triggered method is marked with the @AroundInvoke annotation:
@AroundInvoke
public Object logMethodEntry(
    InvocationContext invocationContext)
        throws Exception {
    System.out.println("Entering method: "
            + invocationContext.getMethod().getName());
    return invocationContext.proceed();
}
In effect, this means that the logMethodEntry method will be executed whenever the ActionBazaarLogger interceptor is triggered. As you might gather from this code, any method designated AroundInvoke must follow this pattern:
Object <METHOD>(InvocationContext) throws Exception
The InvocationContext interface passed in as the single parameter to the method provides a number of features that makes the AOP mechanism extremely flexible. The logMethodEntry method uses just two of the methods included in the interface. The getMethod().getName() call returns the name of the method being intercepted—addBid in our case.
The call to the proceed method is extremely critical to the functioning of the interceptor. In our case, we always return the object returned by InvocationContext.proceed in the logMethodEntry method. This tells the container that it should proceed to the next interceptor in the execution chain or call the intercepted business method. On the other hand, not calling the proceed method will bring processing to a halt and avoid the business method (and any other interceptor down the execution chain) from being called.
This feature can be extremely useful for procedures like security validation. For example, the following interceptor method prevents the intercepted business method from being executed if security validation fails:
@AroundInvoke
public Object validateSecurity(InvocationContext invocationContext)
    throws Exception {
    if (!validate(...)) {
        throw new SecurityException("Security cannot be validated. " +
            "The method invocation is being blocked.");
    }

    return invocationContext.proceed();
}
The InvocationContext interface
The InvocationContext interface has a number of other useful methods. Here is the definition of the interface:
public interface InvocationContext {
    public Object getTarget();
    public Method getMethod();
    public Object[] getParameters();
    public void setParameters(Object[]);
    public java.util.Map<String,Object> getContextData();
    public Object proceed() throws Exception;
}
The getTarget method retrieves the bean instance that the intercepted method belongs to. This method is particularly valuable for checking the current state of the bean through its instance variables or accessor methods.
The getMethod method returns the method of the bean class for which the interceptor was invoked. For AroundInvoke methods, this is the business method on the bean class; for lifecycle callback interceptor methods, getMethod returns null.
The getParameters method returns the parameters passed to the intercepted method as an array of objects. The setParameters method, on the other hand, allows us to change these values at runtime before they are passed to the method. These two methods are helpful for interceptors that manipulate bean parameters to change behavior at runtime.
An interceptor in ActionBazaar that transparently rounds off all monetary values to two decimal places for all methods across the application could use the getParameters and setParameters methods to accomplish its task.
The key to understanding the need for the InvocationContext.getContextData method is the fact that contexts are shared across the interceptor chain for a given method. As a result, data attached to an InvocationContext can be used to communicate between interceptors. For example, assume that our security validation interceptor stores the member status into invocation context data after the user is validated:
invocationContext.getContextData().put("MemberStatus", "Gold");
As you can see, the invocation context data is simply a Map used to store name-value pairs. Another interceptor in the invocation chain can now retrieve this data and take specific actions based on the member status. For example, a discount calculator interceptor can reduce the ActionBazaar item listing charges for a Gold member. The code to retrieve the member status would look like this:
String memberStatus =
    (String) invocationContext.getContextData().get("MemberStatus");
The following is the AroundInvoke method of the DiscountVerifierInterceptor that actually uses the invocation context as well as most of the methods we discussed earlier:
@AroundInvoke
public Object giveDiscount(InvocationContext context)
    throws Exception {
    System.out.println("*** DiscountVerifier Interceptor"
        + " invoked for " + context.getMethod().getName() + " ***");

    if (context.getMethod().getName().equals("chargePostingFee")
        && (((String)(context.getContextData().get("MemberStatus")))
             .equals("Gold"))) {
        Object[] parameters = context.getParameters();
        parameters[2] = new Double ((Double) parameters[2] * 0.99);
        System.out.println (
            "*** DiscountVerifier Reducing Price by 1 percent ***");
            context.setParameters(parameters);
    }

    return context.proceed();
}
You can throw or handle a runtime or checked exception in a business method interceptor. If a business method interceptor throws an exception before invoking the proceed method, the processing of other interceptors in the invocation chain and the target business method will be terminated.
Recall our discussion on lifecycle callback methods in chapters 3 and 4. This isn’t readily obvious, but lifecycle callbacks are a form of interception as well. While method interceptors are triggered when a business method is invoked, lifecycle callbacks are triggered when a bean transitions from one lifecycle state to another. Although this was not the case in our previous lifecycle examples, in some cases such methods can be used for crosscutting concerns (e.g., logging and profiling) that can be shared across beans. For this reason, you can define lifecycle callbacks in interceptor classes in addition to business method interceptors. Let’s take a look at how to do this next.
5.3.5. Lifecycle callback methods in the interceptor class
Recall that the @PostConstruct, @PrePassivate, @PostActivate, and @PreDestroy annotations can be applied to bean methods to receive lifecycle callbacks. When applied to interceptor class methods, lifecycle callbacks work in exactly the same way. Lifecycle callbacks defined in an interceptor class are known as lifecycle callback interceptors or lifecycle callback listeners. When the target bean transitions lifecycles, annotated methods in the interceptor class are triggered.
The following interceptor class logs when ActionBazaar beans allocate and release resources when beans instances are constructed and destroyed:
public class ActionBazaarResourceLogger {
    @PostConstruct
    public void initialize (InvocationContext context) {
        System.out.println ("Allocating resources for bean: "
            + context.getTarget());
         context.proceed();
    }

    @PreDestroy
    public void cleanup (InvocationContext context) {
        System.out.println ("Releasing resources for bean: "
            + context.getTarget());
         context.proceed();
    }
}
As the code sample shows, lifecycle interceptor methods cannot throw checked exceptions (it doesn’t make sense since there is no client for lifecycle callbacks to bubble a problem up to).
Note that a bean can have the same lifecycle callbacks both in the bean itself as well as in one or more interceptors. That is the whole point of calling the InvocationContext.proceed method in lifecycle interceptor methods as in the resource logger code. This ensures that the next lifecycle interceptor method in the invocation chain or the bean lifecycle method is triggered. There is absolutely no difference between applying an interceptor class with or without lifecycle callbacks. The resource logger, for example, is applied as follows:
@Interceptors({ActionBazaarResourceLogger.class})
public class PlaceBidBean { ... }
You might find that you will use lifecycle callbacks as bean methods to manage resources a lot more often than you use interceptor lifecycle callbacks to encapsulate crosscutting concerns such as logging, auditing, and profiling. However, interceptor callbacks are extremely useful when you need them.
As a recap, table 5.3 contains a summary of both business method interceptors and lifecycle callbacks.
Table 5.3. Differences between lifecycle and business method interceptors. Lifecycle interceptors are created to handle EJB lifecycle callbacks. Business method interceptors are associated with business methods, and are automatically invoked when a user invokes the business method.
|
Supported Feature |
Lifecycle Callback Methods |
Business Method Interceptor |
|---|---|---|
|
Invocation |
Gets invoked when a certain lifecycle event occurs. |
Gets invoked when a business method is called by a client. |
|
Location |
In a separate Interceptor class or in the bean class. |
In the class or an interceptor class. |
|
Method signature |
void <METHOD>(InvocationContext)–in a separate interceptor class. void <METHOD>()–in the bean class. |
Object <METHOD>(InvocationContext) throws Exception |
|
Annotation |
@PreDestroy, @PostConstruct, @PrePassivate, @PostActivate |
@AroundInvoke |
|
Exception handling |
May throw runtime exceptions but must not throw checked exceptions. May catch and swallow exceptions. No other lifecycle callback methods are called if an exception is thrown. |
May throw application or runtime exception. May catch and swallow runtime exceptions. No other business interceptor methods or the business method itself are called if an exception is thrown before calling the proceed method. |
|
No security and transaction context. Transaction and security are discussed in chapter 6. |
Share the same security and transaction context within which the original business method was invoked. |
This is all we want to say about interceptors right now. Clearly, interceptors are an extremely important addition to EJB. It is likely that the AOP features in future releases of EJB will grow more and more robust. Interceptors certainly have the potential to evolve into a robust way of extending the EJB platform itself, with vendors offering new out-of-the-box interceptor-based services.
Let’s move on to the final vital EJB 3 feature we’ll cover in this chapter: the timer service. Timers can be used only by stateless session beans and MDBs.
5.4. Scheduling: the EJB 3 timer service
Scheduled tasks are a reality for most nontrivial applications. For example, your business application may have to run a daily report to determine inventory levels and automatically send out restocking requests. For most legacy applications, it is typical to have a batch job to clean up temporary tables at the start or end of each day. If fact, it is fair to say schedulers are an essential holdover from the mainframe days of batch computing. As a result, scheduling tools, utilities, and frameworks have been a development mainstay for a long time. The Unix cron utility is probably the most popular and well-loved scheduling utility. The System Task Scheduler, generally lesser known, is the Microsoft Windows counterpart of cron.
In the Java EE world, you have a few options for scheduling tasks and activities. Most Java EE application servers come with a scheduling utility that is sufficiently useful. There are also a number of feature-rich, full-scale scheduling packages available for enterprise applications. Flux is an excellent commercial scheduling package, while Quartz is a good-quality open source implementation. EJB timer services are the standard Java EE answer to scheduling. As you’ll soon learn, while it does not try to compete with full-scale scheduling products, the EJB 3 timer service is probably sufficient for most day-to-day application development requirements. Because it is so lightweight, the service is also extremely easy to use.
In the next few sections, we’ll build a scheduling service using EJB 3 timers and show you how to use the @Timeout annotation.
5.4.1. What are timers?
In a sense, the EJB 3 timer service is based on the idea of time-delayed callbacks. In other words, the service allows you to specify a method (appropriately called the timeout method) that is automatically invoked after a specified interval of time. The container invokes the timeout method on your behalf when the time interval you specify elapses. As you’ll see, you can use the timer service to register for callbacks triggered once at a specific time or at regular intervals.
We can only use timers in stateless session beans and MDBs because of their asynchronous, stateless nature. However, unlike stateless session beans and MDBs, timers are persistent and can survive a container crash or restart. Timers are also transactional, that is, a transaction failure in a timeout method rolls back the actions taken by the timer. Figure 5.5 illustrates how timers work.
Figure 5.5. How an EJB timer works. A client may invoke an EJB method which creates a timer that registers a callback in the EJB timer service. The EJB container invokes the timeout method in the bean instance when the timer expires.

As the figure demonstrates, an EJB method can register a time-driven callback with the container timer service. When the time interval specified by the EJB expires, the timer service invokes the timeout method pointed to by the EJB. We’ll show you how this works with a simple example next.
5.4.2. Using the timer service
Let’s explore the features of the EJB 3 timer service by adding a timer to the PlaceBid EJB we introduced in chapter 2. We’ll add a timer in the addBid method to check the status of the newly placed bid every 15 minutes. Although we won’t code it, another compelling use case is to create a timer when an item is added for bidding. Such a timer could be triggered when the auction time expired and would determine the winning bidder. We’ll leave the implementation of this timer as an exercise for you.
Among other things, the timer we’ll implement will notify the bidder via e-mail if they have been outbid. We have omitted most of the code that is not absolutely necessary to explain timer functionality in listing 5.3. The complete code is included in the downloadable code samples if you are interested in exploring further.
Listing 5.3. Using the EJB 3 timer service

We use EJB 3 resource injection to gain access to the timer service ![]() . In the addBid method, after we add the bid we schedule a timer service callback to occur every 15 minutes
. In the addBid method, after we add the bid we schedule a timer service callback to occur every 15 minutes ![]() . The newly added Bid is attached as timer information when the timer is registered. At regular intervals, the monitorBid method is called by the timer service, which is designated with the @Timeout annotation
. The newly added Bid is attached as timer information when the timer is registered. At regular intervals, the monitorBid method is called by the timer service, which is designated with the @Timeout annotation ![]() . The monitorBid method retrieves the Bid instance attached as timer information and monitors the bid.
. The monitorBid method retrieves the Bid instance attached as timer information and monitors the bid.
We’ll explore EJB timer services details using listing 5.3 as a jumping-off point in the next few sections, starting with ways to get access to the EJB 3 timer service.
Accessing the timer service
As you just saw in listing 5.3, the EJB timer service can be injected into a Java EE component using the @Resource annotation. Alternatively, you can get access to the container timer service through the EJB context:
@Resource SessionContext context;
...
TimerService timerService = context.getTimerService();
Which method you choose is largely a matter of taste. In general, if you are already injecting an EJB context, you should avoid injecting the timer service as well, in order to avoid redundant code. Instead, you should use the getTimerService method as in the previous code. However, if you aren’t using the EJB context for anything else, it makes perfect sense to simply inject the TimerService as we did in listing 5.3.
Next let’s take a closer look at the injected timer service.
Using the TimerService interface
In listing 5.3, we use the TimerService interface to register a Timer. As you’ll soon see, a Timer is simply a Java EE representation of a scheduled task. The createTimer method used in listing 5.3 is one of four overloaded methods provided in the TimerService interface to add Timers. The one we used specified that the Timer should initially trigger in 15*60*1000 milliseconds (15 minutes), repeat every 15*60*1000 milliseconds (15 minutes), and added a Bid instance as Timer information:
timerService.createTimer(15*60*1000, 15*60*1000, bid);
Let’s take a look at the complete definition of the TimerService interface to get a clearer picture of the range of options available (listing 5.4).
Listing 5.4. Specification for the TimerService interface is used to create either single-event or recurring timers

The first version of the createTimer method ![]() allows us to create a single-event timer that is fired only once and not repeated. The first parameter, duration, specifies the time in milliseconds, after which the timeout method should be invoked. The second parameter, info, allows us to attach an arbitrary piece of information to the timer. Note that timer info objects must always be Serializable, as is the Bid object we used in listing 5.3. Note also that the info parameter can be left null if it is not really needed.
allows us to create a single-event timer that is fired only once and not repeated. The first parameter, duration, specifies the time in milliseconds, after which the timeout method should be invoked. The second parameter, info, allows us to attach an arbitrary piece of information to the timer. Note that timer info objects must always be Serializable, as is the Bid object we used in listing 5.3. Note also that the info parameter can be left null if it is not really needed.
You’ve already seen the second version of the createTimer method ![]() in action in listing 5.3. It allows us to create recurring timers with initial timeout and interval durations set in milliseconds. The third version
in action in listing 5.3. It allows us to create recurring timers with initial timeout and interval durations set in milliseconds. The third version
![]() is similar to the first in that it allows us to create a timer that fires once and only once. However, this version allows
us to specify the expiration value as a specific instant in time represented by a java.util.Date instead of a long time offset. The fourth
is similar to the first in that it allows us to create a timer that fires once and only once. However, this version allows
us to specify the expiration value as a specific instant in time represented by a java.util.Date instead of a long time offset. The fourth ![]() and second versions of the createTimer method differ from each other in the same way. Using a concrete date instead of an offset from the current time generally
makes sense for events that should be fired at a later time. However, this is largely a matter of taste. All of these methods
return a generated Timer reference. In general, this returned value is not used very often. Behind the scenes, all of the TimerService methods associate the current EJB as the callback receiver for the generated Timers. The final method of the TimerService interface, getTimers
and second versions of the createTimer method differ from each other in the same way. Using a concrete date instead of an offset from the current time generally
makes sense for events that should be fired at a later time. However, this is largely a matter of taste. All of these methods
return a generated Timer reference. In general, this returned value is not used very often. Behind the scenes, all of the TimerService methods associate the current EJB as the callback receiver for the generated Timers. The final method of the TimerService interface, getTimers ![]() , retrieves all of the active Timers associated with the current EJB. This method is rarely used, and we won’t discuss it further.
, retrieves all of the active Timers associated with the current EJB. This method is rarely used, and we won’t discuss it further.
Having looked at the TimerService interface and how to create timers, let’s now take a closer look at how to implement timeout methods.
Implementing timeout methods
In listing 5.3, we mark monitorBid to be the timeout method using the @Timeout annotation:
@Timeout
public void monitorBid(Timer timer) {
When the timer or timers created for the PlaceBid EJB expire, the container invokes the designated timeout method—monitorBid. Using the @Timeout annotation is by far the simplest, but not the only way to specify timeout methods. As you might have guessed, methods marked with the @Timeout annotation are expected to follow this convention:
void <METHOD>(Timer timer)
A bean can have at most one timeout method, which can be specified (through annotation @Timeout or deployment descriptor timeout-method) either on the bean class or on a superclass. If the bean class implements the javax.ejb.TimedObject interface, the ejbTimeout method is the bean’s timeout method.
The Timer for which the callback was invoked is passed in as a parameter for the method as processing context. This is because multiple Timers, especially in the case of repeating intervals, may invoke the same timeout method. Also, as you saw in listing 5.3, it is often necessary to use the TimerService interface to pass around data to the timeout methods as Timer information.
We’ll finish our analysis of the EJB 3 timer service code by taking a closer look at the Timer interface next.
Using the Timer interface
As we mentioned, the container passes us back the Timer instance that triggered the timeout method. In the monitorBid method, we use the interface to retrieve the Bid instance stored as timer information through the getInfo method:
@Timeout
public void monitorBid(Timer timer) {
    Bid bid = (Bid) timer.getInfo();
    ... Code to monitor the bid ...
}
A number of other useful methods are defined in the Timer interface. We’ll explore them through the definition of the Timer interface (listing 5.5).
Listing 5.5. The javax.ejb.Timer interface
public interface javax.ejb.Timer {
    public void cancel();

    public long getTimeRemaining();

    public java.util.Date getNextTimeout();

    public javax.ejb.TimerHandle getHandle();

   public java.io.Serializable getInfo();
}
The cancel method is particularly useful in canceling a timer prior to its expiration. You can use this method to stop timers prematurely. In our bid-monitoring example, we can use this method to stop the chain of recurring callbacks when bidding on the item is over.
It is vital to invoke the cancel method for recurring Timers when they are no longer needed. Otherwise, the EJB will spin in an infinite loop unnecessarily. This is a subtle, common, and easy mistake to make.
The getTimeRemaining method can be used on either a single-use or interval timer. The return value of this method indicates the remaining time for the timer to expire, in milliseconds. You might find that this method is rarely used. The getNextTimeout method indicates the next time a recurring Timer will time out, as a java.util.Date instead of a long time offset. Similar to the getTimeRemaining method, this method is useful in the rare instance that you might need to determine whether to cancel a Timer based on when it will fire next.
The getHandle method returns a Timer handle. javax.ejb.TimerHandle is a serialized object that you can store and then use to obtain information about the Timer (by using the getTimer method available through TimerHandle). This is a relatively obscure method that we’ll leave for you to explore on your own if you want to. You have already seen the getInfo method in action. This method is extremely useful in writing nontrivial timeout functions and accessing extra processing information attached to the Timer by the bean method creating the Timer.
Let’s now discuss situations where EJB Timers are an appropriate fit.
EJB timers and transactions
EJB Timers are transactional objects. If the transaction that a timer is triggered under rolls back for some reason (e.g., as a result of a runtime exception in the timeout method), the timer creation is undone. In addition, the timeout method can be executed in a transactional context. You can specify a transactional attribute for the timeout method—Required or RequiresNew—and the container will start a transaction before invoking the timeout method. If the transaction fails, the container will make sure the changes made by the failed method do not take effect and will retry the timeout method.
We’ll talk about EJB transactions in much greater detail in the next chapter.
5.4.3. When to use EJB timers
Clearly, although EJB timers are relatively feature-rich, they are not intended to go toe-to-toe against full-fledged scheduling solutions like Flux or Quartz. However, under some circumstances they are sufficient if not ideal. Like almost all other technology choices, this decision comes down to weighing features against needs for your specific situation and environment.
Merits of timers
Here are some of the merits of using EJB 3 timers:
- Timers are part of the EJB specification. Hence, applications using EJB timers will remain portable across containers instead of being locked into the nonstandard APIs of job schedulers like Quartz.
- Since the EJB timer service comes as a standard part of a Java EE application server, using it incurs no additional cost in terms of time or money. No extra installation or configuration is required as would be the case for an external job scheduler, and you won’t need to worry about integration and support.
- The timer is a container-managed service. No separate thread pools or user threads are required for it, as would be the case with an external scheduler. For the same reasons, the EJB timer service is likely to have better out-of-the-box performance than third-party products.
- Transactions are fully supported with timers (see the sidebar titled “EJB timers and transactions”), unlike external job schedulers, in which you may need to do extra setup for supporting JTA.
- By default, EJB timers are persisted and survive EJB lifecycles and container restarts. The same cannot be said of all third-party schedulers.
Limitations for timers
The following are the primary limitations of EJB timers:
- EJB timers are meant for long-running business processes and not real-time applications where precision timing is absolutely critical. Commercial schedulers may provide much better guarantees in terms of precision than the EJB 3 timer service.
- EJB timers lack support for extremely flexible cron-type timers, blackout dates, workflow modeling for jobs, and so on. These advanced features are commonly available with external job schedulers.
- There is no robust GUI admin tool to create, manage, and monitor EJB 3 timers. Such tools are generally available for third-party job schedulers.
This concludes our analysis of EJB 3 timers and marks the end of this chapter. In general, you should attempt to use EJB 3 timers first. Resort to third-party schedulers only if you run into serious limitations that cannot be easily overcome.
Although robust schedulers are a compelling idea, in general they are complex and should not be used frivolously. However, there are many complex, scheduling-intensive applications where robust schedulers are a must, especially in industries like banking and finance.
5.5. Summary
In this chapter, we covered a few advanced concepts common to all EJB types:
- The EJB object acts as a proxy between clients and container where you can use EJBContext to access container runtime information and services.
- Interceptors are lightweight AOP features in EJB 3 for dealing with crosscutting concerns such as logging and auditing. You can use interceptors at the EJB module level, class level, or method level.
- EJB timers provide a lightweight scheduling service that you can use in your applications.
You’ll find these advanced features useful in moderate-sized, real-life applications.
The only two features common to session and MDBs that we did not cover in this chapter are transaction and security management. You’ll learn more about these features in the next chapter.