
Chapter 2. A first taste of EJB
This chapter covers
- Metadata annotations
- Dependency injection
- The ActionBazaar application
- Code examples of session beans, MDBs, and entities
In this age of hyper-competitiveness, learning a new technology by balancing a book on your lap while hacking away at a business problem on the keyboard has become the norm. Let’s face it—somewhere deep down you probably prefer this “baptism by fire” to trudging the same old roads over and over again. This chapter is for the brave pioneer in all of us, eager to peek over the horizon into the new world of EJB 3.
The first chapter gave you a 20,000-foot view of the EJB 3 landscape from on board a hypersonic jet. We defined EJB, described the services it offers as well as the EJB 3 architectural vision, and listed the different parts of EJB 3. This chapter is a low-altitude fly-over with a reconnaissance airplane. Here, we’ll take a quick look at the code for solving a realistic problem using EJB 3. The example solution will use all of the EJB 3 components types, a layered architecture, and some of the services we discussed in chapter 1.
EJB 3 offers a wide range of features and services. To keep things sane, the examples in this chapter are designed to show you the high-level features and services of EJB 3, and to introduce you to the major players: the beans and clients. Thanks to the almost invisible way most EJB 3 services are delivered, this is pretty easy to do. You’ll see exactly how easy and useful EJB 3 is and how quickly you could pick it up.
We start by covering some basic concepts necessary for understanding the examples, and then we introduce the application that runs throughout the book: ActionBazaar. In the rest of the chapter, we illustrate each EJB type with an example from the ActionBazaar application. We implement business logic with session beans and then we add the power of asynchronous messaging by adding a message-driven bean (MDB). Finally you’ll discover the most powerful innovation of EJB 3 by looking at a simple example of a Java Persistence API (JPA) entity.
If you aren’t a big fan of views from heights, don’t worry too much. Think of this chapter as that first day at a new workplace, shaking hands with the stranger in the next cubicle. In the chapters that follow, you’ll get to know more about your new coworkers’ likes, dislikes, and eccentricities; and you’ll learn how to work around these foibles. All you are expected to do right now is put names to faces.
Note
In the examples in this chapter, we won’t explore the solutions beyond what is necessary for discussing the EJB 3 component types but will leave some of it for you as a brainteaser. If you want to, you can peek at the entire solution by downloading the zip containing code examples file from www.manning.com/panda. In fact, we highly recommend that you follow the tutorial on the site to set up your development environment using the code. That way, you can follow along with us and even tinker with the code on your own—including running it inside a container.
EJB 3 is a fundamental paradigm shift from previous versions. A number of innovations, some familiar and some unfamiliar, make this paradigm shift possible. A good place to start this chapter is with an exploration of three of the most important innovations.
2.1. New features: simplifying EJB
There are three primary sources of complexities in EJB 2: the heavyweight programming model, direct use of the Java Naming Directory Interface (JNDI), and a verbose XML deployment descriptor. Three primary techniques in EJB 3 eliminate these sources of complexity: metadata annotations, minimal deployment descriptors, and dependency injection. In the following sections, we introduce all three of these major innovations that make developing EJB 3 as quick and easy as possible. Let’s begin by looking at how annotations and deployment descriptors work.
2.1.1. Replacing deployment descriptors with annotations
Service configuration using Java metadata annotations is easily the most important change in EJB 3. As you’ll see throughout the book, annotations simplify the EJB programming model, remove the need for detailed deployment descriptors, and act as an effective delivery mechanism for dependency injection.
In the next few years, it’s likely that annotations will play a greater role in improving Java Standard Edition (SE) and Java Enterprise Edition (EE) usability by leaps and bounds. In case you aren’t familiar with the metadata annotation facility added in Java SE 5.0, let’s review it first.
Java metadata annotations: a brief primer
Annotations essentially allow us to “attach” additional information (officially called attributes) to a Java class, interface, method, or variable. The additional information conveyed by annotations can be used by a development environment like Eclipse, the Java compiler, a deployment tool, a persistence provider like Hibernate, or a runtime environment like the Java EE container. Another way to think about annotations is that they are “custom” Java modifiers (in addition to private, public, static, final, and so on) that can be used by anything handling Java source or byte code. This is how annotations look:
import mypackage.Author;

@Author("Debu Panda, Reza Rahman and Derek Lane")
public class EJB3InAction implements ManningBook
The @Author symbol is the annotation. It essentially tells whoever is using the EJB3InAction Java class that the authors are Debu Panda, Reza Rahman, and Derek Lane. More interestingly, it adds this bit of extra information about the class without forcing us to implement an interface, extend a class, or add a member variable or method. Since an annotation is a special kind of interface, it must be imported from where it is defined. In our case, the @Author annotation is defined in the mypackage.Author.class file. This is all there is to making the compiler happy. The runtime environment decides how the @Author annotation should be used. For example, it could be used by the Manning website engine to display the author names for this book.
Like many of the Java EE 5.0 innovations, annotations have humble beginnings. The @ character is a dead giveaway to the grandparent of annotations—JavaDoc tags. The next step in the evolution of the annotation from the lumbering caveman JavaDoc tag was the XDoclet tool. If you’ve done a significant amount of work with EJB 2, you are likely already familiar with XDoclet. XDoclet acted as a source code preprocessor that allowed to you to process custom JavaDoc tags and do whatever you needed to do with the tagged source code, such as generate PDF documentation, additional source code, or even EJB 2 deployment descriptors. XDoclet referred to this paradigm as attribute-oriented programming. In case you’re curious, you can find out more about XDoclet at http://xdoclet.sourceforge.net/xdoclet/index.html.
The sleek new annotation facility essentially makes attribute-oriented programming a core part of the Java language. Although this is entirely possible, it is probably unlikely you’ll be creating your own annotations. If your inner geek just won’t leave you alone, feel free to explore Jason Hunter’s article, Making the Most of Java’s Metadata (www.oracle.com/technology/pub/articles/hunter_meta.html). You can find out more about annotations in general at http://java.sun.com/j2se/1.5.0/docs/guide/language/annotations.html.
Note that, just like anything else, annotations and attribute-oriented programming have a few weaknesses. Specifically, it isn’t always a good idea to mix and match configuration with source code such as annotations. This means that you would have to change source code each time you made a configuration change to something like a database connection resource or deployment environment entry.EJB 3 solves this problem by allowing you to override annotations with XML deployment descriptors where appropriate.
Know your deployment descriptor
A deployment descriptor is simply an XML file that contains application configuration information. Every deployment unit in Java EE can have a deployment descriptor that describes its contents and environment. Some typical examples of deployment units are the Enterprise Archive (EAR), Web Application Archive (WAR), and the EJB (ejb-jar) module. If you have ever used EJB 2, you know how verbose the XML (ejb-jar.xml) descriptor was. Most elements were required even if they were trivial. This added to the complexity of using EJB. For example, you could have had the following deployment descriptor for the HelloUserBean that we saw in chapter 1:
<enterprise-beans>
    <session>
        <ejb-name>HelloUserBean</ejb-name>
        <local>ejb3inaction.example.HelloUser</local>
        <ejb-class>ejb3inaction.example.HelloUserBean</ejb-class>
        <session-type>Stateless</session-type>
        <transaction-type>Container</transaction-type>
    </session>
</enterprise-beans>
We’ll discuss deployment descriptors in greater detail when we talk about EJB packaging in chapter 11. The good news is that EJB 3 makes deployment descriptors completely optional. You can now use metadata annotations instead of descriptor entries, thus making the development experience much simpler. Note that we’ll primarily use annotations throughout this book. This is not because we think deployment descriptors are unimportant or outdated, but because concepts are more easily explained using annotations. As a matter of fact, although deployment descriptors involve dealing with often confusing and verbose XML, we think they can be an excellent mechanism for separating coding concerns from deployment and configuration concerns. With this fact in mind, we present the deployment descriptor counterparts for each of the annotations described in the chapter (and more) in appendix D.
You can use deployment descriptor entries only for corner cases where you need them. (A corner case is a problem or situation that occurs only outside normal operating parameters.)
Mixing annotations and deployment descriptors
Annotations and descriptors are not mutually exclusive. In fact, in EJB 3 they’re designed for harmonious coexistence. Deployment descriptor entries override configuration values hard-coded into EJB components. As an example, we could override the @Author annotation we just introduced with the following imaginary deployment descriptor:
<ManningBooks>
    <ManningBook>
       <BookClass>EJB3InAction</BookClass>
       <Author>Larry, Moe and Curly</Author>
    </ManningBook>
</ManningBooks>
At runtime, the Manning website engine would detect that the authors of the EJB3InAction book really are Larry, Moe, and Curly, and not Debu Panda, Reza Rahman, and Derek Lane.
This is an invaluable feature if you develop enterprise applications that can be deployed to a variety of environments. In the simplest case, the differing environments could be a test and a production server. In the most complex case, you could be selling shrink-wrapped enterprise applications deployed to an unknown customer environment. The most obvious way of mixing and matching annotation and XML metadata is to use XML for deployment environment–specific configurations while using annotations for everything else. If you really don’t like annotations, that’s fine too. You can avoid using them completely in favor of XML deployment descriptors. We’ll primarily focus on annotations rather than deployment descriptors in this book simply because they are so much more intuitive to look at and explain.
Common metadata annotations
Obviously, EJB defines its own set of standard annotations. We’ll be discussing these annotations throughout this book.
During the course of developing Java EE 5.0, it became apparent that the Java EE container as a whole could use some of the annotations geared toward EJB 3. In particular, these annotations are extremely useful in integrating EJB with the web/servlet tier. Some of these annotations were separated out of the EJB 3 spec and christened common metadata annotations. These annotations are a core part of what makes EJB 3 development, including dependency injection, easy. Table 2.1 lists some of the major common metadata annotations. We’ll discuss them throughout this part of the book, starting with some of the most fundamental ones in this chapter.
Table 2.1. Major metadata annotations introduced in Java EE. Although primarily geared toward EJB, these annotations apply to Java EE components such as servlets and JSF managed beans as well as application clients. Annotations defined in the javax.annotation.* package are defined by the Common Metadata Annotations API (JSR-250).
|
Usage |
Components That Can Use Them |
|
|---|---|---|
|
javax.annotation.Resource |
Dependency injection of resources such as DataSource, JMS objects, etc. |
EJB, web, application client |
|
javax.ejb.EJB |
Dependency injection of session beans |
EJB, web, application client |
|
javax.jws.WebServiceRef |
Dependency injection of web services |
EJB, web, application client |
|
javax.persistence.PersistenceContext |
Dependency injection of container-managed EntityManager |
EJB, web |
|
javax.persistence.PersistenceUnit |
Dependency injection of EntityManagerFactory |
EJB, web |
|
javax.annotation.PostConstruct |
Lifecycle method |
EJB, web |
|
javax.annotation.PreDestroy |
Lifecycle method |
EJB, web |
|
javax.annotation.security.RunAs |
Security |
EJB, web |
|
javax.annotation.security.RolesAllowed |
Security |
EJB |
|
javax.annotation.security.PermitAll |
Security |
EJB |
|
javax.annotation.security.DenyAll |
Security |
EJB |
|
javax.annotation.security.DeclareRoles |
Security |
EJB, web |
As you can see, dependency injection is front and center of the common metadata annotations, including the @Resource, @EJB, @WebServiceRef, @PersistenceContext, and @PersistenceUnit annotations. Just as metadata annotations take the ugliness of descriptors away from the developer’s view, dependency injection solves the complexities surrounding manual JNDI lookups. Let’s take a look at this concept next.
2.1.2. Introducing dependency injection
Almost every component uses another component or resource to implement functionality. The primary goal of dependency injection (DI) is to make component interdependencies as loosely coupled as possible. In real terms, this means that one component should call another component or resource only through an interface and that components and resources should be glued together using configuration instead of code. As a result, component implementations can easily be swapped out as necessary simply by reconfiguring the application.
If you’ve used JNDI extensively in EJB 2, you’ll appreciate how much this means. We won’t talk about JNDI very much here since in most cases you can get away without knowing anything about it. If you don’t know about JNDI and are curious to learn more, we discuss it in some length in appendix A. Figure 2.1 shows the difference between manual JNDI lookups and DI.
Figure 2.1. When you’re using JNDI, it’s the responsibility of the client to do a lookup and obtain a reference to the object. In EJB 3, you may think dependency injection is the opposite of JNDI. It is the responsibility of the container to inject an object based on the dependency declaration.

In a sense, injection is lookup reversed. As you can see, in the manual JNDI lookup model, the bean explicitly retrieves the resources and components it needs. As a result, component and resource names are hard-coded in the bean. With DI, on the other hand, the container reads target bean configuration, figures out what beans and resources the target bean needs, and injects them into the bean at runtime. In the end, you write no lookup code and can easily change configuration to swap out beans and resources as needed.
In essence, DI allows you to declare component dependencies and lets the container deal with the complexities of service or resource instantiation, initialization, sequencing, and supplies the service or resource references to the clients as required. As we work our way through the examples in this chapter, you’ll see several places where we use DI, including @EJB to inject EJBs in section 2.3, @Resource to inject JMS resources in section 2.4, and @PersistenceContext to inject container-managed EntityManager in section 2.5.
Note
Lightweight application containers like the Spring Framework and Pico-Container popularized the idea of DI. To learn more about the roots of DI itself, visit www.martinfowler.com/articles/injection.html. This article, by Martin Fowler, faithfully examines the pros and cons of DI over JNDI-style manual lookups. Since the article was written before EJB 3 was conceived, you might find the discussion of EJB 2 cool as well!
Now that we’ve covered some of the most fundamental concepts of EJB 3, it is time to warm up to code. The problem we solve in this chapter utilizes an essential element of this book—ActionBazaar. ActionBazaar is an imaginary enterprise system around which we’ll weave most of the material in this book. In a sense, this book is a case study of developing the ActionBazaar application using EJB 3.
Let’s take a quick stroll around the bazaar to see what it is all about.
2.2. Introducing the ActionBazaar application
ActionBazaar is a simple online auctioning system like eBay. Sellers dust off the treasures hidden away in basement corners, take a few out-of-focus pictures, and post their item listings on ActionBazaar. Eager buyers get in the competitive spirit and put exorbitant bids against each other on the hidden treasures with the blurry pictures and misspelled descriptions. Winning bidders pay for the items. Sellers ship sold items. Everyone is happy, or so the story goes.
As much as we would like to take credit for it, the idea of ActionBazaar was first introduced in Hibernate in Action by Christian Bauer and Gavin King (Manning, 2004) as the CaveatEmptor application. Hibernate in Action primary dealt with developing the persistence layer using the Hibernate object-relational mapping (ORM) framework. The idea was later used by Patrick Lightbody and Jason Carreira in WebWork in Action (Manning, 2005) to discuss the open source presentation-tier framework. We thought this was a pretty good idea to adopt for EJB 3.
The next two parts of this book roughly follow the course of developing each layer of the ActionBazaar application as it relates to EJB 3. We’ll use EJB 3 to develop the business logic tier in part 2, and then the persistence tier in part 3. We’ll deal with the presentation layer as necessary as well.
This section will introduce you to the ActionBazaar application. We start with a subset of the architecture of ActionBazaar, and then we’ll design a solution based on EJB 3 and JPA. After this section, the rest of the chapter explores some of the important features of EJB 3, using examples from the ActionBazaar application to introduce you to the various bean types and show how they are used.
Let’s begin by taking a look at the requirements and design of our example.
2.2.1. Starting with the architecture
For the purposes of introducing all three EJB 3 component types across the business logic and persistence layers, let’s focus on a small subset of ActionBazaar functionality in this chapter—starting from bidding on an item and ending with ordering the item won. This set of application functionality is shown in figure 2.2.
Figure 2.2. A chain of representative ActionBazaar functionality used to quickly examine a cross section of EJB 3. The bidder bids on a desired item, wins the item, orders it, and instantaneously receives confirmation. Parallel with order confirmation, the user is billed for the item. Upon successful receipt of payment, the seller ships the item.

The functionality represented in figure 2.2 encompasses the “essentials” of ActionBazaar. The major functionalities not covered are: posting an item for sale, browsing items, and searching for items. We’ll save these pieces of functionality for parts 2 and 3. This includes presenting the entire domain model, which we’ll discuss in chapter 7 when we start talking about domain modeling and persistence using JPA.
The chain of actions in figure 2.2 starts with the user deciding to place a bid on an item. Our user, Jenny, spots the perfect Christmas gift for Grandpa and quickly puts down a starting bid of $5.00. After the timed auction ends, the highest bidder wins the item. Jenny gets lucky and no one else bids on the item, so she wins it for the grand sum of $5.00. As the winning bidder, Jenny is allowed to order the item from the seller, Joe. An order includes all the items we’ve come to expect from online merchants—shipping information, billing details, a total bill with calculated shipping and handling costs, and so on. Persuasive Jenny gets Mom to foot the bill with her credit card and has the order shipped directly to Grandpa’s address. Not unlike many e-businesses such as Amazon.com and eBay, ActionBazaar does not make the user wait for the billing process to finish before confirming an order. Instead, the order is confirmed as soon as it is reasonably validated and the billing process is started in parallel in the background. Jenny gets an order confirmation number back as soon as she clicks the Order button. Although Jenny doesn’t realize it, the process to charge Mom’s credit card starts in the background as she is receiving the confirmation. After the billing process is finished, both Jenny and the seller, Joe, are sent e-mail notifications. Having been notified of the receipt of the money for the order, Joe ships the item, just in time for Grandpa to get it before Christmas!
In the next section, you’ll see how the business logic and persistence components for this set of actions can be implemented using EJB 3. Before peeking at the solution diagram in the next section, you should try to visualize how the components might look with respect to an EJB-based layered architecture. How do you think session beans, MDBs, entities, and the JPA API fit into the picture, given our discussion? Chances are, with the probable exception of the messaging components, your design will closely match ours.
2.2.2. An EJB 3–based solution
Figure 2.2 shows how the ActionBazaar scenario in the previous section can be implemented using EJB 3 in a traditional four-tier layering scheme. For our purposes, the presentation tier is essentially an amorphous blob that generates business-tier requests in response to user actions. If you examine the scenario in figure 2.2, you’ll see that only two processes are triggered by the user—adding a bid to an item and ordering items won. One more process might be apparent: the background billing process to charge the order, triggered by order confirmation. If you guessed that the billing process is triggered through a message, you guessed right. As you can see in figure 2.3, the bidding and ordering processes are implemented as session beans (PlaceBidBean and PlaceOrderBean) in the business logic tier. On the other hand, the billing process is implemented as an MDB (OrderBillingMDB) since it is triggered by a message sent from the PlaceOrderBean instead of a direct user request.
Figure 2.3. The ActionBazaar scenario implemented using EJB 3. From the EJB 3 perspective, the presentation layer is an amorphous blob that generates business-tier requests. The business-logic tier components match up with the distinct processes in the scenario—putting a bid on an item, ordering the item won, and billing the user. The billing MDB is triggered by a message sent by the order confirmation process. The business-tier components use JPA entities to persist application state into the database.

All three of the processes persist data. The PlaceBidBean needs to add a bid record to the database. Similarly, the PlaceOrderBean must add an order record. Alternatively, the OrderBillingMDB updates the order record to reflect the results of the billing process. These database changes are performed through two entities in the JPA-managed persistence tier—the Bid and Order entities. While the PlaceBidBean uses the Bid entity, the PlaceOrderBean and OrderBillingMDB use the Order entity.
Recall that although JPA entities contain ORM configuration, they do not persist themselves. As you’ll see in the actual code solutions, the business-tier components have to use the JPA EntityManager API to add, delete, update, and retrieve entities as needed.
If your mental picture matches up with figure 2.3 pretty closely, it is likely the code we are going to present next will seem intuitive too, even though you don’t know EJB 3.
In the following sections, we explore each of the EJB 3 component types using our scenario. Without further ado, we can now begin our whirlwind tour of EJB 3 component types, starting with the session beans in the business-logic tier.
2.3. Building business logic with session beans
Session beans are meant to model business processes or actions, especially as perceived by the system user. This is why they are ideal for modeling the bidding and ordering processes in our scenario. Session beans are the easiest but most versatile part of EJB.
Recall that session beans come in two flavors: stateful and stateless. We’ll take on stateless session beans first, primarily because they are simpler. You’ll then discover how you can add statefulness to the ActionBazaar application by using a stateful session bean. Along the way, we introduce you to an example of a session bean client in a web tier, and then build a standalone Java client for a session bean.
2.3.1. Using stateless beans
Stateless session beans are used to model actions or processes that can be done in one shot, such as placing a bid on an item in our ActionBazaar scenario. The addBid bean method in listing 2.1 is called from the ActionBazaar web tier when a user decides to place a bid. The parameter to the method, the Bid object, represents the bid to be placed. The Bid object contains the ID of the bidder placing the bid, the ID of the item being bid on, and the bid amount. As we know, all the method needs to do is save the passed-in Bid data to the database. In a real application, you would see more validation and error-handling code in the addBid method. Since the point is to show you what a session bean looks like and not to demonstrate the über geek principles of right and proper enterprise development, we’ve conveniently decided to be slackers. Also, as you’ll see toward the end of the chapter, the Bid object is really a JPA entity.
Listing 2.1. PlaceBid stateless session bean code

The first thing that you have probably noticed is how plain this code looks. The PlaceBidBean class is just a plain old Java object (POJO) and the PlaceBid interface is a plain old Java interface (POJI). There is no cryptic EJB interface to implement, class to extend, or confusing naming convention to follow. In fact, the only notable features in listing 2.1 are the two EJB 3 annotations: @Stateless and @Local:
- @Stateless— The @Stateless annotation tells the EJB container that PlaceBidBean is a stateless session bean. This means that the container automatically provides such services to the bean as automatic concurrency control, thread safety, pooling, and transaction management. In addition, you can add other services for which stateless beans are eligible, such as transparent security and interceptors.
- @Local— The @Local annotation on the PlaceBid interface tells the container that the PlaceBid EJB can be accessed locally through the interface. Since EJB and servlets are typically collocated in the same application, this is probably perfect. Alternatively, we could have marked the interface with the @Remote annotation. Remote access through the @Remote annotation is provided under the hood by Java Remote Method Invocation (RMI), so this is the ideal means of remote access from Java clients.
If the EJB needs to be accessed by non-Java clients like Microsoft .NET applications, web services–based remote access can be enabled using the @WebService annotation applied either on the interface or the bean class.
That’s pretty much all we’re going to say about stateless session beans for now. Let’s now turn our attention to the client code for using the PlaceBid EJB.
2.3.2. The stateless bean client
Virtually any client can use the PlaceBid EJB in listing 2.1. However, the most likely scenario for EJB usage is from a Java-based web tier. In the ActionBazaar scenario, the PlaceBid EJB is probably called from a JavaServer Page (JSP) or servlet. For simplicity, let’s assume that the PlaceBid EJB is used by a servlet named PlaceBidServlet. Listing 2.2 shows how the code might look. The servlet’s service method is invoked when the user wants to place a bid. The bidder’s ID, item ID, and the bid amount are passed in as HTTP request parameters. The servlet creates a new Bid object, sets it up, and passes it to the EJB addBid method.
Listing 2.2. A simple servlet client for the PlaceBid EJB

As you can see in listing 2.2, EJB from the client side looks even simpler than developing the component code. Other than the @EJB annotation on the placeBid private variable, the code is no different than using a local POJO.
Note
When the servlet container sees the @EJB annotation as the servlet is first loaded, it looks up the PlaceBid EJB behind the scenes and sets the placeBid variable to the retrieved EJB reference. If necessary, the container will look up the EJB remotely over RMI.
The @EJB annotation works in any component that is registered with the Java EE container, such as a servlet or JavaServer Faces (JSF) backing bean. As long as you are using the standard Java EE stack, this is probably more than sufficient.
There are a couple other interesting items in this code that illustrate concepts we introduced earlier. Let’s take a closer look.
EJB 3 dependency injection
Although we mentioned DI in the beginning of the chapter, if you are not familiar with it you may think that what the @EJB annotation is doing is a little unusual—in a nifty, “black-magic” kind of way. In fact, if we didn’t tell you anything about the code, you might have been wondering if the placeBid private variable is even usable in the servlet’s service method since it is never set! If fact, if the container didn’t intervene we’d get the infamous java.lang.NullPointerException when we tried to call the addBid method in listing 2.2 since the placeBid variable would still be null. One interesting way to understand DI is to think of it as “custom” Java variable instantiation. The @EJB annotation in listing 2.2 makes the container “instantiate” the placeBid variable with the EJB named PlaceBid before the variable is available for use.
Recall our discussion in section 2.1.2 that DI can be viewed as the opposite of JNDI lookup. Recall also that JNDI is the container registry that holds references to all container-managed resources such as EJBs. Clients gain access to session beans like our PlaceBid EJB directly or indirectly through JNDI. In EJB 2, you would have to manually populate the placeBid variable using JNDI lookup code that looks like the following:
Object ejbHome = new InitialContext().lookup("java:comp/env/PlaceBid");
PlaceBidHome placeBidHome = (PlaceBidHome)
    PortableRemoteObject.narrow(ejbHome, PlaceBidHome.class);
PlaceBid placeBid = placeBidHome.create();
It isn’t easy to fully appreciate DI until you see code like this. EJB 3 DI using the @EJB annotation reduces all this mechanical JNDI lookup code to a single statement! In a nontrivial application, this can easily translate to eliminating hundreds of lines of redundant, boring, error-prone code. You can think of EJB 3 DI as a high-level abstraction over JNDI lookups.
Understanding statelessness
An interesting point about the PlaceBid stateless bean is that as long as calling the addBid method results in the creation of a new bid record each time, the client doesn’t care about the internal state of the bean. There is absolutely no need for the stateless bean to guarantee that the value of any of its instance variables will be the same across any two invocations. This property is what statelessness means in terms of server-side programming.
The PlaceBid session bean can afford to be stateless because the action of placing a bid is simple enough to be accomplished in a single step. The problem is that not all business processes are that simple. Breaking a process down into multiple steps and maintaining internal state to “glue together” the steps is a common technique to present complex processes to the user in a simple way. Statefulness is particularly useful if what the user does in a given step in a process determines what the next step is. Think of a questionnaire-based setup wizard. The user’s input for each step of the wizard is stored behind the scenes and is used to determine what to ask the user next. Stateful session beans make maintaining server-side application state as easy as possible.
2.3.3. Using stateful beans
Unlike stateless session beans, stateful session beans guarantee that a client can expect to set the internal state of a bean and count on the state being maintained between any number of method calls. The container makes sure this happens by doing two important things behind the scenes.
Maintaining the session
First, the container ensures that a client can reach a bean dedicated to it across more than one method invocation. Think of this as a phone switchboard that makes sure it routes you to the same customer service agent if you call a technical support line more than once in a given period of time (the period of time is the “session”).
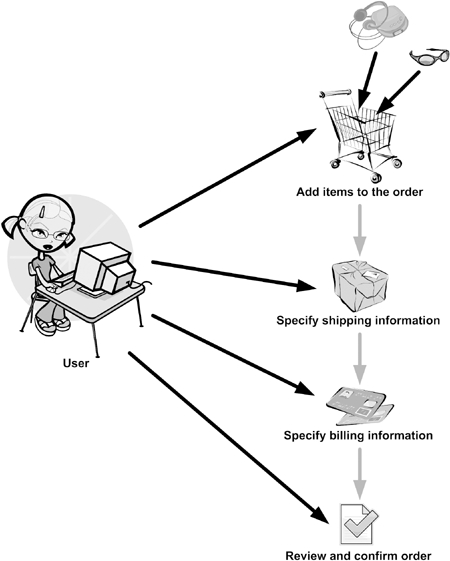
Second, the container ensures that bean instance variable values are maintained for the duration of a session without your having to write any session maintenance code. In the customer service example, the container makes sure that your account information and call history in a given period of time automatically appear on your agent’s screen when you call technical support. This “automagic” maintenance of session state is a huge leap from having to fiddle with the HTTP session, browser cookies, or hidden HTML form variables to try to accomplish the same thing. As we’ll see in the coming code samples, you can develop stateful beans as if you are developing in a “Hello World” application, not a web application with verbose code to maintain session state. The ActionBazaar ordering process is a great example for stateful session beans since it is broken up into four steps, each of which correspond to a screen presented to the user:
1.
Adding items to the order. If the user started the ordering process by clicking the Order Item button on the page displaying an item won, the item is automatically added to the order. The user can still add additional items in this step.
2.
Specifying shipping information, including the shipping method, shipping address, insurance, and so on.
3.
Adding billing information, such as credit card data and the billing address.
4.
Confirming the order after reviewing the complete order, including total cost.
Figure 2.4 depicts these ordering steps. With a stateful bean, the data the user enters at each step can be cached into bean variables until the ordering workflow completes, when the user confirms the order.
Figure 2.4. To make an otherwise overwhelming process manageable, the ActionBazaar ordering process is broken down into several steps. The first of these steps is to add one or more item to the order. The second step is to specify shipping information for the order. The third is to specify the billing information. Reviewing and confirming the order finishes the ordering process.
Now that we know what we want, let’s see how we can implement it.
Implementing the solution
Listing 2.3 shows a possible implementation of the ActionBazaar ordering workflow using a bean named PlaceOrderBean. As you can see, each of the ordering steps maps to a method in the PlaceOrderBean implementation. The addItem, setShippingInfo, setBillingInfo, and confirmOrder methods are called in sequence from the web tier in response to user actions in each step. The setBidderID method essentially represents an implicit workflow setup step. It is called at the beginning of the workflow behind the scenes by the web application to identify the currently logged-in user as the bidder placing the order. Except for the confirmOrder method, the remaining methods do little more than simply save user input into stateful instance variables. In a real application, of course, these methods would be doing a lot more, such as error handling, validation, figuring out the user’s options for a given step, calculating costs, and so on. The confirmOrder method does several things using the data accumulated throughout the session: the complete order is saved into the database, the billing process is started in parallel, and an order ID is returned to the user as confirmation.
Listing 2.3. PlaceOrderBean stateful session bean

As you can see, overall there is no big difference between developing a stateless and a stateful bean. In fact, from a developer’s
perspective, the only difference is that the PlaceOrderBean class is marked with the @Stateful annotation instead of the @Stateless annotation ![]() . As we know, though, under the hood this makes a huge difference in how the container handles the bean’s relationship to
a client and the values stored in the bean instance variables
. As we know, though, under the hood this makes a huge difference in how the container handles the bean’s relationship to
a client and the values stored in the bean instance variables ![]() . The @Stateful annotation also serves to tell the client-side developer what to expect from the bean if behavior is not obvious from the
bean’s API and documentation.
. The @Stateful annotation also serves to tell the client-side developer what to expect from the bean if behavior is not obvious from the
bean’s API and documentation.
It is also important to note the @Remove annotation ![]() placed on the confirmOrder method. Although this annotation is optional, it is critical from a server performance standpoint.
placed on the confirmOrder method. Although this annotation is optional, it is critical from a server performance standpoint.
Note
The @Remove annotation marks the end of the workflow modeled by a stateful bean. In our case, we are telling the container that there is no longer a need to maintain the bean’s session with the client after the confirmOrder method is invoked. If we didn’t tell the container what method invocation marks the end of the workflow, the container could wait for a long time until it could safely time-out the session. Since stateful beans are guaranteed to be dedicated to a client for the duration of a session, this could mean a lot of “orphaned” state data consuming precious server resources for long periods of time!
There is virtually no difference between the bean interfaces for our stateless and stateful bean examples. Both are POJIs
marked with the @Remote annotation to enable remote client access ![]() .
.
Let’s now take a quick look at stateful beans from the client perspective. As you might expect, compared to stateless beans there are no major semantic differences.
2.3.4. A stateful bean client
It is clear that the PlaceOrder EJB is called from the ActionBazaar web tier. However, to give a slightly more colorful perspective on things, we’ll deliberately stay out of web-tier client examples this time. We’ll use a thick Java application that functions as a test script to run through the entire workflow of the PlaceOrder EJB using some dummy data. This test script could have just as easily been part of a very high-level regression test suite using a framework like JUnit or NUnit.
Note
If you have management buy-in to invest in extensive unit testing, you might also note the fact that because of the POJO-centric nature of EJB 3, our example application could be easily modified to a full-scale unit test using dummy data sources and the like. We’ll leave this for you as an exercise in case you are interested in exploring further by tweaking the source code available for download from www.manning.com/panda. If unit testing and code coverage are not viable topics to bring up in your work environment, don’t worry; we don’t assume you do a ton of unit testing.
Listing 2.4 shows the code for the stateful session bean client.
Listing 2.4. Stateful session bean client

There is nothing special you need to do from the client side to use stateful beans. As a matter of fact, there is virtually no difference in the client code between using a stateless and a stateful bean, other than the fact that the client can safely assume that the EJB is maintaining state even if it is sitting on a remote application server. The other remarkable thing to note about listing 2.4 is the fact that the @EJB annotation is injecting a remote EJB into a standalone client. This is accomplished by running the client in the application client container (ACC).
Note
The application client container is a mini Java EE container that can be run from the command line. Think of it as a souped-up Java Virtual Machine (JVM) with some Java EE juice added. You can run any Java SE client such as a Swing application inside the ACC as if you were using a regular old JVM. The beauty of it is that the ACC will recognize and process most Java EE annotations such as the @EJB DI annotation. Among other things, the client container can look up and inject EJBs on remote servers, communicate with remote EJBs using RMI, provide authentication, perform authorization, and so forth. The application client really shines if you need to use EJBs in an SE application or would like to inject real resources into your POJO during unit testing.
Any Java class with a main method can be run inside the ACC. Typically, though, an application client is packaged in a JAR file that must contain a Main-Class in the Manifest file. Optionally, the JAR may contain a deployment descriptor (application-client.xml) and a jndi.properties file that contains the environment properties for connecting to a remote EJB container. Let’s assume you packaged up your application client classes in a JAR file named chapter2-client.jar. Using Sun Microsystems’s GlassFish application server, you could launch your application client inside the ACC as follows:
appclient -client chapter2-client.jar
This finishes our brief introduction to session beans using our ActionBazaar scenario. We are now ready to move on to the next business-tier EJB component: message-driven beans.
2.4. Messaging with message-driven beans
Just as session beans process direct business requests from the client, MDBs process indirect messages. In enterprise systems, messaging has numerous uses, including system integration, asynchronous processing, and distributed system communication. If you’ve been working on enterprise development for some time, you’re probably familiar with at least the idea of messaging. In the most basic terms, messaging involves communicating between two separate processes, usually across different machines. Java EE messaging follows this same idea—just on steroids. Most significantly, Java EE makes messaging robust by adding a reliable middleman between the message sender and receiver. This idea is illustrated in figure 2.5.
Figure 2.5. The Java EE “pony express” messaging model. Java EE adds reliability to messaging by adding a middleman that guarantees the delivery of messages despite network outages, even if the receiver is not present on the other end when the message is sent. In this sense, Java EE messaging has much more in common with the postal service than it does with common RPC protocols like RMI. We’ll discuss this model in much greater detail in chapter 4.

In Java EE terms, the reliable middleman is called a messaging destination, powered by message-oriented middleware (MOM) servers like IBM’s MQSeries or Progress Software’s SonicMQ. Java EE standardizes messaging through a well-known API, Java Messaging Service (JMS), upon which MDBs are heavily dependent.
We’ll discuss messaging, JMS, and MDBs in much greater detail in chapter 4. For the moment, this is all you really need to know.
Next, we’ll build a simple example of message producer and an MBD. In our ActionBazaar example, we enable asynchronous order billing through messaging. To see how this is done, let’s revisit the parts of the PlaceOrderBean introduced in listing 2.3 that we deliberately left hidden, namely the implementation of the billOrder method.
2.4.1. Producing a billing message
As we discussed in our high-level solution schematic in section 2.2, the PlaceOrderBean accomplishes asynchronous or “out-of-process” order billing by generating a message in the confirmOrder method to request that the order billing be started in parallel. As soon as this billing request message is sent to the messaging middleman, the confirmOrder method returns with the order confirmation to the user. We’ll now take a look at exactly how this piece is implemented. As you can see in listing 2.5, the billing request message is sent to a messaging destination named jms/OrderBillingQueue. Since you have already seen most of the implementation of the PlaceOrder bean, we won’t repeat a lot of the code shown in listing 2.3 here.
Listing 2.5. PlaceOrderBean that produces the JMS message

Not surprisingly, the code to send the message in listing 2.5 is heavily dependent on the JMS API. In fact, that’s all that the code in the billOrder method consists of. If you’re familiar with JDBC, the flavor of the code in the method might seem familiar. The end result of the code is that the newly created Order object is sent as a message to a JMS destination named jms/OrderBillingQueue. We won’t deal with the intricacies of JMS immediately, but we’ll save a detailed discussion of this essential messaging API for chapter 4. It is important to note a few things right now, though.
The first thing is that two JMS resources, including the message destination, are injected using the @Resource annotation ![]() instead of being looked up.
instead of being looked up.
Note
As we stated earlier, in addition to the @EJB annotation the @Resource annotation provides DI functionality in EJB 3. While the @EJB annotation is limited to injecting EJBs, the @Resource annotation is much more general purpose and can be used to inject anything that the container knows about.
As shown in listing 2.5, the container looks up the JMS resources specified through the name parameter and injects them into the connectionFactory and billingQueue instance variables. The name parameter values specify what resources are bound to the EJB’s environment naming context. Then the PlaceOrderBean establishes a connection to the JMS provider, and creates a session and a message producer ![]() . Secondly, it is important to realize that the MessageProducer.send method
. Secondly, it is important to realize that the MessageProducer.send method ![]() doesn’t wait for a receiver to receive the message on the other end. Because the messaging server guarantees that the message
will be delivered to anyone interested in the message, this is just fine. In fact, this is exactly what enables the billing
process to start in parallel to the ordering process, which continues on its merry way as soon as the message is sent. You
should also note how loosely coupled the ordering and billing processes are. The ordering bean doesn’t even know who picks
up and processes its message; it simply knows the message destination! Finally, PlaceOrderBean cleans up all resources used by it
doesn’t wait for a receiver to receive the message on the other end. Because the messaging server guarantees that the message
will be delivered to anyone interested in the message, this is just fine. In fact, this is exactly what enables the billing
process to start in parallel to the ordering process, which continues on its merry way as soon as the message is sent. You
should also note how loosely coupled the ordering and billing processes are. The ordering bean doesn’t even know who picks
up and processes its message; it simply knows the message destination! Finally, PlaceOrderBean cleans up all resources used by it ![]() .
.
As we know from our solution schematic in section 2.2, the OrderBillingMDB processes the request to bill the order. It continuously listens for messages sent to the jms/OrderBillingQueue messaging destination, picks up the messages from the queue, inspects the Order object embedded in the message, and attempts to bill the user. We’ll depict this scheme in figure 2.6 to reinforce the concept.
Figure 2.6. Asynchronously billing orders using MDBs. The stateful session bean processing the order sends a message to the order-billing queue. The billing MDB picks up this message and processes it asynchronously.

Let’s take a look now at how the OrderBillingMDB is implemented.
2.4.2. Using the order billing message processor MDB
The OrderBillingMDB’s sole purpose is to attempt to bill the bidder for the total cost of an order, including the price of the items in the order, shipping, handling, insurance costs, and the like. Listing 2.6 shows the abbreviated code for the order billing MDB. Recall that the Order object passed inside the message sent by the PlaceOrder EJB contains a BillingInfo object. The BillingInfo object tells OrderBillingMDB how to bill the customer—perhaps by charging a credit card or crediting against an online bank account. However the user is supposed to be charged, after attempting to bill the user the MDB notifies both the bidder and seller of the results of the billing attempt. If billing is successful, the seller ships to the address specified in the order. If the billing attempt fails, the bidder must correct and resubmit the billing information attached to the order.
Last but not least, the MDB must also update the order record to reflect what happened during the billing attempt. Feel free to explore the complete code sample and deployment descriptor entries containing the JMS resource configuration in the zip containing code examples.
Listing 2.6. OrderBillingMDB

As you might have noticed from the code, MDBs are really session beans in JMS disguise. Like stateless beans, MDBs are not guaranteed to maintain state. The @MessageDriven annotation is the MDB counterpart of the @Stateless and @Stateful annotations—it makes the container transparently provide messaging and other EJB services into a POJO. The activation configuration properties nested inside the @MessageDriven annotation tells the container what JMS destination the MDB wants to receive messages from.
Note
Behind the scenes, the container takes care of several mechanical details to start listening for messages sent to the destination specified by the activation configuration properties. As soon as a message arrives at the destination, the container forwards it to an instance of the MDB.
Instead of implementing a remote or local business interface, MDBs implement the javax.jms.MessageListener interface. The container uses this well-known JMS interface to invoke an MDB. The onMessage method defined by the interface has a single javax.jms.Message parameter that the container uses to pass a received message to the MDB. Believe it or not, this is more or less all you need to know to get by when using MDBs, as long as you have a decent understanding of messaging and JMS.
This wraps up this chapter’s discussion of the EJB 3 business-tier components. As we mentioned earlier, we’ll devote the entirety of the next part of the book to this vital part of the EJB platform. For now, let’s move on to the other major part of EJB, the Persistence API.
2.5. Persisting data with EJB 3 JPA
The Java Persistence API (JPA) is the persistence-tier solution for the Java EE platform. Although a lot has changed in EJB 3 for session beans and MDBs, the changes in the persistence tier have truly been phenomenal. In fact, other than some naming patterns and concepts, JPA has very little in common with the EJB 2 entity bean model. JPA does not follow the container model (which is just not very well suited to the problem of persistence); instead, it follows an API paradigm similar to JDBC, JavaMail, or JMS. As you’ll soon see, the JPA EntityManager interface defines the API for persistence while JPA entities specify how application data is mapped to a relational database. Although JPA takes a serious bite out of the complexity in saving enterprise data, ORM-based persistence is still a nontrivial topic. We’ll devote the entire third part of this book to JPA, namely chapters 7 through 10.
In almost every step of our ActionBazaar scenario, data is saved into the database using JPA. We won’t bore you by going over all of the persistence code for the scenario. Instead, we’ll introduce JPA using a representative example and leave you to explore the complete code on your own. You’ll see what EJB 3 persistence looks like by revisiting the PlaceBid stateless session bean. As a reminder to how the bidding process is implemented, figure 2.7 depicts the various components that interact with one another when a bidder creates a bid in ActionBazaar.
Figure 2.7. PlaceBidServlet invokes the addBid method of PlaceBid EJB and passes a Bid object. The PlaceBidEJB invokes the persist method of EntityManager to save the Bid entity into the database. When the transaction commits, you’ll see that a corresponding database record in the BIDS table will be stored.

Recall that the PlaceBidServlet calls the PlaceBidBean’s addBid method to add a Bid entity into the database. The PlaceBidBean uses the JPA EntityManager’s persist method to save the bid. Let’s first take a look at the JPA, and then we’ll see the EntityManager in action.
2.5.1. Working with the Java Persistence API
You might have noticed in listing 2.1 that we kept the code to save a bid into the database conveniently out of sight. The PlaceBid EJB’s addBid method references the hidden save method to persist the Bid object to the database. Listing 2.8 will fill in this gap by showing you what the save method actually does. The save method uses the JPA EntityManager to save the Bid object. But first let’s take a quick look at the fourth and final kind of EJB—the JPA entity. Listing 2.7 shows how the Bid entity looks.
Listing 2.7. Bid entity

You probably have a good idea of exactly how object-relational mapping in JPA works just by glancing at listing 2.7, even if you have no familiarity with ORM tools such as Hibernate. Think about the annotations that mirror relational concepts such as tables, columns, and primary keys.
The @Entity annotation signifies the fact that the Bid class is a JPA entity ![]() . Note that Bid is a POJO that does not require a business interface, unlike session and message-driven beans. The @Table annotation tells JPA that the Bid entity is mapped to the BIDS table
. Note that Bid is a POJO that does not require a business interface, unlike session and message-driven beans. The @Table annotation tells JPA that the Bid entity is mapped to the BIDS table ![]() . Similarly, the @Column annotations
. Similarly, the @Column annotations ![]() indicate which Bid properties map to which BIDS table fields. Note that entities need not use getter- and setter-based properties. Instead, the field mappings could have
been placed directly onto member variables exposed through nonprivate access modifiers. (You’ll learn more about access via
entity properties and fields in chapter 7.) The @Id annotation is somewhat special. It marks the bidID property as the primary key for the Bid entity
indicate which Bid properties map to which BIDS table fields. Note that entities need not use getter- and setter-based properties. Instead, the field mappings could have
been placed directly onto member variables exposed through nonprivate access modifiers. (You’ll learn more about access via
entity properties and fields in chapter 7.) The @Id annotation is somewhat special. It marks the bidID property as the primary key for the Bid entity ![]() . Just like a database record, a primary key uniquely identifies an entity instance. We have used the @GeneratedValue annotation with strategy set to GenerationType.AUTO
. Just like a database record, a primary key uniquely identifies an entity instance. We have used the @GeneratedValue annotation with strategy set to GenerationType.AUTO ![]() to indicate that the persistence provider should automatically generate the primary key when the entity is saved into the
database.
to indicate that the persistence provider should automatically generate the primary key when the entity is saved into the
database.
Note
If you have used EJB 2 you may remember that it was almost rocket science to generate primary key values with container-managed persistence (CMP) entity beans. With EJB 3 JPA, the generation of primary keys is a snap; you have several options, such as table, sequence, identity key, and so on. We’ll discuss primary-key generation in chapter 8.
The Bid entity could have been related to a number of other JPA entities by holding direct object references (such the Bidder and Item entities). EJB 3 JPA allows such object reference–based implicit relationships to be elegantly mapped to the database. We’ve decided to keep things simple for now and not dive into this topic quite so early; we’ll discuss entity relationship mapping in chapter 8.
Having looked at the Bid entity, let’s now turn our attention to how the entity winds up in the database through the PlaceBid bean.
2.5.2. Using the EntityManager
You’ve probably noticed that the Bid entity doesn’t have a method to save itself into the database. The JPA EntityManager performs this bit of heavy lifting by reading ORM configuration and providing entity persistence services through an API-based interface.
Note
The EntityManager knows how to store a POJO entity into the database as a relational record, read relational data from a database, and turn it into an entity; update entity data stored in the database; and delete data mapped to an entity instance from the database. As you’ll see in chapters 9 and 10, the EntityManager has methods corresponding to each of these CRUD (Create, Read, Update, Delete) operations, in addition to support for the robust Java Persistence Query Language (JPQL).
As promised earlier, listing 2.8 shows how the PlaceBid EJB uses EntityManager API to persist the Bid entity.
Listing 2.8. Saving a bid record using the EJB 3 JPA

The true magic of the code in listing 2.8 lies in the EntityManager interface. One interesting way to think about the EntityManager interface is as an “interpreter” between the object-oriented and relational worlds. The manager reads the ORM mapping annotations
like @Table and @Column on the Bid entity and figures out how to save the entity into the database. The EntityManager is injected into the PlaceBid bean through the @PersistenceContext annotation ![]() . Similar to the name parameter of the @Resource annotation in listing 2.5, the unitName parameter of the @PersistenceContext annotation points to the persistence unit specific to ActionBazaar. A persistence unit is a group of entities packaged together in an application module. You’ll learn more about persistence units in chapters 9 and 11.
. Similar to the name parameter of the @Resource annotation in listing 2.5, the unitName parameter of the @PersistenceContext annotation points to the persistence unit specific to ActionBazaar. A persistence unit is a group of entities packaged together in an application module. You’ll learn more about persistence units in chapters 9 and 11.
In the save method, the EntityManager persist method is called to save the Bid data into the database ![]() . After the persist method returns, a SQL statement much like the following is issued against the database to insert a record corresponding to
the bid:
. After the persist method returns, a SQL statement much like the following is issued against the database to insert a record corresponding to
the bid:
INSERT INTO BIDS (BID_ID, BID_DATE, BIDDER_ID, BID_AMOUNT, ITEM_ID)
VALUES (52, NULL, 60, 20000.50, 100)
It might be instructive to look back at listing 2.7 now to see how the EntityManager figures out the SQL to generate by looking at the object-relational mapping annotations on the Bid entity. Recall that the @Table annotation specifies that the bid record should be saved in the BIDS table while each of the @Column annotations in listing 2.7 tells JPA which Bid entity field maps to which column in the BIDS table. For example, the bidId property maps to the BIDS.BID_ID column, the bidAmount property maps to the BIDS.BID_AMOUNT column, and so on. As we discussed earlier, the @Id and @GeneratedValue value annotations specify that the BID_ID column is the primary key of the BIDS table and that the JPA provider should automatically generate a value for the column before the INSERT statement is issued (the 52 value in the SQL sample). This process of translating an entity to columns in the database is exactly what object-relational mapping and JPA is all about.
This brings us to the end of this brief introduction to the EJB 3 Java Persistence API—and to the end of this whirlwind chapter. At this point, it should be clear to you how simple, effective, and robust EJB 3 is, even from a bird’s-eye view.
2.6. Summary
As we stated in the introduction, the goal of this chapter was not to feed you the “guru pill” for EJB 3, but rather to show you what to expect from this new version of the Java enterprise platform.
This chapter introduced the ActionBazaar application, a central theme to this book. Using a scenario from the ActionBazaar application, we showed you a cross section of EJB 3 functionality, including stateless session beans, stateful session beans, message-driven beans, and the EJB 3 Java Persistence API. You also learned some basic concepts such as deployment descriptors, metadata annotations, and dependency injection.
We used a stateless session bean (PlaceBidBean) to implement the business logic for placing a bid for an item in an auctioning system. To access the bean, we built a very simple servlet client that used dependency injection. We then saw a stateful session bean (PlaceOrderBean) that encapsulated the logic for ordering an item, and we built an application client that accesses the PlaceOrderBean. We saw an example of an MDB, OrderBillingMDB, that processes a billing request when a message arrives on a JMS queue. Finally, we built an entity for storing bids and used the EntityManager API to persist the entity to the database.
Most of the rest of this book roughly follows the outline of this chapter. Chapter 3 revisits session beans; chapter 4 discusses messaging, JMS and MDBs; chapter 5 expands on dependency injection and discusses such topics as interceptors and timers; and chapter 6 explores transactions and security management in EJB. Chapters 7 through 10 are devoted to a detailed exploration of the Persistence API. Finally, chapters 11 through 16 cover advanced topics in EJB.
In the next chapter, we’ll shift to a lower gear and dive into the details of session beans.