
Chapter 5. Ajax
| This chapter covers |
Ajax is a way of using JavaScript to create interactive web pages that send data to and from the server behind the scenes. This means that the user doesn’t see the full page refresh and that a website is more responsive and feels faster to the user. As a result, a web application, such as a web-based email client, behaves more like its desktop cousins. Although it is server-based, Zend Framework’s MVC system, which separates different layers of the application, helps make it easier to add Ajax functionality to your websites.
In this chapter, we will look at what Ajax is and how it is used in web applications. We’ll also examine all the components that make up a simple example in both pure JavaScript and using prebuilt Ajax libraries. We will also integrate Ajax into a Zend Framework application so that we can investigate how Ajax interacts with the MVC system. First, let’s look at exactly what Ajax is.
5.1. Introducing Ajax
As we have noted, Ajax-enabled applications are more user friendly because they are more responsive. Figure 5.1 shows Google Suggest (http://www.google.com/webhp?complete=1&hl=en), an Ajax application that provides a drop-down list of sorted search suggestions as you type your query into the search box. Another example of a good Ajax application is Google Calendar (http://calendar.google.com), with its ability to drag and drop calendar events in order to change their date and time.
Figure 5.1. Google Suggest was developed in Google’s labs incubator and uses Ajax to provide contextual auto-completion.

There are advantages and disadvantages to using Ajax. The main advantages are that the UI is more intuitive, the user’s workflow is interrupted much less, the application feels more responsive, and less bandwidth is used because only the required data is sent from the server. The main disadvantage is that Ajax applications tend to break well-known browser features, such as the back button and reliable URLs on the address bar for bookmarks or emailing to other people. There are additional UI issues for the web designer to be concerned about, such as providing notification of processing because Internet Explorer’s (IE) “spinning globe” no longer performs this task. Websites that use Ajax can also have problems with adhering to the WAI accessibility guidelines, so a fall-back system is often required.
5.1.1. Defining Ajax
Ajax came into use in 2005 as a way of describing the suite of technologies used to build dynamic websites, and the official expansion is Asynchronous JavaScript and XML. So, let’s look at each component technology in turn.
Asynchronous
In order for an Ajax application to be an Ajax application, it needs to talk with the server without a page refresh. This is known as asynchronous data exchange, and it’s generally performed using the web browser’s XMLHttpRequest object. A hidden iframe element can also be used. The XMLHttpRequest object is essentially a mini web browser built into the web browser that we use to talk to the web server without interrupting the user.
Javascript
The key component in Ajax technologies is JavaScript and the browser’s Document Object Model (DOM), which enables scripts to manipulate the web page. JavaScript is a proper programming language in its own right and has been implemented in mainstream browsers since 1995. The DOM is a standardized way of representing the elements of a web page as a tree of objects that can be manipulated by JavaScript. Within Ajax applications, this is the means by which the application dynamically changes the web page to show new information without the server’s sending new data.
Xml
To transfer the new data from the server to the web browser within an asynchronous request, XML is used to format the data. In general, the language used to write the server application is different from JavaScript as used in the web browser, so a language neutral data transfer format is used. XML is a well known standard for solving this type of problem, but other formats, notably structured HTML, plain text, and JSON (a JavaScript-based data transfer format) are also used in Ajax applications.
Not Just Xml
JSON can be used as the data transfer format rather than XML, and the application is still known as an Ajax application (because it sounds better than “Ajaj”!). The term Ajax has taken on meaning beyond its original definition, and nowadays it represents a class of technologies that provide dynamic user interaction with the web server.
There are many uses of Ajax within a website to provide a better user experience. Let’s look briefly at how Ajax is used in applications on the web to make users’ lives easier.
5.1.2. Using Ajax in Web Applications
Ajax has many uses in all kinds of web applications. These are the main uses:
- Retrieving data without a page refresh
- Form validation
- Form helpers (auto-completion and drop-down lists)
- Dragging and dropping of items on the page
Let’s look at each one in more detail.
Retrieving Data Without a Page Refresh
Web applications such as Google’s Gmail and Calendar rely on Ajax in order to work. They retrieve data from the server directly, without forcing a page refresh. This allows for data to be updated in the relevant part of the page, such as when clicking on an email in the inbox, without the whole screen going white while it refreshes. Web applications also respond faster when using Ajax because less data needs to be transferred for each user interaction. The lack of a page refresh also makes the application more immersive for users because their workflow is not interrupted.
Form Validation
JavaScript has been used for form validation since Netscape first invented the language. Usually the validation is a piece of ad hoc code above the form that checks for the obvious errors, with the main validation being left to the server. Because your form is not the only way to post data to a given web page, it is vital that server-side validation remain. However, the more validation that can be done before the user has to wait for the full page to refresh, the better. There is nothing more frustrating than clicking the submit button, waiting 10 seconds, and then finding out that you didn’t format your telephone number correctly!
Form Helpers: Auto-Completion and Drop-Down Lists
Forms are generally complicated, and anything that helps the user to complete one is welcome. Form field auto-completion is so useful that all the major web browsers offer this feature, remembering what you have typed into a given field. Ajax applications can take this idea one step further and help the user fill in text fields correctly all the time. Form drop-down lists of options that have too many choices can be replaced with text fields that are auto-complete enabled. Examples would include fields for choosing your country when completing your address.
Form field auto-completion is also useful when the user should either supply a new value or use an existing one, such as when assigning a task to a category within a project management application. Most of the time, the user would want to select an existing category (and not misspell it!), so the auto-complete drop-down will help them in this task. For those times when a new category needs to be created, the workflow is not interrupted as a new category can be entered straight into the field.
Dragging and Dropping
Dragging and dropping is very common in desktop computer tasks. For example, in a file manager you might select some files and drag them into another folder. Ajax enables this metaphor to work on the web as well. For instance, you could have a shopping basket in an e-commerce website that allows the user to drag items from the basket to a trash can to remove them from the order.
Tip
One caveat with dragging and dropping is that most web applications don’t allow for drag and drop, so users do not expect that it is possible on the web. You should, therefore, always allow for an alternative method of performing the action, or write very clear instructions!
Now that we have looked at what Ajax is and how it is used, we will write a simple example application that uses JavaScript to send a request back to the server and deals with the response.
5.2. A simple Ajax Example
In this example application, we will use form validation and check that a given user-name is acceptable for use. To create the simplest of simple examples, we need three files:
- an HTML page for the form
- a JavaScript file to perform the XMLHTTPRequest
- a PHP file to do the server-side validation
As the user types each character into the form field, a message appears underneath it showing any errors in their choice of name. The application in action is shown in figure 5.2.
Figure 5.2. A simple Ajax example showing an error message while the user types into the text field

The flow of information in an Ajax request is a little more complicated than a straight web page request. It all starts with an HTML element containing a JavaScript callback function, such as onclick, which executes the JavaScript callback code. The JavaScript callback initiates a request to the web server using the XMLHttpRequest system, and the server-side code, such as PHP, performs the work. Once the PHP code has completed, it formats the response in either XML or JSON and sends it back to the browser, where it is processed by a JavaScript callback. Finally the JavaScript updates the HTML display to change the text, add new elements via the DOM, or change CSS styles. This process is shown in figure 5.3.
Figure 5.3. The application data flow in an Ajax request is controlled by the JavaScript code. A user does something, which triggers a request, and updates the web page when a response is received.

For this example, let’s start with the server-side PHP validation code, in listing 5.1, which will check that the submitted username is at least four characters long and doesn’t clash with an existing username.
Listing 5.1. A simple server-side validation routine in PHP: ajax.php

Note that we put the actual validation code into a checkUsername() function so that it will be easy to test. We echo out the result of checkUsername() so that the browser can display it to the user. Although the list of existing users is an array in this example, it’s more likely that the script would execute a database call to check the current list of users.
To access our validation script, we need a form where the user can type in the preferred username. The HTML is shown in listing 5.2.
Listing 5.2. HTML file with simple form that requires validation: index.html

This is a simple form that uses the onkeyup event on the input field to send the current text that the user has entered to the PHP file on the server. This is done in the JavaScript check() function, which is stored in a separate JavaScript file called ajax.js, shown in listing 5.3.
Listing 5.3. Hand-crafted JavaScript code to call back to the server for validation
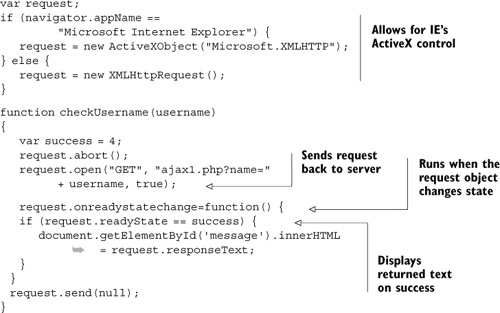
To update the HTML page with the new data, we select an element on the page using document.getElementById() and change its attributes. In this case, we change it entirely by replacing its innerHTML property with the server’s response. We could equally have changed its CSS style or built new child HTML elements, such as new li elements, based on the data received from the server.
You should now have an appreciation of what Ajax is and how the various components fit together. This example is necessarily simplistic, as this book is not about Ajax per se. To really understand what’s going on and the full possibilities available with Ajax, we recommend Ajax in Action by Dave Crane and Eric Pascarello, published by Manning.
The JavaScript code we have presented here looks nice and simple and breaks pretty much every rule of defensive programming—there is no error checking at all! Other than the fact that it would clutter up the example, it is hard to get error checking right for all the browsers out there. We can abstract all the complications away into a client library though, and, fortunately, other people have already done this for us. We will examine Ajax client libraries next, and see how they can simplify the code we need to write.
5.3. Using Ajax Client Libraries
Adding the required JavaScript to create an Ajax application used to be quite painful. For example, the checkUsername() function in listing 5.1 mixes code dealing with the request with code that knows about how the HTML document is built. This is not good for long-term maintenance, as we have seen in Chapter 2, where we used the MVC design pattern to separate business, control, and display code for our main application. We should be separating the responsibilities of our client-side Ajax code too, and rather than writing all the code ourselves, we can utilize an Ajax library to help us.
A JavaScript library will enable us to build upon the work of others. As PHP application developers, we are often more interested in solving our client’s problems than worrying about the underlying technology. A JavaScript library will enable us to work with Ajax at a higher level, in much the same way that Zend Framework empowers us in our server-side application development.
There are many JavaScript libraries to choose from, and it is not obvious how to make the choice. In much the same way as we chose to use Zend Framework, the key considerations when choosing a JavaScript library are features, performance, documentation, and community.
The Yahoo! User Interface (YUI) provides a set of UI widgets along with core underlying classes to make the creation of Ajax applications easier. The attraction of the YUI is that a big company is supporting it, and it has great documentation, including examples. There is also a community of users who use the library, and they have produced extensions that enhance the standard components.
Let’s convert our example from section 5.2 to use the YUI. To do this, we need to add the required YUI library files to the HTML file (yahoo.js and connection.js), then change the code in ajax.js as shown in listing 5.4.
Listing 5.4. Integrating YUI into our example Ajax application: ajax.js

As you can see, the code is pretty much the same. In this case, the class that wraps up XMLHttpRequest is called YAHOO.util.Connect, and we call the asyncRequest static method to initiate the connection to the server. Again, a configuration object is used to define which callback functions we want to use, though this time we have created the object, callback, first and then assigned it to the function.
Using YUI makes development of Ajax applications much easier and less prone to error than hand-coding from scratch. Obviously, there are a lot of other client libraries out there, such as JQuery, MooTools, Prototype, and Dojo, which are worth looking at before making a decision. For the remainder of this book, we will use the YUI library for no other reason than we quite like it!
Now that we have a library to make development easier, we can look at how Ajax fits with Zend Framework.
5.4. Using Ajax with Zend Framework
One thing to consider when using Ajax with Zend Framework is that Zend Framework version 1.5 does not provide an Ajax component per se, but does have various helper plug-ins. Also, the MVC system and other components such as Zend_Json make it easy to add Ajax features to your application. Throughout this book, maintenance of the application is a key design consideration, and Zend Framework’s separation of the model and controller from the view makes it easy to replace the standard HTML-based view of most pages with another view, especially for Ajax requests.
Note
Zend Framework version 1.6 features integration with the Dojo JavaScript library, but it was not available at the time of writing. The Dojo support is provided as an optional extra, and all other JavaScript libraries, such as YUI, JQuery, and Prototype, can be used with Zend Framework 1.6. The online manual provides full details of how to use the new Dojo components.
Integrating Ajax into Zend Framework takes two forms: handling the Ajax request from the user within the controller, and providing the JavaScript elements to handle the response from the server back to the client.
From Zend Framework’s point of view, an Ajax request looks remarkably like any other request that comes in to the application. The most significant difference is that the response back to the client is a snippet of HTML, XML, or JSON. Responding to an Ajax request is a matter of ensuring that we use a different view and turn off the layout if we are using one. This is done using the built-in AjaxContext action helper, which is supplied with the framework.
If AjaxContext detects an XMLHttpRequest, it will set an alternative view suffix based on the desired format, disable layouts if enabled, and send the correct response headers for the format if it isn’t HTML. The advantage of the MVC design pattern becomes noticeable as the controller and model can be reused without any changes when adding Ajax to an application. The only part that has to change is the view, because we are sending data back rather than a nicely formatted web page. Let’s look at the controller first.
5.4.1. The Controller
When providing controller actions that respond to Ajax calls, the view must not send back full HTML pages, but must instead send HTML fragments, JSON, or XML data. The controller for our simple example application in section 5.3 will require two actions: one for displaying the page, and one for responding to the Ajax request. The action for displaying the page, shown in listing 5.5, should look familiar.
Listing 5.5. IndexController action to display the page

The indexAction() method is very simple, as all we need to do is store the baseUrl value into the view. We need it so that we can reference the full path for the JavaScript files.
To respond to the Ajax call, we use a separate action, which we will call checkAction(). In order for checkAction() to respond to an Ajax call, we also need to set up the AjaxContext in init(), as shown in listing 5.6.
Listing 5.6. IndexController::init() sets up the AjaxContext

The AjaxContext action helper is very simple to use. We call addActionContext() for each controller action that we want to respond to an Ajax call. We also have to define the type of response that the
action will produce—in this case HTML. Finally, we initialize the action helper ![]() to register its preDispatch() hook, which will turn off the rendering of the layout and choose a different view script file based on the format of the
incoming Ajax request.
to register its preDispatch() hook, which will turn off the rendering of the layout and choose a different view script file based on the format of the
incoming Ajax request.
The actual PHP server-side work that is done in response to the Ajax request has already been created. We will reuse the same ajax.php file that we have been using for all the examples in this chapter as it has a perfectly good checkUsername() function to do the actual validation. In keeping with the MVC separation, we have put this file in the models directory and included it for use in our action:
public function checkAction()
{
   include ('models/ajax.php'),
   $name = trim($this->getRequest()->getParam('name'));
   $this->_view->result = checkUsername($name);
}
The associated view file, views/scripts/check.ajax.phtml, contains just one line of code to output the result:
<?php echo $this->result; ?>
The view script file has a different filename because it is an Ajax response, so the AjaxContext action helper has changed the filename to include “ajax” to differentiate it from the standard view script file that would be used. Other filename extensions are .json.phtml for JSON responses and .xml.phtml for XML ones. This is probably the simplest view file you’ll ever see! Let’s build the Ajax side now.
5.4.2. The View
In Zend Framework, the JavaScript part of an Ajax request is held within the view section, so the view script for the index action will manage the JavaScript side.
As we have come to expect, the view (application/views/scripts/index/ index.phtml) contains the HTML code for the page. This is the same as before, except that we have to qualify where to find the JavaScript files using the baseUrl property that we created in indexAction():
<script type="text/javascript"
   src="<?php echo $this->baseUrl; ?>/js/yahoo.js"></script>
<script type="text/javascript"
   src="<?php echo $this->baseUrl; ?>/js/connection.js"></script>
<script type="text/javascript"
   src="<?php echo $this->baseUrl; ?>/js/ajax.js"></script>
We have chosen to continue with YUI for the Ajax request, but Prototype would work just as well. The remainder of the index.phtml file is the same as the code in listing 5.2, presented earlier. The JavaScript check() function also needs changing, because we need a fully qualified URL for the request back to the server. We therefore pass the base URL property to check() and rework the JavaScript sUrl variable to be in Zend Framework format (controller/action/param_name/param_value), as shown in listing 5.7.
Listing 5.7. YUI Ajax request to the controller action

In addition to the controller and action, we need to tell the AjaxContext helper which format we want the results in. In this case, we want HTML, so we add the additional request parameter format with a value of html to the sUrl variable ![]() . We also need to tell AjaxContext that the request is an XMLHttpRequest. This is done via the X_REQUESTED_WITH HTTP header. For YUI’s Connect object, we use the initHeader() method
. We also need to tell AjaxContext that the request is an XMLHttpRequest. This is done via the X_REQUESTED_WITH HTTP header. For YUI’s Connect object, we use the initHeader() method ![]() .
.
We now have a working Ajax example that uses Zend Framework’s MVC structure. The only changes made to the basic example application were to ensure that the code was correctly separated according to its role. We can now do something more interesting and look at how to fully integrate Ajax into a typical Zend Framework application, such as the Places website.
5.5. Integrating into a Zend Framework Application
When considering the use of Ajax in a Zend Framework application, it’s not just the client-side JavaScript that needs to be written. We also have to ensure that the view doesn’t try to display a full HTML page in response to an Ajax request and that our controller doesn’t do work that our model should be doing. To look at these issues in context, we will write a feedback system into the Places example application.
Consider this use-case: We are hoping that Places becomes very popular and that we will get lots of reviews on each location. We would like to make it easy for users to let us know whether they thought any given review was helpful for them. We can then display the “helpfulness” of each listed review to users, which will guide them while reading the site. Also, as the number of reviews gets larger, we can display only the most helpful on the location’s main page, and relegate the less-helpful reviews to a secondary page.
This is an ideal task for Ajax because we do not want to intrude upon users with a page refresh; an in-place update will allow them to continue looking at the other reviews once they have indicated whether a given review is helpful or not.
To provide feedback on a review, we need to ask the question “was this review helpful to you?” with the possible answers being yes or no. We keep a count of the number of people who have answered yes and the total number of respondents. This will then allow us to inform the user that “N of M people found this review helpful.” At a later stage, as we get more and more reviews, we could even consider ordering the list by the “helpfulness” of the review.
The UI to our review feedback system is very simple, as shown in figure 5.4.
Figure 5.4. The review feedback system has two buttons to provide feedback.

The review feedback system is a single line of text indicating the number of people who found the review helpful and the number of people who have provided feedback. The user is left to determine whether or not this ratio means that this review is “helpful.” We also have two buttons to allow the user to provide feedback.
We will build this feature by starting with the view scripts and add HTML, then the JavaScript. We also need two database fields to hold the two count numbers: helpful_yes for the first one and helpful_total for the second. Let’s look at the code necessary to build this system, starting with the controller.
5.5.1. The Place Controller
First things first: we need a controller action to display the details of a location and its associated reviews. This is relatively straightforward. We just need an action within a controller. As this page displays a given place, we’ll call the controller Place and use the index action. This means that we will have URLs of the form http://www.placesto-takethekids.com/place/index/id/{id}, which are easy to understand. Listing 5.8 shows this controller (with no error checking!).
Listing 5.8. The Place controller: application/controllers/PlaceController.php

This simple action gets the place record from the database and assigns it to the view. The view file, application/views/scripts/place/index.phtml, shown in listing 5.9, is similar to the view scripts we’ve seen previously.
Listing 5.9. Place view script providing location details and a list of reviews

The first part of the view script adds the JavaScript files required to the headScript() view helper, which are then echoed into the <head> section of the layout file. The view script then displays information about the location itself. The displayAddress() view helper formats the location’s address data for presentation and can be found in the accompanying source files if you want to inspect it. The reviews themselves are presented in an unsigned list and use a separate view script, views/scripts/place/_reviewItem.phtml, which is called by the partialLoop() view helper. This is shown in listing 5.10.
Listing 5.10. __reviewItem.phtml displays one review
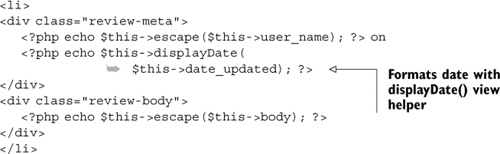
Each review consists of the name of the reviewer and the date when they wrote the review, followed by the review body itself.
We are now ready to add the code required for the review rating system.
5.5.2. Adding Review Rating HTML to the View Script
The view script that displays each review needs to have the count information and the Yes and No buttons added. We must also make sure that we can identify each HTML element that we want to change dynamically by giving it a unique ID. The easiest way to get a unique ID is to use a string followed by the review ID.
We do all this work in a separate partial view script that we integrate with the _reviewItem.phtml view script. The additional HTML for _reviewItem.phtml is shown in listing 5.11 and is added to the code in listing 5.10 just before the closing </li> tag.
Listing 5.11. The HTML for review feedback within _reviewItem.phtml

We use a separate partial view script called _reviewFeedback.phtml to display the HTML for the feedback. This is stored in the same directory as the _reviewItem.phtml script, and is shown in listing 5.12.
Listing 5.12. The HTML for review feedback in _reviewFeedback.phtml

As you can see in listing 5.12, the HTML for the review feedback system consists of a message informing the user of the helpfulness of the review, two buttons
for providing feedback (Yes or No), and two placeholders for providing interactive responses after clicking a link. To make
this HTML code useful for an Ajax application, we have to make each part easily accessible from JavaScript. We do this by setting the id attribute to a unique value using the review’s database id ![]() .
.
The actual Ajax work is done in the ReviewFeedback JavaScript class ![]() , which connects back to the web server within its constructor. Let’s look in detail at this JavaScript, because it does all
the real work.
, which connects back to the web server within its constructor. Let’s look in detail at this JavaScript, because it does all
the real work.
5.5.3. Adding JavaScript to the View Scripts
Using the YUI framework for the behind-the-scenes connection to the server gives us error checking and cross-browser compatibility for free. All our work will be done within a single JavaScript file, review_feedback.js, in the www/js directory. These were added to the view using the headScript() view helper within index.phtml in listing 5.9.
We can break down the client-side work into a number of distinct tasks:
- Initiate request to server and start a spinner animation.
- On success:
- Update the count.
- Stop the spinner animation.
- Say thank you to the user.
- On failure:
- Inform the user.
- Stop the spinner animation.
In order to prevent pollution of the global namespace, we put all the JavaScript code for the review feedback module into a class called ReviewFeedback. The constructor initializes everything and connects to the server, as shown in listing 5.13.
Listing 5.13. The ReviewFeedback class constructor

JavaScript’s object model is a little different from PHP’s, and to create a class, we don’t need a class keyword; we need only a function that will act as the constructor. The rest of the class’s methods are then added to the prototype property of the constructor function, which will make them available to all instances of the class. Appendix B of Ajax in Action (by Dave Crane and Eric Pascarello) has more details if you need to refresh your knowledge of the JavaScript object model.
As you can see in listing 5.13, when we initiate the Ajax call with asyncRequest, we pass in this as the callback object ![]() . This means that we must define the member methods success() and failure() so that the YUI system can call them when appropriate. The advantage of using an instance is that we can store the reviewId and the baseURL into the instance, and they will be available in the member methods when we need them. We can also provide helper methods
within the class to keep the main callback methods easier to read.
. This means that we must define the member methods success() and failure() so that the YUI system can call them when appropriate. The advantage of using an instance is that we can store the reviewId and the baseURL into the instance, and they will be available in the member methods when we need them. We can also provide helper methods
within the class to keep the main callback methods easier to read.
We need to provide a message on success and on failure, so it makes sense to write a method called message():
ReviewFeedback.prototype.message = function(class, text) {
   document.getElementById('message-'+this.id).className = class;
   document.getElementById('message-'+this.id).innerHTML = text;
}
The thank-you message is displayed in the div with an ID of message-{review_id} and the message method just tucks away the verbosity of setting the CSS class and the text of the message that we need to display.
Two other helper methods, startSpinner() and stopSpinner(), are needed also. To create a spinner, we use an animated GIF image, which is added to the HTML in startSpinner() and removed in stopSpinner():
ReviewFeedback.prototype.startSpinner = function() {
   var spinner = document.getElementById('spinner-'+this.id);
   var url = this.baseUrl+'/img/spinner.gif';
   spinner.innerHTML = '<img src="'+ url +' " border="0" />';
}

ReviewFeedback.prototype.stopSpinner = function() {
   document.getElementById('spinner-'+this.id).innerHTML = "";
}
We can now define the success() callback method that does the real work, as shown in listing 5.14.
Listing 5.14. The JavaScript success callback method

As we noted earlier, the success method has to do three different things: update the review count text, display a thank-you message, and stop the spinner. We also remove the Yes and No buttons, as they are no longer needed. To update the count, we deliberately placed a <span> with an ID of helpful-{review_id} around the two numbers that we needed to update. We then set the innerHTML property of the two spans to update the new number of “yes” and “total” counts. To update the message and stop the spinner, we use the helper methods that we previously created, which ensures that this method is easier to maintain.
The failure() callback method is very similar, except that we only need to display a message and stop the spinner:
ReviewFeedback.prototype.failure = function(o) {
   var text = "Sorry, please try later.";
   this.message("failed", text);
   this.stopSpinner();
}
This is all the JavaScript code required for our review feedback system. The server-side code is PHP and is similarly simple.
5.5.4. The Server Code
The client-side JavaScript calls into the feedback action of the Review controller. This is a standard action like any other in the system and so is a class method called ReviewController::feedbackAction() and stored in ReviewController.php. The most significant difference between an action that responds to an Ajax request and an action that displays HTML directly is the view code; we do not need any HTML. We use the AjaxContext action helper to turn off the layout rendering and to use a JSON-specific view script.
The output of the action is an array of JSON-encoded data that the success() method uses to set the HTML text appropriately. We set this up in the init() method of the ReviewController class, which is stored in application/controllers/Review-Controller.php, as showing in listing 5.15.
Listing 5.15. ReviewController::init() sets up the AjaxContext

The init() method is essentially the same as the one we examined earlier, in listing 5.6. The only difference is that this time we specify the format to be JSON.
The feedback action method is shown in listing 5.16.
Listing 5.16. The server-side Ajax response

The code in feedbackAction() is standard Zend Framework code that updates the counts of the database fields helpful_yes and helpful_total within the reviews table for the particular view in question. In this case, we construct the SQL directly and execute it
using the query() method of the Zend_Db_Adapter object ![]() . Note that as we use the review ID from the user within the SQL directly, the cast to an integer is vital to ensure that
we don’t accidentally introduce an SQL injection vulnerability. We then assign the result variable and all the other data we want the JavaScript to know about to the view, ready to be encoded in
the view script.
. Note that as we use the review ID from the user within the SQL directly, the cast to an integer is vital to ensure that
we don’t accidentally introduce an SQL injection vulnerability. We then assign the result variable and all the other data we want the JavaScript to know about to the view, ready to be encoded in
the view script.
The view script, views/scripts/review/feedback.json.phtml, is shown in listing 5.17.
Listing 5.17. Echoing the view’s variables in feedback.json.phtml

The view script for the Ajax response is very simple, because the AjaxContext does the hard work of encoding to JSON for us. All we need to do is echo an array of all the data in the view. The simplest
way to do this is to use get_object_vars() ![]() .
.
We have now completed the full cycle of an Ajax request within the context of a proper Zend Framework application. There is a fair amount of detail to get right, but the hard bits of tying it all together are done for us by Zend Framework’s AjaxContext action helper. Our users are now able to provide information on the usefulness of a review, which can be used for sorting if we want.
5.6. Summary
Within this chapter, we have looked at what Ajax is and where it fits within a Zend Framework application. While it is possible to handcraft all the Ajax code required, it is easier to use one of the many libraries available to simplify development and make the code more robust. We had a look at the Yahoo! YUI libraries and saw how easy it is to use. To place it all in context, we have also integrated a mechanism to allow users to provide feedback on the helpfulness of reviews in our Places website.
The AjaxContext action helper provides a mechanism to integrate Ajax calls within a Zend Framework application. This provides for multiple view scripts to be attached to an action—one for each format of response. The most common are JSON, XML, and plain HTML. The separation provided by the Model-View-Controller design pattern is very helpful when writing Ajax actions, as the controller and model are insulated from the view.
We have now covered all the basics of building a Zend Framework application and fitting out the front end with the latest technology. It is now time to look in detail at the database functionality provided by Zend Framework and how Zend_Db_Table can help us build models that are powerful, yet easy to maintain.