
.Mac is Apple’s entry into the software-as-a-service sweepstakes, and the particular service that .Mac provides is a personal information sharing and exchange center. Included with .Mac’s many features (which would take an book like Joe Kissell’s Take Control of .Mac—http://www.takecontrolbooks.com/dot-mac.html—to describe) is the capability to sync both individual files and all the stuff listed in Table 1 (such as Safari bookmarks and some contact info) between your home Mac and office Mac and any other Macs you happen to have handy.
Although you can replicate just about every information sharing and exchange feature that .Mac offers some other way, the part of the .Mac service you can’t replicate is how well integrated it is with Tiger.
The integration begins with how you obtain a .Mac subscription: as noted in Connect over a Network, you can purchase a .Mac subscription right from the Accounts view of Tiger’s .Mac System preference pane. You use the other three views in the .Mac System preference pane to manage aspects of the syncing capabilities that .Mac provides:
Sync: Use this view to choose the structured information types that you want to sync and when you want to sync them (see The Elements of Syncing for more about structured information). Choose What and When to Sync with .Mac, next page, explains how to use the controls in the Sync view.
iDisk: Use this view to specify how your Mac syncs files with your iDisk (see Syncing between Macs for an introduction to iDisk and the role it plays in file syncing). Sync Files with iDisk goes over the options you can set in this view and explains iDisk in more detail.
Advanced: Use this view to control which Macs sync with your .Mac account and to reset your synced information if necessary; see Reset Information for the lowdown on the Advanced view.
In addition to syncing information between Macs, .Mac gives you access to some of your synced structured information—specifically calendars, Safari bookmarks, and addresses—from any Web browser on any computer (even non-Macs). .Mac also provides ways for you to share some of that information with other people. You can even share files with your .Mac iDisk. See Share Synced Information with .Mac.
Go to the Sync view of the .Mac System preference pane (Figure 9), when you want to pick what kinds of structured information to sync with .Mac syncing and when your Mac should sync them.
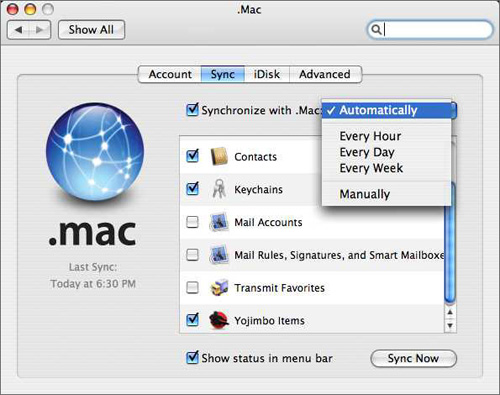
In an act of remarkable interface efficiency, the Sync view uses a single label—Synchronize with .Mac, visible near the top of Figure 9—to apply to three different controls in the Sync view: a checkbox, a pop-up menu, and a scrolling list of checkboxes. Here’s what the three Synchronize with .Mac controls help you do:
Turn .Mac syncing on and off: Select the checkbox to the left of the Synchronize with .Mac label to turn syncing on; deselect it to turn .Mac syncing off.
Choose when to perform .Mac syncing: Use the pop-up menu to the right of the Synchronize with .Mac label to specify how often Tiger syncs your Mac with .Mac. Here are your choices:
Manually: Choose this if you want Tiger to sync only when you click the Sync Now button at the bottom of this pane, or when you choose Sync Now from the syncing status menu (described two pages ahead).
Every Hour/Day/Week: Any of these choices sets Tiger to sync your structured information with .Mac at the selected interval. Unless you continually update your structured information throughout the day, the choice of once a day or even once a week is probably enough (I’m a once-a-week kind of guy myself).
Automatically: Choose this one if you constantly fiddle with your information and you want to be sure .Mac is always up to date. Selecting this makes Tiger sync with .Mac each hour, and it also sets Tiger to send a notice through the .Mac account to other Macs registered with the .Mac account that they need to sync as well.
Choose what to synchronize with .Mac syncing: The scrolling list below the Synchronize with .Mac label shows the structured information types that applications have registered with Tiger’s syncing services; select the checkboxes by the information types that you want to sync. You’ll select the items in this list to Sync Contacts and Calendars, Sync Keychains, Sync Bookmarks, Sync Mail Settings, and Sync Other Stuff with .Mac.
Note
In Tiger, applications register with Tiger’s sync engine and tell it what kinds of information they can sync, and the engine dutifully adds those kinds of information to the Sync view’s list of synchronizable information. Once an application registers, it stays registered and appears in the Sync view of your .Mac System preference pane, even after you remove the application from your Mac. For example, though I don’t use the Transmit utility, Transmit Favorites appears in my .Mac sync list in Figure 9 because I once used the free trial version. Such ghosts are annoying, but they don’t do any harm.
Aside from the three Synchronize with .Mac controls, the Sync view of the .Mac System preference pane has two more controls that make a trip to the pane worthwhile:
Show Status in Menu Bar: Select this checkbox to place a syncing status menu on your menu bar. The status menu displays the date and time the last sync occurred, an indication of any sync conflicts that need to be resolved along with a command to launch The Conflict Resolver to fix them, a Sync Now command, and a command to open the .Mac Sync preferences.
Tip
I strongly recommend you show the syncing status menu: it takes up little room, and with it you can control and monitor syncing much more conveniently. Besides, The Conflict Resolver pretty much depends on the menu being there.
Sync Now: Clicking this button does exactly what you might expect it to do. You may never need to click it if you have the status menu displayed, since it’s more convenient to choose the Sync Now command from that menu, but if you value a spartan menu bar, you can use this button instead.
The fourth view in the .Mac System preference pane bears the label Advanced, an interface convention that here means “a collection of dangerous stuff that you should think carefully about before using.” You come to the Advanced view when you need to make a fresh start with your synced information.
In the normal course of events, you may hardly ever need to visit this view (I’ve gone months between visits), but you should come here if something major, usually unwelcome, happens to your synced info, and you have to reset it to a known, good state—like, say, you totally hose the Address Book on your Mac while trying a new handheld device and you want to replace your Address Book’s contents with the addresses in your .Mac account (the discerning reader might deduce that something like this once happened to me—the discerning reader would be right). Figure 10 shows the Advanced view’s contents, which, one way or another, serve to reset syncing information.

You use the top section in the Advanced view to unregister a Mac from syncing with your .Mac account or to register your Mac to sync with your .Mac account.
Unregistering a Mac eliminates that Mac’s snapshot from the .Mac truth database. You might want to do this, for example, if you want to give the Mac to someone else, or if you want to sync the Mac with a different .Mac account. You can unregister any Mac on the list—including your own—like this:
In the Advanced view, in the list of registered computers, select the Mac you want to unregister. The list displays both the name of the computer and the user account on that computer that is registered to sync with the .Mac account.
Click Unregister.
A dialog appears, warning you that you will no longer be able to sync with that computer—even if the computer you’re unregistering is the one you’re using to perform the unregistering.
In the dialog, click Unregister.
The Mac is removed from the list.
When you register a Macintosh for synchronizing with .Mac, the sync engine creates an entry for that Mac in the .Mac account’s truth database. You’ll probably never need to register your Mac using the Advanced view, because your Mac will usually already appear on the list of registered computers if you’ve obtained a .Mac account and entered the account name and password in the Accounts view of the .Mac System preference pane. That is, unless you’ve previously unregistered your Mac.
To register your unregistered Mac:
In the list of registered Macs, click an empty line to make sure no Macs are selected. The Unregister button changes to a Register This Mac button.
Click Register This Mac.
When you re-register your Mac, it behaves as though it has never been synced with .Mac before: as each structured information type syncs, you see a dialog asking how you want to handle merging or replacing the info. Here’s what I tend to choose, and why:
Replace Data on My Computer with .Mac: If I’m sure that .Mac contains the latest, greatest, most reliable collection of information, I choose this option.
Replace Data on .Mac with My Computer: If I’m sure that my Mac contains the latest, greatest, most reliable collection of information, I choose this option. Choosing this option, however, means that other computers syncing with the .Mac account will get my Mac’s data, and may have to resolve some conflicts (see The Conflict Resolver).
Merge Data on This Computer and .Mac: In my experience, if neither the data on .Mac nor on my Mac are messed up, this option works safely; however, if I have any doubt, I avoid this choice, as it could propagate a problem hiding in the data to be merged. (Lest you be too frightened by this choice, keep in mind that in the process of trying the unregister/re-register process for this book, I chose the merge option on several occasions and each time my Mac’s synced data came through the merge just fine—the Tiger sync engine is pretty clever about merging.)
Sometimes—and those times, fortunately, tend to be rare—the information that you sync can become corrupted or confused, either on your Mac or on .Mac. It’s for those times that Tiger provides the Reset Sync Data button in the Advanced view. This feature lets you replace the structured information you sync on your Mac with the structured information stored on .Mac—or vice versa.
Should you need to reset your sync data, follow these steps:
In the Advanced view of the .Mac System preference pane, click Reset Sync Data. The dialog in Figure 11 appears.
The Replace pop-up menu shows the various structured information types registered with Tiger’s sync engine (such as those visible in Figure 9) that you’ve previously chosen to sync.
From the Replace pop-up menu, choose either a single information type, or All Sync Info.
Indicate the direction of your sync, by clicking a direction arrow.
The graphic above the direction arrows shows which way the structured info will move when you click Replace in the next step.
Click Replace.
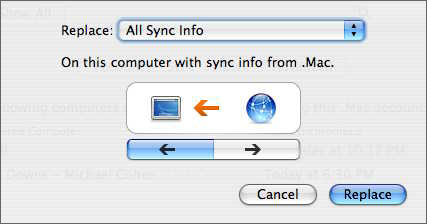
Depending on the arrow you clicked, either your Mac pushes its information to .Mac, replacing what was there, or your Mac pulls information from .Mac, replacing the sync information that was on your Mac.
An iDisk, provided with a .Mac subscription, provides Tiger’s only built-in method for syncing files between Macs. File syncing, however, is a rather late addition to iDisk; if you want to understand how to use iDisk for file syncing, it helps to know a little iDisk history—however, you can skip the sidebar if you feel impatient and history isn’t your thing. And, if you need file-syncing capabilities beyond those described in this section, I cordially invite you to visit Sync Files with Third-Party Applications.
iDisk syncing works like this: Tiger makes a replica of everything you have on your iDisk and puts it in a disk image file on your Mac, stored in ~/Library/Mirrors/ in a folder named with a seemingly random string of numbers. You see this disk image on your Desktop, and when you use the Finder’s Go > iDisk > My iDisk menu item. When you add, remove, or modify a file on your iDisk, Tiger makes those changes on your local iDisk disk image and then uploads the change to Apple’s servers when it can—or when you tell your Mac to sync your iDisk. Similarly, if the contents of the iDisk on Apple’s servers change, Tiger puts those changes on your local iDisk image when it syncs.
Tip
The faster your Internet connection, the better iDisk syncing works. If you use a modem connection, however, you will want to forgo the feature—unless you have an unusually patient nature.
Thus, if you have two or more Macs syncing to the same iDisk, the changes you make to your local iDisk image eventually make their way to the iDisk images stored on the other Macs. If you have your iDisk set up to sync automatically (see Manage your iDisk), you don’t need to do anything other than drag files to and from your iDisk, just as you might with any other disk: iDisk syncing takes care of the rest.
Note
iDisk syncing can slow operations in some programs even when you aren’t actually accessing files on your iDisk: the standard File Open and Save dialogs, for example, can take extra time to appear while they connect to iDisk to display or to cache its directory information, often resulting in a spinning rainbow pizza cursor—even though you work on a local iDisk image, the system software still checks with .Mac to make sure the iDisk directory information is current.
The iDisk view of the .Mac System preference pane contains an iDisk Syncing section, shown in Figure 12, and, as you might expect, that is where you go to set up iDisk syncing.

To turn on iDisk syncing, click the Start button in the iDisk Syncing section of the iDisk view in the .Mac System preference pane. When iDisk syncing is turned on, the Start button becomes a Stop button, as seen in Figure 12.
Note
You needn’t turn on iDisk syncing to use your iDisk. With syncing turned off, you can still mount your iDisk on your Mac and copy files to and from it, so long as your Mac is connected to the Internet.
When iDisk syncing is turned on, you see a syncing icon appear beside your iDisk icon in your Finder windows; the syncing icon’s appearance can vary:
When syncing is in progress, the syncing icon spins.
When you don’t have an Internet connection, the syncing icon is dimmed.
When you have set your iDisk to sync manually (see Manage your iDisk), the syncing icon displays a black dot in its center.
In addition, when you display your iDisk’s contents in the Finder, the Finder window notes the last time an iDisk sync took place; if a sync is taking place, the bottom of the window displays a small progress bar and a status message.
What iDisk syncing syncs are whole files: iDisk syncing simply detects when a file has changed on either iDisk or its local disk image, and then copies the entire file containing the change between iDisk and the local iDisk image.
Note
Copying a file between folders on your synced iDisk is tantamount to deleting it from one folder and then adding it to another: the syncing process isn’t smart enough to simply note that the file’s location has changed, it copies the moved file from your local iDisk image to its new location on the Apple server’s iDisk and deletes the file from its former location on the server. If you pay for Internet access by the amount of bandwidth you consume, moving files on your iDisk has real costs.
iDisk provides a set of folders, similar to those in your Home directory, to which you can add files and folders, and from which you can remove them. The folders’ names indicate the types of information they commonly contain, although you can, in fact, store any types of files in any of them. The folders are:
Documents: Much like the Documents folder in your Home directory, you use this to store any miscellaneous files and folders you want to sync. This folder is accessible only to Macs subscribed to the same .Mac account.
Movies: Use this folder to store video files you want to share over the Internet.
Music: You can store music files, such as those you create in GarageBand, or playlists from iTunes that you want to share, in this folder.
Pictures: Use this folder to store pictures, and folders of pictures, that you want to share; .Mac’s iCard feature will access this folder when you make a custom iCard using one of your own pictures.
Public: You can make the contents of this folder available to everyone on the Internet; it provides an easy way to transfer files to other people—even those poor souls consigned to live in a Windows world (see Share files with the iDisk Public folder).
Sites: Put anything in this folder that you want to make available on the Web. Apple’s iWeb program publishes Web pages you create to this folder, and iPhoto 6 stores the photos you want to photocast here.
Changes you make to any of these folders will propagate to iDisk images on any other Macs using an iDisk synced with your .Mac account.
When you turn on iDisk syncing (see Turn on iDisk syncing, earlier), Tiger creates the local iDisk image on your Mac and then proceeds to copy files from your Apple-hosted iDisk to the local image. Depending on how much information you have on your iDisk, and the speed of your Internet connection, the initial sync can take anywhere from a minute or two, if you’ve never used your iDisk before, to several hours, if you have lots of data on your iDisk and a slow connection.
Aside from managing the files that you place on your iDisk (and how you choose to do that is none of my business), there are only a few things you can control about your iDisk: when it syncs, and how much storage you have.
The iDisk syncing section of the .Mac System preference pane’s iDisk view provides two radio buttons to control when syncing takes place (see Figure 12):
Automatically: Click this to have your iDisk sync whenever Tiger detects a change to either your local iDisk image or the .Mac copy.
Manually: Click this to have your iDisk sync only when you specifically want it. The syncing icon that appears beside your iDisk icon in Finder windows has a black dot in the center to indicate manual syncing is turned on.
To start a manual sync of your iDisk, either click the syncing icon beside the iDisk icon in any Finder window, or Control-click (or right-click) the iDisk icon on your Desktop, and choose Sync Now from the contextual menu.
The storage available you have on .Mac is shared between your iDisk and your .Mac mailbox: the more you allot for your mail, the less you have available for your iDisk.
You can buy more storage on .Mac by clicking the Buy More button in the iDisk view of the .Mac System preference pane, which launches your Web browser and takes you to Apple’s site where you can make the purchase with a credit card. The maximum amount available is currently 4 GB.
To change the amount of storage used by your mail account (and, consequently, the amount available to your iDisk) do the following:
Open the .Mac System preference pane.
At the top of the .Mac System preference pane, click Account.
In the Account view, click Account Info. Your Web browser opens and takes you to the Apple .Mac Account Settings page.
On the Account Settings page, click Storage Settings.
On the Storage Settings page, in the .Mac Mail settings row, choose the amount of space you want to dedicate to your mail storage from the pop-up menu. Whatever space is left over on your .Mac account is used for your iDisk storage.
.Mac can sync your Address Book contacts and your iCal calendars—which sounds limiting until you realize that any set of calendars and contacts that can sync with Address Book and iCal effectively get synced through .Mac as well. This includes contacts and calendars on handheld devices (see Sync a Handheld Device with iSync) as well as those maintained by other Mac programs (see Sync Entourage).
Once you have your contacts and calendars synced with .Mac, they can sync with other Macs that use the same .Mac account. Syncing your Address Book contacts has added benefits: you can use a Web browser on any computer to access your contacts and make changes—and those changes will sync with the Address Book on your Mac(s), and, thus, with any devices and programs that sync with your Address Book (see Share Synced Information with .Mac). Syncing your Address Book also makes your addresses available to you when you access your .Mac mail from a Web browser.
You can turn on syncing for your contacts and calendars either with the .Mac System Preferences or through the preference windows of the Address Book and the iCal applications.
To turn on contact and calendar syncing via System Preferences, do the following:
Open System Preferences.
Click .Mac. You can find it the Internet & Network group, if you organize your System Preferences by category.
In the .Mac preference pane, click Sync.
In the Sync view, in the scrolling list of checkboxes, select either, or both, of the Calendars and the Contacts checkboxes.
If the Synchronize with .Mac checkbox is deselected, select it.
You can take any other action you wish in the Sync preference view, or just close it; the moment you select the checkboxes, your choice takes effect.
To turn on calendar syncing from within iCal, take the following steps:
Open iCal.
From the iCal menu, choose Preferences (Command-,).
In the preferences window, in the toolbar, click General.
In the General view, select the Synchronize My Calendars with Other Computers Using .Mac checkbox. This has the same effect as selecting the Calendars checkbox in the Sync view of the .Mac System Preferences pane.
Turning on contact syncing from within the Address Book application works much the same way:
Open Address Book.
From the Address Book menu, choose Preferences (Command-,).
In the preferences window, in the toolbar, click General.
In the General view, select the Synchronize My Contacts with Other Computers Using .Mac checkbox. This has the same effect as selecting the Contacts checkbox in the Sync view of the .Mac System Preferences pane.
When you sync your contacts or calendars with .Mac, you sync everything. For contacts, it means all the contacts and the contact lists in Address Book. For calendars, that means all the calendars in iCal that you have created as well as all the calendars to which you have subscribed.
Note
Although .Mac syncing syncs any calendars to which you have subscribed in iCal since the last sync, the reverse is not true: if you delete a calendar to which you’ve subscribed in iCal on one of your Macs, the deletion doesn’t sync. The subscribed calendar will remain in iCal on your other Macs until you manually delete it.
This isn’t a mistake on Apple’s part but a useful feature: for example, I sync to my wife’s calendar on my desktop iMac so we can coordinate our social lives. When I do this, the calendar also appears on my iBook the next time I sync it with .Mac. I don’t want my wife’s calendar there, though, because I only use the iBook for work, so I delete it on the iBook. However, my wife’s calendar will stay on my desktop iMac where I first subscribed to it, which is how I want it.
Remember that devices, such as mobile phones, and some programs, such as Entourage, can sync with both Address Book and iCal. As a result, when you sync your contacts and calendars with .Mac, the contacts and calendars from any devices and programs that you’ve synced with Address Book and iCal make the synchronization trip to .Mac, too.
Here’s an example: I have a mobile phone that I sync with my desktop iMac’s Address Book using iSync (see Sync a Handheld Device with iSync). Sometime later, I sync my desktop iMac with .Mac. Following that, I sync my iBook with .Mac. When that last sync finishes, my iBook contains the contacts from my mobile phone, even though I never directly synced the mobile phone with my iBook.
What happens on the first sync with .Mac depends on both the Mac you are syncing, and the .Mac account to which you are syncing it. Here are a couple of possible situations, and what happens on the first sync:
No Mac has ever synced with the .Mac account: In this situation, the .Mac account contains no synced data, so the sync process copies all the contacts and calendars to .Mac. This is equivalent to what happens when you reset your .Mac account (see Resetting your .Mac sync data).
Another Mac has synced to the .Mac account, but the Mac you are using hasn’t: In this situation, both .Mac and your Mac contain some information, but the two sets of information have never been formally introduced. The sync process presents an alert asking you what you want to do on the first sync, and provides a pop-up menu from which you can choose what to do. The choices the menu offers are:
Merge Data on This Computer and .Mac: When you choose this, the sync blends the two sets of data so that everything that was on .Mac ends up on your Mac, along with the information that was already there. Similarly, everything that was on your Mac ends up on .Mac, along with the information that was already there. If either of the sets of information contain similar records—for example, a contact entry for “Allen Smithee” with three phone numbers on .Mac and a one for “Allen Smithee” with two phone numbers on your Mac—both .Mac and your Mac end up with both records.
Following a merge, you may wish to go through the contacts and calendars on your Mac and remove any duplicates: the next time you sync your Mac with .Mac, the syncing process cleans things up on .Mac automagically—as long as you haven’t synced any other Macs with the same .Mac account in the meantime.
Note
Syncing a Mac with a handheld device occasionally can cause some contact or calendar information to change slightly to meet the needs of the device. Such cases may lead to your Mac having some semiduplicate records that you’ll have to clean up after a series of syncs with both the device and with .Mac. See Lost in Translation for how such situations arise and what to do about them.
Replace Data on .Mac: This choice wipes your .Mac contact or calendar information clean and replaces it with the information from your Mac. This is equivalent to resetting .Mac’s sync information (see Resetting your .Mac sync data).
Replace Data on This Computer: This choice wipes your Mac’s contact or calendar information clean and replaces it with the information from .Mac. This is equivalent to resetting your Mac’s sync information (see Resetting your .Mac sync data).
Mail syncing—that is, syncing all your messages and mail folders and attachments so that your mail is available and properly organized on all your Macs—is a problem far beyond the scope of Tiger’s .Mac syncing (or this book). Besides, a widely used email standard known as IMAP offered a solution to that particular problem long before Tiger was even a kitten—Something About IMAP, below, provides a quick overview of what IMAP does.
What .Mac syncing can do is sync the Apple Mail settings you’ve configured to handle your mail so that all of your synced Macs can handle your email in the same way. .Mac syncing divides your Mail settings into two categories: your mail account settings, and a grabbag of other settings that include the mail rules you’ve created, the smart mailboxes you’ve established, and the mail signatures that you’ve composed. What Mail syncing syncs describes these two categories in more detail.
You can turn on syncing for both your Apple Mail accounts and for your Apple Mail rules, signatures, and smart mailboxes with the .Mac System preference or through in the Apple Mail application.
Warning!
Before you turn on either of the Mail syncing options, do yourself a favor and read On the first Mail settings sync and What Mail syncing syncs. Your account and rule settings in particular may cause some of your mail to download to the wrong Mac, or be moved or deleted unexpectedly, if you don’t set things up properly before you first sync.
To turn on contact and calendar syncing via System Preferences, do the following:
In the System Preferences window, click .Mac.
In the .Mac preference pane, click Sync.
In the Sync view, in the scrolling list of checkboxes, select the checkbox labeled Mail Accounts and the one labeled Mail Rules, Signatures, and Smart Mailboxes. You don’t have to select both, however: you can select to sync just the accounts or just the rules, signatures, and smart mailboxes.
If the Synchronize with .Mac checkbox is deselected, select it.
You can take any other action you wish in the preference pane, or just close it; the moment you select a checkbox, your choice takes effect.
To use Apple Mail to turn on both account syncing and the syncing of rules, signatures, and smart mailboxes, take the following steps:
In Apple Mail, choose Mail > Preferences (Command-,).
In the preferences window, in the toolbar, click General.
In the General view, in the Synchronize with Other Computers Using .Mac section, select the Rules, Signatures, and Smart Mailboxes checkbox and the Accounts checkbox. This has the same effect as selecting the corresponding checkboxes in the Sync view of the .Mac System Preferences pane.
The Apple Mail syncing options give you independent control over the syncing of your Mail accounts and of the syncing of the rules, signatures, and smart mailboxes you’ve created.
Syncing Mail Accounts copies almost all the data you’ve set in Mail’s Accounts window. When you turn on Account syncing, each Mac that you sync will have the same Mail accounts, with identical settings for things like port numbers, server names, and mailbox behaviors.
After the initial syncing of Mail accounts, however, there are two account settings that won’t subsequently sync:
Enable This Account: You can find this setting in the Advanced pane of the Accounts window; when disabled, Apple Mail won’t attempt to download or cache any mail for that account. Apple recognizes that you may not want to have the same accounts enabled on all the Macs that you sync; for example, I have several email accounts that I don’t want to check when I use my iBook because the mail I receive in those accounts applies only to business that I transact on my desktop iMac.
Remove Copy from Server After Retrieving a Message: You’ll also find this setting in the Advanced pane of the Accounts window. It applies only to POP mail accounts (see the sidebar Something about IMAP). When this setting is turned off, Apple Mail will not delete the email from the mail server when it downloads the email to your Mac.
For example, I never want to download my POP email to my iBook if it means that the email gets deleted from the mail server because I keep my permanent email archive on my desktop iMac. However, I may want to read the email on my iBook, especially if I’m traveling; when I get back home, though, I do want to be able to finally retrieve and store (or permanently delete) that email using my desktop iMac.
Omitting the synchronization of these two items makes syncing account settings much more practical.
The name of this syncing option describes exactly what it does, with a couple of caveats, both relating to the local mailboxes you may have created on each Mac that you sync.
Any rules that involve moving mail to mailboxes that don’t exist on one of the Macs that you sync won’t work on that Mac: the destination mailbox is changed to No Mailbox Selected. Luckily, this automatic change of the destination mailbox doesn’t sync to any other Macs, so the rule will still work properly on the Macs you sync that do have that mailbox.
Smart mailboxes that depend on a message being in, or not in, a specific mailbox will ignore that criterion when searching for messages to list if the specific mailbox doesn’t exist on that Mac; the other criteria used by the smart mailbox will still be active.
The first time you sync one of your Mac’s Apple Mail settings with .Mac, you have three choices:
Merge Data on This Computer and .Mac: When you choose this, the sync blends your Mail settings so that the settings on .Mac end up on your Mac, along with the settings that were already there. Furthermore, your Mac’s mail settings end up on .Mac, along with the other settings that were there. In the case of conflicting settings, the ones that were most recently changed win.
Note
If you have never synced any Mail settings with .Mac before, merging has the same effect as replacing the settings on .Mac. This makes the settings stored on .Mac the most recently changed settings, which can affect what happens on your other Macs when you sync their Mail settings for the first time.
Replace Data on .Mac: This choice replaces the Mail settings on .Mac with those from your Mac. This is equivalent to resetting .Mac’s sync information (see Resetting your .Mac sync data).
Replace Data on This Computer: This choice replaces your Mac’s Mail settings with the settings stored on .Mac. This is equivalent to resetting your Mac’s sync information (see Resetting your .Mac sync data).
Because of the exceptions in Mail’s syncing, you should look closely at how you have Mail configured on each of your Macs before you turn Mail syncing on for those Macs. In particular, you should:
Compare the local mailboxes you have set up on each Mac so you can spot any dependencies in your rules and smart mailbox criteria that rely on those mailboxes being present.
Examine the Mail rules you have set up on each Mac and look for possible conflicts or duplications between them.
Decide for your POP accounts, if you have any, what each Mac will instruct the mail server to do with the mail on the server when that Mac retrieves messages from it.
Decide which accounts you want enabled on each Mac.
And before you do anything, you should back up your mail: Apple Mail stores your mail in ~/Library/Mail/.
Full disclosure: although I understood the theoretical usefulness of Tiger’s keychain syncing capability when I first heard about it, I had never been tempted to use keychain syncing myself because I didn’t feel comfortable risking something as fundamentally important to my Mac’s operation as my keychains.
But now that I have had to look into the eye of the Tiger regarding keychain syncing, I’m glad I did. Keychain syncing has left neither me nor my Mac the worse for the experience; in fact, we’re both better off: I have my iBook’s keychains available to me on my desktop Mac, my desktop Mac’s keychains available to me on my venerable iBook, and I no longer find myself muttering, “Oh, right, that password was on the other machine...now what was it, again?”
This is not to say you shouldn’t engage in some defensive prep work before you turn on keychain syncing, of course. Your keychains are valuable items and must be treated with care and respect.
You turn on keychain syncing in the .Mac Sync Preferences. But turning keychain syncing on doesn’t suffice to make your keychains actually sync: the sync engine syncs only the keychains that you have explicitly chosen to sync (this works differently from calendar and contact .Mac syncing, which sync all of your iCal and Address Book items, regardless of calendar or contact group).
Warning!
Before you turn on keychain syncing in the .Mac Sync Preferences, read On the first keychain sync, which describes how to prepare for your first keychain sync so you don’t accidentally mess up your valuable keychain information.
To specify the keychains you want to sync, do the following:
Open
/Applications/Utilities/Keychain Access. If necessary, click the Show Keychains button to see the keychains column in the Keychain Access window.Click to select the keychain you want to sync. If you follow my prep steps in On the first keychain sync, it’s the one you created for syncing purposes.
Choose Edit > Change Settings for Keychain “keychain name”.
A Keychain Settings window opens.
In the Keychain Settings window, select Synchronize This Keychain Using .Mac and then click OK.
Repeat steps 2-4 to sync additional keychains.
The next time you sync with .Mac, the keychain(s) you selected will sync as well.
Tip
The built-in Help for the Keychain Access utility instructs you to quit the utility before syncing your keychains. I don’t know whether that is a hard and fast rule or simply a good idea, but, in either case, it’s an instruction I follow—and, as I implied earlier, I’ve yet to experience a keychain-syncing mishap.
When Tiger syncs keychains, it syncs items between identically named keychains. For example, if you have a keychain named Personal on only one Mac and one named Impersonal on all your Macs, Tiger syncs the Impersonal keychain’s contents among your Macs, but doesn’t touch the Personal keychain, whether or not you’ve selected it to be synced.
When you set up a new Mac with Tiger, it automatically creates a default keychain in your user account named login.keychain. By using a standard name for the default keychain, Tiger provides a more seamless keychain syncing experience for the typical user because the default keychain will have the same name on different Macs and so will be synced among all the Macs.
If you’re like many Mac users, chances are you use just one keychain: the default login keychain that Mac OS X creates for you when you set up your user account. Because your default keychain probably holds important passwords that you use all the time (such as email account passwords and file server passwords), you may wish to take a few precautionary steps before embarking on your first keychain sync:
Back up your keychains. Your keychains reside in
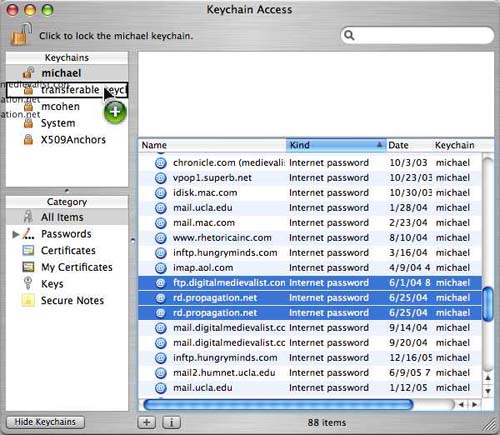
~/Library/Keychains/. Open that folder and copy the keychains to a safe location, just in case your first sync has a hiccup. At the very least, back up your default keychain: normally, this keychain bears the name login.keychain (as described in What keychain syncing syncs), although, if you’ve migrated your settings over a number of Macs and versions of Mac OS (as I have), it may bear a different name—commonly your short user name.Make a keychain for syncing purposes. You may eventually decide you want to sync your default keychain (as Apple expects you will), but using a separate keychain dedicated to syncing reduces the possibility of data corruption trashing your default keychain, and gives you more flexibility—albeit at the cost of slightly more effort. To make a new keychain, do the following:
Open
/Applications/Utilities/Keychain Access.Choose File > New Keychain.
Name the keychain and save it in
~/Library/Keychains/.
Copy the keychain items you want to sync into your new keychain. In Keychain Access, you can Option-drag items from one keychain to another to copy them; a simple drag moves them. Figure 13 shows such a drag in progress; the default keychain appears in bold at the top of the keychain list on the left.
Edit > Copy and Edit > Paste also work to copy items from one keychain to another.
Do the prep!
Of the three prep steps just previously, I consider the first to be almost mandatory, and the others to be A Really Good Idea.
After having taken the appropriate precautions, you can make that first keychain sync. When you do, .Mac offers three familiar choices:
Merge Data on This Computer and .Mac: When you choose this, each synced keychain merges its entries with those on .Mac, so that the entries on .Mac end up in your Mac’s keychains, along with the entries they already had. Furthermore, your Mac’s keychain entries are copied into the keychains stored on .Mac, along with the entries that they already contained.
Replace Data on .Mac: This choice replaces the synced keychains on .Mac with those from your Mac. This is equivalent to resetting .Mac’s sync information (covered in Resetting your .Mac sync data).
Replace Data on This Computer: This choice replaces your Mac’s synced keychains with those stored on .Mac. This is equivalent to resetting your Mac’s sync information (see Resetting your .Mac sync data).
Safari bookmark syncing—it seems like such a trivial syncing capability, but for at least three reasons it’s one of my favorites:
First, it’s a simple set-and-forget operation: there are no special options or considerations—syncing is either on or off.
Second, Safari bookmark syncing just works. Once your bookmarks sync, they appear in Safari on any Mac that you sync with your .Mac account.
Third, you can get access to your synced bookmarks from any Web browser on any computer; see Use your Safari bookmarks anywhere.
You can turn on bookmark syncing in either of two simple ways:
From System Preferences: Open the .Mac Sync Preferences, and select Bookmarks in the list of items you can sync.
From Safari: Choose Safari > Preferences, click Bookmarks in the Preferences window’s toolbar, and select Synchronize Bookmarks with Other Computers Using .Mac.
Bookmark syncing syncs your Safari bookmarks, bookmark folders, and bookmark collections. RSS feeds are also synced, but not whether the feed items have been read or not: that state remains independent of the syncing.
Note
If Synchronize with .Mac is set for Automatically (see Choose What and When to Sync with .Mac), Safari may stop displaying the number of new items for the RSS feeds listed in the Safari Bookmarks Bar. If you run into that bug, set Synchronize with .Mac to Every Hour.
Your first bookmark sync offers you the three familiar .Mac sync choices:
Merge Data on This Computer and .Mac: When you choose this, your Safari bookmarks merge with those stored on .Mac, so that each bookmark, bookmark folder, and bookmark collection stored on .Mac shows up in Safari on your Mac, along with the bookmarks, bookmark folders, and bookmark collections you already have there. Furthermore, your Safari bookmarks, bookmark folders, and bookmark collections merge with those stored on .Mac, where they can eventually join those of other Macs syncing with the .Mac account.
Replace Data on .Mac: This choice replaces the bookmarks, bookmark folders, and bookmark collections stored on .Mac with those from your Mac. This is equivalent to resetting .Mac’s sync information (see Resetting your .Mac sync data).
Replace Data on This Computer: This choice replaces your Mac’s Safari bookmarks, bookmark folders, and bookmark collections with those stored on .Mac. This is equivalent to resetting your Mac’s sync information (see Resetting your .Mac sync data).
“Other stuff”? Here’s why I’ve chosen that vague, catch-all phrase: any application running in Tiger can use Tiger’s sync engine to sync items using .Mac, and each application using the sync engine will use syncing only for data that the application’s developers choose. That could be a lot of different stuff.
For example, if you flip back to Figure 9, you’ll see two non-Apple items in the Synchronize with .Mac list: Transmit Favorites and Yojimbo Items. The first one comes from the Transmit application (http://www.panic.com/transmit/), a program that provides FTP (File Transfer Protocol) services. The program’s developers allow its users to save FTP favorites, which are something like bookmarks for FTP sites. Transmit uses .Mac syncing to sync those favorites among Macs, just like Safari can sync Web bookmarks. In Transmit’s case, it uses the sync engine to sync information that is secondary to the program’s main function, which is to provide FTP communication between a Mac and a remote FTP site.
Yojimbo (http://www.barebones.com/products/yojimbo/), the second non-Apple item in Figure 9, acts as a clippings organizer for text, pictures, URLs, and other miscellaneous bits of info; in this case, the program’s designers use .Mac syncing to sync everything that Yojimbo stores between Macs. Here, what is synced is what is most important about the application: the complete data collection.
Because what shows in Sync view in the .Mac System Preferences depends on what you have installed on your Mac, I next briefly describe what each application that puts something in this view is likely to have in common with the others.
Any application that implements .Mac syncing for any of its data will include one, or more, checkboxes in the Synchronize with .Mac list in the Sync view of the .Mac System preference pane (see Choose What and When to Sync with .Mac).
Applications may also provide a checkbox in their own preferences, or a menu choice, or some other mechanism to turn on .Mac syncing, and you may have to read a Help file or other documentation to find out what that mechanism is. Chances are good, though, that the checkbox in the Sync view of the .Mac System Preferences is all that you’ll need.
What gets synced, as I’ve said, is whatever the application’s developers decide to sync. Because it is .Mac syncing, it will use the Tiger sync engine, so the synced information will consist of structured information (see Syncing structured information) of some sort.
An application using the Tiger sync engine to sync with .Mac will use the engine to offer you three choices the first time you sync the application’s data:
Merge Data on This Computer and .Mac: How the program merges the information is up to the program’s developers. Usually, unique items from .Mac are added to your Mac’s set of synced items, and vice versa, while items already in both locations are not copied, so you won’t end up with duplicates.
Replace Data on .Mac: This choice is equivalent to resetting .Mac’s sync information (see Resetting your .Mac sync data), replacing what’s stored on .Mac with whatever your Mac has stored on it.
Replace Data on This Computer: This choice is equivalent to resetting your Mac’s sync information (see Resetting your .Mac sync data), replacing all of it with the information stored on .Mac.
Having your synced information travel through and be stored on the servers at Apple’s .Mac service might seem a bit cumbersome (What if I want to sync my MacBook with the iMac that’s sitting right next to it? Why should I have to use an Internet connection and pay Apple my hard-earned kopecks for that?). But once your data is on those servers you can use that synced information for other purposes. Apple has added services to .Mac that let you share some of your synced information through any Web browser.
With .Mac, you can currently share three types of information through a Web interface, with more sharing capability, doubtless, planned for the future:
Address Book information, described just ahead
Safari bookmarks, described in Use your Safari bookmarks anywhere
Files, described in Share files with the iDisk Public folder
This syncing option is made possible by .Mac: when you share your Address Book, a synced copy resides on the .Mac servers, available to any other .Mac users you choose to share it with. You control whether each of those users can modify the Address Book or merely read it.
Note
You needn’t have .Mac syncing on in order to set up and use Address Book Sharing. Tiger’s sync services handle the sharing function independently: the .Mac truth database contains a separate version of the shared Address Book with which the sharing feature syncs.
To share your address book, follow these steps:
Choose Address Book > Preferences (Command-,).
Click the Sharing icon.
Figure 14 shows the Sharing window.
Select the Share Your Address Book checkbox.
Tiger prepares your .Mac Address Book for sharing, which can take a few seconds.
Click
 at the bottom of the window to add .Mac users to the list of those who can access your Address Book.
The Sharing window presents a dialog showing your Address Book’s contacts. The dialog shows the names of contacts, and any .Mac email addresses they may have. You can share only with .Mac members that appear in your Address Book.
Select a .Mac member from among your contacts and click OK.
(Optional) Select the Allow Editing checkbox by the names of the contacts you trust to make changes to your Address Book.
(Optional) Click Send Invite to open your mail program and send an email to those with whom you are sharing your Address Book.
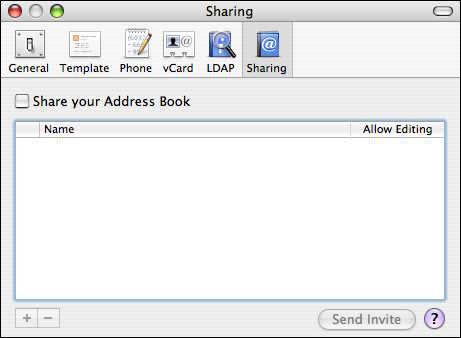
You can close the Sharing window when you finish.
Each time you open your Address Book, Tiger fetches any changes made by the contacts to whom you’ve granted Address Book editing privileges. Similarly, each time you make changes, the Address Book syncs with the shared copy on .Mac. Keep in mind that when you share your Address Book, you share the whole thing—you can’t limit the addresses you share to those in specific contact groups in your Address Book (though many users feel adding this feature would be a Really Smart Thing).
Note
To subscribe to someone else’s shared Address Book, choose File > Subscribe to Address Book, and then enter the address of a .Mac user in the dialog that appears. Shared Address Books appear in the Groups pane below your contact groups, separated from your own contacts. To unsubscribe, click the shared Address Book and press Delete.
You can have your Safari bookmarks available even when you’re using a different Web browser on your Mac, or when you’re not using one of your Macs, or when you’re not even using a Mac at all. I have found this last capability particularly useful when I’m stuck on a Windows machine in an Office Far, Far Away, as I often am.
A visit to the .Mac Web site (http://www.mac.com/) can bring you your Safari bookmarks, laid out in a separate window (Figure 15). Here’s how you can use the .Mac site to make your bookmarks available from almost any Web browser on any computer:
Using any Web browser on any computer, go to .Mac (http://www.mac.com/).
Log in to .Mac.
Click the Bookmarks link on the bar at the top of the .Mac home page. Your Safari bookmarks open in a window similar to the one shown in Figure 15.

Note
Not all Safari bookmarks are compatible with all browsers: in particular, bookmarks with RSS feeds (which Safari saves using the feed:// protocol) may confuse other browsers.
As you might expect, clicking any of the bookmarks in this window opens the page to which the bookmark links. You can add and delete both bookmarks and bookmark folders—the next time you sync your Mac with .Mac, the changes you make in the bookmark window sync back to Safari on your Mac. When you finish enjoying your portable bookmarks, click the Log Out link in the .Mac bookmarks window.
Given that your .Mac iDisk resides on Apple’s servers, it stands to reason that, technically, there’s no obstacle to accessing that disk from any computer with an Internet connection, and, in this instance, reason is perfectly correct. There are, however, practical reasons for not making your entire iDisk available to the whole wide world—just for starters, would you want to store personal files or backups on an iDisk that anyone could access?
On the other hand, having a place online that you can put files for others to access and use has its advantages, and that’s why your iDisk has a Public folder: any files you drop in your iDisk’s Public folder can be accessed by anyone (if you so desire, that is—.Mac gives you some control over that, as you’ll see next).
You use the iDisk view of the .Mac System preference pane, shown earlier in Figure 12, to set up your Public folder for sharing. You can make the Public folder read only—other users can access items but not change them—or read & write, which makes it possible for others to change the folder’s contents. In both cases you can also protect the Public folder with a separate password so that only those who know the password can see the folder’s contents and make any changes.
Warning!
It is possible to share your complete iDisk with someone else if they have your .Mac account name and your password: the iDisk submenu on Go menu in the Finder provides an Other User’s iDisk item that you can use to open another user’s iDisk. However, I strongly recommend that you never give another user your .Mac password unless you also trust them enough to give them the keys to your home, car, and safe deposit box as well.
To set up how the Public folder shares files, do the following:
Open the .Mac System preference pane.
At the top of the .Mac System preference pane, click iDisk.
In the Your Public Folder section of the iDisk view, click either Read Only or Read & Write. The latter choice makes your Public folder alterable by anyone who can access it.
If you make your Public folder writeable, you should protect it with a password to keep the many miscreants, ne’er-do-wells, scallywags, and rapscallions who inhabit the dark corners of the Internet from loading your iDisk with random, and possibly unsavory, material. Even if your Public folder is read only, you may still want to protect the Public folder if it contains sensitive information that you don’t want to make generally public.
To protect your Public folder with a password, do the following:
Open the .Mac System preference pane.
At the top of the .Mac System preference pane, click iDisk.
In the Your Public Folder section of the iDisk view, click Password Protect Your Public Folder. A dialog appears requesting you to type and confirm a password for the Public folder.
Enter a password and confirm it in the dialog, and then click OK. The password is applied to the Public folder.
You can access the contents of any iDisk public folder from any Web browser; all you need is the .Mac account name for the iDisk you want to access—and a password, if the iDisk’s owner requires one.
To open a Public iDisk folder from a Web browser, follow these steps:
Open your Web browser.
Go to the following URL, replacing membername with the .Mac account name of the iDisk you want to access:
http://idisk.mac.com/membername-Public/If the iDisk has a password protecting it, a window appears asking for a user name and a password.
In the password window, enter
publicin the Name field, and the iDisk’s password in the Password field, then click Log In.
The password window closes, and a list of files in the Public folder, and controls for manipulating them, appear in your browser window.
Note
The labels on the fields and buttons in the password window can vary between browsers; for example, the Name field may be labeled User Name, and the Log In button may be labeled OK, depending on the browser you use. It’s not too hard to figure out what goes where, though, no matter which browser you use.