
Microsoft SharePoint Server 2010 supports claims-based authentication, in addition to classic-mode authentication. Unlike the classic mode, which allows only Windows authentication, the claims mode supports the forms-based authentication as well as the SAML authentication in addition to the Windows authentication. The SAML authentication, in turn, supports advanced authentication schemes, for example, two-factor authentication (2FA). The following diagram illustrates the authentication process in SharePoint 2010 under the claims mode for an external trusted identity provider:

In this recipe, we will explore the steps to configure claims-based authentication in SharePoint Server 2010 and register Azure ACS as a trusted claims provider with the SharePoint Server 2010 instance.
You will need a Microsoft SharePoint Server 2010 instance with administrative access (access to the central administration portal). In addition, you will also require a Windows Azure account with the Azure ACS 2.0 namespace configured (refer to Chapter 4, Cloud-based Identity with Azure Access Control Service, for details).
To register Azure ACS 2.0 as a trusted external identity provider in your SharePoint Server 2010 instance, perform the following steps:
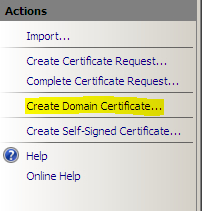
- Create a self-signed certificate with the subject representing your SharePoint 2010 web application name. You can use the Server Certificates page on the IIS management console to create a self-signed certificate:
- Create a relying party application in your Azure ACS 2.0 namespace (refer to Chapter 4, Cloud-based Identity with Azure Access Control Service, for the detailed steps). The important element to remember in this step is the Return URL property. It should be the relying party URL (Realm) appended with the /_trust/ path, as shown in the following screenshot:

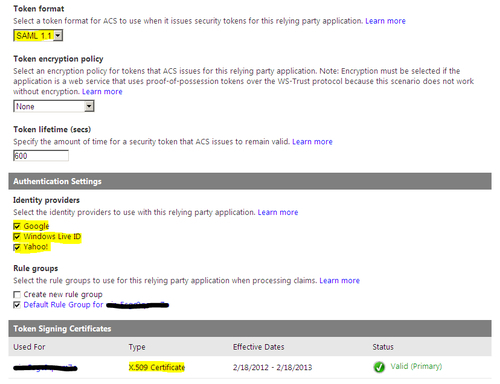
- In the Relying Party Application Settings page, specify Token format as SAML 1.1; select Google, Windows Live ID, and Yahoo! in the Identity providers section under Authentication Settings; and specify the domain/self-signed certificate created in step 1 for signing the token, as shown in the following screenshot:
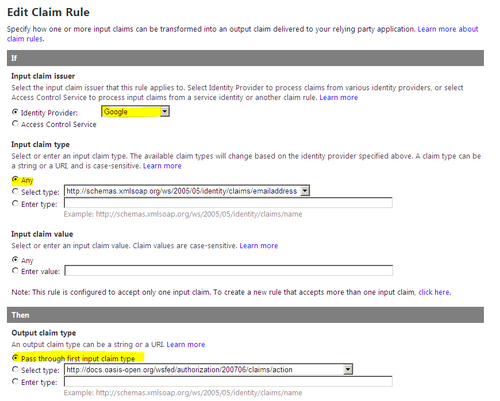
- Select Pass through first input claim type under the Output claim type section for each identity provider under the Rule groups section for the relying party application that you just created:
- Next, we will configure Azure ACS 2.0 as a trusted identity provider in your SharePoint Server 2010 instance. To do this, open SharePoint 2010 Management Shell and create a new trusted identity token issuer using the
New-SPTrustedIdentityTokenIssuercommand:$certificate = New-Object System.Security.Cryptography.X509Certificates.X509Certificate2("<path to your domain certificate>") $claimTypeMapping = New-SPClaimTypeMapping "http://schemas.xmlsoap.org/ws/2005/05/identity/claims/emailaddress" -IncomingClaimTypeDisplayName "EmailAddress" -SameAsIncoming $realm = "<your domain web application URL>" $signinurl = "https://<your namespace>.accesscontrol.windows.net:443/v2/wsfederation?wa=wsignin1.0&wtrealm=https%3a%2f%2f<your realm>%2f" New-SPTrustedIdentityTokenIssuer -Name "Azure ACS" -Description "Windows Azure ACS v2" -Realm $realm -ImportTrustCertificate $certificate -ClaimsMappings $claimTypeMapping -SignInUrl $signinurl -IdentifierClaim $claimTypeMapping.InputClaimType - Create Trusted Root Certification Authority with the
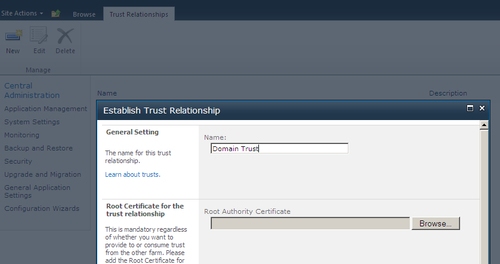
New-SPTrustedRootAuthoritycommand:New-SPTrustedRootAuthority -Name "Domain Trust" -Certificate $certificate- Alternatively, you can also create it using the Establish Trust Relationship dialog box in SharePoint 2010 Central Administration ( Security | Manage trusts link), as shown in the following screenshot:
- We will now configure Azure ACS 2.0 as a trusted identity provider for our domain web application. First, if you are creating a new web application in SharePoint 2010, make sure that you select the Claims Based Authentication option under the Authentication section in the Create New Web Application window, as shown in the following screenshot:

- After selecting the Claims Based Authentication option, Trusted Identity provider will be available as an authentication type option under the Claims Authentication Types section in addition to the Enable Forms Based Authentication (FBA) and the Enable Windows Authentication options. Check the Trusted Identity provider option and select Azure ACS as the provider, as shown in the following screenshot:

$application = get-spwebapplication "<Relying Party URL>" $application.useclaimsauthentication = "True" $application.Update() - The website should also be exposed over SSL. You can create an HTTPS binding in the IIS website and specify the domain/self-signed certificate under the SSL certificate dropdown list in the Add Site Binding dialog box.
- From the Central Administration Web Application page, select your domain web application and create a User Policy to assign permissions for allowing the users of the trusted identity provider to have access to the site:
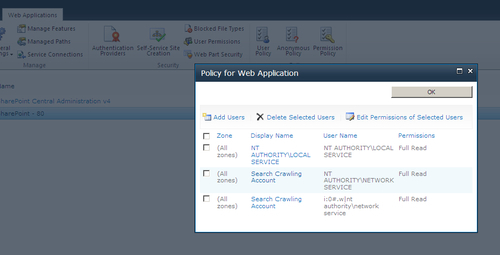
- In the Policy for Web Application dialog box, click on the Add Users link and follow the steps in the wizard. While adding the users, you will notice that Azure ACS is available under the People Picker dialog box, as shown in the following screenshot:

- Now, you are ready to sign in using your OpenID account. Access the SharePoint web application from a browser (using the secure endpoint). The default SharePoint 2010 sign-in page will be displayed. Select Azure ACS from the Select the credentials you want to use to logon to this SharePoint site dropdown menu, as shown in the following screenshot:

- You will get redirected to the default Azure ACS sign-in page, as shown in the following screenshot:
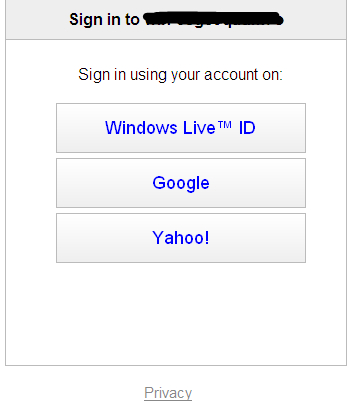
- Click on the identity provider that you want to use to log in to the SharePoint relying party web application and enter your OpenID credentials for the provider. Upon successful login, you will be redirected to the website (in our solution, it is default Team Site in the SharePoint Server 2010 instance) with your e-mail address displayed on the top-right corner of the page, as shown in the following screenshot:

You have now successfully set up Windows Azure ACS 2.0 as a trusted identity provider in your SharePoint Server 2010 instance.
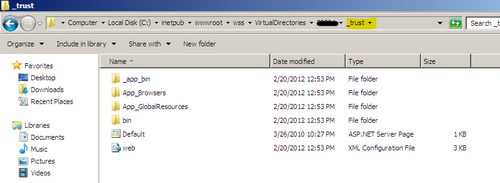
Enabling the claims-based authentication and selecting the trusted identity provider in a SharePoint Server 2010 web application provisions the _trust folder under the C:inetpubwwwrootwssVirtualDirectories folder path. The security token is received and processed by this endpoint:
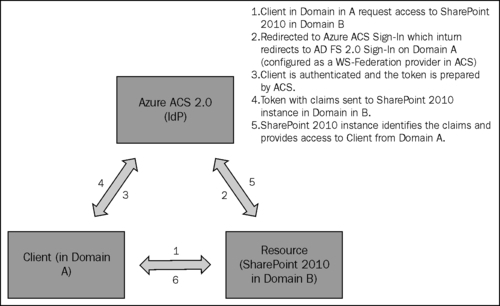
An interesting scenario to explore would be registering Azure ACS 2.0 as a trusted Security Token Service in SharePoint and then use AD FS 2.0 as a WS-Federation identity provider via ACS to allow the users from Active Directories that are not part of your domain to gain access to your relying party. The following diagram illustrates this scenario:
The Forms-based Authentication (FBA) is available in SharePoint 2010 only if the claims-based authentication is enabled in the web application. To learn more about the steps to configure the forms-based authentication in SharePoint Server 2010, follow the TechNet blog post at http://blogs.technet.com/b/mahesm/archive/2010/04/07/configure-forms-based-authentication-fba-with-sharepoint-2010.aspx.
In addition to Azure ACS 2.0, AD FS 2.0 and any custom IP-STS can be registered as a trusted identity provider with SharePoint 2010. The MSDN article— Claims Walkthrough: Creating Trusted Login Providers (SAML Sign-in) for SharePoint 2010 by Andy Li at http://msdn.microsoft.com/en-us/library/ff955607.aspx provides a detailed walkthrough on registering a custom IP-STS as an identity provider with SharePoint 2010.
A set of articles (including hands-on tips) on claims and the security for SharePoint 2010 is available at http://msdn.microsoft.com/en-us/library/gg430136.aspx.