
So far, in this chapter, we have explored how out of the box features provided by the WIF runtime can be used to implement the claims-based identity in the ASP.NET MVC 3 Web Applications without writing a lot of code or configuration. However, it is not uncommon to be in the scenarios, where existing applications within the enterprise need to be extended to support claims. How about a scenario, where an existing ASP.NET MVC 3 Web Application needs to act as an STS and establish a trust relationship with another ASP.NET web application within the trust boundaries? The following diagram illustrates this scenario:
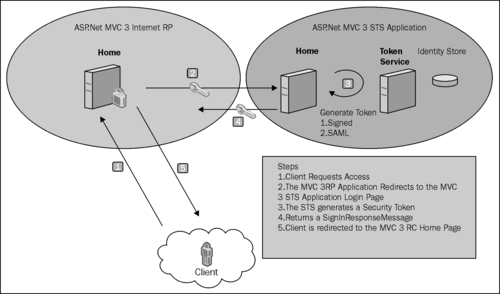
In this recipe, we will implement the claims-based authentication and authorization using an ASP.NET MVC 3 Web Application acting as an STS and providing claims to another ASP.NET MVC 3 Web Application acting as the RP.
In order to create the federation metadata information for the STS, we will use the standalone Federation Metadata Generation Utility written by Shawn Cicoria, and can be downloaded from http://blogs.msdn.com/b/scicoria/archive/2010/08/18/federation-metadata-generation-tool.aspx.
To create an ASP.NET MVC 3 STS, perform the following steps:
- Create a Visual Studio 2010 C# ASP.NET MVC 3 Web Application project, and select the Internet Application template.
- Compile and run the application. Make a note of the URL for future use. Click on the Log On link on the top-right corner of the page, and then click on register from the login page. Register a couple of users with the User name as Manager and User respectively.

- Open the standalone Federation Metadata Generation Utility solution in Visual Studio 2010 admin mode and run the application. Once the Federation Data generator form is displayed, select the STS option and click on Load Settings, as shown in the following screenshot:

- The default federation metadata settings will get loaded.
- Under the Certificate Information section, select SigninCerificateCn from the drop-down menu, as shown in the following screenshot:
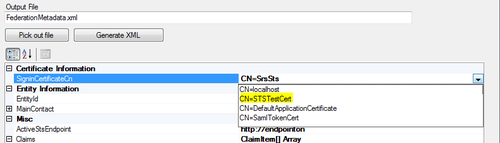
- Specify the
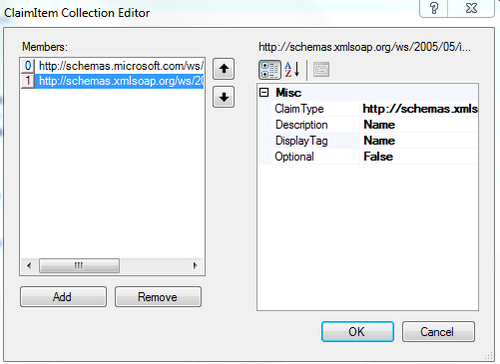
MvcSTSweb application's home URL (http://.../Home/Index) that you noted in step 2 as the EntityId and the ActiveStsEndpoint properties under the Entity Information and the Misc sections respectively. - Click on Claims Collection and enter Name and Role as the supported claim types in ClaimItem Collection Editor. Click on OK to return to the Metadata Property Descriptor form.
- Click on the Pick out file button and specify the path as the
FederationMetadata2007-06folder under theMvcSTSWeb Application project in the File Open window, and then click on Generate XML to generate theFederationMetadata.xmlfile in the specified location. - Open the
Web.configfile in theMvcSTSproject and specify the authorization rules:<location path="FederationMetadata"> <system.web> <authorization> <allow users="*" /> </authorization> </system.web> </location> <location path="Content"> <system.web> <authorization> <allow users="*" /> </authorization> <authorization> <deny users="?" /> </authorization> </system.web> </location>
Note
The
Contentfolder path should be open for access; otherwise, the theme will not get applied. - Create an
ApplicationUtilitiesfolder under theMvcSTSproject. Copy theApp_Codefiles from the previous recipe, and place them under theApplicationUtilitiesfolder. Add reference to the Microsoft.IdentityModel, System.IdentityModel and System.ServiceModel assemblies, as shown in the following screenshot:
- Open the
HomeController.csfile under theControllersfolder in theMvcSTSproject, and modify theIndexmethod to accept aWSFederationMessage (Microsoft.IdentityModel.Protocols.WSFederation)object:public ActionResult Index(WSFederationMessage message) { return View(); } - Check for the
Action(sign-in/sign-out) message and process theSignInRequestMessage/SignOutRequestMessagebased on theAction:public ActionResult Index(WSFederationMessage message) { try { if (message.Action == WSFederationConstants.Actions.SignIn) { // Process signin request. SignInRequestMessage requestMessage = (SignInRequestMessage)WSFederationMessage. CreateFromUri(Request.Url); if (User != null && User.Identity != null && User.Identity.IsAuthenticated) { SecurityTokenService sts = new CustomSecurityTokenService (CustomSecurityTokenServiceConfiguration.Current); SignInResponseMessage responseMessage = FederatedPassiveSecurityTokenServiceOperations. ProcessSignInRequest(requestMessage, User, sts); FederatedPassiveSecurityTokenServiceOperations. ProcessSignInResponse(responseMessage, System.Web.HttpContext.Current.Response); } else { throw new UnauthorizedAccessException(); } } else if (message.Action == WSFederationConstants.Actions.SignOut) { // Process signout request. SignOutRequestMessage requestMessage = (SignOutRequestMessage)WSFederationMessage. CreateFromUri(Request.Url); FederatedPassiveSecurityTokenServiceOperations. ProcessSignOutRequest(requestMessage, User, requestMessage.Reply, System.Web.HttpContext.Current.Response); } else { throw new InvalidOperationException( String.Format(CultureInfo.InvariantCulture, "The action '{0}' (Request.QueryString['{1}']) is unexpected. Expected actions are: '{2}' or '{3}'.", String.IsNullOrEmpty(message.Action) ? "<EMPTY>" : message.Action, WSFederationConstants.Parameters.Action, WSFederationConstants.Actions.SignIn, WSFederationConstants.Actions.SignOut)); } } catch (System.Threading.ThreadAbortException) { } catch (Exception exception) { throw new Exception("An unexpected error occurred when processing the request. See inner exception for details.", exception); } return View(); }You can use the code in the
Default.aspx.cspage from the previous recipe generated by the ASP.NET STS website project template. However, notice thatSystem.Web.MvcimplementsHttpResponseBaseand theProcessSignInResponsemethod expects aHttpResponseobject. We work around this problem by usingSystem.Web.HttpContext.Current.Responsein this example for illustration; however, in a real scenario, you must provide your own implementation ofProcessSignInResponseusingHttpResponseBase. - Open the
CustomSecurityTokenService.csfile under theApplicationUtilitiesfolder and modify theGetOutputClaimsIdentitymethod to include claims based on the incoming principal identity name:protected override IClaimsIdentity GetOutputClaimsIdentity( IClaimsPrincipal principal, RequestSecurityToken request, Scope scope ) { if ( null == principal ) { throw new ArgumentNullException( "principal" ); } ClaimsIdentity outputIdentity = new ClaimsIdentity(); outputIdentity.Claims.Add( new Claim( System.IdentityModel.Claims.ClaimTypes.Name, principal.Identity.Name ) ); if(string.Compare(principal.Identity.Name, "Manager", true) == 0) outputIdentity.Claims.Add( new Claim( ClaimTypes.Role, "Manager" ) ); else outputIdentity.Claims.Add(new Claim(ClaimTypes.Role, "User")); return outputIdentity; }For illustration purposes, we are checking for
Identity.Nameand addingClaimto theClaimsCollectionproperty of theClaimsIdentityobject. In a real implementation, we should use the role provider to check for the role of the user, and then specify the claim. - Create a custom model binder (
System.Web.Mvc.IModelBinder) to associate an incomingWSFederationMessageobject with the controller:public class WSFederationMessageModelBinder : IModelBinder { public object BindModel(ControllerContext controllerCtx, ModelBindingContext bindingCtx) { if (controllerCtx == null || bindingCtx == null) { throw new ArgumentException("Invalid Context"); } try { var message = WSFederationMessage.CreateFromUri (controllerCtx.HttpContext.Request.Url); if (bindingCtx.ModelType.IsAssignableFrom (message.GetType())) return message; } catch (Exception) { } return null; } } - Register the
WSFederationMessageModelBinderinstance in theGlobal.asax.csfile:public static void RegisterModelBinders() { var binder = new WSFederationMessageBinder(); ModelBinders.Binders[typeof(WSFederationMessage)] = binder; } protected void Application_Start() { AreaRegistration.RegisterAllAreas(); RegisterGlobalFilters(GlobalFilters.Filters); RegisterRoutes(RouteTable.Routes); RegisterModelBinders(); } - Add a new Visual Studio C# ASP.NET MVC 3 Web Application project (name it as
MvcClient)to the existing solution. Run the Federation Utility wizard by clicking on Add STS reference… in theMvcClientproject. Under the Security Token Service option, select Use an existing STS, and select theFederationMetadatafile from theMvcSTSproject:
- Once the Federation Utility completes, you will notice the
FederationMetadata.xmlfile generated in theMvcClientproject, ensuring that the trust relationship is established between the STS and the RP.
- Once the Federation Utility completes, you will notice the
- Under the
ViewsHomefolder of theMvcClientproject, add aManager (Manager.cshtml)view and add the following code snippet:@{ ViewBag.Title = "Manager View"; } <h2>You are a Manager, if you are on this page!</h2> - Add a
Managermethod in theHomeControllerclass to return an instance of theManagerview. Decorate the method with theAuthorizeattribute:[Authorize(Roles="Manager")] public ActionResult Manager() { return View(); } - Compile and run the
MvcClientproject. You will get redirected to the Login view under theMvcSTSproject. Enter the Manager credentials, and click on Submit. The credentials will be processed to generate the token, and you will be redirected to theHomeview of theMvcClientproject logged in as Manager. You should be able to access theManagerview by clicking on the Manager tab: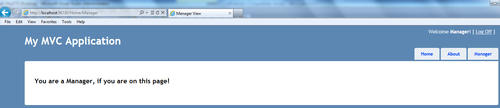
- If you log off from the application, and log on with the User credentials, you will notice that clicking on the Manager tab doesn't display anything.
The core idea behind making an ASP.NET MVC 3 Web Application to extend itself and behave as an STS is to create a Model Binding that allows the Controller method to process WS-Federation Passive Requestor Profile messages and create SignInResponseMessage (Microsoft.IdentityModel.Protocols.Federation). This is achieved by creating the WSFederationMessageModelBinder class inherited from IModelBinder. The BindModel method creates the WSFederationMessage object using the WSFederationMessage.CreateFromUri method. The Authorize attribute in the Controller method checks for the incoming claims principal and allows access to the view based on the role specified in the attribute.
The Authorize attribute can be inherited to provide a custom implementation for explicit validation of incoming claims using the custom rules.
If you are using ASPX as the View Engine, the WIF SDK provides the FederatedPassiveSignIn control, which can be used for the federated sign-in and sign-out requests. More information on this can be found at http://msdn.microsoft.com/en-us/library/ee517286.aspx.