
Most of the businesses running on the Microsoft Server technologies are happy with the native implementation of Windows-based authentication mechanism. Claims-based identity is often an afterthought. The idea of claims-based identity takes center stage when there is a need for the applications within the ecosystem to talk to the third-party vendors that are in different security realms running on the non-Microsoft platforms. The WIF runtime allows extending your current Windows-based security implementation to support claims-based identity. External vendors can be authenticated, and the claims can be assigned in the form of Active Directory Group, allowing them to request resources from the RP.
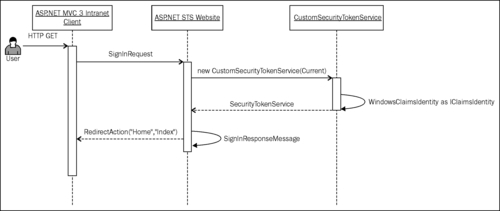
In the previous chapter, we have seen how the identity information can be abstracted using claims. In this recipe, you will learn how Windows identity can be used to generate a ClaimSet(System.IdentityModel.Claims) object and assign it to SecurityToken during a WS-Federation Passive Requestor Profile sign-in request processing operation. We will see how the STS can process incoming identity and assign Active Directory Group level permissions to the requestor as illustrated in the following diagram:
Make sure that you are connected to the identity provider (Active Directory) in order to be able to run the solution associated with this recipe.
To extend the Windows integrated authentication to support claims-based identity, perform the following steps:
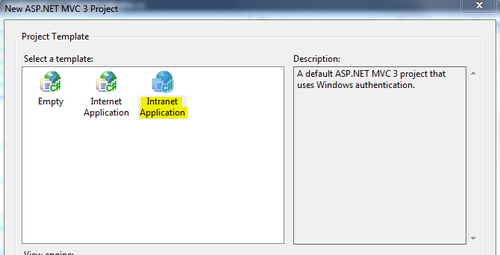
- Create a new Visual Studio C# ASP.NET MVC 3 Web Application project. From the project wizard, select Intranet Application, as shown in the following screenshot:
- Run the Federation Utility wizard by clicking on Add STS reference… from the project context menu, and create a new ASP.NET STS website. In the final step of the wizard, click on Finish to complete the running of wizard. The utility will generate the federation metadata and establish the trust relationship between the ASP.NET MVC 3 application and the ASP.NET STS website. It will also make a bunch of changes to the RP
Web.configfile. Notice that the authentication mode is commented out by the utility and the authorization element is added:<!--Commented out by FedUtil--> <!--<authentication mode="Windows" />--> <authorization> <deny users="?" /> </authorization>
- Open the
CustomSecurityTokenService.csfile under theApp_Codefolder in the ASP.NET STS website, and create an instance of theWindowsClaimSet(System.IdentityModel.Claims)class from the incomingPrincipal.Identityproperty in theGetOutputClaimsIdentitymethod:protected override IClaimsIdentity GetOutputClaimsIdentity( IClaimsPrincipal principal, RequestSecurityToken request, Scope scope ) { if ( null == principal ) { throw new ArgumentNullException( "principal" ); } ClaimsIdentity outputIdentity = new ClaimsIdentity(); outputIdentity.Claims.Add(new Microsoft.IdentityModel.Claims.Claim (System.IdentityModel.Claims.ClaimTypes.Name, principal.Identity.Name)); //Fetch the groups associated with the AD user and create roles WindowsClaimSet claimSet = new WindowsClaimSet(new WindowsIdentity(principal.Identity.Name), true); var accessControlClaims = claimSet.FindClaims(System.IdentityModel.Claims.ClaimTypes.Sid, Rights.PossessProperty); foreach (var claim in accessControlClaims) { outputIdentity.Claims.Add(new Microsoft.IdentityModel.Claims.Claim( Microsoft.IdentityModel.Claims.ClaimTypes.Role, GetResourceFromSid(claim.Resource as SecurityIdentifier))); } return outputIdentity; //The code block above is for illustration purpose only to display the named identifiers. In a real time scenario the following method can be used: //return WindowsClaimsIdentity.CreateFromUpn(principal.Identity.Name, AuthenticationTypes.Windows, false); }Note
The claim values are translated into their equivalent named representations for the illustration purpose in the solution.
- In the ASP.NET MVC 3 RP Web Application, modify the
Indexmethod in theHomeControllerclass to retrieve the list of claims from the current context identity and assign it as a model for the view:public ActionResult Index() { ViewBag.Message = "Welcome to ASP.NET MVC!"; var principal = Thread.CurrentPrincipal; var identity = principal.Identity as IClaimsIdentity; var claims = identity.Claims; return View(claims); } - In the
Indexview (Index.cshtml) under theViewsfolder, create an instance of theWebGridand pass the model to display the assigned claims (types and values):<h2>@ViewBag.Message</h2> <p> @{ var grid = new WebGrid(Model); @grid.GetHtml(columns: grid.Columns(grid.Column("ClaimType"), grid.Column("Value"))); } </p> - Compile and run the application. You will be redirected to the login page of the ASP.NET STS website. Enter your Windows User ID (without the domain) and click on Submit. You will be redirected to the RP home page and if the claims processing is successful, a list of Windows Groups that your identity is part of will be displayed in the grid as roles, as shown in the following screenshot:

- Also notice that you are now logged into the RP application with your Windows credentials.
The GetOutputClaimsIdentity method in the CustomSecurityTokenService (inherited from Microsoft.IdentityModel.SecurityTokenService) class provides an implementation to assign claims to the requestor. In our solution, a WindowsIdentity (System.Security.Principal) instance is created using the incoming identity (System.SecurityModel.Principal.IPrincipal.Identity) name. The WindowsClaimSet (System.IdentityModel.Claims) instance is created using the WindowsIdentity object. The WIF runtime then assigns the claims to the requestor that are retrieved back in the HomeController class of the RP web application using the Thread.CurrentPrincipal property.
In our solution, we have used the ClaimSet class to demonstrate the process of creating claims from Windows identity for the illustration purposes only (translating the identifiers into the named references). In a real scenario, you must use the WindowsClaimsIdentity (Microsoft.IdentityModel.Claims) class to achieve similar results:
return WindowsClaimsIdentity.CreateFromUpn(principal.Identity.Name, AuthenticationTypes.Windows, false);