
3
Extending Your Blog Application
The previous chapter went through the basics of forms and the creation of a comment system. You also learned how to send emails with Django, and you implemented a tagging system by integrating a third-party application with your project. In this chapter, you will extend your blog application with some other popular features used on blogging platforms. You will also learn about other components and functionalities with Django.
The chapter will cover the following points:
- Creating custom template tags and filters: You will learn how to build your own template tags and template filters to exploit the capabilities of Django templates.
- Adding a sitemap and post feed: You will learn how to use the sitemaps framework and syndication framework that come with Django.
- Implementing full-text search with PostgreSQL: Search is a very popular feature for blogs. You will learn how to implement an advanced search engine for your blog application.
Creating custom template tags and filters
Django offers a variety of built-in template tags, such as {% if %} or {% block %}. You used different template tags in Chapter 1, Building a Blog Application, and Chapter 2, Enhancing Your Blog with Advanced Features. You can find a complete reference of built-in template tags and filters at https://docs.djangoproject.com/en/3.0/ref/templates/builtins/.
Django also allows you to create your own template tags to perform custom actions. Custom template tags come in very handy when you need to add a functionality to your templates that is not covered by the core set of Django template tags. This could be a tag to perform a QuerySet or any server-side processing that you want to reuse across templates. For example, you could build a template tag to display the list of latest posts published on your blog. You can include this list in the sidebar of the blog for multiple pages, regardless of the view.
Custom template tags
Django provides the following helper functions that allow you to create your own template tags in an easy manner:
simple_tag: Processes the data and returns a stringinclusion_tag: Processes the data and returns a rendered template
Template tags must live inside Django applications.
Inside your blog application directory, create a new directory, name it templatetags, and add an empty __init__.py file to it. Create another file in the same folder and name it blog_tags.py. The file structure of the blog application should look like the following:
blog/
    __init__.py
    models.py
    ...
    templatetags/
        __init__.py
        blog_tags.py
The way you name the file is important. You will use the name of this module to load tags in templates.
Let's start by creating a simple tag to retrieve the total posts published on the blog. Edit the blog_tags.py file you just created and add the following code:
from django import template
from ..models import Post
register = template.Library()
@register.simple_tag
def total_posts():
    return Post.published.count()
You have created a simple template tag that returns the number of posts published so far. Each module that contains template tags needs to define a variable called register to be a valid tag library. This variable is an instance of template.Library, and it's used to register your own template tags and filters.
In the code above, you define a tag called total_posts with a Python function and use the @register.simple_tag decorator to register the function as a simple tag. Django will use the function's name as the tag name. If you want to register it using a different name, you can do so by specifying a name attribute, such as @register.simple_tag(name='my_tag').
After adding a new template tags module, you will need to restart the Django development server in order to use the new tags and filters in templates.
Before using custom template tags, you have to make them available for the template using the {% load %} tag. As mentioned before, you need to use the name of the Python module containing your template tags and filters.
Open the blog/templates/base.html template and add {% load blog_tags %} at the top of it to load your template tags module. Then, use the tag you created to display your total posts. Just add {% total_posts %} to your template. The template should look like this:
{% load blog_tags %}
{% load static %}
<!DOCTYPE html>
<html>
<head>
  <title>{% block title %}{% endblock %}</title>
  <link href="{% static "css/blog.css" %}" rel="stylesheet">
</head>
<body>
  <div id="content">
    {% block content %}
    {% endblock %}
  </div>
  <div id="sidebar">
    <h2>My blog</h2>
    <p>This is my blog. I've written {% total_posts %} posts so far.</p>
  </div>
</body>
</html>
You will need to restart the server to keep track of the new files added to the project. Stop the development server with Ctrl + C and run it again using the following command:
python manage.py runserver
Open http://127.0.0.1:8000/blog/ in your browser. You should see the total number of posts in the sidebar of the site, as follows:

Figure 3.1: The total posts published included in the sidebar
The power of custom template tags is that you can process any data and add it to any template regardless of the view executed. You can perform QuerySets or process any data to display results in your templates.
Now, you will create another tag to display the latest posts in the sidebar of your blog. This time, you will use an inclusion tag. Using an inclusion tag, you can render a template with context variables returned by your template tag.
Edit the blog_tags.py file and add the following code:
@register.inclusion_tag('blog/post/latest_posts.html')
def show_latest_posts(count=5):
    latest_posts = Post.published.order_by('-publish')[:count]
    return {'latest_posts': latest_posts}
In the preceding code, you register the template tag using @register.inclusion_tag and specify the template that will be rendered with the returned values using blog/post/latest_posts.html. Your template tag will accept an optional count parameter that defaults to 5. This parameter you to specify the number of posts that you want to display. You use this variable to limit the results of the query Post.published.order_by('-publish')[:count].
Note that the function returns a dictionary of variables instead of a simple value. Inclusion tags have to return a dictionary of values, which is used as the context to render the specified template. The template tag you just created allows you to specify the optional number of posts to display as {% show_latest_posts 3 %}.
Now, create a new template file under blog/post/ and name it latest_posts.html. Add the following code to it:
<ul>
  {% for post in latest_posts %}
    <li>
      <a href="{{ post.get_absolute_url }}">{{ post.title }}</a>
    </li>
  {% endfor %}
</ul>
In the preceding code, you display an unordered list of posts using the latest_posts variable returned by your template tag. Now, edit the blog/base.html template and add the new template tag to display the last three posts. The sidebar code should look like the following:
<div id="sidebar">
  <h2>My blog</h2>
  <p>This is my blog. I've written {% total_posts %} posts so far.</p>
  <h3>Latest posts</h3>
  {% show_latest_posts 3 %}
</div>
The template tag is called, passing the number of posts to display, and the template is rendered in place with the given context.
Next, return to your browser and refresh the page. The sidebar should now look like this:

Figure 3.2: The sidebar, including the latest published posts
Finally, you will create a simple template tag that returns a value. You will store the result in a variable that can be reused, rather than directly outputting it. You will create a tag to display the most commented posts.
Edit the blog_tags.py file and add the following import and template tag to it:
from django.db.models import Count
@register.simple_tag
def get_most_commented_posts(count=5):
    return Post.published.annotate(
               total_comments=Count('comments')
           ).order_by('-total_comments')[:count]
In the preceding template tag, you build a QuerySet using the annotate() function to aggregate the total number of comments for each post. You use the Count aggregation function to store the number of comments in the computed field total_comments for each Post object. You order the QuerySet by the computed field in descending order. You also provide an optional count variable to limit the total number of objects returned.
In addition to Count, Django offers the aggregation functions Avg, Max, Min, and Sum. You can read more about aggregation functions at https://docs.djangoproject.com/en/3.0/topics/db/aggregation/.
Next, edit the blog/base.html template and append the following code to the sidebar <div> element:
<h3>Most commented posts</h3>
{% get_most_commented_posts as most_commented_posts %}
<ul>
  {% for post in most_commented_posts %}
    <li>
      <a href="{{ post.get_absolute_url }}">{{ post.title }}</a>
    </li>
  {% endfor %}
</ul>
In the preceding code, you store the result in a custom variable using the as argument followed by the variable name. For your template tag, you use {% get_most_commented_posts as most_commented_posts %} to store the result of the template tag in a new variable named most_commented_posts. Then, you display the returned posts using an unordered list.
Now open your browser and refresh the page to see the final result. It should look like the following:
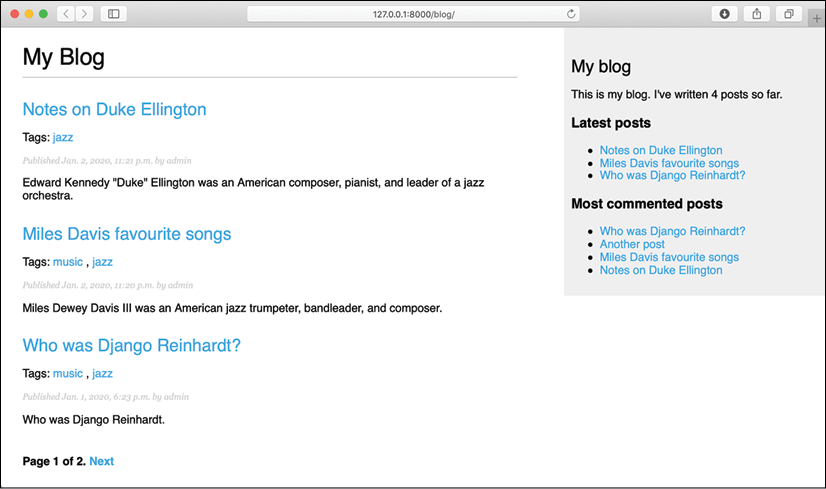
Figure 3.3: The post list view, including the complete sidebar with the latest and most commented posts
You have now a clear idea about how to build custom template tags. You can read more about them at https://docs.djangoproject.com/en/3.0/howto/custom-template-tags/.
Custom template filters
Django has a variety of built-in template filters that allow you to alter variables in templates. These are Python functions that take one or two parameters, the value of the variable that the filter is applied to, and an optional argument. They return a value that can be displayed or treated by another filter. A filter looks like {{ variable|my_filter }}. Filters with an argument look like {{ variable|my_filter:"foo" }}. For example, you can use the capfirst filter to capitalize the first character of the value, like {{ value|capfirst }}. If value is "django", the output will be "Django". You can apply as many filters as you like to a variable, for example, {{ variable|filter1|filter2 }}, and each of them will be applied to the output generated by the preceding filter.
You can find the list of Django's built-in template filters at https://docs.djangoproject.com/en/3.0/ref/templates/builtins/#built-in-filter-reference.
You will create a custom filter to enable you to use markdown syntax in your blog posts and then convert the post contents to HTML in the templates. Markdown is a plain-text formatting syntax that is very simple to use, and it's intended to be converted into HTML. You can write posts using simple markdown syntax and get the content automatically converted into HTML code. Learning markdown syntax is much easier than learning HTML. By using markdown, you can get other non-tech savvy contributors to easily write posts for your blog. You can learn the basics of the markdown format at https://daringfireball.net/projects/markdown/basics.
First, install the Python markdown module via pip using the following command:
pip install markdown==3.2.1
Then, edit the blog_tags.py file and include the following code:
from django.utils.safestring import mark_safe
import markdown
@register.filter(name='markdown')
def markdown_format(text):
    return mark_safe(markdown.markdown(text))
You register template filters in the same way as template tags. To prevent a name clash between your function name and the markdown module, you name your function markdown_format and name the filter markdown for use in templates, such as {{ variable|markdown }}. Django escapes the HTML code generated by filters; characters of HTML entities are replaced with their HTML encoded characters. For example, <p> is converted to <p> (less than symbol, p character, greater than symbol). You use the mark_safe function provided by Django to mark the result as safe HTML to be rendered in the template. By default, Django will not trust any HTML code and will escape it before placing it in the output. The only exceptions are variables that are marked as safe from escaping. This behavior prevents Django from outputting potentially dangerous HTML and allows you to create exceptions for returning safe HTML.
Now, load your template tags module in the post list and detail templates. Add the following line at the top of the blog/post/list.html and blog/post/detail.html templates after the {% extends %} tag:
{% load blog_tags %}
In the post/detail.html template, look for the following line:
{{ post.body|linebreaks }}
Replace it with the following one:
{{ post.body|markdown }}
Then, in the post/list.html template, find the following line:
{{ post.body|truncatewords:30|linebreaks }}
Replace it with the following one:
{{ post.body|markdown|truncatewords_html:30 }}
The truncatewords_html filter truncates a string after a certain number of words, avoiding unclosed HTML tags.
Now open http://127.0.0.1:8000/admin/blog/post/add/ in your browser and add a post with the following body:
This is a post formatted with markdown
--------------------------------------
*This is emphasized* and **this is more emphasized**.
Here is a list:
* One
* Two
* Three
And a [link to the Django website](https://www.djangoproject.com/)
Open your browser and take a look at how the post is rendered. You should see the following output:

Figure 3.4: The post with markdown content rendered as HTML
As you can see in the preceding screenshot, custom template filters are very useful for customizing formatting. You can find more information about custom filters at https://docs.djangoproject.com/en/3.0/howto/custom-template-tags/#writing-custom-template-filters.
Adding a sitemap to your site
Django comes with a sitemap framework, which allows you to generate sitemaps for your site dynamically. A sitemap is an XML file that tells search engines the pages of your website, their relevance, and how frequently they are updated. Using a sitemap will make your site more visible in search engine rankings: sitemaps help crawlers to index your website's content.
The Django sitemap framework depends on django.contrib.sites, which allows you to associate objects to particular websites that are running with your project. This comes in handy when you want to run multiple sites using a single Django project. To install the sitemap framework, you will need to activate both the sites and the sitemap applications in your project.
Edit the settings.py file of your project and add django.contrib.sites and django.contrib.sitemaps to the INSTALLED_APPS setting. Also, define a new setting for the site ID, as follows:
SITE_ID = 1
# Application definition
INSTALLED_APPS = [
    # ...
    'django.contrib.sites',
    'django.contrib.sitemaps',
]
Now run the following command to create the tables of the Django site application in the database:
python manage.py migrate
You should see an output that contains the following lines:
Applying sites.0001_initial... OK
Applying sites.0002_alter_domain_unique... OK
The sites application is now synced with the database.
Next, create a new file inside your blog application directory and name it sitemaps.py. Open the file and add the following code to it:
from django.contrib.sitemaps import Sitemap
from .models import Post
class PostSitemap(Sitemap):
    changefreq = 'weekly'
    priority = 0.9
    def items(self):
        return Post.published.all()
    def lastmod(self, obj):
        return obj.updated
You create a custom sitemap by inheriting the Sitemap class of the sitemaps module. The changefreq and priority attributes indicate the change frequency of your post pages and their relevance in your website (the maximum value is 1).
The items() method returns the QuerySet of objects to include in this sitemap. By default, Django calls the get_absolute_url() method on each object to retrieve its URL. Remember that you created this method in Chapter 1, Building a Blog Application, to retrieve the canonical URL for posts. If you want to specify the URL for each object, you can add a location method to your sitemap class.
The lastmod method receives each object returned by items() and returns the last time the object was modified.
Both the changefreq and priority attributes can be either methods or attributes. You can take a look at the complete sitemap reference in the official Django documentation located at https://docs.djangoproject.com/en/3.0/ref/contrib/sitemaps/.
Finally, you just need to add your sitemap URL. Edit the main urls.py file of your project and add the sitemap, as follows:
from django.urls import path, include
from django.contrib import admin
from django.contrib.sitemaps.views import sitemap
from blog.sitemaps import PostSitemap
sitemaps = {
    'posts': PostSitemap,
}
urlpatterns = [
    path('admin/', admin.site.urls),
    path('blog/', include('blog.urls', namespace='blog')),
    path('sitemap.xml', sitemap, {'sitemaps': sitemaps},
         name='django.contrib.sitemaps.views.sitemap')
]
In the preceding code, you include the required imports and define a dictionary of sitemaps. You define a URL pattern that matches sitemap.xml and uses the sitemap view. The sitemaps dictionary is passed to the sitemap view.
Now run the development server and open http://127.0.0.1:8000/sitemap.xml in your browser. You will see the following XML output:
<?xml version="1.0" encoding="utf-8"?>
<urlset xmlns="http://www.sitemaps.org/schemas/sitemap/0.9">
  <url>
    <loc>http://example.com/blog/2020/1/2/markdown-post/</loc>
    <lastmod>2020-01-02</lastmod>
    <changefreq>weekly</changefreq>
    <priority>0.9</priority>
  </url>
  <url>
    <loc>
http://example.com/blog/2020/1/1/who-was-django-reinhardt/
</loc>
    <lastmod>2020-01-02</lastmod>
    <changefreq>weekly</changefreq>
    <priority>0.9</priority>
  </url>
</urlset>
The URL for each post has been built calling its get_absolute_url() method.
The lastmod attribute corresponds to the post updated date field, as you specified in your sitemap, and the changefreq and priority attributes are also taken from the PostSitemap class.
You can see that the domain used to build the URLs is example.com. This domain comes from a Site object stored in the database. This default object was created when you synced the site's framework with your database.
Open http://127.0.0.1:8000/admin/sites/site/ in your browser. You should see something like this:

Figure 3.5: The Django administration list view for the Site model of the site's framework
The preceding screenshot contains the list display administration view for the site's framework. Here, you can set the domain or host to be used by the site's framework and the applications that depend on it. In order to generate URLs that exist in your local environment, change the domain name to localhost:8000, as shown in the following screenshot, and save it:

Figure 3.6: The Django administration edit view for the Site model of the site's framework
The URLs displayed in your feed will now be built using this hostname. In a production environment, you will have to use your own domain name for the site's framework.
Creating feeds for your blog posts
Django has a built-in syndication feed framework that you can use to dynamically generate RSS or Atom feeds in a similar manner to creating sitemaps using the site's framework. A web feed is a data format (usually XML) that provides users with the most recently updated content. Users will be able to subscribe to your feed using a feed aggregator (software that is used to read feeds and get new content notifications).
Create a new file in your blog application directory and name it feeds.py. Add the following lines to it:
from django.contrib.syndication.views import Feed
from django.template.defaultfilters import truncatewords
from django.urls import reverse_lazy
from .models import Post
class LatestPostsFeed(Feed):
    title = 'My blog'
    link = reverse_lazy('blog:post_list')
    description = 'New posts of my blog.'
    def items(self):
        return Post.published.all()[:5]
    def item_title(self, item):
        return item.title
    def item_description(self, item):
        return truncatewords(item.body, 30)
First, you subclass the Feed class of the syndication framework. The title, link, and description attributes correspond to the <title>, <link>, and <description> RSS elements, respectively.
You use reverse_lazy() to generate the URL for the link attribute. The reverse() method allows you to build URLs by their name and pass optional parameters. You used reverse() in Chapter 1, Building a Blog Application. The reverse_lazy() utility function is a lazily evaluated version of reverse(). It allows you to use a URL reversal before the project's URL configuration is loaded.
The items() method retrieves the objects to be included in the feed. You are retrieving only the last five published posts for this feed. The item_title() and item_description() methods will receive each object returned by items() and return the title and description for each item. You use the truncatewords built-in template filter to build the description of the blog post with the first 30 words.
Now edit the blog/urls.py file, import the LatestPostsFeed you just created, and instantiate the feed in a new URL pattern:
from .feeds import LatestPostsFeed
urlpatterns = [
    # ...
    path('feed/', LatestPostsFeed(), name='post_feed'),
]
Navigate to http://127.0.0.1:8000/blog/feed/ in your browser. You should now see the RSS feed, including the last five blog posts:
<?xml version="1.0" encoding="utf-8"?>
<rss xmlns:atom="http://www.w3.org/2005/Atom" version="2.0">
  <channel>
    <title>My blog</title>
    <link>http://localhost:8000/blog/</link>
    <description>New posts of my blog.</description>
    <atom:link href="http://localhost:8000/blog/feed/" rel="self"/>
    <language>en-us</language>
    <lastBuildDate>Fri, 2 Jan 2020 09:56:40 +0000</lastBuildDate>
    <item>
      <title>Who was Django Reinhardt?</title>
      <link>http://localhost:8000/blog/2020/1/2/who-was-django-
      reinhardt/</link>
      <description>Who was Django Reinhardt.</description>
      <guid>http://localhost:8000/blog/2020/1/2/who-was-django-
      reinhardt/</guid>
    </item>
    ...
  </channel>
</rss>
If you open the same URL in an RSS client, you will be able to see your feed with a user-friendly interface.
The final step is to add a feed subscription link to the blog's sidebar. Open the blog/base.html template and add the following line under the number of total posts inside the sidebar div:
<p>
  <a href="{% url "blog:post_feed" %}">Subscribe to my RSS feed</a>
</p>
Now open http://127.0.0.1:8000/blog/ in your browser and take a look at the sidebar. The new link should take you to your blog's feed:

Figure 3.7: The RSS feed subscription link added to the sidebar
You can read more about the Django syndication feed framework at https://docs.djangoproject.com/en/3.0/ref/contrib/syndication/.
Adding full-text search to your blog
Next, you will add search capabilities to your blog. Searching for data in the database with user input is a common task for web applications. The Django ORM allows you to perform simple matching operations using, for example, the contains filter (or its case-insensitive version, icontains). You can use the following query to find posts that contain the word framework in their body:
from blog.models import Post
Post.objects.filter(body__contains='framework')
However, if you want to perform complex search lookups, retrieving results by similarity, or by weighting terms based on how frequently they appear in the text or by how important different fields are (for example, relevancy of the term appearing in the title versus in the body), you will need to use a full-text search engine. When you consider large blocks of text, building queries with operations on a string of characters is not enough. Full-text search examines the actual words against stored content as it tries to match search criteria.
Django provides a powerful search functionality built on top of PostgreSQL's full-text search features. The django.contrib.postgres module provides functionalities offered by PostgreSQL that are not shared by the other databases that Django supports. You can learn about PostgreSQL full-text search at https://www.postgresql.org/docs/12/static/textsearch.html.
Although Django is a database-agnostic web framework, it provides a module that supports part of the rich feature set offered by PostgreSQL, which is not offered by other databases that Django supports.
Installing PostgreSQL
You are currently using SQLite for your blog project. This is sufficient for development purposes. However, for a production environment, you will need a more powerful database, such as PostgreSQL, MariaDB, MySQL, or Oracle. You will change your database to PostgreSQL to benefit from its full-text search features.
If you are using Linux, install PostgreSQL with the following command:
sudo apt-get install postgresql postgresql-contrib
If you are using macOS or Windows, download PostgreSQL from https://www.postgresql.org/download/ and install it.
You also need to install the psycopg2 PostgreSQL adapter for Python. Run the following command in the shell to install it:
pip install psycopg2-binary==2.8.4
Let's create a user for your PostgreSQL database. Open the shell and run the following commands:
su postgres
createuser -dP blog
You will be prompted for a password for the new user. Enter the desired password and then create the blog database and give ownership to the blog user you just created with the following command:
createdb -E utf8 -U blog blog
Then, edit the settings.py file of your project and modify the DATABASES setting to make it look as follows:
DATABASES = {
    'default': {
        'ENGINE': 'django.db.backends.postgresql',
        'NAME': 'blog',
        'USER': 'blog',
        'PASSWORD': '*****',
    }
}
Replace the preceding data with the database name and credentials for the user you created. The new database is empty. Run the following command to apply all database migrations:
python manage.py migrate
Finally, create a superuser with the following command:
python manage.py createsuperuser
You can now run the development server and access the administration site at http://127.0.0.1:8000/admin/ with the new superuser.
Since you switched the database, there are no posts stored in it. Populate your new database with a couple of sample blog posts so that you can perform searches against the database.
Simple search lookups
Edit the settings.py file of your project and add django.contrib.postgres to the INSTALLED_APPS setting, as follows:
INSTALLED_APPS = [
    # ...
    'django.contrib.postgres',
]
Now you can search against a single field using the search QuerySet lookup, like this:
from blog.models import Post
Post.objects.filter(body__search='django')
This query uses PostgreSQL to create a search vector for the body field and a search query from the term django. Results are obtained by matching the query with the vector.
Searching against multiple fields
You might want to search against multiple fields. In this case, you will need to define a SearchVector object. Let's build a vector that allows you to search against the title and body fields of the Post model:
from django.contrib.postgres.search import SearchVector
from blog.models import Post
Post.objects.annotate(
    search=SearchVector('title', 'body'),
).filter(search='django')
Using annotate and defining SearchVector with both fields, you provide a functionality to match the query against both the title and body of the posts.
Full-text search is an intensive process. If you are searching for more than a few hundred rows, you should define a functional index that matches the search vector you are using. Django provides a SearchVectorField field for your models. You can read more about this at https://docs.djangoproject.com/en/3.0/ref/contrib/postgres/search/#performance.
Building a search view
Now, you will create a custom view to allow your users to search posts. First, you will need a search form. Edit the forms.py file of the blog application and add the following form:
class SearchForm(forms.Form):
    query = forms.CharField()
You will use the query field to let users introduce search terms. Edit the views.py file of the blog application and add the following code to it:
from django.contrib.postgres.search import SearchVector
from .forms import EmailPostForm, CommentForm, SearchForm
def post_search(request):
    form = SearchForm()
    query = None
    results = []
    if 'query' in request.GET:
        form = SearchForm(request.GET)
        if form.is_valid():
            query = form.cleaned_data['query']
            results = Post.published.annotate(
                search=SearchVector('title', 'body'),
            ).filter(search=query)
    return render(request,
                  'blog/post/search.html',
                  {'form': form,
                   'query': query,
                   'results': results})
In the preceding view, first, you instantiate the SearchForm form. To check whether the form is submitted, you look for the query parameter in the request.GET dictionary. You send the form using the GET method instead of POST, so that the resulting URL includes the query parameter and is easy to share. When the form is submitted, you instantiate it with the submitted GET data, and verify that the form data is valid. If the form is valid, you search for published posts with a custom SearchVector instance built with the title and body fields.
The search view is ready now. You need to create a template to display the form and the results when the user performs a search. Create a new file inside the blog/post/ template directory, name it search.html, and add the following code to it:
{% extends "blog/base.html" %}
{% load blog_tags %}
{% block title %}Search{% endblock %}
{% block content %}
  {% if query %}
    <h1>Posts containing "{{ query }}"</h1>
    <h3>
      {% with results.count as total_results %}
        Found {{ total_results }} result{{ total_results|pluralize }}
      {% endwith %}
    </h3>
    {% for post in results %}
      <h4><a href="{{ post.get_absolute_url }}">{{ post.title }}</a></h4>
      {{ post.body|markdown|truncatewords_html:5 }}
    {% empty %}
      <p>There are no results for your query.</p>
    {% endfor %}
    <p><a href="{% url "blog:post_search" %}">Search again</a></p>
  {% else %}
    <h1>Search for posts</h1>
    <form method="get">
      {{ form.as_p }}
      <input type="submit" value="Search">
    </form>
  {% endif %}
{% endblock %}
As in the search view, you can distinguish whether the form has been submitted by the presence of the query parameter. Before the query is submitted, you display the form and a submit button. After the post is submitted, you display the query performed, the total number of results, and the list of posts returned.
Finally, edit the urls.py file of your blog application and add the following URL pattern:
path('search/', views.post_search, name='post_search'),
Next, open http://127.0.0.1:8000/blog/search/ in your browser. You should see the following search form:

Figure 3.8: The form with the query field to search for posts
Enter a query and click on the SEARCH button. You will see the results of the search query, as follows:

Figure 3.9: Search results for the term "music"
Congratulations! You have created a basic search engine for your blog.
Stemming and ranking results
Stemming is the process of reducing words to their word stem, base, or root form. Stemming is used by search engines to reduce indexed words to their stem, and to be able to match inflected or derived words. For example, "music" and "musician" can be considered similar words by a search engine.
Django provides a SearchQuery class to translate terms into a search query object. By default, the terms are passed through stemming algorithms, which helps you to obtain better matches. You also want to order results by relevancy. PostgreSQL provides a ranking function that orders results based on how often the query terms appear and how close together they are.
Edit the views.py file of your blog application and add the following imports:
from django.contrib.postgres.search import SearchVector, SearchQuery, SearchRank
Then, take a look at the following lines:
results = Post.published.annotate(
                search=SearchVector('title', 'body'),
          ).filter(search=query)
Replace them with the following ones:
search_vector = SearchVector('title', 'body')
search_query = SearchQuery(query)
results = Post.published.annotate(
              search=search_vector,
              rank=SearchRank(search_vector, search_query)
          ).filter(search=search_query).order_by('-rank')
In the preceding code, you create a SearchQuery object, filter results by it, and use SearchRank to order the results by relevancy.
You can open http://127.0.0.1:8000/blog/search/ in your browser and test different searches to test stemming and ranking. The following is an example of ranking by the number of occurrences for the word django in the title and body of the posts:

Figure 3.10: Search results for the term "django"
Weighting queries
You can boost specific vectors so that more weight is attributed to them when ordering results by relevancy. For example, you can use this to give more relevance to posts that are matched by title rather than by content.
Edit the previous lines of the views.py file of your blog application and make them look like this:
search_vector = SearchVector('title', weight='A') +
                SearchVector('body', weight='B')
search_query = SearchQuery(query)
results = Post.published.annotate(
 rank=SearchRank(search_vector, search_query)
 ).filter(rank__gte=0.3).order_by('-rank')
In the preceding code, you apply different weights to the search vectors built using the title and body fields. The default weights are D, C, B, and A, and they refer to the numbers 0.1, 0.2, 0.4, and 1.0, respectively. You apply a weight of 1.0 to the title search vector and a weight of 0.4 to the body vector. Title matches will prevail over body content matches. You filter the results to display only the ones with a rank higher than 0.3.
Searching with trigram similarity
Another search approach is trigram similarity. A trigram is a group of three consecutive characters. You can measure the similarity of two strings by counting the number of trigrams that they share. This approach turns out to be very effective for measuring the similarity of words in many languages.
In order to use trigrams in PostgreSQL, you will need to install the pg_trgm extension first. Execute the following command from the shell to connect to your database:
psql blog
Then, execute the following command to install the pg_trgm extension:
CREATE EXTENSION pg_trgm;
Let's edit your view and modify it to search for trigrams. Edit the views.py file of your blog application and add the following import:
from django.contrib.postgres.search import TrigramSimilarity
Then, replace the Post search query with the following lines:
results = Post.published.annotate(
    similarity=TrigramSimilarity('title', query),
).filter(similarity__gt=0.1).order_by('-similarity')
Open http://127.0.0.1:8000/blog/search/ in your browser and test different searches for trigrams. The following example displays a hypothetical typo in the django term, showing search results for yango:

Figure 3.11: Search results for the term "yango"
Now you have a powerful search engine built into your project. You can find more information about full-text search at https://docs.djangoproject.com/en/3.0/ref/contrib/postgres/search/.
Other full-text search engines
You may want to use a full-text search engine other than from PostgreSQL. If you want to use Solr or Elasticsearch, you can integrate them into your Django project using Haystack. Haystack is a Django application that works as an abstraction layer for multiple search engines. It offers a simple search API that is very similar to Django QuerySets. You can find more information about Haystack at https://django-haystack.readthedocs.io/en/master/.
Summary
In this chapter, you learned how to create custom Django template tags and filters to provide templates with a custom functionality. You also created a sitemap for search engines to crawl your site and an RSS feed for users to subscribe to your blog. You then built a search engine for your blog using the full-text search engine of PostgreSQL.
In the next chapter, you will learn how to build a social website using the Django authentication framework, create custom user profiles, and build social authentication.