
11
Rendering and Caching Content
In the previous chapter, you used model inheritance and generic relations to create flexible course content models. You implemented a custom model field, and you built a course management system using class-based views. Finally, you created an AJAX-based drag-and-drop functionality to order course modules and their contents.
In this chapter, you will build the functionality to access course contents, create a student registration system, and manage student enrollment onto courses. You will also learn how to cache data using the Django cache framework.
In this chapter, you will:
- Create public views for displaying course information
- Build a student registration system
- Manage student enrollment onto courses
- Render diverse content for course modules
- Install and configure Memcached
- Cache content using the Django cache framework
- Monitor Memcached using the django-memcache-status
Let's start by creating a course catalog for students to browse existing courses and enroll on them.
Displaying courses
For your course catalog, you have to build the following functionalities:
- List all available courses, optionally filtered by subject
- Display a single course overview
Edit the views.py file of the courses application and add the following code:
from django.db.models import Count
from .models import Subject
class CourseListView(TemplateResponseMixin, View):
    model = Course
    template_name = 'courses/course/list.html'
    def get(self, request, subject=None):
        subjects = Subject.objects.annotate(
                       total_courses=Count('courses'))
        courses = Course.objects.annotate(
                       total_modules=Count('modules'))
        if subject:
            subject = get_object_or_404(Subject, slug=subject)
            courses = courses.filter(subject=subject)
        return self.render_to_response({'subjects': subjects,
                                        'subject': subject,
                                        'courses': courses})
This is the CourseListView view. It inherits from TemplateResponseMixin and View. In this view, you perform the following tasks:
- You retrieve all subjects, using the ORM's
annotate()method with theCount()aggregation function to include the total number of courses for each subject - You retrieve all available courses, including the total number of modules contained in each course
- If a subject slug URL parameter is given, you retrieve the corresponding subject object and limit the query to the courses that belong to the given subject
- You use the
render_to_response()method provided byTemplateResponseMixinto render the objects to a template and return an HTTP response
Let's create a detail view for displaying a single course overview. Add the following code to the views.py file:
from django.views.generic.detail import DetailView
class CourseDetailView(DetailView):
    model = Course
    template_name = 'courses/course/detail.html'
This view inherits from the generic DetailView provided by Django. You specify the model and template_name attributes. Django's DetailView expects a primary key (pk) or slug URL parameter to retrieve a single object for the given model. The view renders the template specified in template_name, including the Course object in the template context variable object.
Edit the main urls.py file of the educa project and add the following URL pattern to it:
from courses.views import CourseListView
urlpatterns = [
    # ...
    path('', CourseListView.as_view(), name='course_list'),
]
You add the course_list URL pattern to the main urls.py file of the project because you want to display the list of courses in the URL http://127.0.0.1:8000/, and all other URLs for the courses application have the /course/ prefix.
Edit the urls.py file of the courses application and add the following URL patterns:
path('subject/<slug:subject>/',
     views.CourseListView.as_view(),
     name='course_list_subject'),
path('<slug:slug>/',
     views.CourseDetailView.as_view(),
     name='course_detail'),
You define the following URL patterns:
course_list_subject: For displaying all courses for a subjectcourse_detail: For displaying a single course overview
Let's build templates for the CourseListView and CourseDetailView views.
Create the following file structure inside the templates/courses/ directory of the courses application:
course/
    list.html
    detail.html
Edit the courses/course/list.html template of the courses application and write the following code:
{% extends "base.html" %}
{% block title %}
  {% if subject %}
    {{ subject.title }} courses
  {% else %}
    All courses
  {% endif %}
{% endblock %}
{% block content %}
  <h1>
    {% if subject %}
      {{ subject.title }} courses
    {% else %}
      All courses
    {% endif %}
  </h1>
  <div class="contents">
    <h3>Subjects</h3>
    <ul id="modules">
      <li {% if not subject %}class="selected"{% endif %}>
        <a href="{% url "course_list" %}">All</a>
      </li>
      {% for s in subjects %}
        <li {% if subject == s %}class="selected"{% endif %}>
          <a href="{% url "course_list_subject" s.slug %}">
            {{ s.title }}
            <br><span>{{ s.total_courses }} courses</span>
          </a>
        </li>
      {% endfor %}
    </ul>
  </div>
  <div class="module">
    {% for course in courses %}
      {% with subject=course.subject %}
        <h3>
          <a href="{% url "course_detail" course.slug %}">
            {{ course.title }}
          </a>
        </h3>
        <p>
          <a href="{% url "course_list_subject" subject.slug %}">{{ subject }}</a>.
            {{ course.total_modules }} modules.
            Instructor: {{ course.owner.get_full_name }}
        </p>
      {% endwith %}
    {% endfor %}
  </div>
{% endblock %}
Make sure that no template tag is split into multiple lines.
This is the template for listing the available courses. You create an HTML list to display all Subject objects and build a link to the course_list_subject URL for each of them. You add a selected HTML class to highlight the current subject if a subject is selected. You iterate over every Course object, displaying the total number of modules and the instructor's name.
Run the development server and open http://127.0.0.1:8000/ in your browser. You should see a page similar to the following one:
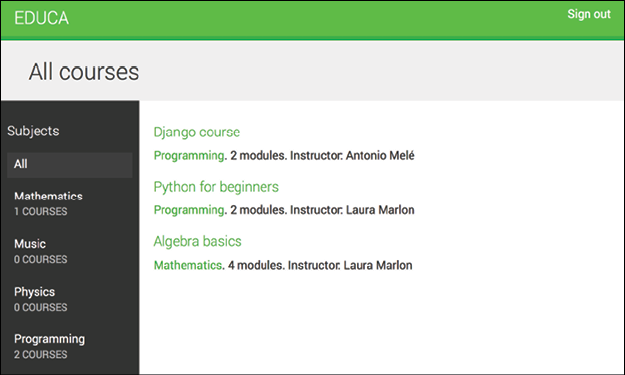
Figure 11.1: The course list page
The left sidebar contains all subjects, including the total number of courses for each of them. You can click any subject to filter the courses displayed.
Edit the courses/course/detail.html template and add the following code to it:
{% extends "base.html" %}
{% block title %}
  {{ object.title }}
{% endblock %}
{% block content %}
  {% with subject=object.subject %}
    <h1>
      {{ object.title }}
    </h1>
    <div class="module">
      <h2>Overview</h2>
      <p>
        <a href="{% url "course_list_subject" subject.slug %}">
        {{ subject.title }}</a>.
        {{ object.modules.count }} modules.
        Instructor: {{ object.owner.get_full_name }}
      </p>
      {{ object.overview|linebreaks }}
    </div>
  {% endwith %}
{% endblock %}
In this template, you display the overview and details for a single course. Open http://127.0.0.1:8000/ in your browser and click on one of the courses. You should see a page with the following structure:
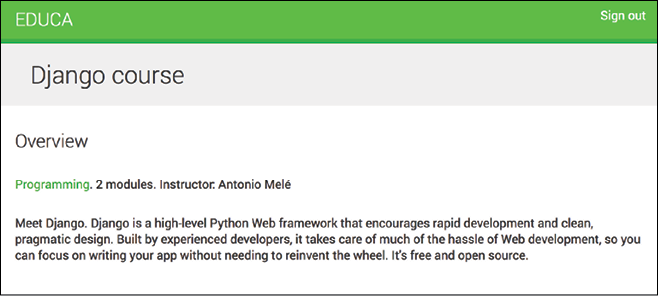
Figure 11.2: The course overview page
You have created a public area for displaying courses. Next, you need to allow users to register as students and enroll on courses.
Adding student registration
Create a new application using the following command:
python manage.py startapp students
Edit the settings.py file of the educa project and add the new application to the INSTALLED_APPS setting, as follows:
INSTALLED_APPS = [
    # ...
    'students.apps.StudentsConfig',
]
Creating a student registration view
Edit the views.py file of the students application and write the following code:
from django.urls import reverse_lazy
from django.views.generic.edit import CreateView
from django.contrib.auth.forms import UserCreationForm
from django.contrib.auth import authenticate, login
class StudentRegistrationView(CreateView):
    template_name = 'students/student/registration.html'
    form_class = UserCreationForm
    success_url = reverse_lazy('student_course_list')
    def form_valid(self, form):
        result = super().form_valid(form)
        cd = form.cleaned_data
        user = authenticate(username=cd['username'],
                            password=cd['password1'])
        login(self.request, user)
        return result
This is the view that allows students to register on your site. You use the generic CreateView, which provides the functionality for creating model objects. This view requires the following attributes:
template_name: The path of the template to render this view.form_class: The form for creating objects, which has to beModelForm. You use Django'sUserCreationFormas the registration form to createUserobjects.success_url: The URL to redirect the user to when the form is successfully submitted. You reverse the URL namedstudent_course_list, which you are going to create in the Accessing the course contents section for listing the courses that students are enrolled on.
The form_valid() method is executed when valid form data has been posted. It has to return an HTTP response. You override this method to log the user in after they have successfully signed up.
Create a new file inside the students application directory and name it urls.py. Add the following code to it:
from django.urls import path
from . import views
urlpatterns = [
    path('register/',
         views.StudentRegistrationView.as_view(),
         name='student_registration'),
]
Then, edit the main urls.py of the educa project and include the URLs for the students application by adding the following pattern to your URL configuration:
urlpatterns = [
    # ...
    path('students/', include('students.urls')),
]
Create the following file structure inside the students application directory:
templates/
    students/
        student/
            registration.html
Edit the students/student/registration.html template and add the following code to it:
{% extends "base.html" %}
{% block title %}
  Sign up
{% endblock %}
{% block content %}
  <h1>
    Sign up
  </h1>
  <div class="module">
    <p>Enter your details to create an account:</p>
    <form method="post">
      {{ form.as_p }}
      {% csrf_token %}
      <p><input type="submit" value="Create my account"></p>
    </form>
  </div>
{% endblock %}
Run the development server and open http://127.0.0.1:8000/students/register/ in your browser. You should see a registration form like this:

Figure 11.3: The student registration form
Note that the student_course_list URL specified in the success_url attribute of the StudentRegistrationView view doesn't exist yet. If you submit the form, Django won't find the URL to redirect you to after a successful registration. As mentioned, you will create this URL in the Accessing the course contents section.
Enrolling on courses
After users create an account, they should be able to enroll on courses. In order to store enrollments, you need to create a many-to-many relationship between the Course and User models.
Edit the models.py file of the courses application and add the following field to the Course model:
students = models.ManyToManyField(User,
                                  related_name='courses_joined',
                                  blank=True)
From the shell, execute the following command to create a migration for this change:
python manage.py makemigrations
You will see output similar to this:
Migrations for 'courses':
  courses/migrations/0004_course_students.py
    - Add field students to course
Then, execute the next command to apply pending migrations:
python manage.py migrate
You should see output that ends with the following line:
Applying courses.0004_course_students... OK
You can now associate students with the courses on which they are enrolled. Let's create the functionality for students to enroll on courses.
Create a new file inside the students application directory and name it forms.py. Add the following code to it:
from django import forms
from courses.models import Course
class CourseEnrollForm(forms.Form):
    course = forms.ModelChoiceField(queryset=Course.objects.all(),
                                    widget=forms.HiddenInput)
You are going to use this form for students to enroll on courses. The course field is for the course on which the user will be enrolled; therefore, it's a ModelChoiceField. You use a HiddenInput widget because you are not going to show this field to the user. You are going to use this form in the CourseDetailView view to display a button to enroll.
Edit the views.py file of the students application and add the following code:
from django.views.generic.edit import FormView
from django.contrib.auth.mixins import LoginRequiredMixin
from .forms import CourseEnrollForm
class StudentEnrollCourseView(LoginRequiredMixin, FormView):
    course = None
    form_class = CourseEnrollForm
    def form_valid(self, form):
        self.course = form.cleaned_data['course']
        self.course.students.add(self.request.user)
        return super().form_valid(form)
    def get_success_url(self):
        return reverse_lazy('student_course_detail',
                            args=[self.course.id])
This is the StudentEnrollCourseView view. It handles students enrolling on courses. The view inherits from the LoginRequiredMixin mixin so that only logged-in users can access the view. It also inherits from Django's FormView view, since you handle a form submission. You use the CourseEnrollForm form for the form_class attribute and also define a course attribute for storing the given Course object. When the form is valid, you add the current user to the students enrolled on the course.
The get_success_url() method returns the URL that the user will be redirected to if the form was successfully submitted. This method is equivalent to the success_url attribute. Then, you reverse the URL named student_course_detail.
Edit the urls.py file of the students application and add the following URL pattern to it:
path('enroll-course/',
     views.StudentEnrollCourseView.as_view(),
     name='student_enroll_course'),
Let's add the enroll button form to the course overview page. Edit the views.py file of the courses application and modify CourseDetailView to make it look as follows:
from students.forms import CourseEnrollForm
class CourseDetailView(DetailView):
    model = Course
    template_name = 'courses/course/detail.html'
    def get_context_data(self, **kwargs):
        context = super().get_context_data(**kwargs)
        context['enroll_form'] = CourseEnrollForm(
                                   initial={'course':self.object})
        return context
You use the get_context_data() method to include the enrollment form in the context for rendering the templates. You initialize the hidden course field of the form with the current Course object so that it can be submitted directly.
Edit the courses/course/detail.html template and locate the following line:
{{ object.overview|linebreaks }}
Replace it with the following code:
{{ object.overview|linebreaks }}
{% if request.user.is_authenticated %}
  <form action="{% url "student_enroll_course" %}" method="post">
    {{ enroll_form }}
    {% csrf_token %}
    <input type="submit" value="Enroll now">
  </form>
{% else %}
  <a href="{% url "student_registration" %}" class="button">
    Register to enroll
  </a>
{% endif %}
This is the button for enrolling on courses. If the user is authenticated, you display the enrollment button, including the hidden form that points to the student_enroll_course URL. If the user is not authenticated, you display a link to register on the platform.
Make sure that the development server is running, open http://127.0.0.1:8000/ in your browser, and click a course. If you are logged in, you should see an ENROLL NOW button placed below the course overview, as follows:
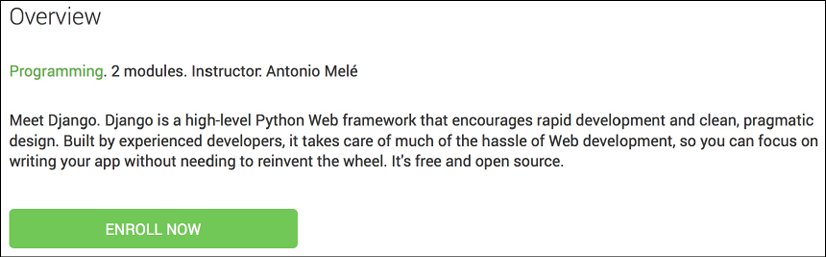
Figure 11.4: The course overview page, including an ENROLL NOW button
If you are not logged in, you will see a REGISTER TO ENROLL button instead.
Accessing the course contents
You need a view for displaying the courses that students are enrolled on, and a view for accessing the actual course contents. Edit the views.py file of the students application and add the following code to it:
from django.views.generic.list import ListView
from courses.models import Course
class StudentCourseListView(LoginRequiredMixin, ListView):
    model = Course
    template_name = 'students/course/list.html'
    def get_queryset(self):
        qs = super().get_queryset()
        return qs.filter(students__in=[self.request.user])
This is the view to see courses that students are enrolled on. It inherits from LoginRequiredMixin to make sure that only logged in users can access the view. It also inherits from the generic ListView for displaying a list of Course objects. You override the get_queryset() method to retrieve only the courses that a student is enrolled on; you filter the QuerySet by the student's ManyToManyField field to do so.
Then, add the following code to the views.py file of the students application:
from django.views.generic.detail import DetailView
class StudentCourseDetailView(DetailView):
    model = Course
    template_name = 'students/course/detail.html'
    def get_queryset(self):
        qs = super().get_queryset()
        return qs.filter(students__in=[self.request.user])
    def get_context_data(self, **kwargs):
        context = super().get_context_data(**kwargs)
        # get course object
        course = self.get_object()
        if 'module_id' in self.kwargs:
            # get current module
            context['module'] = course.modules.get(
                                    id=self.kwargs['module_id'])
        else:
            # get first module
            context['module'] = course.modules.all()[0]
        return context
This is the StudentCourseDetailView view. You override the get_queryset() method to limit the base QuerySet to courses on which the student is enrolled. You also override the get_context_data() method to set a course module in the context if the module_id URL parameter is given. Otherwise, you set the first module of the course. This way, students will be able to navigate through modules inside a course.
Edit the urls.py file of the students application and add the following URL patterns to it:
path('courses/',
     views.StudentCourseListView.as_view(),
     name='student_course_list'),
path('course/<pk>/',
     views.StudentCourseDetailView.as_view(),
     name='student_course_detail'),
path('course/<pk>/<module_id>/',
     views.StudentCourseDetailView.as_view(),
     name='student_course_detail_module'),
Create the following file structure inside the templates/students/ directory of the students application:
course/
    detail.html
    list.html
Edit the students/course/list.html template and add the following code to it:
{% extends "base.html" %}
{% block title %}My courses{% endblock %}
{% block content %}
  <h1>My courses</h1>
  <div class="module">
    {% for course in object_list %}
      <div class="course-info">
        <h3>{{ course.title }}</h3>
        <p><a href="{% url "student_course_detail" course.id %}">
        Access contents</a></p>
      </div>
    {% empty %}
      <p>
        You are not enrolled in any courses yet.
        <a href="{% url "course_list" %}">Browse courses</a>
        to enroll in a course.
      </p>
    {% endfor %}
  </div>
{% endblock %}
This template displays the courses that the student is enrolled on. Remember that when a new student successfully registers with the platform, they will be redirected to the student_course_list URL. Let's also redirect students to this URL when they log in to the platform.
Edit the settings.py file of the educa project and add the following code to it:
from django.urls import reverse_lazy
LOGIN_REDIRECT_URL = reverse_lazy('student_course_list')
This is the setting used by the auth module to redirect the student after a successful login if no next parameter is present in the request. After a successful login, a student will be redirected to the student_course_list URL to view the courses that they are enrolled on.
Edit the students/course/detail.html template and add the following code to it:
{% extends "base.html" %}
{% block title %}
  {{ object.title }}
{% endblock %}
{% block content %}
  <h1>
    {{ module.title }}
  </h1>
  <div class="contents">
    <h3>Modules</h3>
    <ul id="modules">
      {% for m in object.modules.all %}
        <li data-id="{{ m.id }}" {% if m == module %}class="selected"{% endif %}>
          <a href="{% url "student_course_detail_module" object.id m.id %}">
            <span>
              Module <span class="order">{{ m.order|add:1 }}</span>
            </span>
            <br>
            {{ m.title }}
          </a>
        </li>
      {% empty %}
        <li>No modules yet.</li>
      {% endfor %}
    </ul>
  </div>
  <div class="module">
    {% for content in module.contents.all %}
      {% with item=content.item %}
        <h2>{{ item.title }}</h2>
        {{ item.render }}
      {% endwith %}
    {% endfor %}
  </div>
{% endblock %}
This is the template for enrolled students to access the contents of a course. First, you build an HTML list including all course modules and highlighting the current module. Then, you iterate over the current module contents and access each content item to display it using {{ item.render }}. You are going to add the render() method to the content models next. This method will take care of rendering the content properly.
Rendering different types of content
You need to provide a way to render each type of content. Edit the models.py file of the courses application and add the following render() method to the ItemBase model:
from django.template.loader import render_to_string
class ItemBase(models.Model):
    # ...
    def render(self):
        return render_to_string(
            f'courses/content/{self._meta.model_name}.html',
            {'item': self})
This method uses the render_to_string() function for rendering a template and returning the rendered content as a string. Each kind of content is rendered using a template named after the content model. You use self._meta.model_name to generate the appropriate template name for each content model dynamically. The render() method provides a common interface for rendering diverse content.
Create the following file structure inside the templates/courses/ directory of the courses application:
content/
    text.html
    file.html
    image.html
    video.html
Edit the courses/content/text.html template and write this code:
{{ item.content|linebreaks }}
This is the template to render text content. The linebreaks template filter replaces line breaks in plain text with HTML line breaks.
Edit the courses/content/file.html template and add the following:
<p><a href="{{ item.file.url }}" class="button">Download file</a></p>
This is the template to render files. You generate a link to download the file.
Edit the courses/content/image.html template and write:
<p><img src="{{ item.file.url }}" alt="{{ item.title }}"></p>
This is the template to render images. For files uploaded with ImageField and FileField to work, you need to set up your project to serve media files with the development server.
Edit the settings.py file of your project and add the following code to it:
MEDIA_URL = '/media/'
MEDIA_ROOT = os.path.join(BASE_DIR, 'media/')
Remember that MEDIA_URL is the base URL to serve uploaded media files and MEDIA_ROOT is the local path where the files are located.
Edit the main urls.py file of your project and add the following imports:
from django.conf import settings
from django.conf.urls.static import static
Then, write the following lines at the end of the file:
if settings.DEBUG:
    urlpatterns += static(settings.MEDIA_URL,
                          document_root=settings.MEDIA_ROOT)
Your project is now ready to upload and serve media files. The Django development server will be in charge of serving the media files during development (that is, when the DEBUG setting is set to True). Remember that the development server is not suitable for production use. You will learn how to set up a production environment in Chapter 14, Going Live.
You also have to create a template for rendering Video objects. You will use django-embed-video for embedding video content. django-embed-video is a third-party Django application that allows you to embed videos in your templates, from sources such as YouTube or Vimeo, by simply providing their public URL.
Install the package with the following command:
pip install django-embed-video==1.3.2
Edit the settings.py file of your project and add the application to the INSTALLED_APPS setting, as follows:
INSTALLED_APPS = [
    # ...
    'embed_video',
]
You can find the django-embed-video application's documentation at https://django-embed-video.readthedocs.io/en/latest/.
Edit the courses/content/video.html template and write the following code:
{% load embed_video_tags %}
{% video item.url "small" %}
This is the template to render videos.
Now run the development server and access http://127.0.0.1:8000/course/mine/ in your browser. Access the site with a user belonging to the Instructors group, and add multiple contents to a course. To include video content, you can just copy any YouTube URL, such as https://www.youtube.com/watch?v=bgV39DlmZ2U, and include it in the url field of the form.
After adding contents to the course, open http://127.0.0.1:8000/, click the course, and click on the ENROLL NOW button. You should be enrolled on the course and redirected to the student_course_detail URL. The following screenshot shows a sample course contents page:
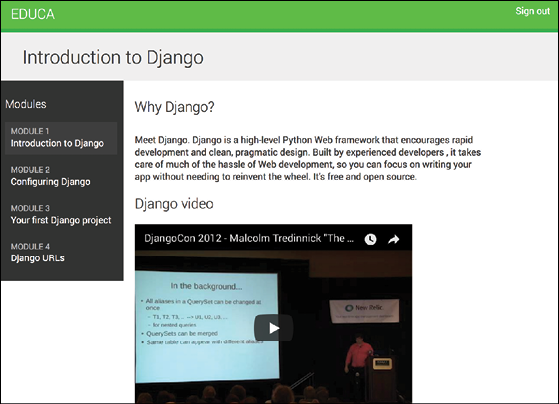
Figure 11.5: A course contents page
Great! You have created a common interface for rendering different types of course contents.
Using the cache framework
HTTP requests to your web application usually entail database access, data processing, and template rendering. This is much more expensive in terms of processing than serving a static website. The overhead in some requests can be significant when your site starts getting more and more traffic. This is where caching becomes precious. By caching queries, calculation results, or rendered content in an HTTP request, you will avoid expensive operations in the following requests. This translates into shorter response times and less processing on the server side.
Django includes a robust cache system that allows you to cache data with different levels of granularity. You can cache a single query, the output of a specific view, parts of rendered template content, or your entire site. Items are stored in the cache system for a default time. You can specify the default timeout for cached data.
This is how you will usually use the cache framework when your application gets an HTTP request:
- Try to find the requested data in the cache
- If found, return the cached data
- If not found, perform the following steps:
- Perform the query or processing required to obtain the data
- Save the generated data in the cache
- Return the data
You can read detailed information about Django's cache system at https://docs.djangoproject.com/en/3.0/topics/cache/.
Available cache backends
Django comes with several cache backends. These are the following:
backends.memcached.MemcachedCacheorbackends.memcached.PyLibMCCache: A Memcached backend. Memcached is a fast and efficient memory-based cache server. The backend to use depends on the Memcached Python bindings you choose.backends.db.DatabaseCache: Use the database as a cache system.backends.filebased.FileBasedCache: Use the file storage system. This serializes and stores each cache value as a separate file.backends.locmem.LocMemCache: A local memory cache backend. This the default cache backend.backends.dummy.DummyCache: A dummy cache backend intended only for development. It implements the cache interface without actually caching anything. This cache is per-process and thread-safe.
Installing Memcached
You are going to use the Memcached backend. Memcached runs in memory and it is allotted a specified amount of RAM. When the allotted RAM is full, Memcached starts removing the oldest data to store new data.
Download Memcached from https://memcached.org/downloads. If you are using Linux, you can install Memcached using the following command:
./configure && make && make test && sudo make install
If you are using macOS, you can install Memcached with the Homebrew package manager using the command brew install memcached. You can download Homebrew from https://brew.sh/.
After installing Memcached, open a shell and start it using the following command:
memcached -l 127.0.0.1:11211
Memcached will run on port 11211 by default. However, you can specify a custom host and port by using the -l option. You can find more information about Memcached at https://memcached.org.
After installing Memcached, you have to install its Python bindings. You can do this with the following command:
pip install python-memcached==1.59
Cache settings
Django provides the following cache settings:
CACHES: A dictionary containing all available caches for the projectCACHE_MIDDLEWARE_ALIAS: The cache alias to use for storageCACHE_MIDDLEWARE_KEY_PREFIX: The prefix to use for cache keys- Set a prefix to avoid key collisions if you share the same cache between several sites
CACHE_MIDDLEWARE_SECONDS: The default number of seconds to cache pages
The caching system for the project can be configured using the CACHES setting. This setting allows you to specify the configuration for multiple caches. Each cache included in the CACHES dictionary can specify the following data:
BACKEND: The cache backend to use.KEY_FUNCTION: A string containing a dotted path to a callable that takes a prefix, version, and key as arguments and returns a final cache key.KEY_PREFIX: A string prefix for all cache keys, to avoid collisions.LOCATION: The location of the cache. Depending on the cache backend, this might be a directory, a host and port, or a name for the in-memory backend.OPTIONS: Any additional parameters to be passed to the cache backend.TIMEOUT: The default timeout, in seconds, for storing the cache keys. It is 300 seconds by default, which is five minutes. If set toNone, cache keys will not expire.VERSION: The default version number for the cache keys. Useful for cache versioning.
Adding Memcached to your project
Let's configure the cache for your project. Edit the settings.py file of the educa project and add the following code to it:
CACHES = {
    'default': {
        'BACKEND': 'django.core.cache.backends.memcached.MemcachedCache',
        'LOCATION': '127.0.0.1:11211',
    }
}
You are using the MemcachedCache backend. You specify its location using the address:port notation. If you have multiple Memcached instances, you can use a list for LOCATION.
Monitoring Memcached
In order to monitor Memcached, you will use a third-party package called django-memcache-status. This application displays statistics for your Memcached instances in the administration site. Install it with the following command:
pip install django-memcache-status==2.2
Edit the settings.py file and add 'memcache_status' to the INSTALLED_APPS setting:
INSTALLED_APPS = [
    # ...
    'memcache_status',
]
Edit the admin.py file of the courses application and add the following lines to it:
# use memcache admin index site
admin.site.index_template = 'memcache_status/admin_index.html'
Make sure Memcached is running, start the development server in another shell window and open http://127.0.0.1:8000/admin/ in your browser. Log in to the administration site using a superuser. You should see the following block on the index page of the administration site:

Figure 11.6: The Memcached status block
The block contains a bar graph that shows the cache load. The green color represents free cache, while red indicates used space. If you click the title of the box, it shows detailed statistics of your Memcached instance.
You have set up Memcached for your project and are able to monitor it. Let's start caching data!
Cache levels
Django provides the following levels of caching, listed here by ascending order of granularity:
- Low-level cache API: Provides the highest granularity. Allows you to cache specific queries or calculations.
- Template cache: Allows you to cache template fragments.
- Per-view cache: Provides caching for individual views.
- Per-site cache: The highest-level cache. It caches your entire site.
Think about your cache strategy before implementing caching. Focus first on expensive queries or calculations that are not calculated on a per-user basis.
Using the low-level cache API
The low-level cache API allows you to store objects in the cache with any granularity. It is located at django.core.cache. You can import it like this:
from django.core.cache import cache
This uses the default cache. It's equivalent to caches['default']. Accessing a specific cache is also possible via its alias:
from django.core.cache import caches
my_cache = caches['alias']
Let's take a look at how the cache API works. Open the shell with the command python manage.py shell and execute the following code:
>>> from django.core.cache import cache
>>> cache.set('musician', 'Django Reinhardt', 20)
You access the default cache backend and use set(key, value, timeout) to store a key named 'musician' with a value that is the string 'Django Reinhardt' for 20 seconds. If you don't specify a timeout, Django uses the default timeout specified for the cache backend in the CACHES setting. Now, execute the following code:
>>> cache.get('musician')
'Django Reinhardt'
You retrieve the key from the cache. Wait for 20 seconds and execute the same code:
>>> cache.get('musician')
No value is returned this time. The 'musician' cache key has expired and the get() method returns None because the key is not in the cache anymore.
Always avoid storing a None value in a cache key because you won't be able to distinguish between the actual value and a cache miss.
Let's cache a QuerySet with the following code:
>>> from courses.models import Subject
>>> subjects = Subject.objects.all()
>>> cache.set('my_subjects', subjects)
You perform a QuerySet on the Subject model and store the returned objects in the 'my_subjects' key. Let's retrieve the cached data:
>>> cache.get('my_subjects')
<QuerySet [<Subject: Mathematics>, <Subject: Music>, <Subject: Physics>, <Subject: Programming>]>
You are going to cache some queries in your views. Edit the views.py file of the courses application and add the following import:
from django.core.cache import cache
In the get() method of the CourseListView, find the following line:
subjects = Subject.objects.annotate(
               total_courses=Count('courses'))
Replace it with the following ones:
subjects = cache.get('all_subjects')
if not subjects:
    subjects = Subject.objects.annotate(
                   total_courses=Count('courses'))
    cache.set('all_subjects', subjects)
In this code, you try to get the all_students key from the cache using cache.get(). This returns None if the given key is not found. If no key is found (not cached yet or cached but timed out), you perform the query to retrieve all Subject objects and their number of courses, and you cache the result using cache.set().
Run the development server and open http://127.0.0.1:8000/ in your browser. When the view is executed, the cache key is not found and the QuerySet is executed. Open http://127.0.0.1:8000/admin/ in your browser and click on the Memcached section to expand the statistics. You should see usage data for the cache that is similar to the following screen:

Figure 11.7: The Memcached status and usage details
Take a look at Curr Items, which should be 1. This shows that there is one item currently stored in the cache. Get Hits shows how many get commands were successful and Get Misses shows the get requests for keys that are missing. The Miss Ratio is calculated using both of them.
Next, navigate back to http://127.0.0.1:8000/ using your browser and reload the page several times. If you take a look at the cache statistics now, you will see several more reads (Get Hits and Cmd Get will increase).
Caching based on dynamic data
Often, you will want to cache something that is based on dynamic data. In these cases, you have to build dynamic keys that contain all the information required to uniquely identify the cached data.
Edit the views.py file of the courses application and modify the CourseListView view to make it look like this:
class CourseListView(TemplateResponseMixin, View):
    model = Course
    template_name = 'courses/course/list.html'
    def get(self, request, subject=None):
        subjects = cache.get('all_subjects')
        if not subjects:
            subjects = Subject.objects.annotate(
                           total_courses=Count('courses'))
            cache.set('all_subjects', subjects)
        all_courses = Course.objects.annotate(
                           total_modules=Count('modules'))
        if subject:
            subject = get_object_or_404(Subject, slug=subject)
            key = f'subject_{subject.id}_courses'
            courses = cache.get(key)
            if not courses:
                courses = all_courses.filter(subject=subject)
                cache.set(key, courses)
        else:
            courses = cache.get('all_courses')
            if not courses:
                courses = all_courses
                cache.set('all_courses', courses)
        return self.render_to_response({'subjects': subjects,
                                        'subject': subject,
                                        'courses': courses})
In this case, you also cache both all courses and courses filtered by subject. You use the all_courses cache key for storing all courses if no subject is given. If there is a subject, you build the key dynamically with f'subject_{subject.id}_courses'.
It is important to note that you can't use a cached QuerySet to build other QuerySets, since what you cached are actually the results of the QuerySet. So you can't do the following:
courses = cache.get('all_courses')
courses.filter(subject=subject)
Instead, you have to create the base QuerySet Course.objects.annotate(total_modules=Count('modules')), which is not going to be executed until it is forced, and use it to further restrict the QuerySet with all_courses.filter(subject=subject) in case the data was not found in the cache.
Caching template fragments
Caching template fragments is a higher-level approach. You need to load the cache template tags in your template using {% load cache %}. Then, you will be able to use the {% cache %} template tag to cache specific template fragments. You will usually use the template tag as follows:
{% cache 300 fragment_name %}
    ...
{% endcache %}
The {% cache %} template tag has two required arguments: the timeout in seconds and a name for the fragment. If you need to cache content depending on dynamic data, you can do so by passing additional arguments to the {% cache %} template tag to uniquely identify the fragment.
Edit the /students/course/detail.html of the students application. Add the following code at the top of it, just after the {% extends %} tag:
{% load cache %}
Then, find the following lines:
{% for content in module.contents.all %}
  {% with item=content.item %}
    <h2>{{ item.title }}</h2>
    {{ item.render }}
  {% endwith %}
{% endfor %}
Replace them with the following ones:
{% cache 600 module_contents module %}
  {% for content in module.contents.all %}
    {% with item=content.item %}
      <h2>{{ item.title }}</h2>
      {{ item.render }}
    {% endwith %}
  {% endfor %}
{% endcache %}
You cache this template fragment using the name module_contents and passing the current Module object to it. Thus, you uniquely identify the fragment. This is important to avoid caching a module's contents and serving the wrong content when a different module is requested.
If the USE_I18N setting is set to True, the per-site middleware cache will respect the active language. If you use the {% cache %} template tag, you have to use one of the translation-specific variables available in templates to achieve the same result, such as {% cache 600 name request.LANGUAGE_CODE %}.
Caching views
You can cache the output of individual views using the cache_page decorator located at django.views.decorators.cache. The decorator requires a timeout argument (in seconds).
Let's use it in your views. Edit the urls.py file of the students application and add the following import:
from django.views.decorators.cache import cache_page
Then, apply the cache_page decorator to the student_course_detail and student_course_detail_module URL patterns, as follows:
path('course/<pk>/',
     cache_page(60 * 15)(views.StudentCourseDetailView.as_view()),
     name='student_course_detail'),
path('course/<pk>/<module_id>/',
     cache_page(60 * 15)(views.StudentCourseDetailView.as_view()),
     name='student_course_detail_module'),
Now, the result for the StudentCourseDetailView is cached for 15 minutes.
The per-view cache uses the URL to build the cache key. Multiple URLs pointing to the same view will be cached separately.
Using the per-site cache
This is the highest-level cache. It allows you to cache your entire site. To allow the per-site cache, edit the settings.py file of your project and add the UpdateCacheMiddleware and FetchFromCacheMiddleware classes to the MIDDLEWARE setting, as follows:
MIDDLEWARE = [
    'django.middleware.security.SecurityMiddleware',
    'django.contrib.sessions.middleware.SessionMiddleware',
    'django.middleware.cache.UpdateCacheMiddleware',
    'django.middleware.common.CommonMiddleware',
    'django.middleware.cache.FetchFromCacheMiddleware',
    # ...
]
Remember that middleware are executed in the given order during the request phase, and in reverse order during the response phase. UpdateCacheMiddleware is placed before CommonMiddleware because it runs during response time, when middleware are executed in reverse order. FetchFromCacheMiddleware is placed after CommonMiddleware intentionally because it needs to access request data set by the latter.
Next, add the following settings to the settings.py file:
CACHE_MIDDLEWARE_ALIAS = 'default'
CACHE_MIDDLEWARE_SECONDS = 60 * 15  # 15 minutes
CACHE_MIDDLEWARE_KEY_PREFIX = 'educa'
In these settings, you use the default cache for your cache middleware and set the global cache timeout to 15 minutes. You also specify a prefix for all cache keys to avoid collisions in case you use the same Memcached backend for multiple projects. Your site will now cache and return cached content for all GET requests.
You have done this to test the per-site cache functionality. However, the per-site cache is not suitable for you, since the course management views need to show updated data to instantly reflect any changes. The best approach to follow in your project is to cache the templates or views that are used to display course contents to students.
You have seen an overview of the methods provided by Django to cache data. You should define your cache strategy wisely and prioritize the most expensive QuerySets or calculations.
Summary
In this chapter, you implemented the public views for the course catalog. You built a system for students to register and enroll on courses. You also created the functionality to render different types of content for the course modules. Finally, you learned how to use the Django cache framework and you installed and monitored the Memcached cache backend.
In the next chapter, you will build a RESTful API for your project using Django REST framework.