This chapter will introduce you to React Hooks, enabling you to avoid wrapping your components in classes just to gain access to the state of a component. Using fewer abstractions will make the components lighter and will enhance the readability of the code. You will be able to optimize code while using Hooks in components efficiently. You will be able to create abstractions with Hooks that can be reused and so we do not need to rely on class-based components or component life cycle methods.
Introduction
In the previous chapters, we have seen how React handles state in class components. By the end of 2018, however, React developers had come up with a completely new API called Hooks, which changes how we manipulate the state of a component. This brings in massive syntax changes within the React framework. Even more importantly, this new method of state management can be used to manipulate state of the functional components.
Nothing in the life of a React component has a more significant effect than Hooks, which, of course, begs the question: what problems do Hooks solve that the former APIs could not? Previously, if we wanted to declare a state, we had to create a whole class and all the boilerplate code for that. Hooks, on the other hand, enable you to declare the state of a component with just one line. Hooks make React code more readable, maintainable, and reusable, while also making it a lot easier for newcomers to understand.
The Hooks library has been built with a newer version of ECMAScript; a script used to package JavaScript code for reuse. In this chapter, we will first take a look at the functionalities of Hooks. Later on in this chapter, we will look at the old style of writing code using class-based components and render props in React components and compare this method directly with Hooks and see how Hooks can improve the code you write.
Let's get started to see how you, as a developer, can benefit from embracing hooks.
Hooks
In this section, we are going to introduce two of the popularly used React hooks: useState and useEffect. These are widely used and can solve most of our problems. The useState hook is used to initialize the state of a component and get access to a function that allows you to modify the state of that same component. The useEffect hook, on the other hand, is used when changes are made to the component, similar to the use case for componentDidMount or componentDidUpdate methods in class-based components.
Note
There are other types of hooks that come bundled with the React library. You can find a complete list of these at https://packt.live/3bCTh8d.
Let's dive right into these two particular hooks in more detail.
useState
useState is the first type of hook that we are going to use. It gives us all the functionality that this.state and this.setState provide for class-based components. When we call useState, it will return an array where the first item in the array is the initial state of the component (which is what we pass in React.useState), and the second item is a function that acts identically as setState in a class-based component.
We can declare useState as following:
const [state, setState] = React.useState({ someFlag: false });
// or like this
const result = React.useState({ someFlag: false });
const state = result[0];
const setState = result[1];
The square brackets might seem intimidating, but they are exactly like object destructuring in JavaScript, except here we use arrays.
Note
Look at JavaScript de-structuring here: https://packt.live/2WxE2sS.
We have also discussed object de-structuring in Chapter 7, Communication between Components.
The first element of the arrays is the state itself, while the second element is a function that updates the state and, of course, triggers a re-render. We call this the setter function.
It can have two signatures; we can also say that the setter function can be overloaded. We will discuss the overloading of the setter function in more detail in Chapter 12, State Management with Hooks.
In this case, we will use the following code:
setState({ someNewState: true });
setState(prevState => ({ someNewState: !prevState.someNewState }));
The first example just takes a new state. For the second, you pass in a function with the previous state as the argument, and that function must return the new state. This is useful when our new state depends on the previous state. We will see the implementation shortly.
This behaves exactly like this.setState in class components. Now, let's work through a hands-on exercise to render an image using the useState hook.
Exercise 11.01: Displaying an Image with the Toggle Button
In this exercise, we will display an image in a functional component. We will use an <img/> tag to render an image. Image tags require at least the source properties src and alt for accessibility. We will create a base component, and this will be provided to <Base/> and passed down as props later. To do so, let's go through the following steps:
- Start by creating a new React project, which we will call imagehook, start the project, and take a look at the browser window that should have opened for you automatically:
$ npx create-react-app imagehook
$ cd imagehook
$ yarn start
- Delete src/logo.svg. We won't be using this file, so we don't need to include it.
- Replace the contents of src/App.css with the following:
img {
margin: 20px;
}
button {
width: 200px;
height: 50px;
background: #4444ff;
color: white;
font-weight: bold;
border: none;
cursor: pointer;
}
You'll want to find an image to display in our component. For example, we could grab a nice picture of coffee beans from Unsplash, like the image we will use in this example: https://packt.live/3dMzzrI.
(Photo by Nadia Valko on Unsplash: https://unsplash.com/s/photos/coffee-beans?utm_source=unsplash&utm_medium=referral&utm_content=creditCopyText)
- Replace the contents of the App component with the functional component below. This will set up our base UI, which we will refine through hooks later:
import React from "react";
import "./App.css";
const App = () => {
const url = "https://images.unsplash.com/photo-1562051036-e0eea191d42f";
return (
<div className="App">
<img src={url} alt="Some coffee beans" />
<br />
<button>Toggle Image Display</button>
</div>
);
};
export default App;
This should give us our starting component UI, matching the following screenshot:
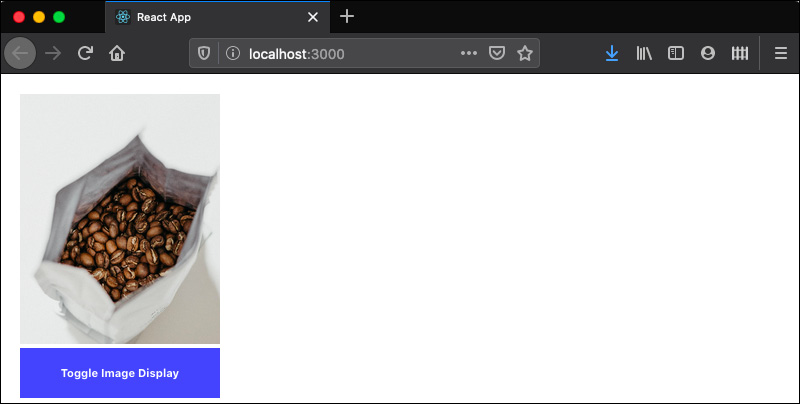
Figure 11.1: Toggle button
Let's expand this functional component a little more by making the image display toggleable and dependent on a displayImage Boolean value.
- First, add the displayImage Boolean with a default value, false, and then change the JSX containing the <img> tag to be conditionally rendered when displayImage is true:
const App = () => {
const url = "https://images.unsplash.com/photo-1562051036-e0eea191d42f";
const displayImage = false;
return (
<div className="App">
{displayImage && <img src={url} alt="Some coffee beans" />}
<br />
<button>Toggle Image Display</button>
</div>
);
};
We are now ready to start adding React Hooks to this component. We will add a new line to the component that calls React.useState, pass in an initial value, false, and de-structure the result of that call into two new variables: displayImage and setState.
- Use the following code
const [displayImage, setState] = React.useState(false);
Note that we are not using setState yet; we will be doing that soon. When your browser refreshes, you should no longer see the image on your component.
- Next, we will need to implement a function that will toggle the displayImage flag via our setState function:
const toggleImage = () => setState(!displayImage);
- Finally, hook it up by adding the toggleImage call to the button's onClick handler:
<button onClick={toggleImage}>Toggle Image Display</button>
Our final component code in src/App.js should now be the following:
App.js
1 import React from "react";
2 import "./App.css";
3
4 const App = () => {
5 const url = "https://images.unsplash.com/photo-1562051036-e0eea191d42f";
6 const [displayImage, setState] = React.useState(false);
7 const toggleImage = () => setState(!displayImage);
8 return (
The complete code can be found at: https://packt.live/2N9GEYi.
The output is as follows:

Figure 11.2: Final output of the Toggle button
Now, what would previously have been a complex abstraction has been reduced to only a function call. We don't need a complex constructor, multiple additional state modifying functions, or any other additional logic. It is close to our view layer; the order reads from top to bottom, which makes it super readable. Our JSX remained the same and no more wrappers got injected into the React tree. Similar to how we moved state modification away from class components, let's now see how we can move away from life cycle methods used in class components and use the useEffect hook instead.
useEffect – from Life Cycle Methods to Effect Hooks
Hooks not only encompass new syntax in React but also require a different design pattern when it comes to developing the functional components in a React application. During the development cycle of a React application, components are continuously created, modified, and destroyed. Developers might want to use these events to call an API to modify the DOM elements, or maybe keep a log of information to display in the console.
As we've discussed previously, class components have life cycle methods to do this. If we wanted to do something like modifying the DOM or fetch some data by initiating a network request, we would use the life cycle methods, componentDidMount, componentDidUpdate, or componentWillUnmount. These life cycle events are tied to the insertion, updating, and removal of a given component. If you want to attach an event listener to a button in a form component, you could do that in componentDidMount. If you eventually need to remove it, you will use the componentWillUnmount method.
Other frameworks, such as Vue.js or Angular, have the concept of using life cycle methods as event callbacks. They provide callbacks to create a way to respond to events such as mouse clicks or mouse scrolls. However, with Hooks, there is a massive fundamental shift in the usual mental model. Instead of putting the code separately in each life cycle method, we group our logic and put it together into a functional hook called Effects.
Let's look at an example. We will create a class component, Comp, within which we will display our name prop when the component updates on mount. We will do this by implementing the life cycle methods, componentDidUpate and componentDidMount, as mentioned in Chapter 4, React Lifecycle Methods, as follows:
class Comp extends React.Component {
componentDidMount(){
console.log(this.props.name);
}
componentDidUpdate(prevProps){
if(prevProps.name !== this.props.name) {
console.log(this.props.name);
}
}
render() {
return <div>{this.props.name}</div>;
}
}
If we want to capture similar functionality in a functional component as provided by these life cycle methods in a class component, we will need to use the useEffect hook. With the useEffect hook, we are going to take a different approach in terms of syntax. We will rewrite the Comp component, where we will create the logic first and will control when to run it like the following code:
const Comp = props => {
React.useEffect(() => {
console.log("name prop changed");
}, [props.name]);
return <div>{props.name}</div>;
}
As you can see from the preceding code, the useEffect hook takes two arguments:
- the first is the function that will be used to handle the effect.
- the other argument is an array of variables which will be used to determine whether we should call the function we passed in as the first argument.
In the preceding example, we have a React Effect we want to use, but we only want it to be executed when the name attribute in props gets updated, so we pass in [props.name] as our second argument. This effect (the first callback argument) will rerun only if the name prop changes. The logic is now encapsulated.
In a useEffect hook, the first argument is always a function where we put what we want to do (what we would have put into our life cycles for class-based components), and the second is an array of values. In that array, we set out our conditions when to perform effects. We don't need to rely on updates, mounts, and removals; we can create our own conditions. We can add multiple values to that array, which means that React will run that effect any time any of these values change. We can also leave this empty; in that case, the effect only runs on mount. We can also omit that array entirely in which case it will run every time the component re-renders.
The biggest difference between life cycle methods and useEffect is that with life cycle methods, you must think about which event is the right event to listen to and implement the correct logic for each. With useEffect, we think about the logic first and then control when to run it.
This has a few implications in terms of the readability of our code. For one, life cycle methods can be cluttered. If we have multiple things to do (such as logging the output and a network request), they will live inside the same function; they cannot be extracted.
In the following code, we are creating a class component, Comp, where we will perform multiple different actions when the component updates; the name prop will be displayed in the console and a network request will be initiated:
class Comp extends React.Component {
componentDidMount(){
console.log(this.props.name)
}
componentDidUpdate(prevProps){
// this is one piece of logic
if(prevProps.name !== this.props.name) {
console.log(this.props.name);
}
// this is another
fetch('https://jsonplaceholder.typicode.com/todos/1');
}
}
In the preceding example, the fetch method used to initiate a network request has no connection with the console.log function, yet it still lives inside the same componentDidUpdate life cycle method in a class-based component.
useEffect focuses on the logic and allows you to couple logic with specific properties or attributes. This allows us to create one effect for the console and a different one for a network request, and we can control when they are called. This provides a cleaner and more elegant approach to writing different effects for different use cases.
Using useEffect hooks, we would rewrite the Comp component to look more like this:
const Comp = props => {
React.useEffect(() => {
console.log("name prop changed");
}, [props.name]);
React.useEffect(() => {
fetch('https://jsonplaceholder.typicode.com/todos/1');
}, [props.name]);
return <div>{props.name}</div>;
}
Here, there are two separate hooks for the two different actions where the logic remains encapsulated. Our code is cleaner and the logic for each property is clear and easy to follow. Using this knowledge, let's build a component using useEffect.
Exercise 11.02: Creating a Login State Using useEffect
In this exercise, we will utilize useEffect to create a component where we simulate logging in (and remaining logged in even if we refresh the page) through a combination of hooks and localStorage.
Note
localStorage is a part of the HTML5 specifications. With the help of localStorage, we can write values to our browser that will be persistent across re-renders. This constitutes unique persistent storage for our domain. If you would like to know more about localStorage, you can visit MDN for more information: https://packt.live/2Z1eOEF).
For this exercise, it is recommended to have Chrome developer panels open on the Application page. For that, you only need to right-click on your web page, click on inspect, and, on the tabs starting with elements, find Application -> Storage -> Local Storage:
- Begin by creating a new React project, which we will call login-storage, start the project, and take a look at the browser window that should have opened for you automatically:
$ npx create-react-app login-storage
$ cd login-storage
$ yarn start
- Delete src/logo.svg.
- Replace the contents of src/App.css with the following:
body {
margin: 20px;
}
button {
width: 200px;
height: 50px;
background: #4444ff;
color: white;
font-weight: bold;
border: none;
cursor: pointer;
}
- We will begin by creating the base UI without any of the logic attached to it yet. This will help us to understand how the UI will function later. Right now, the UI will just have a block of text telling us whether we are logged in or not and a button to log in/log out:
import React from "react";
import "./App.css";
const App = () => {
return (
<div className="App">
<p>Logged Out</p>
<button>Log In</button>
</div>
);
};
export default App;
Our early UI should resemble the following screenshot:

Figure 11.3: Component logged out
Now, we can incorporate the logic based on React Hooks.
- Begin by using React.useState again to declare our initial state and store the results in loggedIn and setLoggedIn, respectively:
let [loggedIn, setLoggedIn] = React.useState(false);
- Add some conditional logic to display Welcome Back if the user is logged in, or Logged Out if the user is logged out:
<p>{loggedIn ? "Welcome Back!" : "Logged Out"}</p>
- Add a login condition to the button as well. There should be an onClick event handler that calls the setLoggedIn function and toggles the login state, while the text of the button should also be conditional based on whether the user is logged in:
<button onClick={() => setLoggedIn(!loggedIn)}>
{loggedIn ? "Log Out" : "Log In"}
</button>
- Now, we need to save the logged-in state to localStorage. We will use the localStorage.setItem(key, value) function to set a string key in the browser's local storage. This will allow the value of loggedIn to persist even if the browser refreshes. We want to store the loggedIn variable to localStorage. That would look something like this:
localStorage.setItem("loggedIn", loggedIn);
- Use the preceding code to write our useEffect hook, which we only want to trigger when the loggedIn value is changed:
React.useEffect(() => {
localStorage.setItem("loggedIn", loggedIn);
}, [loggedIn]);
The full component we have built so far should be the following:
import React from "react";
import "./App.css";
const App = () => {
let [loggedIn, setLoggedIn] = React.useState(false);
React.useEffect(() => {
localStorage.setItem("loggedIn", loggedIn);
}, [loggedIn]);
return (
<div className="App">
<p>{loggedIn ? "Welcome Back!" : "Logged Out"}</p>
<button onClick={() => setLoggedIn(!loggedIn)}>
{loggedIn ? "Log Out" : "Log In"}
</button>
</div>
);
};
export default App;
- Next, use your browser's development tools to see what values are getting stored in localStorage and the output is as follows:
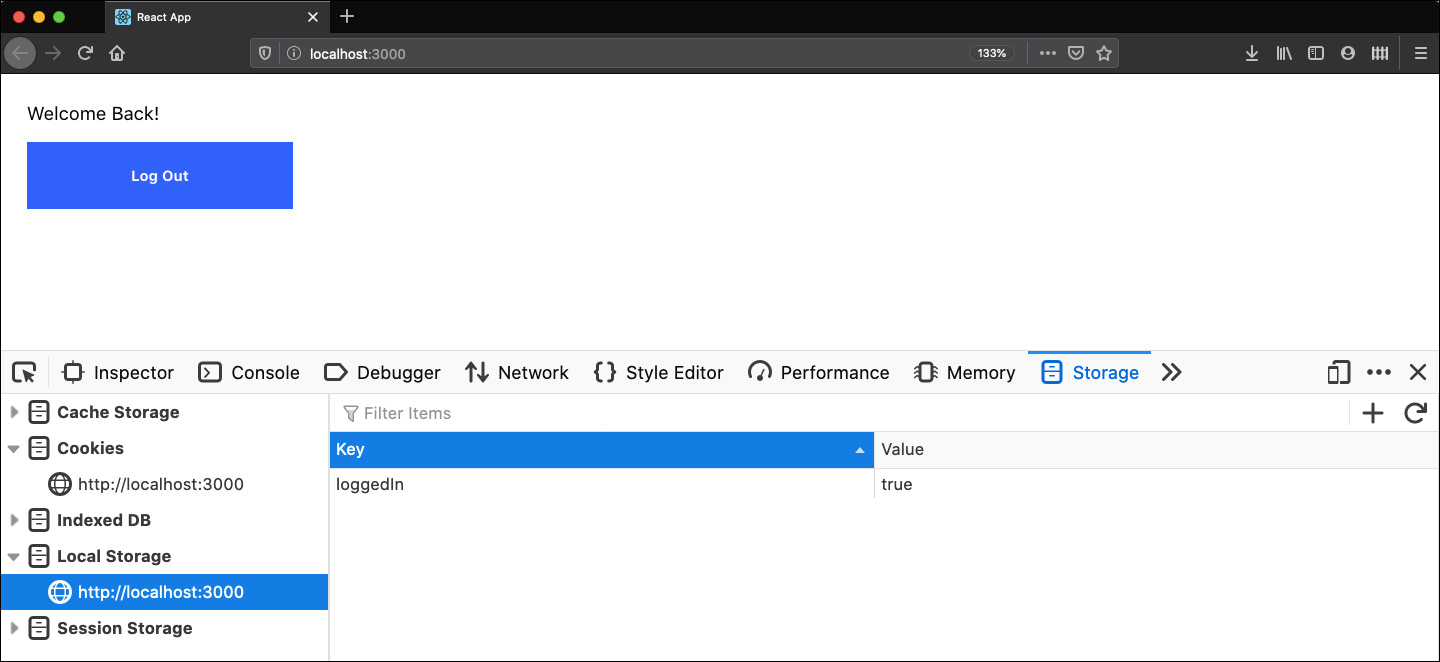
Figure 11.4: Opening browser development tools to see localStorage
When the app starts or we refresh the page, our program is not picking up the value from localStorage. Let's apply the same logic we used before.
- Apply the same logic we used before and we will grab the value from localStorage with the help of the getItem function. It takes one argument: the identifier (or key) of the value. We could get the value out using the following code:
const loggedInFromLocalStorage = localStorage.getItem("loggedIn");
if (JSON.parse(loggedInFromLocalStorage) === true) {
setLoggedIn(true);
}
This returns a string, so we need to use JSON.parse to parse it to a boolean. If that is true, we set the state to true as if we clicked on the Log-n button. Let's place this in our code in a useEffect hook. We want to run this code on mount, so it runs once, and automatically return the value in the console if it is true.
- Specify an empty array as the values to watch on the useEffect call to have our hook only affect when our component is mounted:
React.useEffect(() => {
const loggedInFromLocalStorage = localStorage.getItem("loggedIn");
if (JSON.parse(loggedInFromLocalStorage) === true) {
setLoggedIn(true);
}
}, []);
The complete code for our component is as follows:
App.js
1 import React from "react";
2 import "./App.css";
3
4 const App = () => {
5 let [loggedIn, setLoggedIn] = React.useState(false);
6 React.useEffect(() => {
7 const loggedInFromLocalStorage = localStorage.getItem("loggedIn");
8
9 if (JSON.parse(loggedInFromLocalStorage) === true) {
10 setLoggedIn(true);
11 }
12 }, []);
The complete code can be found here: https://packt.live/2y5Crky.
The output will be as follows:
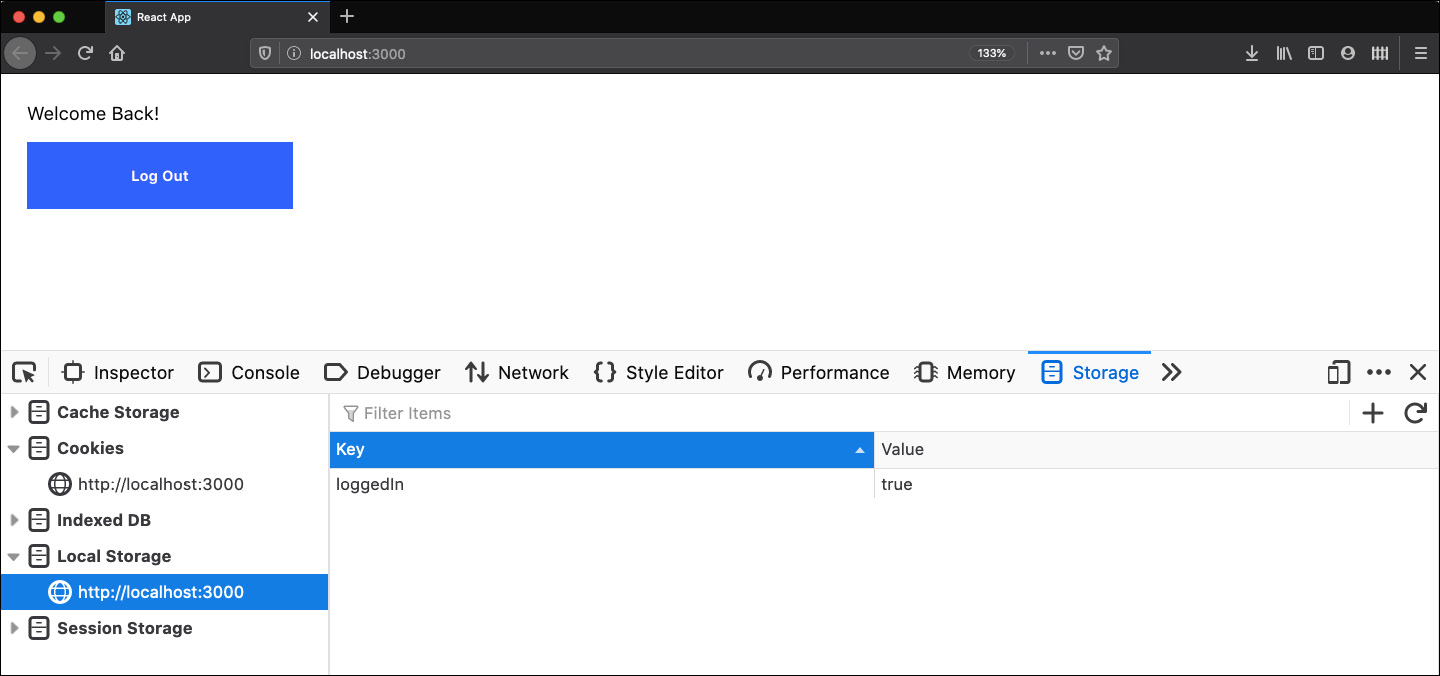
Even if we refresh our page, we are still logged in. Try it for yourself to verify whether it is working in the way you expect.
Comparing useEffect Hooks with Life Cycle Methods
After seeing how we can be more precise in our code using effects compared to life cycles, let's have a brief overview, through a diagram, to see how the life cycle methods in the class components work, as shown in the following:
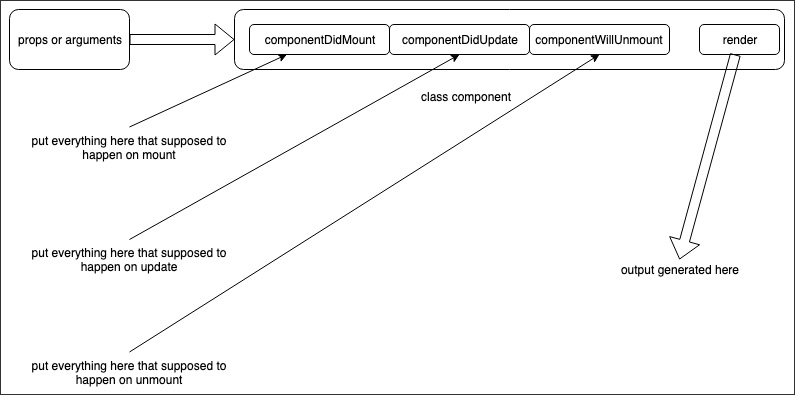
Figure 11.6: Life cycle methods
In classes, you have life cycle methods that tap into some state of that component. The problem with that model is that you may actually need to break each event into multiple different unrelated functions. For example, say you want to attach an event listener and, to avoid memory leaks, you want to remove the listener when it is no longer needed. What you must do in a class-based component is to attach it in componentDidMount and remove it in componentWillUnmount. This means that, now, both of those life cycle methods must track and have access to that listener. Instead of our code being grouped by context, it is grouped by life cycle methods.
Let's now see how Effect Hooks work by means of a diagram:
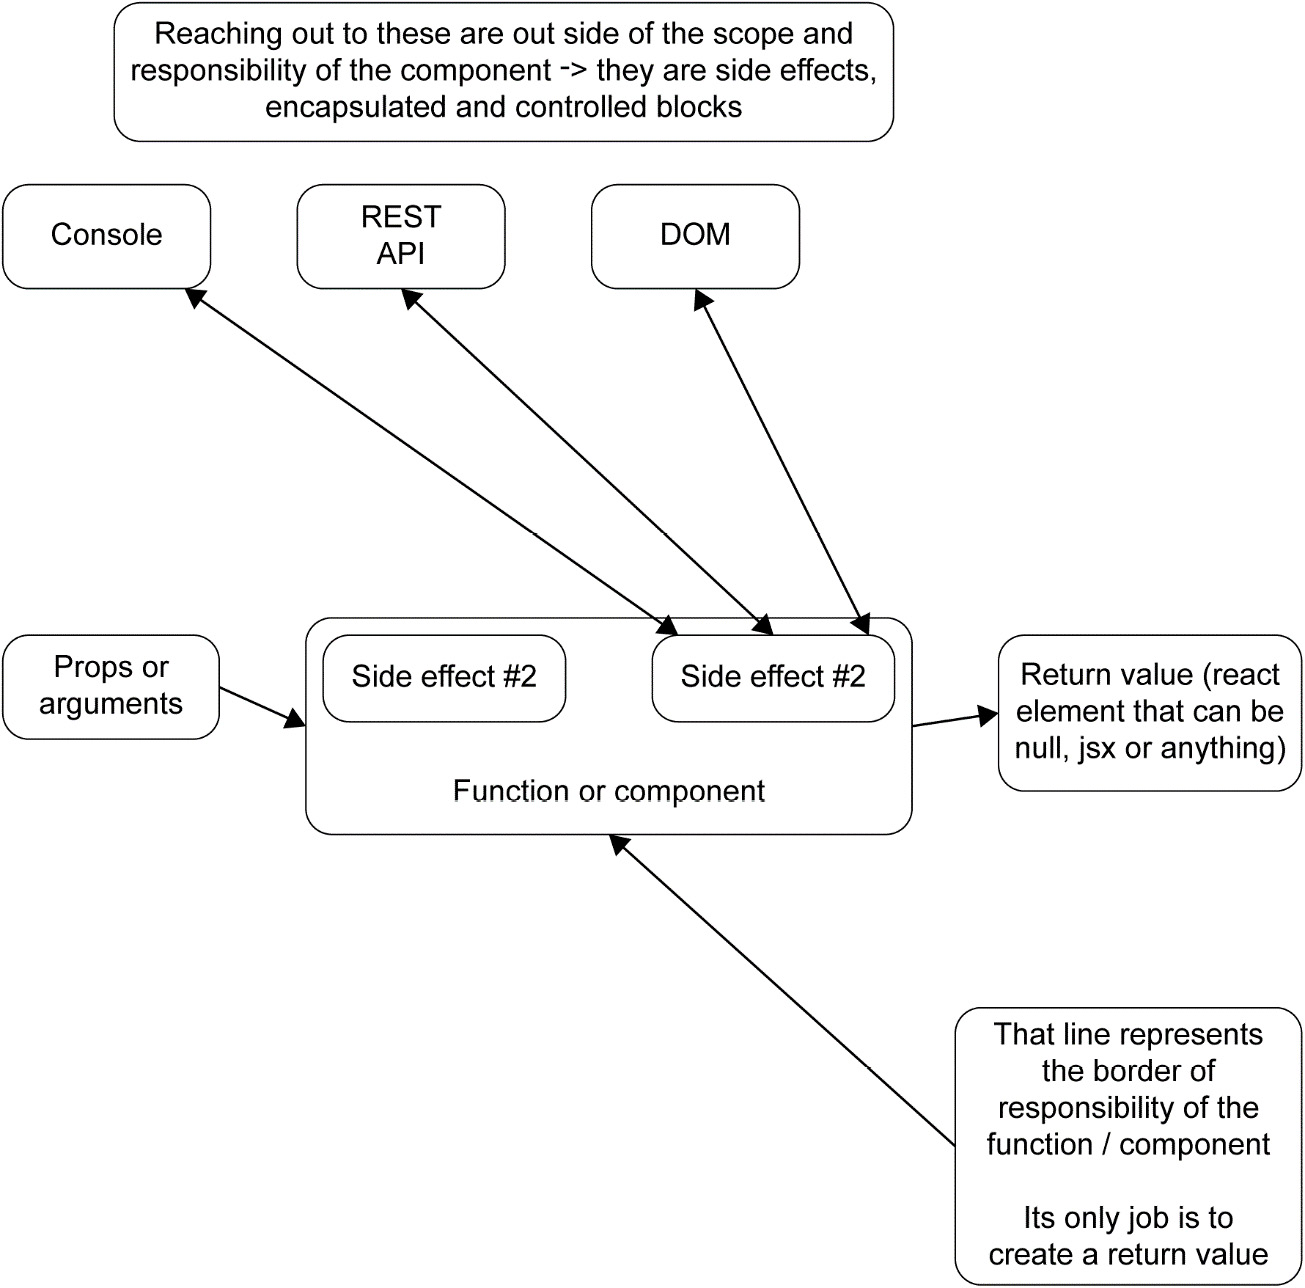
Figure 11.7: UseEffect hook
It is different with hooks. If we have an event listener, we put it to one useEffect. In that useEffect hook, we manage everything related to that specific context, and no unrelated code will live in that effect. If we need to do something unrelated, we instead create a separate effect for that. In the preceding diagram, we have two logical units and they are put into two separate effect hooks. With life cycle methods, they might have shared the same life cycle or life cycle methods depending on when they were required.
Comparing Hooks to Render Props
Now that we know how to apply these hooks, let's take a quick look at why such a paradigm shift was required. The idea behind introducing hooks was mainly to improve developer experience. At React Conf 2018, the React team tried to address three main points:
- Make smaller components where logic is easier to understand
- Make components more reusable
- Limit the use of class-based components as they are harder to optimize
After practicing some exercises on how to start using the useState and useEffect hooks with functional components, it might be a good idea to see how hooks actually simplify the design pattern.
To do so, let's take the final component of Exercise 11.01, Displaying an Image with the Toggle Button, which contains code where we built an app that loads and shows an image by pressing a button.
We had a component called <App/> that rendered an <img/> tag:
const App = () => {
const url = "https://images.unsplash.com/photo-1562051036-e0eea191d42f";
const [displayImage, setState] = React.useState(false);
const toggleImage = () => setState(!displayImage);
return (
<div className="App">
{displayImage && <img src={url} alt="Some coffee beans" />}
<br />
<button onClick={toggleImage}>Toggle Image Display</button>
</div>
);
};
We had a toggleImage function that hides the logic toggling the displayImage variable between true and false depending on whether you have a value inside it. We could further extract this out to its own function so that it is not bound to the <App /> component, and then we can throw it in any other functional component like so:
const useToggle = initialValue => {
const [value, setValue] = React.useState(initialValue);
const toggle = () => setValue(prevValue => !prevValue);
return [value, toggle];
};
The preceding code demonstrates what useToggle looks like. It's just a function that can be called in any functional React component. For example, using it back in our original App component, we would get code similar to the following:
const App = () => {
const url = "https://images.unsplash.com/photo-1562051036-e0eea191d42f";
const [displayImage, toggleState] = useToggle(false);
const toggleImage = () => toggleState(!displayImage);
return (
<div className="App">
{displayImage && <img src={url} alt="Some coffee beans" />}
<br />
<button onClick={toggleImage}>Toggle Image Display</button>
</div>
);
};
It's not dramatically different, and it's even easier to reuse the simple toggle function going forward. Now, it's time to put all of this together and work through this activity, building a reusable Counter component.
Activity 11.01: Creating a Reusable Counter
We will start by building our Counter component using render props and move the logic into Hooks over the course of this activity.
We will design a reusable click counter in this activity. We will remove the state (setState) first, convert it to a functional component, abstract the logic away, and control the component entirely through props. We should be able to set an initial number. Also, every time the value changes, it should be logged out. That function should be separate from the toggle logic.
The following steps will help you to execute this activity:
- First, set up a standard component that you'll use to display the Counter component. This is usually our App component.
- Next, you will want to set up the Counter component, which will just display the value for the counter.
- Then, set up the state for the counter variable and the helper functions to increment, decrement, and reset the counter.
- Set up a UI to increase, decrease, and reset the counter.
- Make sure you keep your UI (presentation or view) layer separate from the counter through the use of useState.
- Create a callback using the setter function on useState.
- Create a logging hook using useEffect hooks.
- Finally, make sure the counter hook is reusable by making it a custom hook called useCounter.
The final output should look like:
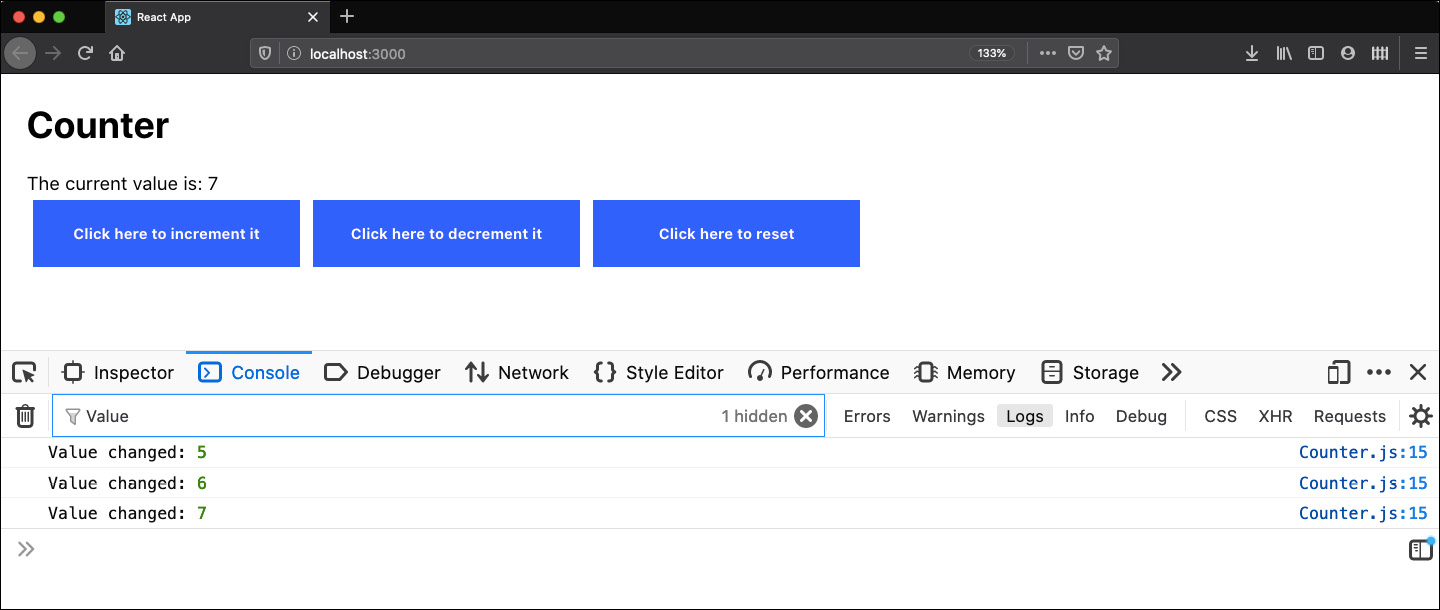
Figure 11. 8: Reusable Counter App
Note
The solution of this activity can be found on page 689
Summary
This chapter introduced us to why hooks are better in a lot of ways than prior methods. The activity demonstrated how much easier it is to create an app using Hooks, and how much simpler it is to read and reason about what it actually does.
Over the course of this chapter, we have seen how React Hooks can allow us to write cleaner, more manageable code as our applications expand in complexity. The introduction of hooks allows us to think outside of classes and, even more importantly, allows us to throw away complex mental models of state management passing through multiple separate parent and child components.
In the next chapters, we are going to concentrate on effects, how to further use hooks, what basic hooks React provides, and how we can put them together.