Chapter 9: Pushing Images to a Container Registry
In the previous chapter, we went through the very important concept of the container base image. As we saw, it is really important to choose the base image wisely for our containers, using official container images from trusted container registries and development communities.
But once we choose the preferred base image and then build our final container image, we need a way to further distribute our work to the various target hosts that we plan to let it run on.
The best option to distribute a container image is to push it to a container registry and after that, let all the target hosts pull the container image and run it.
For this reason, in this chapter, we're going to cover the following main topics:
- What is a container registry?
- Cloud-based and on-premise container registries
- Managing container images with Skopeo
- Running a local container registry
Technical requirements
Before proceeding with the chapter and its examples, a machine with a working Podman installation is required. As stated in Chapter 3, Running the First Container, all the examples in the book are executed on a Fedora 34 system or later but can be reproduced on your OS of choice.
A good understanding of the topics covered in Chapter 4, Managing Running Containers, and Chapter 8, Choosing the Container Base Image, is useful to easily grasp concepts regarding container registries.
What is a container registry?
A container registry is just a collection of container images' repositories, used in conjunction with systems that need to pull and run container images in a dynamic way.
The main features available on a container registry are the following:
- Repository management
- Pushing container images
- Tag management
- Pulling container images
- Authentication management
Let's look at every feature in detail in the following sections.
Repository management
One of the most important features of container registries is managing container images through repositories. Depending on the container registry implementation that we choose, we will be sure to find a web interface or a command-line interface that will let us handle the creation of a sort of folder that will act as a repository for our container images.
According to the Open Container Initiative (OCI) Distribution Specification [1], the container images are organized in a repository that is identified by name. A repository name is usually composed of a user/organization name and the container image name in this way: myorganization/mycontainerimage, and it must respect the following regular expression check:
[a-z0-9]+([._-][a-z0-9]+)*(/[a-z0-9]+([._-][a-z0-9]+)*)*
Important Definition
A regular expression (regex) is a search pattern defined by a sequence of characters. This pattern definition leverages several notations that let the user define in detail the target keyword, line, or multiple lines to find in a text document.
Once we've created a repository on our container registry, we should be able to start pushing, pulling, and handling different versions (identified by a label) of our container images.
Pushing container images
The act of pushing container images to a container registry is handled by the container tool that we are using, which respects the OCI Distribution Specification.
In this process, the blobs, which are the binary form of the content, are uploaded first and, usually at the end, the manifest is then uploaded. This order is not strict and mandatory by the specification, but a registry may refuse a manifest that references blobs that it does not know.
Using a container management tool to push a container image to a registry, we must specify again the name of the repository in the form shown before and the container image's tag we want to upload.
Tag management
As we introduced starting in Chapter 4, Managing Running Containers, the container images are identified by a name and a tag. Thanks to the tag mechanism, we can store several different versions of the container images on a system's local cache or on a container registry.
The container registry should be able to expose the feature of content discovery, providing the list of the container images' tags to the client requesting it. This feature can give the opportunity to the container registry's users to choose the right container image to pull and run to the target systems.
Pulling container images
In the process of pulling container images, the client should first request the manifest to know which blobs, which are the binary form of the content, to pull to get the final container image. The order is strict because without pulling and parsing the manifest file of the container image, the client would not be able to know which binary data it has to request from the registry.
Using a container management tool to pull a container image from a registry, we must specify again the name of the repository in the form shown before and the container image's tag we want to download.
Authentication management
All the previous operations may require authentication. In many cases, public container registries may allow anonymous pulling and content discovery but for pushing container images they require a valid authentication.
Depending on the container registry chosen, we might find basic or advanced features to authenticate to a container registry, let our client store a token, and then use it for every operation that could require it.
This ends up our brief deep dive into container registry theory. If you want to know more about the OCI Distribution Specification, you can investigate the URL [1] available at the end of this chapter in the Further reading section.
Nice to Know
The OCI Distribution Specification also defines a set of conformance tests that anyone could run against a container registry to check if that particular implementation respects all the rules defined in the specification: https://github.com/opencontainers/distribution-spec/tree/main/conformance.
The various implementations of a container registry available on the web, in addition to the basic functions we described before, also add more features that we will discover soon in the next section.
Cloud-based and on-premise container registries
As we introduced in the previous sections, the OCI defined a standard to adhere to for container registries. This initiative allowed the rise of many other container registries apart from the initial Docker Registry and its online service, Docker Hub.
We can group the available container registries into two main categories:
Let's see these two categories in detail in the following subsections.
On-premise container registries
On-premise container registries are often used for creating a private repository for enterprise purposes. The main use cases include the following:
- Distributing images in a private or isolated network
- Deploying a new container image at a large scale over several machines
- Keeping any sensitive data in our own data center
- Improving the speed of pulling and pushing images using an internal network
Of course, running an on-premise registry requires several skills to ensure availability, monitoring, logging, and security.
This is a non-comprehensive list of the available container registries that we can install on-premises:
- Docker Registry: Docker's project, which is currently at version 2, provides all the basic features described in the earlier sections and we will learn how to run it in the last section of this chapter, Running a local container registry.
- Harbor: This is a VMware open source project that provides high availability, image auditing, and integration with authentication systems.
- GitLab Container Registry: This is strongly integrated with the GitLab product, so it requires minimal setup, but it depends on the main project.
- JFrog Artifactory: This manages more than just containers; it provides management for any artifact.
- Quay: This is the open source distribution of the Red Hat product called Quay. This project offers a fully-featured web UI, a service for image vulnerability scanning, data storage, and protection.
We will not go into every detail of these container registries. What we can suggest for sure is to pay attention and choose the product or project that fits better with your use cases and support needs. Many of these products have support plans or enterprise editions (license required) that could easily save your skin in the event of a disaster.
Let's now see what the cloud-based container registries are that could make our life easier, offering a complete managed service, with which our operational skills could be reduced to zero.
Cloud-based container registries
As anticipated in the previous section, cloud-based container registries could be the fastest way to start working with container images through a registry.
As described in Chapter 8, Choosing the Container Base Image, there are several cloud-based container registry services on the web. We will concentrate only on a small subset, taking out of the analysis the ones provided by a public cloud provider and the ones offered by the Linux distribution, which usually are only available to pull images, preloaded by the distribution maintainers.
We will take a look at these cloud container registries:
- Docker Hub: This is a hosted registry solution by Docker Inc. This registry also hosts official repositories and security verified images for some popular open source projects.
- Quay: This is the hosted registry solution born under the CoreOS company, now part of Red Hat. It offers private and public repositories, automated scanning for security purposes, image builds, and integration with popular Git public repositories.
Docker Hub cloud registry
Docker Hub cloud registry was born together with the Docker project and it represented one of the greatest features added to this project and containers in general, the right attention they deserved.
Talking about features, Docker Hub has free and paid plans:
- Anonymous access: Only 100 image pulls in 6 hours.
- A registered user account with the free tier: 200 image pulls in 6 hours and unlimited public repositories. With the free tier we do not get builds or security scans.
- Pro, Team, and Business accounts: Thousands of image pulls per day, automated builds, security scans, RBAC, and so on.
As we just reported, if we try to log in with a registered user account with the free tier, we can only create public repositories. This could be enough for communities or individual developers, but once you start using it at the enterprise level, you may need the additional features provided by the paid plans.
To avoid a big limitation in terms of image pulls, we should at least use a registered user account and log in to the web portal and to the container registry with our beloved container engine: Podman. We will see in the following sections how to authenticate to a registry and ensure 200 image pulls every 6 hours using Docker Hub.
Red Hat Quay cloud registry
Quay cloud registry is the Red Hat on-premise registry but offered as Software-as-a-Service (SaaS).
Quay cloud registry, like Docker Hub, offers paid plans as well to unlock additional features.
But the nice news is that Quay's free tier has a lot of features included:
- Build from a Dockerfile, manually uploaded or even linked through GitHub/Bitbucket/Gitlab or any Git repository.
- Security scans for images pushed on the registry.
- Usage/auditing logs.
- Robot user account/tokens for integrating any external software.
- There is no limit on image pulls.
On the other hand, the paid plans will unlock private repositories and team-based permissions.
Let's look at the Quay cloud registry by creating a public repository and linking it to a GitHub repository in which we pushed a Dockerfile to build our target container image:
- First, we need to register or log in to the Quay portal at https://quay.io.
After that, we can click on the + Create New Repository button in the upper-right corner:

Figure 9.1 – Quay Create New Repository button
- Once done, the web portal will request some basic information about the new repository we want to create:
- A name
- A description
- Public or private (we are using a free account, so public is fine)
- How to initialize the repository:

Figure 9.2 – Create New Repository page
We just defined a name for our repo, ubi8-httpd, and we chose to link this repository to a GitHub repository push.
- Once confirmed, the Quay registry cloud portal will redirect us to GitHub to allow the authorization and then it will ask us to select the right organization and GitHub repository to link with:
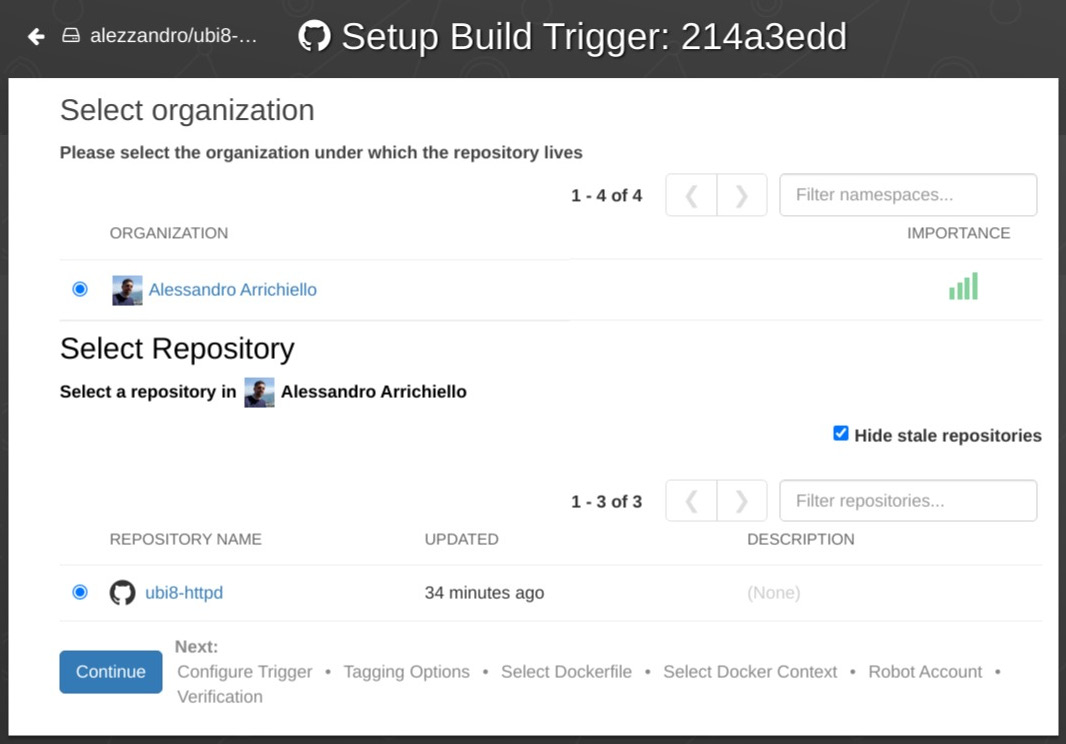
Figure 9.3 – Select the GitHub repository to link with our container repo
We just selected the default organization and the Git repository we created holding our Dockerfile. The Git repository is named ubi8-httpd and it is available here: https://github.com/alezzandro/ubi8-httpd.
Important Note
The repository used in this example belongs to the author's own project. You can fork the repository on GitHub and make your own copy with read/write permissions in order to be able to make changes and experiment with commits and automated builds.
- Finally, it will ask us to further configure the trigger:

Figure 9.4 – Build trigger customization
We just left the default option, which will trigger a new build every time a push is made on the Git repository for any branches and tags.

Figure 9.5 – Main repository page
Once created, the repository is empty with no information or activity, of course.
- On the left bar, we can easily access the build section. It's the fourth icon starting from the top. In the following figure, we just executed two pushes on our Git repository, which triggered two different builds:

Figure 9.6 – Container image build section

Figure 9.7 – Container image build details
As we can see, the build worked as expected, connecting to the GitHub repository, downloading the Dockerfile and executing the build, and finally, pushing the image to the container registry, all in an automated way. The Dockerfile contains just a few commands for installing an httpd server on a UBI8 base image, as we learned in Chapter 8, Choosing the Container Base Image.
- Finally, the last section that is worth mentioning is the included security scanning functionality. This feature is accessible by clicking the Tag icon, the second from the top in the left panel:

Figure 9.8 – Container image tags page
As you will notice, there is a SECURITY SCAN column (the third) reporting the status of the scan executed on that particular container image associated with the tag name reported in the first column. By clicking on the value of that column (in the previous screenshot, it is Passed), we can obtain further details.
We just got some experience leveraging a container registry offered as a managed service. This could make our life easier, reducing our operational skills, but they are not always the best option for our projects or companies.
In the next section, we will explore more in detail how to manage container images with Podman's companion Skopeo, and then we'll learn how to configure and run a container registry on-premises.
Managing container images with Skopeo
So far, we have learned about many container registry concepts, including the differences between private and public registries, their compliance with OCI image specifications, and how to consume images with Podman and Buildah to build and run containers.
However, sometimes we need to implement simple image manipulation tasks such as moving an image from a registry to a mirror, inspecting a remote image without the need to pull it locally, or even signing images.
The community that gave birth to Podman and Buildah developed a third amazing tool, Skopeo (https://github.com/containers/skopeo), which exactly implements the features described previously.
Skopeo was designed as an image and registry manipulation tool for DevOps teams and is not intended to run containers (the main role of Podman) nor build OCI images (the main role of Buildah). Instead, it offers a minimal and straightforward command-line interface with basic image manipulation commands that will prove to be extremely useful in different contexts.
Let's inspect the most interesting features in the next subsections.
Installing Skopeo
Skopeo is a Go binary tool that is already packaged and available for many distributions. It can also be built and installed from source directly.
This section provides a non-exhaustive list of installation examples on the major distributions. For the sake of clarity, it is important to reiterate that the book lab environments were all based on Fedora 34:
- Fedora: To install Skopeo on Fedora, run the following dnf command:
$ sudo dnf -y install skopeo
- Debian: To install Skopeo on Debian Bullseye, Testing and Unstable (Sid), run the following apt-get commands:
$ sudo apt-get update
$ sudo apt-get -y install skopeo
- RHEL 8/9, CentOS 8 and CentOS Stream 8/9: To install Skopeo on RHEL, CentOS, and CentOS Stream, run the following dnf command:
$ sudo dnf -y install skopeo
- RHEL 7 and CentOS 7: To install Skopeo on earlier releases of RHEL and CentOS, run the following yum command:
$ sudo yum -y install skopeo
- Ubuntu: To install Skopeo on Ubuntu 20.10 and newer, run the following command:
$ sudo apt-get -y update
$ sudo apt-get -y install skopeo
- Arch Linux: To install Skopeo on Arch Linux, run the following pacman command:
$ sudo pacman –S skopeo
- openSUSE: To install Skopeo on openSUSE, run the following zypper command:
$ sudo zypper install skopeo
- macOS: To install Skopeo on macOS, run the following brew command:
$ brew install skopeo
- Building from source: Skopeo can also be built from source. As for Buildah, for the purposes of this book, we will keep the focus on simple deployment methods but if you're curious, you can find a dedicated install section in the main project repository that illustrates how to build Skopeo from source: https://github.com/containers/skopeo/blob/main/install.md#building-from-source.
The preceding link shows examples of containerized and non-containerized builds.
- Running Skopeo in a container: Skopeo is also released as a container image that can be executed with Podman. To pull and run the latest version of Skopeo as a container, use the following podman command:
$ podman run quay.io/skopeo/stable:latest <command> <options>
- Windows: At the time of writing of this book, there is no build available for Microsoft Windows.
Skopeo uses the same system and local configuration files described for Podman and Buildah, therefore we can immediately focus on the installation verification and the analysis of the most common use cases.
Verifying the installation
To verify the correct installation, simply run the skopeo command with the -h or --help option to view all available commands, as in the following example:
$ skopeo -h
The expected output will show, among the utility options, all the available commands, each one with a description of the command scope. The full list of commands is as follows:
- copy: Copy an image across locations, using different transports, such as the Docker Registry, local directories, OCI, tarballs, OSTree, and OCI archives.
- delete: Delete an image from a target location.
- help: Print help commands.
- inspect: Inspect the metadata, tags, and configuration of an image in a target location.
- list-tags: Shows the available tags for a specific image repository.
- login: Authenticates to a remote registry.
- logout: Log out from a remote registry.
- manifest-digest: Produce a manifest digest for a file.
- standalone-sign: A debugging tool to publish and sign an image using local files.
- standalone-verify: Verify an image signature using local files.
- sync: Synchronizes one or more images across locations.
Let's now inspect in greater detail some of the most interesting Skopeo commands.
Copying images across locations
Podman, just like Docker, can be used not only to run containers but also to pull images locally and push them to other locations. However, one of the main caveats is the need to run two commands, one to pull and one to push, while the local image store remains filled with the pulled images. Therefore, users should periodically clean up the local store.
Skopeo offers a smarter and simpler way to achieve this goal with the skopeo copy command. The command implements the following syntax:
skopeo copy [command options] SOURCE-IMAGE DESTINATION-IMAGE
In this generic description, SOURCE-IMAGE and DESTINATION-IMAGE are images belonging to local or remote locations and reachable using one of the following transports:
- docker://docker-reference: This transport is related to images stored in registries implementing the Docker Registry HTTP API V2.
This setting uses the /etc/containers/registries.conf or $HOME/.config/containers/registries.conf file to obtain further registry configurations.
The docker-reference field follows the format name[:tag|@digest].
- containers-storage:[[storage-specifier]]{image-id|docker-reference[@image-id]}: This setting refers to an image in local container storage.
The storage-specifier field is in the format [[driver@]root[+run-root][:options]].
- dir:path: This setting refers to an existing local directory that holds manifests, layers (in tarball format), and signatures.
- docker-archive:path[:{docker-reference|@source-index}]: This setting refers to a Docker archive obtained with the docker save or podman save commands.
- docker-daemon:docker-reference|algo:digest: This setting refers to image storage in the Docker daemon's internal storage.
- oci:path[:tag]: This setting refers to an image stored in a local path compliant with the OCI layout specifications.
- oci-archive:path[:tag]: This setting refers to an OCI layout specification compliant image stored in tarball format.
- ostree:docker-reference[@/absolute/repo/path]: This setting refers to an image stored in a local ostree repository. OSTree is a tool to manage multiple versioned filesystem trees. It allows you to manage operating systems in an atomic and immutable way. Check out man ostree for more details.
Let's inspect some usage examples of the skopeo copy command in real-world scenarios. The first example shows how to copy an image from a remote registry to another remote registry:
$ skopeo copy
docker://docker.io/library/nginx:latest
docker://private-registry.example.com/lab/nginx:latest
The preceding example does not take care of registry authentication, which is usually a requirement to push images to the remote repository. In the next example, we show a variant where both source and target registry are decorated with authentication options:
$ skopeo copy
--src-creds USERNAME:PASSWORD
--dest-creds USERNAME:PASSWORD
docker://registry1.example.com/mirror/nginx:latest
docker://registry2.example.com/lab/nginx:latest
The previous approach, despite working perfectly, has the limitation of passing username and password strings as clear text strings. To avoid this, we can use the skopeo login command to authenticate to our registries before running skopeo copy.
The third example shows a pre-authentication to the destination registry, assuming that the source registry is publicly accessible for pulls:
$ skopeo login private-registry.example.com
$ skopeo copy
docker://docker.io/library/nginx:latest
docker://private-registry.example.com/lab/nginx:latest
When we log in to the source/target registries, the system persists the registry-provided auth tokens in dedicated auth files that we can reuse later for further access.
By default, Skopeo looks at the ${XDG_RUNTIME_DIR}/containers/auth.json path, but we can provide a custom location for the auth file. For example, in case we used Docker container runtime before, we could find it in the path ${HOME}/.docker/config.json. This file contains a simple JSON object that holds, for every used registry, the token obtained upon authentication. The client (Podman, Skopeo, or Buildah) will use this token to directly access the registry.
The following example shows the usage of the auth file, provided with a custom path:
$ skopeo copy
--authfile ${HOME}/.docker/config.json
docker://docker.io/library/nginx:latest
docker://private-registry.example.com/lab/nginx:latest
Another common issue that can be encountered when working with a private registry is the lack of certificates signed by a known certification authority (CA) or the lack of HTTPS communication (which means that all traffic is completely unencrypted). If we consider these totally non-secure scenarios safe to trust in a lab environment, we can skip the TLS verification with the --dest-tls-verify and --src-tls-verify options, which accept a simple Boolean value.
The following example shows how to skip the TLS verification on the target registry:
$ skopeo copy
--authfile ${HOME}/.docker/config.json
--dest-tls-verify false
docker://docker.io/library/nginx:latest
docker://private-registry.example.com/lab/nginx:latest
So far, we've seen how to move images across public and private registries, but we can use Skopeo to move images to and from local stores easily. For example, we can use Skopeo as a highly specialized push/pull tool for images inside our build pipelines.
The next example shows how to push a locally built image to a public registry:
$ skopeo copy
--authfile ${HOME}/.docker/config.json
containers-storage:quay.io/<namespace>/python_httpd
docker://quay.io/<namespace>/python_httpd:latest
This is an amazing way to manage an image push with total control over the push/pull process and shows how the three tools – Podman, Buildah, and Skopeo – can fulfill specialized tasks in our DevOps environment, each one accomplishing the purpose it was designed for at its best.
Let's see another example, this time showing how to pull an image from a remote registry to an OCI-compliant local store:
$ skopeo copy
--authfile ${HOME}/.docker/config.json
docker://docker.io/library/nginx:latest
oci:/tmp/nginx
The output folder is compliant with the OCI image specifications and will have the following structure (blob hashes cut for layout reasons):
$ tree /tmp/nginx
/tmp/nginx/
├─ blobs
│ └─sha256
│ ├──21e0df283cd68384e5e8dff7e6be1774c86ea3110c1b1e932[...]
│ ├──44be98c0fab60b6cef9887dbad59e69139cab789304964a19[...]
│ ├──77700c52c9695053293be96f9cbcf42c91c5e097daa382933[...]
│ ├──81d15e9a49818539edb3116c72fbad1df1241088116a7363a[...]
│ ├──881ff011f1c9c14982afc6e95ae70c25e38809843bb7d42ab[...]
│ ├──d86da3a6c06fb46bc76d6dc7b591e87a73cb456c990d814fd[...]
│ ├──e5ae68f740265288a4888db98d2999a638fdcb6d725f42767[...]
│ └──ed835de16acd8f5821cf3f3ef77a66922510ee6349730d89a[...]
├─ index.json
└─ oci-layout
The files inside the blobs/sha256 folder include the image manifest (in JSON format) and the image layers, as compressed tarballs.
It's interesting to know that Podman can seamlessly run a container based on a local folder compliant with the OCI image specifications. The next example shows how to run an NGINX container from the previously downloaded image:
$ podman run -d oci:/tmp/nginx
Getting image source signatures
Copying blob e5ae68f74026 done
Copying blob 21e0df283cd6 done
Copying blob ed835de16acd done
Copying blob 881ff011f1c9 done
Copying blob 77700c52c969 done
Copying blob 44be98c0fab6 done
Copying config 81d15e9a49 done
Writing manifest to image destination
Storing signatures
90493fe89f024cfffda3f626acb5ba8735cadd827be6c26fa44971108e09b54f
Notice the oci: prefix before the image path, necessary to specify that the path provided is OCI compliant.
Besides, it is interesting to show that Podman copies and extracts the blobs inside its local store (under $HOME/.local/share/containers/storage for a rootless container like the one in the example).
After learning how to copy images with Skopeo, let's see how to inspect remote images without the need to pull them locally.
Inspecting remote images
Sometimes we need to verify the configurations, tags, or metadata of an image before pulling and executing it locally. For this purpose, Skopeo offers the useful skopeo inspect command to inspect images over supported transports.
The first example shows how to inspect the official NGINX image repository:
$ skopeo inspect docker://docker.io/library/nginx
The skopeo copy command creates a JSON-formatted output with the following fields:
- Name: The name of the image repository.
- Digest: The SHA256 calculated digest.
- RepoTags: The full list of available image tags in the repository. This list will be empty when inspecting local transports such as containers-storage: or oci: since they will be referred to as a single image.
- Created: The creation date of the repository or image.
- DockerVersion: The version of Docker used to create the image. This value is empty for images created with Podman, Buildah, or other tools.
- Labels: Additional labels applied to the image at build time.
- Architecture: The target system architecture the image was built for. This value is amd64 for x86-64 systems.
- Os: The target operating system the image was built for.
- Layers: The list of layers that compose the image, along with their SHA256 digest.
- Env: Additional environment variables defined in the image at build time.
The same considerations illustrated previously about authentication and TLS verification apply to the skopeo inspect command: it is possible to inspect images on a private registry upon authentication and skip the TLS verification. The next example shows this use case:
$ skopeo inspect
--authfile ${HOME}/.docker/config.json
--tls-verify false
registry.example.com/library/test-image
Inspecting local images is possible by passing the correct transport. The next example shows how to inspect a local OCI image:
$ skopeo inspect oci:/tmp/custom_image
The output of this command will have an empty RepoTags field.
In addition, it is possible to use the --no-tags option to intentionally skip the repository tags, like in the following example:
$ skopeo inspect --no-tags docker://docker.io/library/nginx
On the other hand, if we need to print only the available repository tags, we can use the skopeo list-tags command. The next example prints all the available tags of the official Nginx repository:
$ skopeo list-tags docker://docker.io/library/nginx
The third use case we are going to analyze is the synchronization of images across registries and local stores.
Synchronizing registries and local directories
When working with disconnected environments, a quite common scenario is the need to synchronize repositories from a remote registry locally.
To serve this purpose, Skopeo introduced the skopeo sync command, which helps synchronize content between a source and destination, supporting different transport kinds.
We can use this command to synchronize a whole repository, with all the available tags inside it, between a source and a destination. Alternatively, it is possible to synchronize only a specific image tag.
The first example shows how to synchronize the official busybox repository from a private registry to the local filesystem. This command pulls all the tags contained in the remote repository to the local destination (the target directory must already exist):
$ mkdir /tmp/images
$ skopeo sync
--src docker --dest dir
registry.example.com/lab/busybox /tmp/images
Notice the use of the --src and --dest options to define the kind of transport. Supported transport types are as follows:
- Source: docker, dir, and yaml (covered later in this section)
- Destination: docker and dir
By default, Skopeo syncs the repository content to the destination without the whole image source path. This could represent a limitation when we need to sync repositories with the same name from multiple sources. To solve this limitation, we can add the --scoped option and get the full image source path copied in the destination tree.
The second example shows a scoped synchronization of the busybox repository:
$ skopeo sync
--src docker --dest dir --scoped
registry.example.com/lab/busybox /tmp/images
The resulting path in the destination directory will contain the registry name and the related namespace, with a new folder named after the image tag.
The next example shows the directory structure of the destination after a successful synchronization:
ls -A1 /tmp/images/docker.io/library/
busybox:1
busybox:1.21.0-ubuntu
busybox:1.21-ubuntu
busybox:1.23
busybox:1.23.2
busybox:1-glibc
busybox:1-musl
busybox:1-ubuntu
busybox:1-uclibc
[...omitted output...]
If we need to synchronize only a specific image tag, it is possible to specify the tag name in the source argument, like in this third example:
$ skopeo sync --src docker --dest dir docker.io/library/busybox:latest /tmp/images
We can directly synchronize two registries using Docker both for the source and destination transport. This is especially useful in disconnected environments where systems are allowed to reach a local registry only. The local registry can mirror repositories from other public or private registries and the task can be scheduled periodically to keep the mirror updated.
The next example shows how to synchronize the UBI8 image and all its tags from the public Red Hat repository to a local mirror registry:
$ skopeo sync
--src docker --dest docker
--dest-tls-verify=false
registry.access.redhat.com/ubi8
mirror-registry.example.com
The preceding command will mirror all the UBI8 image tags to the target registry.
Notice the --dest-tls-verify=false option to disable TLS certificate checks on the destination.
The skopeo sync command is great to mirror repositories and single images between locations but when it comes to mirroring full registries or a large set of repositories, we should run the command many times, passing different source arguments.
To avoid this limitation, the source transport can be defined as a YAML file to include an exhaustive list of registries, repositories, and images. It is also possible to use regular expressions to capture only selected subsets of image tags.
The following is an example of a custom YAML file that will be passed as a source argument to Skopeo:
Chapter09/example_sync.yaml
docker.io:
tls-verify: true
images:
alpine: []
nginx:
- "latest"
images-by-tag-regex:
httpd: ^2.4.[0-9]*-alpine$
quay.io:
tls-verify: true
images:
fedora/fedora:
- latest
registry.access.redhat.com:
tls-verify: true
images:
ubi8:
- "8.4"
- "8.5"
In the preceding example, different images and repositories are defined and therefore the file content deserves a detailed description.
The whole alpine repository is pulled from docker.io, along with the nginx:latest image tag. Also, a regular expression is used to define a pattern of tags for the httpd image, in order to pull Alpine-based image version 2.4.z only.
The file also defines a specific tag (latest) for the fedora image stored under https://quay.io/ and the 8.4 and 8.5 tags for the ubi8 image stored under the registry.access.redhat.com registry.
Once defined, the file is passed as an argument to Skopeo, along with the destination:
$ skopeo sync
--src yaml --dest dir
--scoped example_sync.yaml /tmp/images
All the contents listed in the example_sync.yaml file will be copied to the destination directory, following the previously mentioned filtering rules.
The next example shows a larger mirroring use case, applied to the OpenShift release images. The following openshift_sync.yaml file defines a regular expression to sync all the images for version 4.9.z of OpenShift built for the x86_64 architecture:
Chapter09/openshift_sync.yaml
quay.io:
tls-verify: true
images-by-tag-regex:
openshift-release-dev/ocp-release: ^4.9..*-x86_64$
We can use this file to mirror a whole minor release of OpenShift to an internal registry accessible from disconnected environments and use this mirror to successfully conduct an air-gapped installation of OpenShift Container Platform. The next command example shows this use case:
$ skopeo sync
--src yaml --dest docker
--dest-tls-verify=false
--src-authfile pull_secret.json
openshift_sync.yaml mirror-registry.example.com:5000
It is worth noticing the usage of a pull secret file, passed with the --src-authfile option, to authenticate on the Quay public registry and pull images from the ocp-release repository.
There is a final Skopeo feature that captures our interest: the remote deletion of images, covered in the next subsection.
Deleting images
A registry can be imagined as a specialized object store that implements a set of HTTP APIs to manipulate its content and push/pull objects in the form of image layers and metadata.
The Docker Registry v2 protocol is a standard API specification that is widely adopted among many registry projects. This set of API specifications covers all the registry functions that are expected to be exposed to an external client through standard HTTP GET, PUT, DELETE, POST, and PATCH methods.
This means that we could interact with a registry with any kind of HTTP client capable of managing the requests correctly, for example, the curl command.
Any container engine uses, at a lower level, HTTP client libraries to execute the various methods against the registry (for example, for an image pull).
The Docker v2 protocol also supports the remote deletion of images, and any registry that implements this protocol supports the following DELETE request for images:
DELETE /v2/<name>/manifests/<reference>
The following example represents a theoretical delete command issued with the curl command against a local registry:
$ curl -v --silent
-H "Accept: application/vnd.docker.distribution.manifest.v2+json"
-X DELETE http://127.0.0.1:5000/v2/<name>/manifests/sha256:<image_tag_digest>
The preceding example intentionally avoids including the management of authorization tokens for readability.
Podman or Docker, designed to work as registry engines, do not implement a remote delete feature in their command interfaces.
Fortunately, Skopeo comes to the rescue with its built-in skopeo delete command to manage remote image deletion with a simple and user-friendly syntax.
The following example deletes an image on a hypothetical internal mirror-registry.example.com:5000 registry:
$ skopeo delete
docker://mirror-registry.example.com:5000/foo:bar
The command immediately deletes the image tag references in the remote registry.
Important Note
When deleting images with Skopeo, it is necessary to enable image deletion in the remote registry, as covered in the next section, Running a local container registry.
In this section, we have learned how to use Skopeo to copy, delete, inspect, and sync images or even whole repositories across different transports, including private local registries, gaining control over daily image manipulation operations.
In the next section, we will learn how to run and configure a local container registry to directly manage image storage in our lab or development environments.
Running a local container registry
Most companies and organizations adopt enterprise-grade registries to rely on secure and resilient solutions for their container image storage. Most enterprise registries also offer advanced features such as role-based access control (RBAC), an image vulnerability scanner, mirroring, geo-replication, and high availability, becoming the default choice for production and mission-critical environments.
However, sometimes it is very useful to run a simple local registry, for example, in development environments or training labs. Local registries can also be helpful in disconnected environments to mirror main public or private registries.
This section aims to illustrate how to run a simple local registry and how to apply basic configuration settings.
Running a containerized registry
Like every application, a local registry can be installed on the host by its administrators. Alternatively, a commonly preferred approach is to run the registry itself inside a container.
The most used containerized registry solution is based on the official Docker Registry 2.0 image, which offers all the necessary functionalities for a basic registry and is very easy to use.
When running a local registry, containerized or not, we must define a destination directory to host all image layers and metadata. The next example shows the first execution of a containerized registry, with the /var/lib/registry folder created and bind-mounted to hold image data:
# mkdir /var/lib/registry
# podman run -d
--name local_registry
-p 5000:5000
-v /var/lib/registry:/var/lib/registry:z
--restart=always registry:2
The registry will be reachable at the host address on port 5000/tcp, which is also the default port for this service. If we run the registry on our local workstation, it will be reachable at localhost:5000, and exposed to the external connection using the assigned IP address or its Fully Qualified Domain Name (FQDN) if the workstation/laptop is resolved by a local DNS service.
For, example, if a host has the IP address 10.10.2.30 and FQDN registry.example.com correctly resolved by DNS queries, the registry service will be reachable at 10.10.2.30:5000 or at registry.example.com:5000.
Important Note
If the host runs a local firewall service or is behind a corporate firewall, do not forget to open the correct ports to expose the registry externally.
We can try to build and push a test image to the new registry. The following Containerfile builds a basic UBI-based httpd server:
Chapter09/local_registry/minimal_httpd/Containerfile
FROM registry.access.redhat.com/ubi8:latest
RUN dnf install -y httpd && dnf clean all -y
COPY index.html /var/www/html
RUN dnf install -y git && dnf clean all -y
CMD ["/usr/sbin/httpd", "-DFOREGROUND"]
We can build the new image with Buildah:
$ buildah build -t minimal_httpd .
To push the image to the local registry, we can use Podman or its companion tools Buildah or Skopeo. Skopeo is very handy for these use cases since we do not even need to scope the image name with the registry name.
The next command shows how to push the new image on the registry:
$ skopeo copy --dest-tls-verify=false
containers-storage:localhost/minimal_httpd
docker://localhost:5000/minimal_httpd
Notice the use of --dest-tls-verify=false: it was necessary since the local registry provides an HTTP transport by default.
Despite being simple to implement, the default registry configuration has some limitations that must be addressed. To illustrate one of those limitations, let's try to delete the just uploaded image:
$ skopeo delete
--tls-verify=false
docker://localhost:5000/minimal_httpd
FATA[0000] Failed to delete /v2/minimal_httpd/manifests/sha256:f8c0c374cf124e728e20045f327de30ce1f3c552b307945de9b911cbee103522: {"errors":[{"code":"UNSUPPORTED","message":"The operation is unsupported."}]}
(405 Method Not Allowed)
As we can see in the previous output, the registry did not allow us to delete the image, returning an HTTP 405 error message. To alter this behavior, we need to edit the registry configuration.
Customizing the registry configuration
The registry configuration file /etc/docker/registry/config.yml can be modified to alter its behavior. The default content of this file is the following:
version: 0.1
log:
fields:
service: registry
storage:
cache:
blobdescriptor: inmemory
filesystem:
rootdirectory: /var/lib/registry
http:
addr: :5000
headers:
X-Content-Type-Options: [nosniff]
health:
storagedriver:
enabled: true
interval: 10s
threshold: 3
We soon realize that this is an extremely basic configuration with no authentication, no deletion of images allowed, and no TLS encryption. Our custom version will try to address those limitations.
Important Note
The full documentation about the registry configuration has a wide range of options that we're not mentioning here since it is out of the scope of this book. More configuration options can be found at this link: https://docs.docker.com/registry/configuration/.
The following file contains a modified version of the registry config.yml:
Chapter09/local_registry/customizations/config.yml
version: 0.1
log:
fields:
service: registry
storage:
cache:
blobdescriptor: inmemory
filesystem:
rootdirectory: /var/lib/registry
delete:
enabled: true
auth:
htpasswd:
realm: basic-realm
path: /var/lib/htpasswd
http:
addr: :5000
headers:
X-Content-Type-Options: [nosniff]
tls:
certificate: /etc/pki/certs/tls.crt
key: /etc/pki/certs/tls.key
health:
storagedriver:
enabled: true
interval: 10s
threshold: 3
The highlighted sections in the previous example emphasize the added features:
- Image deletion: By default, this setting is disabled.
- Basic authentication using an htpasswd file. This approach is acceptable in a development and lab environment while a token-based authentication relying on an external issuer would be best suited for production use cases.
- HTTPS transport using self-signed certificates.
Before running the registry again with our custom configuration, we need to generate a htpasswd file that holds at least one valid login and the self-signed certificates for TLS encryption. Let's start with the htpasswd file – we can generate it using the htpasswd utility, like in the following example:
htpasswd -cBb ./htpasswd admin p0dman4Dev0ps#
The -cBb option enables batch mode (useful to provide the password non-interactively), creates the file if it does not exist, and enables the bcrypt hashing function [2]. In this example, we create the user admin with the password p0dman4Dev0ps#.
Finally, we need to create a self-signed server certificate with its related private key, to be used for HTTPS connections. As an example, a certificate associated with the localhost Common Name (CN) will be created.
Important Note
Bounding certificates to the localhost CN is a frequent practice in development environments. However, if the registry is meant to be exposed externally, the CN and SubjectAltName fields should map to the host FQDN and alternate names.
The following example shows how to create a self-signed certificate with the openssl utility:
$ mkdir certs
$ openssl req -newkey rsa:4096 -x509 -sha256 -nodes
-days 365
-out certs/tls.crt
-keyout certs/tls.key
-subj '/CN=localhost'
-addext "subjectAltName=DNS:localhost"
The command will issue non-interactive certificate generation, without any extra information about the certificate subject. The private key tls.key is generated using a 4096-bit RSA algorithm. The certificate, named tls.crt, is set to expire after 1 year. Both the key and certificate are written inside the certs directory.
To inspect the content of the generated certificate, we can run the following command:
$ openssl x509 -in certs/tls.crt -text -noout
The command will produce a human-readable dump of the certificate data and validity.
Hint
For the purpose of this example, the self-signed certificate is acceptable, but it should be avoided in production scenarios.
Solutions such as Let's Encrypt provide a free CA service for everybody and can be used to reliably secure the registry or any other HTTPS service. For further details, visit https://letsencrypt.org/.
We now have all the requirements to run our custom registry. Before creating the new container, make sure the previous instance has been stopped and removed:
# podman stop local_registry && podman rm local_registry
The next command shows how to run the new custom registry using bind mounts to pass the certificates folder, the htpasswd file, the registry store, and, obviously, the custom config file:
# podman run -d --name local_registry
-p 5000:5000
-v $PWD/htpasswd:/var/lib/htpasswd:z
-v $PWD/config.yml:/etc/docker/registry/config.yml:z
-v /var/lib/registry:/var/lib/registry:z
-v $PWD/certs:/etc/pki/certs:z
--restart=always
registry:2
We can now test the login to the remote registry using the previously defined credentials:
$ skopeo login -u admin -p p0dman4Dev0ps# --tls-verify=false localhost:5000
Login Succeeded!
Notice the --tls-verify=false option to skip TLS certificate validation. Since it is a self-signed certificate, we need to bypass checks that would produce the error message x509: certificate signed by unknown authority.
We can try again to delete the image pushed before:
$ skopeo delete
--tls-verify=false
docker://localhost:5000/minimal_httpd
This time, the command will succeed since the deletion feature was enabled in the config file.
A local registry can be used to mirror images from an external public registry. In the next subsection, we will see an example of registry mirroring using our local registry and a selected set of repositories and images.
Using a local registry to sync repositories
Mirroring images and repositories to a local registry can be very useful on disconnected environments. This can also be very useful to keep an async copy of selected images and be able to keep pulling them during public service outages.
The next example shows simple mirroring using the skopeo sync command with a list of images provided by a YAML file and our local registry as the destination:
$ skopeo sync
--src yaml --dest docker
--dest-tls-verify=false
kube_sync.yaml localhost:5000
The YAML file contains a list of the images that compose a Kubernetes control plane for a specific release. Again, we take advantage of regular expressions to customize the images to pull:
Chapter09/kube_sync.yaml
k8s.gcr.io:
tls-verify: true
images-by-tag-regex:
kube-apiserver: ^v1.22..*
kube-controller-manager: ^v1.22..*
kube-proxy: ^v1.22..*
kube-scheduler: ^v1.22..*
coredns/coredns: ^v1.8..*
etcd: 3.4.[0-9]*-[0-9]*
When synchronizing a remote and local registry, a lot of layers can be mirrored in the process. For this reason, it is important to monitor the storage used by the registry (/var/lib/registry in our example) to avoid filling up the filesystem.
When the filesystem is filled, deleting older and unused images with Skopeo is not enough and an extra garbage collection action is necessary to free space. The next subsection illustrates this process.
Managing registry garbage collection
When a delete command is issued on a container registry, it only deletes the image manifests that reference a set of blobs (which could be layers or further manifests), while keeping the blobs in the filesystem.
If a blob is no longer referenced by any manifest, it can be eligible for garbage collection by the registry. The garbage collection process is managed with a dedicated command, registry garbage-collect, issued inside the registry container. This is not an automatic process and should be executed manually or scheduled.
In the next example, we will run a simple garbage collection. The --dry-run flag only prints the eligible blobs that are no longer referenced by a manifest and thus they can be safely deleted:
# podman exec -it local_registry
registry garbage-collect --dry-run
/etc/docker/registry/config.yml
To delete the blobs, simply remove the --dry-run option:
# podman exec -it local_registry
registry garbage-collect /etc/docker/registry/config.yml
Garbage collection is helpful to keep the registry cleaned of unused blobs and save space. On the other hand, we must keep in mind that an unreferenced blob could still be reused in the future by another image. If deleted, it could be necessary to upload it again eventually.
Summary
In this chapter, we explored how to interact with container registries, which are the fundamental storage services for our images. We started with a high-level description of what a container registry is and how it works and interacts with our container engines and tools. We then moved on to a more detailed description of the differences between public, cloud-based registries and private registries, usually executed on-premises. It was especially useful to understand the benefits and limitations of both and to help us to understand the best approach for our needs.
To manage container images on registries, we introduced the Skopeo tool, which is part of the Podman companion tools family, and illustrated how it can be used to copy, sync, delete, or simply inspect images over registries, giving users a higher degree of control over their images.
Finally, we learned how to run a local containerized registry using the official community image of the Docker Registry v2. After showing a basic usage, we went deeper into more advanced configuration details by showing how to enable authentication, image deletion, and HTTPS encryption. The local registry proved to be useful to sync local images as well as remote registries. The registry garbage collection process was illustrated to keep things tidy inside the registry store.
With the knowledge gained in this chapter, you will be able to manage images over registries and even local registry instances with a higher degree of awareness of what happens under the hood. Container registries are a crucial part of a successful container adoption strategy and should be understood very well: with this chapter's concepts in mind, you should also be able to understand and design the best fitting solutions and gain deep control over the tools to manipulate images.
With this chapter, we have also completed the exploration of all the basic tasks related to container management. We can now move on to more advanced topics, such as container troubleshooting and monitoring, covered in the next chapter.
Further reading
- [1] Open Container Initiative (OCI) Distribution Specification: https://github.com/opencontainers/distribution-spec/blob/main/spec.md
- [2] Bcrypt description: https://en.wikipedia.org/wiki/Bcrypt
- [3] Docker Registry v2 API specifications: https://docs.docker.com/registry/spec/api/