
Chapter 18: Using Dynamic Memory Allocation
Not all data can be allocated statically or automatically. Sometimes, the number of items to be manipulated is not known beforehand; that number can only be known at runtime and may vary from run to run, depending on external inputs (such as user input and files). In the preceding chapter, we examined automatic and static memory allocation. We now stand on the threshold of an incredibly powerful feature of C – dynamic memory allocation and manipulation. Once we pass this threshold, many flexible dynamic data manipulations will be available to us. We will briefly introduce many of these data structures and their uses in this chapter.
As mentioned in the preceding chapter, dynamic memory is unnamed, so it can only be manipulated via pointers. Furthermore, dynamic memory has a different lifetime than either automatic or static memory.
The following topics will be covered in this chapter:
- Acquiring an introductory understanding of the power and flexibility of dynamic memory allocation
- Learning how to allocate and release dynamic memory
- Implementing a simple linked list dynamic data structure
- Creating and using a dynamic function pointer
- Becoming aware of various special considerations when using dynamic memory
- Learning about some other important dynamic data structures
Let's get started!
Technical requirements
As detailed in the Technical requirements section of Chapter 1, Running Hello World!, continue to use the tools you have chosen.
The source code for this chapter can be found at https://github.com/PacktPublishing/Learn-C-Programming-Second-Edition/tree/main/Chapter18.
Introducing dynamic memory
Do we always know exactly how many objects we will need to manipulate and allocate memory for in a program? The answer is a resounding no!
Not every situation or program can be efficiently addressed using just automatic or static memory. The number of objects may vary widely over the runtime of the program and from one run to another of the same program. The number of objects may depend on inputs from the user (covered in Chapter 20, Getting Input from the Command Line, and Chapter 21, Exploring Formatted Input), from one or more existing files (covered in Chapter 22 Working with Files, and Chapter 23, Using File Input and File Output), another device, or even from a network connection to a remote server.
Furthermore, some problems cannot be easily solved with simple automatic or static memory. These types of problems include sorting algorithms, efficient searching and lookup of large amounts of data, and many geometric and graph theory optimization techniques. All of these are advanced programming topics. Dynamic memory opens the doors to these fascinating and powerful algorithms.
Before we dive into dynamic memory allocation, let's examine the way C allocates all types of memory in a program's memory space.
A brief tour of C's memory layout
It is now time to gain a cursory understanding of how C organizes memory when a program is loaded and run. When a program is invoked to be run, the system first performs a number of steps before main() is called. A rough outline of this process is as follows:
- The operating system creates a new process and allocates memory space for the process.
- System device addresses and system executables are mapped into the memory space.
- The program code is loaded into the memory space.
- Global variables, static variables, and string constants are loaded into memory. These addresses won't change over the life of the program.
- Other required initializations occur. This includes setting the starting heap address and the starting stack address.
- main() is called and the execution of the program begins.
This discussion of memory layout builds upon the Introduction to pointers section in Chapter 13, Using Pointers. Consider the following diagram:

Figure 18.1 – Simplified map of program memory
This is a very simple conceptual view of a program's memory space. The operating system provides this space to the program when it is loaded and ready to be run. The C runtime then divvies up the memory given to it into segments, each for a specific use. It consists of the following segments:
- System memory: This consists of system memory and system programs, as well as the addresses for all of the devices on the computer. This segment is mapped for all running programs so that there is only ever one copy of the system code in the overall system memory space. The system exclusively manages this memory.
- Program code: This is where the compiled program is loaded and executed. Function definitions—the executable part of each function—are located here.
- Global and static memory: After the program is loaded, global and static variables are allocated and initialized, as well as string literals.
- The call stack: When your program makes a function call, its parameters, any automatic variables declared within it, and its return value are allocated in this segment or pushed onto the stack. The call stack grows from high memory to lower memory, and then to the heap space, as one function calls another and that function calls yet another. When a function returns, its memory is popped off the stack (deallocated). Think of a stack of plates—you put a plate on top of the stack one after the other; then, you take them off the stack one at a time in the reverse order they were placed on the stack.
- The heap: When your program allocates dynamic memory, it is allocated from this segment. Heap space grows from low memory to higher memory, toward the stack space. Most allocations here are done somewhat randomly using the best fit allocation scheme. That is, the lowest available space is allocated, if possible. When that memory is deallocated, it becomes available for other allocations of the same or smaller size.
Each program lives in its own memory space. The system space is common to all programs. After your program has been loaded into this memory space and the global and static variables have been allocated, the system calls the main() function and begins execution. When you call a function, execution jumps to the memory address of that function and pushes its parameters, automatic variables, and return values onto the call stack. When the function completes, it pops its memory off the stack and returns execution to the location in the program space where it was called.
All dynamic memory allocations are made from within the heap segment of the program memory space. Now, we will explore the mechanisms we can use to allocate and release dynamic memory.
Allocating and releasing dynamic memory
Dynamic memory is allocated and released (deallocated) only at very explicit points by a program. It doesn't happen automatically; it doesn't happen by accident or by chance. You make this happen when you call specific C Standard Library calls to allocate and release dynamic memory.
Allocating dynamic memory
Memory allocation routines are declared in stdlib.h and are a part of the C runtime library. There are two very similar allocation routines, malloc() and calloc(), which are used to allocate a new block of memory from the heap. The main difference between malloc() and calloc() is that calloc() clears the memory block it allocates, whereas malloc() only does allocation. There is a third routine, realloc(), which is used to resize an existing block of heap memory. These functions have the following prototypes:
void* malloc( size_t size );
void* calloc( size_t count , size_t size );
void* realloc( void *ptr , size_t size);
size_t is defined somewhere in stdlib.h, as follows:
type unsigned int size_t;
Each of these functions returns a void* pointer to a block of memory in the heap space. Recall that void* is a pointer type that is of an unknown or generic type; a pointer of the void* type must be cast to the required pointer type before you can use that pointer. Notice that malloc() takes a single size parameter, while calloc() takes the count and size parameters. The total amount of memory allocated for malloc() is size. The total amount of memory allocated for calloc() is count multiplied by size. Very often count is 1 and size is the total memory to allocate.
If neither function can find memory in the heap space, the returned pointer will be NULL. It is a good practice to check whether these routines were successful.
The following code shows how each allocates memory for a single Card structure:
Card* pCard1 = (Card*)malloc( sizeof( Card ) );
if( NULL == pCard1 ) ... // out of memory error
Card* pCard2 = (Card*)calloc( 1 , sizeof( Card ) );
if( NULL == pCard2 ) ... // out of memory error
If we wanted to allocate memory for, say, five cards, we would use the following code:
Card* pHand1 = (Card)malloc( 5 * sizeof( Card ) );
if( NULL == pHand1 ) ... // out of memory error
Card* pHand2 = (Card*)calloc( 5 , sizeof( Card ) );
if( NULL == pHand2 ) ... // out of memory error
In this second example, we are allocating space for five cards contiguously in dynamic memory. This sounds like an array, doesn't it? Well, in fact, it is. Instead of an automatic array declared with Card hand1[5] and Card hand2[5], both of which allocate blocks of memory to hold five cards on the stack, pHand1 and pHand2 both point to contiguous blocks of memory in the heap space.
Recall how array names and pointers to arrays are interchangeable. With these allocations, we can now refer to individual cards in the heap space (allocated previously) with pHand1[3] and pHand2[i]. This is simply astounding! We can access arrays in either the stack space or the heap space using array notation or pointer notation. Examples of how to do this are provided in the Accessing dynamic memory section.
In both examples, each call to allocate memory using calloc() or malloc() appears to be interchangeable. So, why use one function over the other? Is one of these preferred over the other? Before we can answer that, we need to know that calloc() both allocates memory and initializes it to all zeros, while malloc() simply allocates the memory and leaves initialization up to us. So, the simple answer is to prefer calloc() over malloc().
The realloc() function changes the size of the memory that's pointed to by ptr to the given size, which may be larger or smaller than the original memory allocation. If size is larger, the original contents are copied and the extra space is uninitialized. If size is smaller, the original contents are truncated. If ptr is NULL, then realloc() behaves exactly like malloc(). As with malloc() and calloc(), the pointer returned by realloc() must be cast to the required type before it can be used.
Releasing dynamic memory
When we are done with the heap memory we've allocated, we release it with a call to free(). The free() function returns the allocated memory to the available heap pool of memory. This call does not have to occur within the same function where the memory was allocated. The prototype in stdlib.h for free() is as follows:
void free( void* ptr );
The pointer that's passed to free() must contain a value that originated from one of the calls to malloc(), calloc(), or realloc(). There is no need to cast the void* pointer argument. If ptr is NULL, then free() does nothing.
We would release the memory that was allocated in the previous subsection as follows:
free( pCard1 );
free( pCard2 );
free( pHand1 );
free( pHand2 );
These four statements release each block of memory that we allocated earlier. Allocated dynamic memory can be freed in any order; it does not have to be freed in the same order it was allocated.
Accessing dynamic memory
Once we've allocated dynamic memory, we can access it via the pointer that's returned by the allocation functions, as we would with any other pointer. With each of the previous examples, we could use that dynamic memory as follows:
InitializeCard( pCard1 , spade , ace , kNotWild );
InitializeCard( pCard2 , heart , queen , kNotWild );
pCard1 and pCard2 are pointers to individual Card structures. Therefore, we can use them just like we used the pointers in carddeck.c using automatic variables.
However, consider the following:
pHand1[3].suit = diamond;
pHand1[3].face = two;
for( int i = 0 ; i < kCardsInHand , i++ ) {PrintCard( &(pHand[i]) );
}
Both pHand1 and pHand2 point to a contiguous block of memory that is equivalent to the size of five Card structures. Using array notation, we set the suit and face structure members of the fourth element via pHand1. The PrintCard() function takes a pointer to a Card structure, while pHand2 points to a block of Card structures. Array notation gives us the individual cards in the block; we must then get the address of that card element and pass it PrintCard(). We will see this in action when we rework (yet again!) our cardDeck.c program in Chapter 20, Getting Input from the Command Line, and Chapter 24, Working with Multi-File Programs.
Rather than using arrays in heap memory, it is far more common to manipulate structures individually, as we shall see when we explore the linked list dynamic structure in the next section.
The lifetime of dynamic memory
Heap memory has a lifetime that begins when the memory is allocated. Once allocated, that memory exists until the free() function is called to release that memory. Allocating and releasing memory is also called memory management within a program.
Alternatively, all memory is deallocated when the program exits, both in terms of fixed memory and dynamic memory. It is generally considered a sloppy practice to ignore memory management of dynamic memory, especially for large, complex programs or for programs that are likely to run for a very long time.
Knowing the lifetime of heap memory, let's now consider some of the situations involved with managing heap memory. These will be common considerations. Unfortunately, they will not be all possible situations.
Special considerations for dynamic allocation
Dynamic memory allocation does not come without a cost. In this case, the cost is typically conceptual complexity. This cost also takes the form of added management of heap memory and awareness of the pitfalls of potential memory leaks.
To be honest, I should add that it may take some time to get your head around some of these concepts. For me, some of them took me quite a while to grasp. The best way, I've found, is to take a working program and alter it, see how it behaves, and then understand why it did what it did. Assume nothing. Or, start with a minimal working program that uses the mind-bending feature and then build upon it. Interact with your code; play with it. No matter how you do it, you can't just think about it. You have to twist, poke, prod, and cajole your code until you understand what it is doing. Otherwise, it is just guesswork.
Heap memory management
The amount or degree of heap memory management required in a program is a consideration that depends on the complexity and expected runtime duration of that program.
When heap memory is initialized at the start of a program and remains largely unchanged after it is initialized, little heap management will be required. It may be acceptable to simply let heap memory exist until the program exits. The free() function may never be called in such a program.
On the other hand, for programs whose complexity is large, or where heap memory is heavily used, or where the runtime duration is hours, days, months, or even years, heap management is essential. A program that controls, say, a banking system, a fighter jet, or a petroleum refinery might have catastrophic consequences if the heap for that program is not properly managed, causing the program to terminate abnormally. The bank may suddenly show a pile of money in your account or take it all away from you; the fighter jet may lose control while in flight and crash; the petroleum refinery may suddenly react chaotically and explode. The discipline of software engineering exists primarily to make such software systems both maintainable by various levels of programmers and extremely reliable over the long lifespan of such systems.
For some data structures, such as a linked list, which we will explore in depth later in this chapter, memory management is relatively straightforward. However, for others, memory management may not be obvious. Each data structure and algorithm has its own set of memory considerations to be addressed. When we ignore memory management or do not address it fully, we might encounter a common dynamic memory problem known as memory leaks.
Memory leaks
One of the main challenges of heap management is to prevent memory leaks. A memory leak is when a block of memory is allocated and the pointer to it is lost so that it cannot be released until the program quits. The following is a simple example of a memory leak:
Card* pCard = (Card*)calloc( 1 , sizeof( Card ) );
...
pCard = (Card*)calloc( 1 , sizeof( Card ) ); // <-- Leak!
In this example, pCard first points to one block of heap memory. Later, pCard is assigned to another block of heap memory. The first block of memory is allocated but has not been freed. After pCard is given another address, there is nothing pointing to the first block of heap memory. Without a pointer to it, it cannot be accessed nor can it be freed; the first block of heap memory is leaked. To correct this error, first call free() before reassigning pCard, as follows:
Card* pCard = (Card*)calloc( 1 , sizeof( Card ) );
...
free( pCard );
pCard = (Card*)calloc( 1 , sizeof( Card ) );
A more subtle leak is as follows:
struct Thing1 {int size;
struct Thing2* pThing2
}
struct Thing1* pThing1 = (struct Thing1*)calloc( 1,sizeof(Thing1) );
Thing1->pThing2 = (struct Thing2*)calloc( 1,sizeof(Thing2) );
...
free( pThing1 ); // <-- Leak!
In this example, we create the Thing1 structure, which contains a pointer to another dynamically allocated Thing2 structure. We allocate heap memory for Thing1, which is pointed to by pThing1. We then allocate heap memory for Thing2, which is pointed to by the pThing2 pointer element of Thing1. So far, so good, and we go on our merry way.
Later, we release pThing1. Uh oh! What happened to the pointer to pThing2? It's gone. That means that whatever pThing2 pointed to cannot be accessed again. We just leaked the memory of pThing2.
The correct way to release all of the memory of pThing1 is as follows:
free( pThing1->pThing2 );
free( pThing1 );
First, the free() function is called on pThing1->pThing2, which is the pointer element of pThing2. Then, and only then, can we release the memory of pThing1.
A third, equally subtle leak is as follows:
Card* CreateCard( ... ) {Card* pCard = (Card*) calloc( 1 , sizeof( Card ) );
InitializeCard( pCard , ... );
return pCard;
}
In the CreateCard() function, memory for Card is allocated in the heap space, initialized, and the pointer to it is returned. This is all fine and dandy.
Now, consider how this function might be called, as follows:
Card* aCard = CreateCard( ... );
PrintCard( aCard );
aCard = CreateCard( ... ); // <-- Leak!
PrintCard( aCard );
This is similar, but less obvious than the first memory leak example. Each time the CreateCard() function is called, it allocates more heap memory. However, when it is called multiple times, the pointer to the allocated memory may be overwritten as it is in the sequence of CreateCard() and PrintCard(). The CreateCard() function has added the burden on the caller of being responsible for either calling free() before reusing aCard, or to somehow keep track of the various pointer values that are returned, as follows:
Card* aCard = CreateCard( ... );
PrintCard( aCard );
free( aCard );
aCard = CreateCard( ... );
PrintCard( aCard );
free( aCard )
Card* pHand = (Card*)calloc( 5 , sizeof( Card* ) );
for( int i = 0 ; i<5 ; i++ ) {pHand[i] = CreateCard( ... );
PrintCard( pHand[i] );
}
...
for( int i = 0 ; i<5 ; i++ )
free( pHand[i] );
free( pHand );
In the first group of statements, free() is called before aCard is assigned a new pointer to the heap memory.
In the second group of statements, an array of five pointers to Card is allocated. Note that this is not the same as allocating memory for five Card structures; CreateCard() does the allocation for a Card one at a time in a loop. Using a loop, five cards are created in the heap space and printed. Later, a loop is used to properly release the Card memory allocated in CreateCard(), which is pointed to by each element of pHand. Finally, pHand (a block of five pointers) is released.
Simply being aware of possible memory leaks and what might cause them goes a long way when it comes to recognizing and preventing them from happening in the first place.
We will now explore a general, yet very useful, dynamic structure.
The linked list dynamic data structure
The most basic dynamic data structure is the linked list. A linked list is the basis for other dynamic structures, such as stacks, queues, and deques. A stack conforms to the rules that each new element must be added to the front of the list, and that each element can only be removed from the front of the list. A queue conforms to the rules that each new element must be added to the back of the list, and that each element can only be removed from the front of the list. A deque is a generalized form of both a stack and queue and has the operations of both of them.
We will implement a simple linked list and then test it from within the main() function. Later, we will employ this list structure and its routines when we return to our carddeck.c program in Chapter 24, Working with Multi-File Programs.
Create a file called linklisttester.c. It is in this single file that we will create our linked list structure, operations, and test code. Before we begin, consider the following diagram of the linked list we will create:

Figure 18.2 – Linked list
A linked list consists of a header structure that contains information about the list, as well as a link to the first element, or list node. Any link that is NULL signifies that it is the last list node in the list. If the head structure has a NULL link, the list is empty. In the preceding diagram, the linked list contains the link list header with four list nodes. Each node contains a pointer to the next list node and a pointer to a data element. We must ensure that each node has a non-null data pointer; otherwise, the node is not valid. The data element could be a simple variable or a complex structure.
Notice how this list structure has a backbone of ListNode instances, and the actual data for each ListNode instance is a separate, dynamically allocated variable or structure, or even an array. This makes this implementation of a link list rather generic. We could replace our ListData with different data types and still use the same operations on the linked list. We will reuse this linked list structure in Chapter 23, Using File Input and File Output, but the ListData will be a string instead of a structure.
Also, note that this is just one implementation of a singly-linked list. There are many variations of linked list implementations. Nonetheless, the operations on a linked list are fairly standard regardless of the details of the implementation.
Linked list structures
It should be no surprise given our diagram of a linked list in Figure 18.2 that we need two structures—a linked list header structure and a list node structure. They are defined as follows:
typedef struct _Node ListNode;
typedef struct _Node {ListNode* pNext;
ListData* pData;
} ListNode;
typedef struct {ListNode* pFirstNode;
int nodeCount;
} LinkedList;
First, we define an arbitrary tag, struct _Node, as a ListNode structure. This is a naming mechanism so that we can use the name ListNode in the following structure definition with the members of struct _Node. The struct _Node tag contains a ListNode pointer and a ListData pointer, both of which will be known henceforth as simple ListNode custom types. We won't need to use struct _Node again. Our list will consist of zero or more ListNode structures.
Next, we define a heading for our linked list, LinkedList, which consists of a ListNode pointer and an int element to keep track of the number of elements in our list. Note that we don't need a temporary tag name after struct; this structure will only be known as LinkedList.
Note that the data portion of ListNode is a pointer to something called ListData. We will redefine ListData as an int element, as follows:
typedef int ListData;
We're doing this so that we don't get bogged down in the unnecessary details of ListData. Later, when we complete and validate our linked list code, we will change ListData for our revised carddeck.c program so that it looks as follows:
typedef Card ListData;
This linked list code will work the same for pointers to int, as well as pointers to Card, or as a pointer to any other structure that we want our list to contain. This is the power (or confusion, depending on your perspective) of using typedef.
Declaring operations on a linked list
Now that we have the required data structures defined, we can declare operations on those data structures. A data structure is defined by both the data it contains or represents and the operations that can be performed on it. The operations we will need to perform in order to manipulate a general linked list mechanism independently of the specific data contents of the list are as follows:
- Create a new LinkedList header that allocates and properly initializes the header record.
- Create a new ListNode element that allocates and properly initializes the node element. Once created, the node still isn't part of the list.
- Delete a node. This doesn't involve the list; typically, this will be done after a node is removed from the list.
- Insert a node either into the front or back of the list.
- Remove a node, either from the front or back of the list, and return that node to the caller.
- Get the node from either the front or back of the list; this only observes the node data – it does not change the list in any way.
- Determine whether the list is empty.
- Determine the size of the list.
- Print the list. This involves traversing the list and printing each node.
- Print an individual node. This involves printing the ListData element of the node. The function to print ListData needs to be specific to the type of ListData. We will need a way to pass a print function as a parameter to this operation.
These operations lead to the following function prototypes:
LinkedList* CreateLinkedList();
bool IsEmpty( LinkedList* pList );
int Size( LinkedList* pList );
void InsertNodeToFront( LinkedList* pList , ListNode* pNode );
void InsertNodeToBack( LinkedList* pList , ListNode* pNode );
ListNode* RemoveNodeFromFront( LinkedList* pList );
ListNode* RemoveNodeFromBack( LinkedList* pList );
ListNode* GetNode( LinkedList* pList , int pos );
ListNode* CreateNode( ListData* pData );
void DeleteNode( ListNode* pNode );
void PrintList( LinkedList* pList ,
void (*printData)(ListData* pData ) );
void PrintNode( ListNode* pNode ,
void (*printData)(ListData* pData ) );
void OutOfStorage( void );
As we go through the definitions of each of these operations, you may find it helpful to refer to the diagram of the linked list. Try to identify how each pointer in the list is manipulated in each function.
Here, we will add a CreateData() operation. It will be deferred to the final implementation where the specific ListData type is known. At that point, we'll also define the printListData function.
Notice the OutOfStorage() function. We don't know whether we'll ever need this function. We will need it if the CreateXXX() function fails to allocate memory. It is generally a good practice to provide some feedback when a program fails, as follows:
void OutOfStorage( void ) {fprintf(stderr,"### FATAL RUNTIME ERROR ### No Memory
Available" );
exit( EXIT_FAILURE );
}
This is a simple function that does the following:
- Prints an error message to a special output stream, stderr.
- Exits the program with a non-zero exit value. The program exits immediately and no further program execution is done. We will learn more about stderr in Chapter 23, Using File Input and File Output.
We can now see how each operation is defined.
A new LinkedList header can be created as follows:
LinkedList* CreateLinkedList() {LinkedList* pLL = (LinkedList*) calloc( 1 , sizeof( LinkedList ) );
if( NULL == pLL ) OutOfStorage();
return pLL;
}
The calloc() function is used to allocate memory for the LinkedList header and initialize all the values in the structure to 0; a pointer to that memory is returned unless calloc() fails, in which case, OutOfStorage() is called and the program stops. The IsEmpty() and Size() functions are as follows:
bool IsEmpty( LinkedList* pList ) {return( 0 == pList->nodeCount );
}
int Size( LinkedList* pList ) {return pList->nodeCount;
}
The IsEmpty() utility function returns true if the list is empty, and false otherwise.
The Size() utility function simply returns the value of nodeCount. We use a function to get this value rather than access it directly because the structure of LinkedList may need to be changed. This approach encapsulates the size information, regardless of how it might be implemented later.
The next two functions define how a ListNode structure can be inserted into the list, as follows:
void InsertNodeToFront( LinkedList* pList , ListNode* pNode ) {ListNode* pNext = pList->pFirstNode;
pList->pFirstNode = pNode;
pNode->pNext = pNext;
pList->nodeCount++;
}
The following is the second function:
void InsertNodeToBack( LinkedList* pList , ListNode* pNode ) { if( IsEmpty( pList ) ) {pList->pFirstNode = pNode;
} else {ListNode* pCurr = pList->pFirstNode ;
while( NULL != pCurr->pNext ) {pCurr = pCurr->pNext;
}
pCurr->pNext = pNode;
}
pList->nodeCount++;
}
To insert a ListNode structure into the front of the list, we only need to adjust two pointers, pList->pFirstNode (saving it before we change it) and the new node's pNode->pNext pointer. If the list is empty, pList->pFirstNode will be NULL anyway, so this code properly handles all cases. Finally, the node count is incremented.
Let's see what inserting a new node at the front of the list looks like. The following diagram illustrates the list when this function is entered:

Figure 18.3 – Linked list before inserting a new item at the front
After the two pointers have been adjusted, the list will look as follows:

Figure 18.4 – Linked list after inserting a new item at the front
Notice that the pNode pointer is no longer needed since pList->pFirstNode also points to the new node.
To insert a ListNode structure at the back of the list, we first have to see if the list is empty; if so, we only need to set pList->pFirstNode. Otherwise, we have to traverse the list to the last entry. This is done by first setting a temporary pointer, pCurr, to the first item in the list. When pCurr->pNext is NULL, then pCurr is pointing to the last item in the list. We only need to set pCurr->pNext to the new node; its pNext pointer is already NULL. Finally, the node count is incremented.
Now, let's see what inserting a new node at the back of the list looks like. The following diagram illustrates the list when this function is entered:

Figure 18.5 – Linked list before inserting a new item at the back
After the next final pointer is adjusted, the list will look as follows:

Figure 18.6 – Linked list after inserting a new item at the back
Once pCurr->next points to our new node, both the pCurr and pNode pointers are no longer needed.
Like the insert functions, the next two functions define how a ListNode structure can be removed from the list, as follows:
ListNode* RemoveNodeFromFront( LinkedList* pList ) {if( IsEmpty( pList )) return NULL;
ListNode* pCurr = pList->pFirstNode;
pList->pFirstNode = pList->pFirstNode->pNext;
pList->nodeCount--;
return pCurr;
}
The following is the second function:
ListNode* RemoveNodeFromBack( LinkedList* pList ) { if( IsEmpty( pList ) ) {return NULL;
} else {ListNode* pCurr = pList->pFirstNode ;
ListNode* pPrev = NULL;
while( NULL != pCurr->pNext ) {pPrev = pCurr;
pCurr = pCurr->pNext;
}
pPrev->pNext = NULL;
pList->nodeCount--;
return pCurr;
}
}
To remove a ListNode structure from the front of the list, we need to check whether the list is empty and return NULL if it is. Otherwise, we set the node to be returned by pCurr to pList->pFirstNode, and then we set the next node after pList->pFirstNode, which is being pointed to by pList->pFirstNode->pNext, as the first node. The node count is decremented and returns pCurr.
Let's see what deleting a node from the front of the list looks like. The following diagram illustrates the list when this function is entered:

Figure 18.7 – Linked list before removing list item from the front
Notice that pCurr also points to pList->pFirstNode. After the two pointers have been adjusted, the list will look as follows:

Figure 18.8 – Linked list after removing list item from the front
Notice that pCurr is the only pointer pointing to the node to be deleted and that the first node in the list pointed to by pList->pFirstNode now points to the new first node.
To remove a ListNode item from the back of the list, we have to see if the list is empty; if so, we return NULL. Otherwise, we have to traverse the list to the last entry. This is done by setting a temporary pointer, pCurr, to the first item in the list. We need another temporary pointer, pPrev, which points to the node before the node we want to remove. Both are adjusted as the list is traversed. When pCurr->pNext is NULL, then pCurr is pointing to the last item in the list – the node we want to remove. But, we also need to set pPrev->pNext to NULL to indicate it is the last item in the list. The node count is decremented and pCurr is returned.
Now, let's see what deleting a node from the back of the list looks like. The following diagram illustrates the list when this function is entered:
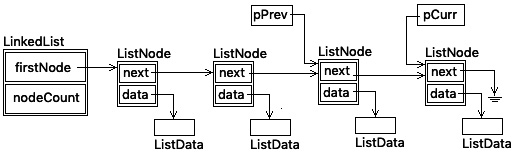
Figure 18.9 – Linked list before removing list item from the back
After the final next pointer is adjusted, the list will look as follows:
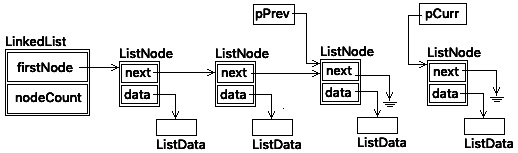
Figure 18.10 – Linked list after removing list item from the back
Once pCurr->next points to our new node, the pCurr and pNode pointers are no longer needed.
The GetNode() function inspects a node's data without removing it from the list, as follows:
ListNode* GetNode( LinkedList* pList , int pos ) {ListNode* pCurr = pList->pFirstNode;
if( NULL == pCurr ) {return pList->pFirstNode;
} else if ( pos == 0 ) {return pList->pFirstNode;
} else {int i = 0;
while( NULL != pCurr->pNext ) {if( i == pos ) return pCurr;
i++;
pCurr = pCurr->pNext;
}
return pCurr;
}
}
Before traversing the list, GetNode() first checks to see whether the list is empty, and then checks to see whether the 0th position (a magic number indicating the front of the list) is requested. If so, the pFirstNode pointer is returned. Otherwise, the list is traversed, adjusting pCurr in order to check for both the end of the list and whether the current node count is the node we are looking for. This will be either a pointer to the node we are requesting or a pointer to the last node that was returned. The list remains unchanged.
The CreateNode() function simply creates a new node structure, as follows:
ListNode* CreateNode( ListData* pData ) {ListNode* pNewNode = (ListNode*) calloc( 1 , sizeof( ListNode ) );
if( NULL == pNewNode ) OutOfStorage();
pNewNode->pData = pData;
return pNewNode;
}
The calloc() function is used to allocate memory for a ListNode structure and initialize all the values in it to 0; a pointer to that memory is returned unless calloc() fails, in which case, OutOfStorage() is called and the program stops. Note that the linked list is not involved; this function only creates the node and correctly initializes it with the ListData pointer, which itself needs to have been created before we call this routine.
When items are removed from the list, they are not deleted until DeleteNode() is called, as follows:
void DeleteNode( ListNode* pNode ) {free( pNode->pData );
free( pNode );
}
Notice that in order to prevent a subtle memory leak, DeleteNode() frees both the ListData structure (pointed to by pNode->pData) and the ListNode structure (pointed to by pNode).
To print the list, PrintList() is called, as follows:
void PrintList( LinkedList* pList ,
void (*printData)(ListData* pData ) ) {printf( "List has %2d entries: [" , Size( pList ) );
ListNode* pCurr = pList->pFirstNode;
while( NULL != pCurr ) {PrintNode( pCurr , printData );
pCurr = pCurr->pNext;
}
  printf( "]
" );
}
The PrintList() function takes two parameters—the first should be familiar to you, while the second deserves some explanation. Recall from our memory layout diagram earlier in this chapter that a function is a named location in memory where program execution jumps to and returns back to the location it was called from. Most of the time, we've simply used the function name. In this case, we don't know the function name because the ListData type could change. The print function for ListData will need to change to reflect its actual type. Therefore, we need to pass a pointer to that function so that we can simply call it by using a pointer to it at some later time.
Pointers to functions
When we declare a pointer to a function, we need more than just the pointer value – we need to specify both the return type of the function and the parameter list of the function being pointed to.
Let's break this apparent syntactical gobbledygook down into understandable parts. It consists of three parts:
- The return type of the function; in this case, void.
- The name of the pointer to the function; in this case, (*printData). This indicates that printData is the name pointer to a function; the function itself may have a completely different name. Given the first item, we know that the function returns void.
- The function we'll implement via this pointer to it has a parameter list, in this case, (ListData* pData).
Given these three parts, compare the function pointer declaration to the function's prototype, in this case, PrintInt():
void (*printData)(ListData* pData); // function pointer
void PrintInt( ListData* pData); // function prototype
void PrintInt( ListData* pData) { // function definition...
}
Notice how, except for the declaration of a function pointer, the other elements of a function call are present—the return type and the function parameter list. A function pointer cannot point to just any function. It must be declared with the same return type and parameter list as the function it will be used to call.
In the function body of PrintList(), we do not call the function using the function pointer named printData; instead, we pass that pointer value to the function that will call it, that is, PrintNode().
To print the list, we print some information about the list and then iterate through it, updating the temporary pointer, pCurr, all while visiting each node in the list. At each iteration, PrintNode() is called with the current node pointer and the pointer to the function to print the data.
To print an individual node's data, PrintNode() is called, as follows:
void PrintNode( ListNode* pNode ,
void(*printData)( ListData* pData ) ) {printData( pNode->pData );
}
The parameter list for PrintNode() consists of a pointer to a node and the same function pointer specification (you may still call this syntactical gobbledygook). But notice that here, in the function body, the printData pointer is used as if it were a function name (it's just a pointer) with the appropriate parameter list. We'll see the definition of PrintInt(), the function this will call, very shortly.
Now would be a good time to enter all of the function prototypes, the functions themselves, a dummy main() function, and the following #include files in linkedlisttester.c before going any further:
#include <stdio.h> // for printf() and fprintf()
#include <stdlib.h> // for calloc() and free()
#include <stdbool.h> // for bool, true, false
Compile the program. You should receive no errors. This will serve as a simple checkpoint. Address any compiler errors. Most likely, they will be typos or omissions of simple things. Do not proceed until you get a clean compile.
More complex operations on a linked list
Our list provides a useful but minimal set of operations. It contains both stack and queue operations so that we can use it for either a stack or a queue, as needed. There are other list operations you might want to try to implement yourself. Some of them might include the following function prototypes:
ListNode* InsertNodeAt( LinkedList* pList , ListNode* pNode );
ListNode* RemoveNodeAt( LinkedList* pList , ListNode* pNode );
void SortList ( LinkedList* pList , eSortOrder order );
void ConcatenateList( LinkedList* pList1 , LinkedList* pList2 );
We will not implement these functions right now. We will, however, implement some of them when we revisit our carddeck.c program.
A program to test our linked list structure
OK, so we implemented a linked list in C, or so we think. We wrote a lot of code that we compiled for errors as we wrote it; however, we can't know for certain until we test it. We need to test it thoroughly and get all the results we expect. The testing and verification part of programming is just as important—sometimes even more important—than just writing code that compiles. Writing and verifying the code you write distinguishes a novice programmer from an expert.
Before we can continue, we need two functions specific to our ListData type. The first is as follows:
void PrintInt( int* i ) {printf( "%2d ", *i );
}
The second is as follows:
ListData* CreateData( ListData d ) {ListData* pD = (ListData*)calloc( 1 , sizeof( ListData ) );
if( pD == NULL ) OutOfStorage();
*pD = d;
return pD;
}
The PrintInt() function simply prints the integer value passed to it by calling printf(). If we were to use a different ListData type, we would need to provide an appropriate PrintData() routine for it. We'll see how this function is called in main() with the PrintList() function calls.
The CreateData() function calls calloc() to allocate memory for a ListData structure and initializes all the values in the structure to 0; a pointer to that memory is returned unless calloc() fails, in which case, OutOfStorage() is called and the program stops. This function will be used in our test functions to exercise our linked list. By creating a ListData structure and putting data into it, we can then insert this data element into our list as needed.
To facilitate testing, we will first declare the following enumerated values:
typedef enum {
eFront = 0 ,
eBack
} eWhere;
typedef enum {
eLook = 0 ,
eInsert ,
eDelete
} eAction;
We can now start with the main() function and work backward. The test code in main() is as follows:
int main( void ) {LinkedList* pLL = CreateLinkedList();
printf( "Input or operation "
          "Current state of linked list
"
"========================= "
"======================================");
  printf( "
Using input{ 1  2  3  4 } " );
PrintList( pLL , PrintInt );
int data1[] = { 1 , 2 , 3 , 4 }; for( int i = 0 ; i < 4 ; i++) {TestPrintOperation( pLL , eInsert , data1[i] , eFront );
}
TestPrintOperation( pLL , eLook , 0 , eFront );
TestPrintOperation( pLL , eDelete , 0 , eBack );
  printf( "
Using input{ 31 32 33 }   " );
PrintList( pLL , PrintInt );
int data2[] = { 31 , 32 , 33 }; for( int i = 0 ; i < 3 ; i++) {TestPrintOperation( pLL , eInsert , data2[i] , eBack );
}
TestPrintOperation( pLL , eLook , 0 , eBack );
int count = pLL->nodeCount;
for( int i = 0 ; i < count ; i++) {TestPrintOperation( pLL , eDelete, 0 , eFront );
}
}
In main(), we are exercising all of the features of our linked list. This test consists of the following operations:
- Create a new linked list.
- Print it out, showing that it is empty.
- Insert four nodes, each into the front of the list. Each time a node is inserted, the action is described and the current list is printed.
- Look at the first node.
- Delete a node from the back. Each time a node is inserted, the action is described and the current list is printed.
- Insert three nodes, each into the back of it.
- Look at the last node.
- Delete each node from the front of the list until it is empty. Each time a node is deleted, the action is described and the current list is printed.
At each operation, we print some information about what happened and the current state of the list. Most of the test work occurs in TestPrintOperation(), as follows:
void TestPrintOperation( LinkedList* pLL , eAction action ,
ListData data , eWhere where ) { switch( action ) {case eLook:
data = TestExamineNode( pLL , where );
printf( "Get %s node, see [%2d]. " ,
where==eFront ? "front" : " back" , data );
break;
case eInsert:
printf( "Insert [%2d] to %s. " , data ,
where==eFront ? "front" : " back" );
TestCreateNodeAndInsert( pLL , data , where );
break;
case eDelete:
data = TestRemoveNodeAndFree( pLL , where );
printf( "Remove [%2d] from %s. " , data ,
where==eFront ? "front" : " back" );
break;
default:
      printf( "::ERROR:: unknown action
" );
break;
}
PrintList( pLL , TestPrintInt );
}
For testing purposes, some enumerations are defined, that is, eAction { eLook , eInsert, eDelete } and eWhere {eFront , eBack }, to enable a central test routine, TestPrintOperation(), to be called. For each possible eAction, we use a switch to print information about the action, as well as call either TestExamineNode(), TestCreateNodeAndInsert(), or TestRemoveNodeAndFree().
Before returning, the current list is printed for inspection. Three action functions are implemented. The first is as follows:
void TestCreateNodeAndInsert( LinkedList* pLL , ListData data ,
eWhere where ) {ListData* pData = CreateData( data );
ListNode* pNode = CreateNode( pData );
switch( where ) {case eFront: InsertNodeToFront( pLL , pNode ); break;
case eBack: InsertNodeToBack( pLL , pNode ); break;
}
}
The second is as follows:
ListData TestExamineNode( LinkedList* pLL , eWhere where ) {ListNode * pNode;
switch( where ) {case eFront: pNode = GetNode( pLL , 0 ); break;
case eBack: pNode = GetNode( pLL , pLL->nodeCount ); break;
}
ListData data = *(pNode->pData);
return data;
}
The third is as follows:
ListData TestRemoveNodeAndFree( LinkedList* pLL , eWhere where ) {ListNode * pNode;
switch( where ) {case eFront: pNode = RemoveNodeFromFront( pLL ); break;
case eBack: pNode = RemoveNodeFromBack( pLL ); break;
}
ListData data = *(pNode->pData);
DeleteNode( pNode );
return data;
}
Enter each of these test routines after all of the linked list code but before main(). Then, enter the main() routine. Save the file and then compile and run this program. Because there is quite a bit of code, you may have to edit and compile your version several times until you get a clean compilation.
When you run the program, you should see the following output:

Figure 18.11 – Screenshot of the linkedlisttester.c output
Notice how each line of the program corresponds to the test outline given previously. Carefully compare the action taken to the impact resulting in the state of the list. When this validation passes, we can feel confident in using this code in other, more useful scenarios. We will employ this list structure and its routines when we return to our carddeck.c program in Chapter 24, Working with Multi-File Programs.
You may have noticed that writing test code is nearly as much work as writing the code itself. This is very often the case. Writing concise, complete, and correct test code is hard. From my years of experience, I would argue that writing such test code is as worthwhile as writing the code, for several reasons:
- When your tests fail, you invariably learn something.
- You gain a very high level of confidence that the body of code works as intended.
- You can make changes to the code and verify that the code still works as expected.
- There tends to be much less reworking and debugging with tested code.
Often, as a professional programmer, you may be pushed and cajoled to omit testing. Don't do it, largely for the reasons given here, as well as to preserve your own sanity.
Other dynamic data structures
In this chapter, we have created a program that implements a singly-linked list where we can add and remove list elements, or list nodes, from the front or back of the list. This is a fairly general, minimal list implementation that leaves out a few other possibly useful operations, such as listConcatenate() to join two lists, listSplit() to break a list into two given criteria, listSort() to order the elements of the list in various ways, and listReverse() to reverse the elements of a list. We may also want to enhance our insert and remove operations so that we can add and remove nodes from anywhere in the list. Because of space limitations, we will not do so here.
The following is a brief, annotated list of other useful, possibly mind-bending, data structures:
- Doubly-linked list: A linked list that contains not only a single pointer to the next list node, but also another pointer that points to the preceding list node. The list may be traversed easily from front to back, as well as from back to front.
- Stack: A linked list where each list node is added only to the front of the list (pushed onto the stack). Subsequently, each list node is only removed from the front of the list (popped off the stack). This is also known as a Last In First Out (LIFO) list.
- Queue: A linked list where each list node is added only to the back of the list (enqueued). Subsequently, each list node is only removed from the front of the list (dequeued). This is also known as a First In First Out (FIFO) list.
- Deque: A generalized list that combines the properties of both a stack and a queue. Elements can be added or removed from anywhere in the list. Our implementation of a linked list is very close to that of a deque.
- Priority queue: A list where each list node also has a given priority. List nodes are added to the list in order of priority and removed from the list according to a priority scheduling scheme.
- Set: A collection of unique elements, in no particular order. Sometimes, they are implemented using other dynamic data structures, such as trees or hash tables.
- Map: A collection of key-value pairs, where the key is unique and is used to look up a value associated with that key. This can also be called an associative array, symbol table, or dictionary.
- Tree: A tree simulates a hierarchical tree structure, with a single root node from which child nodes form branches. Like branches in a real tree, child nodes can only contain subchildren and cannot be linked to other branches.
- Graph: A collection of nodes connected via links. A graph is more of a general form of a tree in that it may have cycles (where a node from one branch may link to the root or a node in another branch).
Studying these data structures and implementing them yourself is beyond the scope of this book. However, such a study would be extremely worthwhile and should be one of the next steps in your journey to becoming an expert C programmer.
Summary
In this chapter, we learned how to allocate, release, and manipulate dynamic memory. We learned about some special considerations to take into account when employing dynamic memory, such as memory management and avoidance of memory leaks. To put our knowledge into practice, we implemented a singly-linked list, which can add and remove list nodes to either the front or back of the list. We learned from this that data structures, as well as performing operations on those data structures, can allow us to create very powerful tools. Consequently, our implementation can be reused for any kind of data wherever needed. In doing so, we have gotten an introduction to the power and flexibility of dynamic data structures.
We also employed another flexible mechanism pointer to functions and saw how to pass that pointer to another function, as well as call a function using that pointer. Lastly, we got a brief overview of other important dynamic data structures, such as deques, maps, and trees.
In the next chapter, we will have a chance to catch our breath as we take a deep dive into formatted output and the full range of formatting values that printf() provides.
Questions
- What is the difference between malloc() and calloc()?
- What is the lifetime of memory allocated on the heap?
- What is a memory leak?
- Describe several reasons to create test code that verifies the code you create.